
How to Post SiteGiant Orders and Marketplace Charges to AutoCount
Set up marketplace charges, customer and order field mapping, and manual or automatic invoice posting.
Topic 13 — How Shipping, Discounts, Vouchers and Marketplace Charges Post to AutoCount?
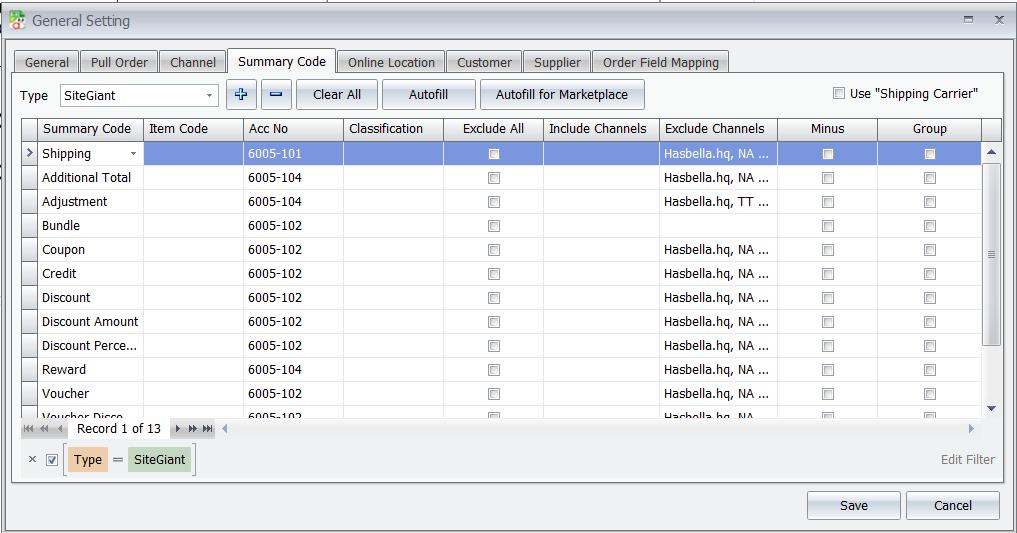
There are two ways to obtain charges: SiteGiant Summary Code for buyer-side charges; Marketplace Summary Code for more complete buyer and seller fees from Shopee, TikTok or Lazada.
| Option | When to Use | What It Covers |
|---|---|---|
| SiteGiant Summary Code | Normal buyer-side order charges needed. | Shipping, Voucher, Discount, Adjustment and other buyer-side charges. |
| Marketplace Summary Code | Marketplace seller fees also needed. | Marketplace buyer/seller charges such as commission and service fees. |
Some charges appear in both sources. Exclude overlapping SiteGiant Summary Codes for a channel to avoid double posting.
Questions to Ask the Client
- Which charges must appear in the AutoCount Invoice?
- Are Shopee, TikTok or Lazada seller fees needed?
- Which AutoCount Item Code and Account No. should be assigned?
Confirm Required Charges → Choose Source → Maintain Item Code / Account No. → Set Channel Rules → Save → Test Order → Check Invoice
Summary Code Function Guide
| Setting | Function | When to Use |
|---|---|---|
| Type | Select the source of the Summary Code. | Choose SiteGiant, Shopee, TikTok or Lazada. |
| Summary Code | The type of charge to post. | For example Shipping, Voucher, Discount, Commission or Service Fee. |
| Item Code | AutoCount Item Code used for the charge. | Use when the charge should post using a specific item. |
| Acc No. | AutoCount account used for the charge. | Select the account where the charge should be posted. |
| Classification | AutoCount e-Invoice Classification Code. | Select the correct classification code for e-Invoice. |
| Exclude All | Do not post this Summary Code. | Tick when the charge is not required. |
| Include Channels | Apply this row only to selected channels. | Use when the same Summary Code needs different Item Code or Acc No. for different channels. |
| Exclude Channels | Do not apply this row to selected channels. | Use when the charge should not post for certain channels. Marketplace setup may also update this automatically to prevent duplicate posting. |
| Minus | Reverse the amount sign. | Use when the charge needs to post as a negative amount. |
| Group | Combine Summary Codes into one invoice detail row. | Use when several Summary Codes post to the same account and should show as one row instead of separate rows. |
| Use “Shipping Carrier” | Replace the normal Shipping description with ‘shipping carrier’. | Tick when the client wants the invoice description to show ‘shipping carrier’ instead. |
Option 1 — SiteGiant Order Charges
- Go to Unicart+ → General Settings → Summary Code.
- Click Autofill to load default SiteGiant Summary Codes.
- Keep charges required by the client.
- Maintain Item Code, Account No. and channel rules if needed.
- Click Save.
- Pull a test order and check AutoCount Invoice.
Option 2 — Marketplace Fees and Charges
Requires Unicart+ Essential or above.
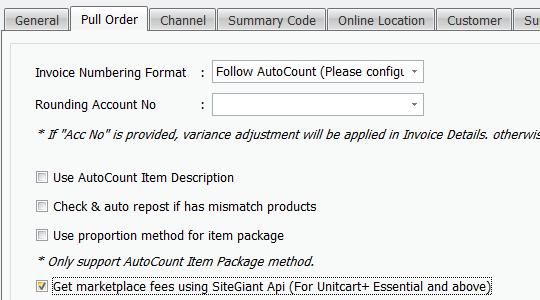
- Enable Get Marketplace Fees Using SiteGiant API.
- Go to General Settings → Channel and select the correct marketplace under e-Commerce.
- Go to General Settings → Summary Code.
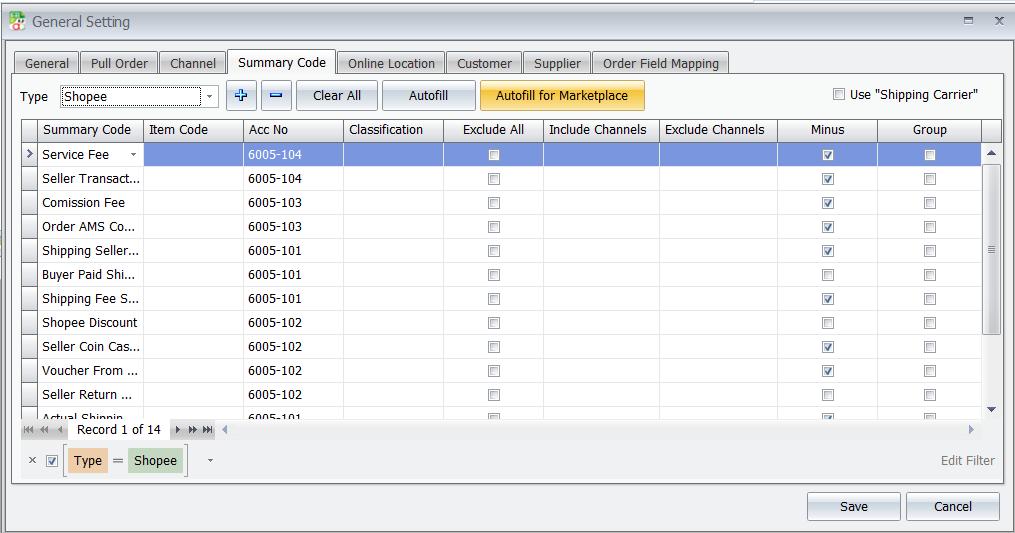
- Click Autofill → Autofill for Marketplace.
- Select Shopee, TikTok or Lazada.
- Maintain Item Code, Account No., Classification and channel rules.
- Exclude overlapping SiteGiant Summary Codes for the same channel.
- Click Save.
- After marketplace income statement is available, pull a test order and compare AutoCount Invoice with statement.
If absent after Autofill, manually add Platform Voucher or Platform Shipping Discount. Save and pull or repost the affected order.
Original Software Screenshots
Troubleshooting / Common Errors
| Issue | What to Do |
|---|---|
| Shipping, Voucher or Discount missing | Check Summary Code, Exclude All, Include Channels, Exclude Channels. |
| Duplicate charge | Check overlap between SiteGiant and Marketplace Summary Codes; use Exclude Channels. |
| Wrong Item Code / Account No. | Check Summary Code mapping for that channel. |
| Charge posted to wrong channel | Check Include Channels / Exclude Channels. |
| Marketplace seller fee missing | Check marketplace Type, fee setting and Summary Code. |
| Too many invoice detail rows | Check Group where codes use the same account. |
| Shipping description incorrect | Check Use “Shipping Carrier”. |
| Amount sign incorrect | Check Minus. |
Topic 14 — How Customer, Supplier and Order Field Mapping Works
Use these optional mappings only if additional mapping beyond normal Channel Settings is needed.
| Mapping | Purpose |
|---|---|
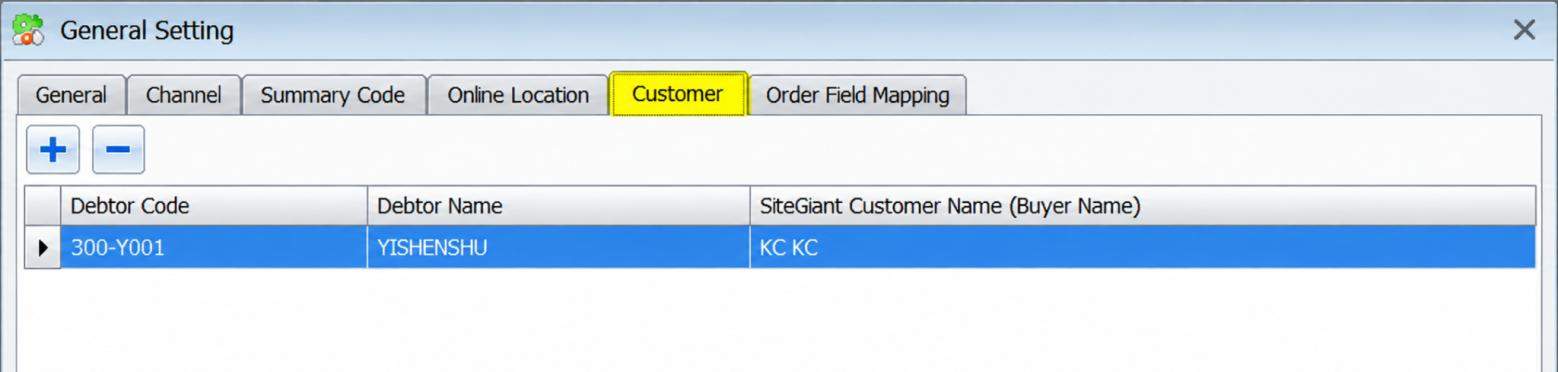
| Customer Mapping | Link a specific SiteGiant B2B customer to its own AutoCount Debtor Code. |
| Supplier Mapping | Link an AutoCount Creditor to a SiteGiant Vendor for Purchase / GRN. |
| Order Field Mapping | Transfer SiteGiant order data to a chosen AutoCount Invoice field. |
If none of these are required, no additional mapping is needed.
Questions to Ask the Client
- Does a B2B customer need its own Debtor Code?
- Does the client use SiteGiant Purchase Order receiving?
- Should order information appear in AutoCount Invoice?
Confirm Requirement → Choose Mapping Type → Maintain Mapping → Save → Test Transaction → Verify Result
A. Customer Mapping
- Go to Unicart+ → General Settings → Customer.
- Select the SiteGiant customer.
- Map to the correct AutoCount Debtor Code.
- Save and test one order.
Customer ID → Customer Name → Company Name → Email Address. Normal online customers still use Channel Settings Debtor Code.
B. Supplier Mapping
- Go to Unicart+ → General Settings → Supplier.
- Select AutoCount Creditor Code.
- Map to correct SiteGiant Vendor.
- Save.
For the full Purchase / GRN process, see PDF Topic 18.
C. Order Field Mapping
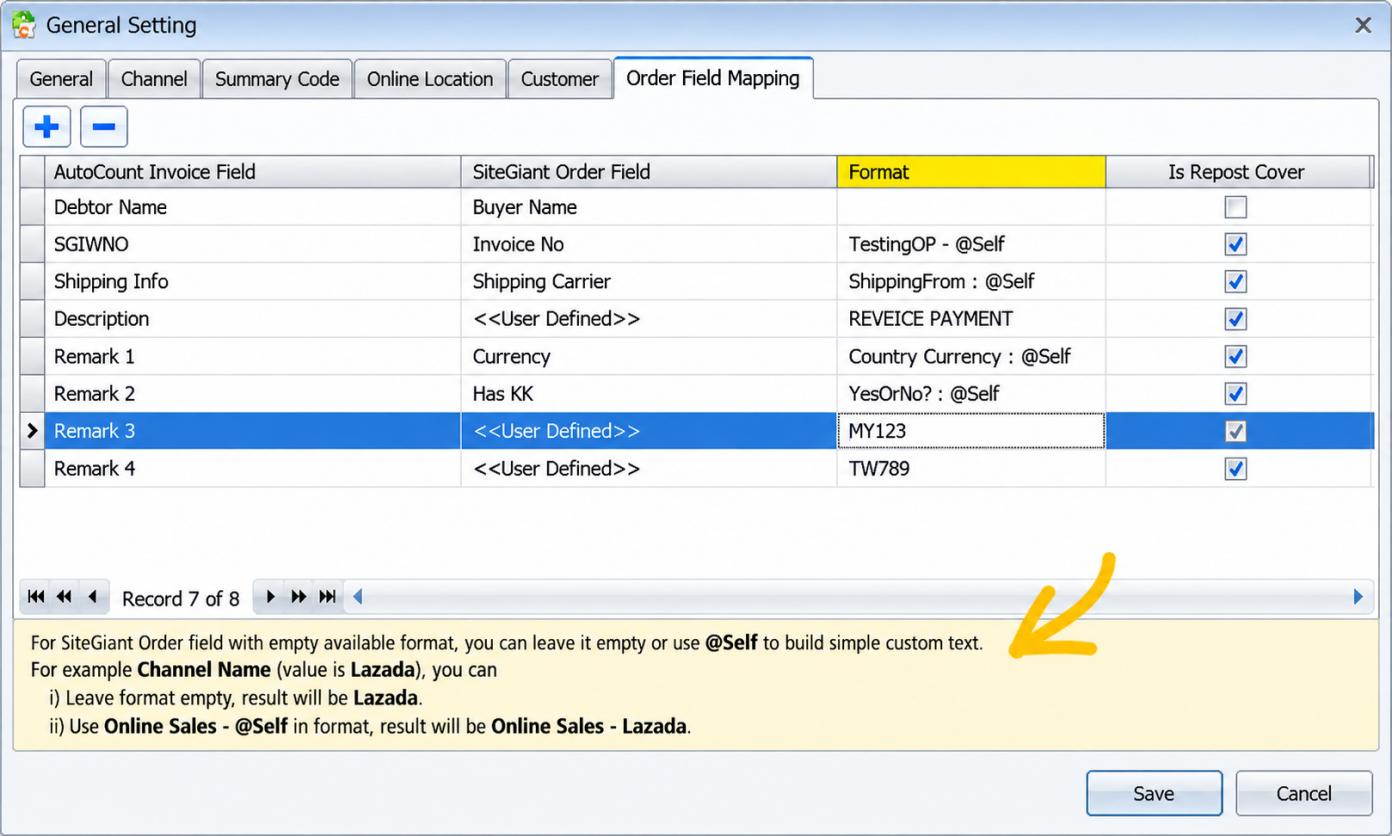
- Go to Unicart+ → General Settings → Order Field Mapping.
- Click +.
- Select AutoCount Invoice Field.
- Select corresponding SiteGiant Order Field.
- For custom wording, enter a Format with @Self for the SiteGiant value, e.g. ShippingFrom : @Self.
- Click Save.
- Pull a test order and check AutoCount Invoice.
@Self = the value from SiteGiant.
Original Software Screenshots

Troubleshooting / Common Errors
| Issue | What to Do |
|---|---|
| Wrong Debtor Code | Check Customer Mapping and selected SiteGiant customer. |
| Vendor unavailable | Check SiteGiant Vendor setup; refresh Supplier Mapping. |
| GRN not created | Supplier Mapping is only part of the process. See Topic 18. |
| Mapped invoice field blank | Check order contains value and correct source/target fields. |
| Format incorrect | Check Format and @Self. |
Topic 15 — How SiteGiant Orders Sync to AutoCount: Manual or Automatic
Use Unicart+ → Pull Order to select and post SiteGiant orders to AutoCount Invoice; alternatively configure the automatic service.
| Option | Use When | How It Works |
|---|---|---|
| Pull Order | Staff review/select orders before posting. | Pull Order → Inquiry → Select Order → Confirm. |
| Auto Pull Order | Automatically check new orders. | Service uses Sync Interval and Cutoff Date; may auto-post invoice when enabled. |
Auto Pull Order can run without automatic invoice posting; Auto post to AutoCount Invoice requires AutoCount API Module.
Questions to Ask the Client
- Which Channel should pull orders?
- What starting date?
- Post manually or automatically?
Check Channel & Product Mapping → Pull Order → Inquiry → Using Default Item Code = 0 → Confirm → Check AutoCount Invoice → Set Auto Pull Order if needed
A. Pull Order
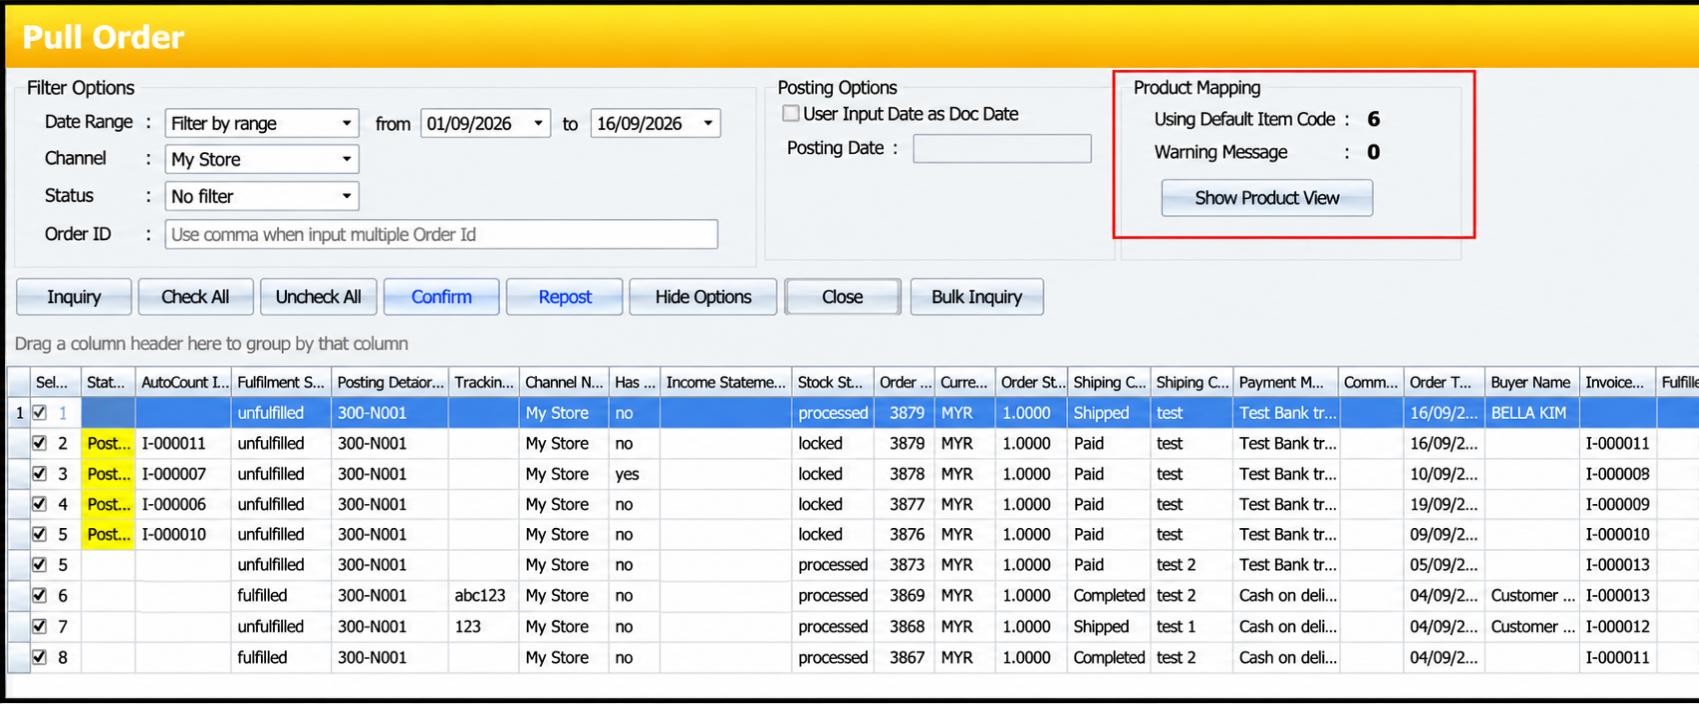
- Open Unicart+ → Pull Order.
- Under Date Range, choose Filter by range and dates. Avoid No Filter because it retrieves all orders.
- Choose the Channel; leave blank only for all channels.
- Choose Status: No Filter for normal valid orders, or Filter by multi-select for selected statuses.
- Enter Order ID if required; multiple IDs can be separated with commas.
- Click Inquiry.
- Ensure Using Default Item Code = 0.
- If not 0, click Show Product View and correct unmapped Item / Package first.
- Select order and click Confirm.
- Check created AutoCount Invoice.
Do not post when Using Default Item Code is not 0. Correct Product Mapping first.
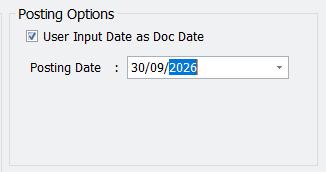
Posting Date Option
Example scenario: Use this when a delayed order must be recorded in the current accounting period.
When User Input Date as Doc. Date is ticked, AutoCount Invoice Date follows selected Posting Date rather than SiteGiant Order Time. PDF example: order date 5/10/2026, Posting Date 30/09/2026, AutoCount Invoice Date 30/09/2026. Confirm with the accounts team before posting.
B. Auto Pull Order
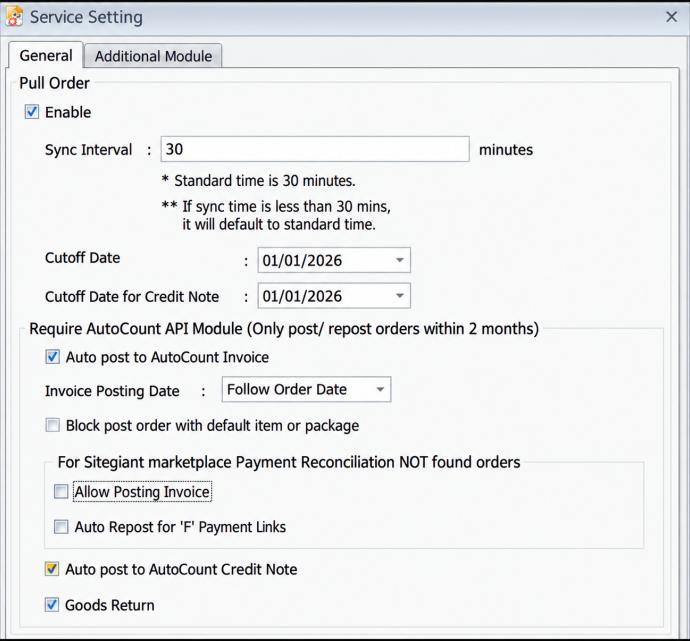
- Go to Unicart+ → Automation → Service Settings.
- Under Pull Order, tick Enable.
- Set Sync Interval and Cutoff Date.
- If automatic invoice creation is needed, tick Auto post to AutoCount Invoice (AutoCount API Module required).
- Click Save.
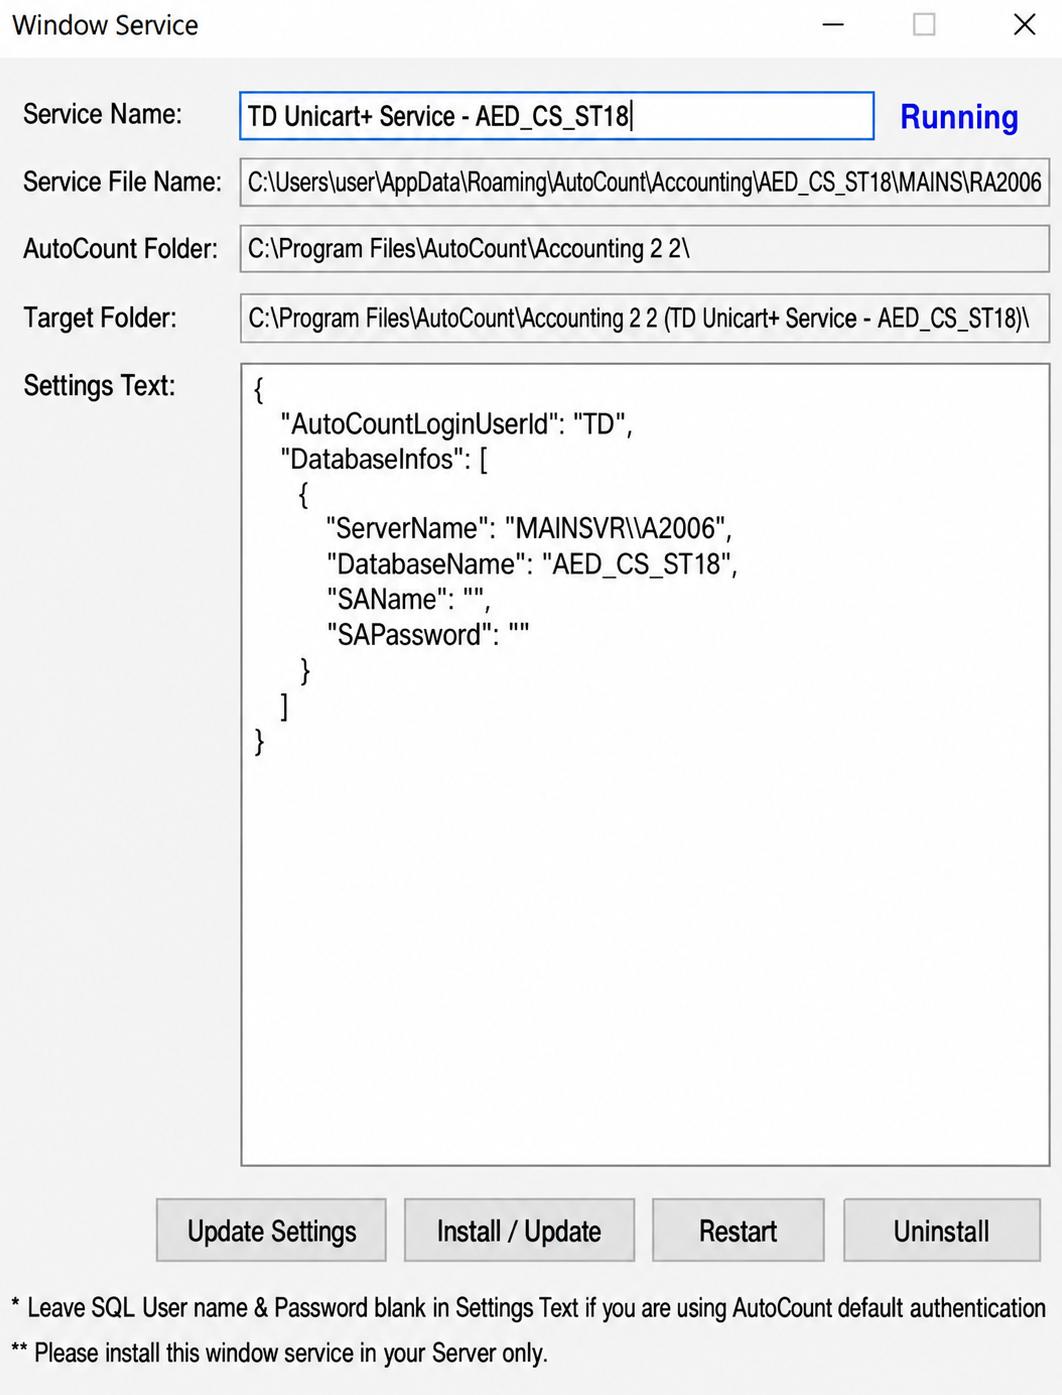
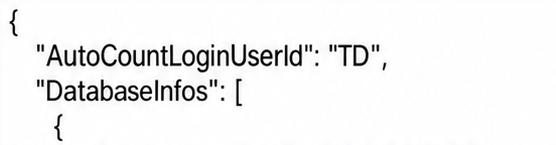
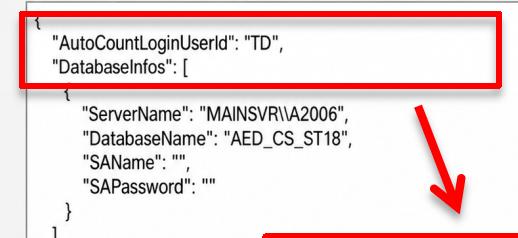
- Prepare a dedicated AutoCount user, e.g. TD User, with access rights.
- On Server PC, open Automation → Install Service.
- Maintain TD User for service.
- Click Install / Update.
- Check service status Running.
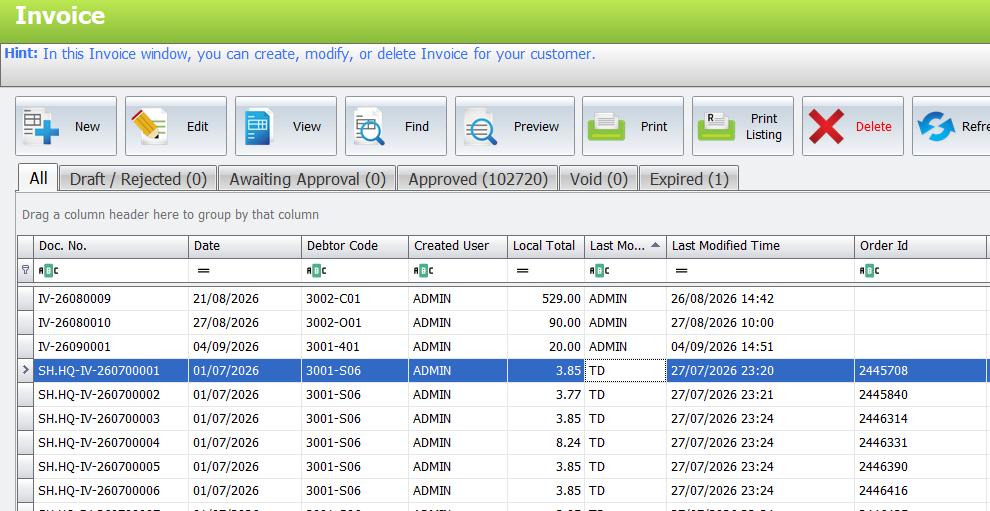
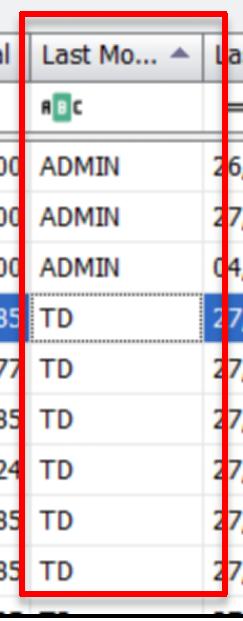
- After first auto-post, verify creator of AutoCount Invoice is TD User.
Why Use TD User?
This distinguishes automatically posted invoices from manual invoices.
Manual Pull Order creator = Normal AutoCount User. Auto Pull Order + Auto Post creator = TD User.
Each channel needs a successful manual order-sync test before Automatic Order Sync. For new automation, allow the first 30-minute synchronization interval to complete before judging the service.
When to Use Repost
Common examples: Summary Code was corrected or added; Product Mapping was corrected; or other posting settings were corrected and need to be applied to the posted order.
Repost only when the order was already posted and setup has been corrected, such as Summary Codes, Product Mapping or other posting settings. Order not posted → Confirm. Already posted and corrected → Repost.
Steps to Repost
- Go to Unicart+ → Pull Order.
- Enter Date Range, Channel or Order ID.
- Click Inquiry.
- Find already-posted order.
- Confirm corrections were made.
- Select the order.
- Click Repost.
- Check AutoCount Invoice and confirm corrections.
Original Software Screenshots
Troubleshooting / Common Errors
| Issue | What to Do |
|---|---|
| Order missing | Check Date Range, Channel, Status, Order ID and Inquiry. |
| Using Default Item Code not 0 | Correct mapping through Show Product View before posting. |
| Auto Pull Order not detecting order | Check Sync Interval, Cutoff Date and service Running. |
| Automatic Invoice not created | Check Auto post, AutoCount API Module and service. |
| TD User cannot create invoice | Check active user and required access rights. |
| Possible duplicate invoice | Search Order ID in AutoCount before retrying. |
| Manual works but Auto fails | Check Auto Pull Order, TD User, Windows Service; update/restart if required. |