-
AutoCount Accounting Features
-
- Approval Workflow
- Audit Trail
- Auto Save in Draft Folder
- AutoCount Contra Account
- AutoCount License Setting Guide
- Deposit Tracking & Management
- Documents Numbering Format
- Full Transfer and Partial Transfer
- Import Data to AutoCount Accounting Using Excel
- Informative Charts and Analytical Data
- Layout Customization
- Multi Pricing
- Sales and Services Tax
- Schedule Backup
- Search Lookup Edit
- View Documents Flow
- AutoCount Feature Stock Take
- Column Chooser
- Show Remaining (3) Collapse
-
AutoCount Cloud Accounting
-
AutoCount E-Invoice
-
AutoCount HRMS User Guide
-
AutoCount Modules
-
- Activity Stream
- Advanced Financial Report
- Advanced Item
- Advanced Multi-UOM
- Advanced Quotation Module
- Basic Multi-UOM
- Budget Module
- Consignment
- Filter By Salesman
- FOC Quantity
- Formula
- Item Batch
- Item Package
- Landing Cost
- Multi-Currency
- Multi-Dimensional Analysis
- Multi-Location
- Project Account
- Recurrence
- Remote Credit Control Module
- Stock Assembly
- User Defined Fields (UDF)
- AutoCount SST Hidden Functions
- AutoCount SST Submission - Service Tax
- AutoCount Scripting Module User Guide
- AutoCount Bonus Point Module User Guide
- Show Remaining (11) Collapse
-
AutoCount Plugins
-
- Fixed Assets Management
- Goldsmith
- TD Ordering Mobile Apps
- TD Stock Mobile Apps
- Universal Import Plugin
- DMS Import Plugin
- AutoCount Item Scope Plugin
- AutoCount Easy Knock Off Plugin
- AutoCount Pick List Plugin User Guide
- AutoCount Agent Validation Plugin User Guide
- AutoCount Barcode Generator Plugin User Guide
- AutoCount Bill Remark Plugin User Guide
- AutoCount Easy Batch Number Entry Plugin User Guide
- AutoCount Recurring Invoice Plugin User Guide
- AutoCount Easy Photo 2.0 User Guide
- AutoCount Pain Tracker User Guide
- AutoCount Credit Memo Plugin User Guide
- Show Remaining (2) Collapse
-
- AutoCount Easy Recurrence Plugin
- AutoCount Recurring Billing Plugin
- Event Management System
- AutoCount To-Do List Plugin
- AutoCount AutoBank Reconciliation Plugin
- Intercompany Billing Plugin User Guide
- AutoCount Basket Plugin User Guide
- Lead Management 2.0 Plugin
- AutoCount Service Contract Plugin User Guide
- Autocount Repacking Plugin
- AutoCount Scale Barcode Plugin User Guide
- AutoCount Progressive Billing
- AutoCount Optical Plugin
- AutoCount Meter Reading Plugin User Guide
- AutoCount Car Tint Film Plugin
- AutoCount Leasing Plugin User Guide
- AutoCount Integrator Plugin
- AutoCount Procurement Planning Plugin
- Show Remaining (3) Collapse
-
-
Form Template
-
Report Template
-
- Advance Quotation
- Cash Sale
- Consignment
- Consignment Movement
- Credit Note
- Debit Note
- Delivery Order
- FOC Quantity Analysis By Document Report
- Invoice
- Item Package Sales Report
- Monthly Sales Analysis
- Outstanding Sales Order Listing
- Profit And Loss Of Documents
- Quotation
- Sales Agent Contribution Report
- Sales Order
- Top/Bottom Sales Ranking
- Show Remaining (2) Collapse
-
- Available Stock Status Report
- Expired Item Batch Listing
- Inventory Physical Worksheet
- Stock Adjustment
- Stock Aging Report
- Stock Assembly
- Stock Assembly Order
- Stock Balance By Location
- Stock Balance Report
- Stock Card Report
- Stock Disassembly
- Stock Issue
- Stock Item Profit Margin
- Stock Movement Report
- Stock Receive
- Stock Take
- Stock Transfer
- Stock Write Off
- Show Remaining (3) Collapse
AutoCount Accounting: Stock Take
Ensure Your Inventory Truly Matches Your Records
Accurate inventory is critical for smooth operations — from purchasing and sales to costing and profitability. The AutoCount Stock Take function is designed to help you systematically verify physical stock on hand against AutoCount’s system balance and automatically generate adjustments to correct discrepancies. Unlike manual methods that rely on separate worksheets and manual calculations, AutoCount’s Stock Take workflow helps minimise human error and saves time. In AutoCount, Stock Take lets you record the physical inventory count, compare it against system balances as of a specific date, and post the required adjustment automatically — all within the system.
AutoCount Stock Take Video Guide
Watch these step-by-step videos guide on how to use the AutoCount Stock Take feature to perform accurate inventory counting and stock adjustments.
- AutoCount Stock Take (EN)
Stock Take Setup
Integration & Stock Take Setup
- AutoCount Stock Take (CN)
库存盘点准备
集成和库存盘点设置
What AutoCount Stock Take Does
Inventory vs System Balance Comparison
AutoCount’s stock take lets you key in your actual physical on hand quantities as of a selected date, and the system will automatically calculate differences between the physical count and system records.
This removes the need for manual math — a common source of errors in traditional stock take workflows.
Automatic Stock Adjustment Posting
Once you save your counted quantities, AutoCount provides an option to post these differences as a Stock Adjustment. The system auto generates the adjustment transaction with the correct variance between physical and ledger quantities.
No more hand maintaining adjustment entries — AutoCount takes care of the posting logic.
Flexible Item Selection & Filtering
Instead of adding items one at a time, AutoCount lets you filter items by Item Code, Item Group, Item Type, warehouse, or other attributes to focus your stock take effort where it matters.
Recalculate Latest On Hand Balance
If you delay posting until after purchases and sales transactions have updated the system after a stock take, the Recalculate On Hand Qty button ensures your stock take reflects the correct balance for the original date you are reconciling to — not the date you’re posting.
Benefits & Business Value
Accuracy
Reduces human errors by automating quantity variance calculations.
Efficiency
Eliminates manual calculations and multi‑stage adjustment posting.
Control
Enables staged stock count, saving before final adjustment.
Flexibility
Allows filtering item lists and partial stock takes by item type or warehouse.
Audit Ready
Provides a clear trail from physical count to adjustment posting.
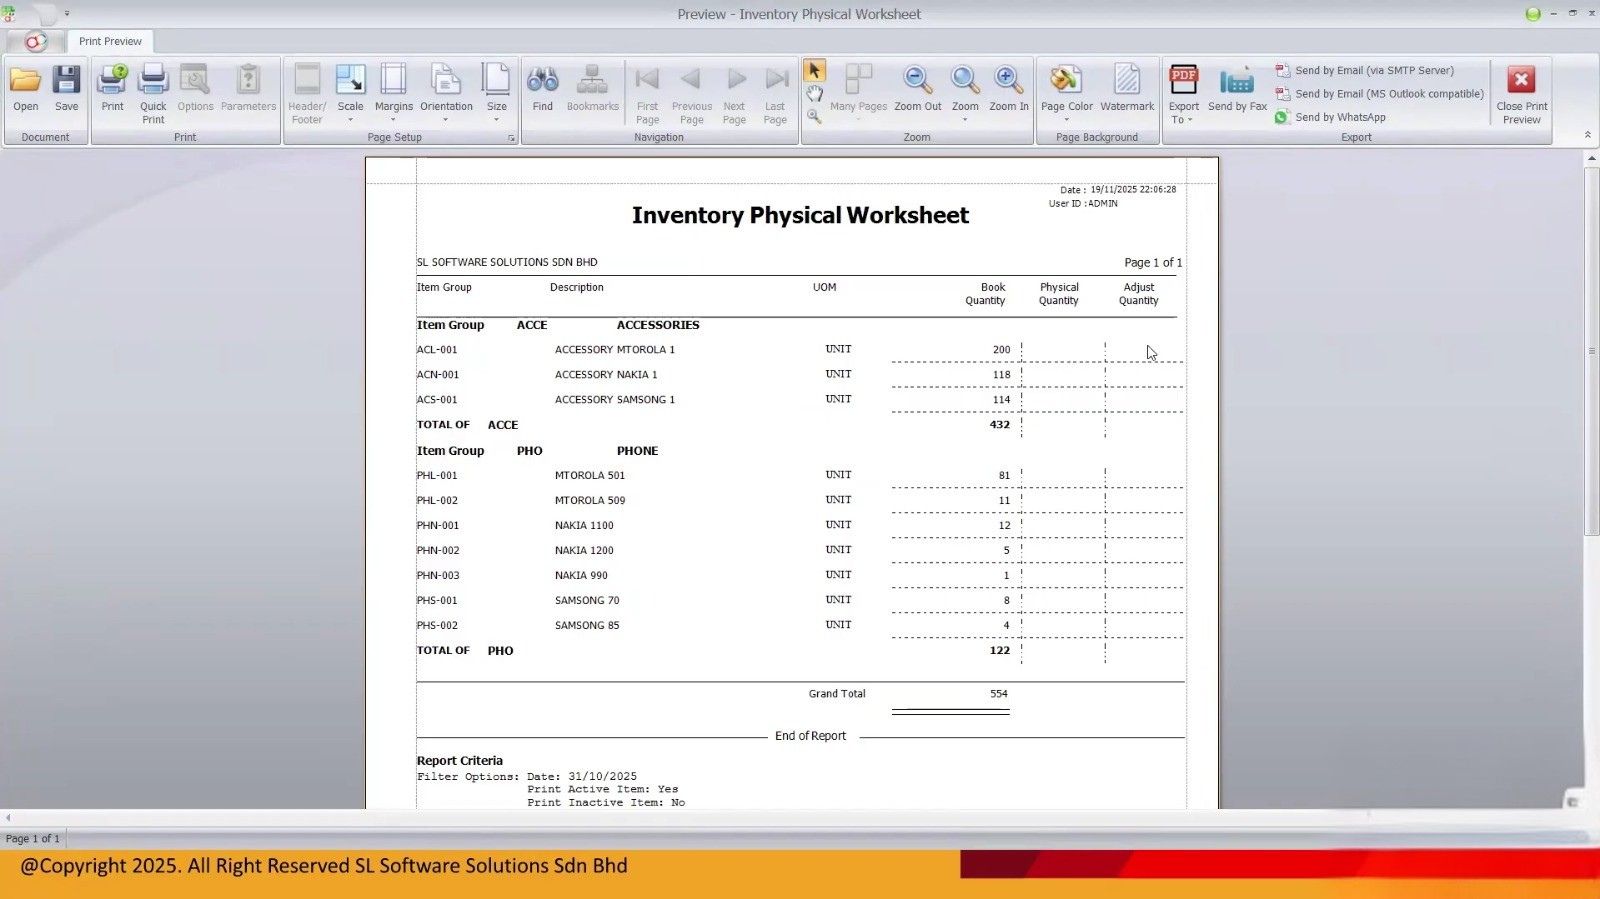
Print the Inventory Physical Worksheet
Before any physical count, print the Inventory Physical Worksheet, which is designed to show each item’s system balance and provides space to enter physical quantities.
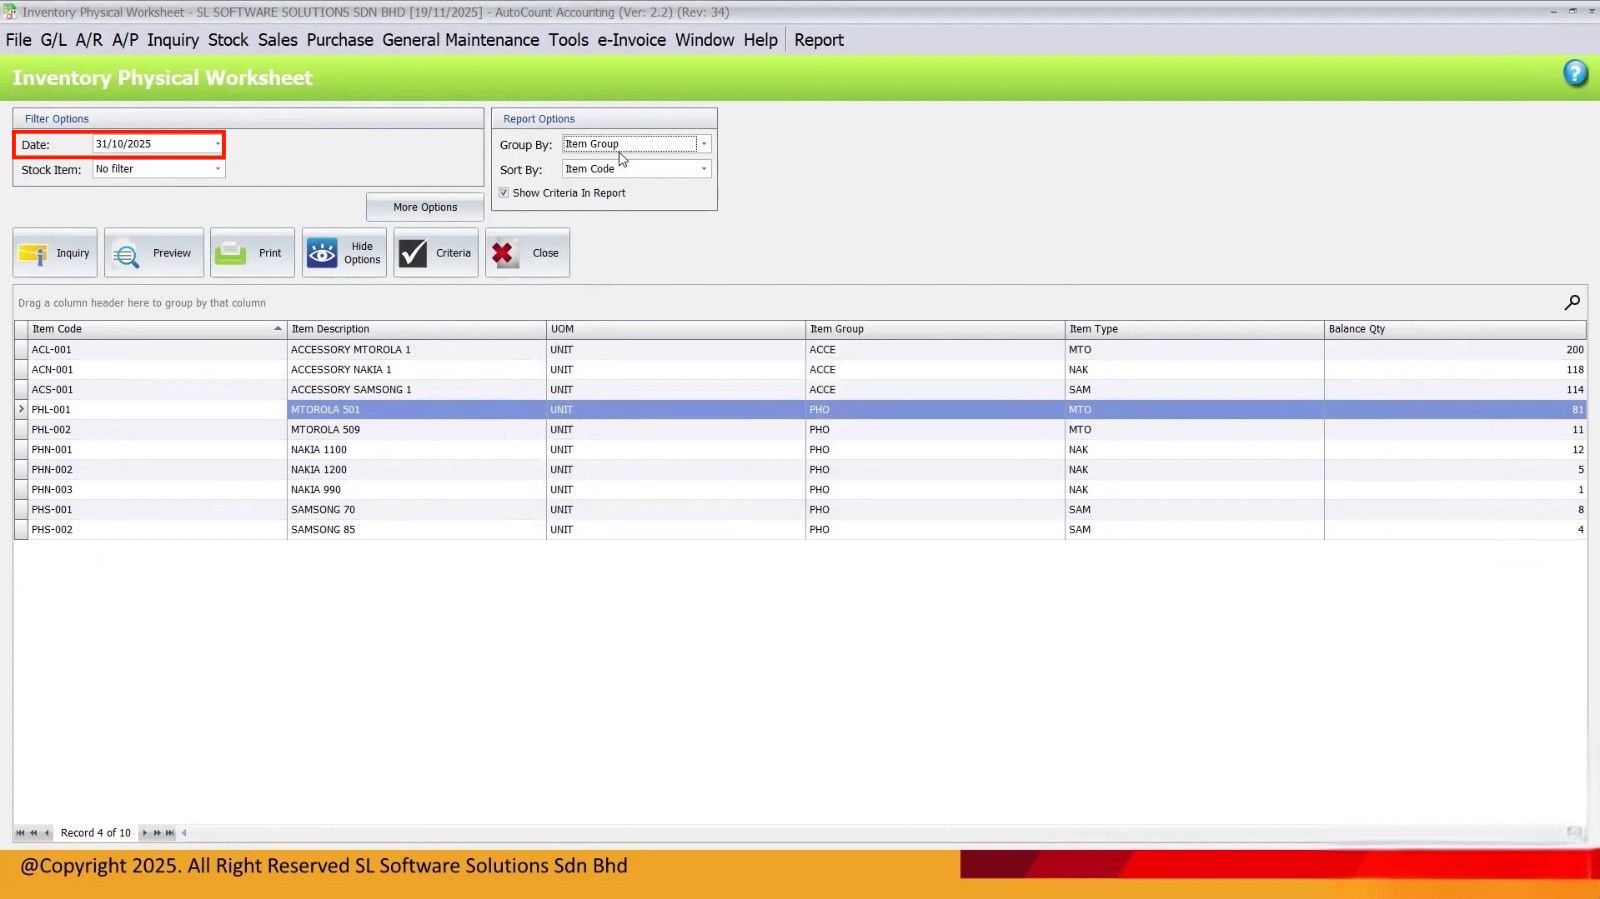
Tip: Use the previous day’s date (e.g., 31 Oct if you are starting 1 Nov) for accurate closing balances. The video stresses this approach as the best practice for accuracy.
Conduct the Physical Count
Take the worksheet into the warehouse and physically count your stock by item. Write down the actual quantities next to the system figures. Be systematic — group by warehouse, item group, brand, etc.
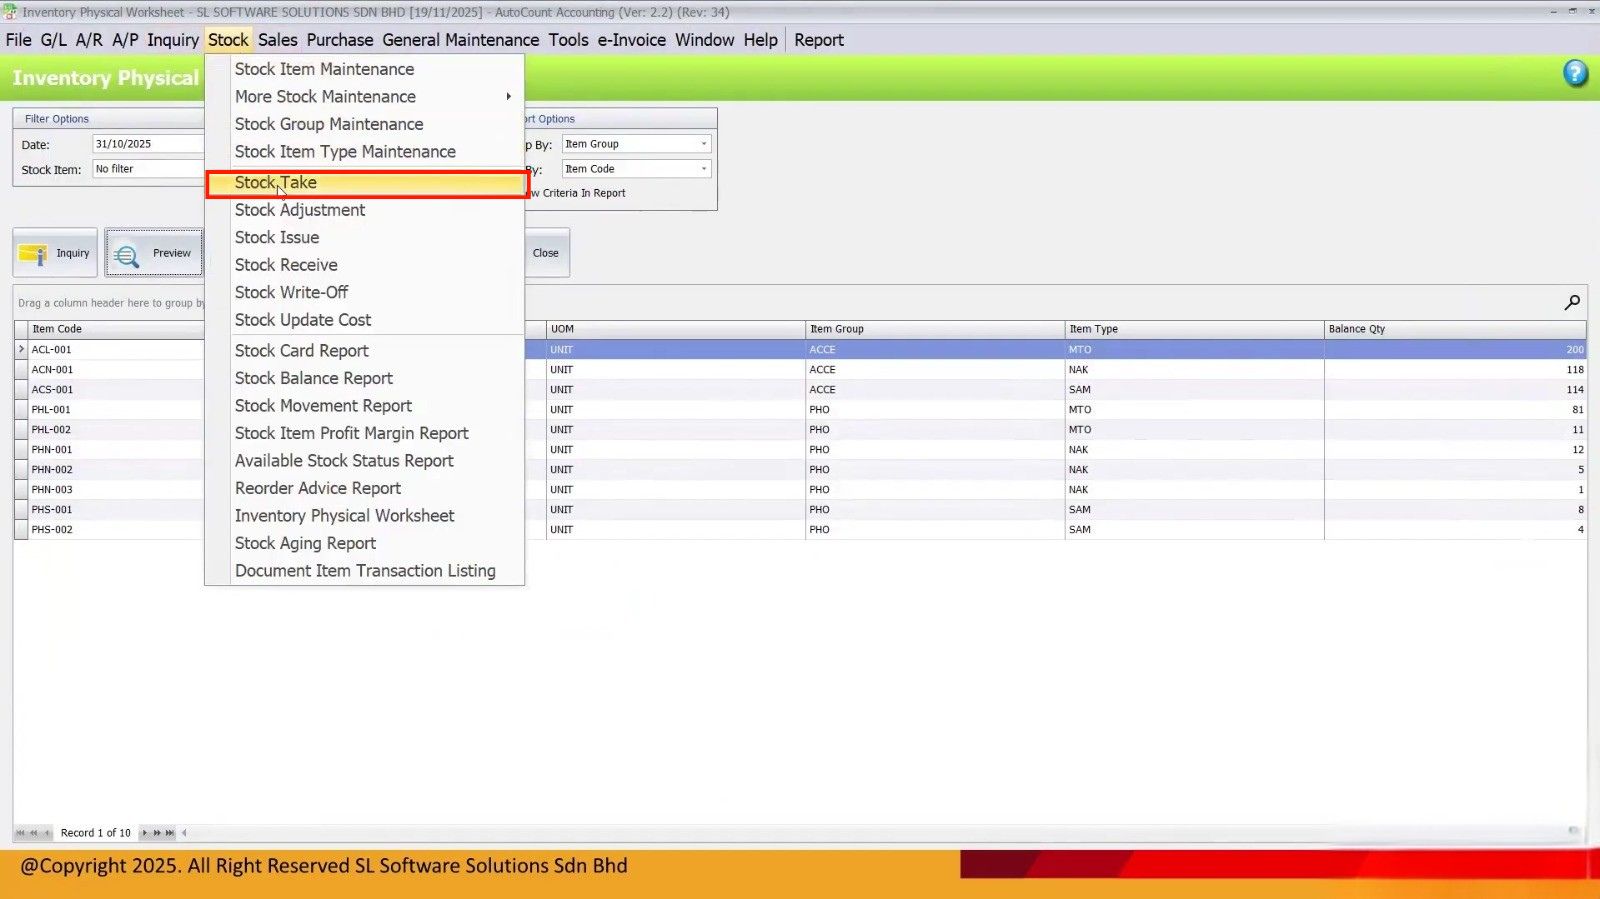
Begin Stock Take in AutoCount
Go to Stock → Stock Take in AutoCount.
Step 1:
- Set the date to the same closing date used for the worksheet.
Step 2:
- If needed, filter items (by item code, group, warehouse, etc.). AutoCount will list the items you need to update.
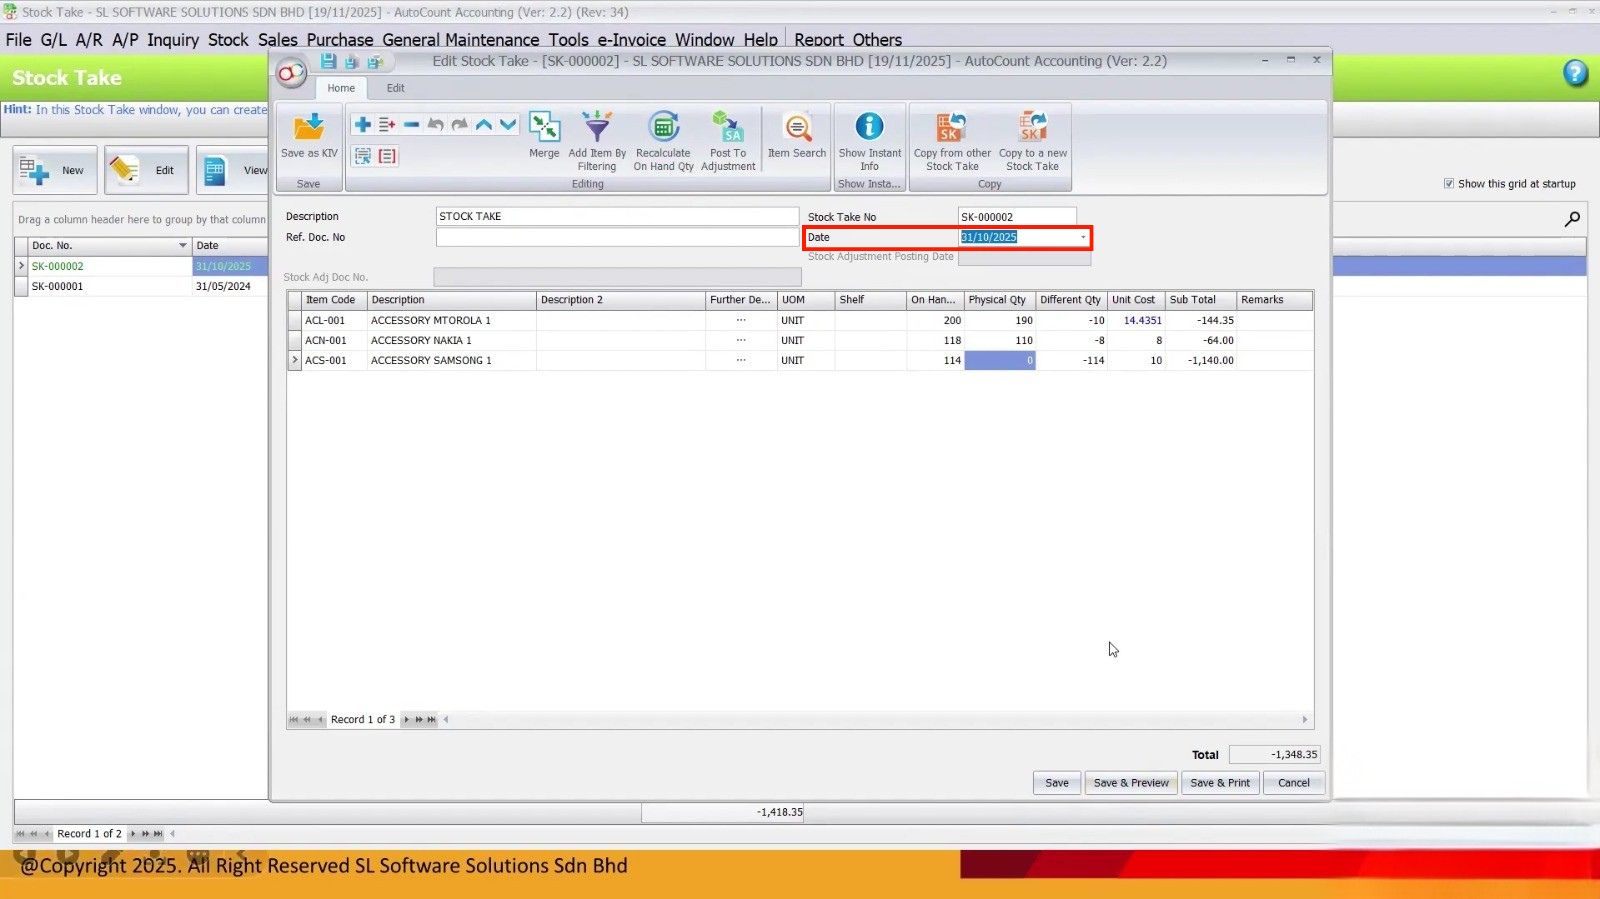
Enter Physical Quantities
Enter the physical on‑hand quantities into the system. As you input these, AutoCount automatically calculates the variance between physical and system balances.
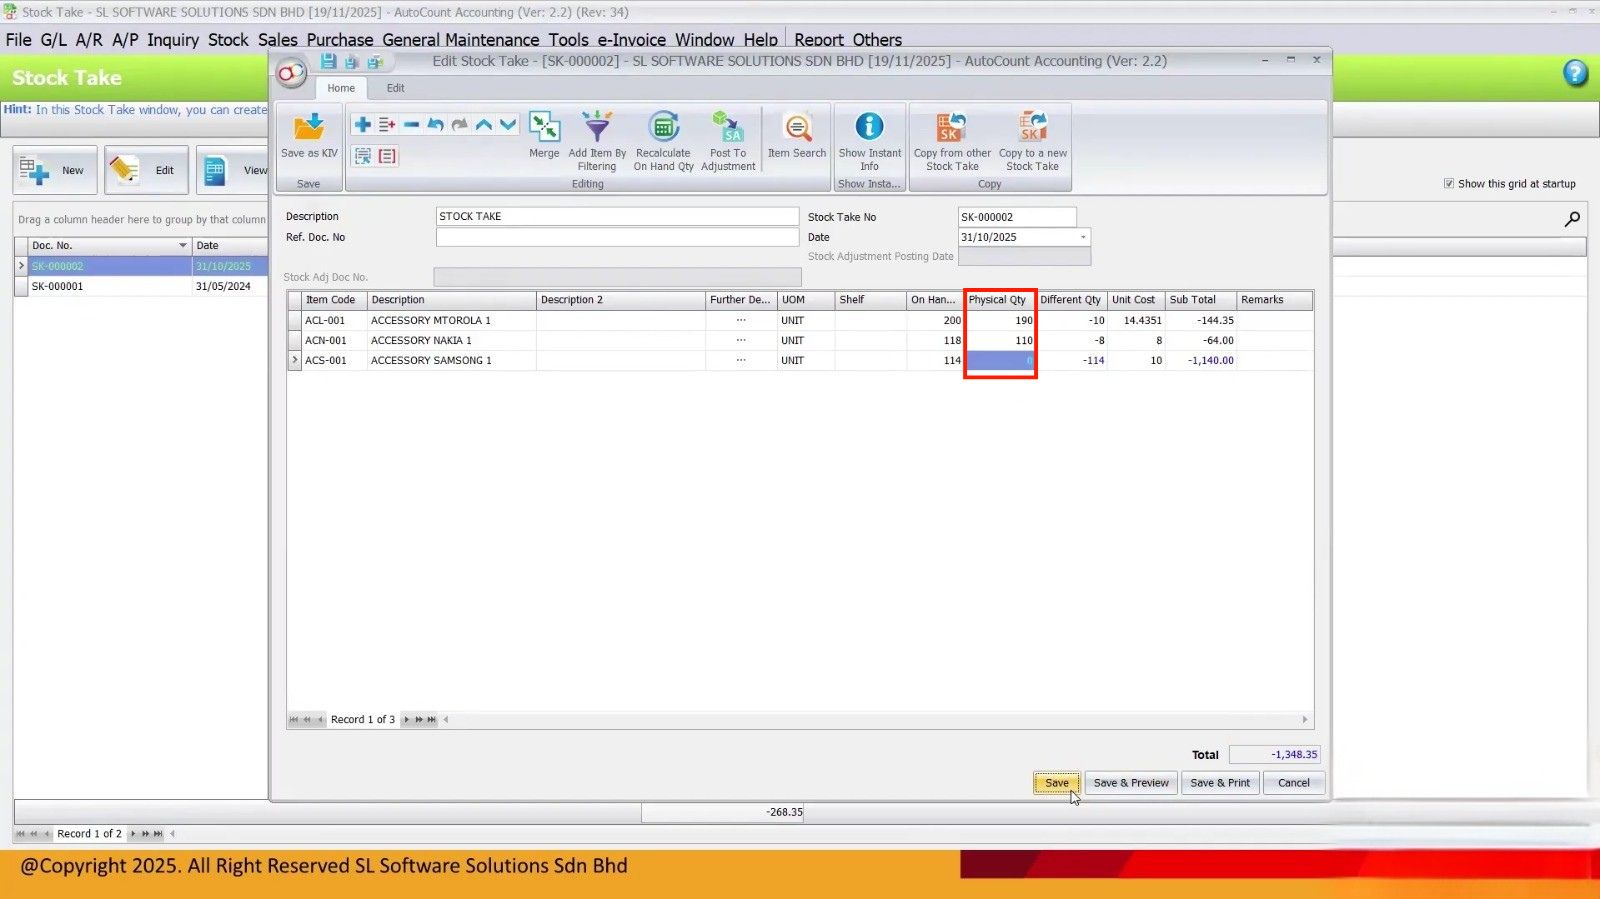
Shortcut: Use Add Item By Filtering to add many items at once instead of one‑by‑one.
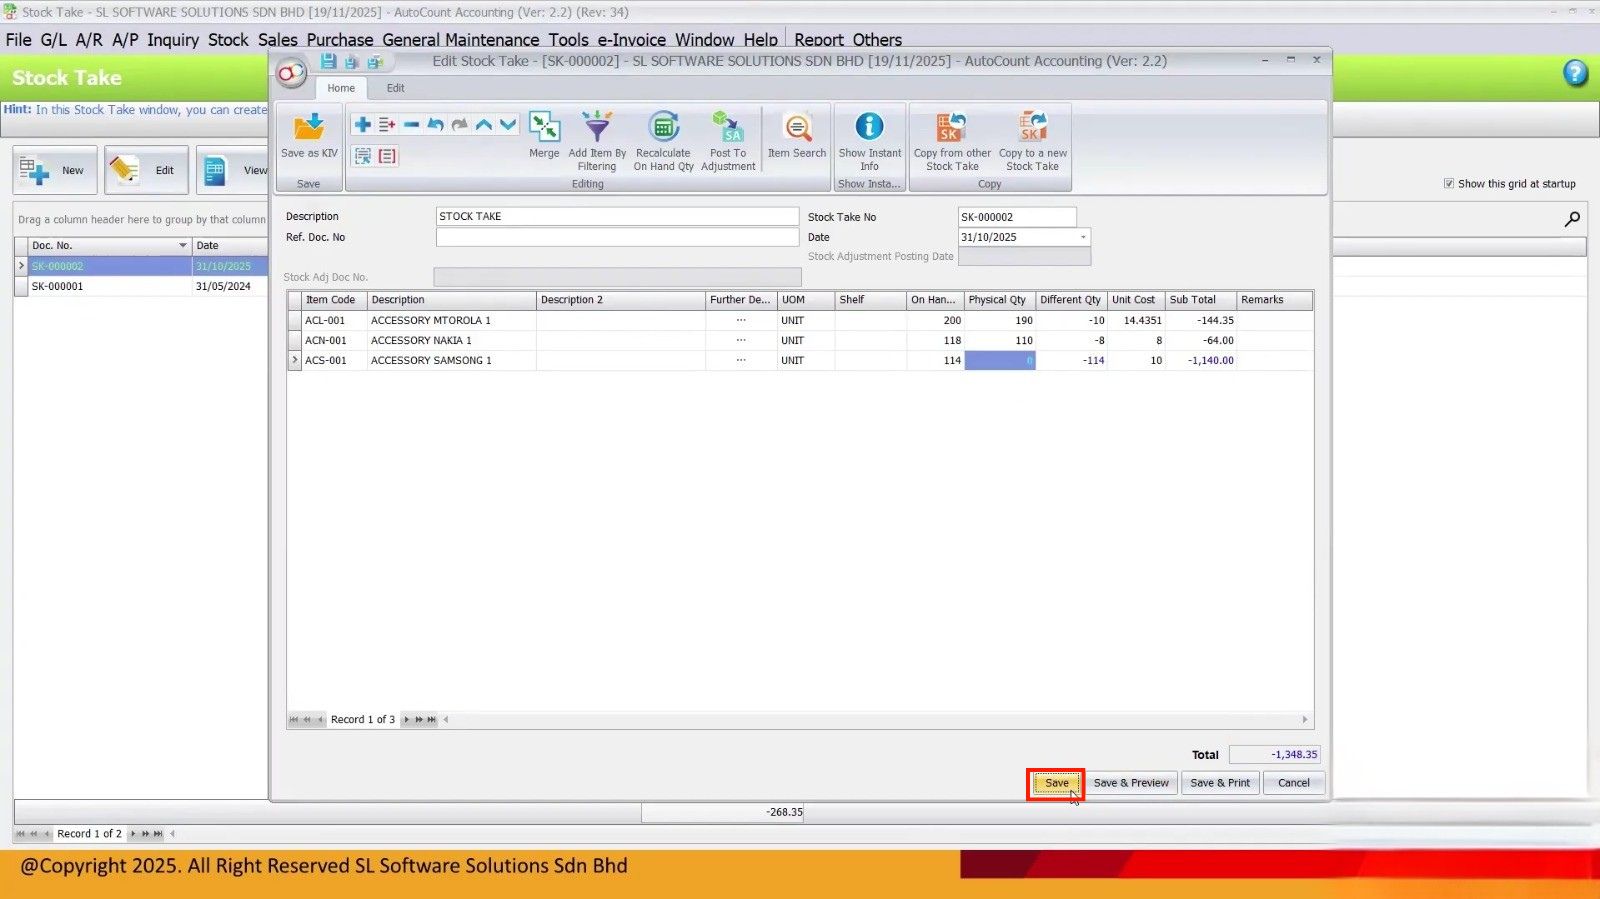
Save Stock Take for Review
Click Save — this preserves your stock take without affecting balances yet. This allows time to investigate anomalies (e.g., stock in a different warehouse, missing items, or manual entry issues).
Recalculate On Hand Qty Before Posting
Before posting the adjustment, press Recalculate On Hand Qty.
This ensures that the stock take uses the original closing date’s balances (e.g., last night’s stock), not today’s live balance.
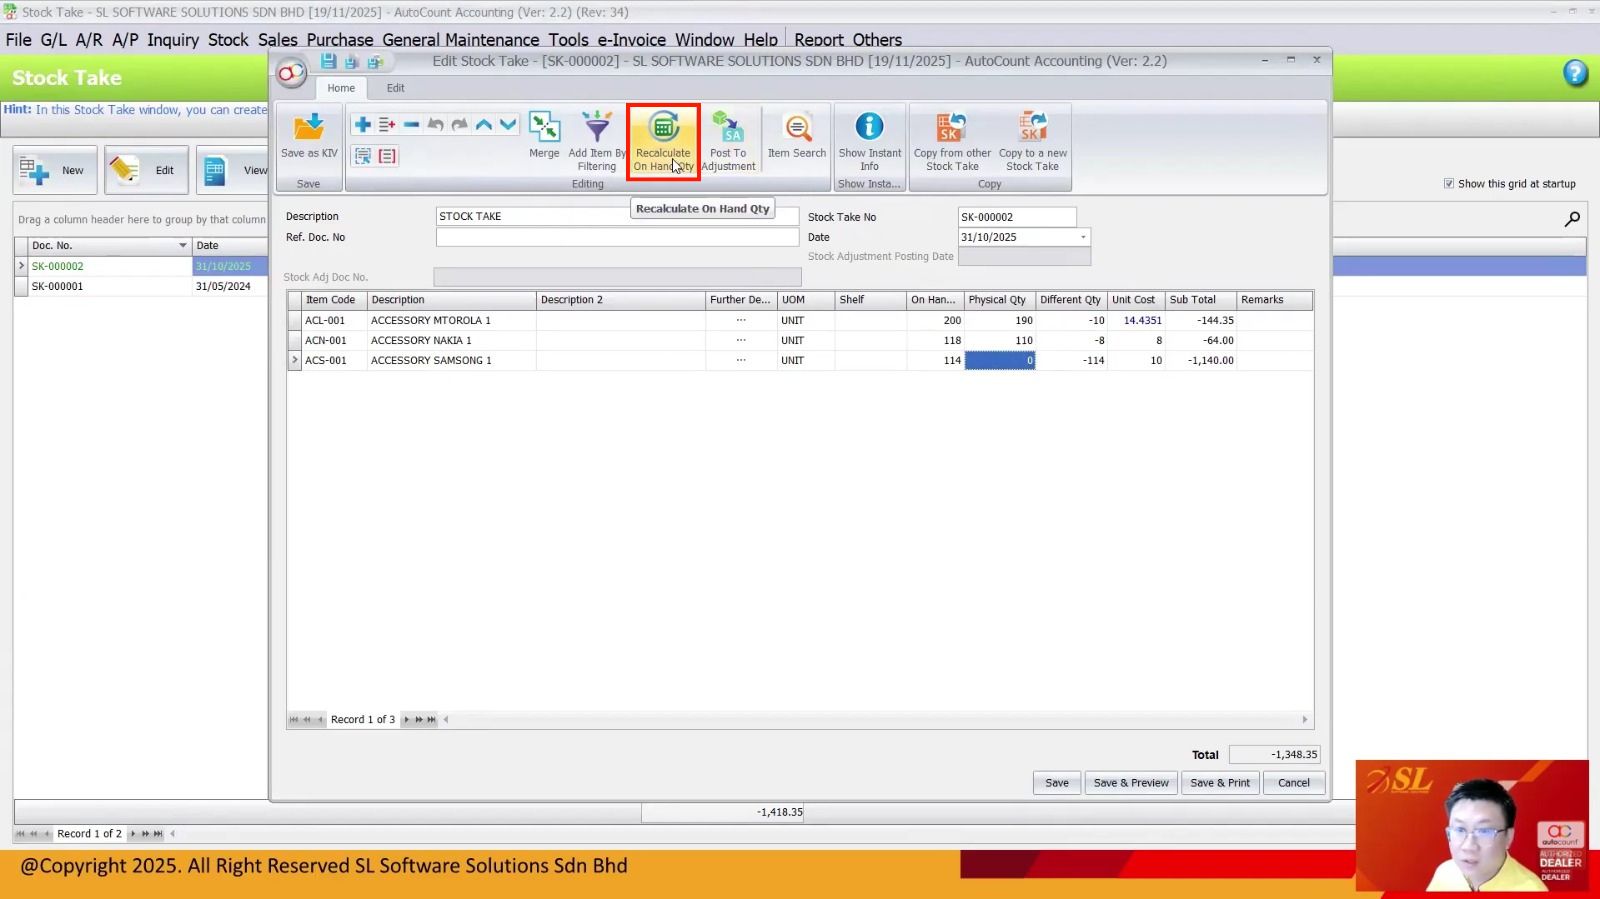
Without this, your adjustments might be off if there were transactions between your count and posting.
Post to Stock Adjustment
Once everything looks correct and recalculated, click Post to Adjustment.

AutoCount will generate a Stock Adjustment document reflecting the variances and post it with the correct date.
Common Pitfalls to Avoid
Using today’s live balance instead of the previous day’s balance for stock take — this leads to inaccuracies.
Not recalculating before posting after production or sales continue after your count.
Counting without clear assignment — leads to missing or double counted items.
Entering zero as “0” instead of “0.00” — AutoCount may skip it.
Not including zero balance items where relevant — they might still have physical stock.
Frequently Asked Questions
What is Stock Take in AutoCount?
Stock Take is a feature that lets you record the actual physical quantity of stock and compare it against the system’s on‑hand balance. AutoCount then calculates the variance and helps post the necessary Stock Adjustment.
Why is using Stock Take better than manual adjustment?
With manual adjustment, you must calculate variances yourself and enter them. AutoCount’s Stock Take calculates variances automatically, reducing human calculation errors and saving time.
What date should I use for Stock Take?
Always use the previous day’s closing balance (e.g., if you’re counting on Nov 1, use Oct 31’s stock balance). This gives you a final, closed stock position and avoids discrepancies due to ongoing transactions.
Can I save stock take before posting?
Yes. You can save stock take results, review them, and make corrections. This is useful if you want to finish counting and post adjustments later.
Do I need to recalculate before posting?
Yes — always hit Recalculate On‑Hand Qty right before posting. This ensures the system uses the correct date’s balance for calculation (e.g., Oct 31), not today’s live balance.
What if an item shows zero in the system but exists physically?
You must input it as 0.00 (not just “0”) so AutoCount displays and calculates it properly. The system may hide zero balances if formatted incorrectly.
Why is my stock balance still off after stock take?
Common causes include:
- Transactions (purchases, sales, returns) not updated before counting
- Negative stocks not cleared before stock take
- Items moved between warehouses without system updates
- Data entry errors (wrong UOM, double entries)
Can I do stock take by categories or warehouses?
Yes — AutoCount lets you filter the Stock Take list by item type, group, category, or warehouse so you can count in batches.
Is it necessary to count all items on the same day?
No — you can do stock take in multiple stages (e.g., one category today, another tomorrow) and save as you go. Just make sure all are reconciled to the same closing date before posting.
What does “Post to Adjustment” do?
This action generates a Stock Adjustment entry reflecting the difference between counted and system quantities. Posting it updates your inventory ledger.
When should managers post adjustments?
Ideally after all counting is completed, variances reviewed, and Recalculate On‑Hand Qty has been run to ensure accuracy.
Is there a faster way to count stock than writing on paper?
Yes — AutoCount supports Stock Take scanning apps on Android or dedicated devices. These streamline scanning and capturing counts, which then post back to AutoCount.
Does using a scanner improve accuracy?
Absolutely — it reduces key‑in errors, speeds up counting, and cuts down on mistakes from manual entry.
What if stock balance is still inaccurate after adjustment?
Check if:
- Transactions (sales/purchases) were recorded after your count date
- There are late postings from the previous period
- Negative stock was not cleared prior to counting
- Items were miscounted or counted twice
Can AutoCount undo a stock adjustment?
You can reverse or correct adjustments if needed — but it’s best to validate counts thoroughly before posting.
Interested in Getting AutoCount for your Business?
Contact our sales team today to explore pricing options and get started with the perfect solution for you.