-
AutoCount Accounting Features
-
- Approval Workflow
- Audit Trail
- Auto Save in Draft Folder
- AutoCount Contra Account
- AutoCount License Setting Guide
- Deposit Tracking & Management
- Documents Numbering Format
- Full Transfer and Partial Transfer
- Import Data to AutoCount Accounting Using Excel
- Informative Charts and Analytical Data
- Layout Customization
- Multi Pricing
- Sales and Services Tax
- Schedule Backup
- Search Lookup Edit
- View Documents Flow
- AutoCount Feature Stock Take
- Column Chooser
- Show Remaining (3) Collapse
-
AutoCount Cloud Accounting
-
AutoCount E-Invoice
-
AutoCount HRMS User Guide
-
AutoCount Modules
-
- Activity Stream
- Advanced Financial Report
- Advanced Item
- Advanced Multi-UOM
- Advanced Quotation Module
- Basic Multi-UOM
- Budget Module
- Consignment
- Filter By Salesman
- FOC Quantity
- Formula
- Item Batch
- Item Package
- Landing Cost
- Multi-Currency
- Multi-Dimensional Analysis
- Multi-Location
- Project Account
- Recurrence
- Remote Credit Control Module
- Stock Assembly
- User Defined Fields (UDF)
- AutoCount SST Hidden Functions
- AutoCount SST Submission - Service Tax
- AutoCount Scripting Module User Guide
- AutoCount Bonus Point Module User Guide
- AutoCount Service Management Plugin User Guide
- Show Remaining (12) Collapse
-
AutoCount Plugins
-
- Fixed Assets Management
- Goldsmith
- TD Ordering Mobile Apps
- TD Stock Mobile Apps
- Universal Import Plugin
- DMS Import Plugin
- AutoCount Pick List Plugin User Guide
- AutoCount Credit Memo Plugin User Guide
- AutoCount Lock Price Plugin
- AutoCount Progressive Billing
- AutoCount Easy Recurrence Plugin
- Batch Update Unit Price Plugin
- AutoCount Production order
-
- Event Management System
- AutoCount To-Do List Plugin
- AutoCount AutoBank Reconciliation Plugin
- Intercompany Billing Plugin User Guide
- Lead Management 2.0 Plugin
- AutoCount Service Contract Plugin User Guide
- AutoCount Optical Plugin
- AutoCount Integrator Plugin
- AutoCount Procurement Planning Plugin
- Cage Management Plugin
- AutoCount Vehicle Plugin
- AutoCount Agent Validation Plugin User Guide
- AutoCount Barcode Generator Plugin User Guide
- AutoCount Easy Batch Number Entry Plugin User Guide
- Warranty 2.0 Plugin
- AutoCount Easy Photo 2.0 User Guide
- AutoCount Recurring Invoice Plugin User Guide
- AutoCount Scale Barcode Plugin User Guide
- AutoCount Recurrence Late Interest Plugin
- AutoCount Item Visibility Control
- AutoCount Bill Remark Plugin User Guide
- AutoCount Pain Tracker User Guide
- AutoCount Easy Payment
- AutoCount Easy Deposit Plugin
- AutoCount Easy Knock Off Plugin
- AutoCount Daily Collection Summary Plugin
- Timber Log Plugins
- Batch Transfer SODO Plugin
- AutoCount Plugin: Vege Basket Plugin
- AutoCount Plugin: Fruit Basket Plugin
- Show Remaining (15) Collapse
-
-
Form Template
-
Report Template
-
- Advance Quotation
- Cash Sale
- Consignment
- Consignment Movement
- Credit Note
- Debit Note
- Delivery Order
- FOC Quantity Analysis By Document Report
- Invoice
- Item Package Sales Report
- Monthly Sales Analysis
- Outstanding Sales Order Listing
- Profit And Loss Of Documents
- Quotation
- Sales Agent Contribution Report
- Sales Order
- Top/Bottom Sales Ranking
- Show Remaining (2) Collapse
-
- Available Stock Status Report
- Expired Item Batch Listing
- Inventory Physical Worksheet
- Stock Adjustment
- Stock Aging Report
- Stock Assembly
- Stock Assembly Order
- Stock Balance By Location
- Stock Balance Report
- Stock Card Report
- Stock Disassembly
- Stock Issue
- Stock Item Profit Margin
- Stock Movement Report
- Stock Receive
- Stock Take
- Stock Transfer
- Stock Write Off
- Show Remaining (3) Collapse
-
B2B ORDERING
-
AutoCount AI Agent
- Coming soon
AutoCount Module: User Defined Field (UDF) Module
Introduction To AutoCount User Defined Field (UDF) Module
Firstly, the AutoCount User Defined Field (UDF) Module is a powerful tool designed for businesses seeking deeper customization within their AutoCount accounting system. To clarify, the User Defined Field (UDF) feature in AutoCount offers businesses powerful customization tools to enhance their accounting system. In addition, with its ability to create tailored fields, this module supports various data types and simplifies workflow automation. Thus, ensuring flexibility and a personalized user experience. In addition, by using UDFs, businesses can enhance their accounting system’s flexibility and ensure a more personalized experience. So, this guide will explore every feature, functionality, and practical application of the UDF module in great detail.
AutoCount User Defined Field (UDF) Module Video Guide
- AutoCount User Defined Field (UDF) Module (EN)
User Defined Field (UDF) Module Setup
Integration & User Defined Field (UDF) Module Setup
- AutoCount User Defined Field (UDF) Module (CN)
用户自定义字段 (UDF) 模块设置
集成和用户自定义字段 (UDF) 模块设置
What is the AutoCount User Defined Field Module?
Firstly, the AutoCount UDF Module is a feature-rich customization tool available in most editions of AutoCount (except Account Plus and Express Plus). In addition, it enables businesses to add, edit, and integrate custom fields into their accounting software. Thus, making it a versatile solution for companies that need more than the default system capabilities.
Why is the UDF Module Essential for Businesses?
In today’s dynamic business environment, static templates often fail to meet unique operational demands. The UDF module bridges this gap by offering:
Customizable Data Fields
Firstly, you can ersonalize data collection to align with business processes
Improved Data Accuracy
Secondly, you can define field parameters like type, size, and default values
Enhanced Workflow Efficiency
Thirdly, you can streamline operations with fields that suit specific tasks
Core Features of the AutoCount UDF Module
The UDF module’s robust features include:
Adding New Fields
Firstly, users can create new fields in most sections of the system. For example, a retail business can add a “Customer Preferences” field. On the other hand, a manufacturing firm might require fields for batch tracking.
Supported Data Types
Secondly, the module supports a wide range of data types. Thus, ensuring compatibility with different business needs:
Fields for binary decisions, such as yes/no or on/off values.
Example: Employee status (Active/Inactive)
Numeric fields for precise calculations, whole numbers, or decimals.
Examples: Product prices, stock quantities
Date: Fields for storing date information; Memo: long-form text notes
Example: Recording customer follow-up dates; Storing project notes or descriptions
Predefined dropdown menus for standardized input.
Example: Product categories (Electronics, Furniture, etc.)
Fields supporting formatted text; media links for enhanced content.
Examples: product descriptions with bold; Linking to product images
Integrating Fields Across Documents
Thirdly, UDFs can seamlessly integrate into forms like invoices or purchase orders. Thus, enhancing document usability.
Step-by-Step Guide to Adding a New Field
Creating new fields with the UDF module involves simple but systematic steps. Follow this comprehensive guide to get started:
Prerequisites
Administrative Access
Only users with admin privileges can create or modify fields
Steps to Create a New UDF:
1. Log into Management Studio
- Firstly, perform a window search on the keyword “management“.
- Then, click on the AutoCount Accounting Management Studio to launch the Management Studio.
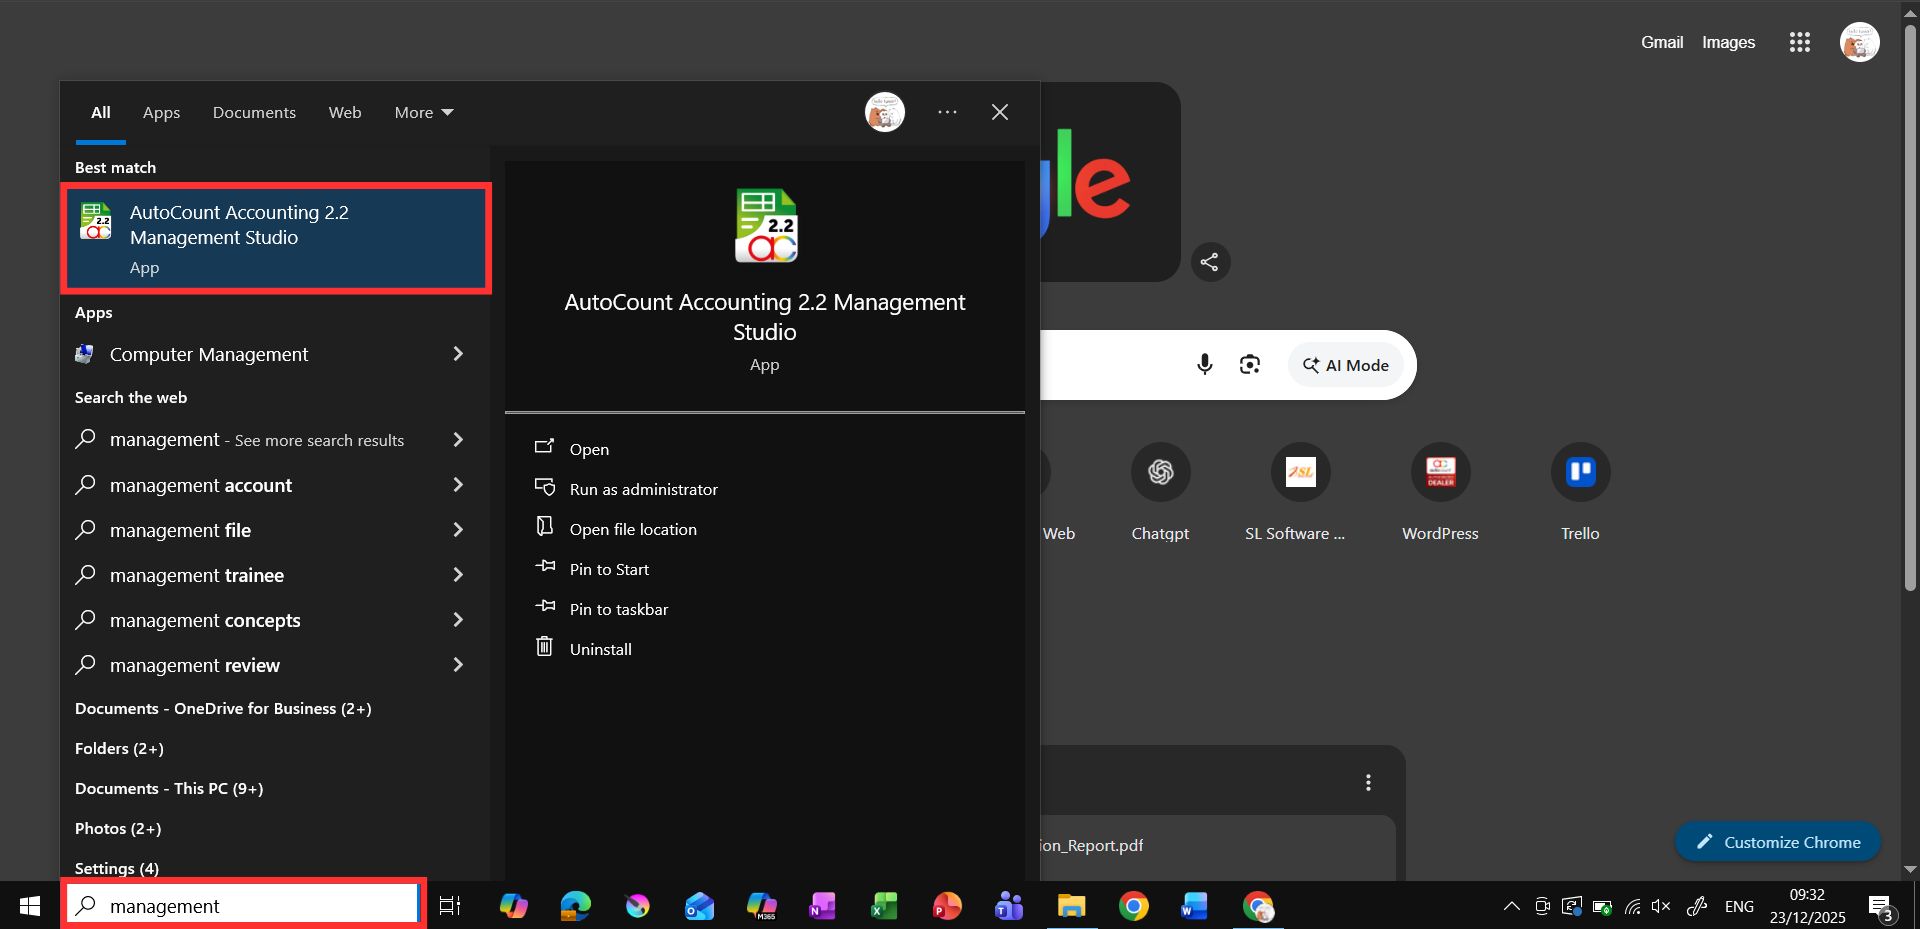
- Next, log in using admin account and password.

2. Navigate to UDF
- Secondly, navigate to Tools > User Defined Field.

3. Choose a Category
- Thirdly, select the area where you want to add the field (e.g., invoices, customers).
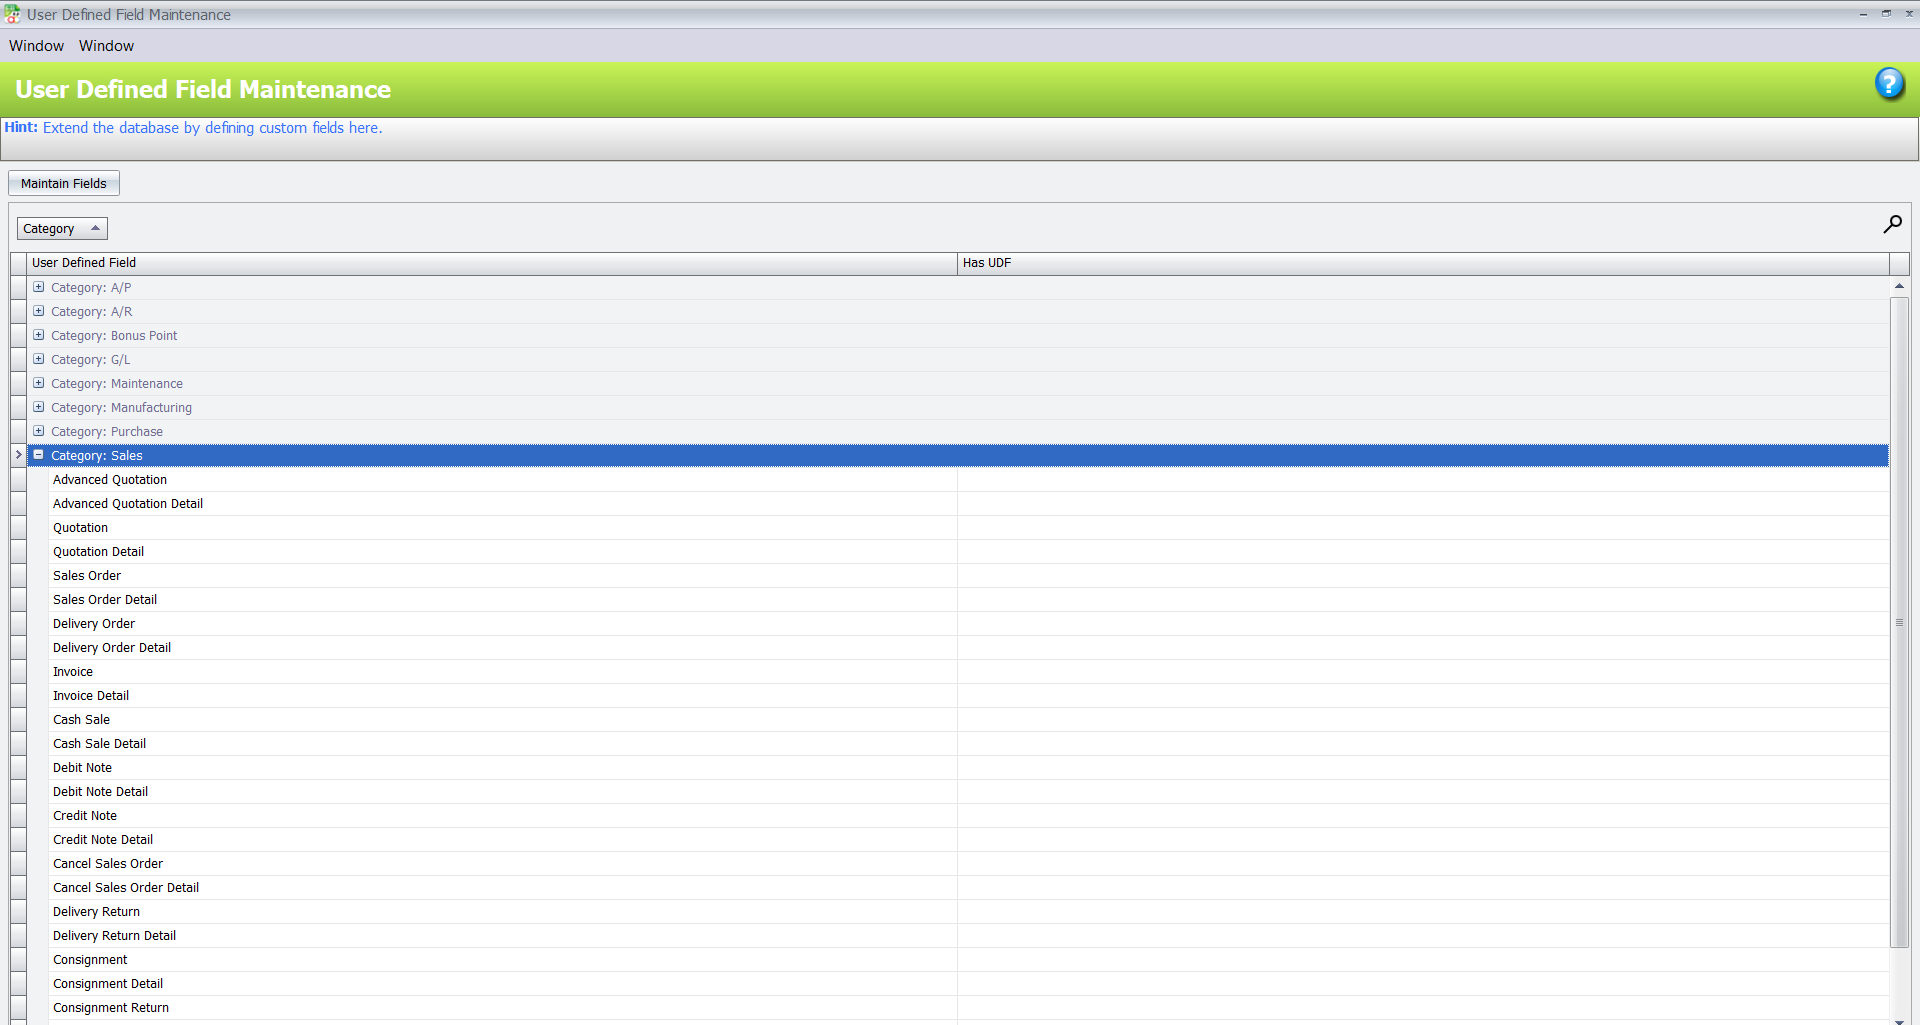
4. Click “Maintain Fields”
- After that, a dialog box will appear.

5. Add a New Field
- After that, click the “+” icon.
- Next, enter a Name and Caption for the field.
- After that, select a Data Type (e.g., Date, Decimal).
- Next, adjust settings like size, required/unique status, and default values.

6. Save Changes
- Finally, click Save to finalize.

- The new field will now appear in the selected section of the account book.

Copying UDFs for Reusability
Reusing UDFs across different categories reduces redundancy and ensures consistency. So here’s how you can copy and paste UDFs:
1. Locate an Existing UDF
- Firstly, go to the field group where the original UDF exists.

2. Click “Copy UDF”
- Secondly, this duplicates the field configuration.
3. Paste the UDF
- Thirdly, navigate to the target field group and click “Paste UDF” .

4. Save Changes
- Finally, ensure that modifications are reflected in the account book.


Integrating UDFs into Document Forms
Embedding UDFs directly into document forms improves accessibility and utility.
How to Add UDFs to Forms:
1. Access the Document Form
- Firstly, navigate to a form (e.g., invoice) in the account book
2. Enter Customization Mode
- Secondly, right-click in a blank space.
- Then, select Customize Layout.

3. Drag and Drop the UDF
- Thirdly, place it in the desired location on the form.

4. Save Layout
- After that, close the customization window, right-click.
- Finally, save changes.


Use Case:
- For invoices, businesses can include a “Bank Account” UDF to display payment details clearly.

Exporting and Importing UDFs
Transferring UDF configurations between account books saves time and ensures standardization.
Exporting UDFs
1. Navigate to UDF Export Menu
- Firstly, go to Tools > Export UDF, Scripting, and Formula.

2. Select Fields to Export
- Secondly, enter a title and description for clarity.

3. Save the File
- Thirdly, choose a location to store the exported data.

Importing UDFs
1. Navigate to UDF Import Menu
- Navigate to Tools > Import UDF, Scripting, and Formula.

2. Browse for the Export File
- Select and open it.

3. Import Fields
- Overwrite existing UDFs if necessary.


Managing Access Rights for UDFs
- Admins can control who can view, modify, or manage UDFs to maintain security.
Steps:
1. Navigate to General Maintenance > Access Right Maintenance.

2. Search for “User Defined” in the search bar.

3. Allow or disallow user actions related to UDFs.

Practical Applications Across Industries

Retail
Track customer preferences for personalized marketing

Manufacturing
Monitor product batch numbers for quality control

Services
Maintain comprehensive client records for better service delivery
Optimizing UDF Usage
Maximize the benefits of the UDF module by following these tips:
Audit Fields Regularly
Remove outdated fields to streamline forms.
Use Descriptive Names
Make field purposes clear to all users.
Addressing Common Challenges
- Problem: Duplicate data fields
- Solution: Use unique naming conventions and perform periodic reviews.
- Problem: Unauthorized access to sensitive data
- Solution: Assign access rights strategically to maintain security.
Future Enhancements to the UDF Module
AutoCount aims to incorporate AI tools for automated field recommendations and advanced analytics, ensuring the module evolves to meet emerging business needs.
Conclusion
The AutoCount User Defined Field Module is a versatile solution for businesses looking to enhance their accounting system’s functionality. By leveraging its robust features, companies can achieve greater efficiency, data accuracy, and workflow customization.
Frequently Asked Questions
What is the UDF module used for?
It allows businesses to add custom fields to AutoCount for unique data needs.
What data types are supported?
The module supports Boolean, Decimal, Integer, RichText, ImageLink, and more.
How can I integrate UDFs into forms?
You can add UDFs via the customization layout option in document forms.
Can I transfer UDFs between systems?
Yes, the export/import functionality simplifies transferring UDFs across account books.
Who can manage UDFs?
Only admins or users with appropriate permissions can manage UDFs.
How does the UDF module benefit businesses?
It improves customization, data accuracy, and workflow efficiency.
Interested in Getting AutoCount for your Business?
Contact our sales team today to explore pricing options and get started with the perfect solution for you.