-
AutoCount Accounting Features
-
- Approval Workflow
- Audit Trail
- Auto Save in Draft Folder
- AutoCount Contra Account
- AutoCount License Setting Guide
- Deposit Tracking & Management
- Documents Numbering Format
- Full Transfer and Partial Transfer
- Import Data to AutoCount Accounting Using Excel
- Informative Charts and Analytical Data
- Layout Customization
- Multi Pricing
- Sales and Services Tax
- Schedule Backup
- Search Lookup Edit
- View Documents Flow
- AutoCount Feature Stock Take
- Column Chooser
- Show Remaining (3) Collapse
-
AutoCount Cloud Accounting
-
AutoCount E-Invoice
-
AutoCount HRMS User Guide
-
AutoCount Modules
-
- Activity Stream
- Advanced Financial Report
- Advanced Item
- Advanced Multi-UOM
- Advanced Quotation Module
- Basic Multi-UOM
- Budget Module
- Consignment
- Filter By Salesman
- FOC Quantity
- Formula
- Item Batch
- Item Package
- Landing Cost
- Multi-Currency
- Multi-Dimensional Analysis
- Multi-Location
- Project Account
- Recurrence
- Remote Credit Control Module
- Stock Assembly
- User Defined Fields (UDF)
- AutoCount SST Hidden Functions
- AutoCount SST Submission - Service Tax
- AutoCount Scripting Module User Guide
- AutoCount Bonus Point Module User Guide
- AutoCount Service Management Plugin User Guide
- Show Remaining (12) Collapse
-
AutoCount Plugins
-
- Fixed Assets Management
- Goldsmith
- TD Ordering Mobile Apps
- TD Stock Mobile Apps
- Universal Import Plugin
- DMS Import Plugin
- AutoCount Pick List Plugin User Guide
- AutoCount Credit Memo Plugin User Guide
- AutoCount Lock Price Plugin
- AutoCount Progressive Billing
- AutoCount Easy Recurrence Plugin
- Batch Update Unit Price Plugin
- AutoCount Production order
- AutoCount Car Tint Film Plugin
-
- Event Management System
- AutoCount To-Do List Plugin
- AutoCount AutoBank Reconciliation Plugin
- Intercompany Billing Plugin User Guide
- Lead Management 2.0 Plugin
- AutoCount Service Contract Plugin User Guide
- AutoCount Optical Plugin
- AutoCount Integrator Plugin
- AutoCount Procurement Planning Plugin
- Cage Management Plugin
- AutoCount Vehicle Plugin
- AutoCount Agent Validation Plugin User Guide
- AutoCount Barcode Generator Plugin User Guide
- AutoCount Easy Batch Number Entry Plugin User Guide
- Warranty 2.0 Plugin
- AutoCount Easy Photo 2.0 User Guide
- AutoCount Recurring Invoice Plugin User Guide
- AutoCount Scale Barcode Plugin User Guide
- AutoCount Recurrence Late Interest Plugin
- AutoCount Item Visibility Control
- AutoCount Bill Remark Plugin User Guide
- AutoCount Pain Tracker User Guide
- AutoCount Easy Payment
- AutoCount Easy Deposit Plugin
- AutoCount Easy Knock Off Plugin
- AutoCount Daily Collection Summary Plugin
- Timber Log Plugins
- Batch Transfer SODO Plugin
- AutoCount Plugin: Vege Basket Plugin
- AutoCount Plugin: Fruit Basket Plugin
- Show Remaining (15) Collapse
-
-
Form Template
-
Report Template
-
- Advance Quotation
- Cash Sale
- Consignment
- Consignment Movement
- Credit Note
- Debit Note
- Delivery Order
- FOC Quantity Analysis By Document Report
- Invoice
- Item Package Sales Report
- Monthly Sales Analysis
- Outstanding Sales Order Listing
- Profit And Loss Of Documents
- Quotation
- Sales Agent Contribution Report
- Sales Order
- Top/Bottom Sales Ranking
- Show Remaining (2) Collapse
-
- Available Stock Status Report
- Expired Item Batch Listing
- Inventory Physical Worksheet
- Stock Adjustment
- Stock Aging Report
- Stock Assembly
- Stock Assembly Order
- Stock Balance By Location
- Stock Balance Report
- Stock Card Report
- Stock Disassembly
- Stock Issue
- Stock Item Profit Margin
- Stock Movement Report
- Stock Receive
- Stock Take
- Stock Transfer
- Stock Write Off
- Show Remaining (3) Collapse
-
B2B ORDERING
-
AutoCount AI Agent
- Coming soon
AutoCount Accounting: Barcode Scanning
Firstly, this guide provides a step-by-step approach to setting up and using the Barcode Scanning feature in AutoCount Accounting 2.0. To clarify, it covers all essential functions, from enabling barcode scanning to configuring advanced settings. Thus, ensuring smooth inventory and sales management.
Introduction to Barcode Scanning
Firstly, the Barcode Scanning feature in AutoCount Accounting 2.0 allows users to scan product information directly into the system. As a result, this functionality speeds up the stock management process by eliminating manual data entry and helping reduce errors in counting and invoicing.
Enabling Barcode Scanning
To enable this feature in AutoCount Accounting, follow these steps:
1. Equipment Needed
- Firstly, ensure you have a compatible Barcode Scanner connected to your computer.
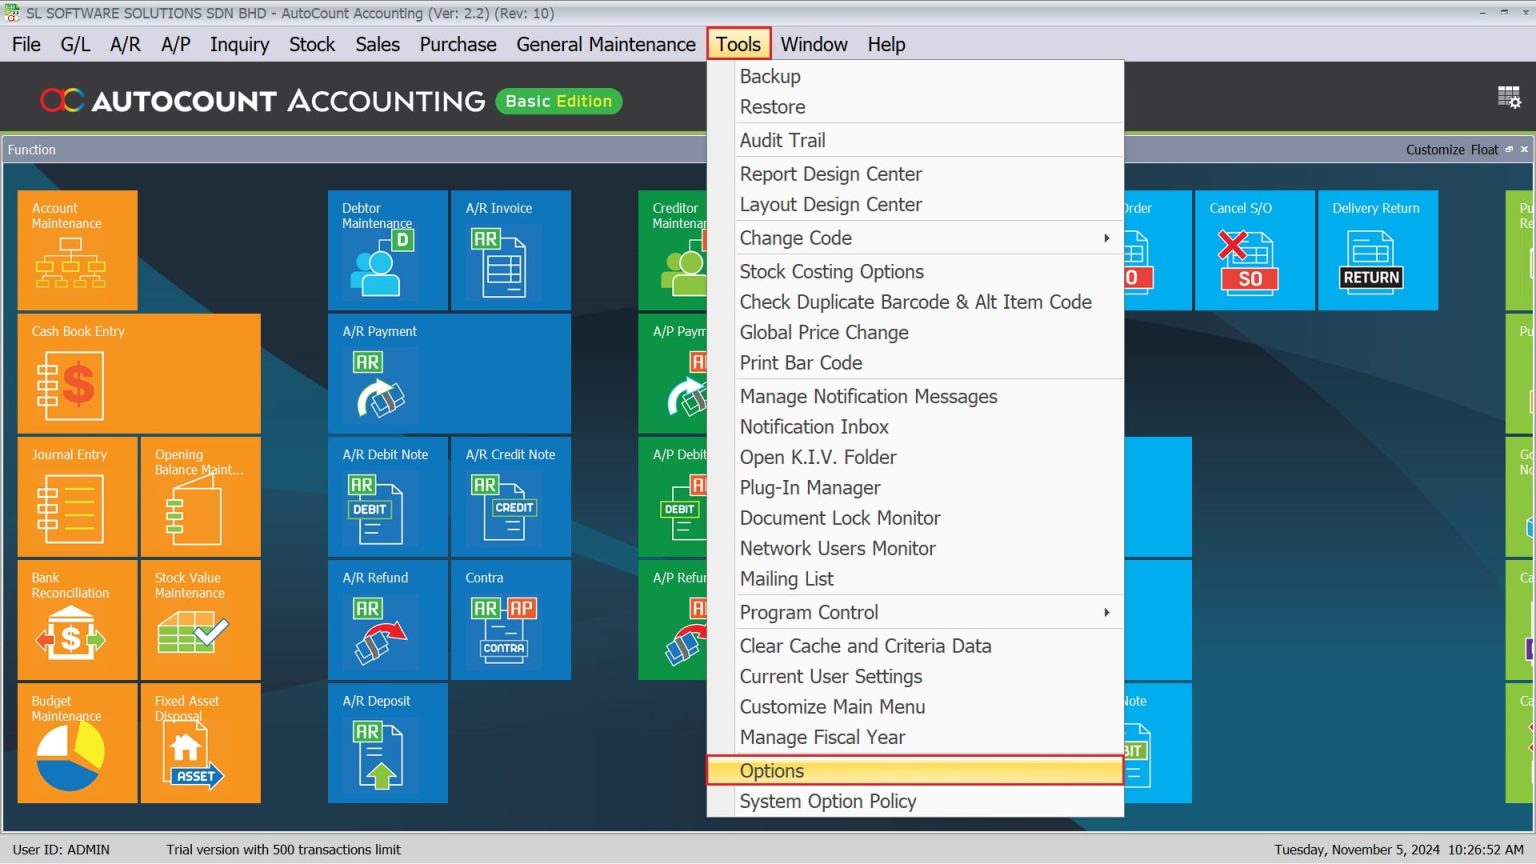
2. Navigate to Tools > Options
- Secondly, open AutoCount Accounting 2.0 and go to the Tools menu.
- After that, click on Options.
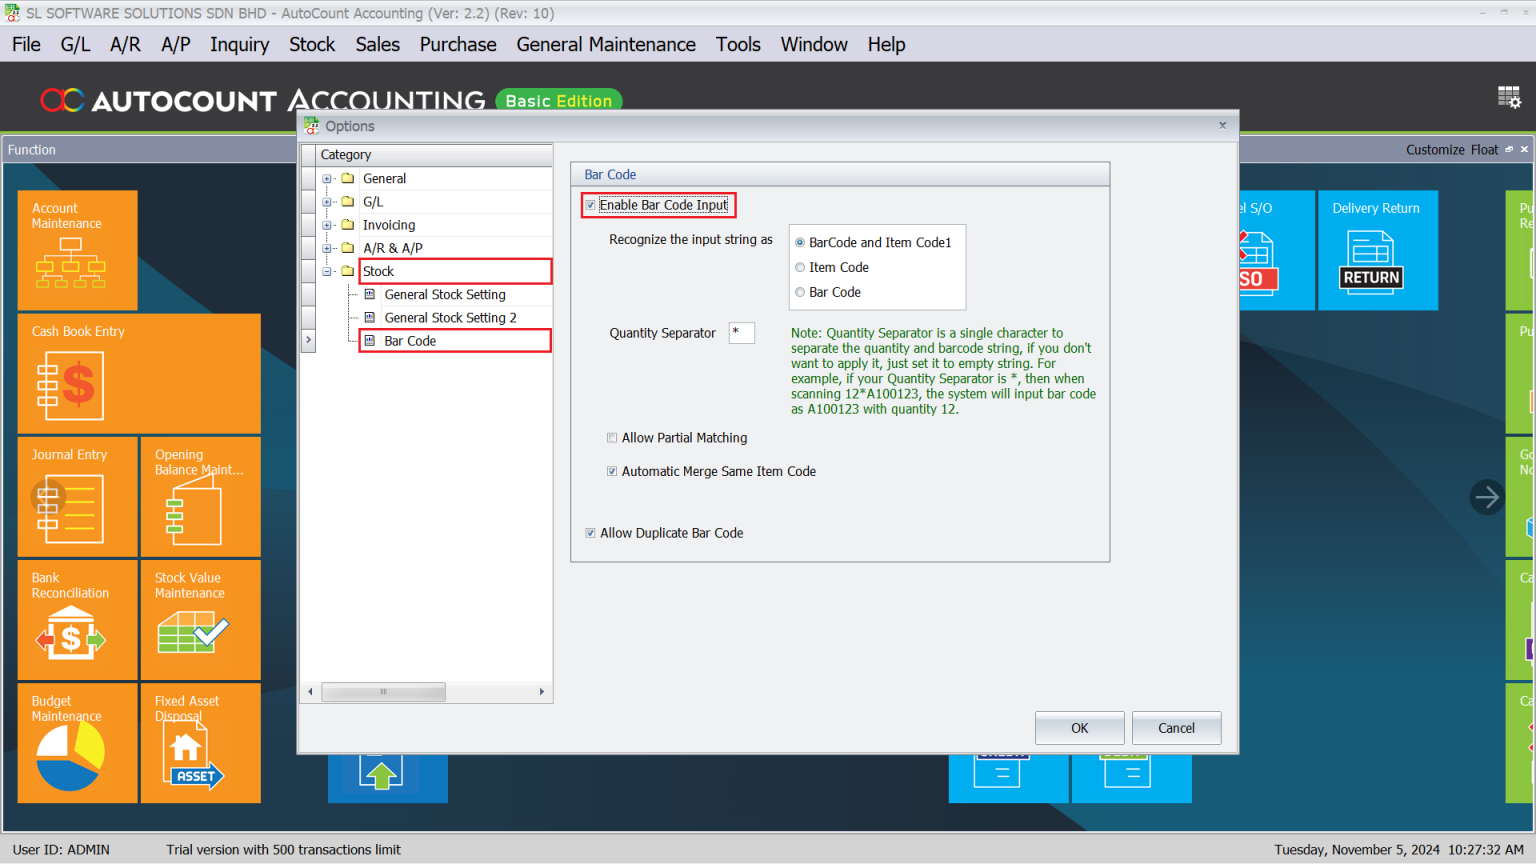
3. Enable Barcode Input
- Thirdly, under the Stock section, find BarCode.
After that, check the box for Enable Barcode Input and click OK
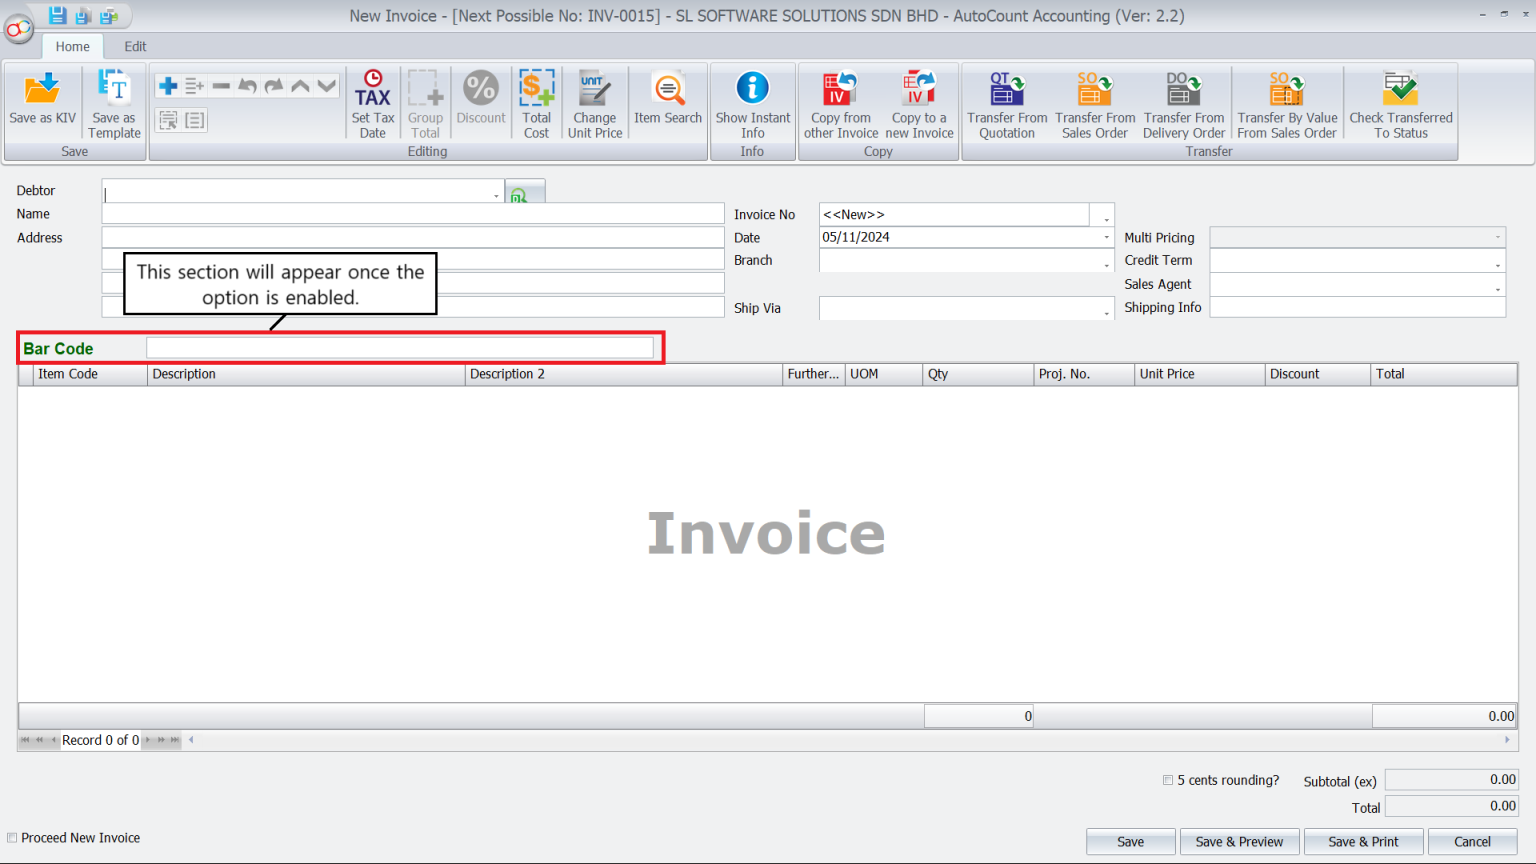
4. Verify Changes
- Finally, open Sales > Invoice to check if the Barcode Input feature is active. You should see a designated row for barcode input in your invoice form.
Setting Up Barcodes for Stock Items
Once the feature is enabled, you can start adding barcodes to each item in your stock.
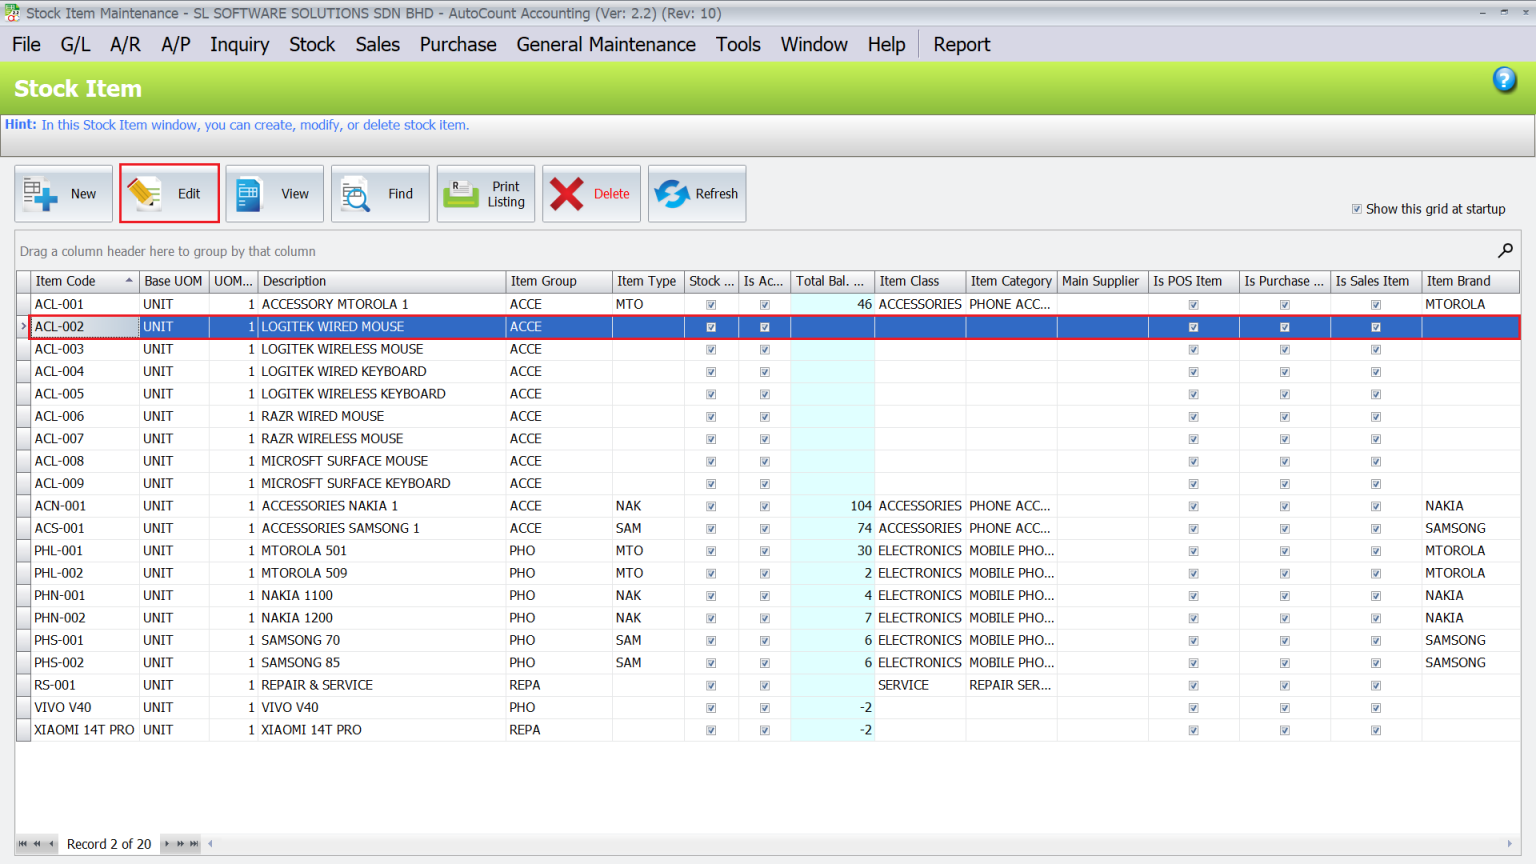
1. Navigate to Stock Item Maintenance
- Firstly, go to Stock > Stock Item Maintenance.
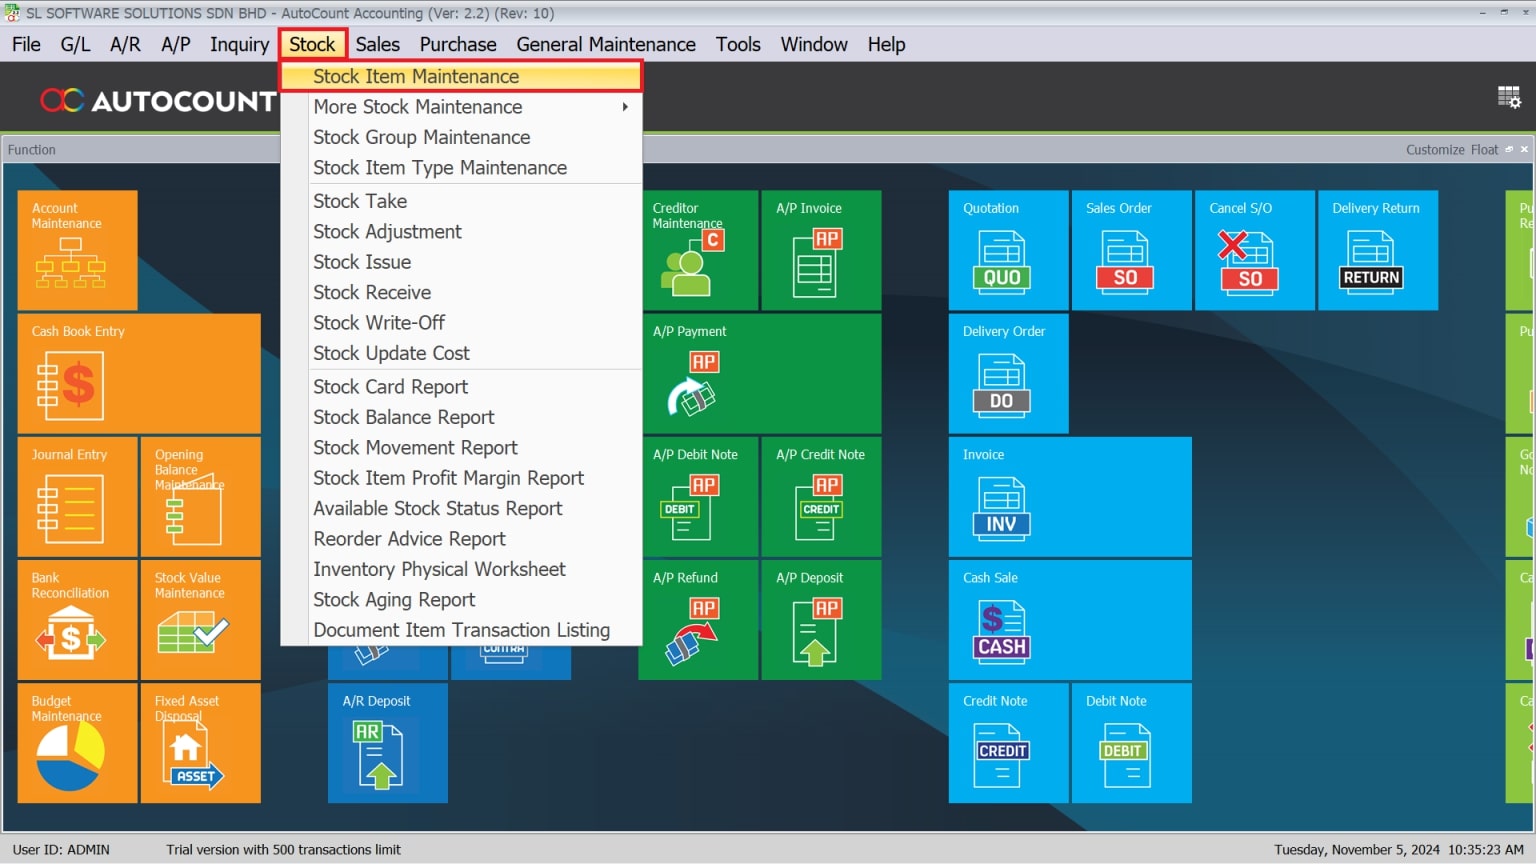
2. Edit Item Details
- Secondly, select the item you want to add a barcode to.
- After that, click Edit.
3. Add Barcode
- Thirdly, in the Details section, click on Others.
- After that, enter the custom barcode for the item.
- Next, click OK to save.
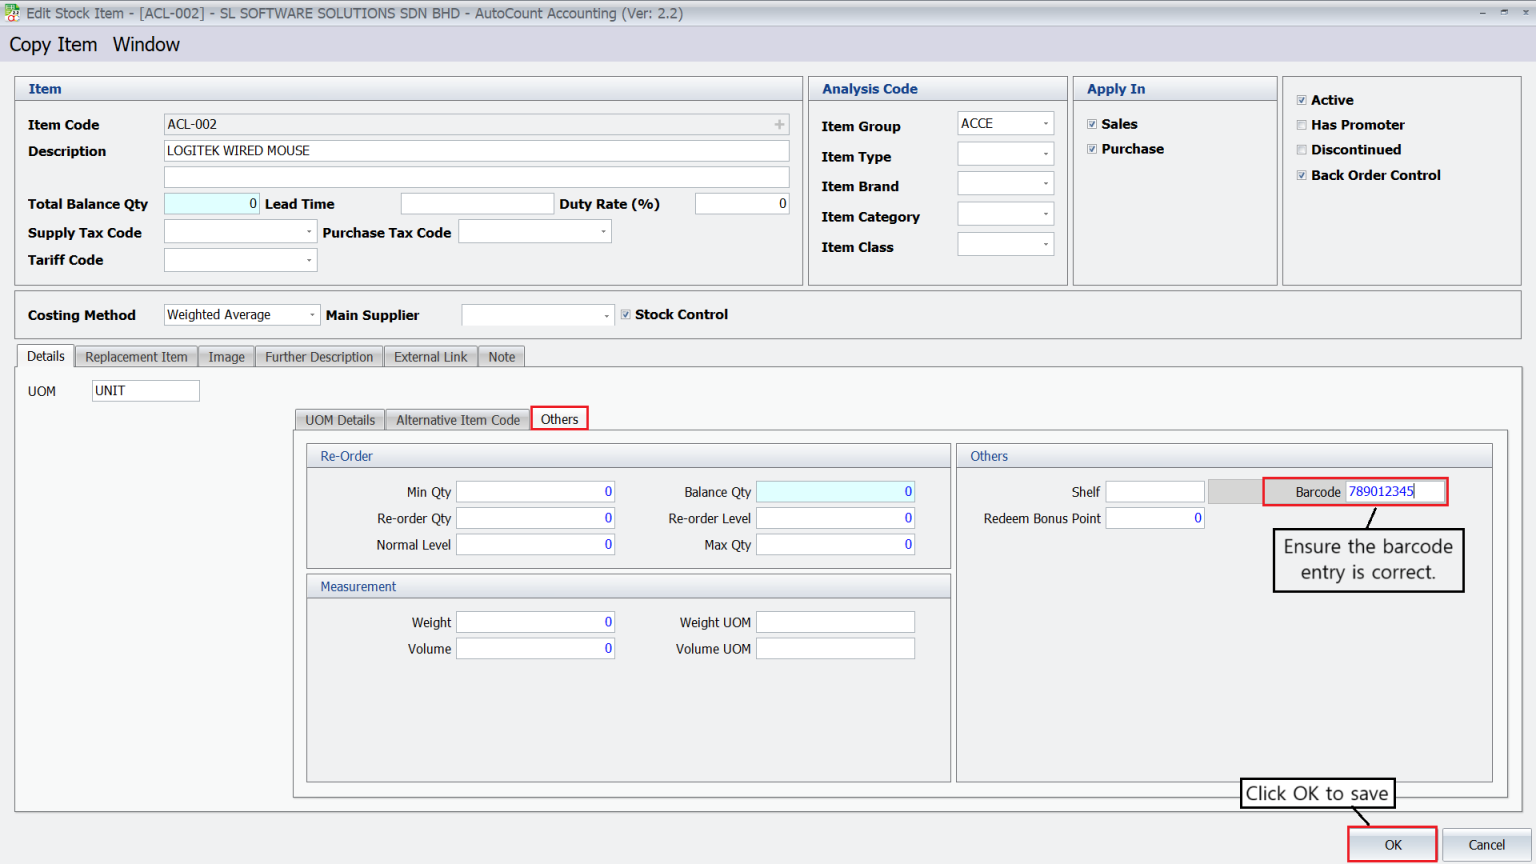
Note: Repeat this process for each stock item you want to barcode.
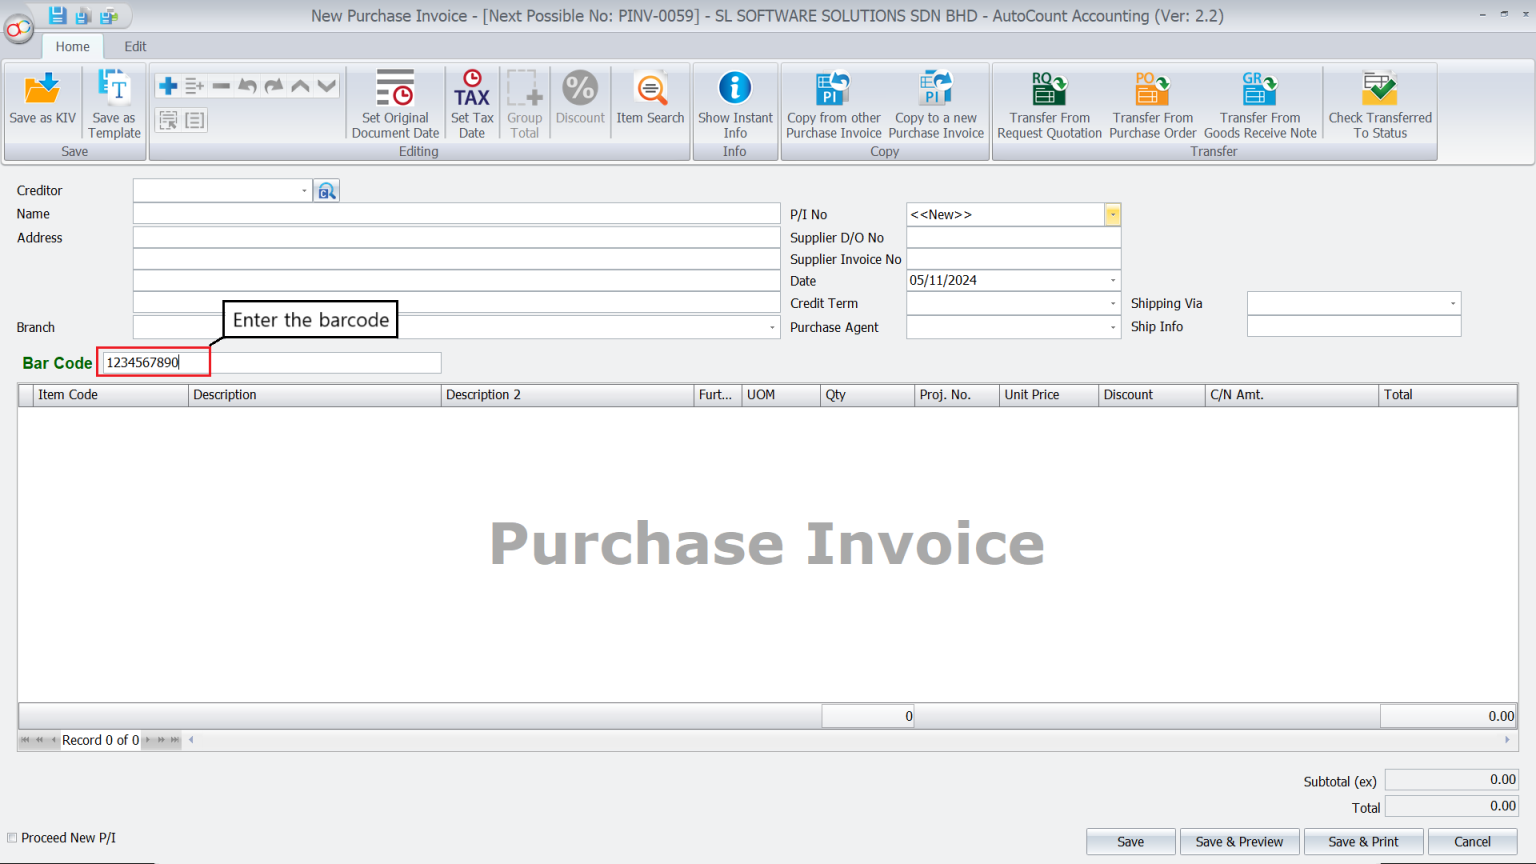
Using Barcodes in Invoices and Sales
With barcodes added, you can use them directly when creating invoices.
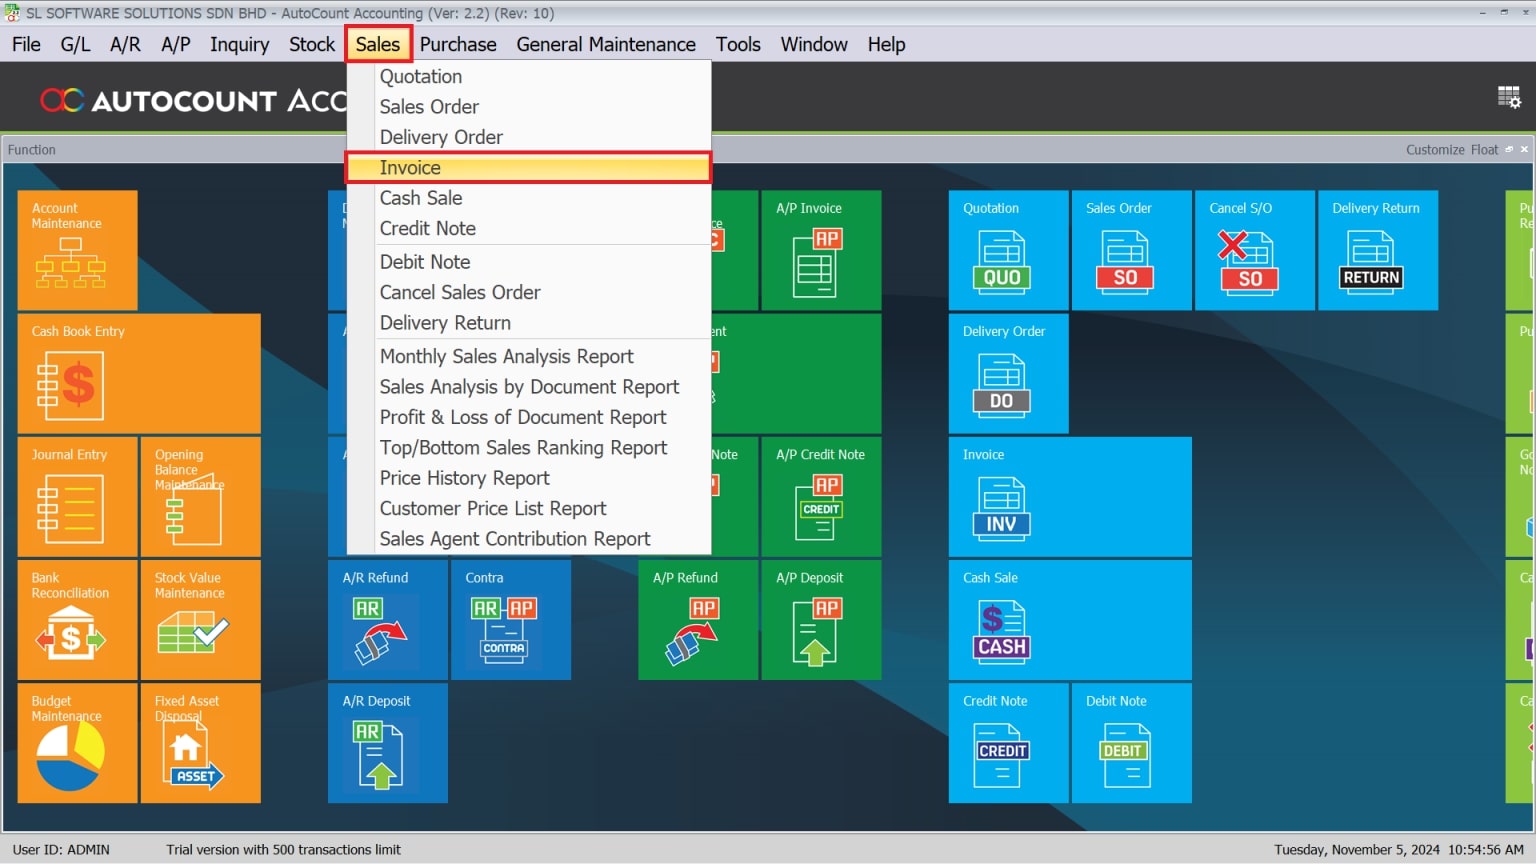
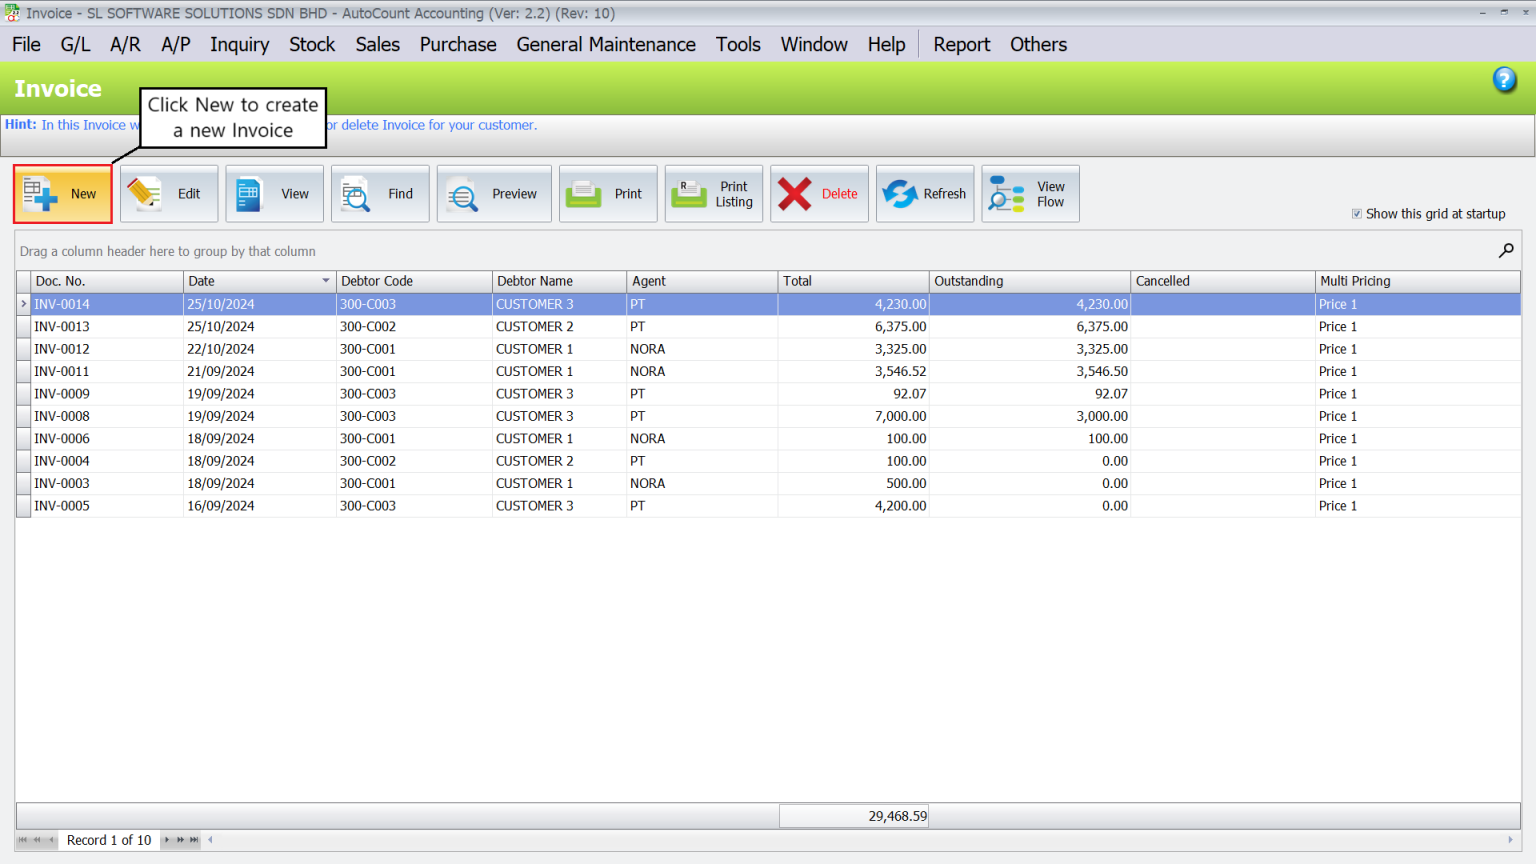
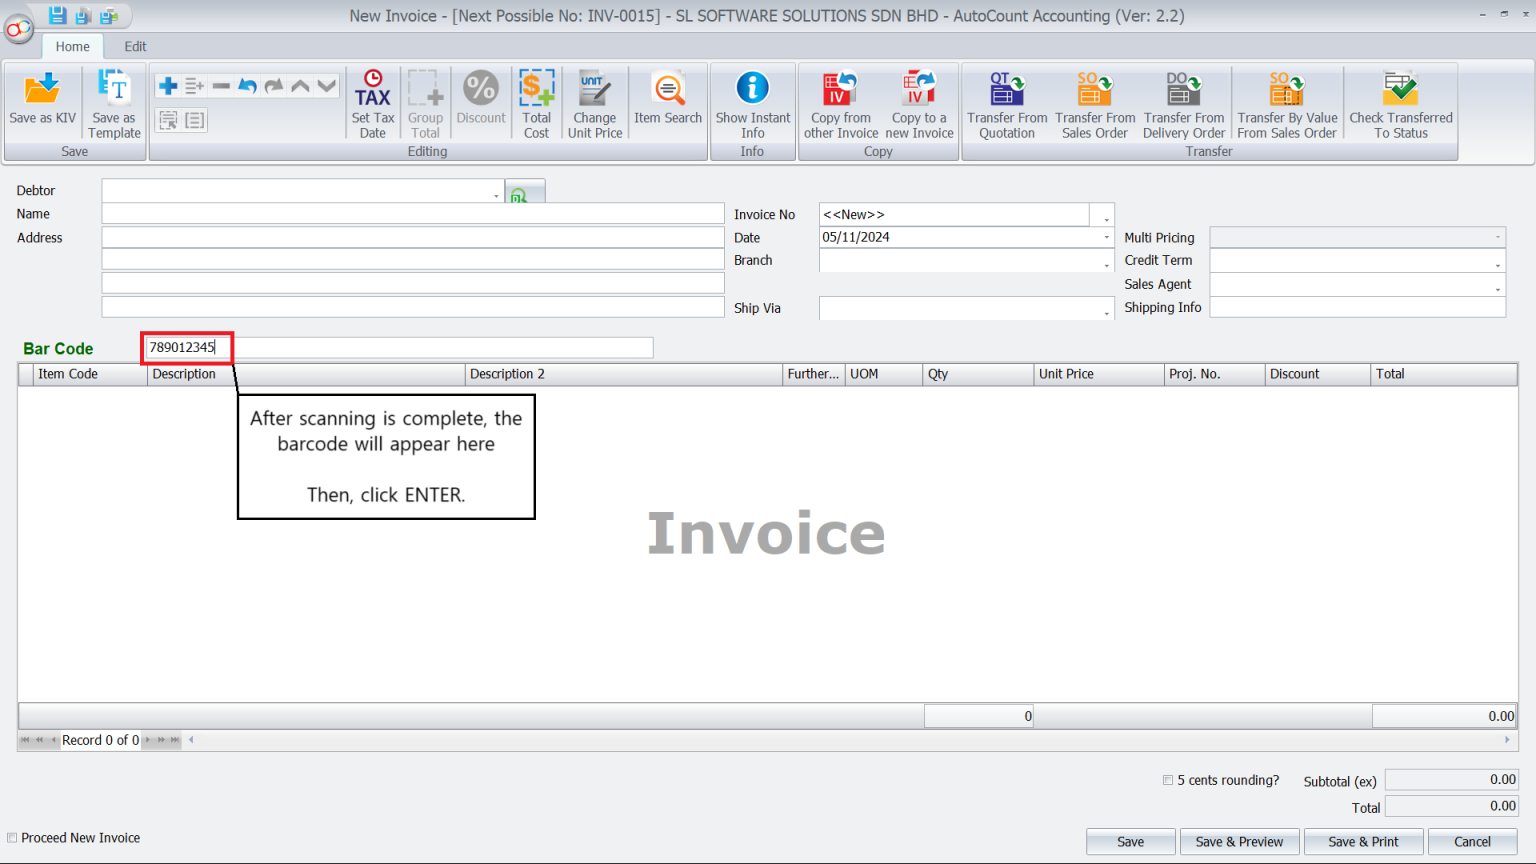
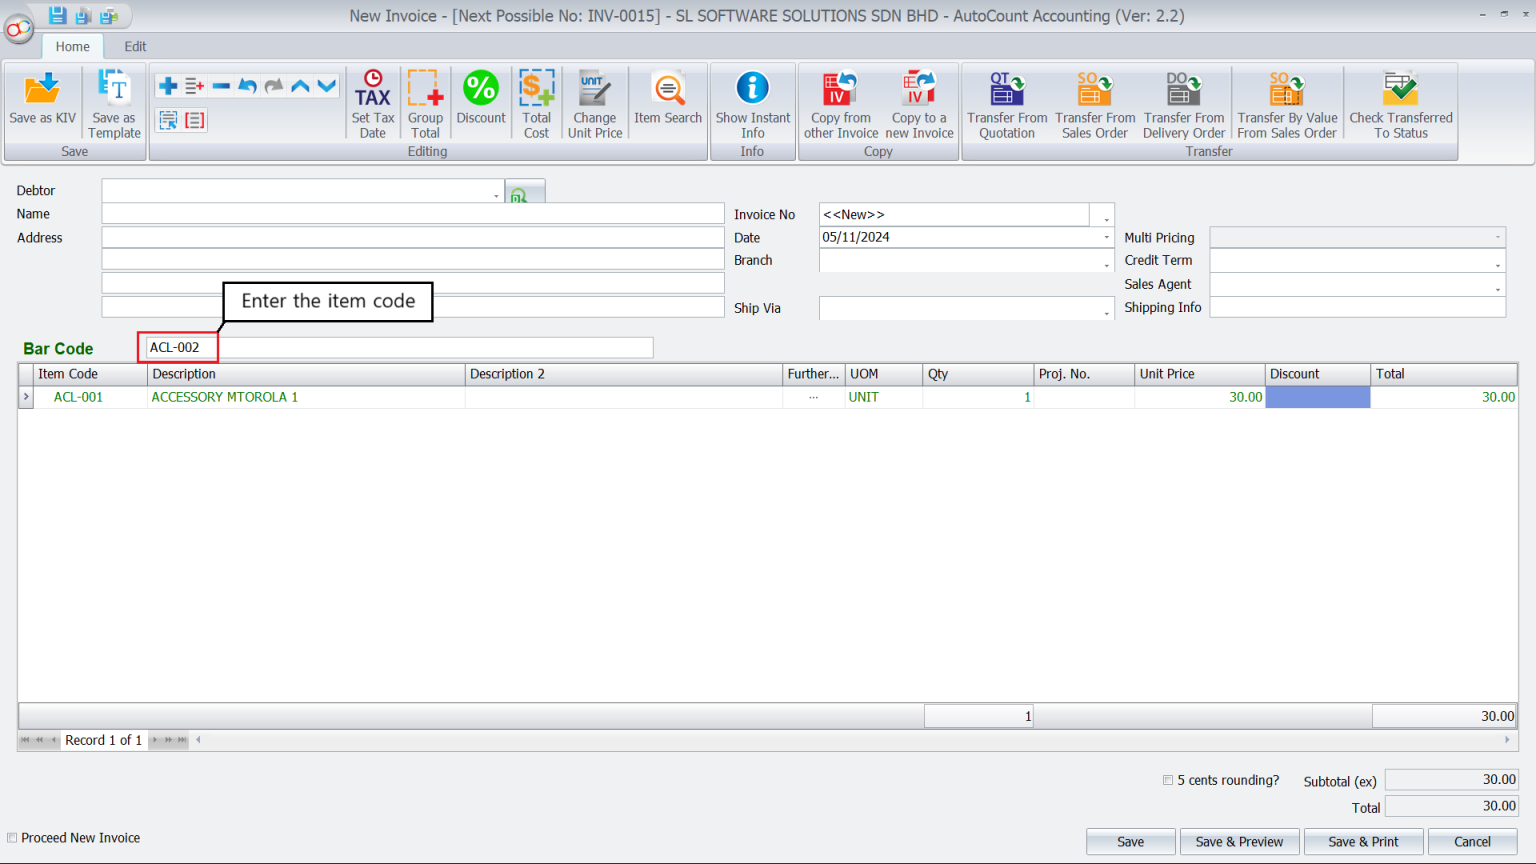
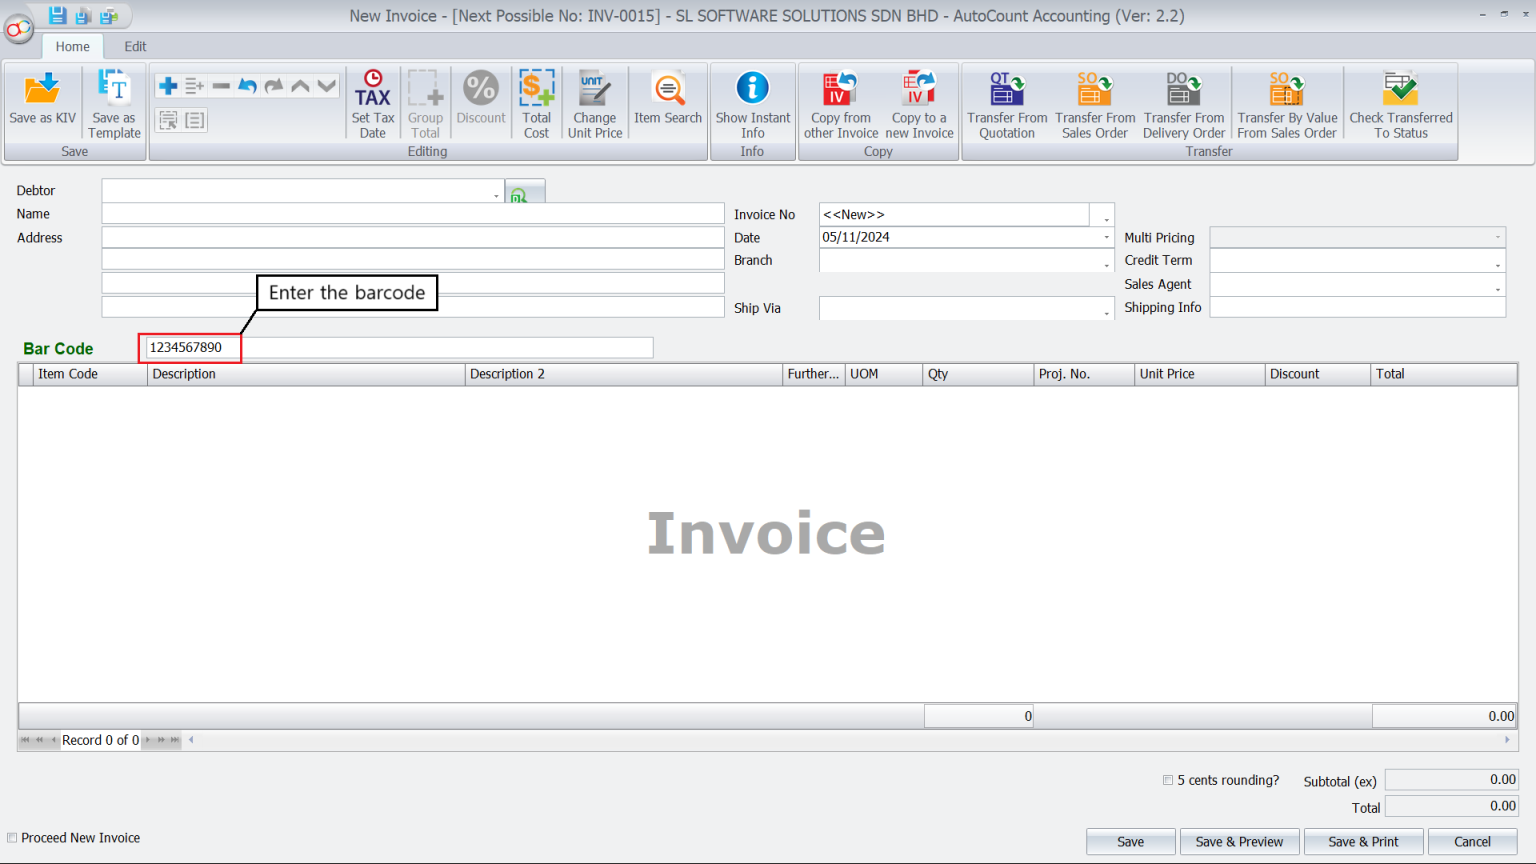
1. Create a New Invoice
- Firstly, go to Sales > Invoice.
- After that, select New Invoice.
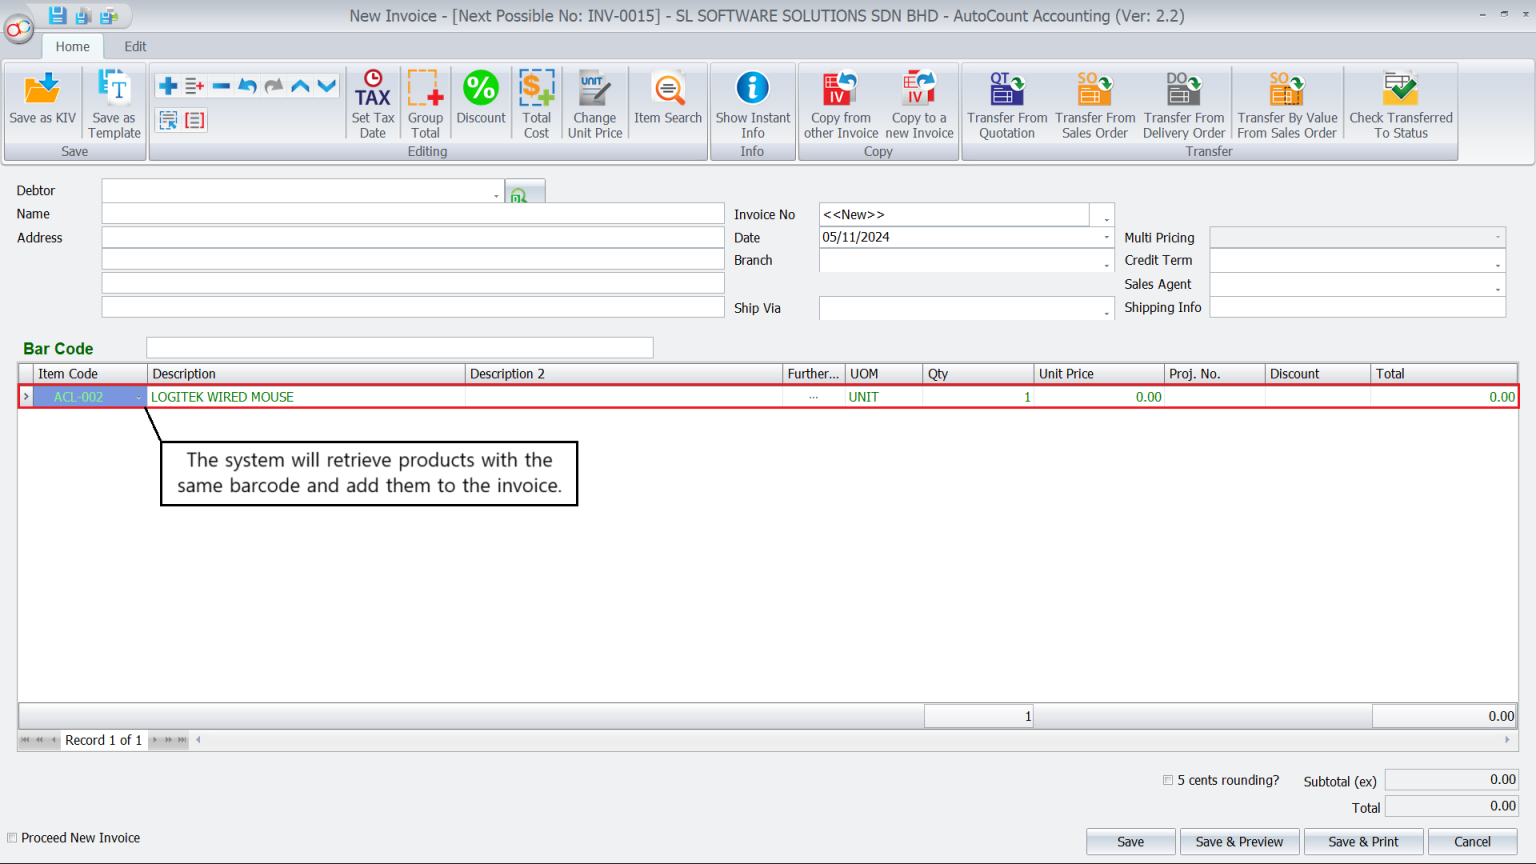
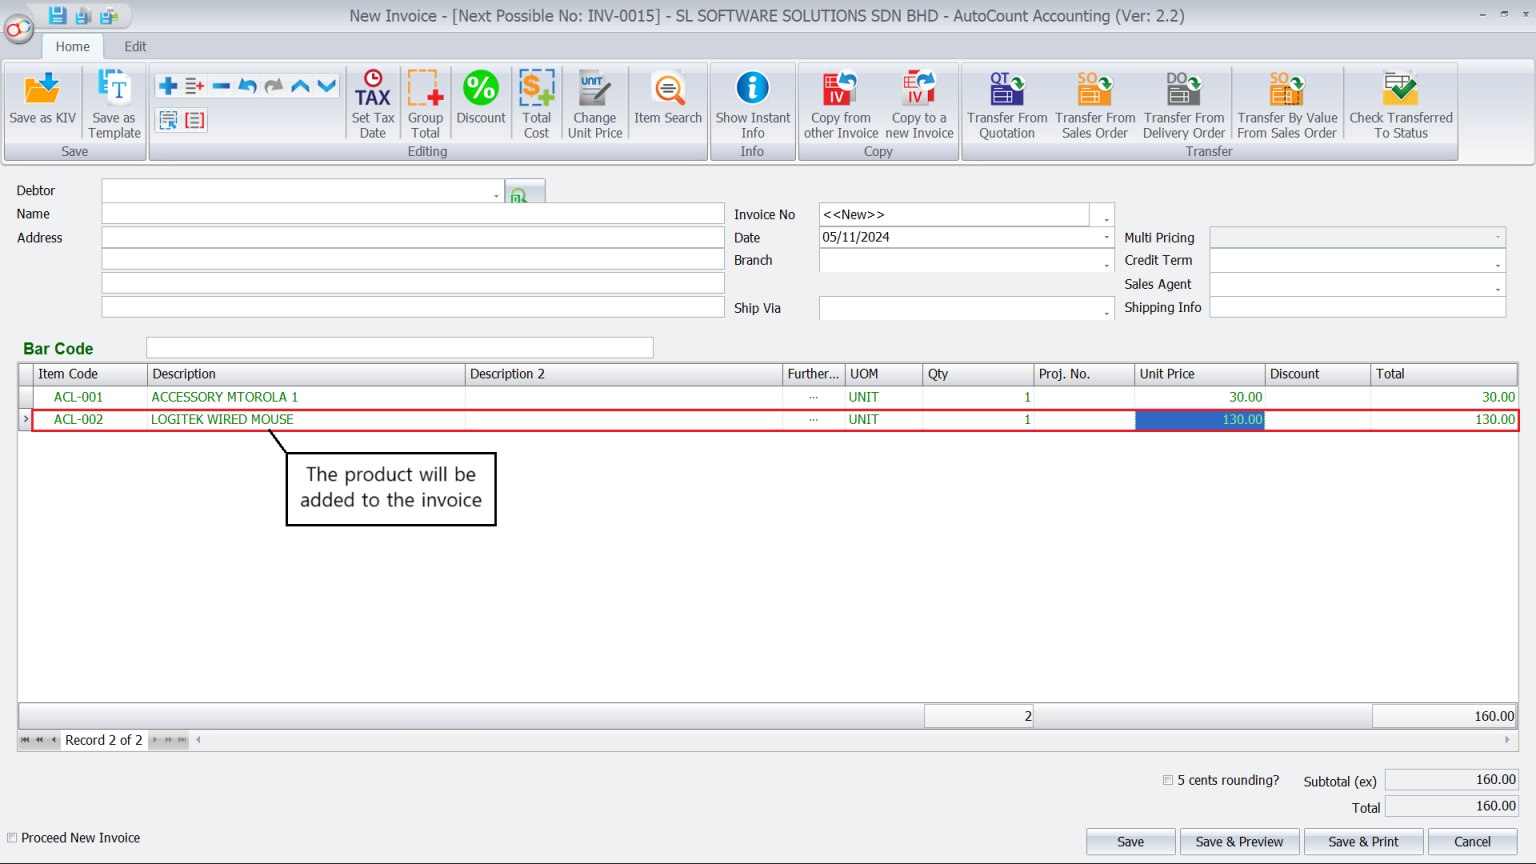
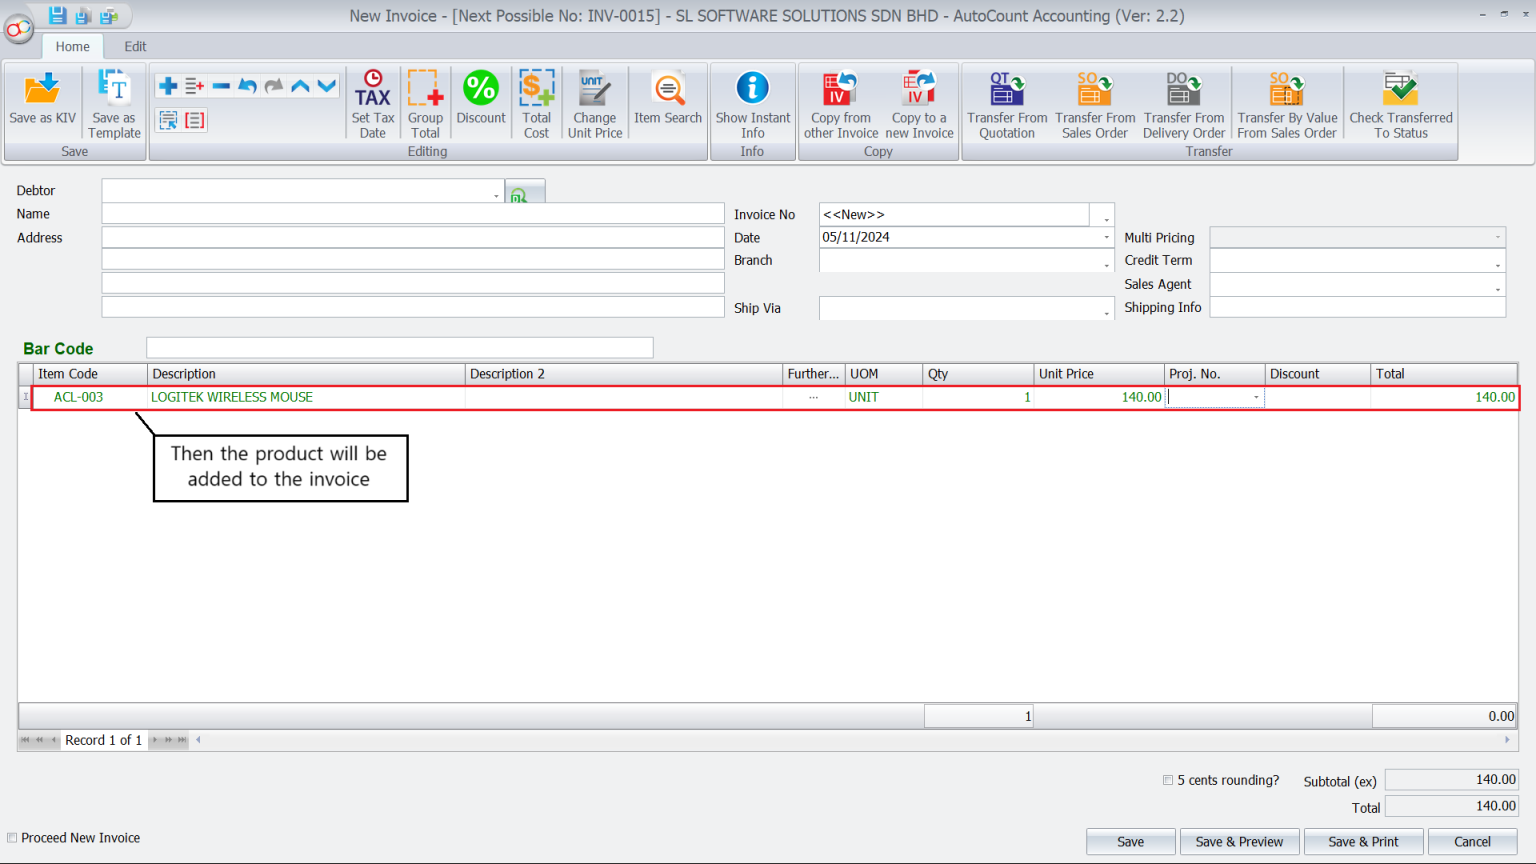
2. Scan the Barcode
- Secondly, use your scanner to input the barcode in the designated barcode field.
- The system will automatically retrieve the product associated with the barcode and add it to the invoice.
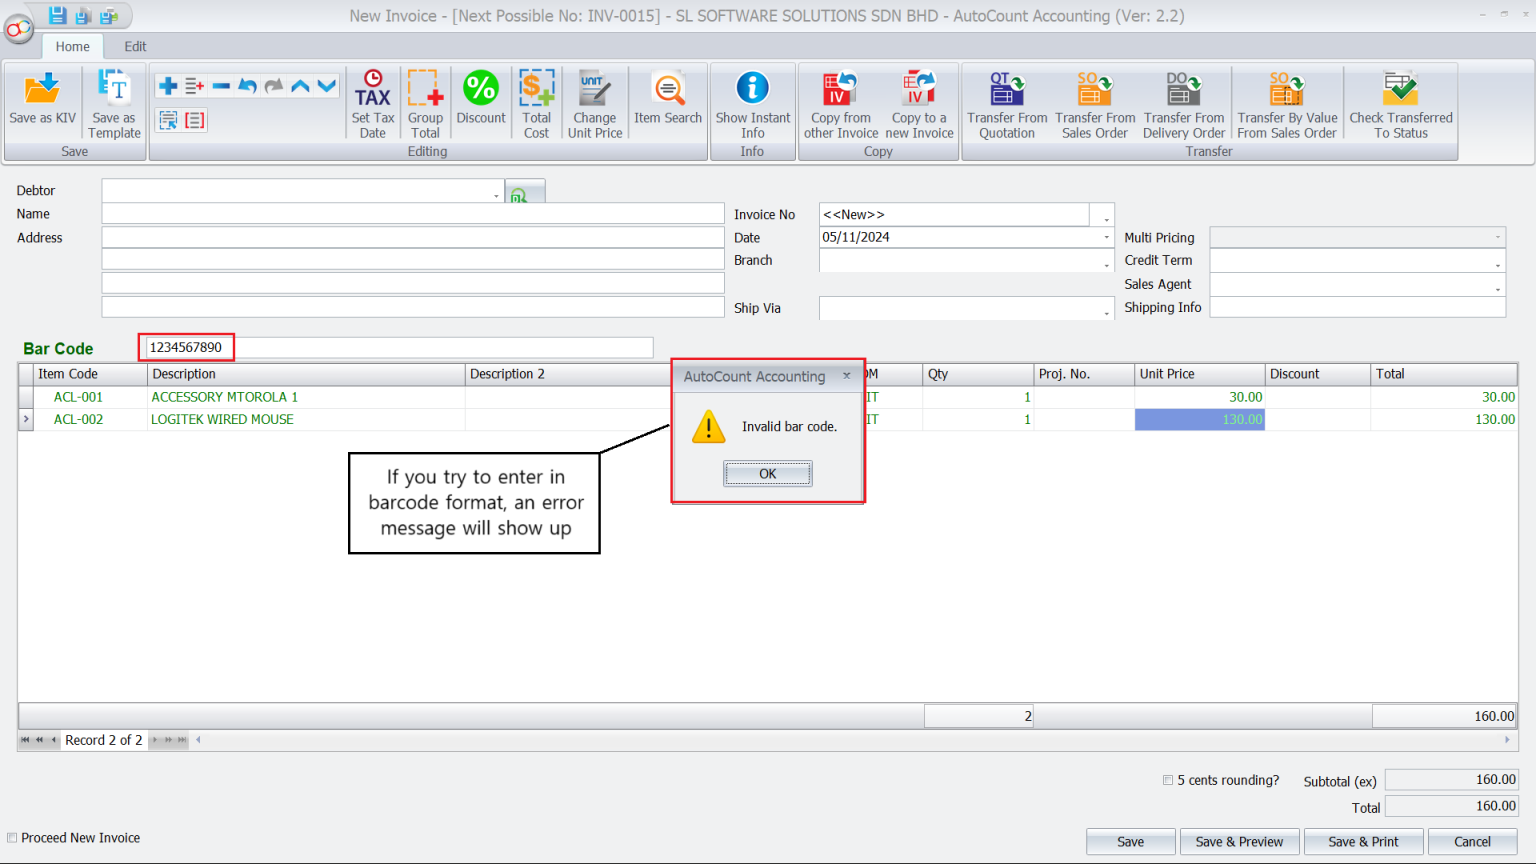
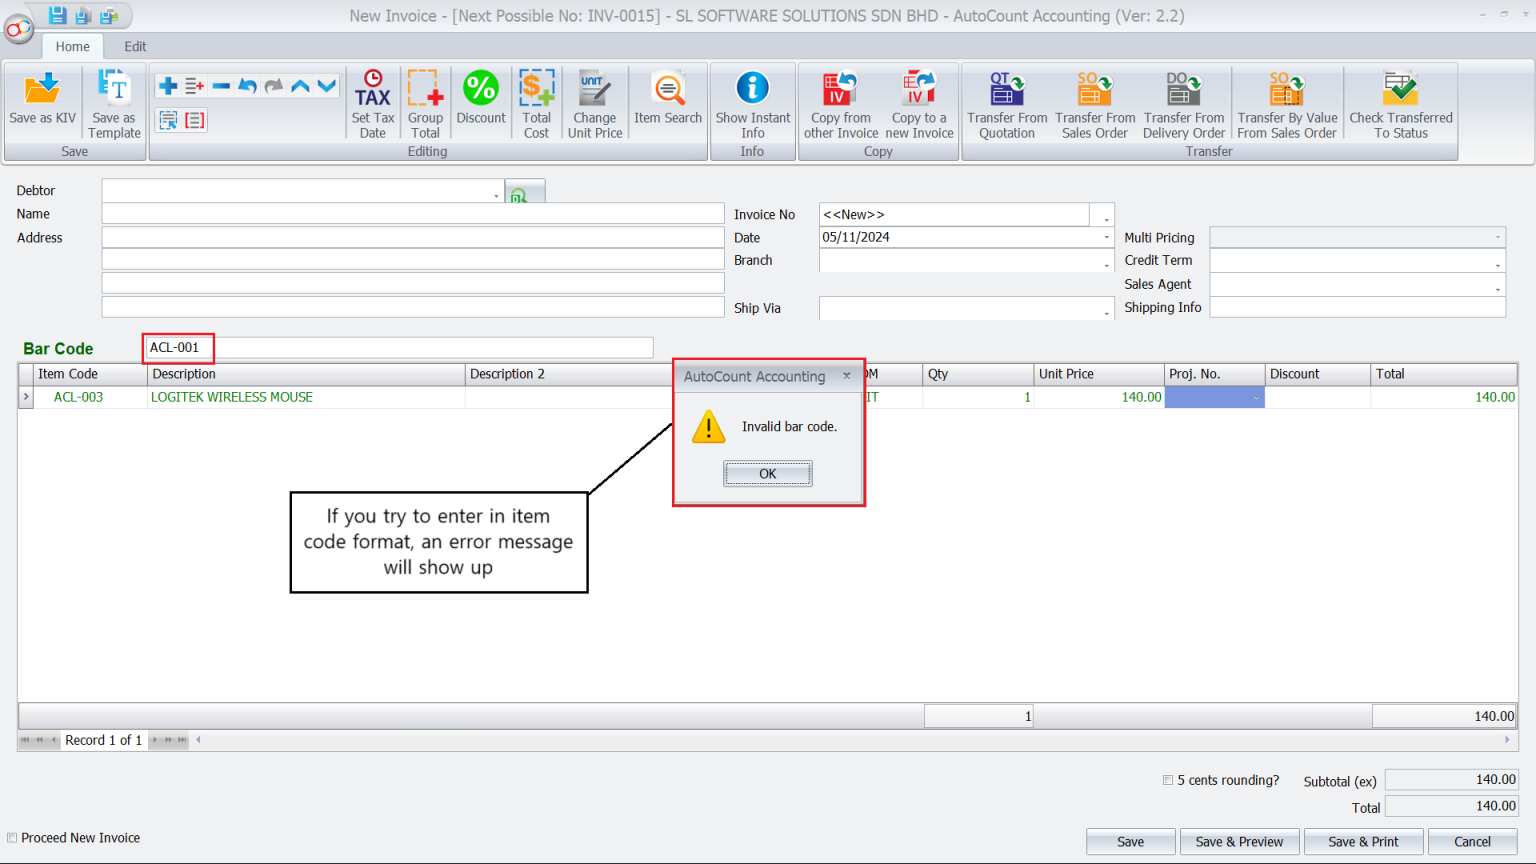
3. Check for Incorrect Entries
- Thirdly, if an invalid barcode is entered, AutoCount will notify you with an error message.
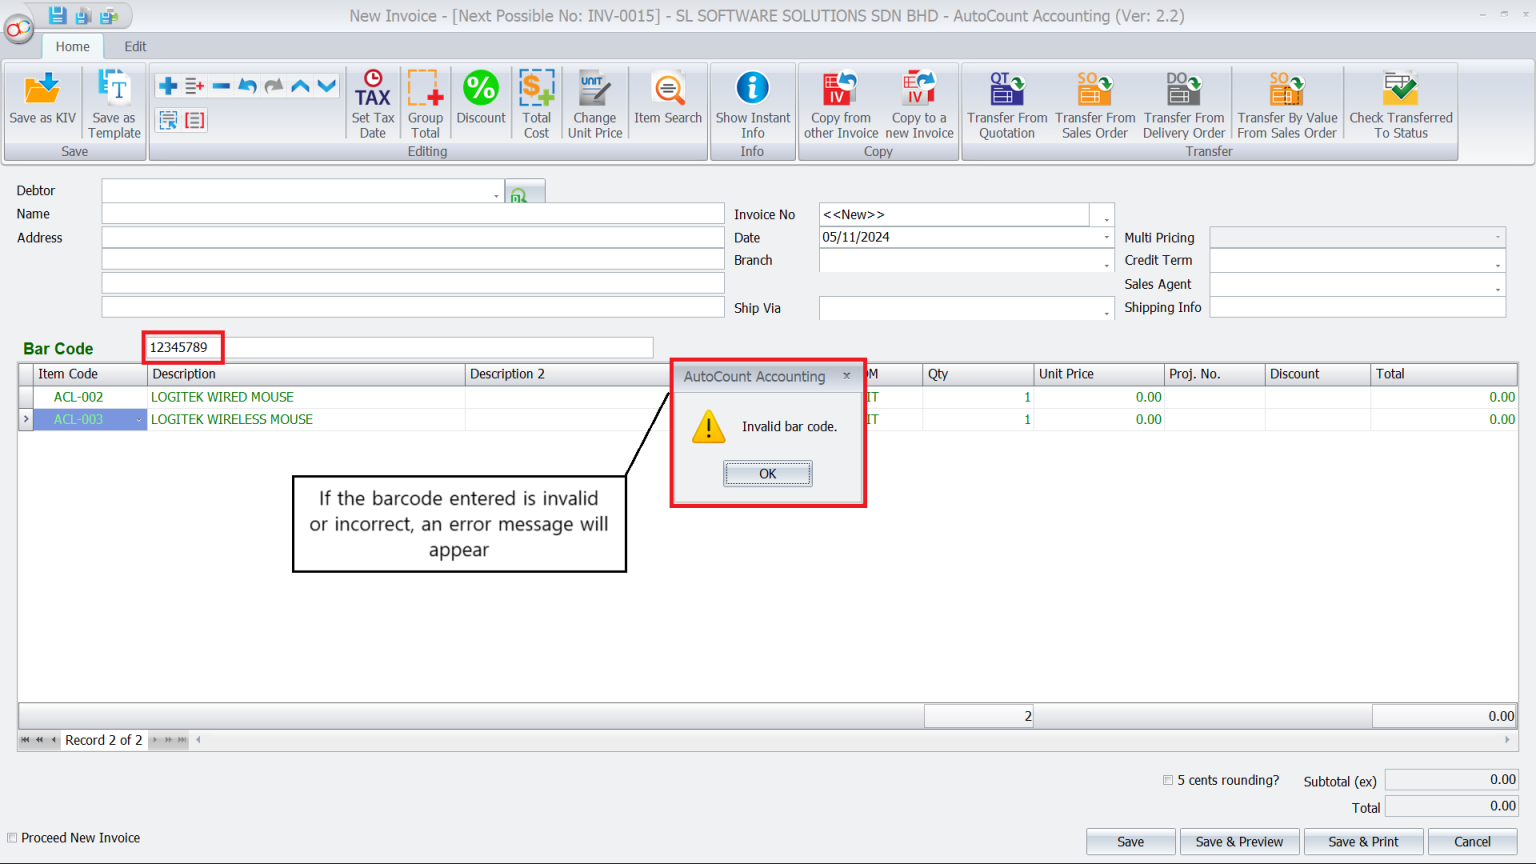
Handling Incorrect Barcode Entries
AutoCount provides an immediate notification if an incorrect barcode is scanned. Simply double-check the barcode or manually enter the correct barcode or item code if necessary.

Advanced Features and Configurations
AutoCount offers several advanced barcode configurations to tailor the feature to your specific requirements:
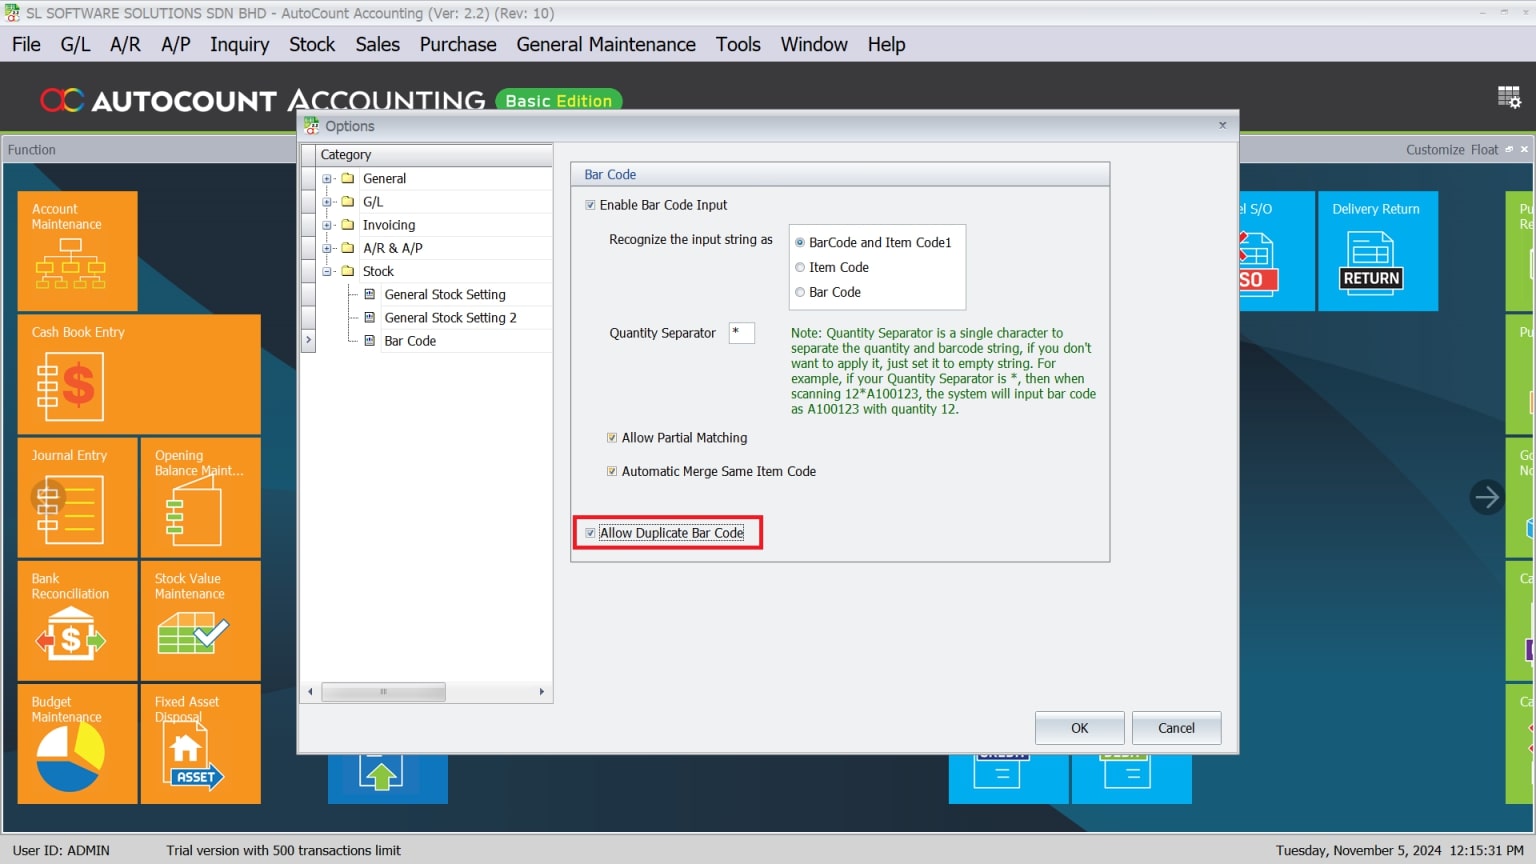
Input Recognition Options
AutoCount allows you to specify whether the system recognizes barcodes, item codes, or both.
To configure:
a. Navigate to Tools > Options > Stock > BarCode
b. Choose the Recognition Mode
- Select BarCode & ItemCode1 to allow the system to recognize both.

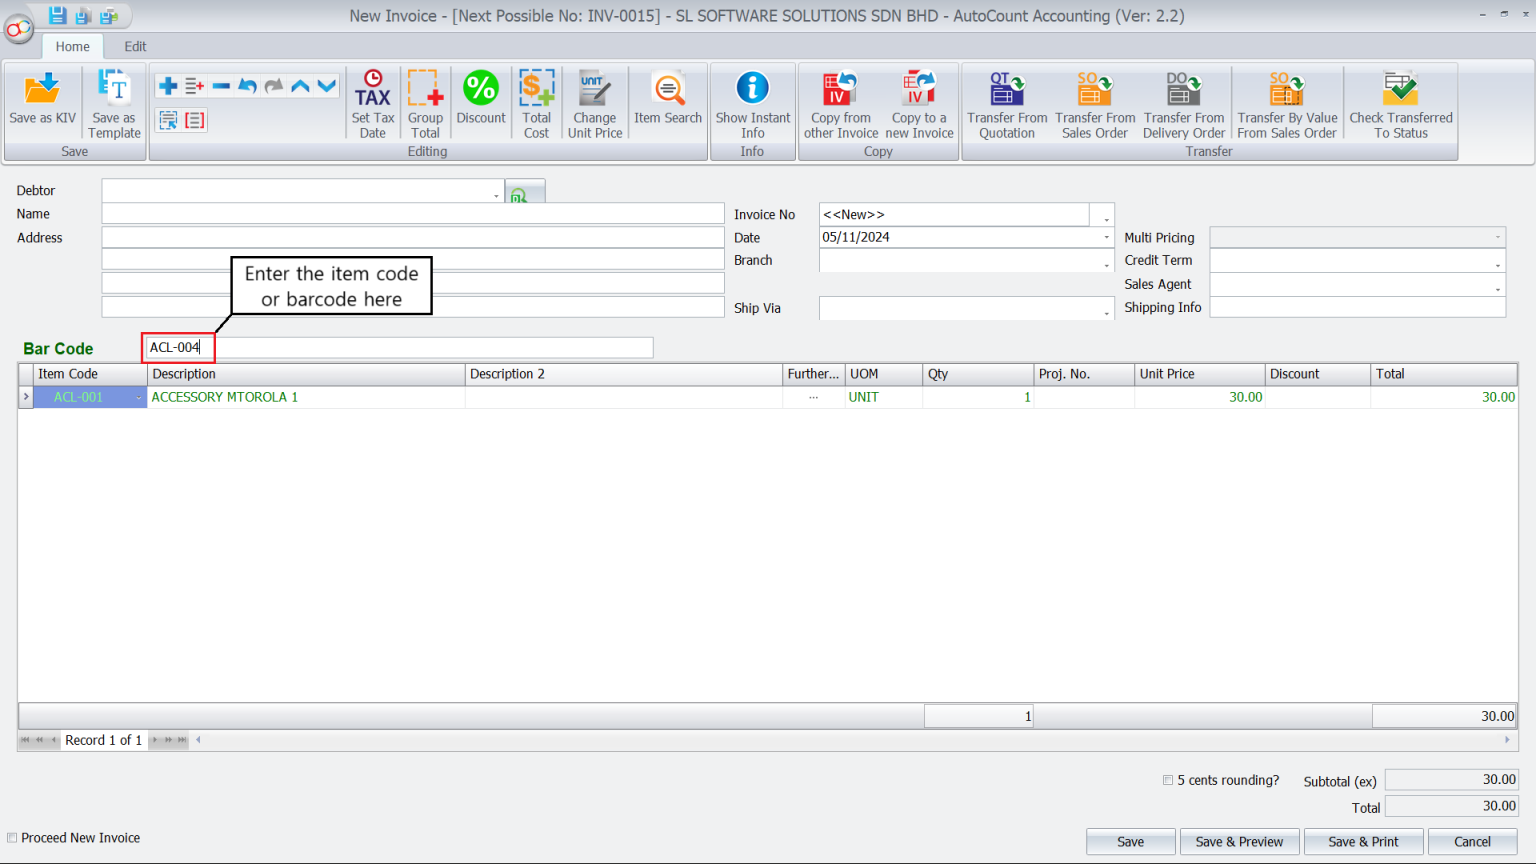
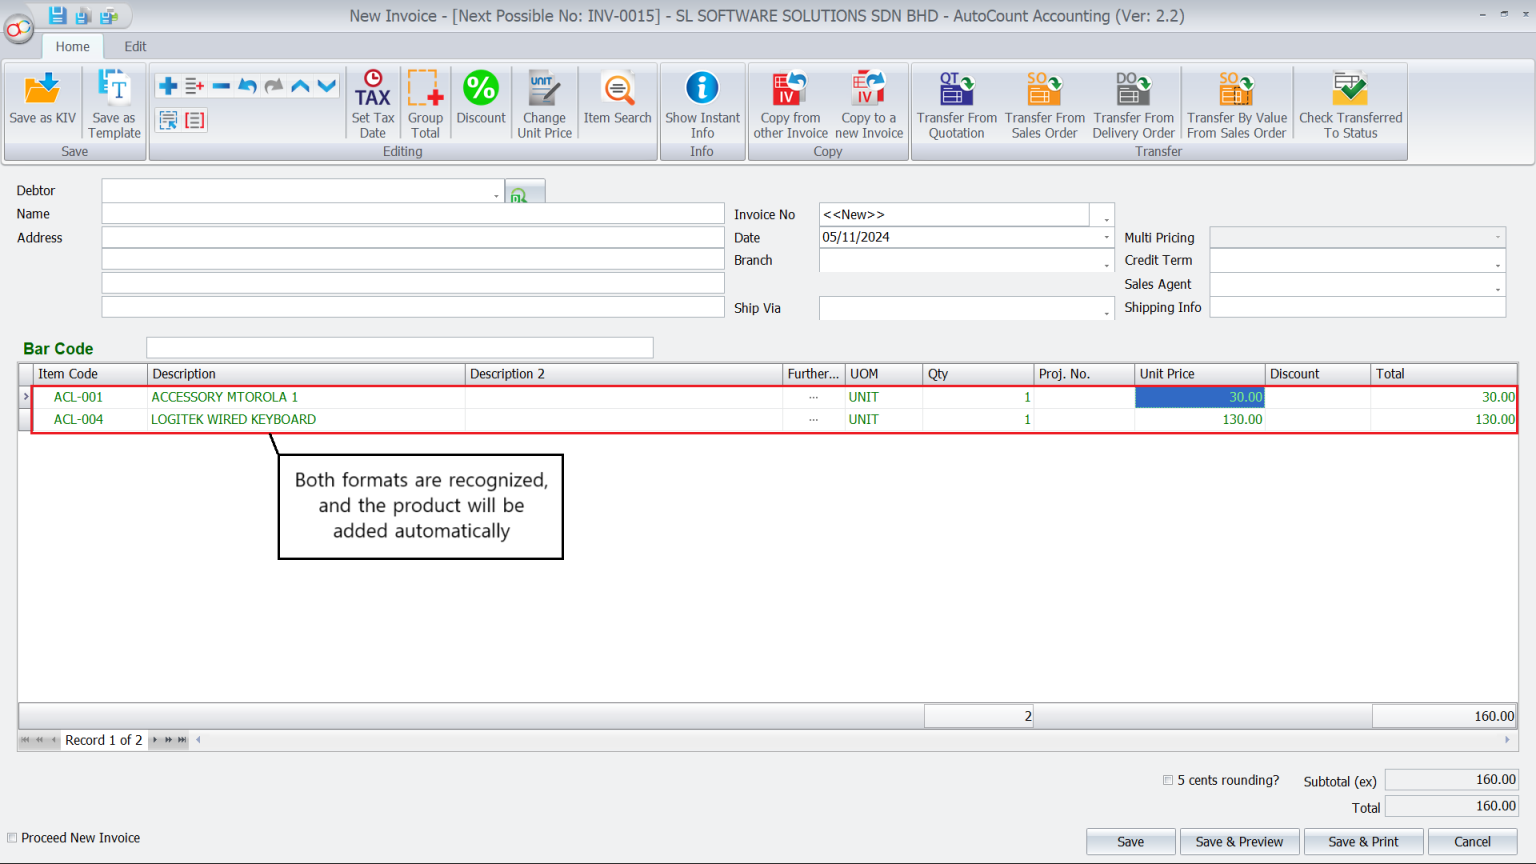
- Choose Item Code for item codes only.
- Select BarCode for barcode-only recognition.
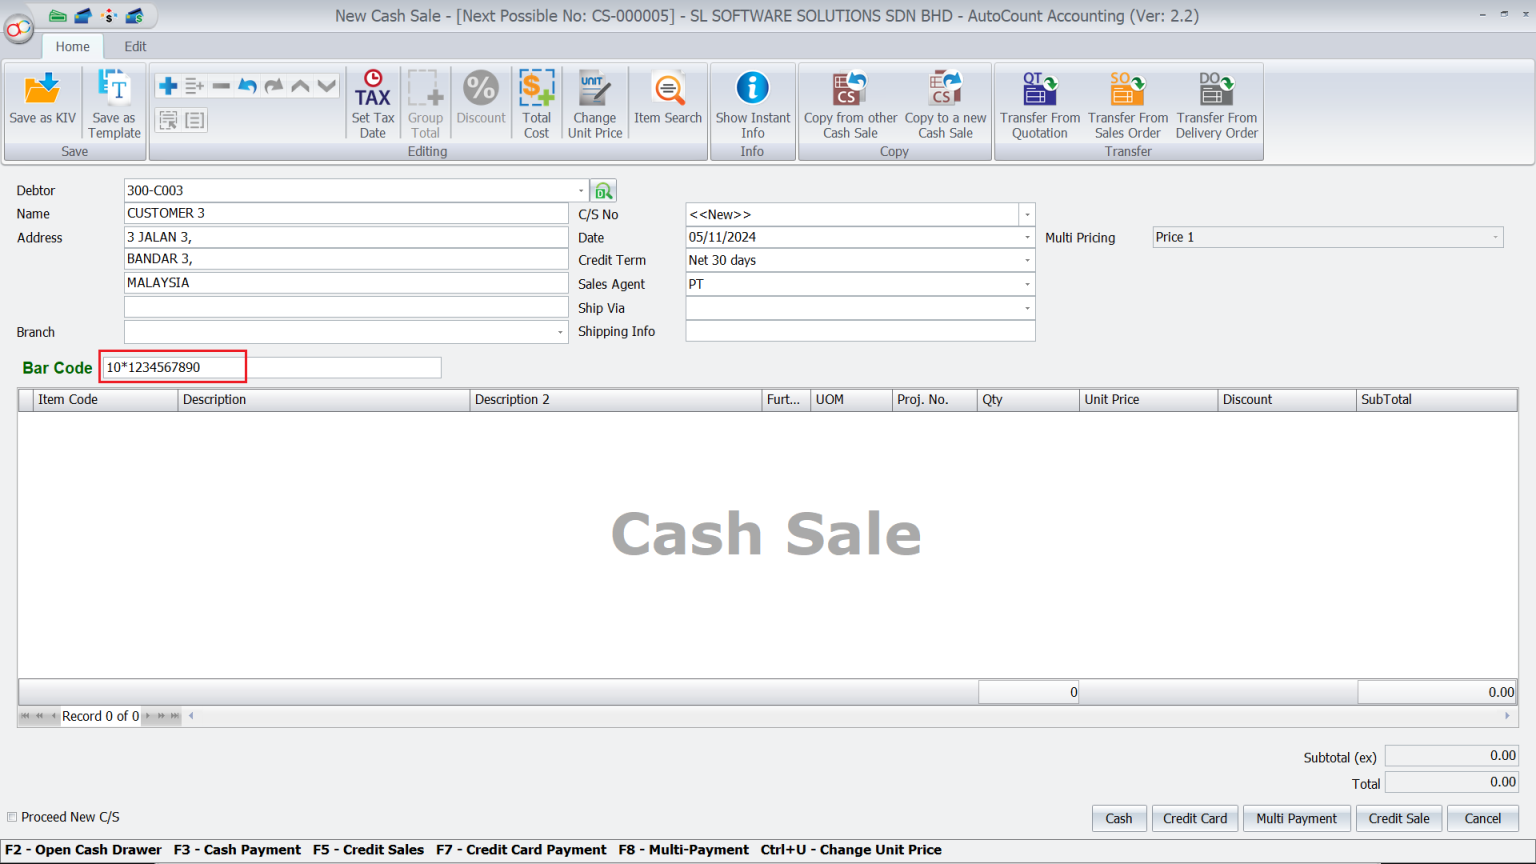
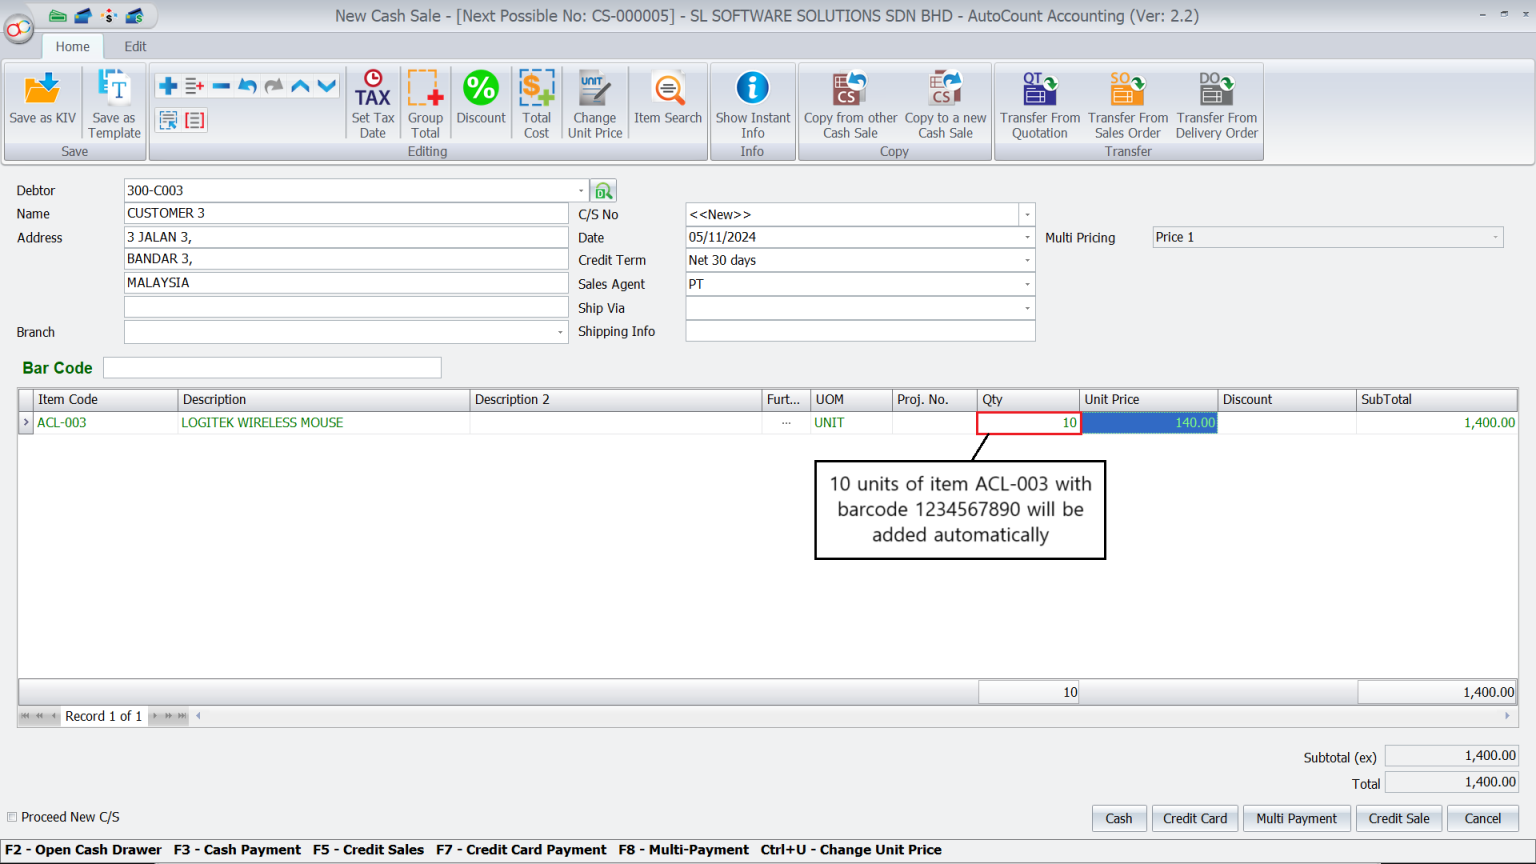
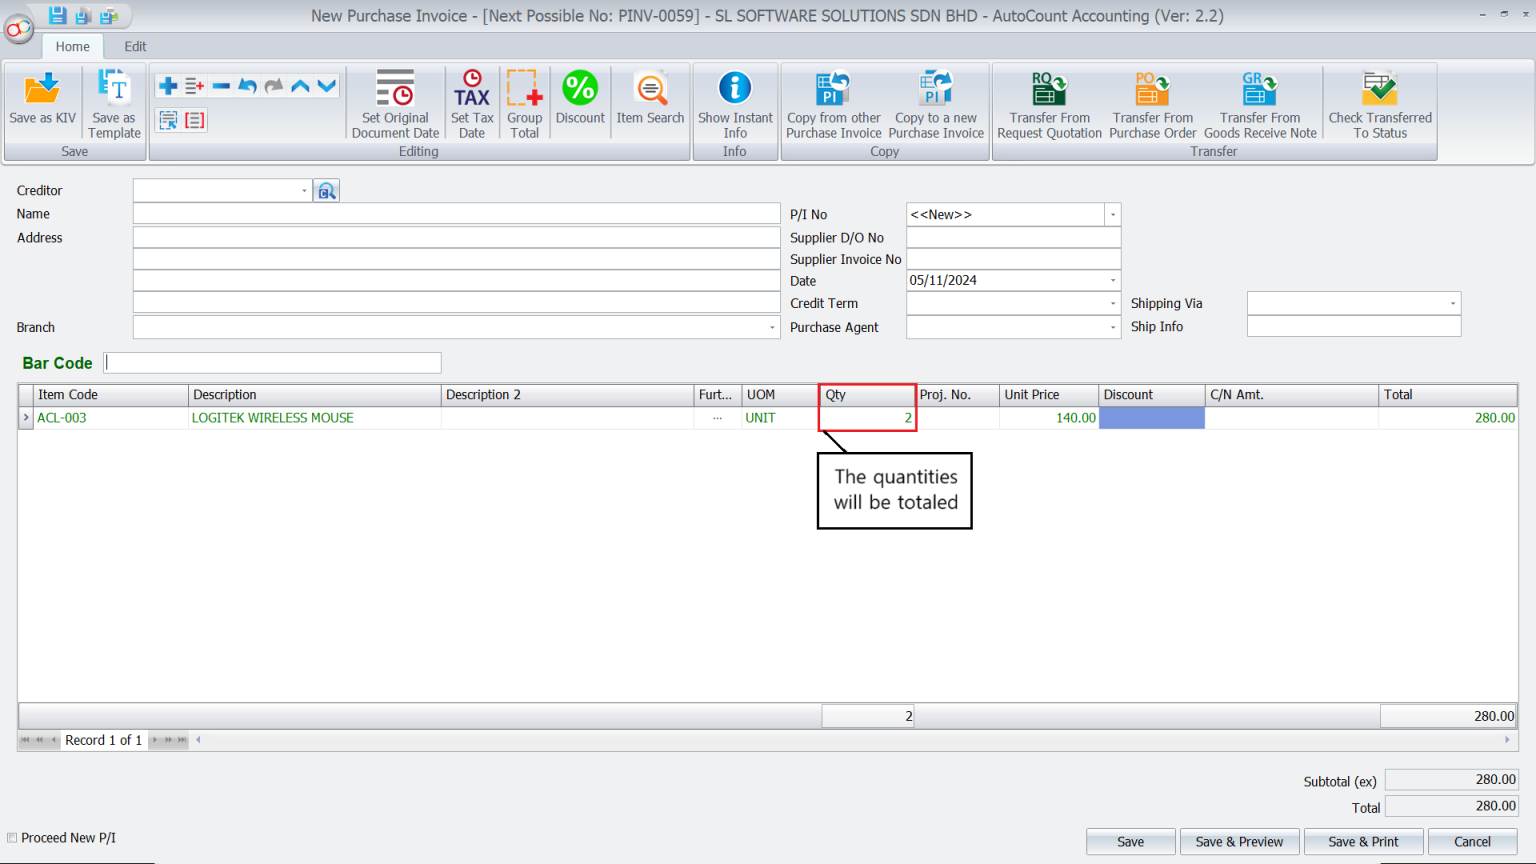
Quantity Separator Function
This function enables users to scan a specified number of items at once:
a. Navigate to Tools > Options > Stock > BarCode
b. Set Quantity Separator
- Input a symbol (e.g., an asterisk “*”) to denote quantity.
- For instance, scanning 10*123456789 will enter 10 units of the item with barcode 123456789.

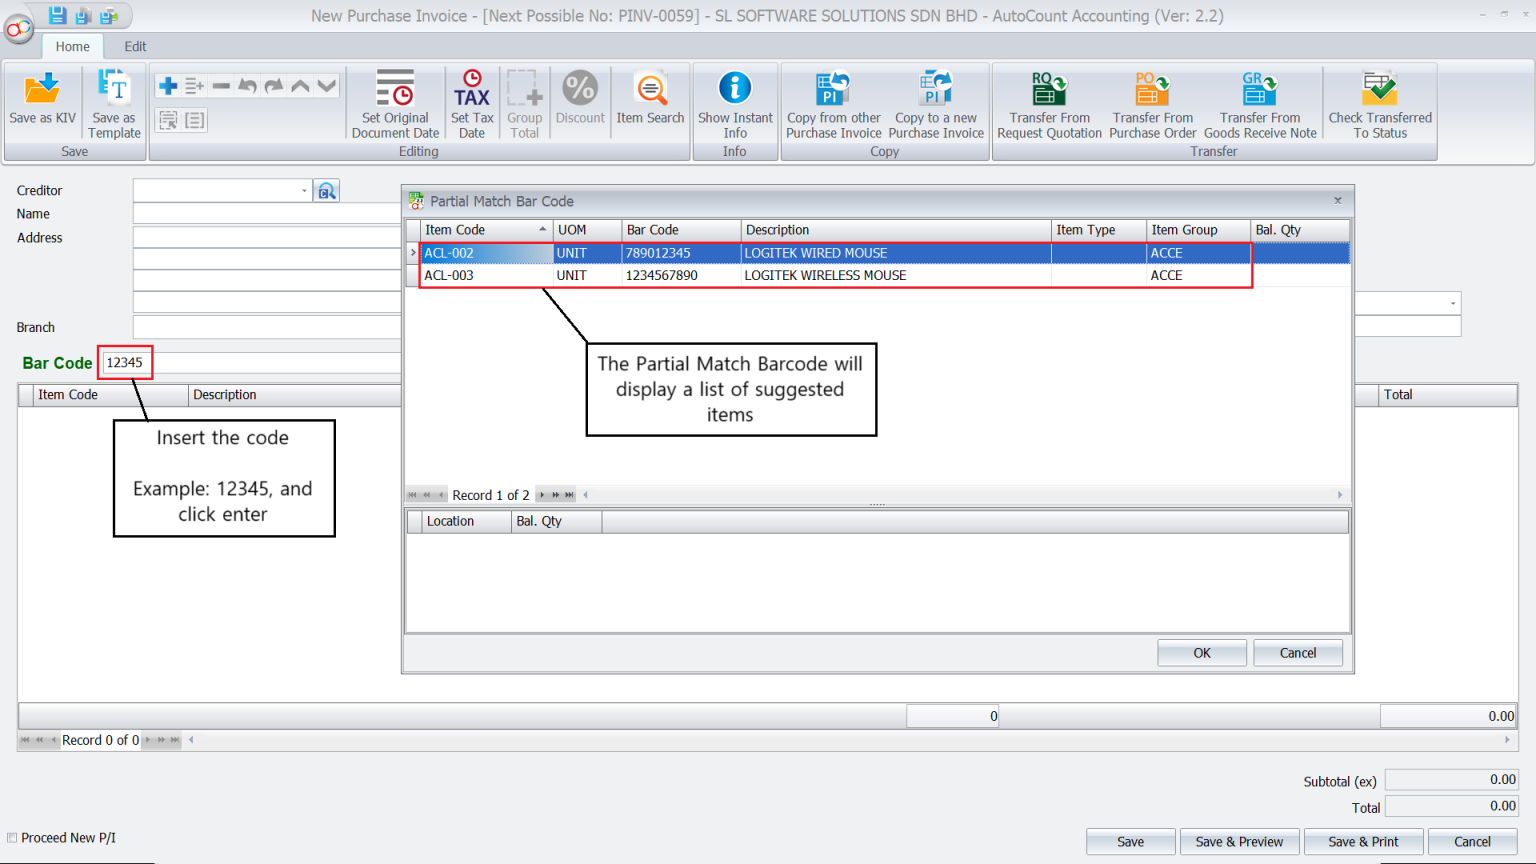
Allow Partial Matching
Partial matching allows users to enter only a part of the barcode and view matching results:
a. Navigate to Tools > Options > Stock > BarCode
b. Enable Partial Matching
- Check the box Allow Partial Matching and click OK.
- Test it by entering a portion of the barcode to see suggested items.
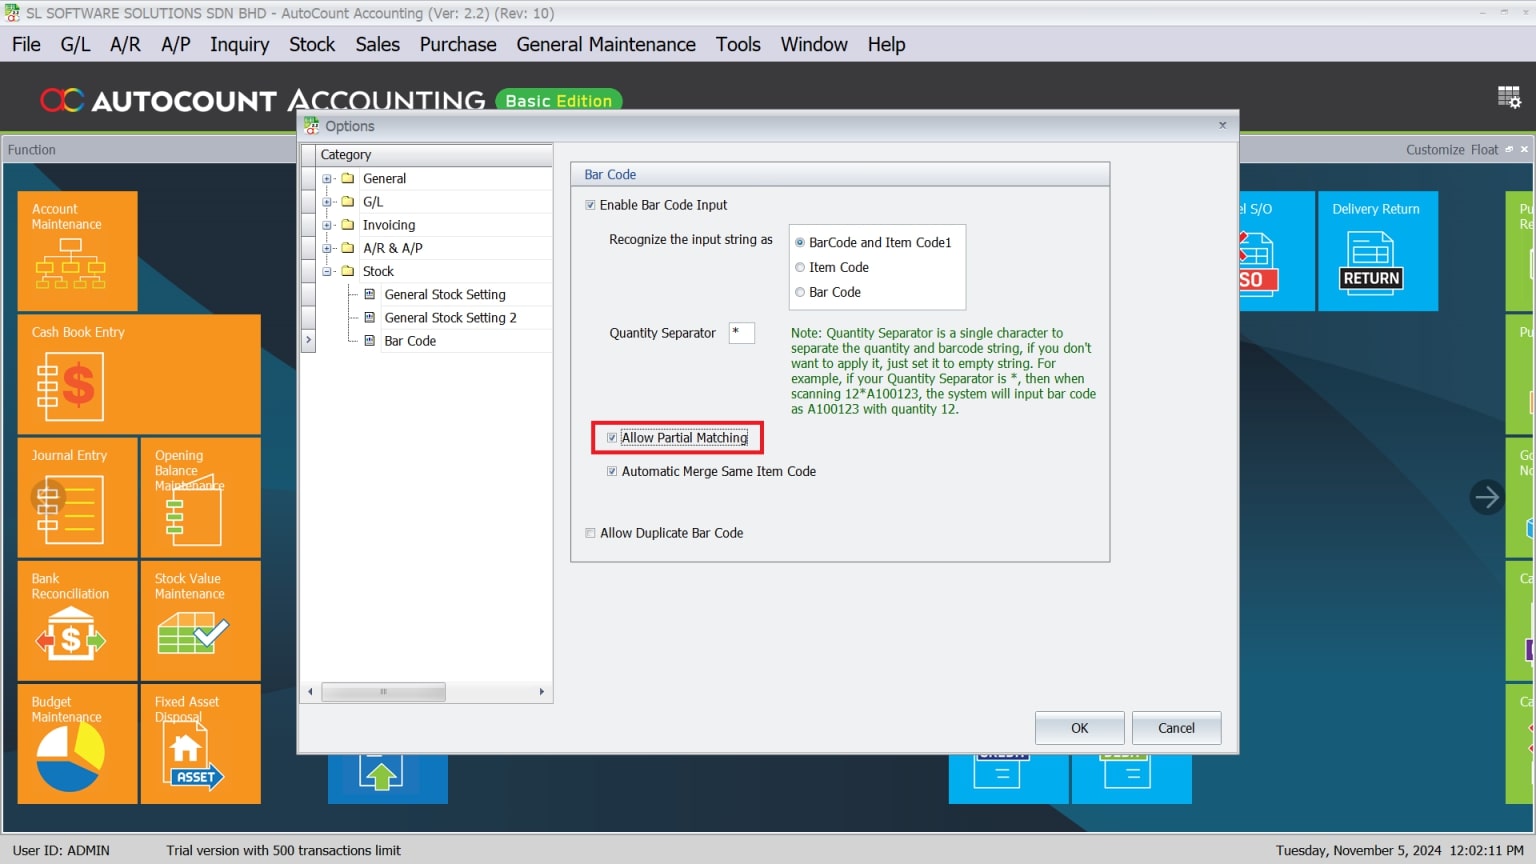
Automatic Merge of Same Item Code
Automatically merge identical items to prevent duplicates:
a. Navigate to Tools > Options > Stock > BarCode
b. Enable Automatic Merge
- Check the box for Automatic Merge Same Item Code and click OK.

Allow Duplicate Barcode
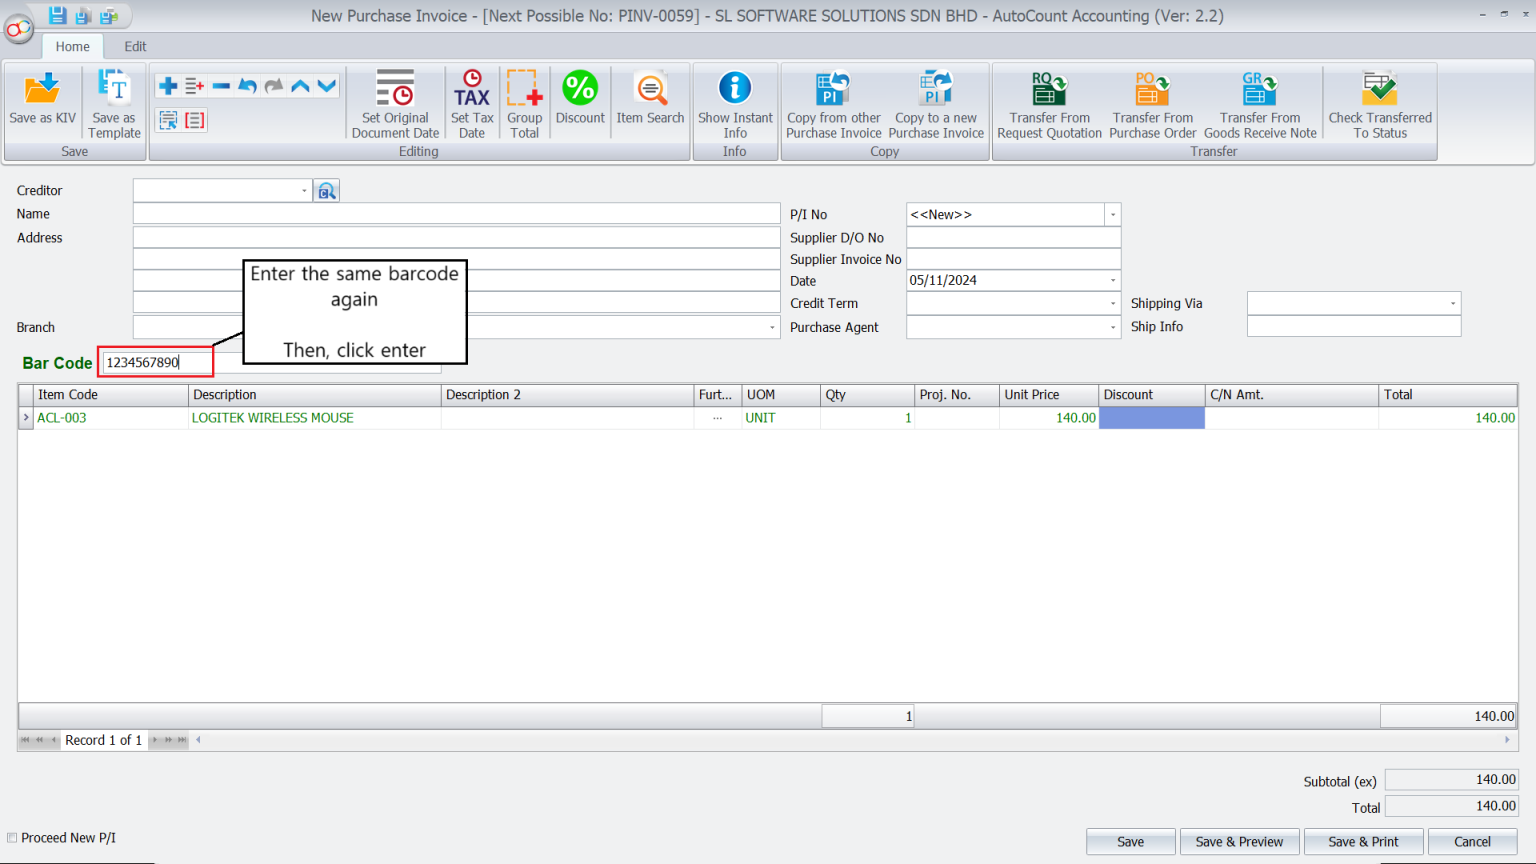
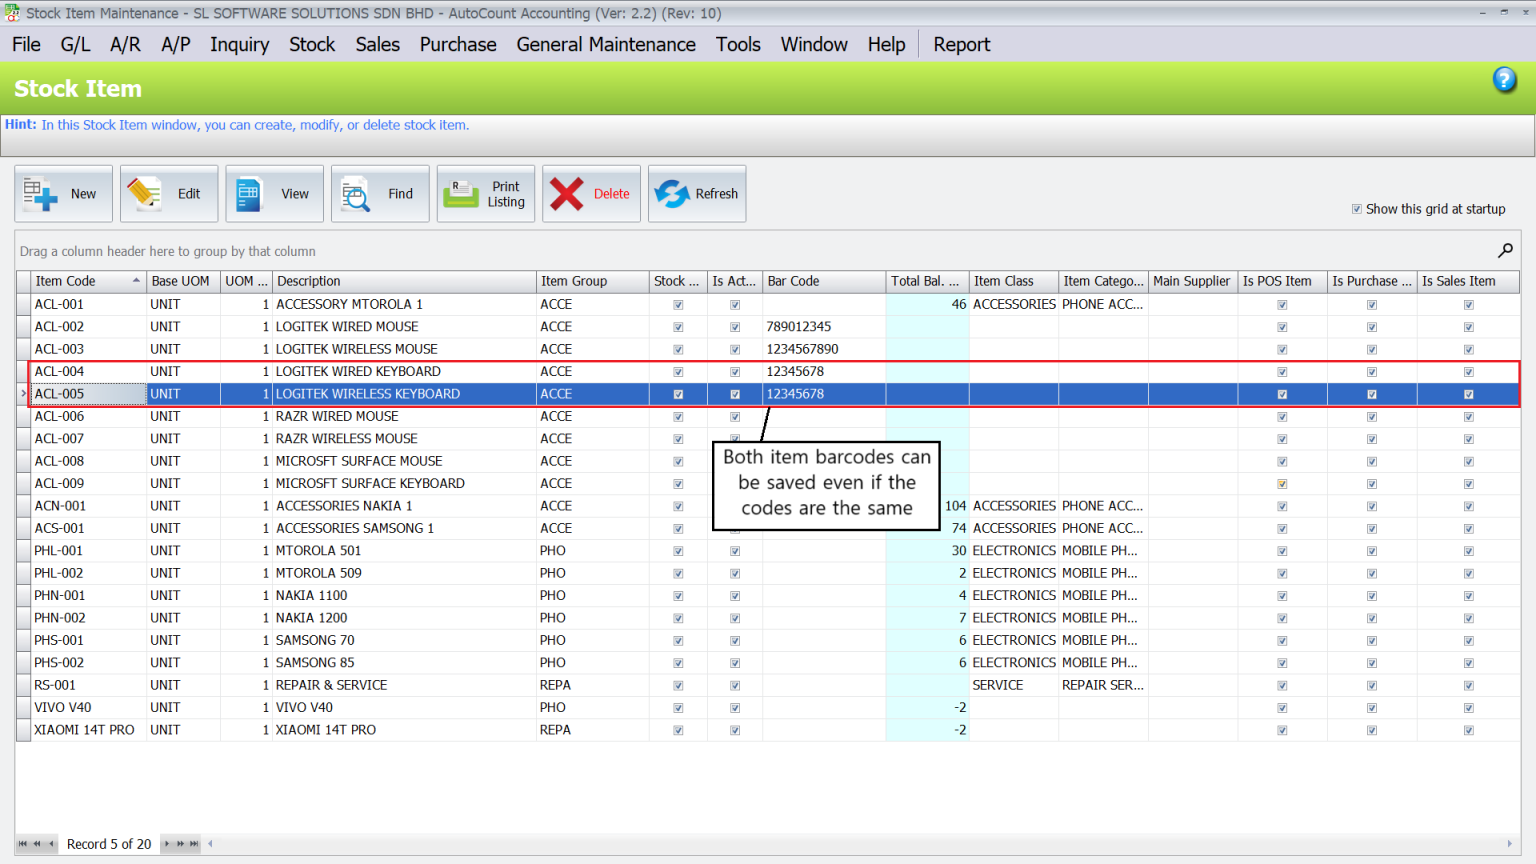
Allow the same barcode to be used across multiple items:
a. Navigate to Tools > Options > Stock > BarCode
b. Enable Duplicate Barcodes
- Check the box for Allow Duplicate Barcode and click OK.
Troubleshooting Common Issues
Conclusion
Barcode scanning in AutoCount Accounting 2.0 enhances operational efficiency, reducing errors and simplifying inventory processes. By configuring settings to align with your specific needs, businesses can leverage AutoCount’s advanced features for optimized stock management and seamless invoicing.
Frequently Asked Questions
Can I use both item codes and barcodes?
Yes, you can configure the system to accept both barcodes and item codes.
What should I do if my scanner doesn’t read the barcode?
Ensure your scanner is compatible and correctly configured. Refer to the scanner’s manual if issues persist.
Can I partially enter barcodes for items?
Yes, with partial matching enabled, you can enter a segment of the barcode to locate matching items.
Is there a way to merge identical items automatically?
Yes, by enabling the automatic merge function, identical items will be consolidated in invoices.
Can the same barcode be used for different items?
Yes, by enabling the “Allow Duplicate Barcode” setting, you can assign the same barcode to multiple items.
Interested in Getting AutoCount for your Business?
Contact our sales team today to explore pricing options and get started with the perfect solution for you.