-
AutoCount Accounting Features
-
- Approval Workflow
- Audit Trail
- Auto Save in Draft Folder
- AutoCount Contra Account
- AutoCount License Setting Guide
- Deposit Tracking & Management
- Documents Numbering Format
- Full Transfer and Partial Transfer
- Import Data to AutoCount Accounting Using Excel
- Informative Charts and Analytical Data
- Layout Customization
- Multi Pricing
- Sales and Services Tax
- Schedule Backup
- Search Lookup Edit
- View Documents Flow
- AutoCount Feature Stock Take
- Column Chooser
- Show Remaining (3) Collapse
-
AutoCount Cloud Accounting
-
AutoCount E-Invoice
-
AutoCount HRMS User Guide
-
AutoCount Modules
-
- Activity Stream
- Advanced Financial Report
- Advanced Item
- Advanced Multi-UOM
- Advanced Quotation Module
- Basic Multi-UOM
- Budget Module
- Consignment
- Filter By Salesman
- FOC Quantity
- Formula
- Item Batch
- Item Package
- Landing Cost
- Multi-Currency
- Multi-Dimensional Analysis
- Multi-Location
- Project Account
- Recurrence
- Remote Credit Control Module
- Stock Assembly
- User Defined Fields (UDF)
- AutoCount SST Hidden Functions
- AutoCount SST Submission - Service Tax
- AutoCount Scripting Module User Guide
- AutoCount Bonus Point Module User Guide
- Show Remaining (11) Collapse
-
AutoCount Plugins
-
- Fixed Assets Management
- Goldsmith
- TD Ordering Mobile Apps
- TD Stock Mobile Apps
- Universal Import Plugin
- DMS Import Plugin
- AutoCount Item Scope Plugin
- AutoCount Easy Knock Off Plugin
- AutoCount Pick List Plugin User Guide
- AutoCount Agent Validation Plugin User Guide
- AutoCount Barcode Generator Plugin User Guide
- AutoCount Bill Remark Plugin User Guide
- AutoCount Easy Batch Number Entry Plugin User Guide
- AutoCount Recurring Invoice Plugin User Guide
- AutoCount Easy Photo 2.0 User Guide
- AutoCount Pain Tracker User Guide
- AutoCount Credit Memo Plugin User Guide
- Show Remaining (2) Collapse
-
- AutoCount Easy Recurrence Plugin
- AutoCount Recurring Billing Plugin
- Event Management System
- AutoCount To-Do List Plugin
- AutoCount AutoBank Reconciliation Plugin
- Intercompany Billing Plugin User Guide
- AutoCount Basket Plugin User Guide
- Lead Management 2.0 Plugin
- AutoCount Service Contract Plugin User Guide
- Autocount Repacking Plugin
- AutoCount Scale Barcode Plugin User Guide
- AutoCount Progressive Billing
- AutoCount Optical Plugin
- AutoCount Meter Reading Plugin User Guide
- AutoCount Car Tint Film Plugin
- AutoCount Leasing Plugin User Guide
- AutoCount Integrator Plugin
- AutoCount Procurement Planning Plugin
- Show Remaining (3) Collapse
-
-
Form Template
-
Report Template
-
- Advance Quotation
- Cash Sale
- Consignment
- Consignment Movement
- Credit Note
- Debit Note
- Delivery Order
- FOC Quantity Analysis By Document Report
- Invoice
- Item Package Sales Report
- Monthly Sales Analysis
- Outstanding Sales Order Listing
- Profit And Loss Of Documents
- Quotation
- Sales Agent Contribution Report
- Sales Order
- Top/Bottom Sales Ranking
- Show Remaining (2) Collapse
-
- Available Stock Status Report
- Expired Item Batch Listing
- Inventory Physical Worksheet
- Stock Adjustment
- Stock Aging Report
- Stock Assembly
- Stock Assembly Order
- Stock Balance By Location
- Stock Balance Report
- Stock Card Report
- Stock Disassembly
- Stock Issue
- Stock Item Profit Margin
- Stock Movement Report
- Stock Receive
- Stock Take
- Stock Transfer
- Stock Write Off
- Show Remaining (3) Collapse
AutoCount Accounting: License Setting Guide
Introduction to AutoCount License
Setting up the AutoCount License is a crucial step in ensuring that your AutoCount Accounting software functions correctly. In this guide, we'll walk you through the steps to add and configure your AutoCount license, including entering product details and connecting to the server.
Step-by-Step Guide to Configuring AutoCount License Settings
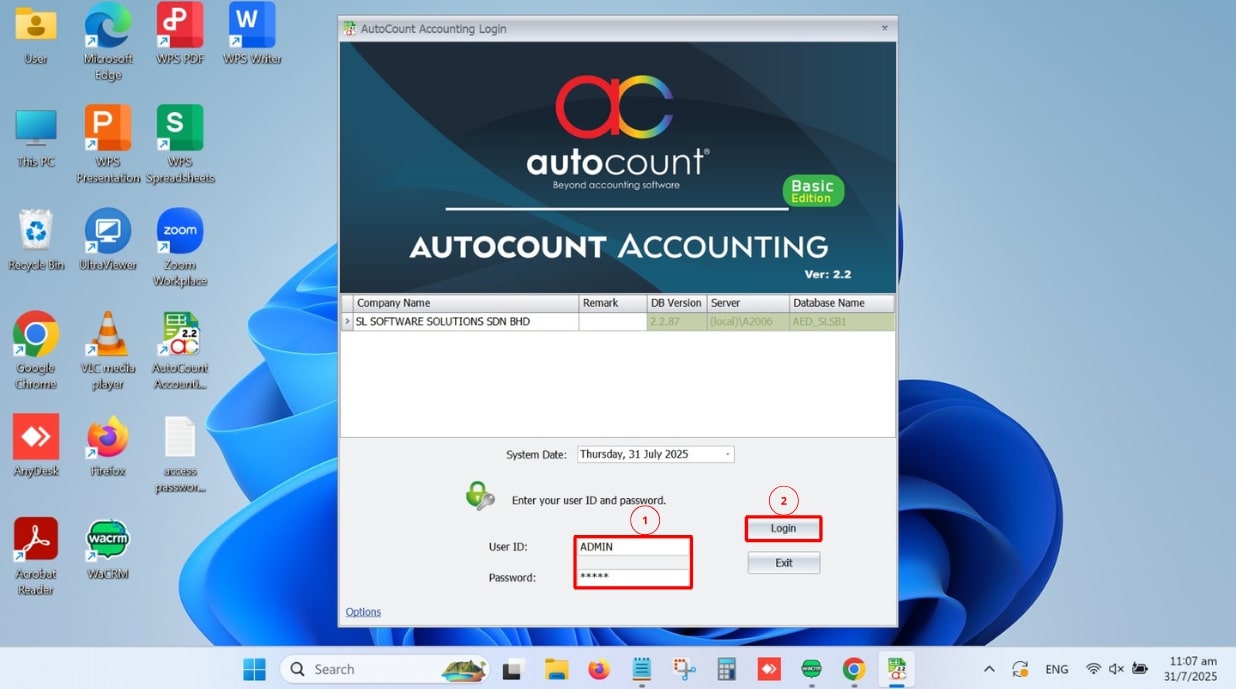
Step 1: Log in to AutoCount
Log in to your AutoCount account using your admin credentials.
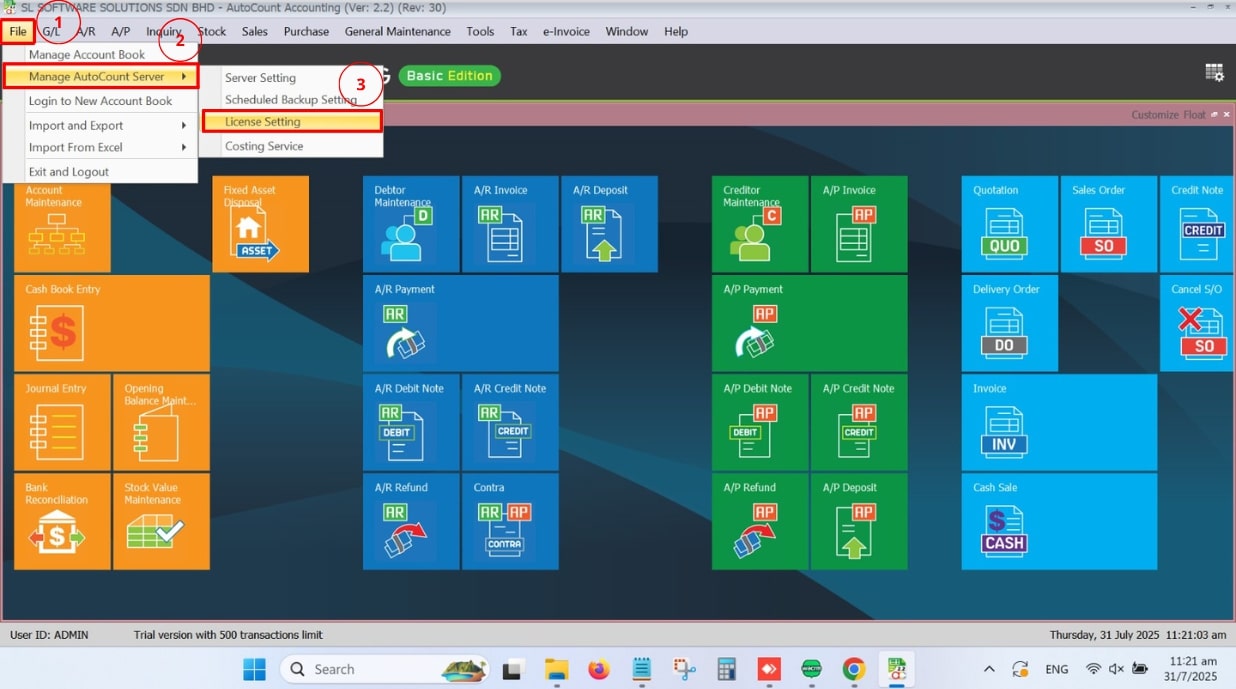
Step 2: Access License Settings
1. Once logged in, go to the File menu.
2. Select Manage AutoCount Server from the dropdown.
3. Click on License Setting
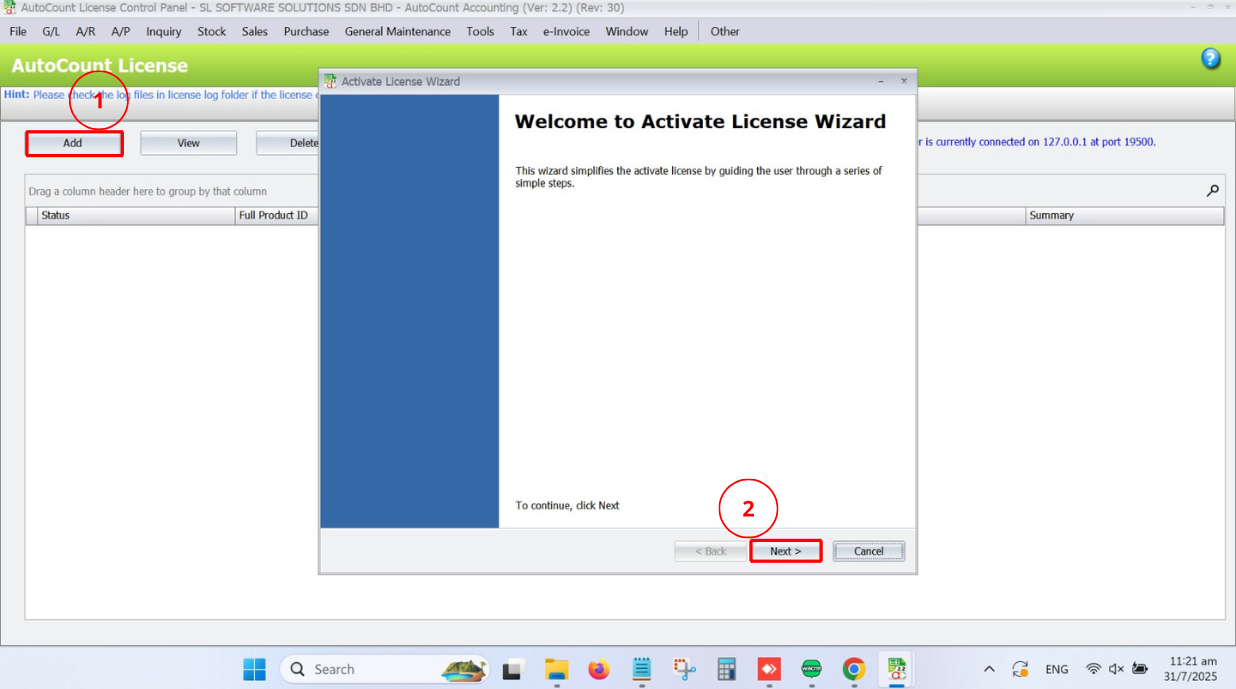
Step 3: Add New License
1. In the License Setting window, click the Add button.
2. A new window will pop up — click Next to continue.
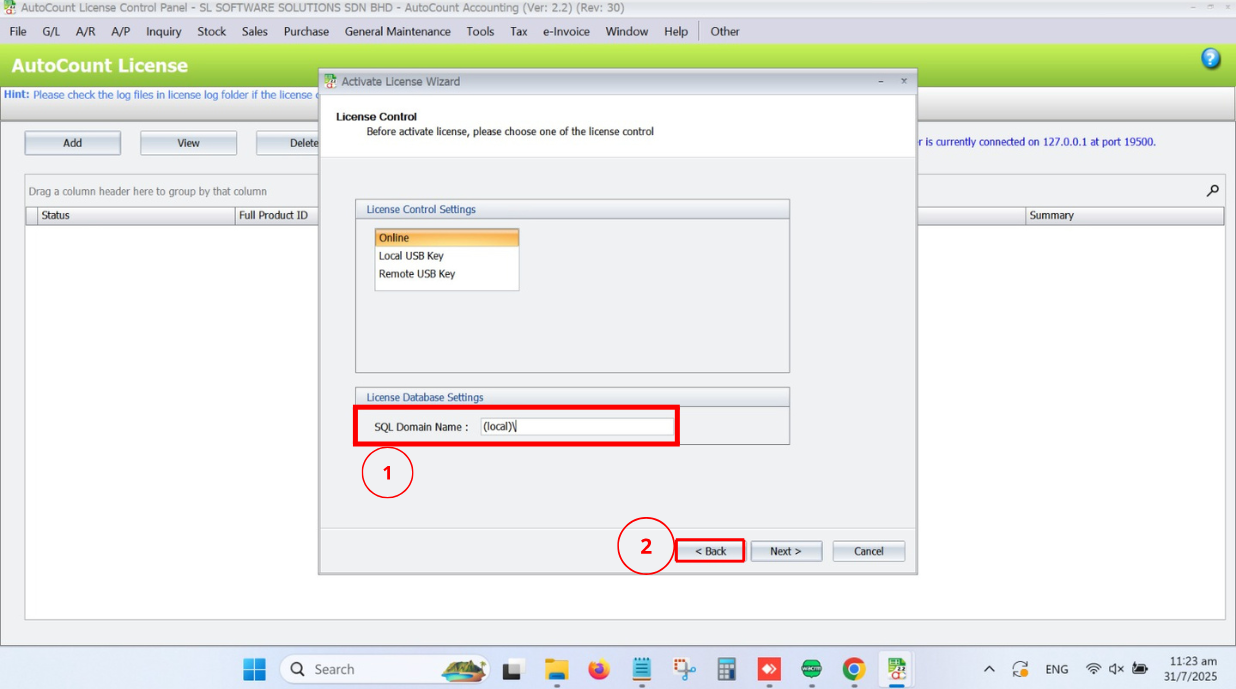
Step 4: Enter SQL Domain Name
1. Enter the SQL Domain Name as (local)\.
2. Click Next.
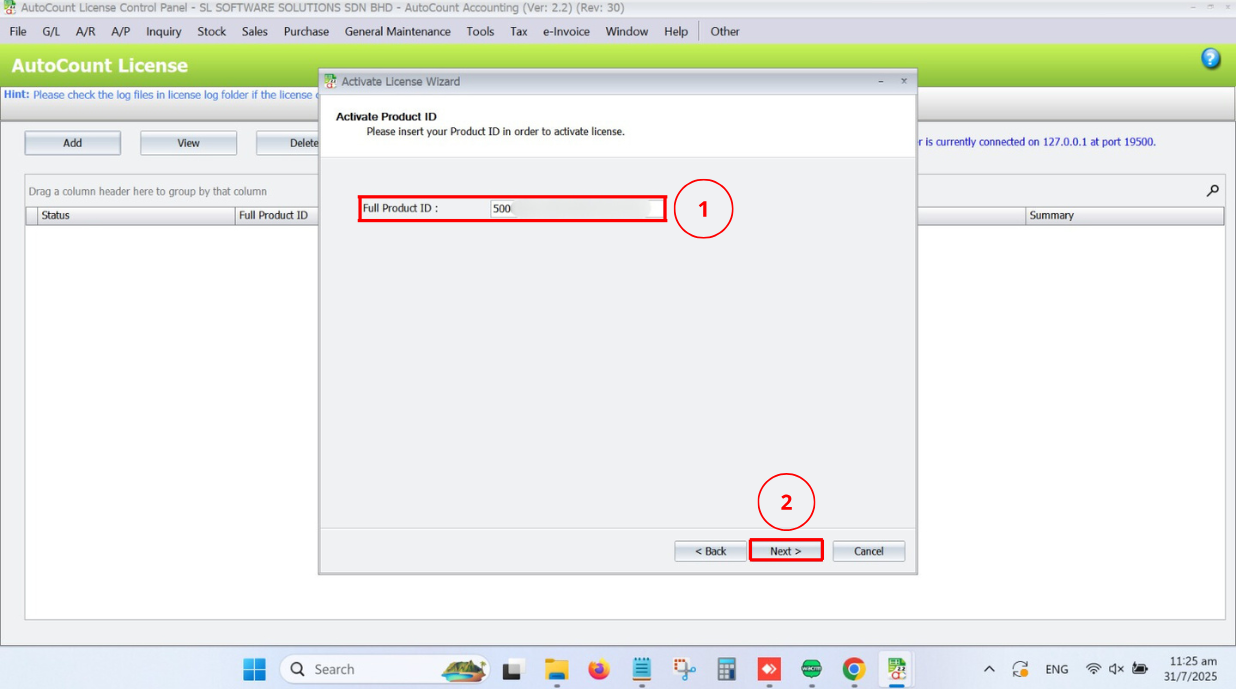
Step 5: Enter Full Product ID
1. Input your Full Product ID (provided by AutoCount Dealer).
2. Click Next.
Step 6: Complete License Activation
1. Once the information is filled in, click Finish to complete the license setup.
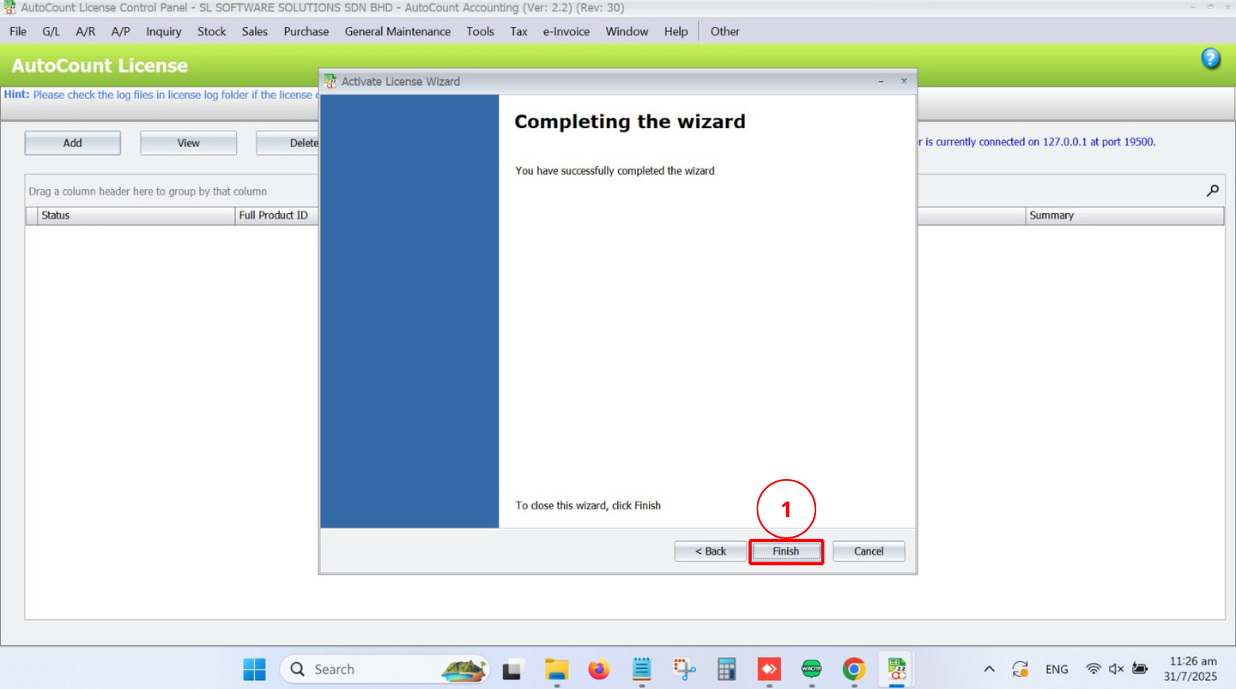
2. The following screen will prompt when u click Finish.
Conclusion
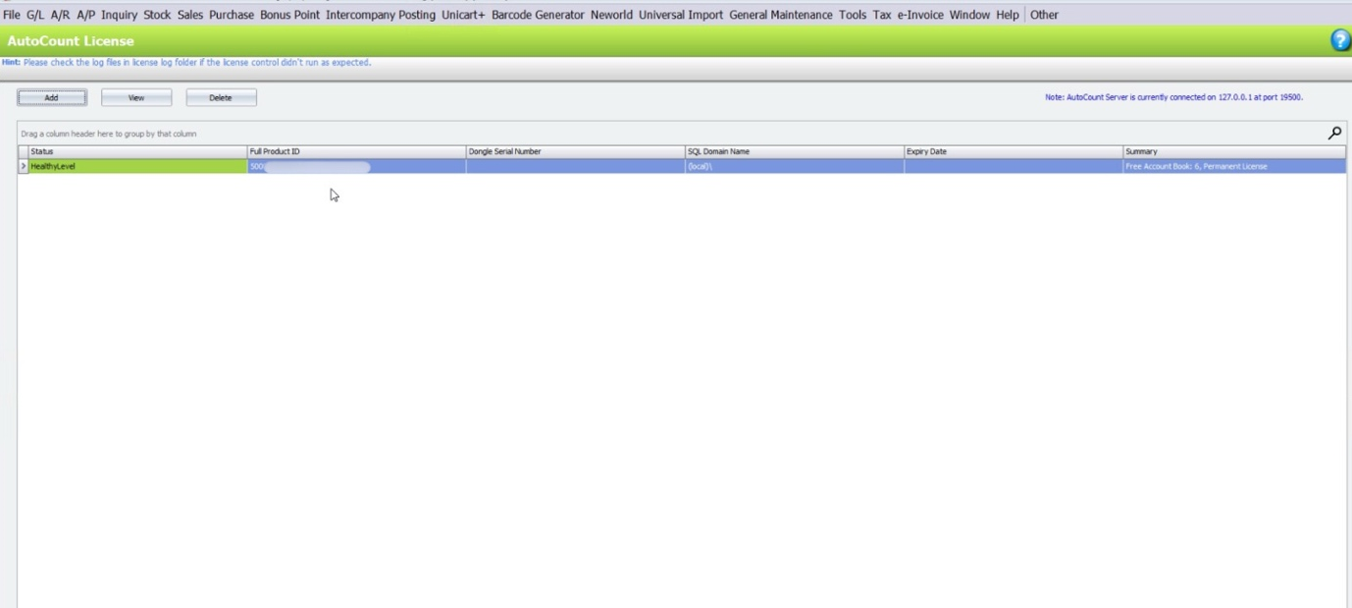
Activating and configuring the AutoCount license is essential for accessing all the features and functionalities of AutoCount Accounting. By following these simple steps, you can ensure that the software is legally registered and properly configured on your server. Keeping your license updated and correctly installed also helps with compliance, support eligibility, and uninterrupted service.
Frequently Asked Questions
What should I do if I get a license error?
Double-check that the SQL domain name and Product ID are entered correctly. If the issue persists, contact AutoCount support for assistance.
Can I transfer my AutoCount license to another server?
Yes, you can transfer your license to another server, but you may need to deactivate it on the current server first. Please reach out to AutoCount support for assistance with the transfer process.
How do I find my Product ID?
Your Product ID is provided upon purchase. If you can’t locate it, contact AutoCount support or refer to the email confirmation from your purchase.
Can multiple users manage the license settings?
No, only admin users have permission to manage license settings in AutoCount. Ensure that you are logged in with admin credentials to complete the setup.
What happens if my license expires?
Once your license expires, you will lose access to the full functionality of AutoCount. You will need to renew your license to continue using the software.
Interested in Getting AutoCount for your Business?
Contact our sales team today to explore pricing options and get started with the perfect solution for you.