-
AutoCount Accounting Features
-
- Approval Workflow
- Audit Trail
- Auto Save in Draft Folder
- AutoCount Contra Account
- AutoCount License Setting Guide
- Deposit Tracking & Management
- Documents Numbering Format
- Full Transfer and Partial Transfer
- Import Data to AutoCount Accounting Using Excel
- Informative Charts and Analytical Data
- Layout Customization
- Multi Pricing
- Sales and Services Tax
- Schedule Backup
- Search Lookup Edit
- View Documents Flow
- AutoCount Feature Stock Take
- Column Chooser
- Show Remaining (3) Collapse
-
AutoCount Cloud Accounting
-
AutoCount E-Invoice
-
AutoCount HRMS User Guide
-
AutoCount Modules
-
- Activity Stream
- Advanced Financial Report
- Advanced Item
- Advanced Multi-UOM
- Advanced Quotation Module
- Basic Multi-UOM
- Budget Module
- Consignment
- Filter By Salesman
- FOC Quantity
- Formula
- Item Batch
- Item Package
- Landing Cost
- Multi-Currency
- Multi-Dimensional Analysis
- Multi-Location
- Project Account
- Recurrence
- Remote Credit Control Module
- Stock Assembly
- User Defined Fields (UDF)
- AutoCount SST Hidden Functions
- AutoCount SST Submission - Service Tax
- AutoCount Scripting Module User Guide
- AutoCount Bonus Point Module User Guide
- Show Remaining (11) Collapse
-
AutoCount Plugins
-
- Fixed Assets Management
- Goldsmith
- TD Ordering Mobile Apps
- TD Stock Mobile Apps
- Universal Import Plugin
- DMS Import Plugin
- AutoCount Item Scope Plugin
- AutoCount Easy Knock Off Plugin
- AutoCount Pick List Plugin User Guide
- AutoCount Agent Validation Plugin User Guide
- AutoCount Barcode Generator Plugin User Guide
- AutoCount Bill Remark Plugin User Guide
- AutoCount Easy Batch Number Entry Plugin User Guide
- AutoCount Recurring Invoice Plugin User Guide
- AutoCount Easy Photo 2.0 User Guide
- AutoCount Pain Tracker User Guide
- AutoCount Credit Memo Plugin User Guide
- Show Remaining (2) Collapse
-
- AutoCount Easy Recurrence Plugin
- AutoCount Recurring Billing Plugin
- Event Management System
- AutoCount To-Do List Plugin
- AutoCount AutoBank Reconciliation Plugin
- Intercompany Billing Plugin User Guide
- AutoCount Basket Plugin User Guide
- Lead Management 2.0 Plugin
- AutoCount Service Contract Plugin User Guide
- Autocount Repacking Plugin
- AutoCount Scale Barcode Plugin User Guide
- AutoCount Progressive Billing
- AutoCount Optical Plugin
- AutoCount Meter Reading Plugin User Guide
- AutoCount Car Tint Film Plugin
- AutoCount Leasing Plugin User Guide
- AutoCount Integrator Plugin
- AutoCount Procurement Planning Plugin
- Show Remaining (3) Collapse
-
-
Form Template
-
Report Template
-
- Advance Quotation
- Cash Sale
- Consignment
- Consignment Movement
- Credit Note
- Debit Note
- Delivery Order
- FOC Quantity Analysis By Document Report
- Invoice
- Item Package Sales Report
- Monthly Sales Analysis
- Outstanding Sales Order Listing
- Profit And Loss Of Documents
- Quotation
- Sales Agent Contribution Report
- Sales Order
- Top/Bottom Sales Ranking
- Show Remaining (2) Collapse
-
- Available Stock Status Report
- Expired Item Batch Listing
- Inventory Physical Worksheet
- Stock Adjustment
- Stock Aging Report
- Stock Assembly
- Stock Assembly Order
- Stock Balance By Location
- Stock Balance Report
- Stock Card Report
- Stock Disassembly
- Stock Issue
- Stock Item Profit Margin
- Stock Movement Report
- Stock Receive
- Stock Take
- Stock Transfer
- Stock Write Off
- Show Remaining (3) Collapse
AutoCount E-Invoice: E-Invoice Guide and Preparation for AutoCount Users
Welcome to our comprehensive e-invoice guide designed specifically for AutoCount users. This guide aims to simplify the e-invoice preparation process by providing step-by-step instructions and essential tips. Whether you are new to e-invoicing or looking to refine your existing process, this e-invoice guide will help you navigate through the setup and ensure seamless invoicing for your business. So, dive in to learn how to efficiently prepare, manage, and send e-invoices using AutoCount.
AutoCount E-Invoicing Preparation Video (CN)
Watch the AutoCount E-Invoicing Preparation video in Chinese to gain a deeper understanding of e-invoice preparation.
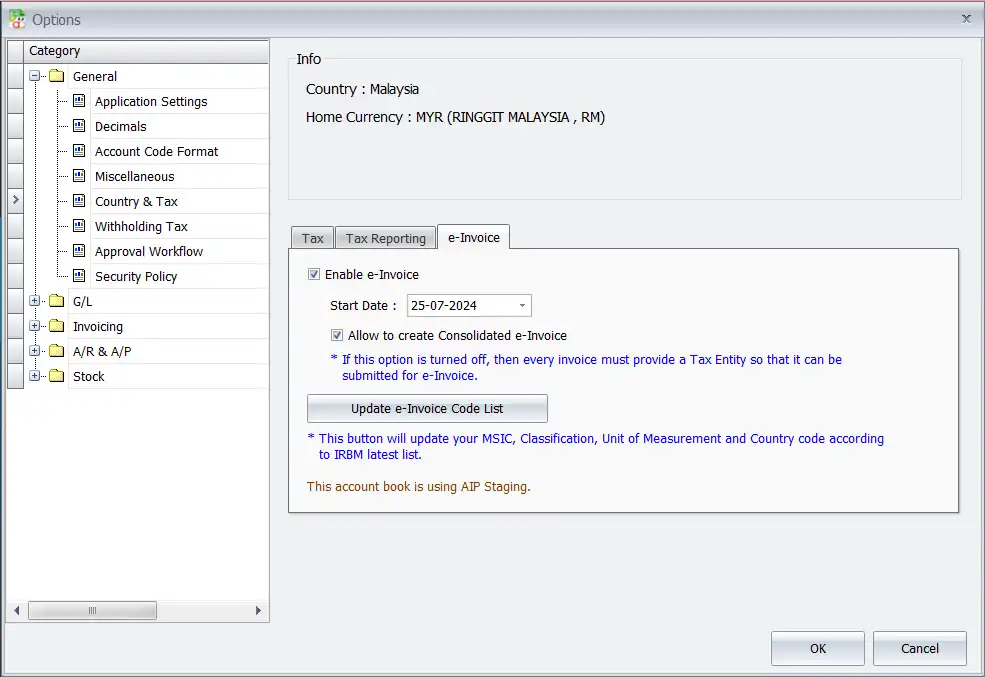
Update E-Invoice Start Date
To update the e-Invoice start date, first you must enable the e-Invoice module in your AutoCount software. AutoCount has added an e-Invoice module:
- Go to “Tools”
- Then, Choose “Options”
- Look for “General”
- Last, Click “Country & Tax”
This tab is only available for account books in Malaysia. In the e-Invoice tab, you need to check the “Enable e-Invoice” box to add the start date. Once the module is enabled, therefore, other e-Invoice columns will become visible.
Update Buyer/TIN information
To update buyer/TIN information, you need to enable the e-Invoice module. Hence, here are a few methods to update the buyer/TIN information:
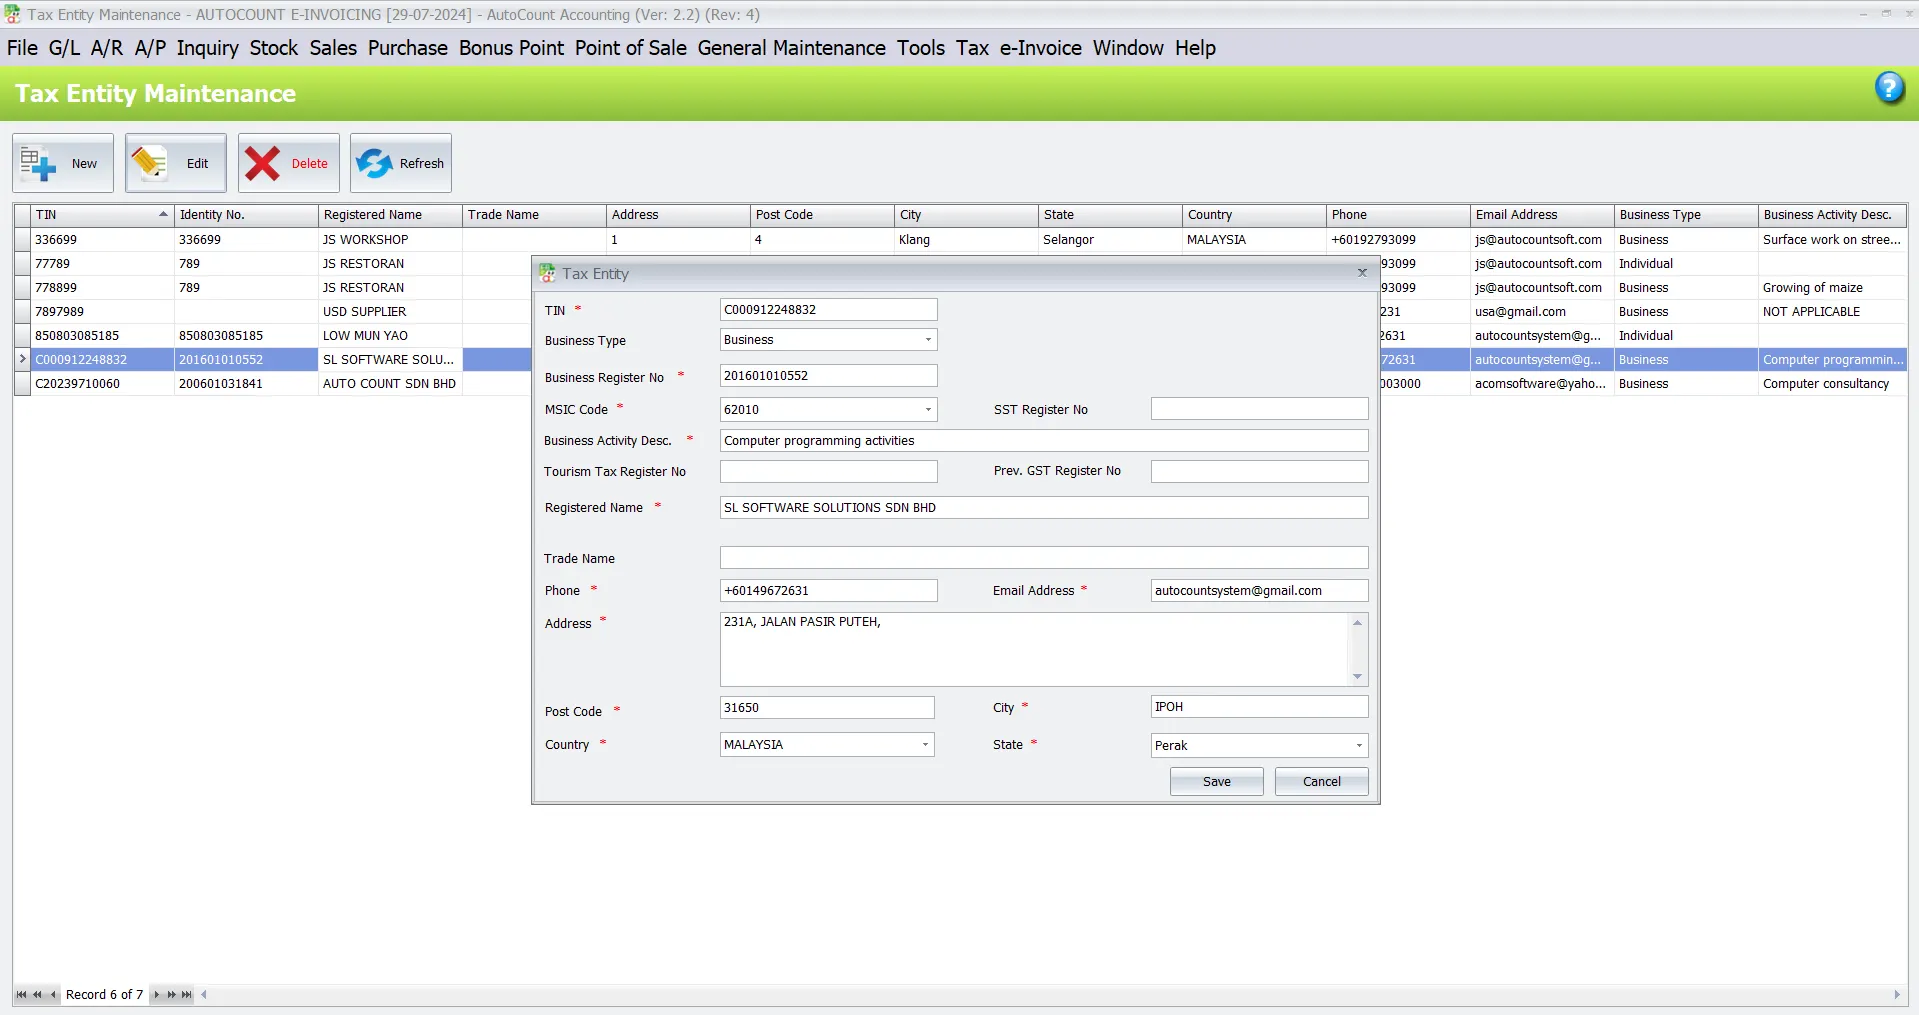
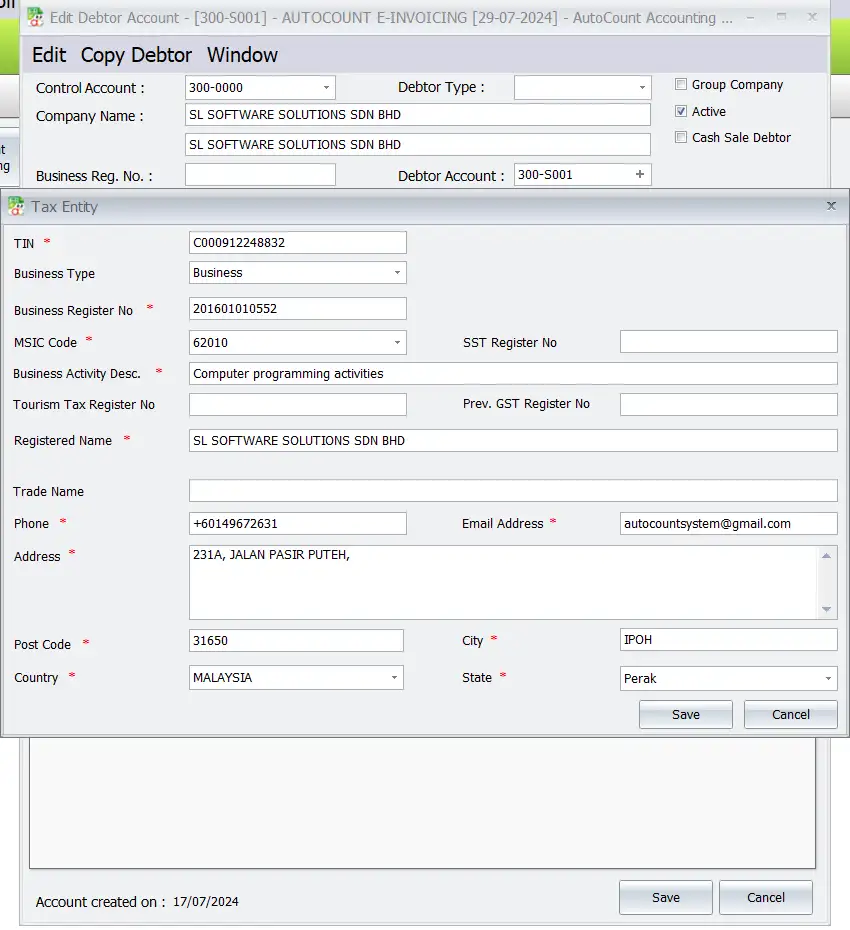
Method 1: Tax Entity Maintenance
- Go to “Tax”
- Click on “Tax Entity Maintenance”
- In the Tax Entity view, you need to insert the TIN, Business Type, MSIC Code, SST Registration No, Business Activity Description, and other required information
- Then, save the information after insert required information.
- Go to “A/R”
- Click on “Debtor Maintenance”
- In the Edit Debtor Account view, you can insert the Tax Entity/TIN based on the data you entered in Tax Entity Maintenance.
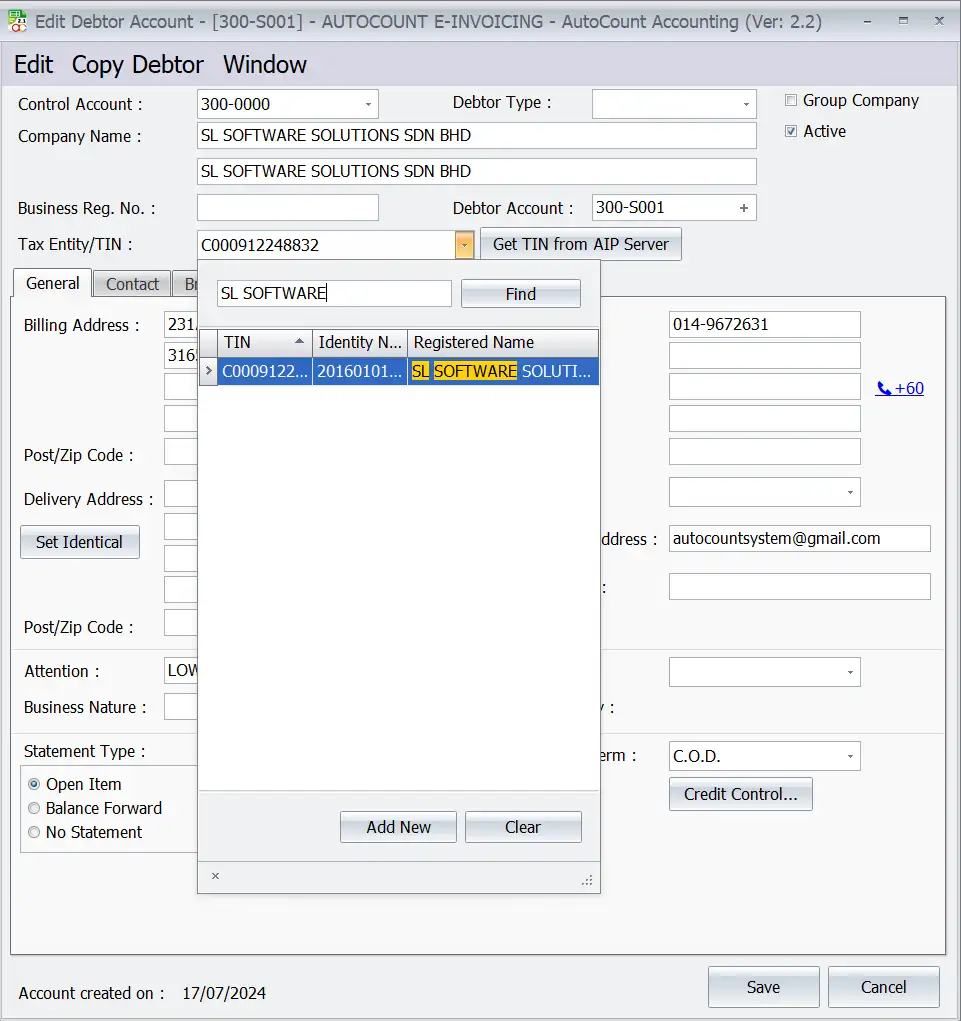
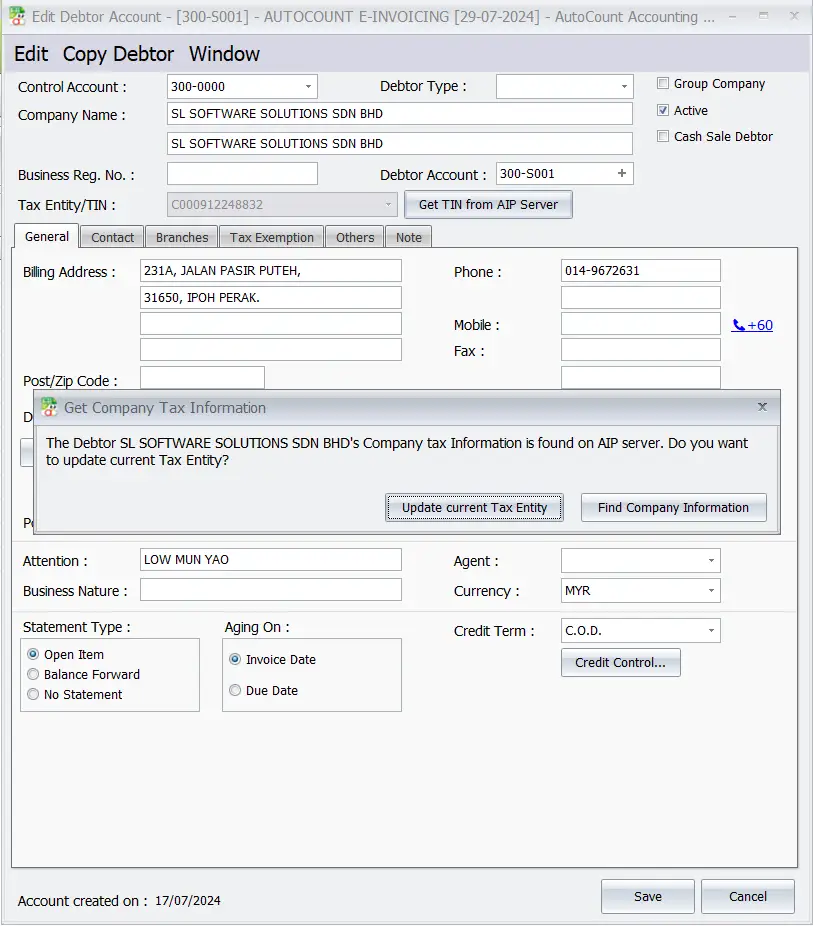
Method 2: Search From AIP Server
To search the information from the AIP server:
- Click the “Get TIN from AIP Server” button

- Then, it will auto prompt the “Tax Entity” window if customer TIN already exist in AIP

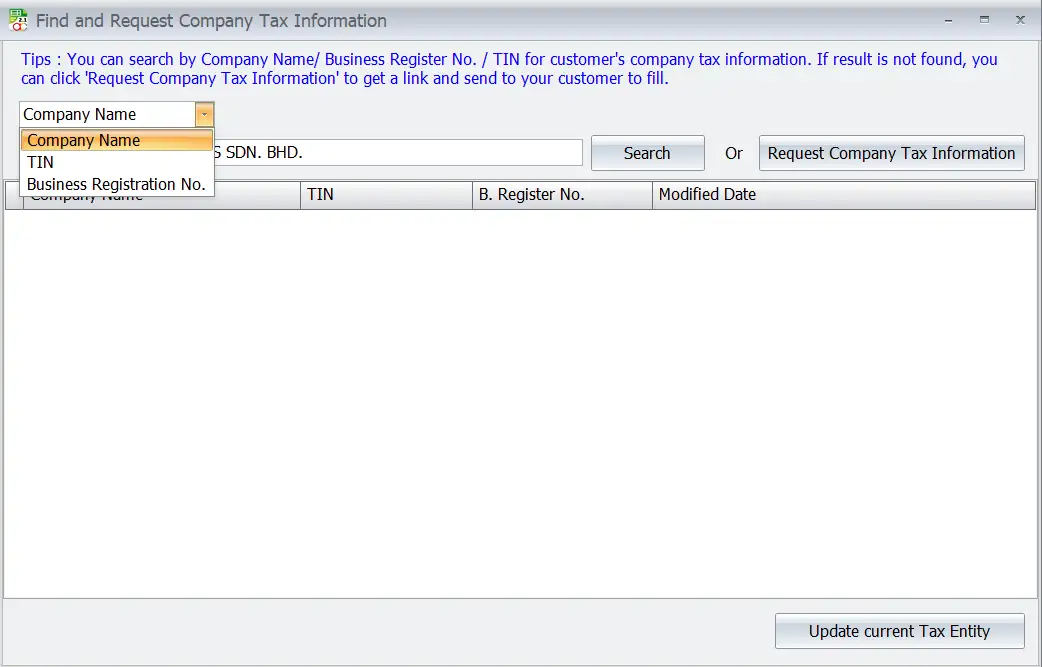
Method 3: Prompt If Buyer Not Found In AIP
- Click the “Get TIN from AIP Server” button again
- This screen will show a list of tax information, but initially, no information will be stored
- So it will prompt “No Result found” message when you click on “Search” button.
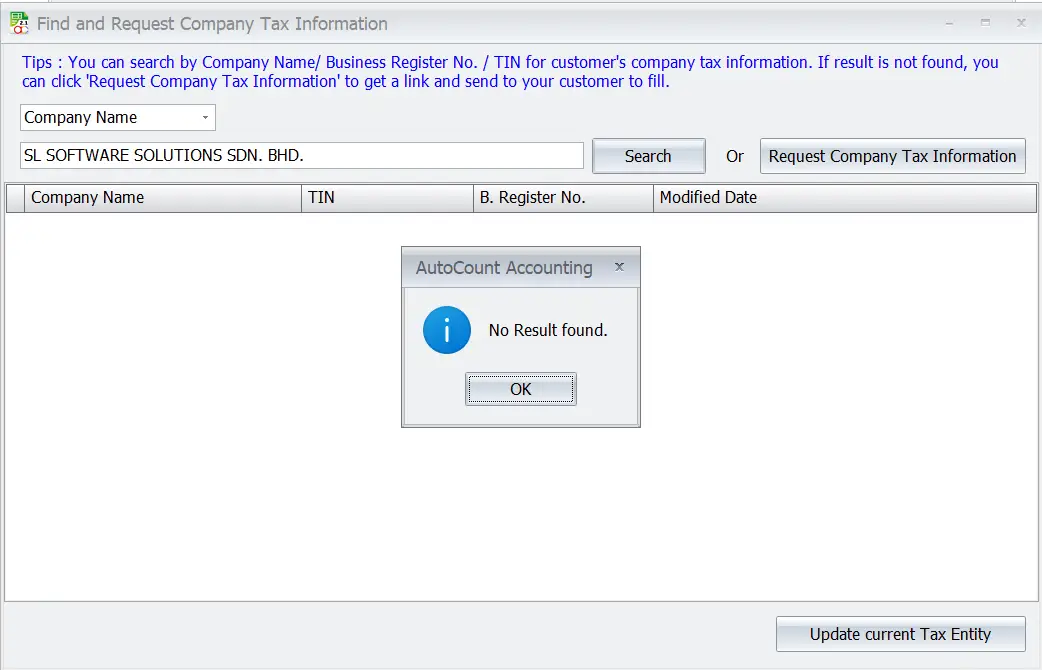
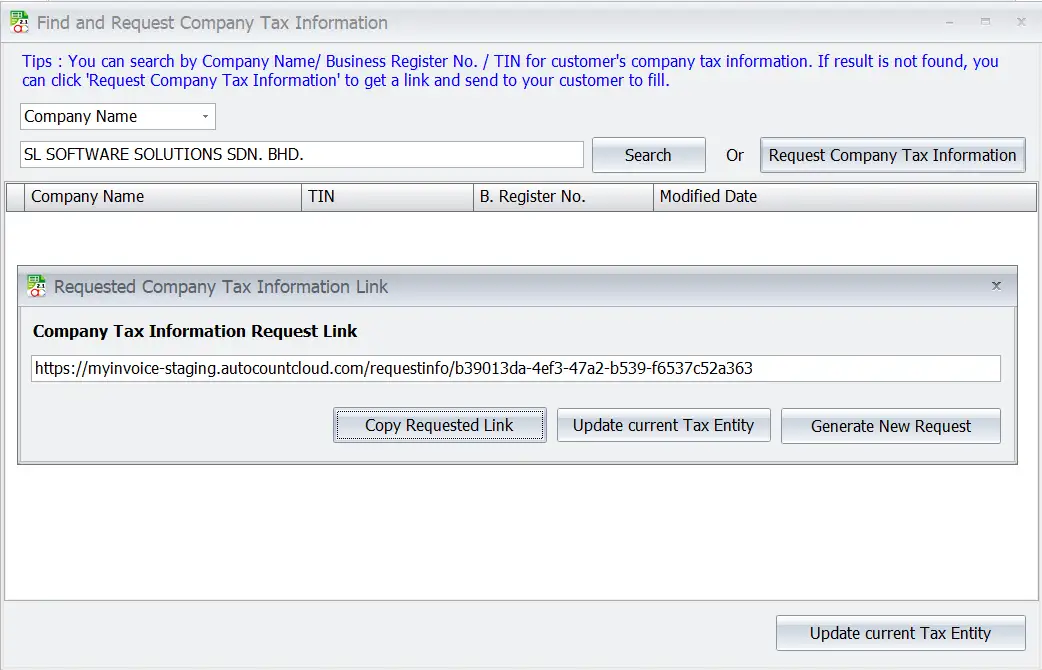
- In this case, you can click “Request Company Tax Information” button to generate request link. The system will provide a link for the recipient to fill in the information
- Then, simply click the “Copy Requested Link” button and share it with them.
- Customer or Supplier will see after opening the link. After opening the link, they need to fill out the form
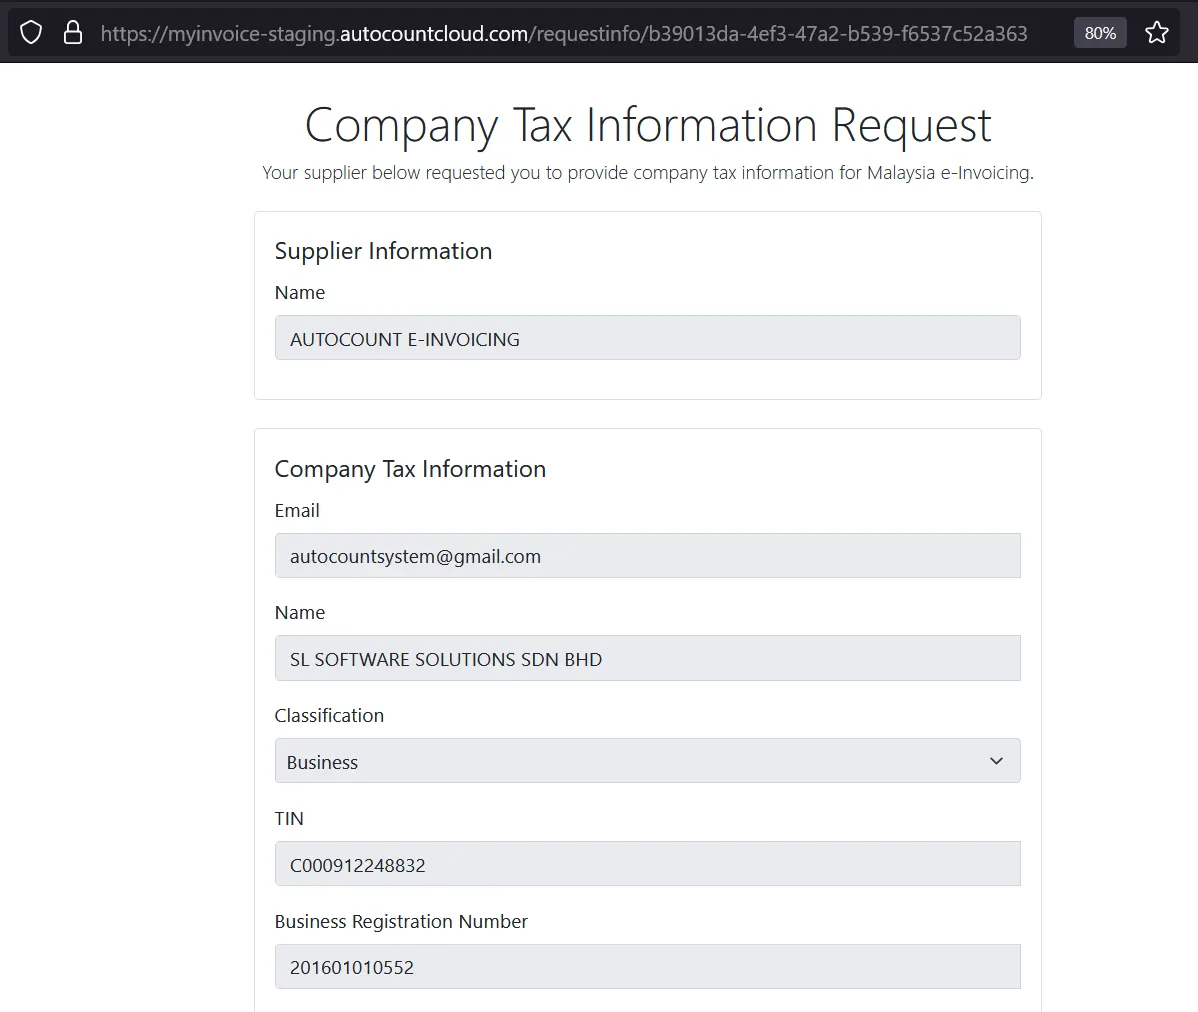
- When they completely fill out the form, All records will be sent to your email as a notification
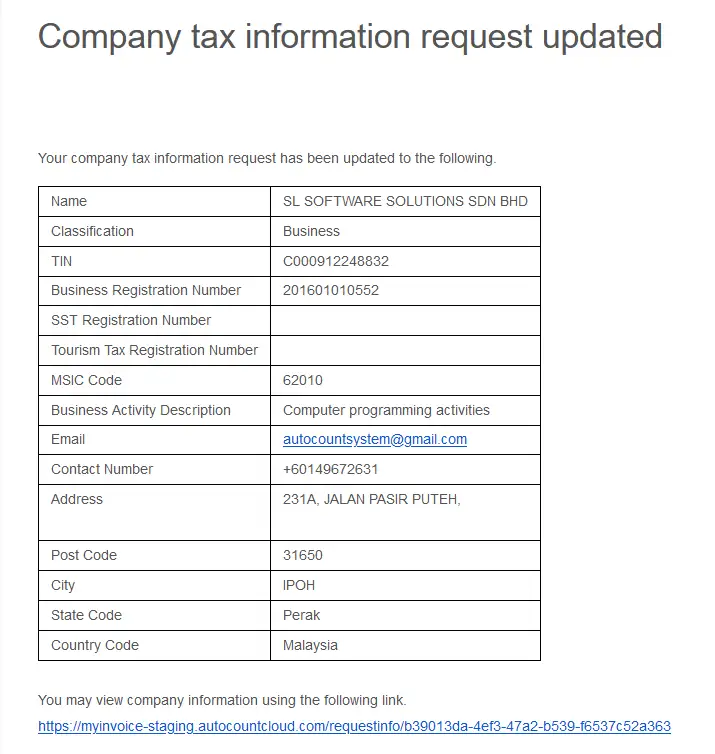
NOTE: If they need to change the information, they can use back the same requested link to update.
- Now, you can reload info from AIP after buyer update TIN
From “Find and Request Company Tax Information” window, there are three support searching that you can find out if a company exists:
- Company Name
- TIN
- Business Registration No.
If you want to update the information in future, you can click this “Get TIN from AIP Server” button again to update current Tax Enity
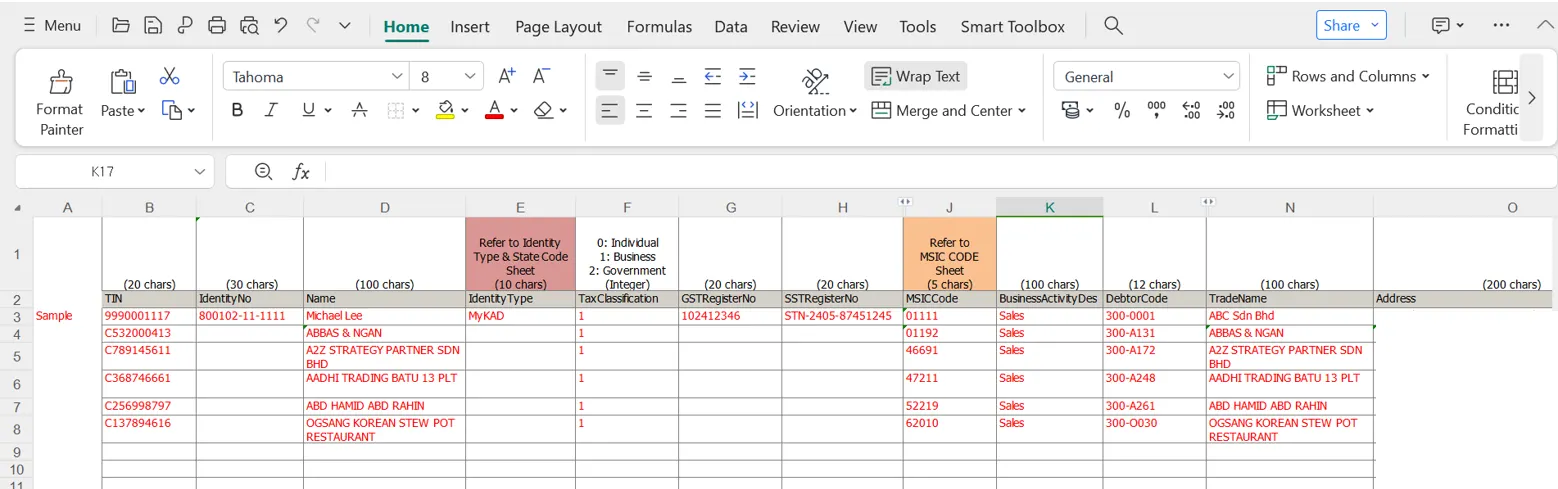
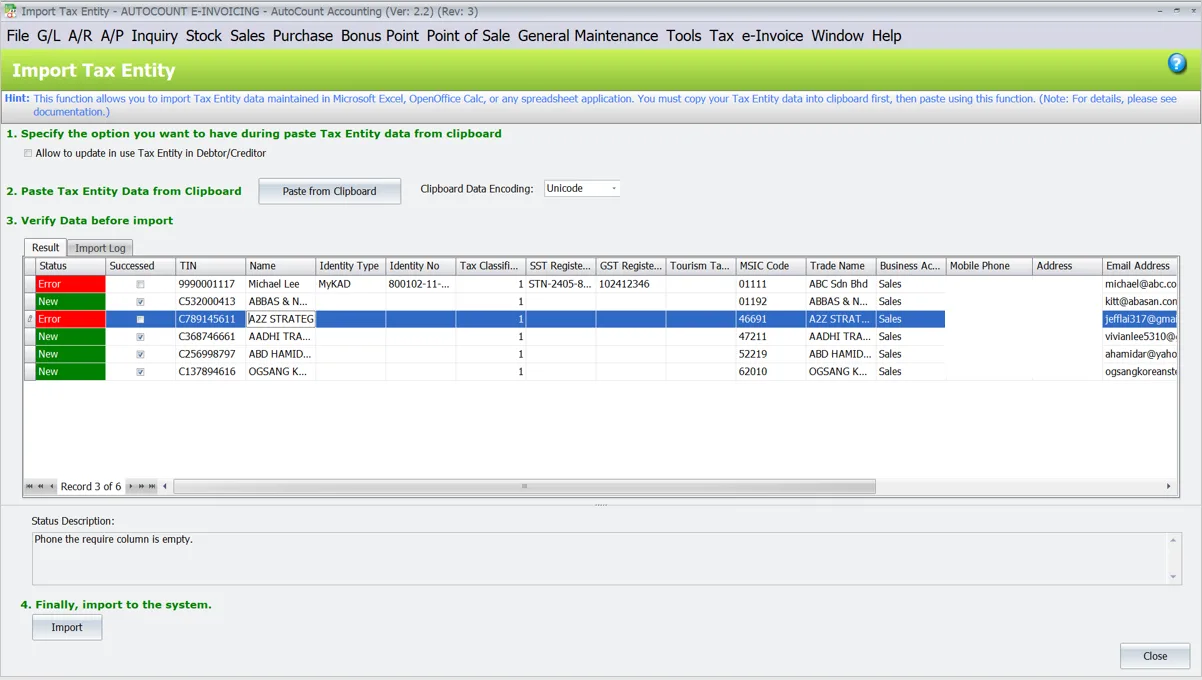
Method 4: Import By Excel
- This method allows you to import Excel data into AutoCount software through the Import Tax Entity feature
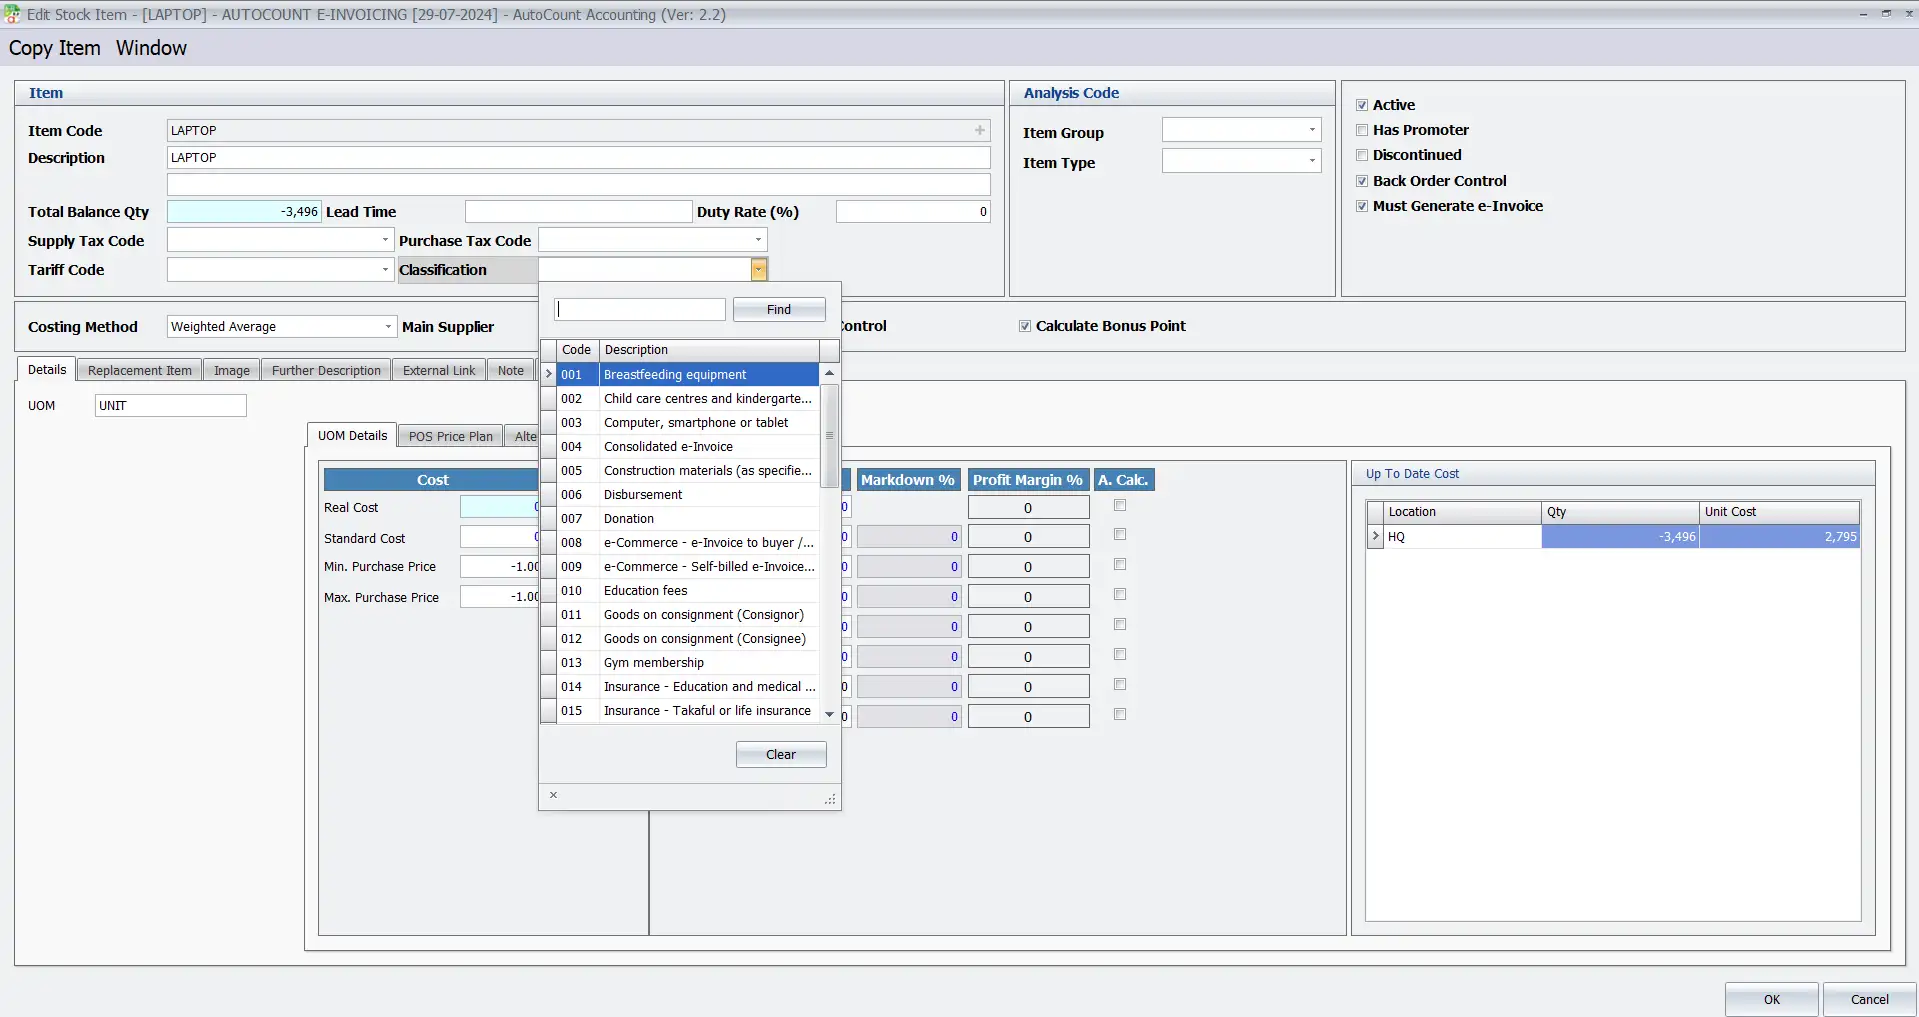
Update Data Classification Code
You can check the Data Classification Code on LHDN Malaysia webite if you’re unsure it.
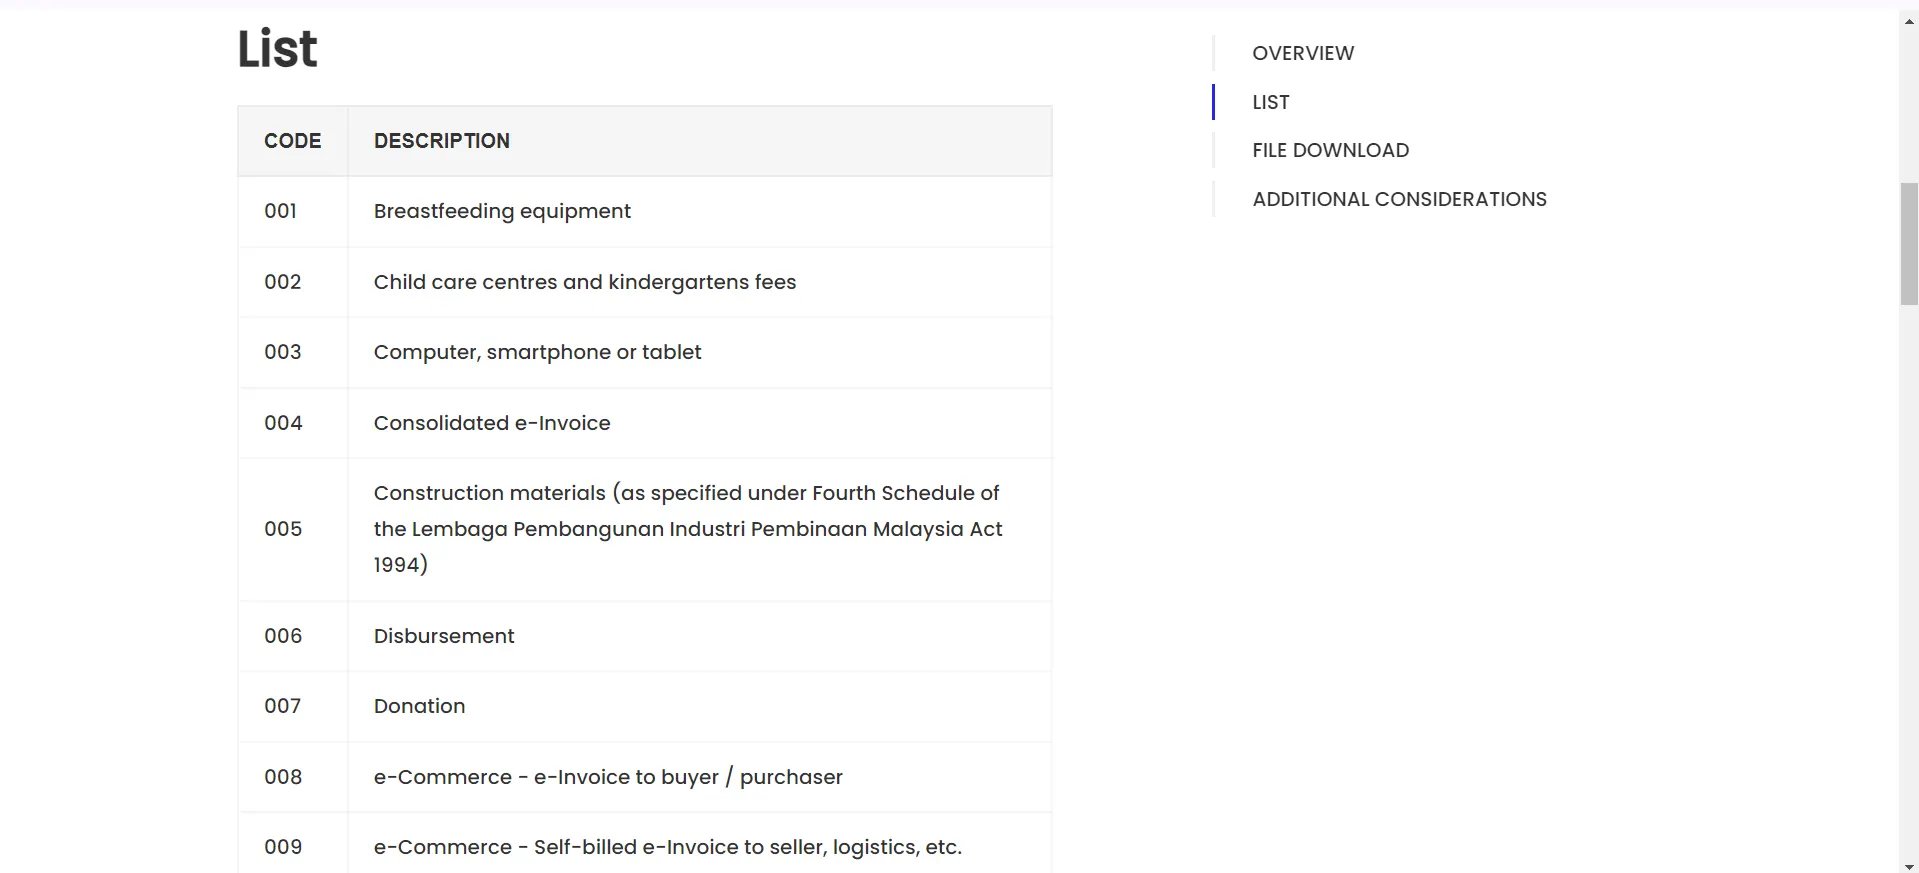
To update the data classification code, you can simply input item classification code (by item) in Classification field.
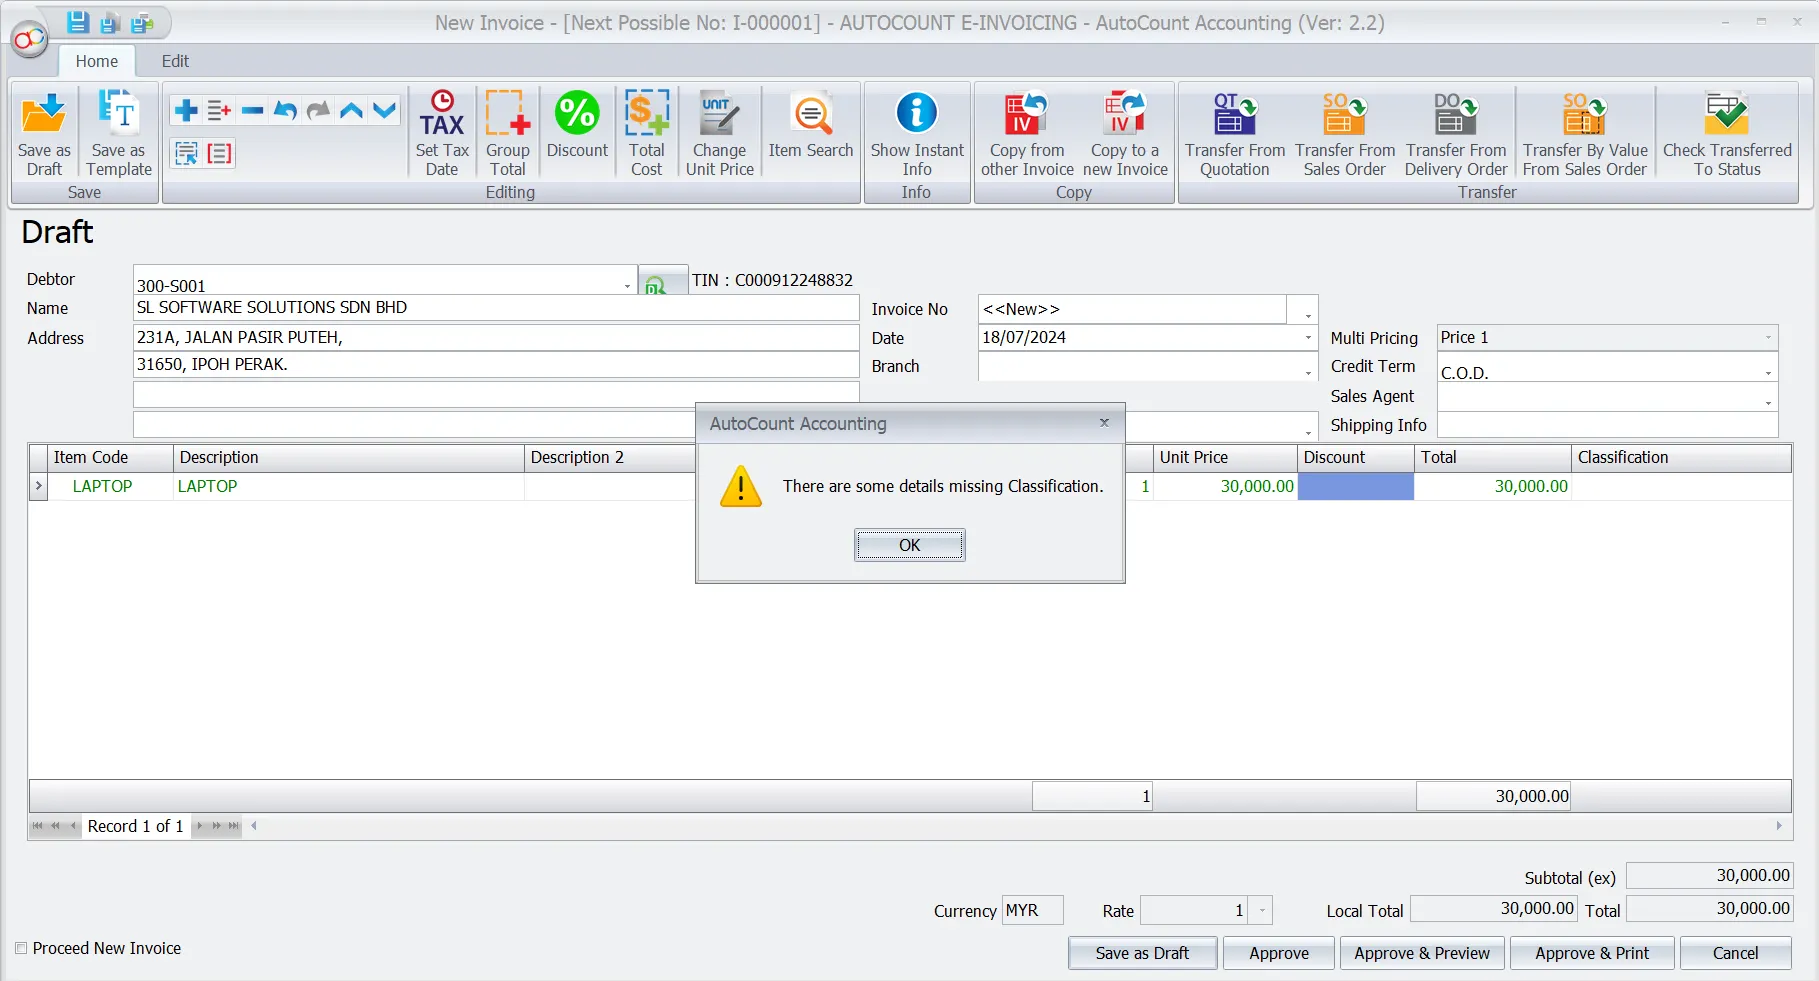
If the invoice is missing the classification code, it will be prompt the “There are some details missing Classification” message.
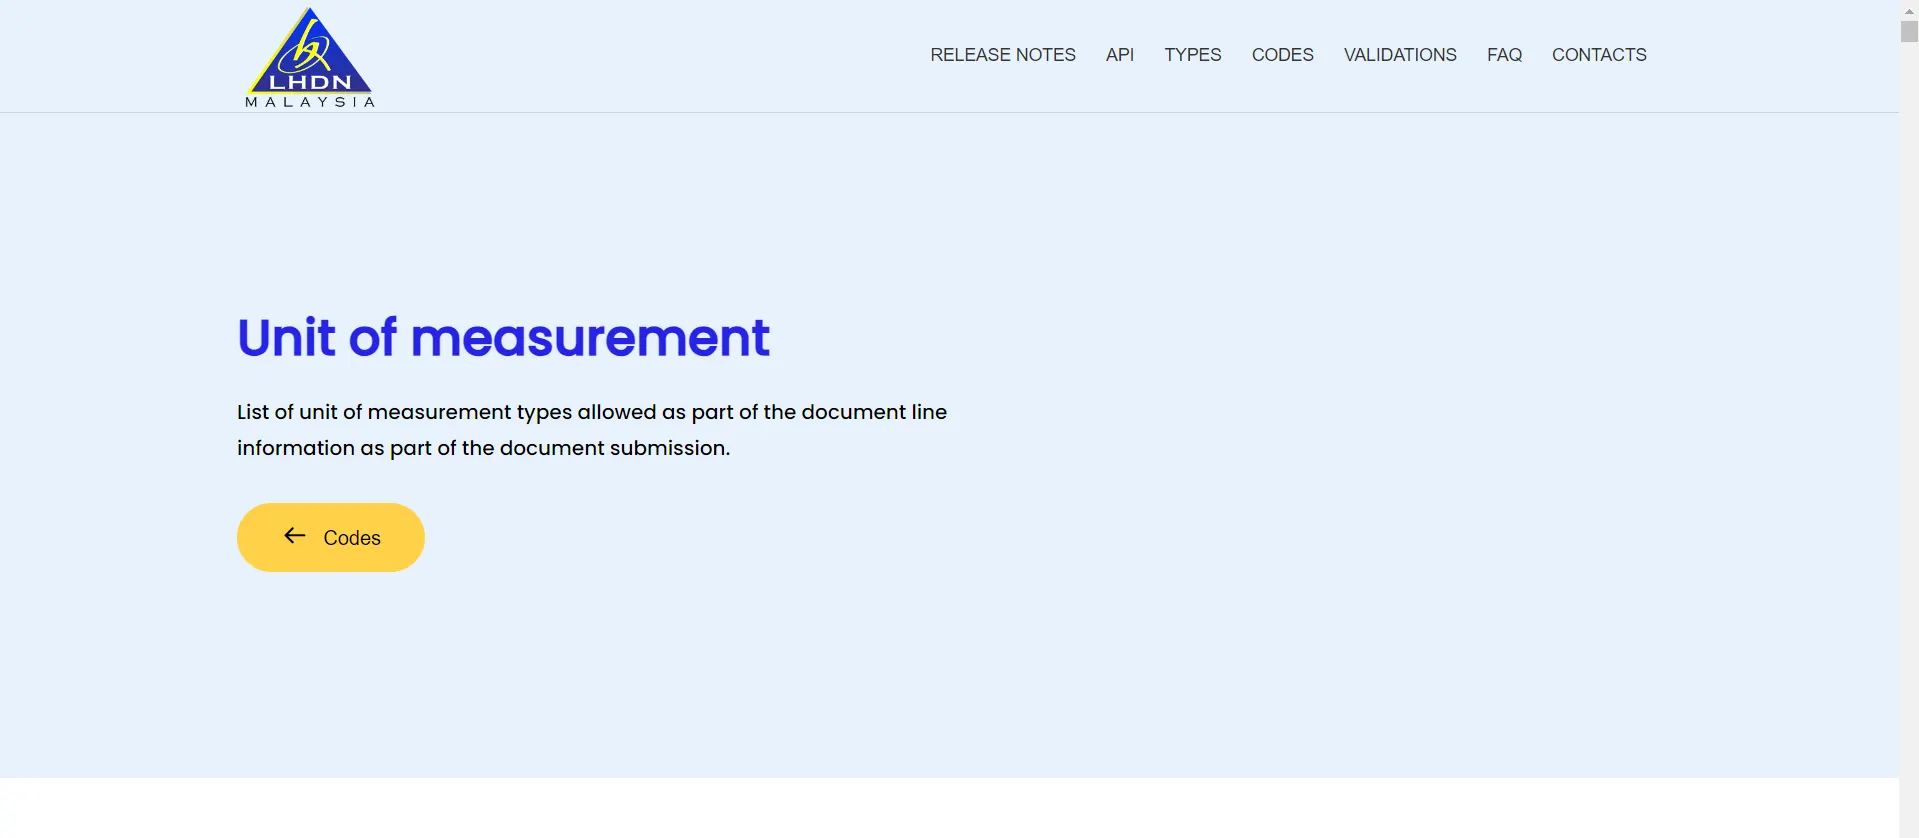
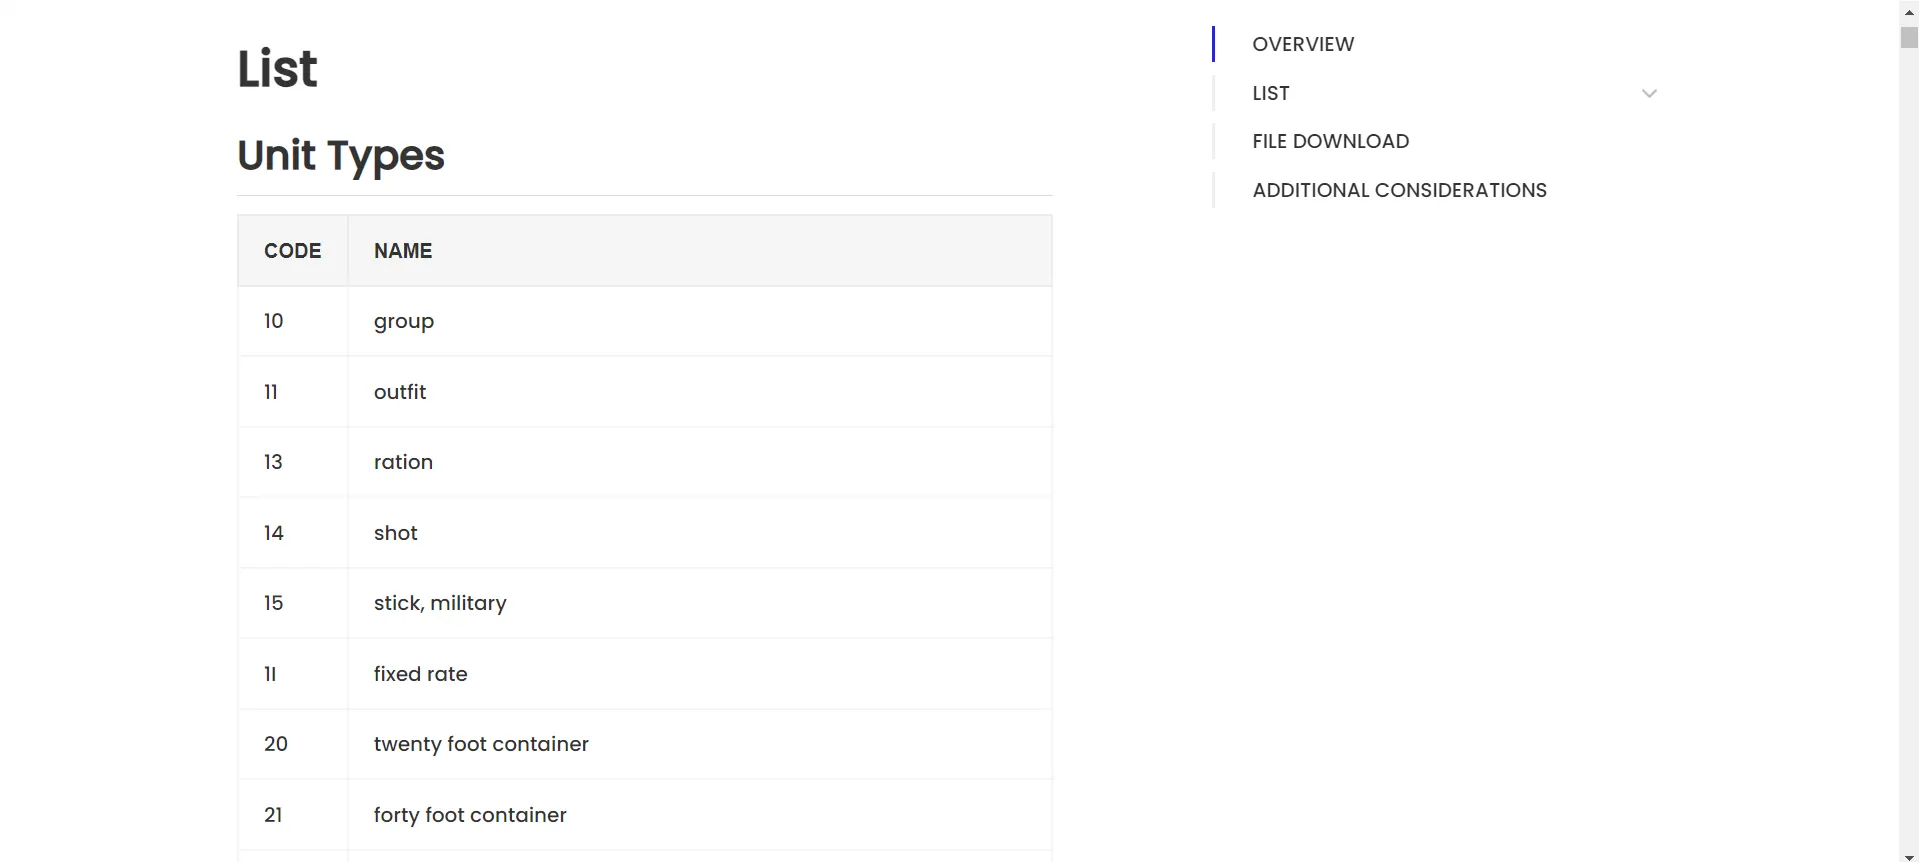
Update Unit Measurement Code
You can learn about Unit of Measurement Types on LHDN Malaysia website before updating the unit of measurement code.
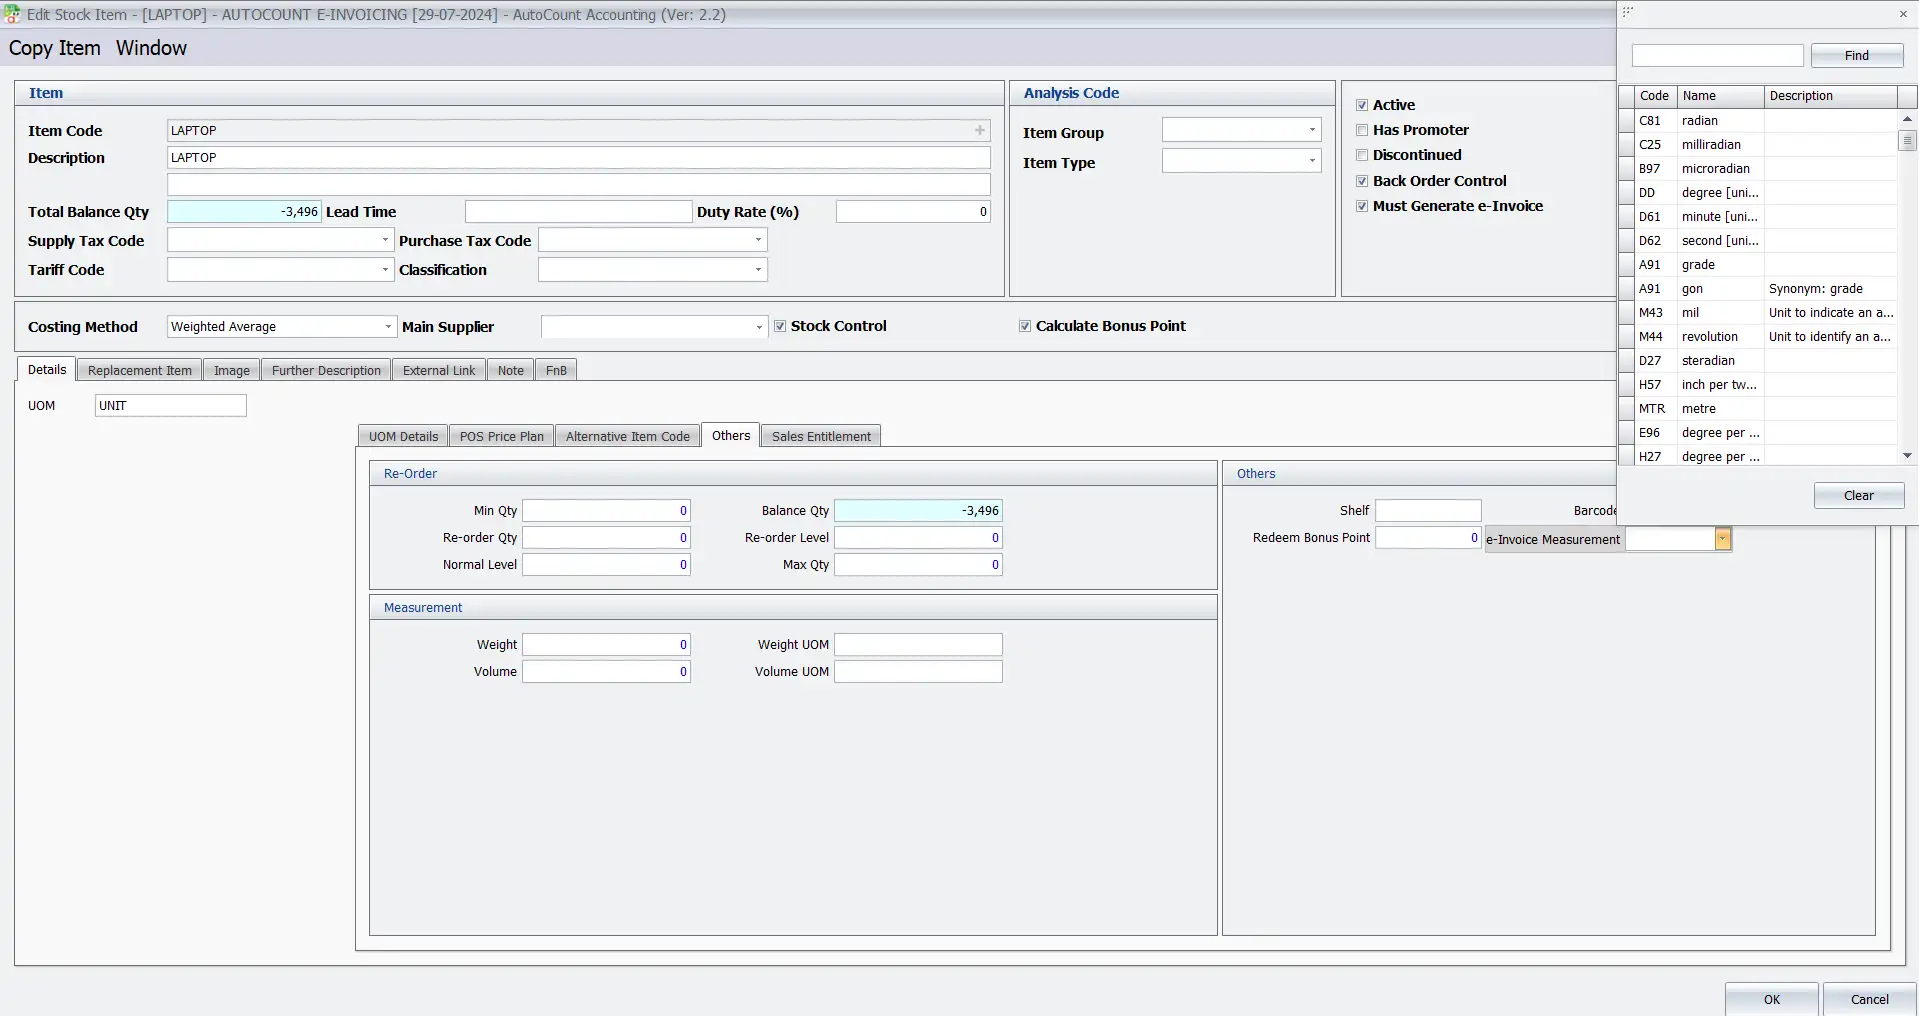
After that, to update the unit of measurement (by item UOM), you can go to “Others” tab. Then, navigate to the “e-Invoice Measurement” field and make the updates there.
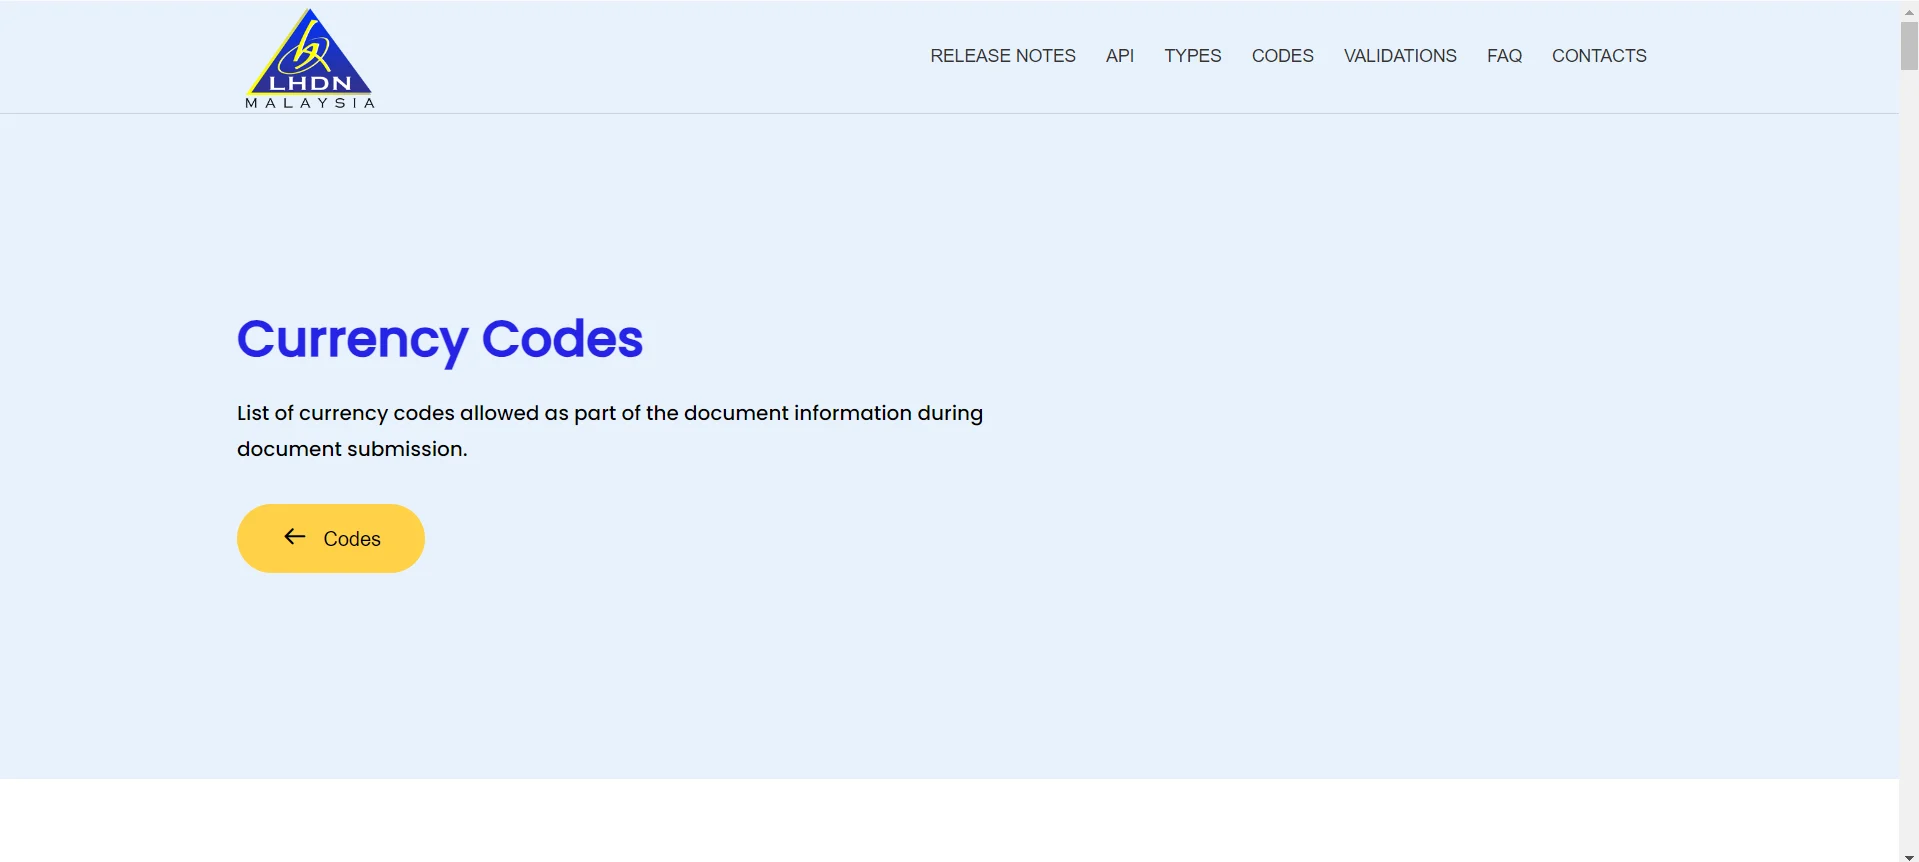
Update Currency Code
You can find the currency codes on LHDN Malaysia website if you’re unsure about it.
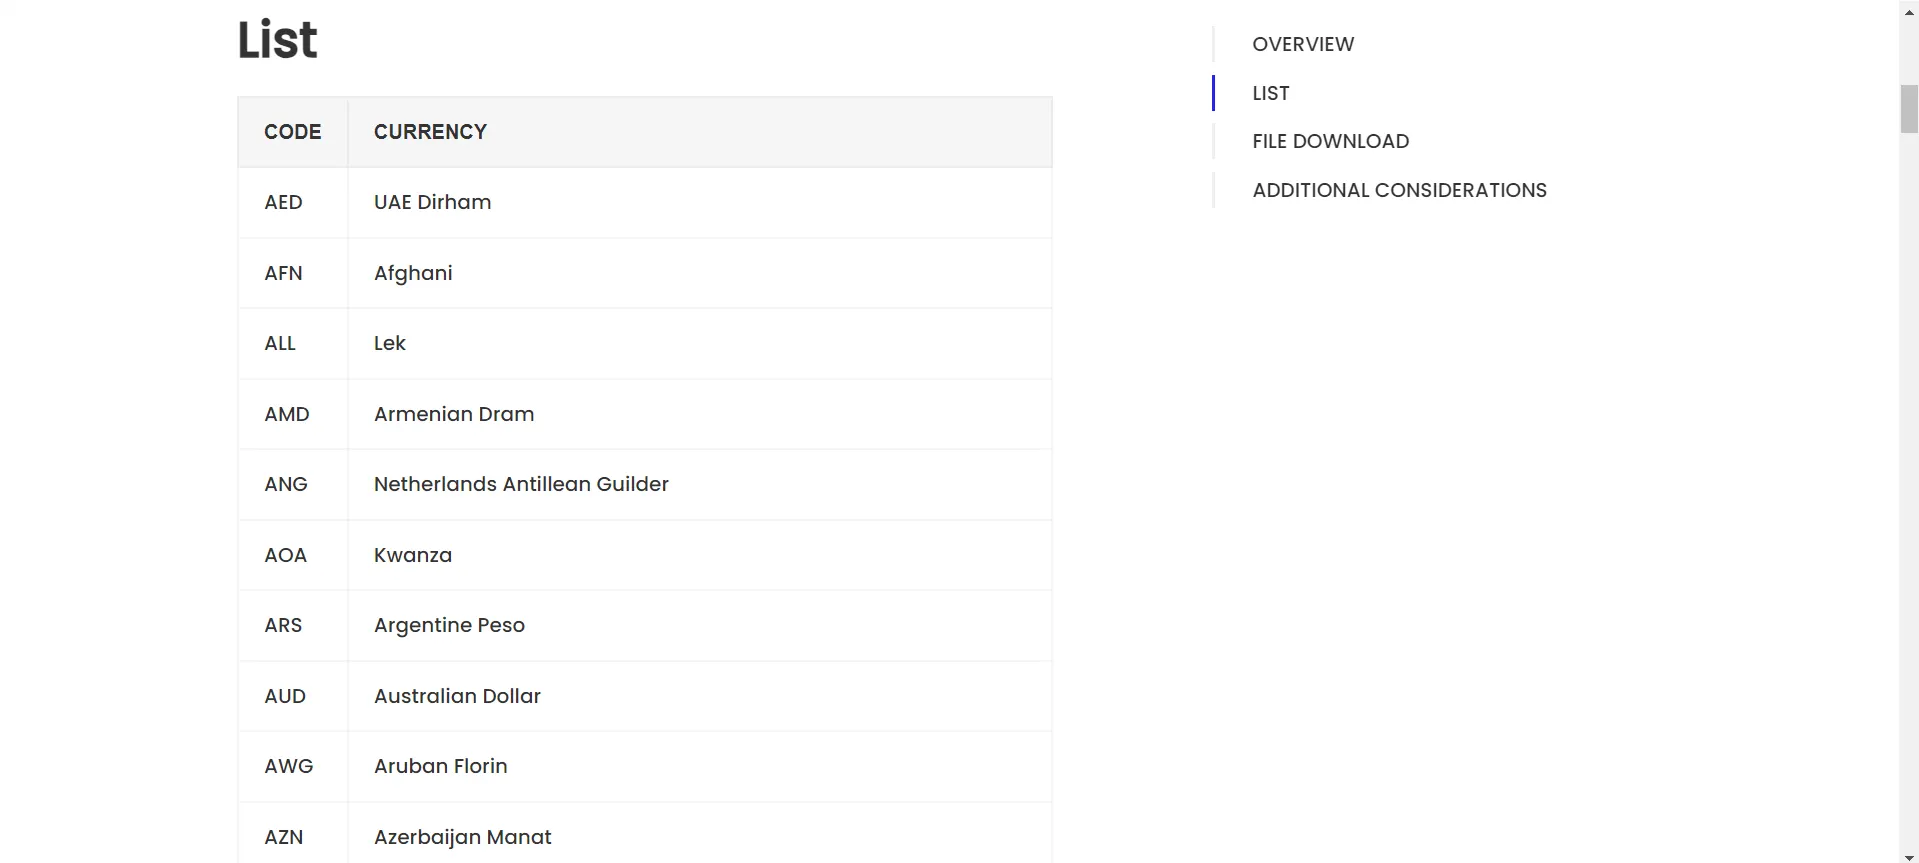
To update the currency code:
- Go to “General Maintenance”
- Click “Currency Maintenance”
Here you can add, edit, and delete currency codes.
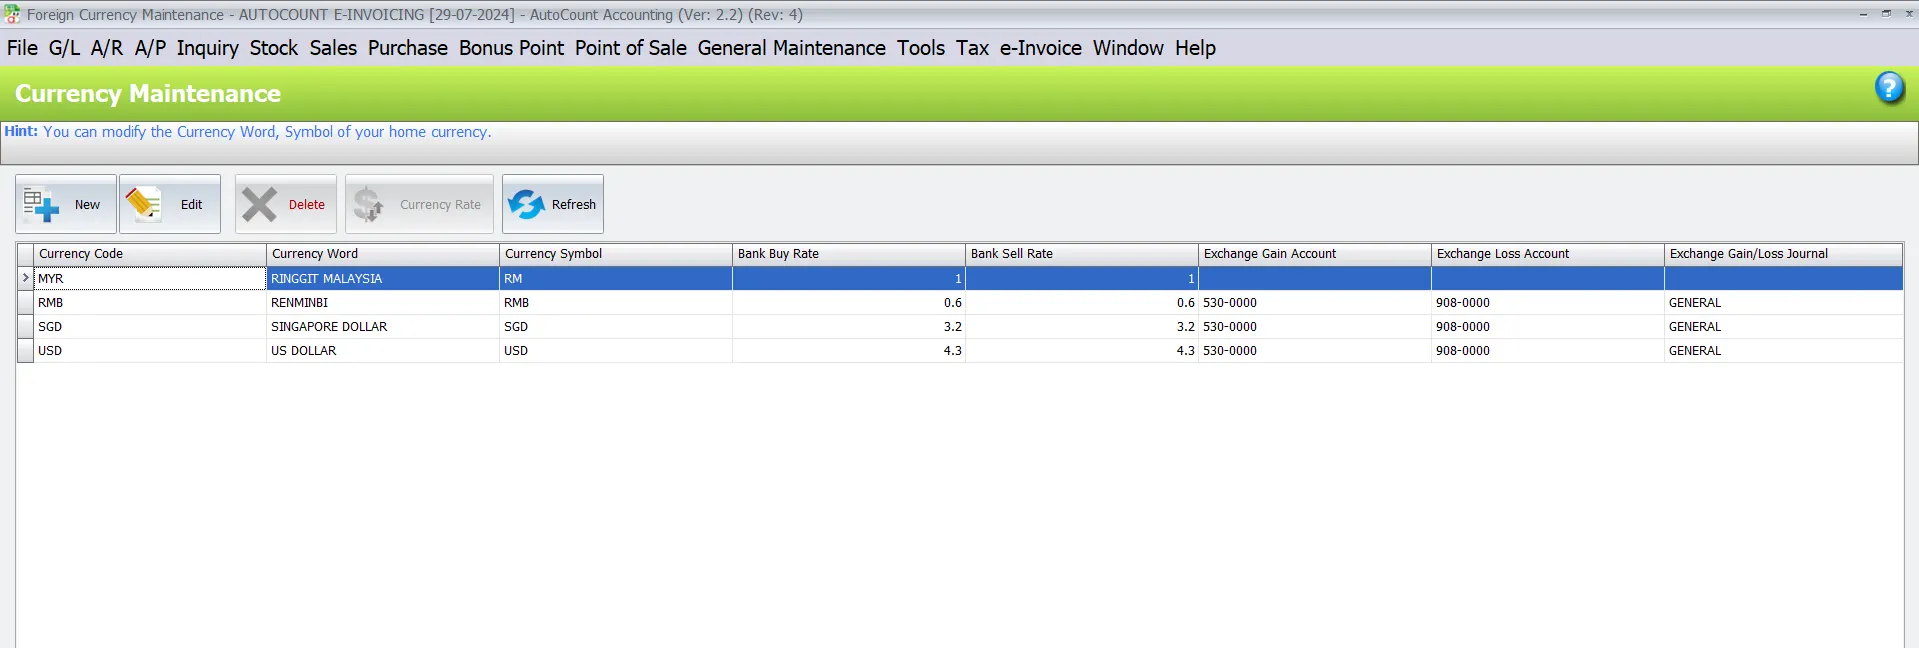
For example, change the currency code:
- Go to “Tools”
- Choose “Change Code”
- Then, click on “Change Currency Code”
Then, you can change the existing currency code – RMB to new currency code – CNY.
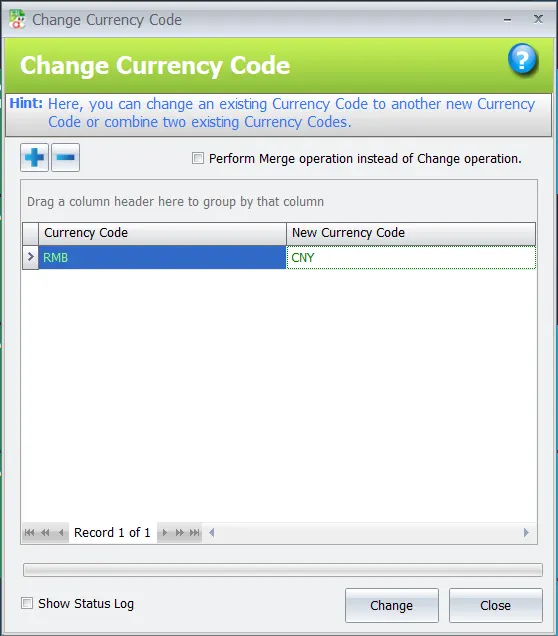
NOTE: LHDN code is recognize CNY instead of RMB.
How to do quick updates?
If IRBM update these code, you can have a quick update to add new code in future:
- Go to “Tools”
- Choose “Options”
- Then, click on “General”
- Choose “Country & Tax”
- After that, look for “e-Invoice” tab
In the e-invoice tab, you can update them by clicking “Update e-Invoice Code List” button with just one click.

For AutoCount, it has two modes which is Live Mode and Sandbox Mode to support both for unified time conversion and switching.

You can open new data through the agent to test how the whole e-invoice is operated. in order to prepare in advance.
NOTE: You cannot use existing data for testing, in order to avoid data crashes.
Conclusion
Updating the various components of your e-Invoice system in AutoCount software is a straightforward process once you enable the e-Invoice module. Firstly, by following the methods outlined above, you can efficiently manage the e-Invoice start date, buyer/TIN information, data classification code, unit measurement code, and currency code. Additionally, utilizing features like manual updates, downloads from the AIP server, and Excel imports can streamline your workflow and ensure compliance with Malaysia’s tax regulations. Furthermore, quick updates are also easily accessible through the general settings, making the overall process user-friendly and efficient.
NOTE: This e-invoice function is only available for those who implemented e-invoice module in AutoCount and account book under country Malaysia.
Interested in Getting AutoCount for your Business?
Contact our sales team today to explore pricing options and get started with the perfect solution for you.