-
AutoCount Accounting Features
-
- Approval Workflow
- Audit Trail
- Auto Save in Draft Folder
- AutoCount Contra Account
- AutoCount License Setting Guide
- Deposit Tracking & Management
- Documents Numbering Format
- Full Transfer and Partial Transfer
- Import Data to AutoCount Accounting Using Excel
- Informative Charts and Analytical Data
- Layout Customization
- Multi Pricing
- Sales and Services Tax
- Schedule Backup
- Search Lookup Edit
- View Documents Flow
- AutoCount Feature Stock Take
- Show Remaining (2) Collapse
-
AutoCount Cloud Accounting
-
AutoCount E-Invoice
-
AutoCount HRMS User Guide
-
AutoCount Modules
-
- Activity Stream
- Advanced Financial Report
- Advanced Item
- Advanced Multi-UOM
- Advanced Quotation Module
- Basic Multi-UOM
- Budget Module
- Consignment
- Filter By Salesman
- FOC Quantity
- Formula
- Item Batch
- Item Package
- Landing Cost
- Multi-Currency
- Multi-Dimensional Analysis
- Multi-Location
- Project Account
- Recurrence
- Remote Credit Control Module
- Stock Assembly
- User Defined Fields (UDF)
- AutoCount SST Hidden Functions
- AutoCount SST Submission - Service Tax
- Show Remaining (9) Collapse
-
AutoCount Plugins
-
Form Template
-
Report Template
-
- Advance Quotation
- Cash Sale
- Consignment
- Consignment Movement
- Credit Note
- Debit Note
- Delivery Order
- FOC Quantity Analysis By Document Report
- Invoice
- Item Package Sales Report
- Monthly Sales Analysis
- Outstanding Sales Order Listing
- Profit And Loss Of Documents
- Quotation
- Sales Agent Contribution Report
- Sales Order
- Top/Bottom Sales Ranking
- Show Remaining (2) Collapse
-
- Available Stock Status Report
- Expired Item Batch Listing
- Inventory Physical Worksheet
- Stock Adjustment
- Stock Aging Report
- Stock Assembly
- Stock Assembly Order
- Stock Balance By Location
- Stock Balance Report
- Stock Card Report
- Stock Disassembly
- Stock Issue
- Stock Item Profit Margin
- Stock Movement Report
- Stock Receive
- Stock Take
- Stock Transfer
- Stock Write Off
- Show Remaining (3) Collapse
MyInvois Portal Guide:
How to Add Intermediary & Register ERP in MyInvois Portal
Introduction
If you are using AutoCount or any other ERP system, setting up intermediaries and registering your ERP in the MyInvois Portal is essential for smooth integration. Below is a step-by-step guide on how to perform these tasks effectively.
Objective
To comply with Malaysia's mandatory e-Invoicing requirements, businesses must authorize an intermediary—such as AutoCount—to submit invoices on their behalf. Registering your ERP system in the MyInvois Portal facilitates seamless integration, ensuring that your e-Invoicing processes are automated, compliant, and efficient.
Step-by-step MyInvois Portal Guide
1. Access the MyInvois Portal
Ensure that you are logged into your company profile to proceed with adding an intermediary and registering your ERP.
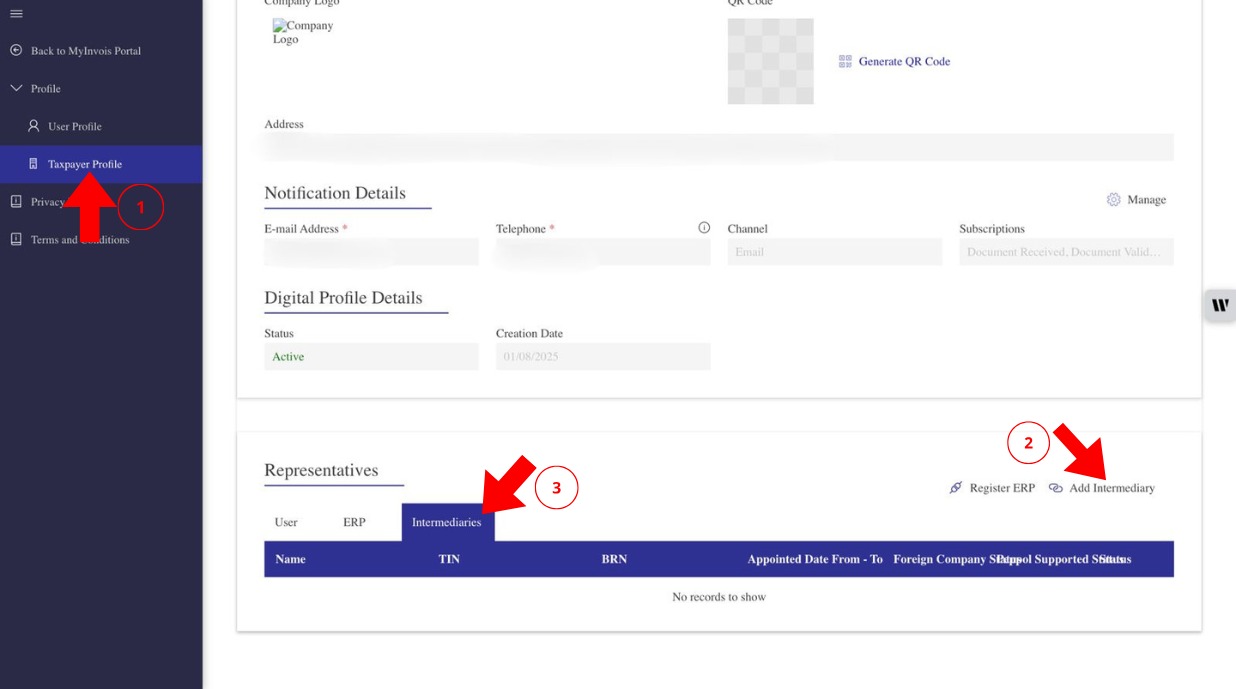
- Login to the MyInvois Portal.
- Navigate to the Taxpayer Profile section from the main dashboard.

2. Add an Intermediary
In the Taxpayer Profile, you can add an intermediary by following these steps:
- Scroll down to the bottom of the page, where you’ll find a table for Intermediaries.
- Click on the Add Intermediary button.
3. Enter Intermediary Details
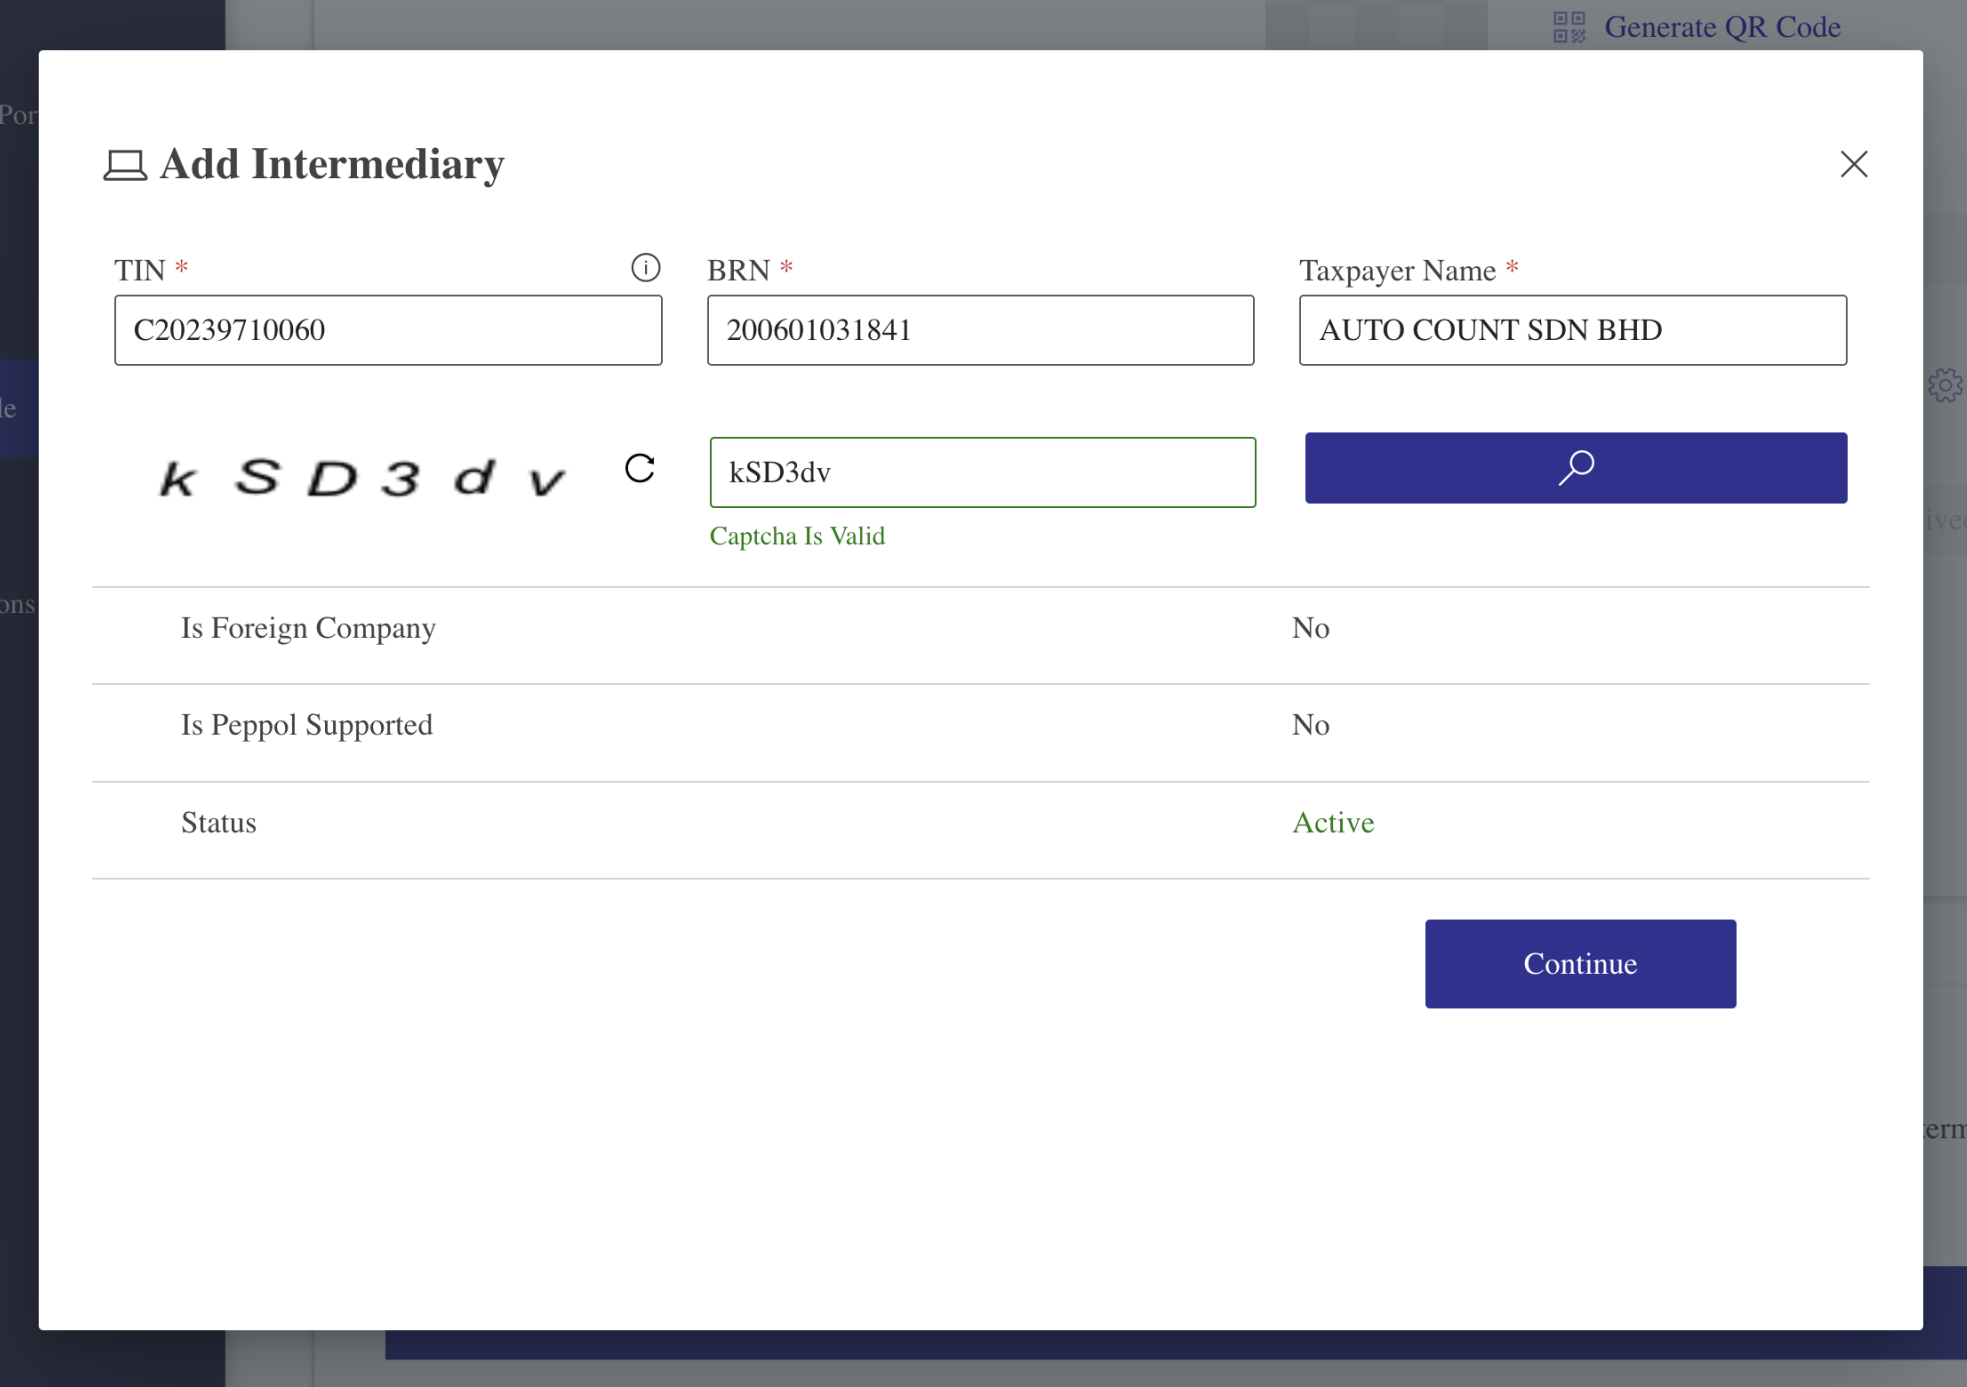
You’ll need to provide the following information for the intermediary:
- After entering the details and captcha, click the Search button.
- Click Continue to proceed with the next step.
4. Set Effective Date and Permissions
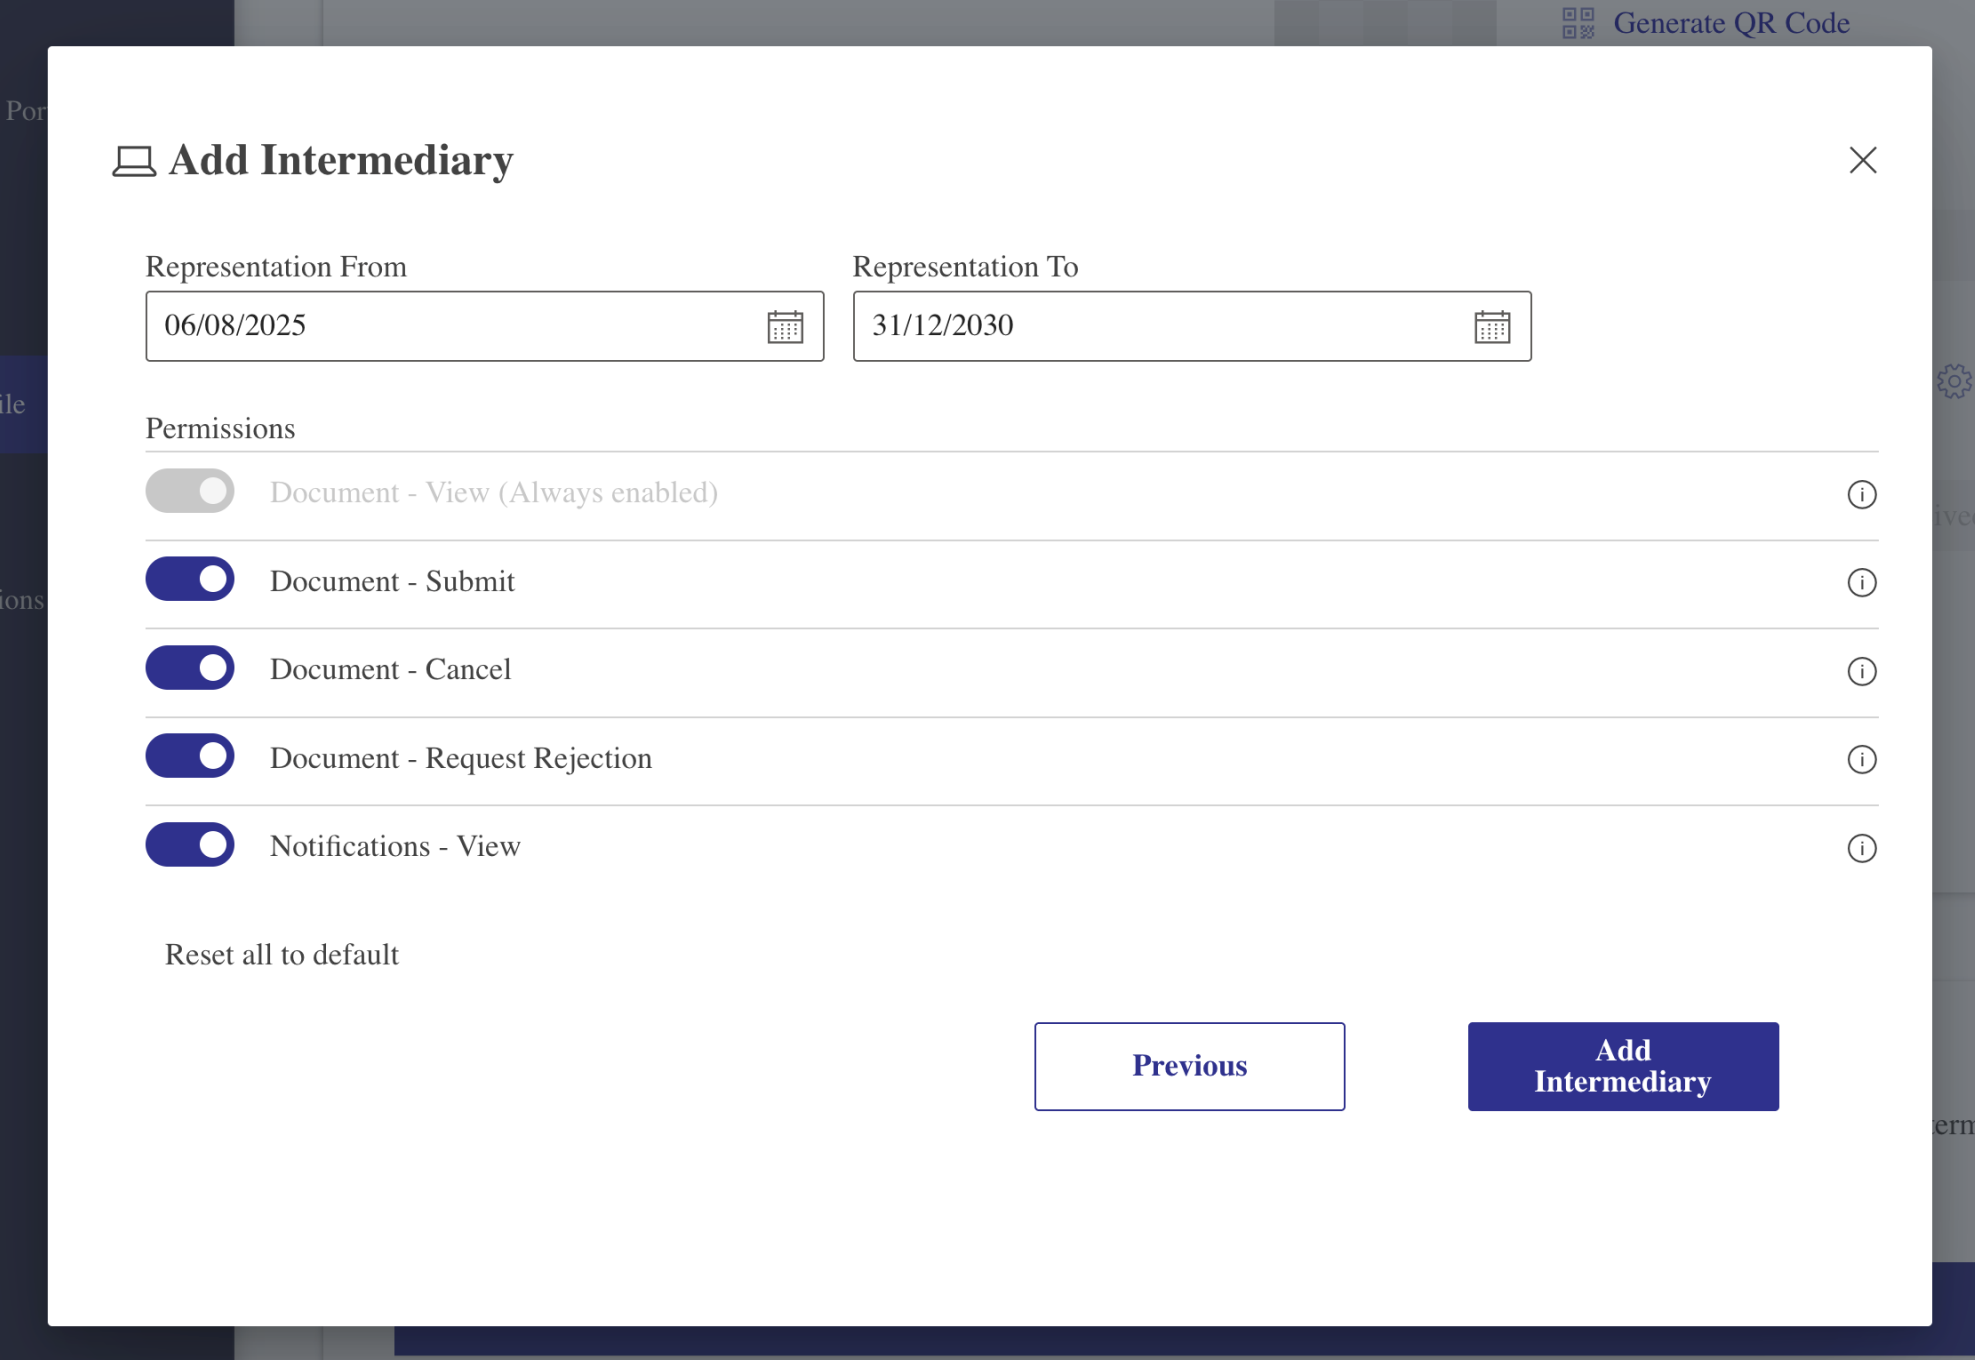
You can now set the Effective Date and Permissions for the intermediary. After adjusting the settings, click Save to complete the process.
5. Register Your ERP
Once the intermediary is added, move on to the ERP registration process:
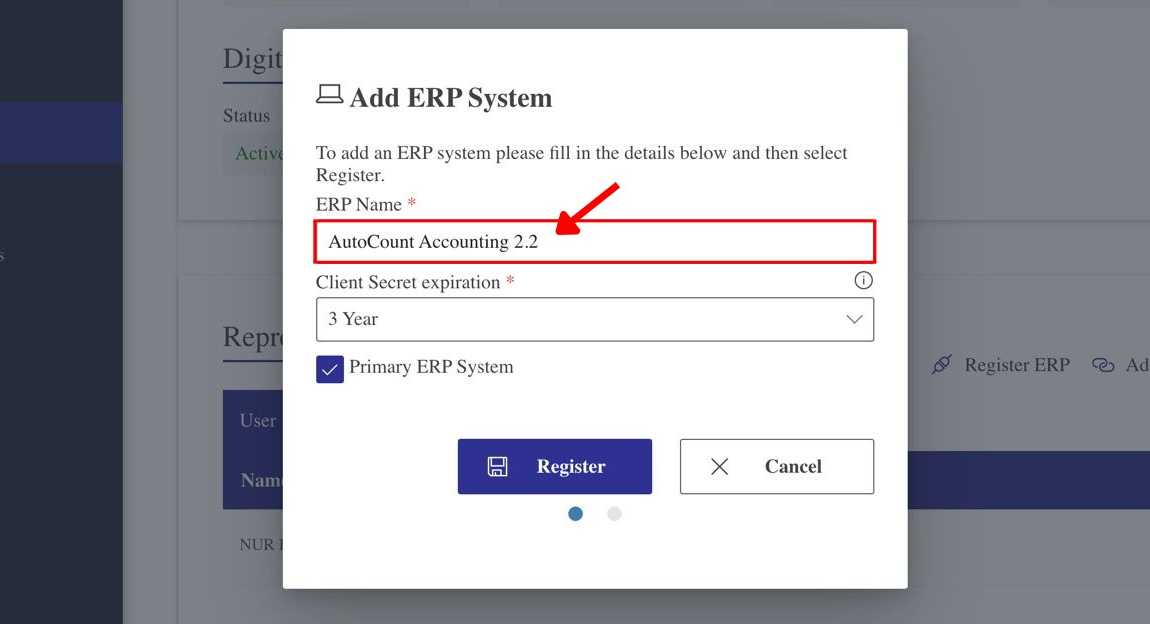
- In the Taxpayer Profile, click on Register ERP.
- A dialog box will appear. Enter the ERP Name. For instance, use AutoCount Accounting 2.2.
- Select a Client Secret Expiration of 3 Years and click Register.
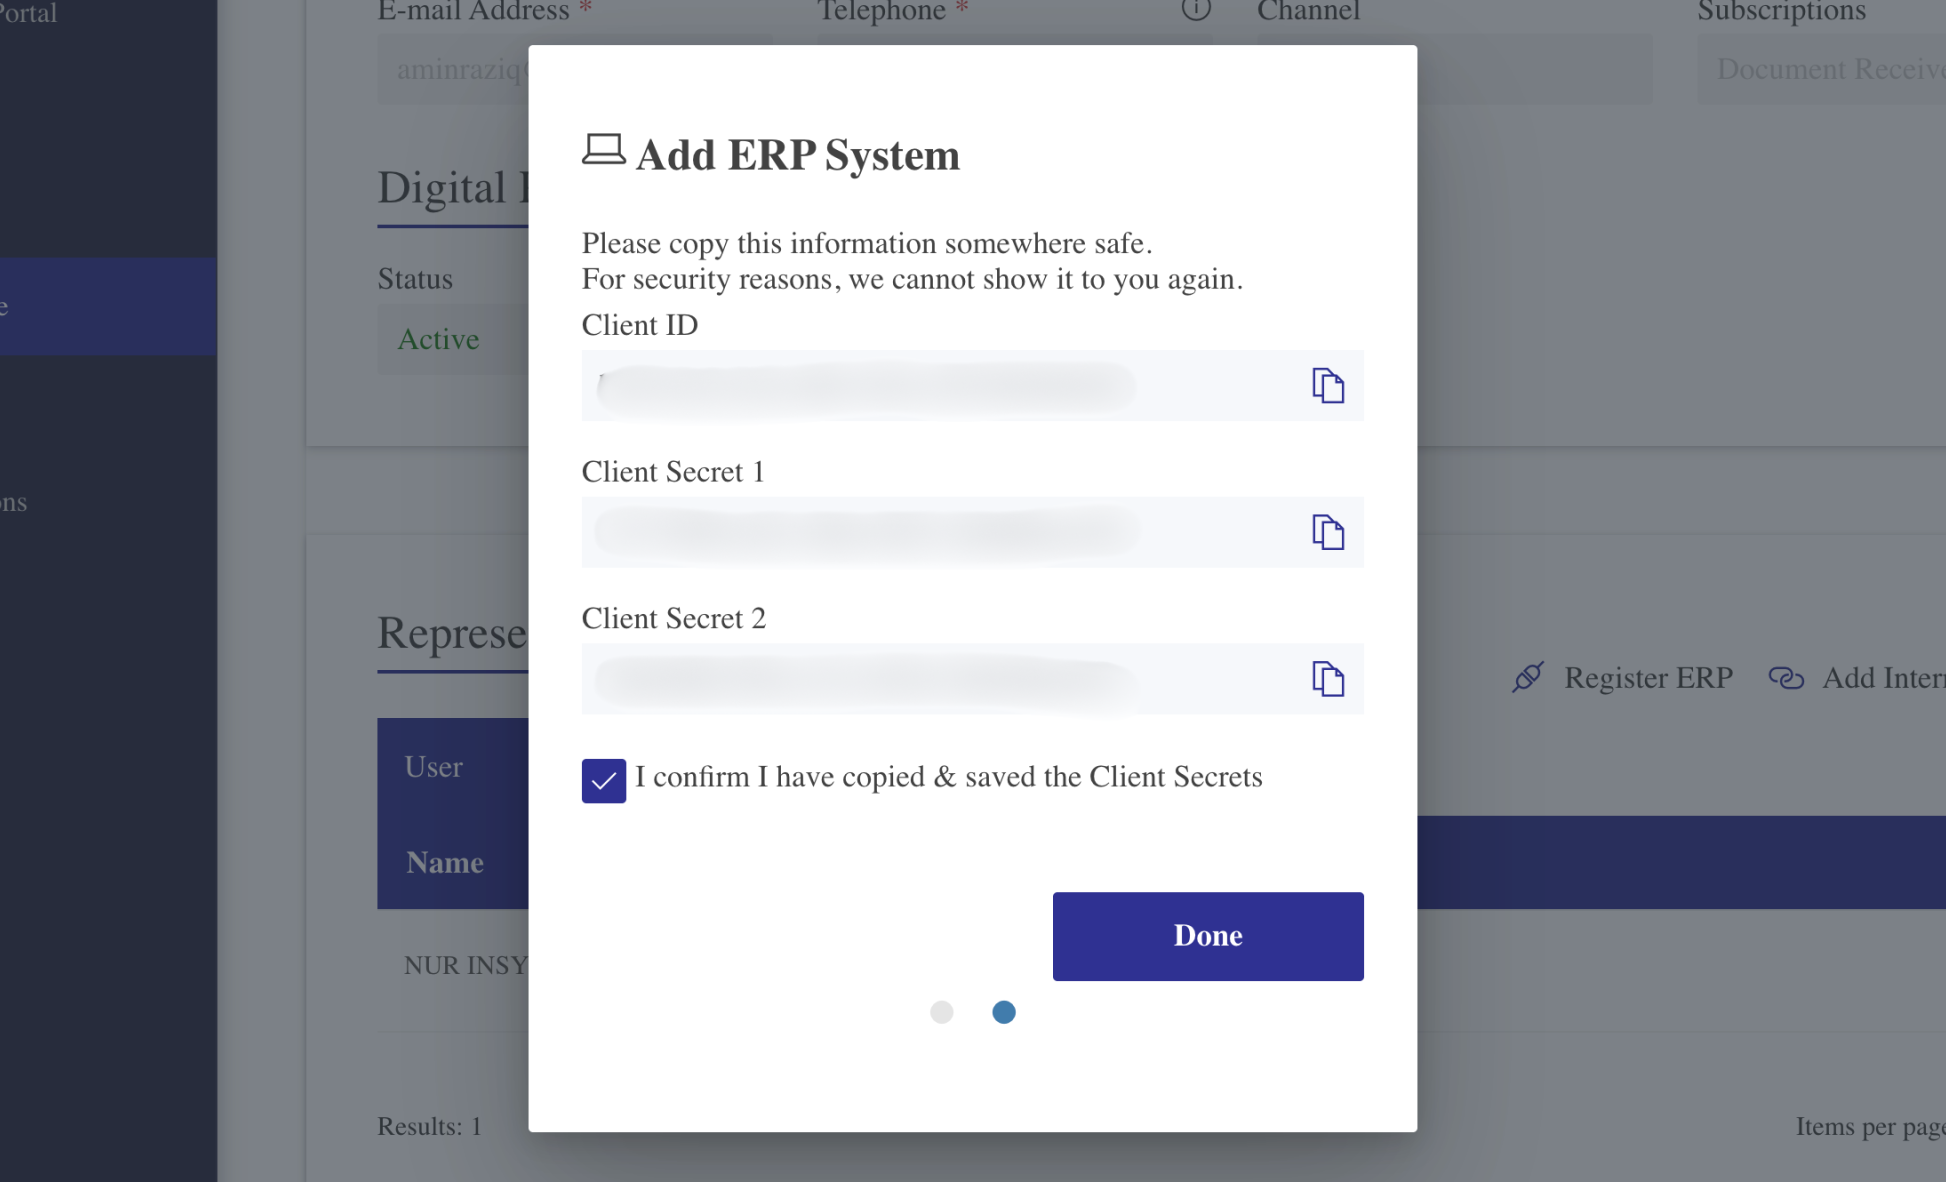
6. Save Client ID and Secret
After registration, the system will display your Client ID and Client Secret. Ensure you copy this information for later use, as it will be required for validation in AutoCount.
- Once copied, check the box to confirm the information has been saved.
- Click Done to finish the process. Your ERP table will now show the name you entered earlier.
Benefits of Adding an Intermediary & Registering ERP
Seamless Integration with AutoCount
Enhanced Compliance with LHDN Regulations
Streamlined Invoicing Process
Improved Cash Flow Management
Conclusion
By following these steps, you can easily add an intermediary and register your ERP system in the MyInvois Portal. This integration ensures that your e-Invoicing and ERP systems work seamlessly together, simplifying your business’s tax reporting process.
To fully streamline your invoicing and business operations, explore how AutoCount ERP integrates with e-Invoicing for seamless compliance and automation.
Frequently Asked Questions
Representative can add intermediaries?
Yes, representatives can add intermediaries if permission is granted. To provide this permission, you can set it under the Representative section in the MyInvois Portal. The same applies for adding ERP.
Sandbox or PreProd of MyTax need to upload document for verification when adding or linking a company?
The sandbox or preprod environment of MyTax does not verify your document. However, you still need to upload a file to bypass the registration. You can upload any PDF or image file to proceed.
In the MyInvois Portal, why did it not show "Add Intermediary"?
This happens because you are currently accessing your individual profile. Switch your taxpayer profile to your company, and you will see the Intermediary section.
Interested in Getting AutoCount for your Business?
Contact our sales team today to explore pricing options and get started with the perfect solution for you.
