-
AutoCount Accounting Features
-
- Approval Workflow
- Audit Trail
- Auto Save in Draft Folder
- AutoCount Contra Account
- AutoCount License Setting Guide
- Deposit Tracking & Management
- Documents Numbering Format
- Full Transfer and Partial Transfer
- Import Data to AutoCount Accounting Using Excel
- Informative Charts and Analytical Data
- Layout Customization
- Multi Pricing
- Sales and Services Tax
- Schedule Backup
- Search Lookup Edit
- View Documents Flow
- AutoCount Feature Stock Take
- Column Chooser
- Show Remaining (3) Collapse
-
AutoCount Cloud Accounting
-
AutoCount E-Invoice
-
AutoCount HRMS User Guide
-
AutoCount Modules
-
- Activity Stream
- Advanced Financial Report
- Advanced Item
- Advanced Multi-UOM
- Advanced Quotation Module
- Basic Multi-UOM
- Budget Module
- Consignment
- Filter By Salesman
- FOC Quantity
- Formula
- Item Batch
- Item Package
- Landing Cost
- Multi-Currency
- Multi-Dimensional Analysis
- Multi-Location
- Project Account
- Recurrence
- Remote Credit Control Module
- Stock Assembly
- User Defined Fields (UDF)
- AutoCount SST Hidden Functions
- AutoCount SST Submission - Service Tax
- AutoCount Scripting Module User Guide
- AutoCount Bonus Point Module User Guide
- Show Remaining (11) Collapse
-
AutoCount Plugins
-
- Fixed Assets Management
- Goldsmith
- TD Ordering Mobile Apps
- TD Stock Mobile Apps
- Universal Import Plugin
- DMS Import Plugin
- AutoCount Item Scope Plugin
- AutoCount Easy Knock Off Plugin
- AutoCount Pick List Plugin User Guide
- AutoCount Agent Validation Plugin User Guide
- AutoCount Barcode Generator Plugin User Guide
- AutoCount Bill Remark Plugin User Guide
- AutoCount Easy Batch Number Entry Plugin User Guide
- AutoCount Recurring Invoice Plugin User Guide
- AutoCount Easy Photo 2.0 User Guide
- AutoCount Pain Tracker User Guide
- AutoCount Credit Memo Plugin User Guide
- Show Remaining (2) Collapse
-
- AutoCount Easy Recurrence Plugin
- AutoCount Recurring Billing Plugin
- Event Management System
- AutoCount To-Do List Plugin
- AutoCount AutoBank Reconciliation Plugin
- Intercompany Billing Plugin User Guide
- AutoCount Basket Plugin User Guide
- Lead Management 2.0 Plugin
- AutoCount Service Contract Plugin User Guide
- Autocount Repacking Plugin
- AutoCount Scale Barcode Plugin User Guide
- AutoCount Progressive Billing
- AutoCount Optical Plugin
- AutoCount Meter Reading Plugin User Guide
- AutoCount Car Tint Film Plugin
- AutoCount Leasing Plugin User Guide
- AutoCount Integrator Plugin
- AutoCount Procurement Planning Plugin
- Show Remaining (3) Collapse
-
-
Form Template
-
Report Template
-
- Advance Quotation
- Cash Sale
- Consignment
- Consignment Movement
- Credit Note
- Debit Note
- Delivery Order
- FOC Quantity Analysis By Document Report
- Invoice
- Item Package Sales Report
- Monthly Sales Analysis
- Outstanding Sales Order Listing
- Profit And Loss Of Documents
- Quotation
- Sales Agent Contribution Report
- Sales Order
- Top/Bottom Sales Ranking
- Show Remaining (2) Collapse
-
- Available Stock Status Report
- Expired Item Batch Listing
- Inventory Physical Worksheet
- Stock Adjustment
- Stock Aging Report
- Stock Assembly
- Stock Assembly Order
- Stock Balance By Location
- Stock Balance Report
- Stock Card Report
- Stock Disassembly
- Stock Issue
- Stock Item Profit Margin
- Stock Movement Report
- Stock Receive
- Stock Take
- Stock Transfer
- Stock Write Off
- Show Remaining (3) Collapse
AutoCount Module: Basic Multi-UOM
The Ultimate Solution for Inventory Management
Inventory management is a cornerstone of operational efficiency for any business. For companies dealing with diverse product categories, managing stock in multiple units of measurement (UOM) can be daunting. The AutoCount Basic Multi-UOM Module offers a cutting-edge solution to this challenge, enabling seamless management of inventory across different UOMs. This comprehensive guide explores the features, benefits, and real-world applications of AutoCount Basic Multi-UOM while providing actionable steps to maximize its potential.
AutoCount Basic Multi-UOM Module Video Guide
- AutoCount Basic Multi-UOM Module (EN)
Basic Multi-UOM Module Setup
Integration & Basic Multi-UOM Module Setup
- AutoCount Basic Multi-UOM Module (CN)
多计量单位模块基本设置
集成和基本多计量单位模块设置
Understanding AutoCount Basic Multi - UOM
The term UOM, or Unit of Measurement, refers to how products are quantified. For example:

A beverage distributor may purchase stock in cartons (CTN) but sell them in individual cans (CAN).

A manufacturing unit might order fabric by rolls (ROLL) but use meters (M) during production.
The AutoCount Basic Multi-UOM Module enables businesses to track, purchase, sell, and report inventory in different UOMs while maintaining consistency and accuracy.
Why Choose AutoCount Basic Multi-UOM?
Improved Accuracy
Firstly, by automating UOM conversions, the module reduces human errors. Thus, ensuring precise stock updates.
Step-by-Step Guide to Using AutoCount Basic Multi-UOM
Setting Up AutoCount Basic Multi-UOM
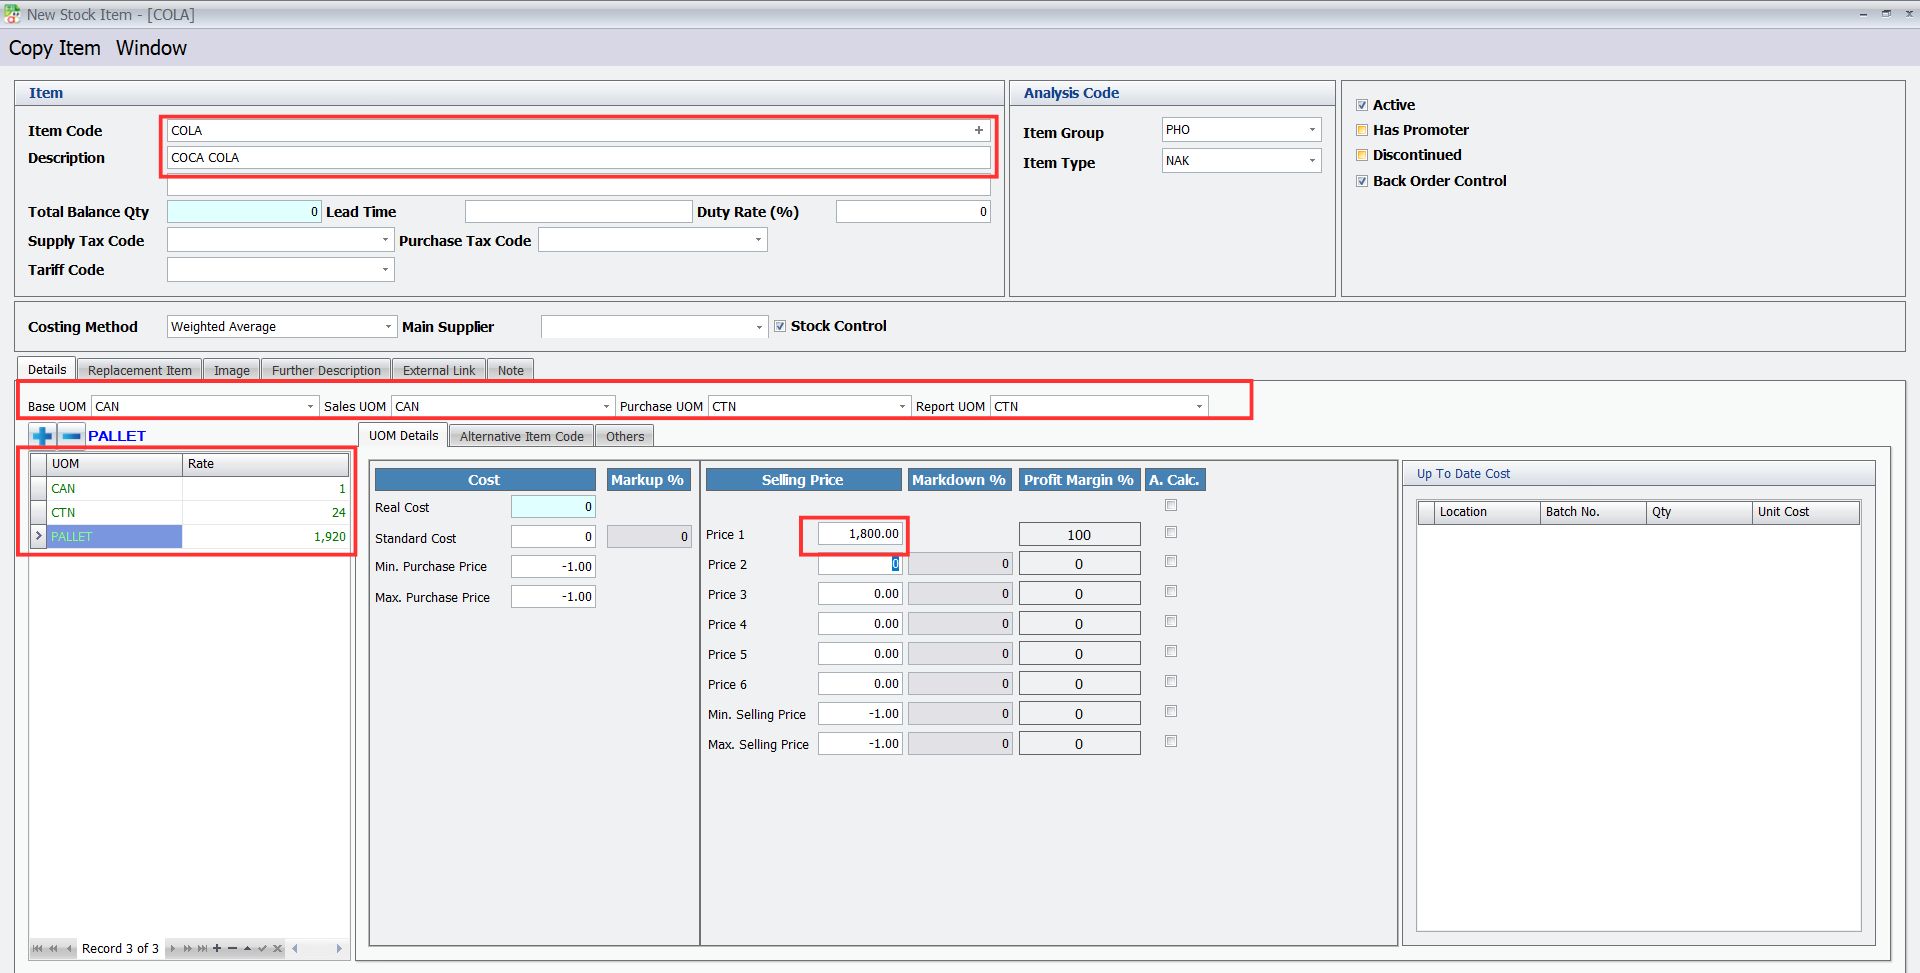
1. How to Create New Items
- Navigate to Stock > Stock Item Maintenance

Select “New.” Check if your system supports the Basic Multi-UOM Module (available in basic edition or above).

- Enable the module to access fields for Base UOM, Sales UOM, Purchase UOM, and Report UOM.
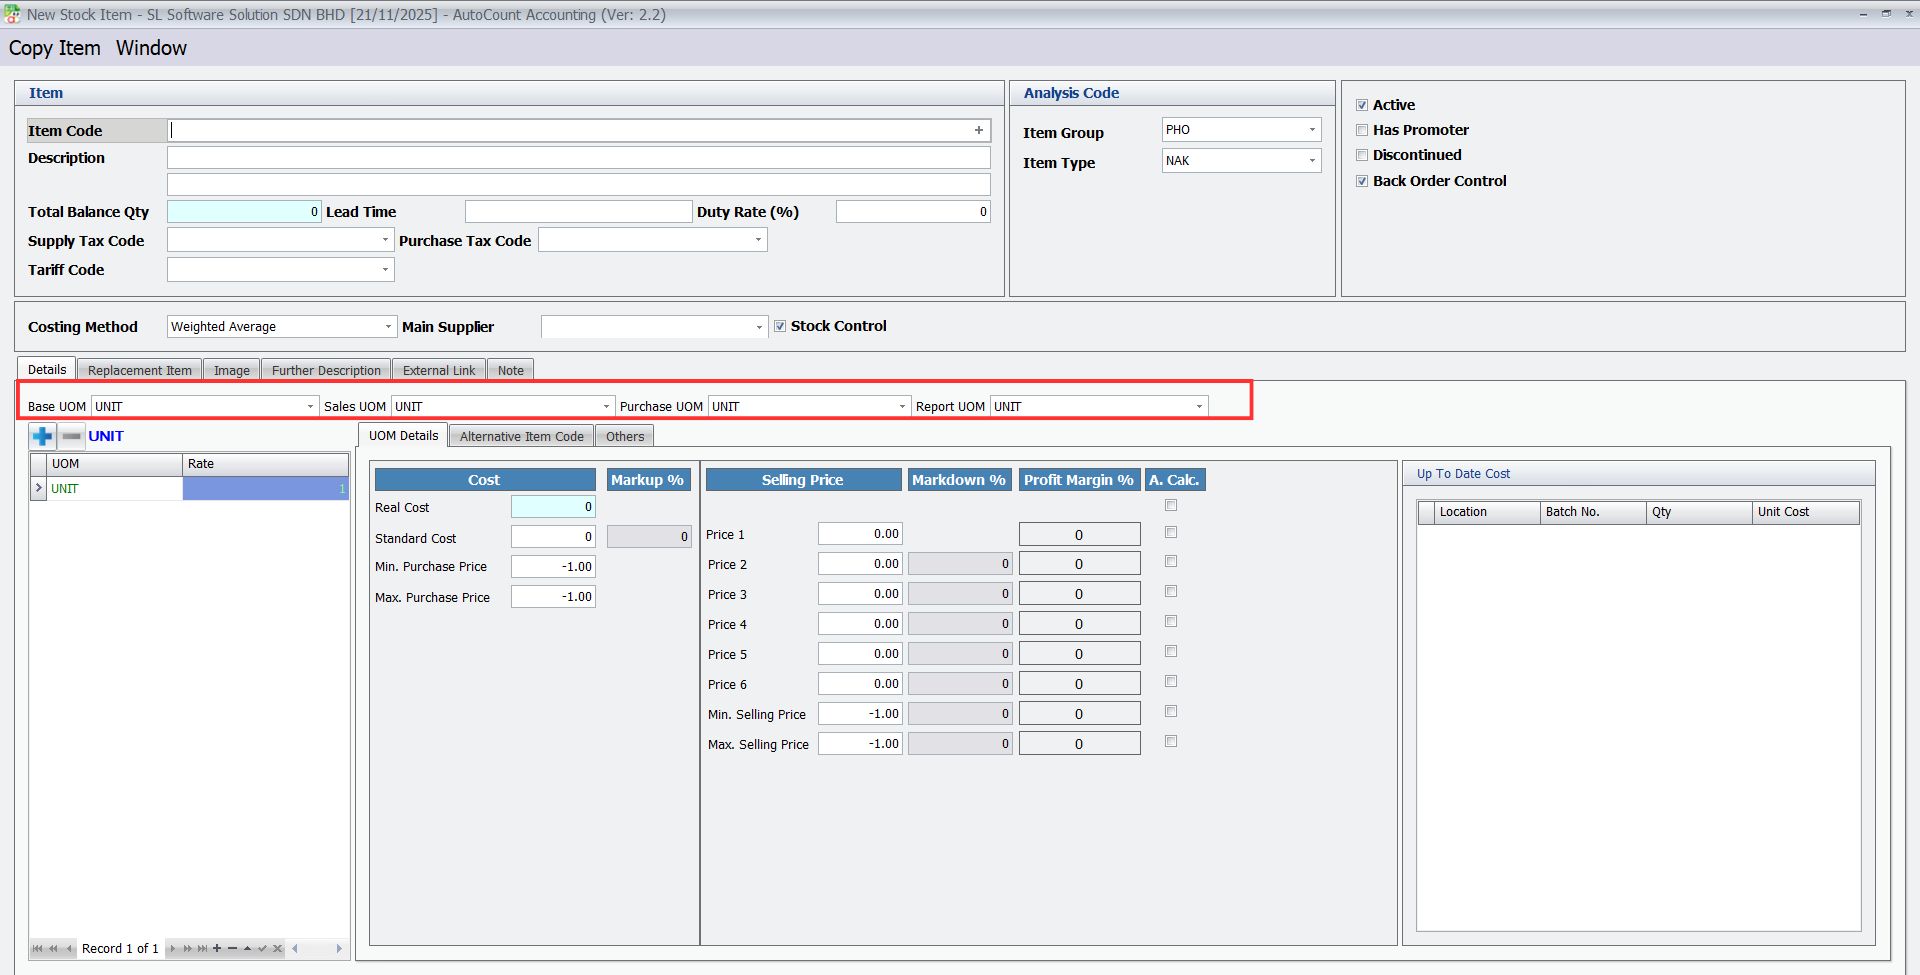
- Enter your Item Code, Description, UOM, Rate, and Price for new items
- After that, select your units for Sales UOM, Purchase UOM and Report UOM
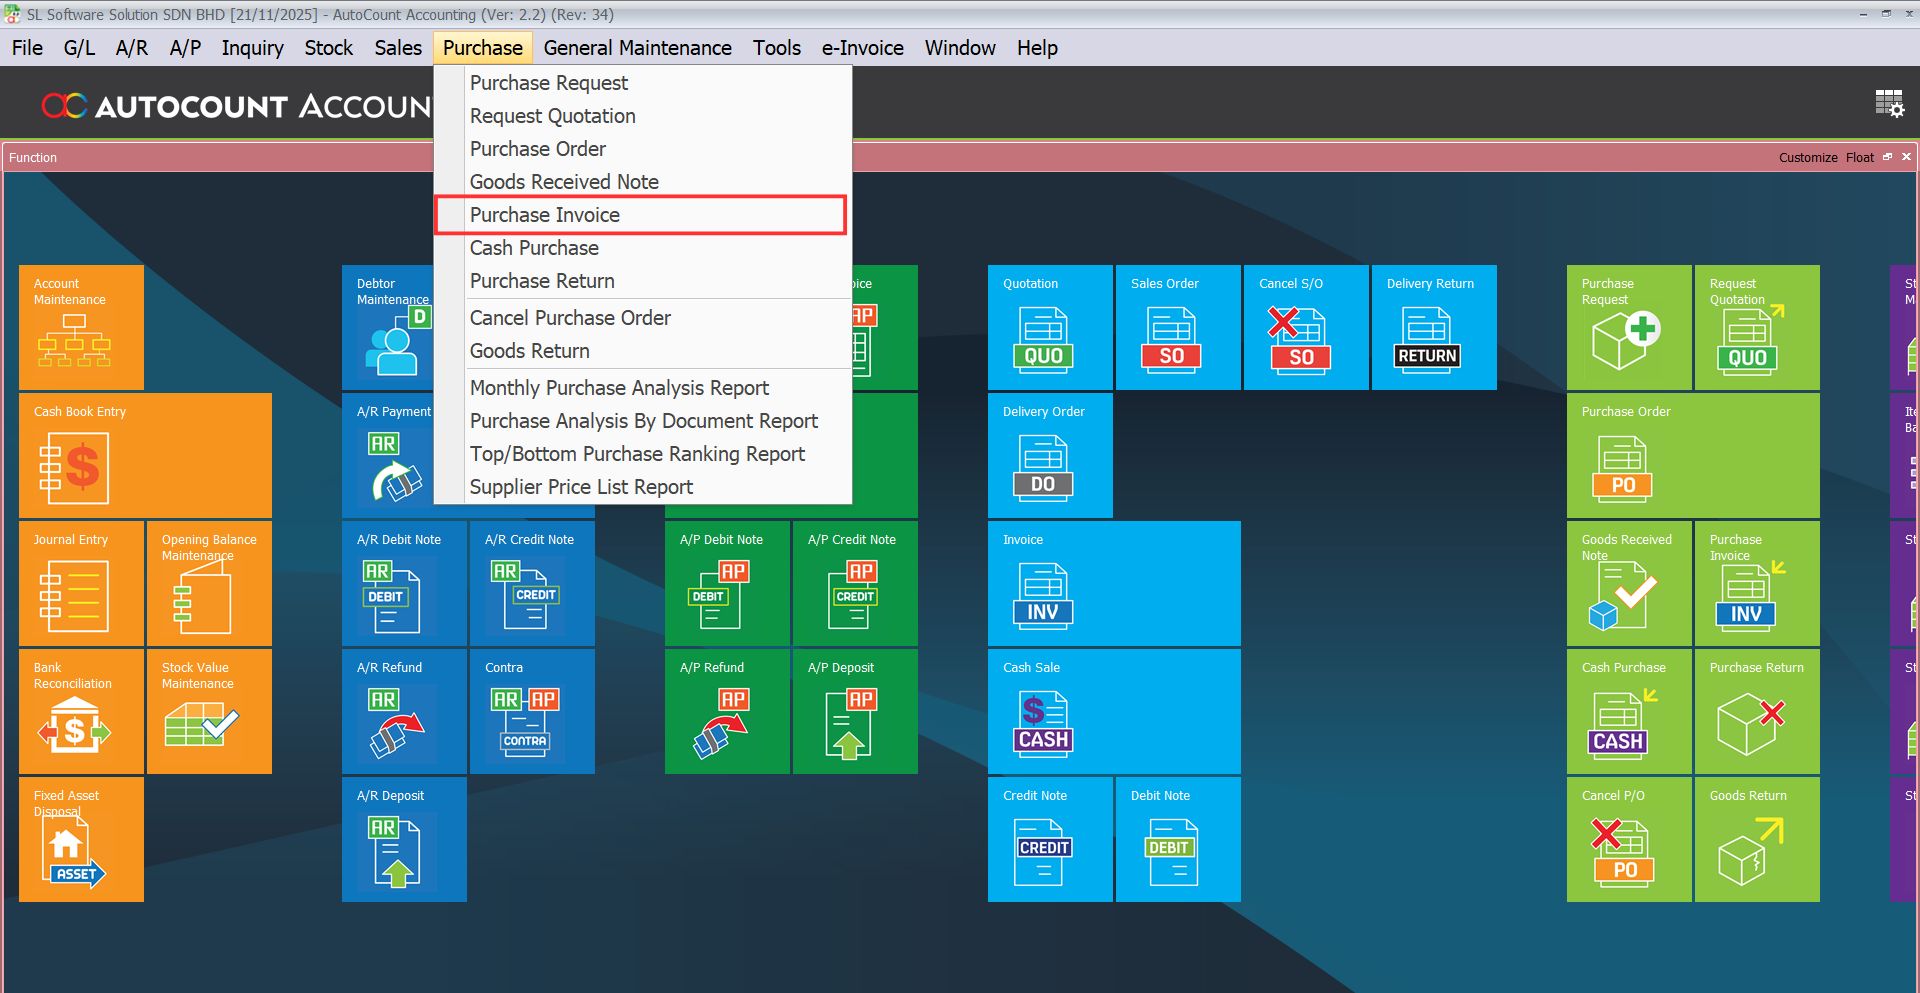
2. Test Items in Purchase
This function is available in Purchase. All updates sync across your purchase, inventory, and reporting modules, ensuring real-time accuracy and traceability.
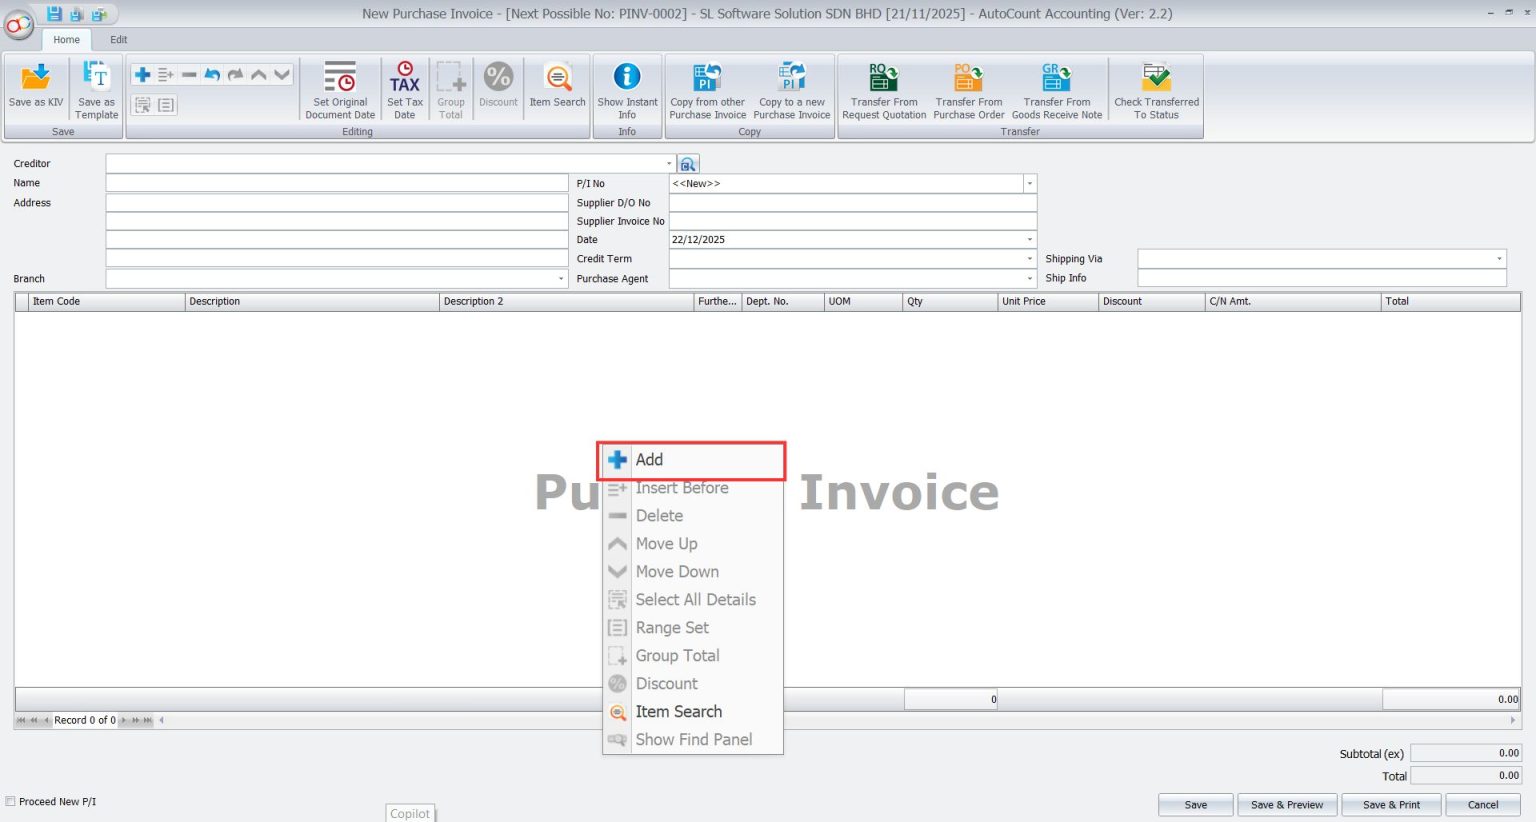
- Navigate to Purchase > Purchase Invoice > Select “New”
- Right click on the blank space of Purchase Invoice and a row of options will pop up.
- Select “Add”
- In the Item Code section, click on the column and select the Item you want.
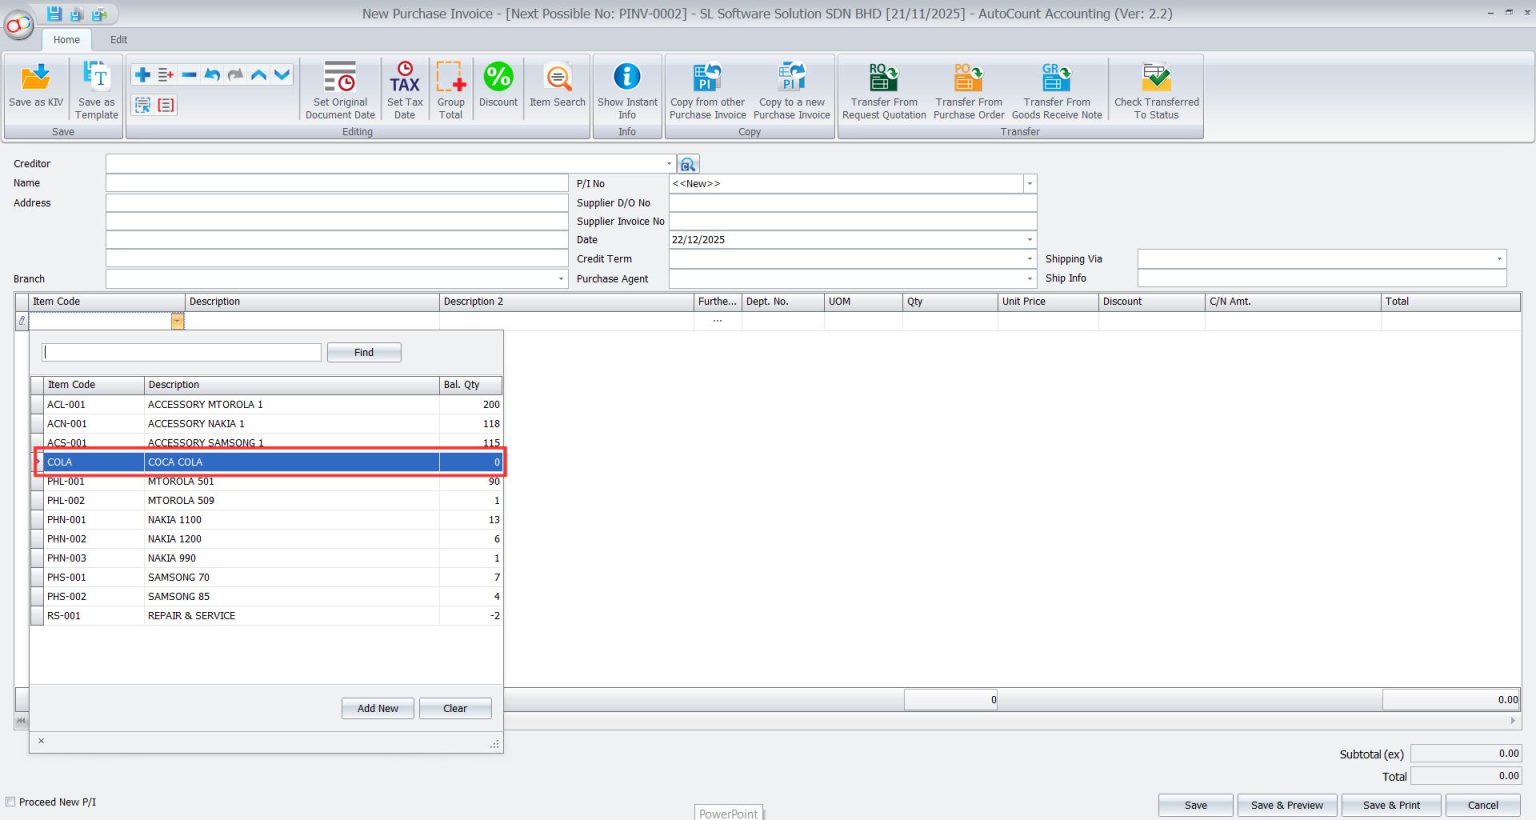
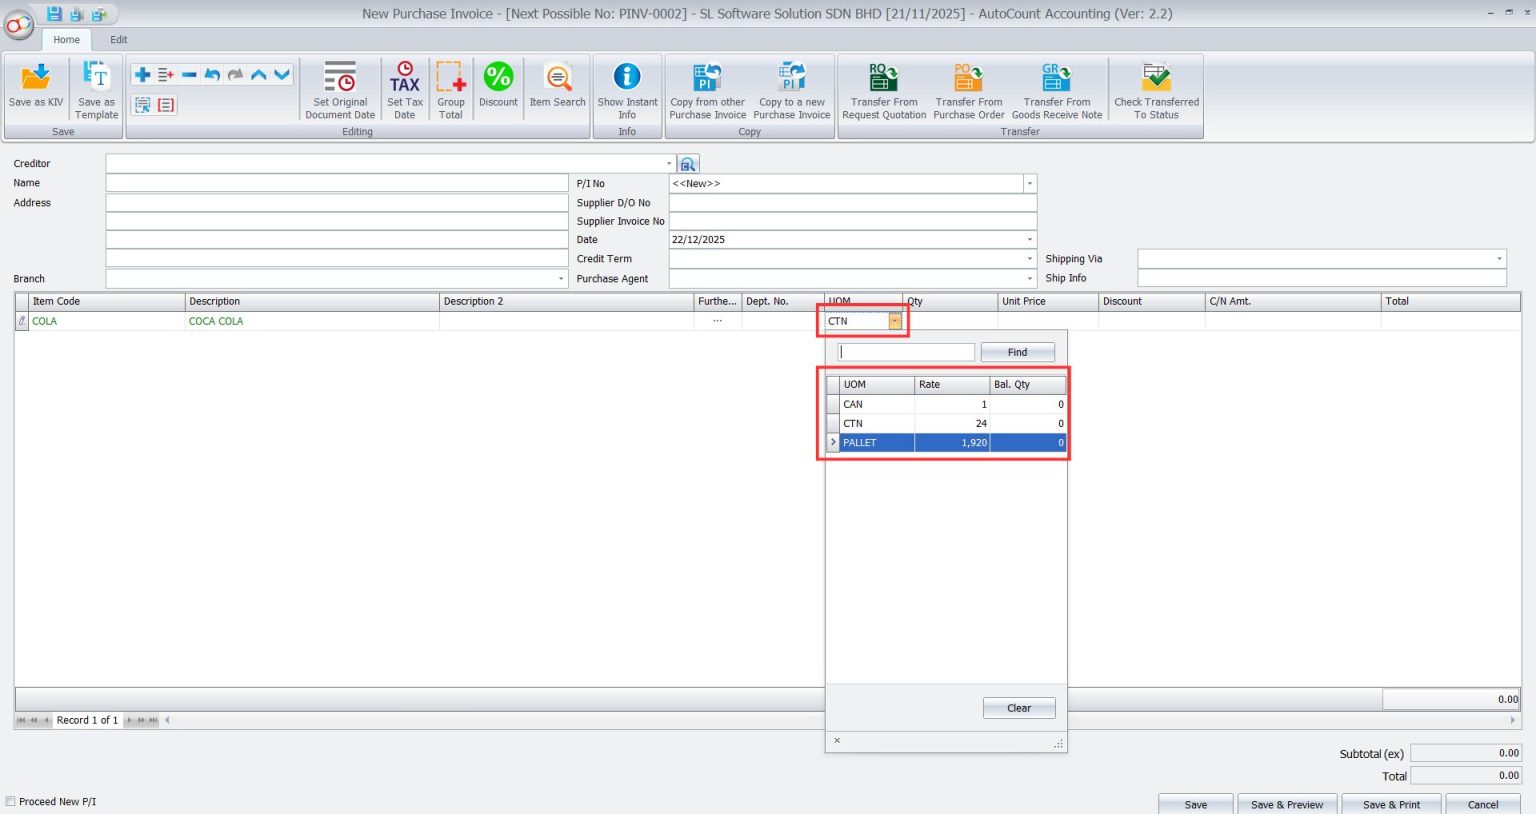
- In the UOM (Unit of Measurement) section, the default option such as CTN (Carton), has been applied based on settings configured earlier.
- This ensures consistency and accuracy when processing purchase transactions.
If needed, adjust the UOM by clicking the UOM field.
3. Test Items in Sales
This function is available in Sales.
- Navigate to Sales > Invoice > Select “New”
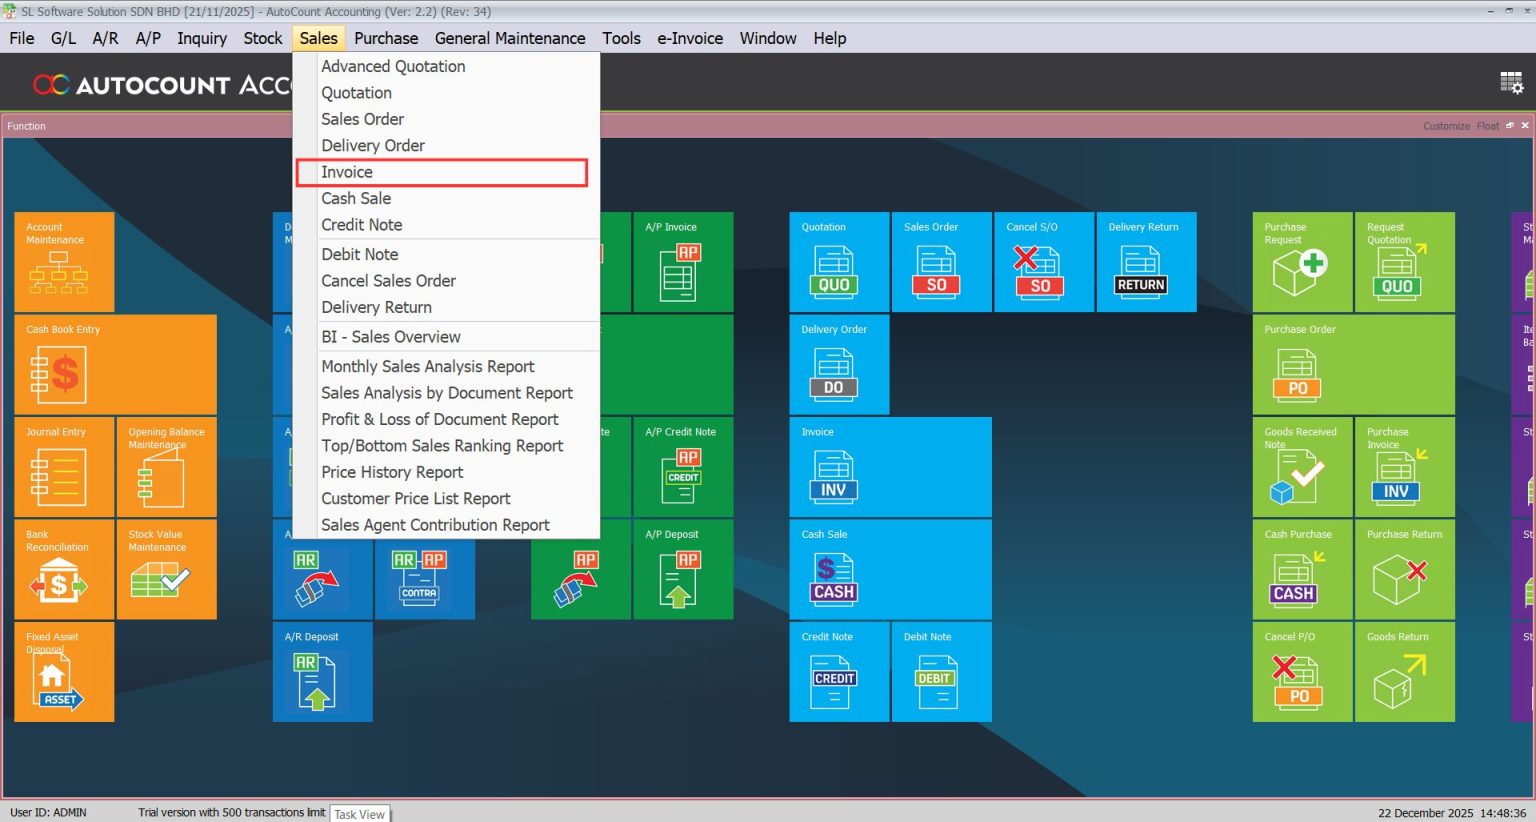
- Right click on the blank space of Invoice and select “Add”.
- Choose the Item Code.
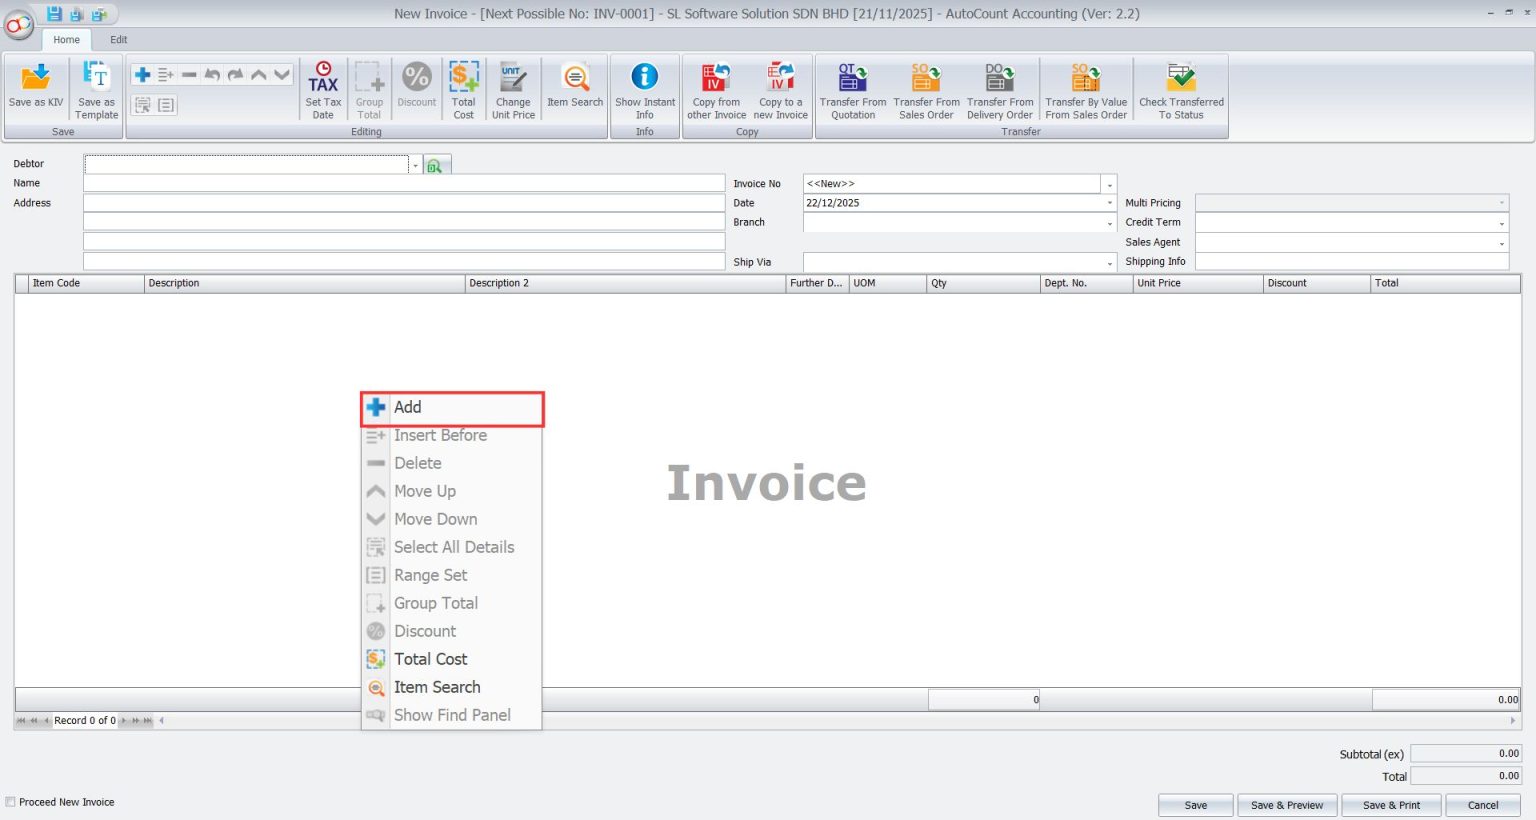
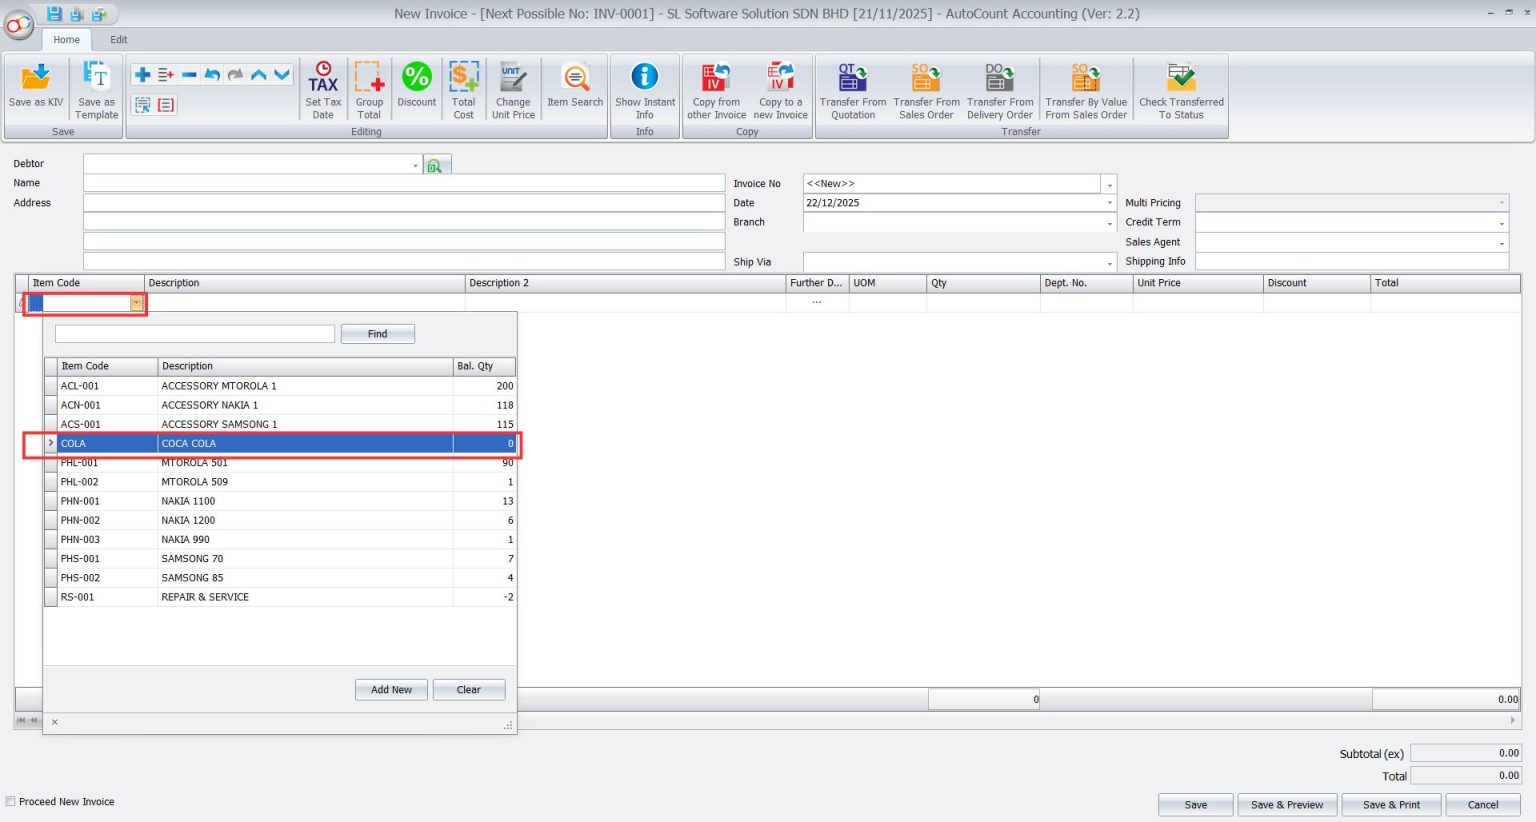
- Adjust the UOM if necessary.
Query basic reports of multiple measurement units
4. Basic Multi-UOM Report
Perform test before use.
For example, if the merchant buys goods for 15 CTN and sells them for 6 CAN, the final report should show 14.75 CTN.
Purchase > Purchase Invoice. select “New”

- Same as the previous add items.
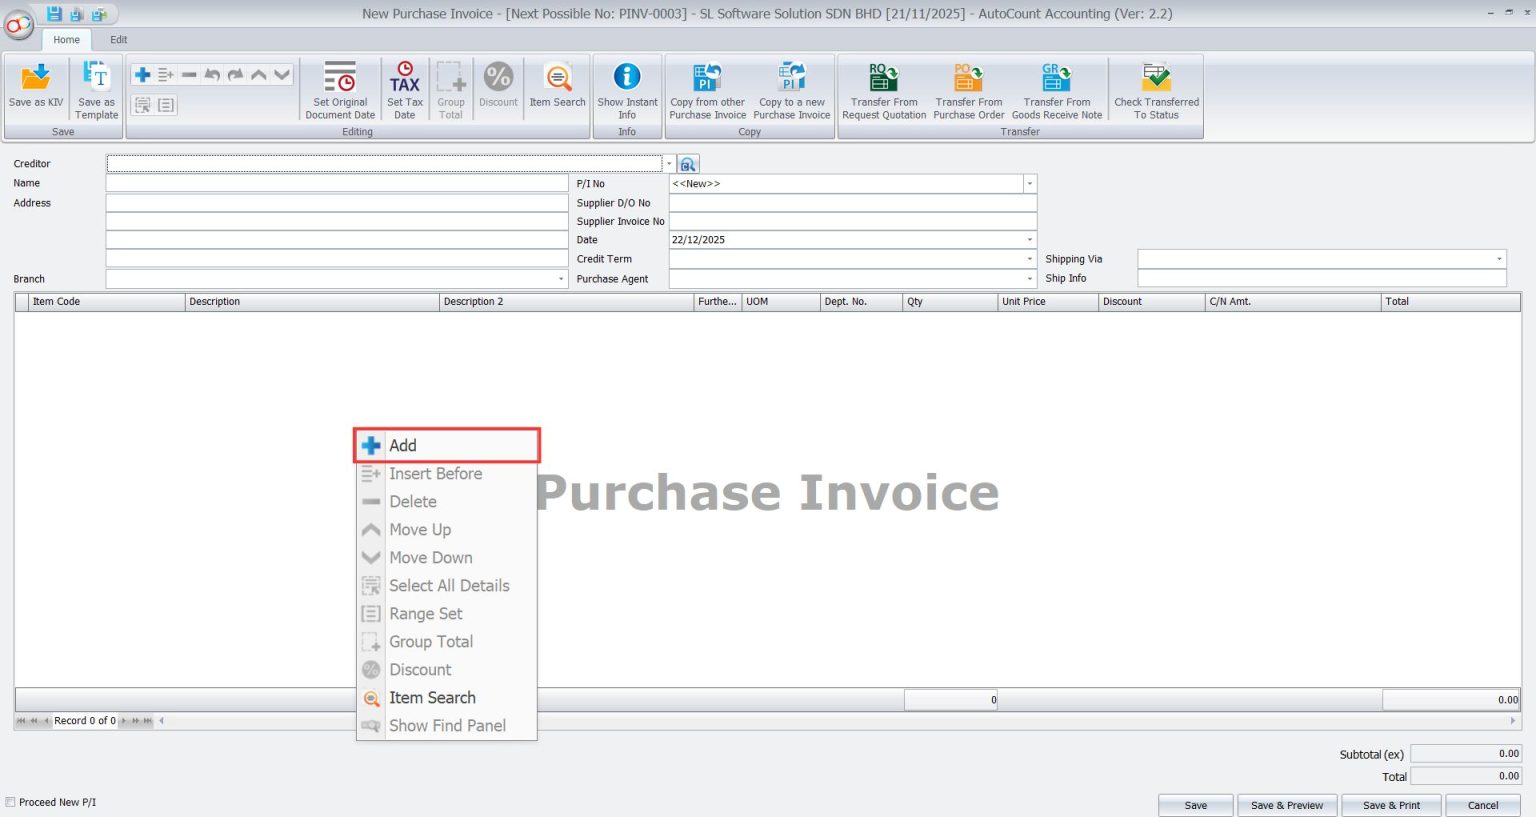
- Select a supplier in the “Creditor” section.
- Enter the quantity and price you want to buy and click “Save”

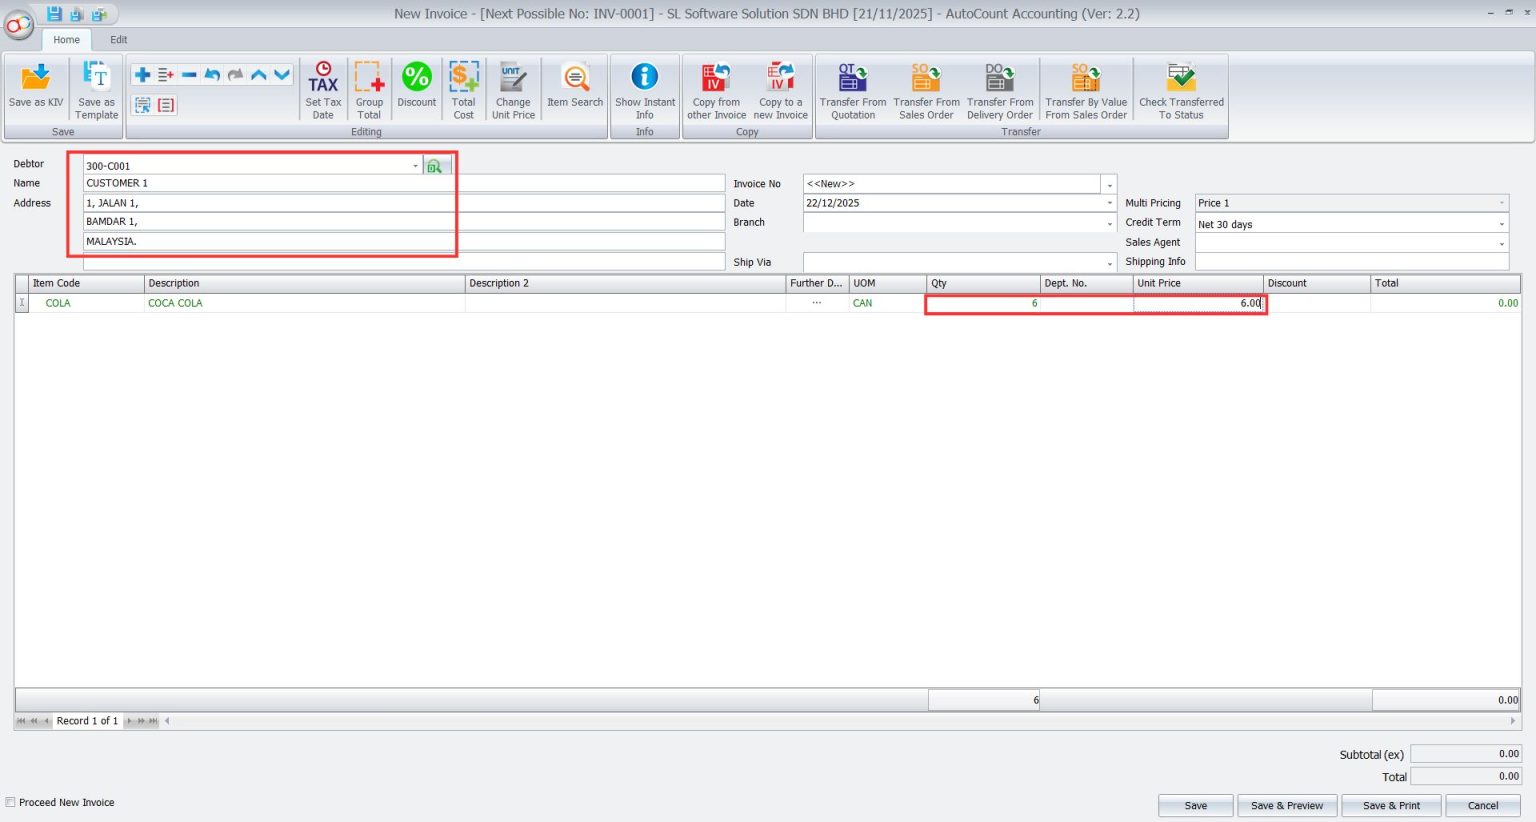
- Next, navigate to Sales > Invoice > Select “New”
- Right click on the blank space of Invoice and a row of options will pop up.
- Select “Add”
- Select a Customer in the “Debtor” section.
- Then enter the quantity and price you want to sell and click “Save”
- Next, navigate to Stock > Stock Balance Report.
- Select “Inquiry”, you will find that the format of Qty is different from our example.
- This is because there are two formats that can be presented here
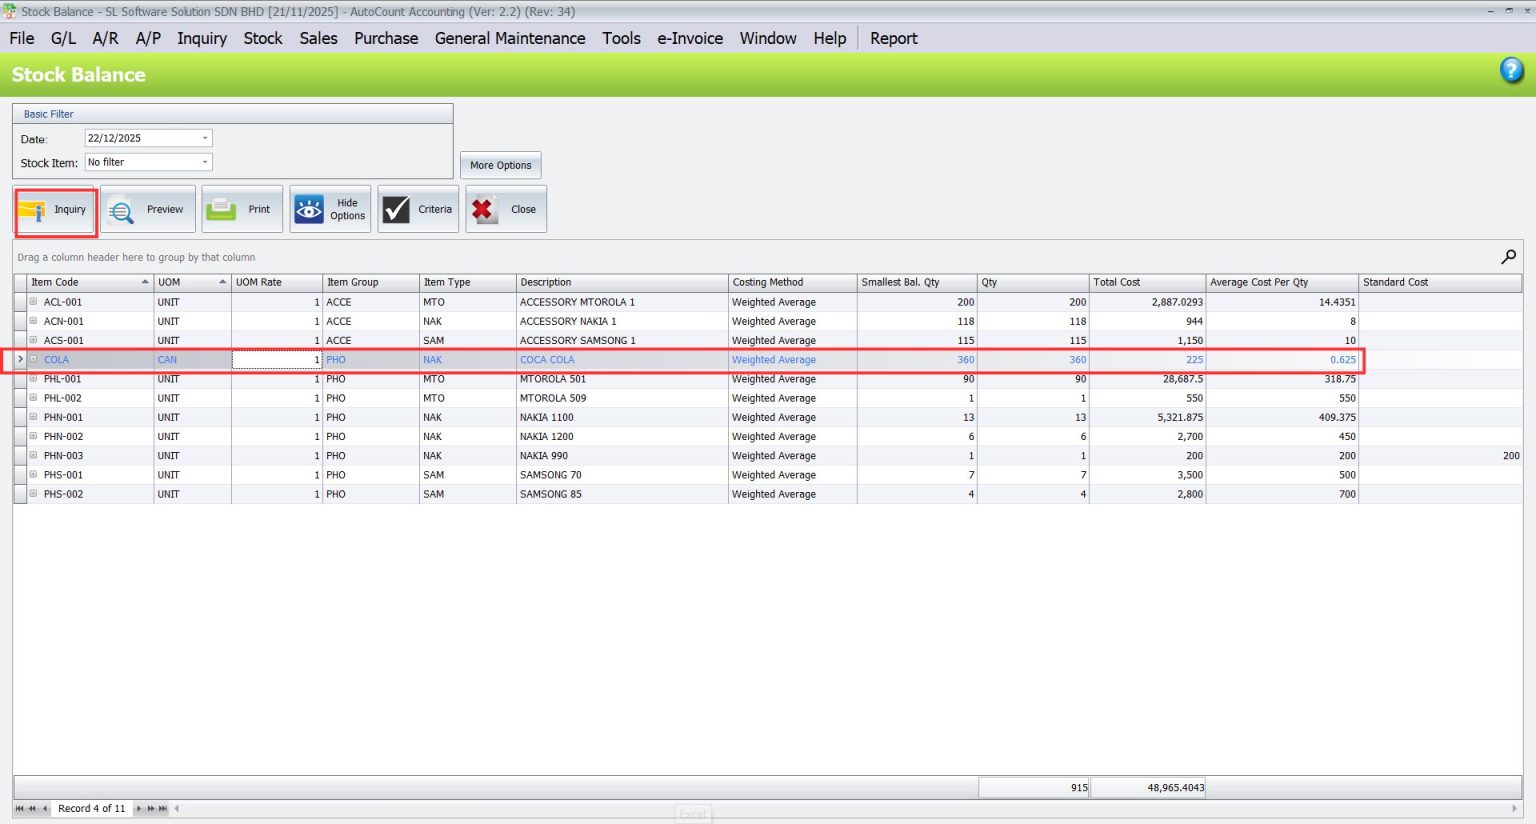
- Select More Option > UOM Option > Show Default Report UOM > OK
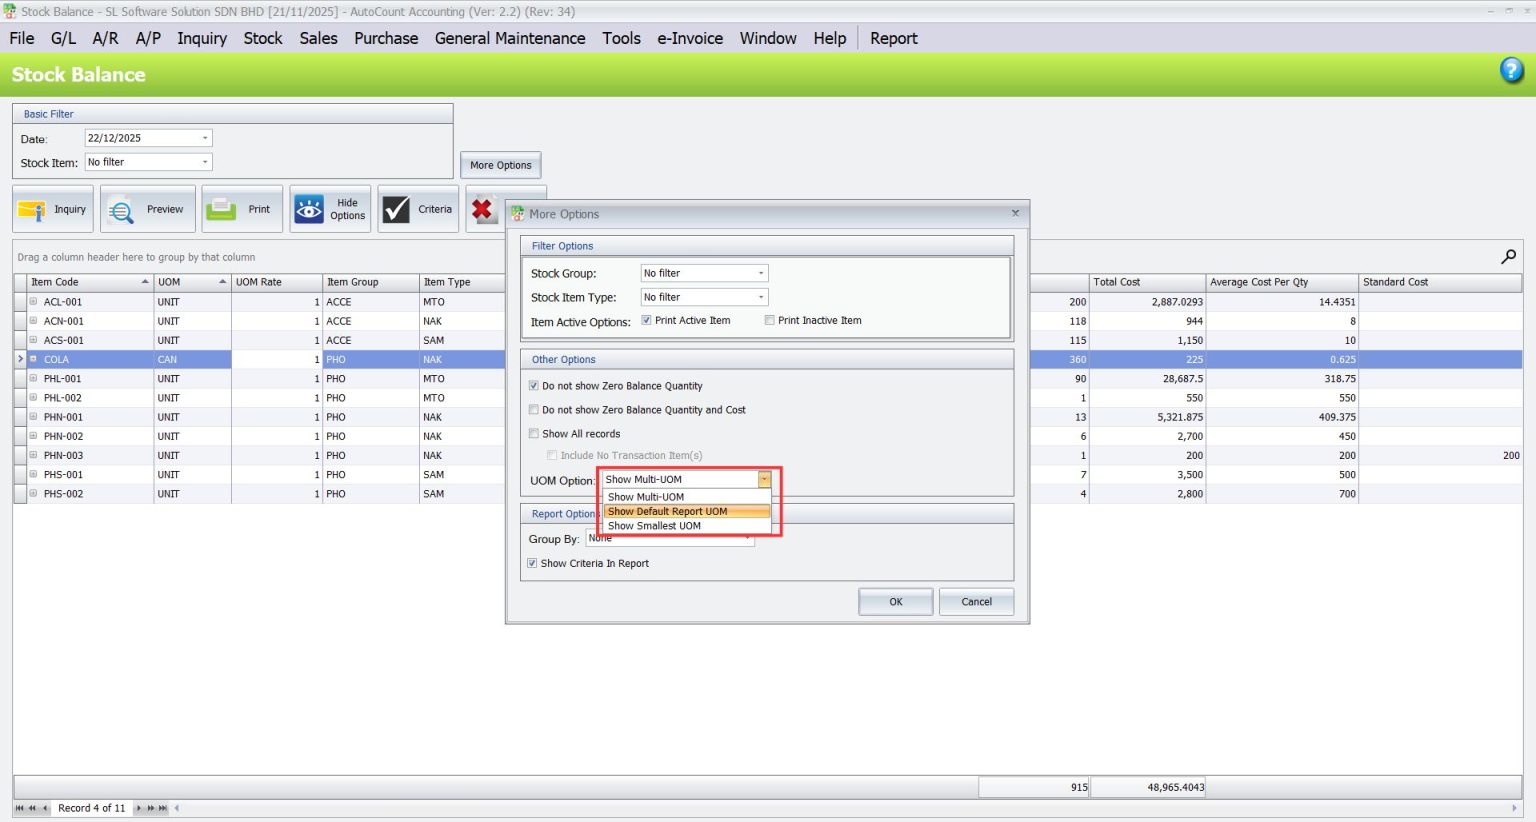
- Select Inquiry once more, the Qty will prompt different format 14.75 CTN

Real-World Applications of AutoCount Basic Multi-UOM

Retail Chains
Purchase inventory in bulk (CTN), sell as individual items (PCS), and generate stock reports in any UOM format

Wholesale Distribution
Track large-scale purchases in pallets while managing sales in boxes or units

Manufacturing
Streamline raw material management, converting between bulk orders & production quantities
Pro Tips for Using AutoCount Basic Multi-UOM Effectively
If you want to upgrade to Advanced Multi-UOM, check out Advanced Multi-UOM for more details.
Conclusion
The AutoCount Basic Multi-UOM Module is a game-changer for businesses looking to streamline inventory management. Whether you’re in retail, manufacturing, or wholesale, this module empowers you to track and report stick with unparalleled accuracy and efficiency.
Frequently Asked Questions
What versions of AutoCount support the Multi-UOM Module?
Basic edition and higher versions support the feature. Ensure your software is compatible before enabling it.
Can I switch between UOMs during transactions?
Yes, the system allows you to adjust UOMs directly within purchase or sales invoices.
How does the module ensure reporting accuracy?
It automates conversions and provides customizable UOM options in reports.
Is this module suitable for small businesses?
Absolutely! The Basic Multi-UOM Module is ideal for businesses of all sizes seeking to simplify inventory management.
What is the difference between Basic and Advanced Multi-UOM Modules?
The Basic Module covers essential inventory needs, while the Advanced Module offers additional features like flexible UOM hierarchies and detailed analytics.
How do I enable the Multi-UOM feature?
Under Tools > Program Control, check version compatibility in Product Edition. Then, enable the module in Module Settings.
Interested in Getting AutoCount for your Business?
Contact our sales team today to explore pricing options and get started with the perfect solution for you.