-
AutoCount Accounting Features
-
- Approval Workflow
- Audit Trail
- Auto Save in Draft Folder
- AutoCount Contra Account
- AutoCount License Setting Guide
- Deposit Tracking & Management
- Documents Numbering Format
- Full Transfer and Partial Transfer
- Import Data to AutoCount Accounting Using Excel
- Informative Charts and Analytical Data
- Layout Customization
- Multi Pricing
- Sales and Services Tax
- Schedule Backup
- Search Lookup Edit
- View Documents Flow
- AutoCount Feature Stock Take
- Column Chooser
- Show Remaining (3) Collapse
-
AutoCount Cloud Accounting
-
AutoCount E-Invoice
-
AutoCount HRMS User Guide
-
AutoCount Modules
-
- Activity Stream
- Advanced Financial Report
- Advanced Item
- Advanced Multi-UOM
- Advanced Quotation Module
- Basic Multi-UOM
- Budget Module
- Consignment
- Filter By Salesman
- FOC Quantity
- Formula
- Item Batch
- Item Package
- Landing Cost
- Multi-Currency
- Multi-Dimensional Analysis
- Multi-Location
- Project Account
- Recurrence
- Remote Credit Control Module
- Stock Assembly
- User Defined Fields (UDF)
- AutoCount SST Hidden Functions
- AutoCount SST Submission - Service Tax
- AutoCount Scripting Module User Guide
- AutoCount Bonus Point Module User Guide
- Show Remaining (11) Collapse
-
AutoCount Plugins
-
- Fixed Assets Management
- Goldsmith
- TD Ordering Mobile Apps
- TD Stock Mobile Apps
- Universal Import Plugin
- DMS Import Plugin
- AutoCount Item Scope Plugin
- AutoCount Easy Knock Off Plugin
- AutoCount Pick List Plugin User Guide
- AutoCount Agent Validation Plugin User Guide
- AutoCount Barcode Generator Plugin User Guide
- AutoCount Bill Remark Plugin User Guide
- AutoCount Easy Batch Number Entry Plugin User Guide
- AutoCount Recurring Invoice Plugin User Guide
- AutoCount Easy Photo 2.0 User Guide
- AutoCount Pain Tracker User Guide
- AutoCount Credit Memo Plugin User Guide
- Show Remaining (2) Collapse
-
- AutoCount Easy Recurrence Plugin
- AutoCount Recurring Billing Plugin
- Event Management System
- AutoCount To-Do List Plugin
- AutoCount AutoBank Reconciliation Plugin
- Intercompany Billing Plugin User Guide
- AutoCount Basket Plugin User Guide
- Lead Management 2.0 Plugin
- AutoCount Service Contract Plugin User Guide
- Autocount Repacking Plugin
- AutoCount Scale Barcode Plugin User Guide
- AutoCount Progressive Billing
- AutoCount Optical Plugin
- AutoCount Meter Reading Plugin User Guide
- AutoCount Car Tint Film Plugin
- AutoCount Leasing Plugin User Guide
- AutoCount Integrator Plugin
- AutoCount Procurement Planning Plugin
- Show Remaining (3) Collapse
-
-
Form Template
-
Report Template
-
- Advance Quotation
- Cash Sale
- Consignment
- Consignment Movement
- Credit Note
- Debit Note
- Delivery Order
- FOC Quantity Analysis By Document Report
- Invoice
- Item Package Sales Report
- Monthly Sales Analysis
- Outstanding Sales Order Listing
- Profit And Loss Of Documents
- Quotation
- Sales Agent Contribution Report
- Sales Order
- Top/Bottom Sales Ranking
- Show Remaining (2) Collapse
-
- Available Stock Status Report
- Expired Item Batch Listing
- Inventory Physical Worksheet
- Stock Adjustment
- Stock Aging Report
- Stock Assembly
- Stock Assembly Order
- Stock Balance By Location
- Stock Balance Report
- Stock Card Report
- Stock Disassembly
- Stock Issue
- Stock Item Profit Margin
- Stock Movement Report
- Stock Receive
- Stock Take
- Stock Transfer
- Stock Write Off
- Show Remaining (3) Collapse
AutoCount Cloud Accounting: Subscribe and Create an Account Book
Introduction to AutoCount Cloud Accounting
AutoCount Cloud Accounting is a cloud-based solution designed for modern businesses to manage their accounting needs efficiently and one way that they can help is to allow businesses to subscribe and create an account book. With its user-friendly interface and powerful features, it enables businesses to stay on top of their financial activities, ensuring accuracy and compliance.
How to Subscribe to a New AutoCount Cloud Account
Creating a new account with AutoCount Cloud is a straightforward process. Follow these steps:
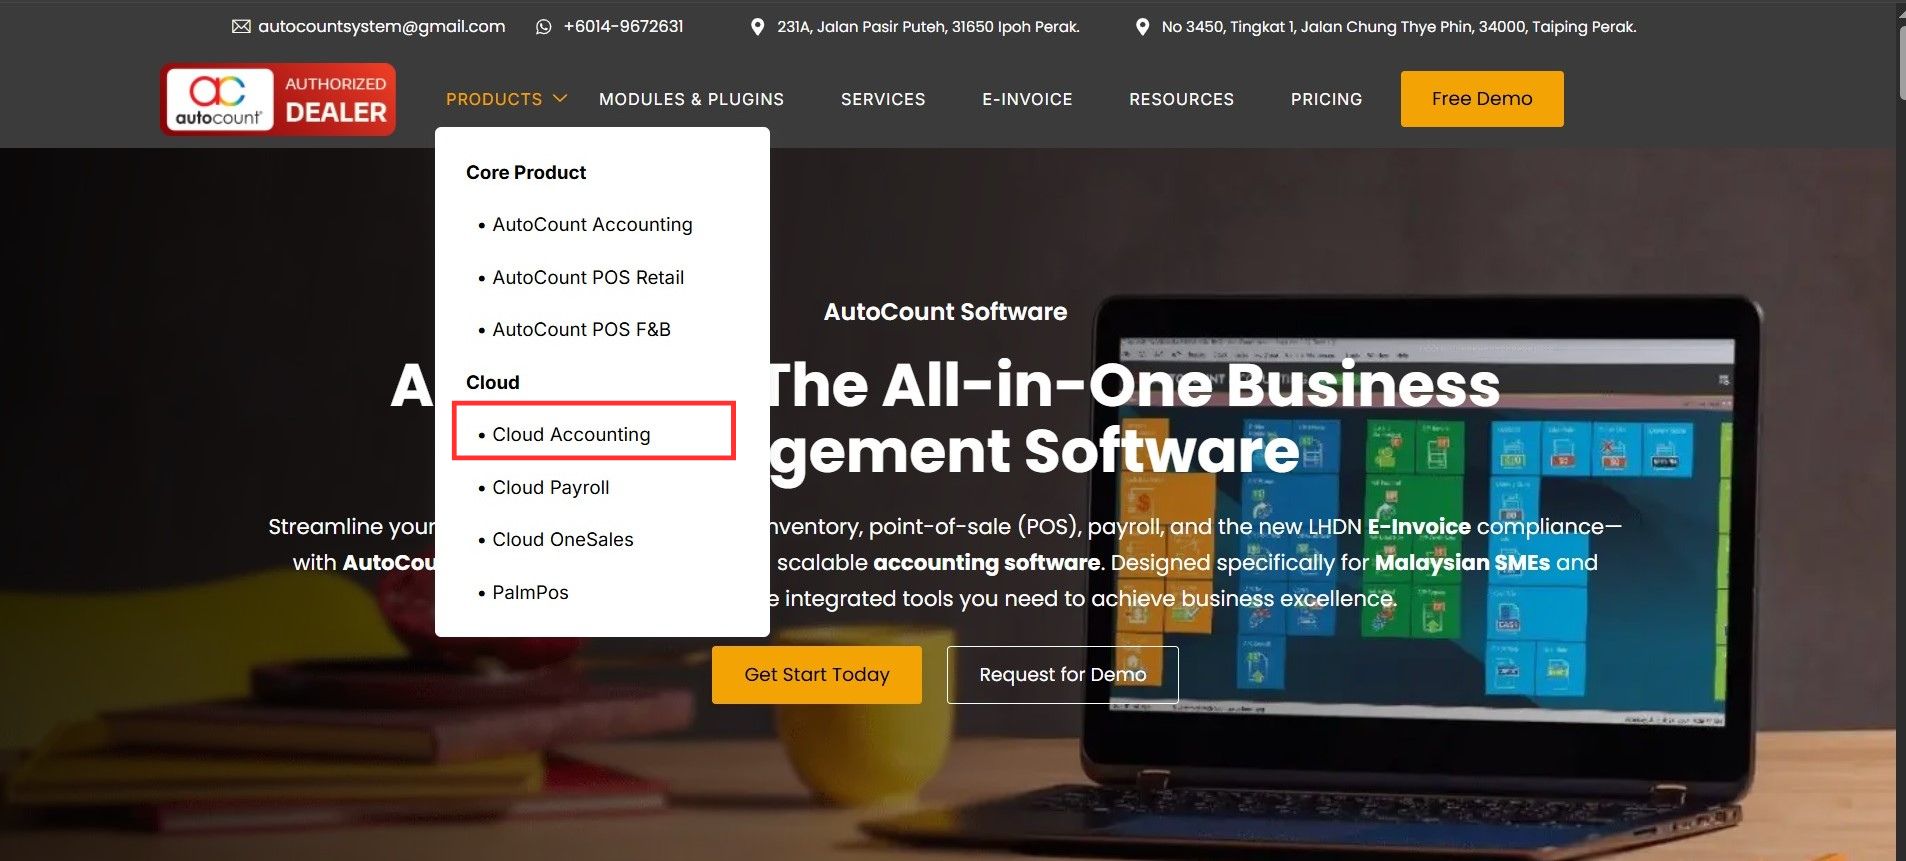
1. Visit the AutoCount Website
- Firstly, use the email and password created during registration.
- After that, navigate to our AutoCount Homepage and select Cloud Accounting from the Products drop down menu.
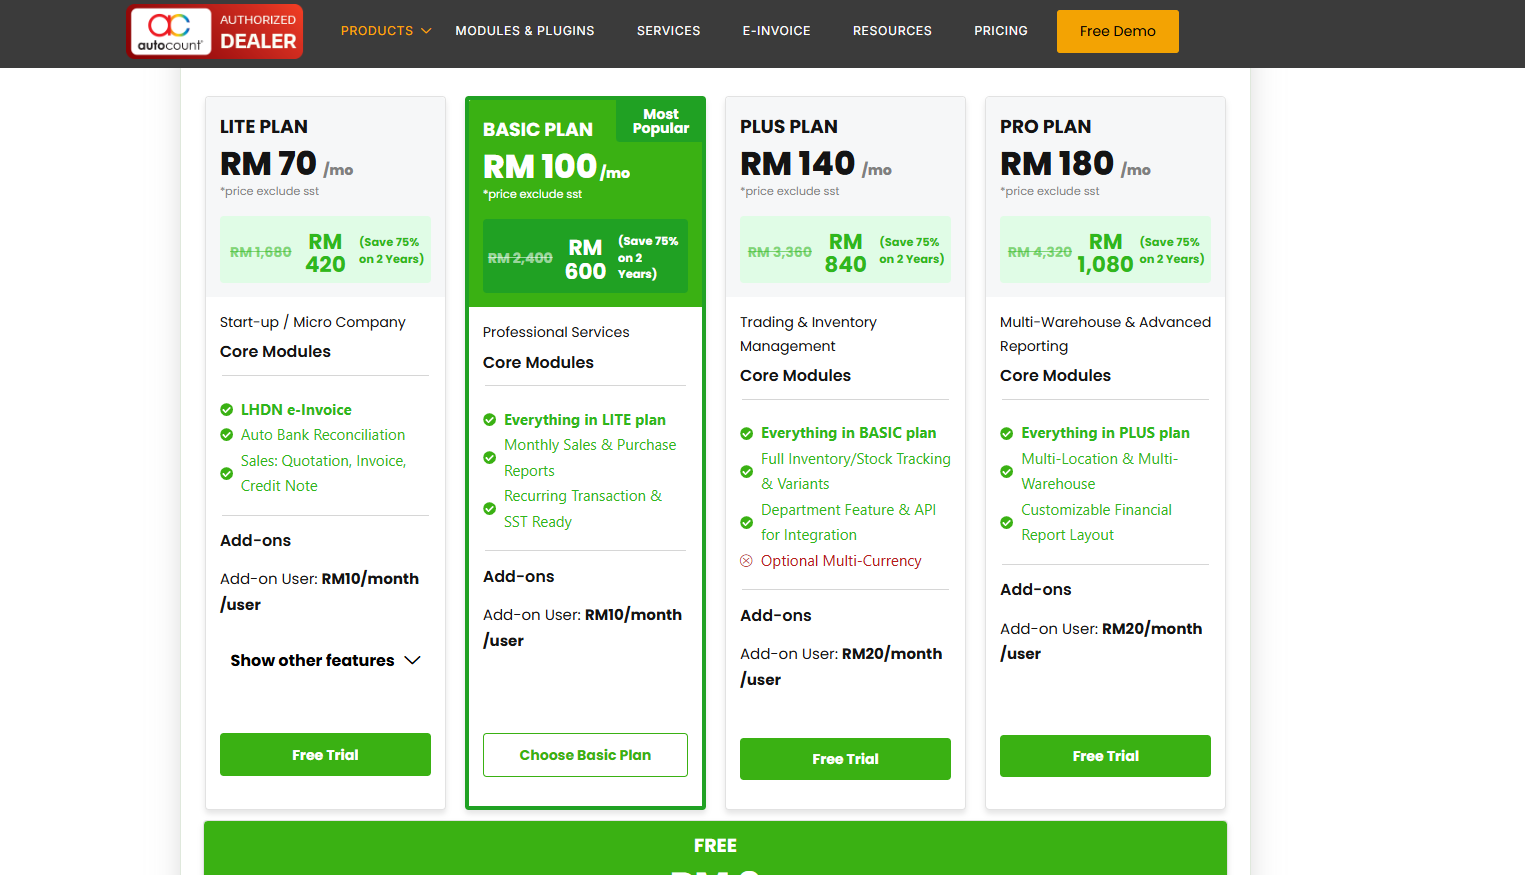
2. Select a Plan
- Secondly, scroll through the available plans, comparing features and pricing.
- After that, choose the plan that aligns with your business requirements.
3. Register an Account
- Thirdly, click on the desired plan to begin the registration process.
- Next, fill in the required fields, including email address, company name, and other details.
- Finally, submit your registration and verify your email address to complete the setup.

Logging into AutoCount Cloud for the First Time
After registration, logging in for the first time is an exciting step toward managing your business finances with ease.
1. Access the Login Page
- Use the email and password created during registration.
- Navigate to the dashboard upon successful login.

2. Explore the Dashboard
- The main interface will display essential tools and options.
- Familiarize yourself with buttons and menus to understand functionality.

Creating a New Company Account Book
Your business records start with creating an account book. AutoCount makes this process simple:
1. Initiate the Creation
- Click on the Create New Company button in the dashboard.
- Choose your country or region to tailor tax and currency settings.

2. Fill in Company Information
- Enter basic details such as company name, address, and registration number.
- Double-check for accuracy to avoid future corrections.

3. Preview and Confirm
- Review the entered details by clicking Next Preview.
- If everything looks correct, click Confirm to finalize.
Exploring the Company Dashboard
Once your company is set up, the dashboard becomes your command center.
Key Features
- Financial reports: Access detailed insights into your company’s performance.
- Transaction records: Keep track of every sale, purchase, and expense.
- User guides: Built-in tutorials to help you navigate the software.
User Tips
- Bookmark frequently used features for quick access.
- Regularly update your data to maintain accuracy.
Managing the Company Profile
Keep your company details updated to reflect accurate information in reports and communications.
Edit Basic Information
- Navigate to the Company Profile section.
- Update details like phone number, email address, and physical location.
Upload a Logo
- Personalize your profile by adding your company’s logo.
- This will appear on reports and invoices.
Customizing Report Headers
Well-designed reports enhance professionalism. AutoCount allows customization of report headers:
1. Navigate to Report Header Settings
- Access this section under the Company Profile menu.
- Add essential details like the company logo, address, and contact information.
2. Save Changes
- Preview the header to ensure it meets your needs.
- Save the settings to reflect in all generated reports.
Switching Between Companies
If managing multiple businesses, you can easily switch between companies:
1. Use the Switch Company Feature
- Firstly, click on the user profile icon at the top-right corner.
- After that, select the Switch Company option.

2. Choose the Desired Company
- Next, a list of your companies will appear.
- After that, click on the one you wish to manage.
Practical Tips for Effective Use of AutoCount Cloud Accounting
Maximize your experience with these tips:
Set Clear Permissions
Assign roles to team members for better access control.
Regular Backups
While cloud systems are secure, exporting data periodically adds another layer of protection.
Utilize Tutorials
Leverage built-in guides and community forums for troubleshooting.
Advantages of AutoCount Cloud Over Traditional Accounting Software
AutoCount Cloud Accounting stands out with its advanced capabilities:
Real-Time Access
Firstly, collaborate with your team in real-time, irrespective of location.
Cost Efficiency
Secondly, no need for extensive IT infrastructure or hardware.
Flexibility
Thirdly, scale your plan as your business grows.
Conclusion
To conclude, AutoCount Cloud Accounting simplifies financial management with its intuitive interface and powerful features. Therefore, whether you’re a small business owner or a seasoned accountant, its tools empower you to manage your finances effectively. So, subscribe today and take your accounting experience to the next level!
Frequently Asked Questions
How much does AutoCount Cloud cost?
The pricing depends on the plan you choose. Visit the official AutoCount website for details.
Can I use AutoCount Cloud offline?
No, an internet connection is necessary for accessing the cloud features.
What if I forget my password?
Use the Forgot Password link on the login page to reset it.
Is AutoCount Cloud secure?
Yes, the platform uses advanced encryption to safeguard data.
Can I switch between plans later?
Yes, AutoCount allows plan upgrades or downgrades based on your needs.
Does AutoCount support multiple currencies?
Yes, it supports multi-currency transactions, making it ideal for global businesses.
Interested in Getting AutoCount for your Business?
Contact our sales team today to explore pricing options and get started with the perfect solution for you.