-
AutoCount Accounting Features
-
- Approval Workflow
- Audit Trail
- Auto Save in Draft Folder
- AutoCount Contra Account
- AutoCount License Setting Guide
- Deposit Tracking & Management
- Documents Numbering Format
- Full Transfer and Partial Transfer
- Import Data to AutoCount Accounting Using Excel
- Informative Charts and Analytical Data
- Layout Customization
- Multi Pricing
- Sales and Services Tax
- Schedule Backup
- Search Lookup Edit
- View Documents Flow
- AutoCount Feature Stock Take
- Show Remaining (2) Collapse
-
AutoCount Cloud Accounting
-
AutoCount E-Invoice
-
AutoCount HRMS User Guide
-
AutoCount Modules
-
- Activity Stream
- Advanced Financial Report
- Advanced Item
- Advanced Multi-UOM
- Advanced Quotation Module
- Basic Multi-UOM
- Budget Module
- Consignment
- Filter By Salesman
- FOC Quantity
- Formula
- Item Batch
- Item Package
- Landing Cost
- Multi-Currency
- Multi-Dimensional Analysis
- Multi-Location
- Project Account
- Recurrence
- Remote Credit Control Module
- Stock Assembly
- User Defined Fields (UDF)
- AutoCount SST Hidden Functions
- AutoCount SST Submission - Service Tax
- AutoCount Scripting Module User Guide
- Show Remaining (10) Collapse
-
AutoCount Plugins
-
- Fixed Assets Management
- Goldsmith
- TD Ordering Mobile Apps
- TD Stock Mobile Apps
- Universal Import Plugin
- DMS Import Plugin
- AutoCount Item Scope Plugin
- AutoCount Easy Knock Off Plugin
- AutoCount Pick List Plugin User Guide
- AutoCount Bonus Point Module User Guide
- AutoCount Agent Validation Plugin User Guide
- AutoCount Barcode Generator Plugin User Guide
- AutoCount Bill Remark Plugin User Guide
-
-
Form Template
-
Report Template
-
- Advance Quotation
- Cash Sale
- Consignment
- Consignment Movement
- Credit Note
- Debit Note
- Delivery Order
- FOC Quantity Analysis By Document Report
- Invoice
- Item Package Sales Report
- Monthly Sales Analysis
- Outstanding Sales Order Listing
- Profit And Loss Of Documents
- Quotation
- Sales Agent Contribution Report
- Sales Order
- Top/Bottom Sales Ranking
- Show Remaining (2) Collapse
-
- Available Stock Status Report
- Expired Item Batch Listing
- Inventory Physical Worksheet
- Stock Adjustment
- Stock Aging Report
- Stock Assembly
- Stock Assembly Order
- Stock Balance By Location
- Stock Balance Report
- Stock Card Report
- Stock Disassembly
- Stock Issue
- Stock Item Profit Margin
- Stock Movement Report
- Stock Receive
- Stock Take
- Stock Transfer
- Stock Write Off
- Show Remaining (3) Collapse
AutoCount HRMS: How to Set Up iFace Biometric Device?
Introduction to iFace Biometric Device Setup
Setting up your iFace Biometric Device correctly is essential for accurate attendance tracking and streamlined workforce management. Therefore, this detailed guide will walk you through the complete process, ensuring that your device is perfectly integrated with the AutoCount Cloud Payroll system. In addition, by following these instructions, you’ll optimize your time attendance management and enhance operational efficiency.
Step-By-Step Guide to Set Up iFace Biometric Device
1. Setup in iFace Biometric Attendance Device
A) Configure the iFace Biometric Device
- Firstly, turn on the device and click on the menu
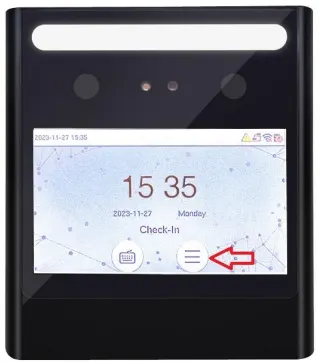
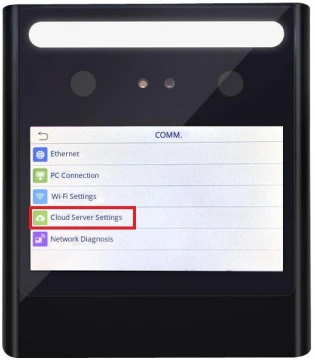
After that, click the COMM
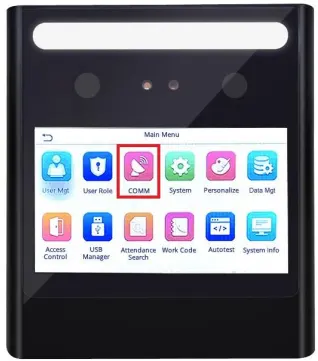
- You have the option to connect to the internet using either Ethernet or a Wireless Network
NOTE: DHCP under Ethernet must be turn ON. You can ignored this if you are using Wi-Fi settings.
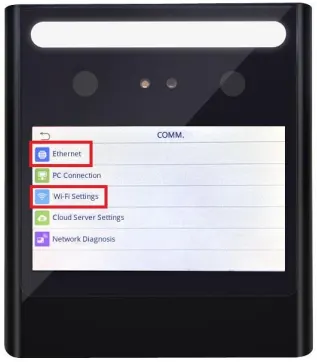
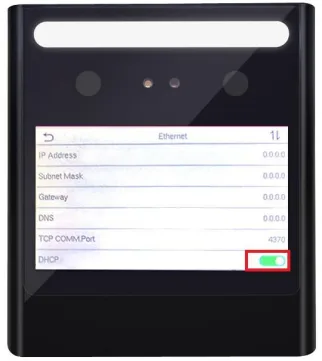
Thirdly, once connected to the internet, click on Cloud Server Setting
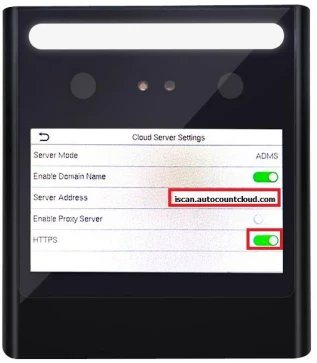
After that, enter the server address iscan.autocountcloud.com, and ensure that HTTPS is activated
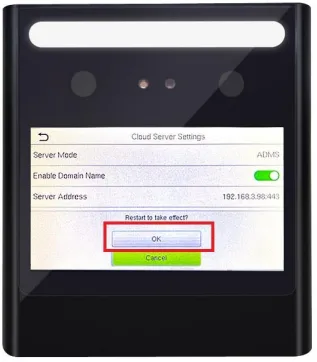
Next, you are required to click [OK] to restart the device once the HTTPS feature has been enabled
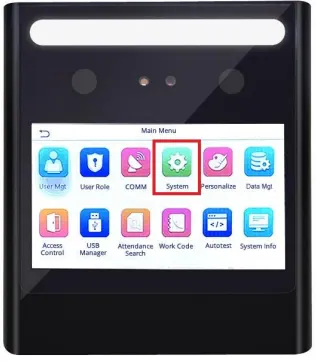
After that, once the device restart, kindly click menu.
Go to “System”.
- Then, click on “Attendance”
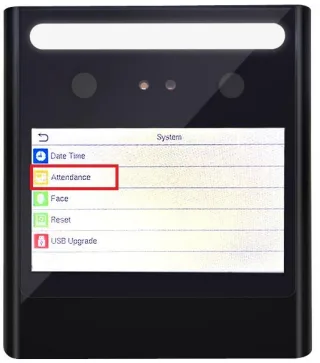
- After that, look for “Camera Mode”
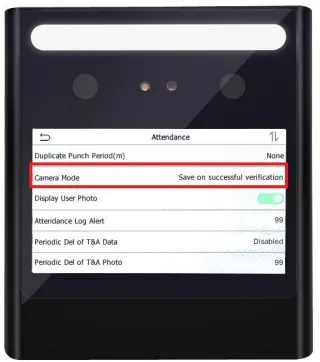
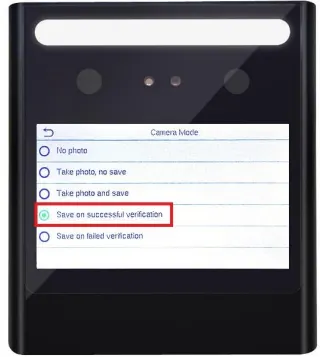
- Next, select “Save on successful verification”
2. Setup in Cloud Payroll
A) Enable Time Attendance for Employees
Kindly ensure the following setting is turned on for those employees who would like to use the time attendance integration feature.
- Go to “Payroll”
- Look for “Employee Maintenance”
- Click on “Edit” icon

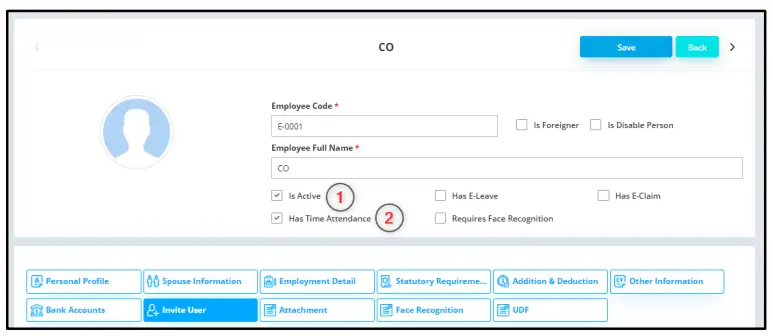
Make sure the following setting is set.
- Employee must tick “Is Active” and “Has Time Attendance“
NOTE: You can use “Batch Edit” to update “Has Time Attendance” by bulk.
B) Link iFace Biometric Device to Company
- Go to “Integration”
- After that, click on “TA Device”

- Look for “Maintaining Time Attendance Device”
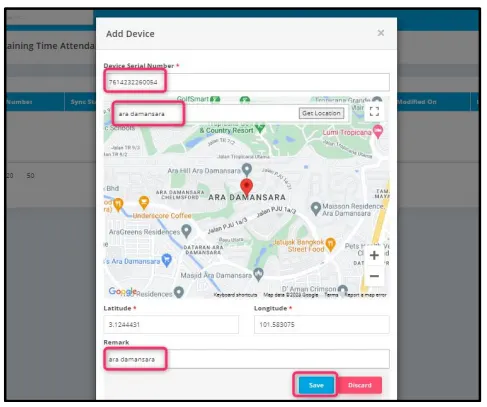
- Click on “Add New”

- Enter the Device Serial Number, Location, and Remarks before saving the information
- Once completed, click “Save” to store the entered details.
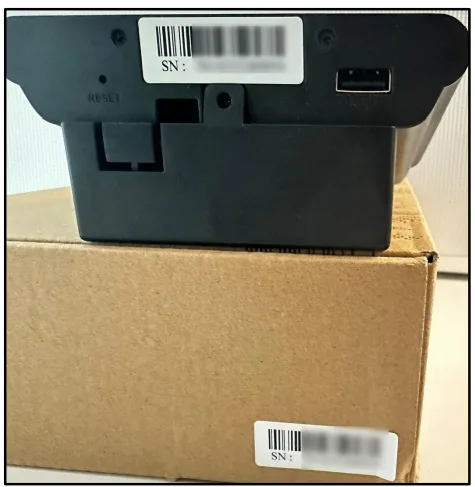
- You may find the serial number on the device or the box itself
- After that, you may check the result on the iFace Biometric Device
3. Sync iFace Biometric Device with Auto Count Cloud Payroll
A) Restart and Connect Device
- After completing the device setup, restart it and connect it to the internet
- Then, the device will automatically synchronize the employee’s data if you have entered the serial number in the company settings
B) Check Sync Status
You may check the sync status at cloud payroll:
- Go to “Integration”
- Click on “TA Device”
- Then, look for “Maintaining Time Attendance Device”

C) Capture Employee Face Photo
- At device, can go to “User Mgt”
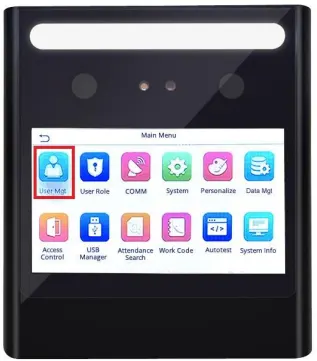
- Then, click on “All User”
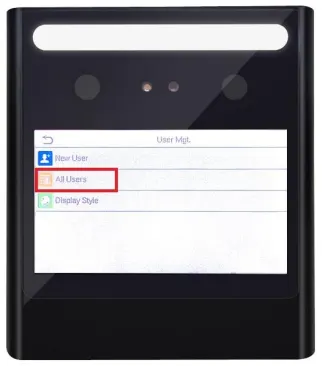
- So, All Users to check employee details and capture the employee face photo.
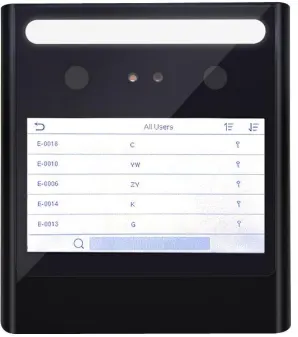
- Select Employee and click on the Edit.
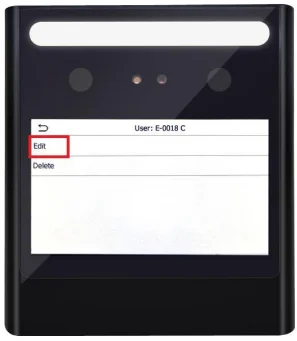
- Lastly, face to capture employee photo
NOTE: You may skip this step if you have previously maintained a face recognition photo in Cloud Payroll.
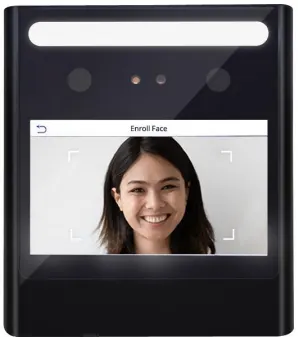
D) Using the iFace Biometric Device for Clocking In
- Employees just need to show their faces to the device, and it will automatically capture the attendance data without requiring any extra steps.
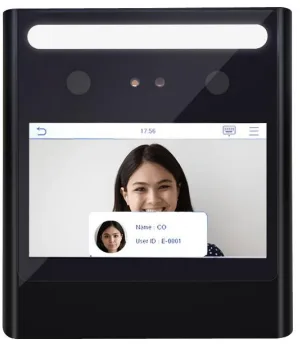
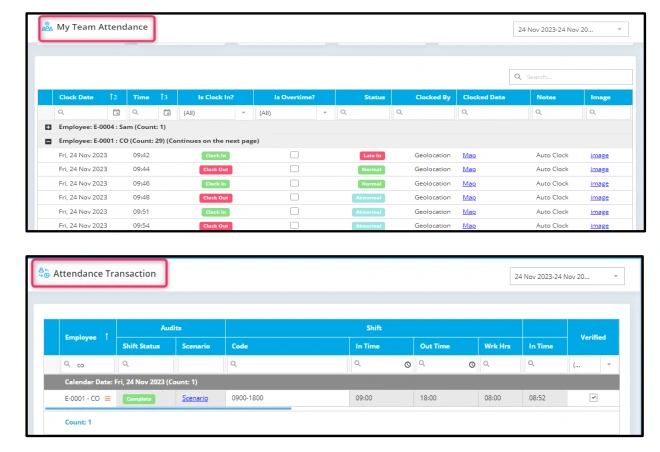
- The record is then sent to AutoCount Cloud Payroll, where it can be reviewed by HR or supervisors in the My Team Attendance or Attendance Transaction
Conclusion
To conclude, setting up the iFace Biometric Device with AutoCount Cloud Payroll can be straightforward if the correct steps are followed. Therefore, with this integration, you’ll be able to streamline your attendance management, enhance accuracy, and eliminate manual errors. After that, once the setup is complete, employees can clock in seamlessly using facial recognition, and the records will automatically sync with your payroll system.
Therefore, by maintaining accurate attendance records and utilizing automated processes, your organization will save time and reduce administrative workloads.
Frequently Asked Questions
What should I do if my iFace Biometric Device fails to sync?
Ensure the device is properly connected to the internet and the server settings are correct. Restart the device if necessary.
Can I connect multiple devices to a single payroll system?
Yes, you can link multiple devices to the same system using the Maintaining Time Attendance Device option.
What is the purpose of the Camera Mode setting?
It captures a visual confirmation when attendance is recorded, ensuring accuracy.
How do I update the employee list on the device?
Simply restart the device and ensure it is connected to the internet. The device will auto-sync employee data.
Can I use the iFace Biometric Device without internet connectivity?
For real-time attendance tracking, an internet connection is required. However, the device can operate offline for local attendance records.
What if an employee's photo is not recognized?
Re-capture the employee’s face photo using the User Mgt settings on the device.
Interested in Getting AutoCount for your Business?
Contact our sales team today to explore pricing options and get started with the perfect solution for you.
