-
AutoCount Accounting Features
-
- Approval Workflow
- Audit Trail
- Auto Save in Draft Folder
- AutoCount Contra Account
- AutoCount License Setting Guide
- Deposit Tracking & Management
- Documents Numbering Format
- Full Transfer and Partial Transfer
- Import Data to AutoCount Accounting Using Excel
- Informative Charts and Analytical Data
- Layout Customization
- Multi Pricing
- Sales and Services Tax
- Schedule Backup
- Search Lookup Edit
- View Documents Flow
- AutoCount Feature Stock Take
- Column Chooser
- Show Remaining (3) Collapse
-
AutoCount Cloud Accounting
-
AutoCount E-Invoice
-
AutoCount HRMS User Guide
-
AutoCount Modules
-
- Activity Stream
- Advanced Financial Report
- Advanced Item
- Advanced Multi-UOM
- Advanced Quotation Module
- Basic Multi-UOM
- Budget Module
- Consignment
- Filter By Salesman
- FOC Quantity
- Formula
- Item Batch
- Item Package
- Landing Cost
- Multi-Currency
- Multi-Dimensional Analysis
- Multi-Location
- Project Account
- Recurrence
- Remote Credit Control Module
- Stock Assembly
- User Defined Fields (UDF)
- AutoCount SST Hidden Functions
- AutoCount SST Submission - Service Tax
- AutoCount Scripting Module User Guide
- AutoCount Bonus Point Module User Guide
- Show Remaining (11) Collapse
-
AutoCount Plugins
-
- Fixed Assets Management
- Goldsmith
- TD Ordering Mobile Apps
- TD Stock Mobile Apps
- Universal Import Plugin
- DMS Import Plugin
- AutoCount Item Scope Plugin
- AutoCount Easy Knock Off Plugin
- AutoCount Pick List Plugin User Guide
- AutoCount Agent Validation Plugin User Guide
- AutoCount Barcode Generator Plugin User Guide
- AutoCount Bill Remark Plugin User Guide
- AutoCount Easy Batch Number Entry Plugin User Guide
- AutoCount Recurring Invoice Plugin User Guide
- AutoCount Easy Photo 2.0 User Guide
- AutoCount Pain Tracker User Guide
- AutoCount Credit Memo Plugin User Guide
- Show Remaining (2) Collapse
-
- AutoCount Easy Recurrence Plugin
- AutoCount Recurring Billing Plugin
- Event Management System
- AutoCount To-Do List Plugin
- AutoCount AutoBank Reconciliation Plugin
- Intercompany Billing Plugin User Guide
- AutoCount Basket Plugin User Guide
- Lead Management 2.0 Plugin
- AutoCount Service Contract Plugin User Guide
- Autocount Repacking Plugin
- AutoCount Scale Barcode Plugin User Guide
- AutoCount Progressive Billing
- AutoCount Optical Plugin
- AutoCount Meter Reading Plugin User Guide
- AutoCount Car Tint Film Plugin
- AutoCount Leasing Plugin User Guide
- AutoCount Integrator Plugin
- AutoCount Procurement Planning Plugin
- Show Remaining (3) Collapse
-
-
Form Template
-
Report Template
-
- Advance Quotation
- Cash Sale
- Consignment
- Consignment Movement
- Credit Note
- Debit Note
- Delivery Order
- FOC Quantity Analysis By Document Report
- Invoice
- Item Package Sales Report
- Monthly Sales Analysis
- Outstanding Sales Order Listing
- Profit And Loss Of Documents
- Quotation
- Sales Agent Contribution Report
- Sales Order
- Top/Bottom Sales Ranking
- Show Remaining (2) Collapse
-
- Available Stock Status Report
- Expired Item Batch Listing
- Inventory Physical Worksheet
- Stock Adjustment
- Stock Aging Report
- Stock Assembly
- Stock Assembly Order
- Stock Balance By Location
- Stock Balance Report
- Stock Card Report
- Stock Disassembly
- Stock Issue
- Stock Item Profit Margin
- Stock Movement Report
- Stock Receive
- Stock Take
- Stock Transfer
- Stock Write Off
- Show Remaining (3) Collapse
AutoCount Plugin: Basket Plugin User Guide
Understanding AutoCount Basket Plugin
In wholesale businesses — especially fruit and vegetable trading — keeping track of reusable baskets is important for inventory, cost control, and accurate client records. The AutoCount Basket Plugin lets businesses automate basket tracking and balance calculations across sales and purchase transactions in AutoCount Accounting.
What Is The AutoCount Basket Plugin?
A purpose‑built tool designed for wholesale operations that require tracking of physical baskets used in deliveries or returns. It integrates basket movements into AutoCount Accounting sales, purchase, and debtor/creditor records — automatically calculating quantities and balances to ensure accurate inventory and accounting.
AutoCount Basket Plugin Video Guide
Watch this video guide to see the AutoCount Basket Plugin in action. You’ll learn how it automatically tracks basket movements and quantities during sales and purchase transactions, how to set up basket balances in AutoCount, and how the basket update and reporting features help you manage reusable baskets across different documents and users.
- Fruit Basket Plugin (EN)
Fruit Basket Plugin Setup
automate basket tracking and balance calculations
- Fruit Basket Plugin (CN)
水果篮插件设置
自动进行篮子追踪和余额计算
Why This Matters?
For businesses dealing with reusable containers (like baskets), manual tracking can be time‑consuming, inaccurate, and error‑prone. With the Basket Plugin:
Basket quantities are calculated automatically during document entry.
Helps reduce losses and ensures correct billing or return processing.
Users get real time basket balance history in customer and supplier accounts.
Basket balances update based on outgoing, incoming, and adjustment values.
Key Features & Capabilities
Automated Basket Totaling
Auto‑compute basket usage and return quantities within sales and purchase entries.
Basket Update Tool
Adjust basket counts after transactions easily with a dedicated update feature.
Setting Up the Basket Plugin
Calculates the net basket balance based on outgoing, incoming, and adjustment values.
Debtor & Creditor Basket Balances
Maintain ongoing basket balance records per customer or supplier.
New Reporting Features
View detailed basket info across documents via preview or print reports.
Who This Plugin Is For
Businesses That Use Physical Containers or Reusables
If your business deals with items that get loaned, reused, or returned, the plugin becomes super valuable.
Businesses That Need Accurate Accounting of Returns
This plugin helps automate balance tracking, so nobody ends up with surprise liabilities or missing assets.
Businesses That Want Cleaner Inventory and Accounting
This directly helps finance teams operations teams, sales and purchasing. That means fewer errors and way easier month‑end reconciliation.
Businesses With High Volume Transactions
If you’re processing dozens or hundreds of Sales/Purchase entries with baskets every day, doing this manually isn’t just slow — it’s risky.
Setting Up the Basket Plugin
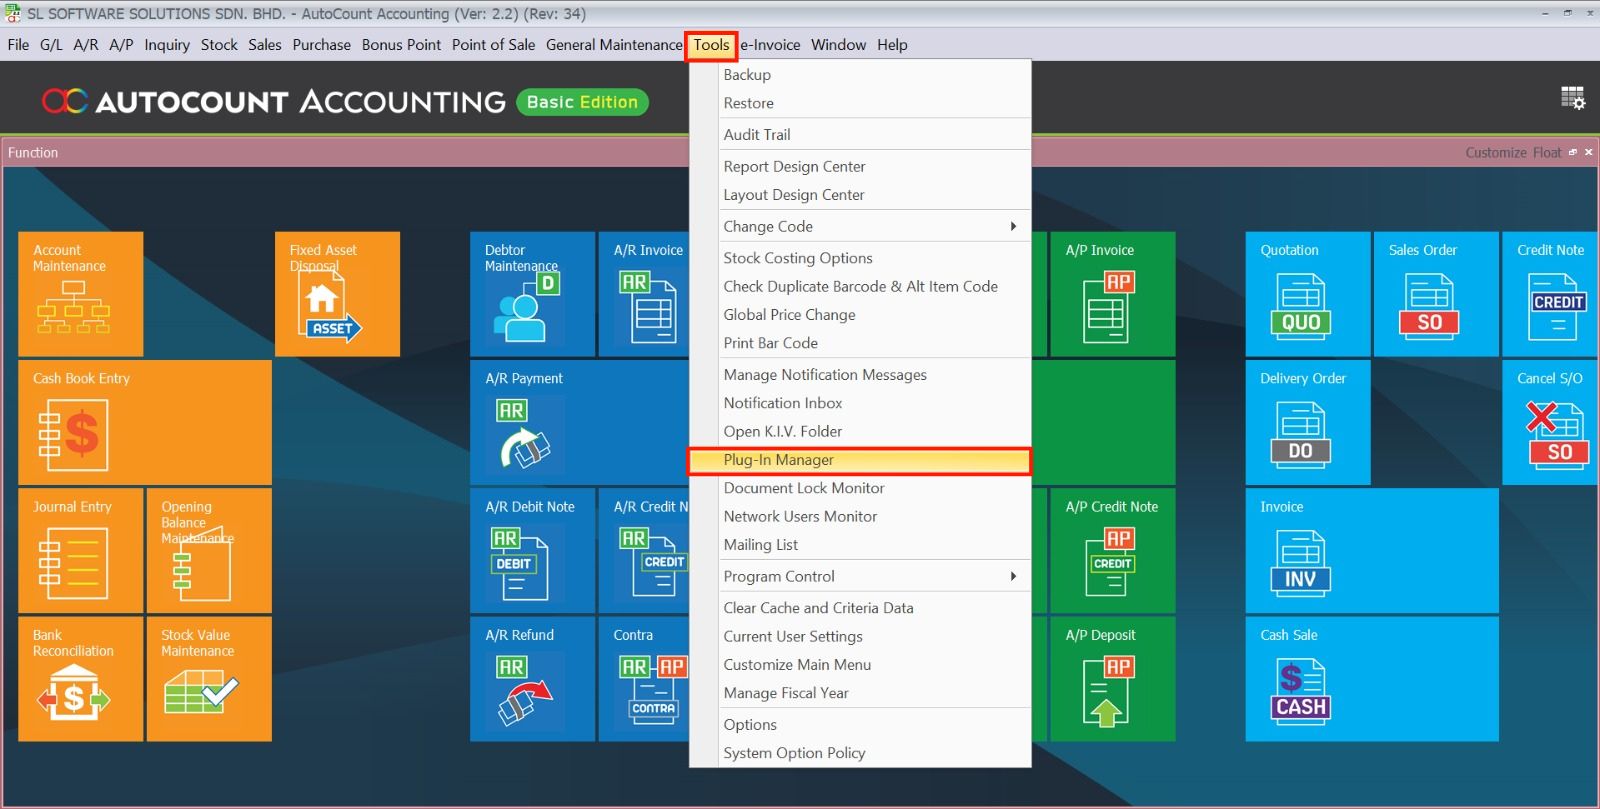
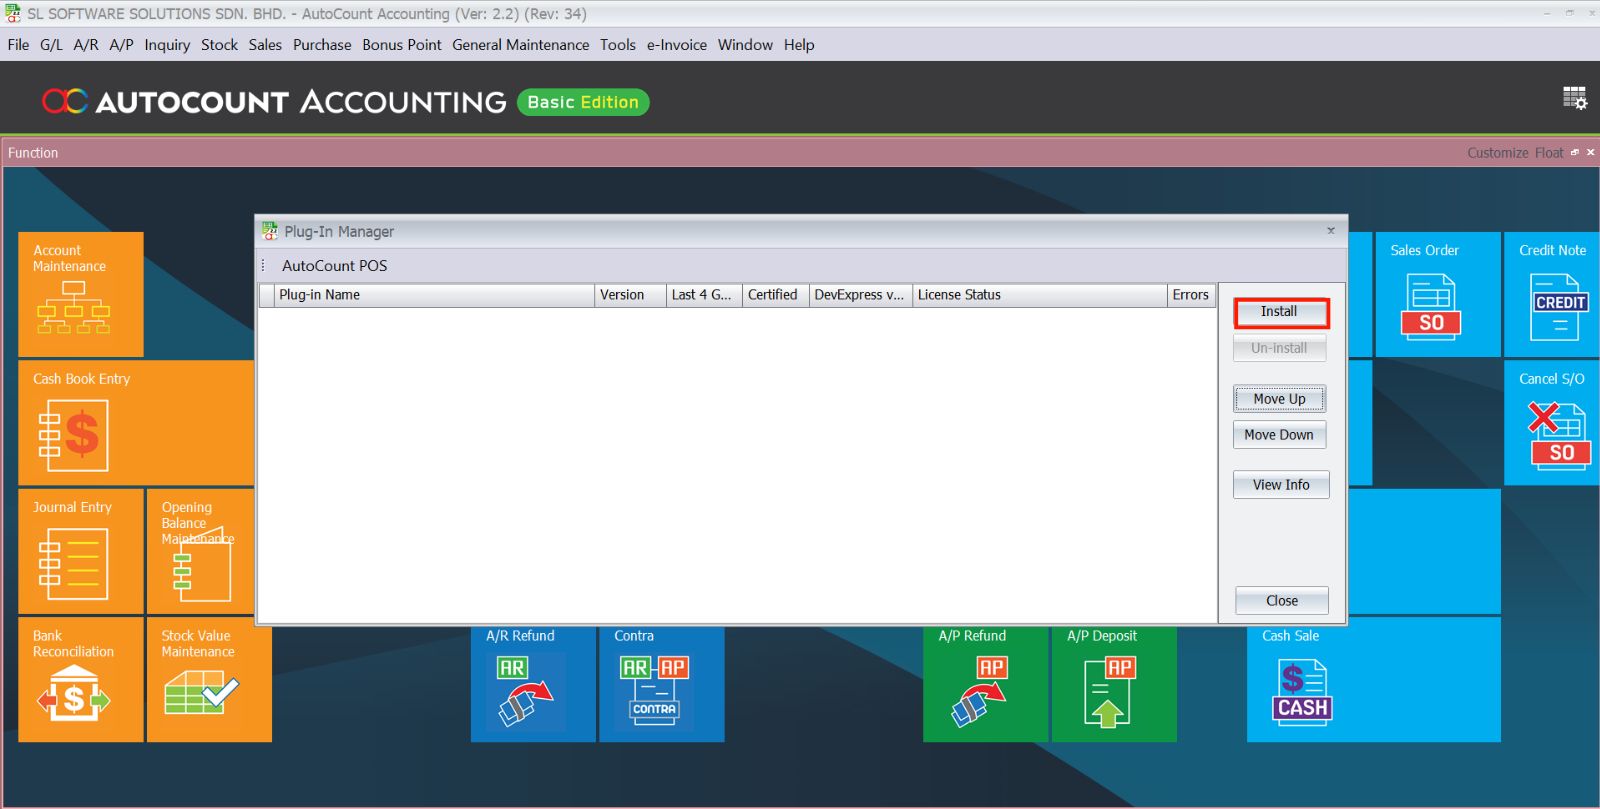
1. Installing the Plug In
Navigate to Tools > Plug-In Manager in AutoCount, click Install, select the Basket .app file, review the details, confirm the installation, and wait for the success message.
Install the basket plugin so the system can start automating basket tracking.
- Go to Tools > Plug‑In Manager in AutoCount, click Install, and choose the Basket .app file. Follow the prompts until the install completes successfully
Pro Tip:
Check you’re using the right plugin file version for your AutoCount release — mismatches can cause missing menus or calculation problems.

2. Assign Access Rights
To assign user permissions for the Basket Plugin, navigate to General Maintenance > Access Right Maintenance in your AutoCount software. Then, expand the SL Plug‑In section and the Basket category within it. Click on Basket and select the option Set Group Access Rights. In the pop‑up window, choose the relevant user group (e.g., Admin), change the permission setting from Don’t Change to Add, click OK to save, and then confirm by clicking Yes to apply these rights to all sub‑commands.
Control who in your team can use the plugin and make changes.
- Head to General Maintenance > Access Right Maintenance, expand SL Plug‑In > Basket
- Choose the group (e.g., Admin), set Add for permissions, then save.
Pro Tip:
Track who has access, especially if team turnover or role changes happen frequently.


3. Basket Setting
To configure the core functionality of the plugin, navigate to Basket > Basket Setting within the AutoCount menu. In the settings window, ensure that the Auto Calculate Quantity checkbox is ticked (enabled), then click Save to apply this configuration. This crucial setting automates all basket balance computations during sales and purchase document entry, eliminating manual calculations and reducing errors.
Turn on automatic calculations so AutoCount manages balances for you.
- Go to Basket > Basket Setting and tick Auto Calculate Quantity, then click Save.
Pro Tip:
If your business changes how baskets are used (e.g., new container types), revisit these settings before heavy transaction periods.


4. Debtor Maintenance
To set up a customer’s initial basket balance, go to A/R > Debtor Maintenance and click New to create a record. Enter the debtor’s essential information, then navigate to the User Define Field tab. Here, input the starting quantity in the Balance Basket field and click Save. This field displays the current number of baskets the debtor holds and forms the baseline for all future automated balance tracking.
Let AutoCount know starting basket positions.
- In A/R > Debtor Maintenance, enter the starting balance under Balance Basket inside the User Define Field tab.


5. Creditor Maintenance
To configure a supplier’s basket tracking, navigate to A/P > Creditor Maintenance and click New. Enter the creditor’s basic details, then go to the User Define Field tab. Input the starting inventory number into the Balance Basket field. If this supplier also returns baskets as a customer, select their corresponding Debtor Code from the dropdown to link the accounts. Finally, click Save to complete the setup.
- Do the same for suppliers via A/P > Creditor Maintenance.
Pro Tip:
If someone functions as both supplier and customer, link their records so basket movements stay consistent.


Sales & Purchase Documents Entry
1. Document Types with Basket Info
Documents that include Basket Info controls:
- Delivery Order
- Invoice
- Cash Sales
- Credit Note
- Goods Received Note
- Purchase Invoice
- Cash Purchase
- Purchase Return
Understand where basket tracking applies.
The system includes basket fields for these types:
Delivery Order
Invoice
Cash Sales
Credit Note
Goods Received Note
Purchase Invoice
Cash Purchase
Purchase Return
Pro Tip:
Train users to always choose a supported document type when basket movement occurs.
2. Document Entry (Operate)
To process a transaction with basket tracking, go to Sales and select your document type (e.g., Invoice). Click New, choose the relevant debtor (for sales) or creditor (for purchases), and add your item lines. For basket items, enter values in the KGPerCtn (Kilograms per Container) and Ctn (Number of Containers) fields—note that the system calculates the total Qty by multiplying these two values. When the Basket Item box is ticked, the Out Basket field will be auto-populated. You can also optionally enter values in the In Basket (for returns) and Adjustment fields. Click Save to finalize the transaction; the system will then automatically recalculate the customer’s or supplier’s Balance Basket based on all inputs.
Record basket usage as part of the transaction.
- Create a new sales or purchase entry (e.g., Invoice or Cash Purchase).
- Pick the relevant debtor or creditor, add item lines, then fill basket info like Out Basket, In Basket, and Adjustment as needed.
Pro Tip:
- Out Basket is usually auto‑populated if the item is marked as a basket item.
- Use In Basket for returns and Adjustment for corrections.


Balance Basket is updated based on:
- No In Basket or Adjustment: Last Balance + Out Basket
- With In Basket only: (Last Balance + Out Basket) – In Basket
- With Adjustment only: Last Balance + Out Basket + Adjustment
- With both: (Last Balance + Out Basket) – In Basket + Adjustment
3. Basket Update
To modify basket records after a transaction, navigate to Sales, locate and select the existing document you wish to adjust. Click on the Basket Update function, then update the values in the In Basket and Adjustment fields as needed. Finally, click Save to apply these changes and update the associated basket balances in the system.
Make changes to basket returns or adjustments for a transaction that’s already been saved.
- Go to Sales (or Purchase) and find the document you need to adjust.
- Click Basket Update, update the In Basket and Adjustment values as needed, then click Save.
- The system will recalculate the basket balance based on your edits.
Pro Tip:
Only provide access to Basket Update for trusted staff — it rewrites historical basket balances, so you want control over who can do it


4. Basket Report
To generate a detailed basket report, go to Sales and select the set of documents you want to analyze. Click either Preview or Print, then from the options presented, choose Invoice With Basket. Finally, click OK to generate and view the comprehensive report, which displays detailed basket movements and current balances.
Generate a detailed report of basket movement across saved documents.
- Open the list of Sales (or Purchase) documents you want to review.
- Click Preview or Print, then choose the Invoice With Basket (or the basket‑inclusive report) from the options, and click OK.
- This produces a detailed report showing basket outflow, returns, and balances
Pro Tip:
Run this report regularly (e.g., weekly or monthly) so you catch discrepancies early and ensure your basket records reflect reality.


Benefits of Using Basket Plugin
Streamlined Basket Tracking
Automatically records basket movements without manual entry.
Accurate Inventory Management
Ensures basket balances are calculated and updated correctly.
Reduced Errors & Time Savings
Automatic calculations remove manual reconciliation.
Simplified Return Process
Use the Basket Update feature to easily record returned baskets.
Complete Enhanced Transparency
Debtor and creditor basket histories provide clear visibility.
Conclusion
The AutoCount Basket Plugin streamlines inventory tracking of baskets for businesses such as fruit and vegetable wholesalers. It automates basket‑related calculations, updates customer and supplier basket balances accurately, and provides reporting tools that make managing reusable assets easier and more reliable.
Frequently Asked Questions
Which documents support basket tracking?
Basket info appears on Delivery Order, Invoice, Cash Sales, Credit Note, Goods Received Note, Purchase Invoice, Cash Purchase, and Purchase Return.
What if I need to adjust basket counts after saving?
Use the Basket Update feature to adjust In Basket and Adjustment values.
Is the basket balance updated automatically?
Yes — based on Out, In, and Adjustment values once saved.
Can I see basket history for customers?
Yes — Balances are stored on Debtor and Creditor records.
Why is Basket Tracking useful?
It improves inventory accuracy, reduces losses, and ensures contract clarity with clients.
Interested in Getting AutoCount for your Business?
Contact our sales team today to explore pricing options and get started with the perfect solution for you.