-
AutoCount Accounting Features
-
- Approval Workflow
- Audit Trail
- Auto Save in Draft Folder
- AutoCount Contra Account
- AutoCount License Setting Guide
- Deposit Tracking & Management
- Documents Numbering Format
- Full Transfer and Partial Transfer
- Import Data to AutoCount Accounting Using Excel
- Informative Charts and Analytical Data
- Layout Customization
- Multi Pricing
- Sales and Services Tax
- Schedule Backup
- Search Lookup Edit
- View Documents Flow
- AutoCount Feature Stock Take
- Column Chooser
- Show Remaining (3) Collapse
-
AutoCount Cloud Accounting
-
AutoCount E-Invoice
-
AutoCount HRMS User Guide
-
AutoCount Modules
-
- Activity Stream
- Advanced Financial Report
- Advanced Item
- Advanced Multi-UOM
- Advanced Quotation Module
- Basic Multi-UOM
- Budget Module
- Consignment
- Filter By Salesman
- FOC Quantity
- Formula
- Item Batch
- Item Package
- Landing Cost
- Multi-Currency
- Multi-Dimensional Analysis
- Multi-Location
- Project Account
- Recurrence
- Remote Credit Control Module
- Stock Assembly
- User Defined Fields (UDF)
- AutoCount SST Hidden Functions
- AutoCount SST Submission - Service Tax
- AutoCount Scripting Module User Guide
- AutoCount Bonus Point Module User Guide
- Show Remaining (11) Collapse
-
AutoCount Plugins
-
- Fixed Assets Management
- Goldsmith
- TD Ordering Mobile Apps
- TD Stock Mobile Apps
- Universal Import Plugin
- DMS Import Plugin
- AutoCount Item Scope Plugin
- AutoCount Easy Knock Off Plugin
- AutoCount Pick List Plugin User Guide
- AutoCount Agent Validation Plugin User Guide
- AutoCount Barcode Generator Plugin User Guide
- AutoCount Bill Remark Plugin User Guide
- AutoCount Easy Batch Number Entry Plugin User Guide
- AutoCount Recurring Invoice Plugin User Guide
- AutoCount Easy Photo 2.0 User Guide
- AutoCount Pain Tracker User Guide
- AutoCount Credit Memo Plugin User Guide
- Show Remaining (2) Collapse
-
- AutoCount Easy Recurrence Plugin
- AutoCount Recurring Billing Plugin
- Event Management System
- AutoCount To-Do List Plugin
- AutoCount AutoBank Reconciliation Plugin
- Intercompany Billing Plugin User Guide
- AutoCount Basket Plugin User Guide
- Lead Management 2.0 Plugin
- AutoCount Service Contract Plugin User Guide
- Autocount Repacking Plugin
- AutoCount Scale Barcode Plugin User Guide
- AutoCount Progressive Billing
- AutoCount Optical Plugin
- AutoCount Meter Reading Plugin User Guide
- AutoCount Car Tint Film Plugin
- AutoCount Leasing Plugin User Guide
- AutoCount Integrator Plugin
- AutoCount Procurement Planning Plugin
- Show Remaining (3) Collapse
-
-
Form Template
-
Report Template
-
- Advance Quotation
- Cash Sale
- Consignment
- Consignment Movement
- Credit Note
- Debit Note
- Delivery Order
- FOC Quantity Analysis By Document Report
- Invoice
- Item Package Sales Report
- Monthly Sales Analysis
- Outstanding Sales Order Listing
- Profit And Loss Of Documents
- Quotation
- Sales Agent Contribution Report
- Sales Order
- Top/Bottom Sales Ranking
- Show Remaining (2) Collapse
-
- Available Stock Status Report
- Expired Item Batch Listing
- Inventory Physical Worksheet
- Stock Adjustment
- Stock Aging Report
- Stock Assembly
- Stock Assembly Order
- Stock Balance By Location
- Stock Balance Report
- Stock Card Report
- Stock Disassembly
- Stock Issue
- Stock Item Profit Margin
- Stock Movement Report
- Stock Receive
- Stock Take
- Stock Transfer
- Stock Write Off
- Show Remaining (3) Collapse
AutoCount E-Invoice Set Up:
How to Set Up e-Invoice in AutoCount (2025 Guide)
Introduction
Malaysia’s Inland Revenue Board (IRBM) is rolling out mandatory e-Invoice implementation. To stay compliant, businesses must properly configure AutoCount Accounting with the latest settings and license requirements. This guide walks you through every key step: from activation to SMTP email setup and e-Invoice license validation.
Objective
To comply with Malaysia's mandatory e-Invoicing requirements, businesses must authorize an intermediary—such as AutoCount—to submit invoices on their behalf. Registering your ERP system in the MyInvois Portal facilitates seamless integration, ensuring that your e-Invoicing processes are automated, compliant, and efficient.
How to Use AutoCount for e-Invoicing Guide Video (En)
Watch the How to Set Up e-Invoice in AutoCount guide video in English to gain a deeper understanding and learn how to configure e-Invoicing with AutoCount.
Step-by-Step Guide to Set Up e-Invoice in AutoCount
Log In and Open e-Invoice Settings
- Open AutoCount Accounting (version 2.2.22.30 or newer recommended).
- Navigate to e-Invoice tab → e-Invoice Setting.

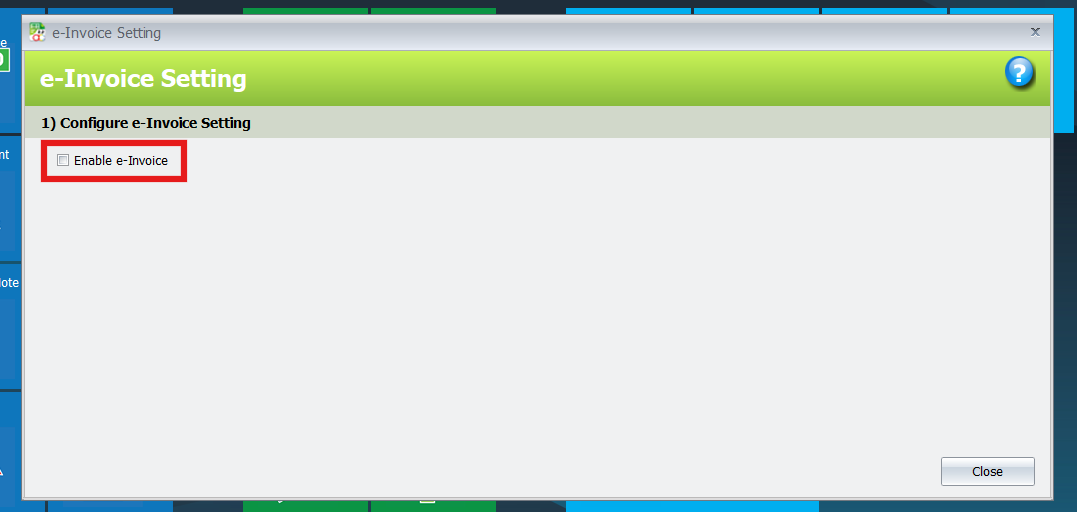
Activate e-Invoice Feature
- Tick the “Enable e-Invoice” box to activate the e-Invoice feature.
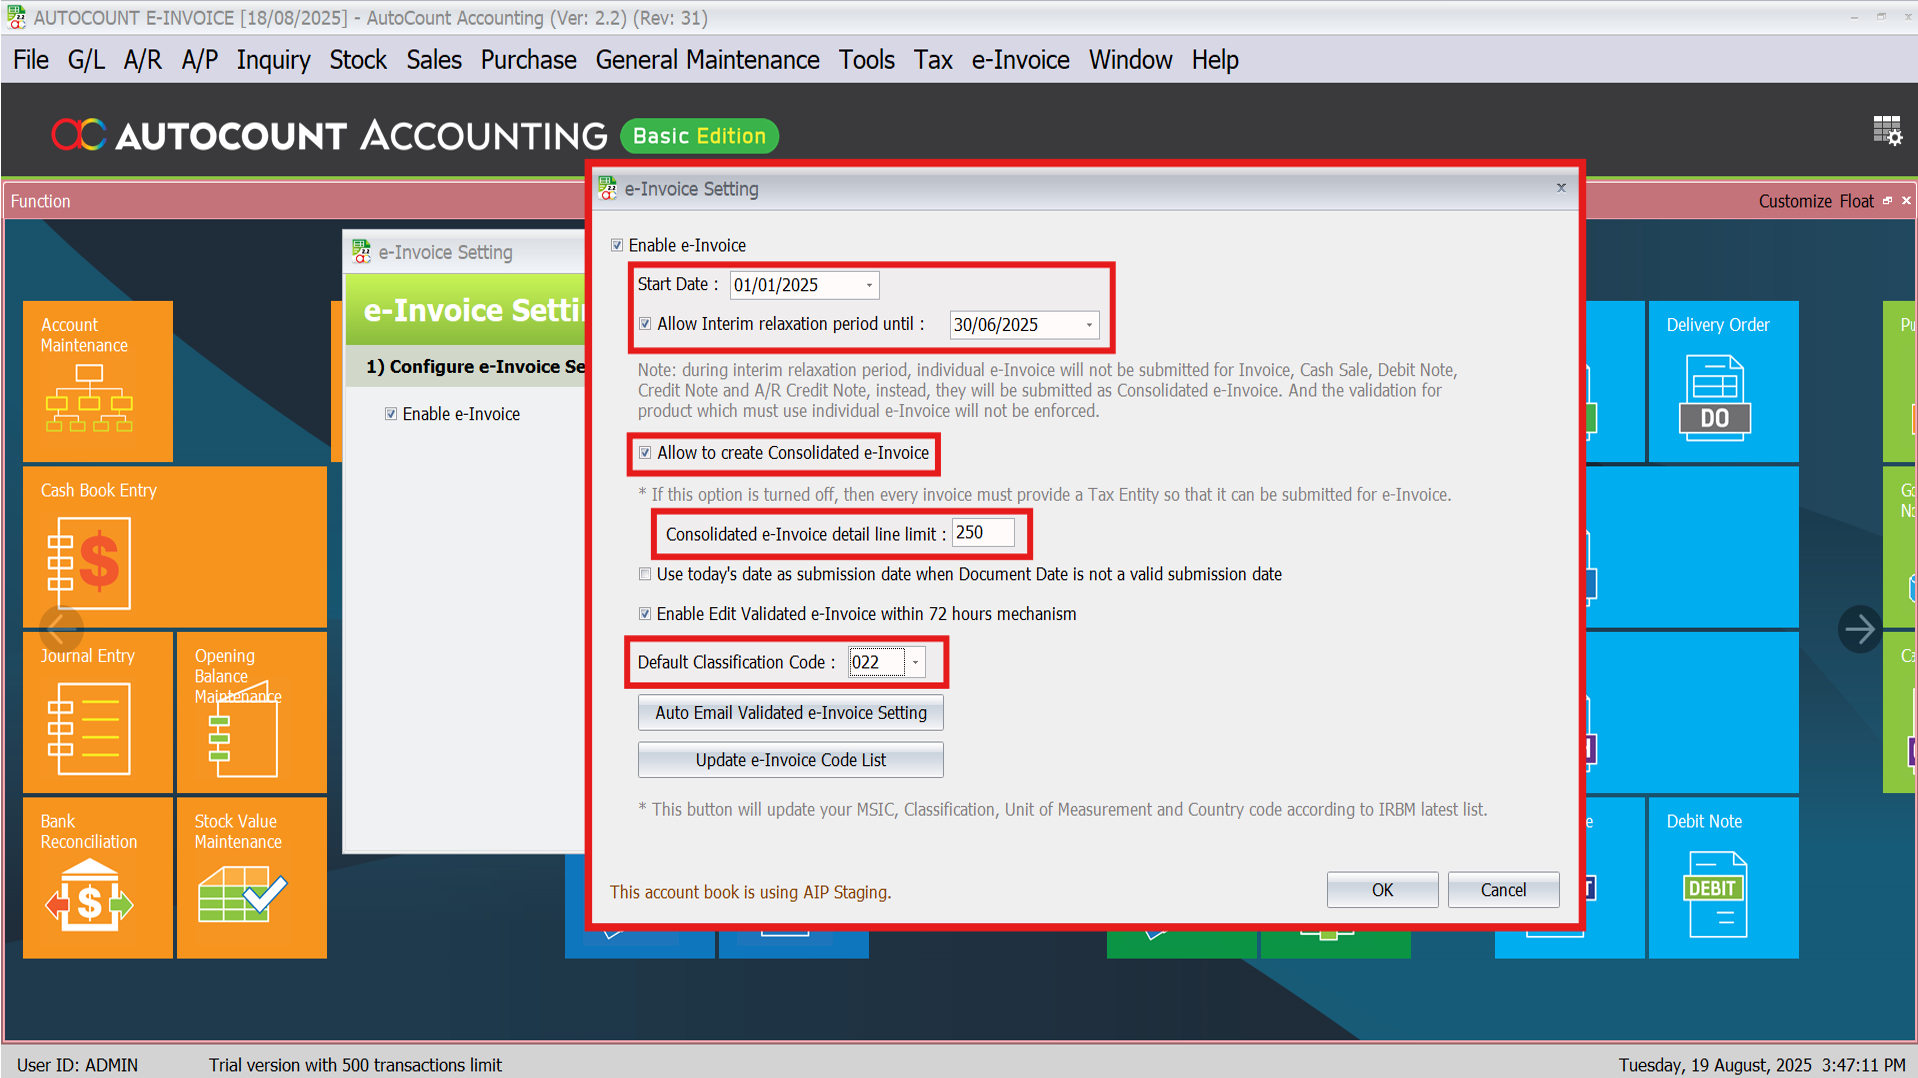
Configure e-Invoice and Basic Settings

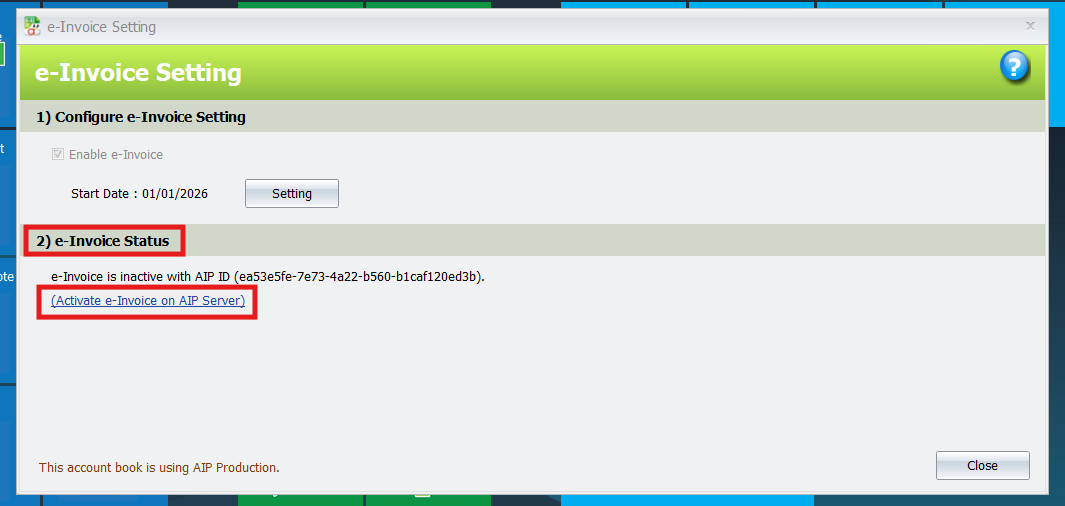
Activate e-Invoice on AIP Server
- Go to the e-Invoice Status section.
- Click “Activate e-Invoice on AIP Server.”
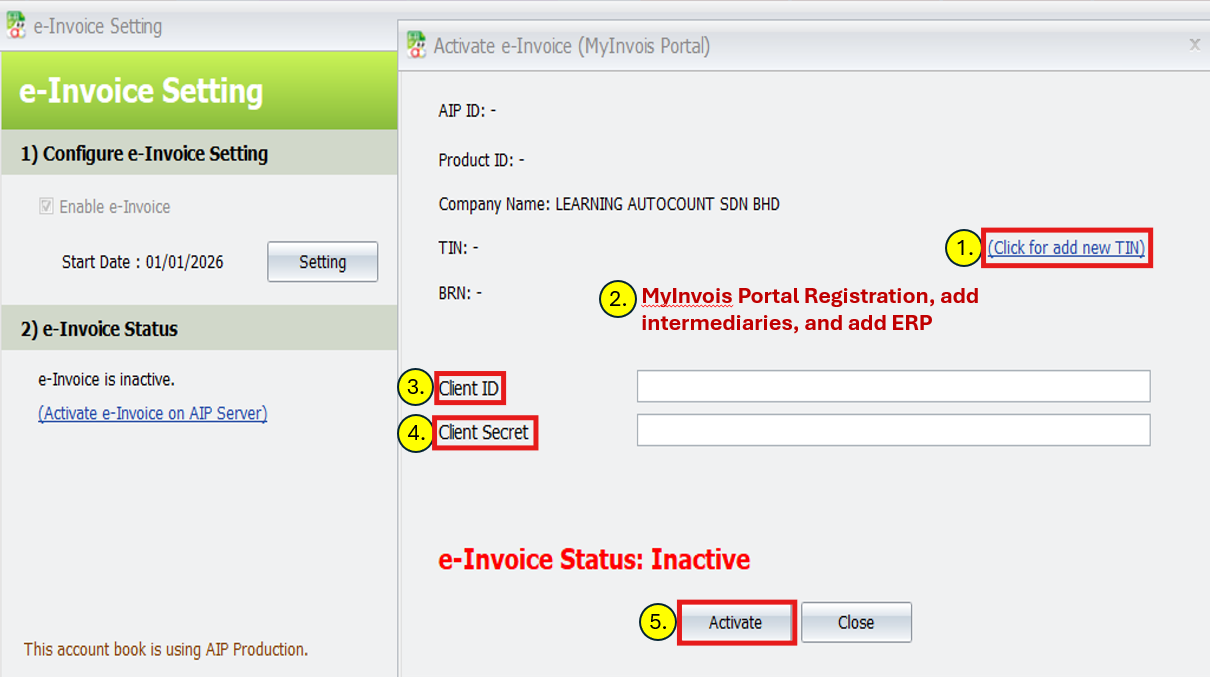
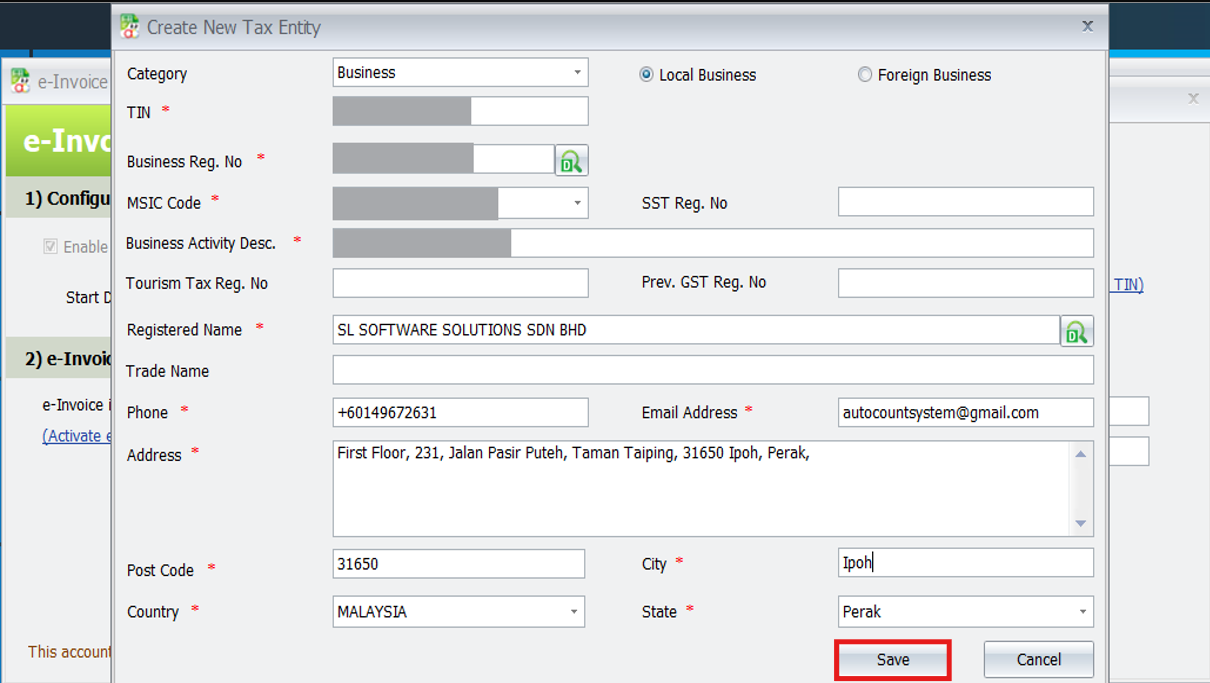
Create or Update Tax Entity
- Click “Click for add new TIN.
- If an entity exists, it will say “Click for update TIN.”
- Complete MyInvois Portal Registration (add intermediaries, link ERP).
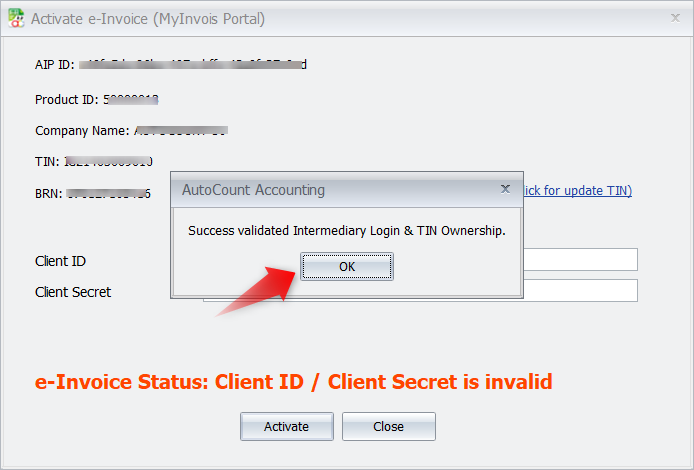
- Enter Client ID.
- Enter Client Secret.
- Click Activate.
Connect AutoCount to MyInvois Portal
- Enter your Client ID and Client Secret.
- Click Activate

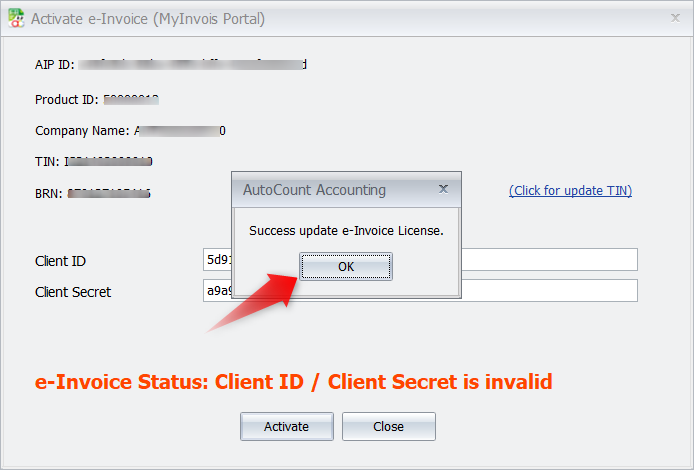
Connect AutoCount to MyInvois Portal
- If the license is already registered, it will auto-activate
- Otherwise:
– Click Check License and then Get License
– Review and confirm details
– On success, you’ll see: “Success update e-Invoice License”
Conclusion
Ensure your AutoCount software is updated. Always double-check SMTP settings and tax entity info. This setup enables smooth submission of e-Invoices to MyInvois Portal.
Frequently Asked Questions
For Enterprise and Sole Proprietorship, what should we choose at AutoCount Tax Entity, Business or Individual?
For such cases, you will need to select Business Category as you will need to input the company BRN.
I have 3 sole prop company with same TIN number. How to create in AutoCount?
You can create 3 different Tax Each sole prop company should have its own BRN number. Our Tax Entity allow to create / save as long the TIN + BRN combination is unique for local Business category.
Will we have submission reconciliation on received bill?
Such feature is in the development plan.
My customer starts e-invoice in July 2025, can they key in their Client ID and Secret in AutoCount now?
Yes, customer can start to add AutoCount as intermediary and key their Client ID and Secret in AutoCount now. It does not affect the start time of e-invoice of the company.
Can a Tax Entity still change the Country if already have an invoice validated?
No, currently country is one of the fields used to check if the Tax Entity is a foreign company or not. Therefore, if that Tax Entity already tied to any validated e-Invoice, the Country field is not allowed to change.
Tax entity can maintain more than 1 email?
Yes, you can maintain more than 1 email. Usually we will use semi-colon as separator. Example: autocountsystem@gmail.com; slsoftware6118@gmail.com
How to handle corrupted database where we restore older backup file back for user?
Currently those missing submission should be keyed in back and untick the “Submit e-Invoice” to avoid double submission. The UUID and Validation Link is not able to key as for now. We will come out with a better solution in future on such scenarios
Interested in Getting AutoCount for your Business?
Contact our sales team today to explore pricing options and get started with the perfect solution for you.