-
AutoCount Accounting Features
-
- Approval Workflow
- Audit Trail
- Auto Save in Draft Folder
- AutoCount Contra Account
- AutoCount License Setting Guide
- Deposit Tracking & Management
- Documents Numbering Format
- Full Transfer and Partial Transfer
- Import Data to AutoCount Accounting Using Excel
- Informative Charts and Analytical Data
- Layout Customization
- Multi Pricing
- Sales and Services Tax
- Schedule Backup
- Search Lookup Edit
- View Documents Flow
- AutoCount Feature Stock Take
- Column Chooser
- Show Remaining (3) Collapse
-
AutoCount Cloud Accounting
-
AutoCount E-Invoice
-
AutoCount HRMS User Guide
-
AutoCount Modules
-
- Activity Stream
- Advanced Financial Report
- Advanced Item
- Advanced Multi-UOM
- Advanced Quotation Module
- Basic Multi-UOM
- Budget Module
- Consignment
- Filter By Salesman
- FOC Quantity
- Formula
- Item Batch
- Item Package
- Landing Cost
- Multi-Currency
- Multi-Dimensional Analysis
- Multi-Location
- Project Account
- Recurrence
- Remote Credit Control Module
- Stock Assembly
- User Defined Fields (UDF)
- AutoCount SST Hidden Functions
- AutoCount SST Submission - Service Tax
- AutoCount Scripting Module User Guide
- AutoCount Bonus Point Module User Guide
- AutoCount Service Management Plugin User Guide
- Show Remaining (12) Collapse
-
AutoCount Plugins
-
- Fixed Assets Management
- Goldsmith
- TD Ordering Mobile Apps
- TD Stock Mobile Apps
- Universal Import Plugin
- DMS Import Plugin
- AutoCount Pick List Plugin User Guide
- AutoCount Credit Memo Plugin User Guide
- AutoCount Lock Price Plugin
- AutoCount Progressive Billing
- AutoCount Easy Recurrence Plugin
- Batch Update Unit Price Plugin
- AutoCount Production order
- AutoCount Car Tint Film Plugin
-
- Event Management System
- AutoCount To-Do List Plugin
- AutoCount AutoBank Reconciliation Plugin
- Intercompany Billing Plugin User Guide
- Lead Management 2.0 Plugin
- AutoCount Service Contract Plugin User Guide
- AutoCount Optical Plugin
- AutoCount Integrator Plugin
- AutoCount Procurement Planning Plugin
- Cage Management Plugin
- AutoCount Vehicle Plugin
- AutoCount Agent Validation Plugin User Guide
- AutoCount Barcode Generator Plugin User Guide
- AutoCount Easy Batch Number Entry Plugin User Guide
- Warranty 2.0 Plugin
- AutoCount Easy Photo 2.0 User Guide
- AutoCount Recurring Invoice Plugin User Guide
- AutoCount Scale Barcode Plugin User Guide
- AutoCount Recurrence Late Interest Plugin
- AutoCount Item Visibility Control
- AutoCount Bill Remark Plugin User Guide
- AutoCount Pain Tracker User Guide
- AutoCount Easy Payment
- AutoCount Easy Deposit Plugin
- AutoCount Easy Knock Off Plugin
- AutoCount Daily Collection Summary Plugin
- Timber Log Plugins
- Batch Transfer SODO Plugin
- AutoCount Plugin: Vege Basket Plugin
- AutoCount Plugin: Fruit Basket Plugin
- Show Remaining (15) Collapse
-
-
Form Template
-
Report Template
-
- Advance Quotation
- Cash Sale
- Consignment
- Consignment Movement
- Credit Note
- Debit Note
- Delivery Order
- FOC Quantity Analysis By Document Report
- Invoice
- Item Package Sales Report
- Monthly Sales Analysis
- Outstanding Sales Order Listing
- Profit And Loss Of Documents
- Quotation
- Sales Agent Contribution Report
- Sales Order
- Top/Bottom Sales Ranking
- Show Remaining (2) Collapse
-
- Available Stock Status Report
- Expired Item Batch Listing
- Inventory Physical Worksheet
- Stock Adjustment
- Stock Aging Report
- Stock Assembly
- Stock Assembly Order
- Stock Balance By Location
- Stock Balance Report
- Stock Card Report
- Stock Disassembly
- Stock Issue
- Stock Item Profit Margin
- Stock Movement Report
- Stock Receive
- Stock Take
- Stock Transfer
- Stock Write Off
- Show Remaining (3) Collapse
-
B2B ORDERING
-
AutoCount AI Agent
- Coming soon
Master Milestone-Based Invoicing for Construction Firms with AutoCount Plugins
Why You Should Use Progressive Billing Plugin
Precise Milestone Tracking
Easily organize your invoicing based on project completion or milestones, ensuring every stage is billed correctly.
Better Cash Flow Management
Automating your billing reduces manual effort and ensures invoices are sent on time, improving your business cash flow.
Reduce Human Errors
Eliminate mistakes in complex partial payment tracking. The plugin keeps your financial records 100% accurate and integrated with AutoCount.
Seamless Module Integration
Works flawlessly within your existing system, syncing your project claims directly with your accounting records for a smooth workflow.
Key Features of AutoCount Progressive Billing Plugin
Milestone-Based Billing
Automatically generate invoices based on milestones or stages of a project, ensuring accurate tracking and timely payments.
Partial Payment Support
Supports partial payments, allowing businesses to invoice clients progressively rather than waiting for project completion.
Integration with AutoCount Modules
Seamlessly integrates with AutoCount Accounting Software, including modules like Stock Management, Sales, and Accounts Receivable.
Automated Billing Reminders
Set up automatic reminders for customers to ensure timely payments.
Who This Plugin is For
Construction Companies
Ideal for tracking progress claims and milestone-based payments.
Consultancy Firms
Perfect for long-term service contracts that require billing in multiple stages.
Large Project Managers
Designed for businesses handling massive ongoing projects with complex billing cycles.
Service Providers
Great for any business looking to automate partial payments and improve billing accuracy.
How AutoCount AutoCount Progressive Billing Plugin Works
1. Installing the Plug-In
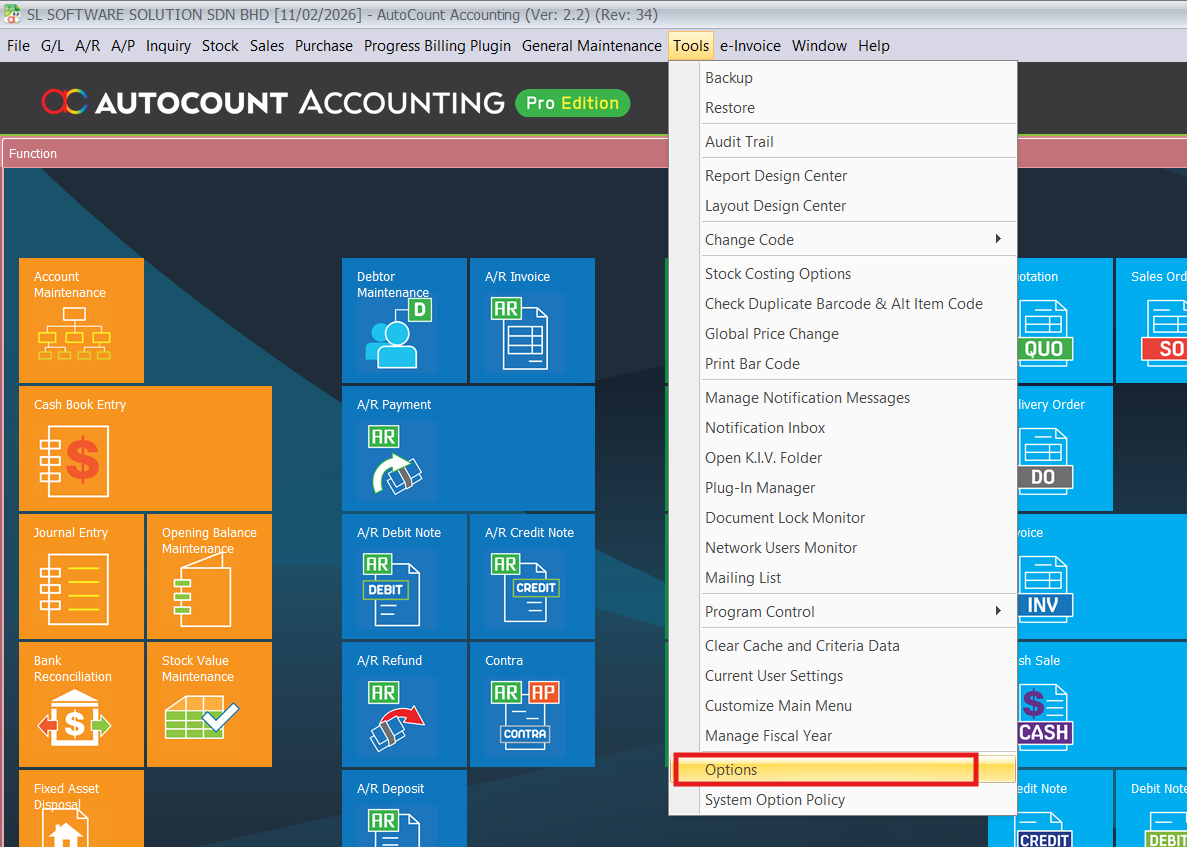
To install the tool, you must navigate to Tools > Plug-In Manager and select the appropriate installation file. After the installation is complete, a confirmation message will prompt you to click Yes to finalize the process.
To start using the tool, you need to add it to your system via the Plug-In Manager.
- Navigate to Tools > Plug-In Manager.
- Click on Install and select the correct installation file.
- Wait for the setup to complete.
- Click Yes when the confirmation message pops up to finish the process.
Pro Tip:
Always back up your database before installing any new plugin. This keeps your data safe and ensures a smooth setup.

2.Configure Quantity Decimal Setting
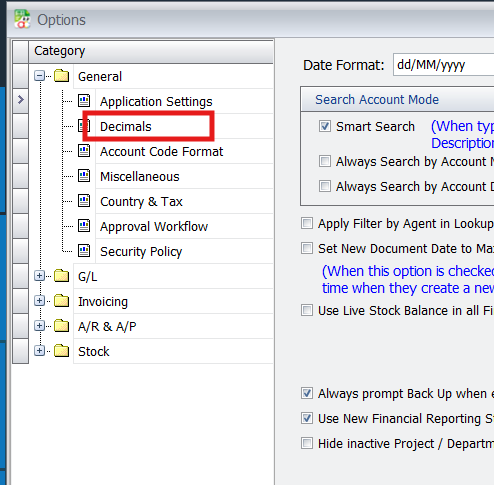
Before processing transactions, you must go to Tools > Options to configure the Quantity Decimal setting. Clicked “decimals”. It is recommended to set this to a value of two to ensure that percentage-based quantity calculations are handled accurately.
Set your decimal points correctly to ensure the system calculates percentages and quantities accurately.
- Navigate to Tools > Options.
- Select the Decimals category under General.
- Find Quantity Decimal and set the value to 2.
- Click OK to save your changes.
Pro Tip:
Using two decimal places helps the system handle percentage-based billing without rounding errors.

3.Create a Sales Order for the Project
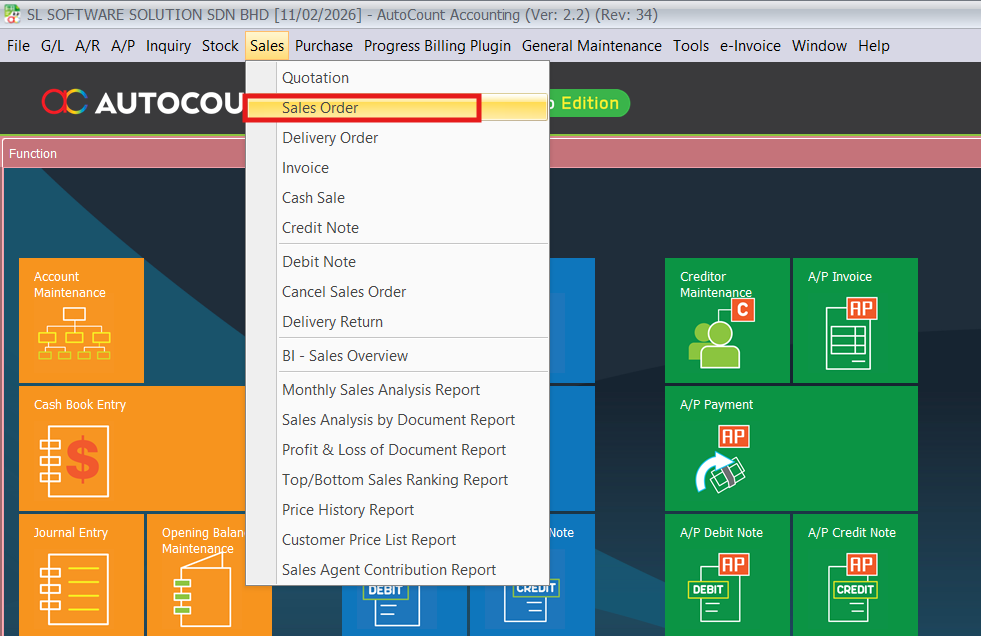
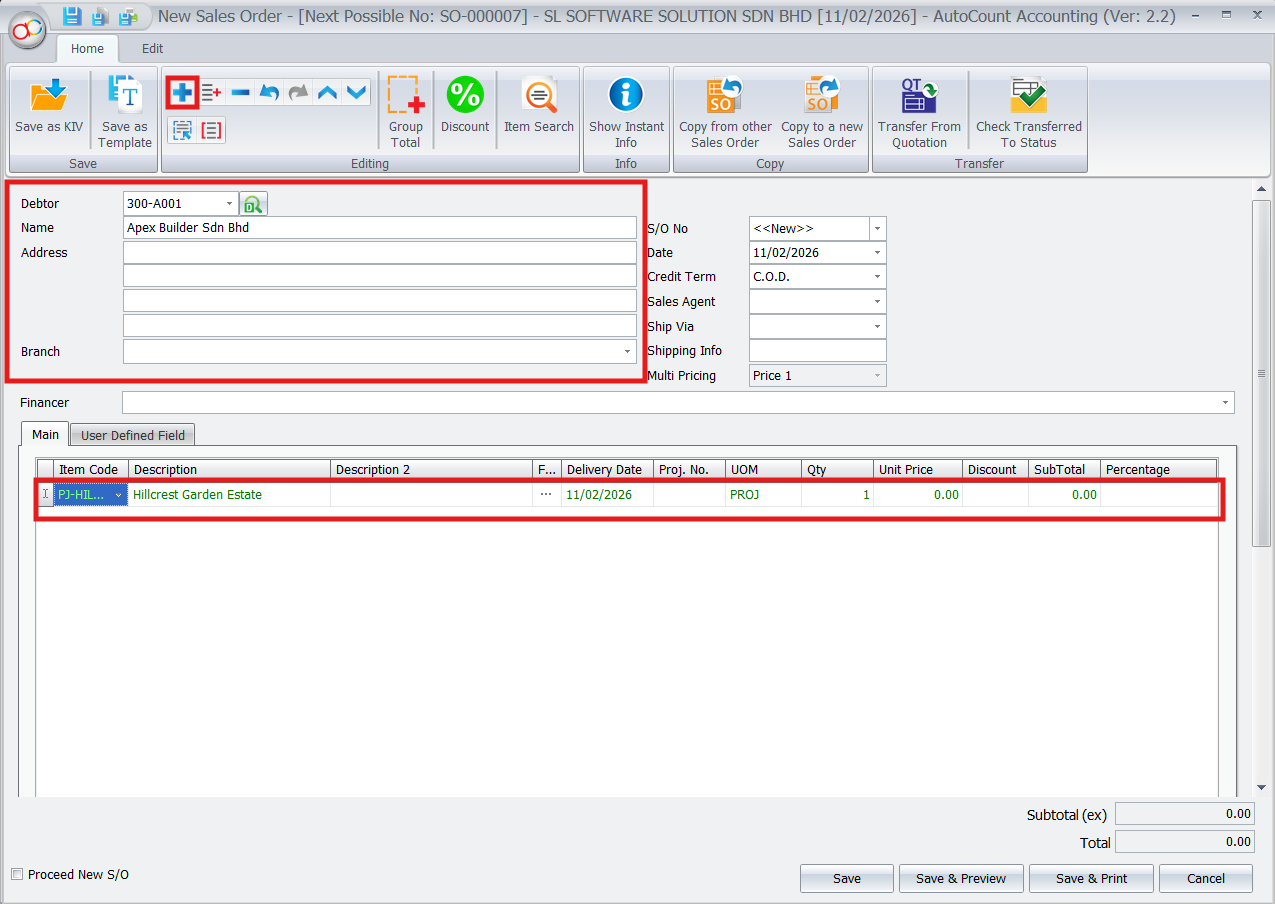
To initiate the project, you navigate to Sales > Sales Order to record the customer’s master order. In the item grid, you add the project items and enter the billing Percentage for each stage, which allows the system to automatically calculate the Quantity for that specific row. You repeat this process until the cumulative total reaches 100% before saving the document.
This step records your main order and sets up the billing stages.
- Go to Sales > Sales Order.
- Select your Debtor and add the project items to the list.
- In the item grid, enter the Percentage for each billing stage.
- The system will automatically calculate the Quantity based on your percentage.
Pro Tip:
Make sure the total percentage for all stages reaches 100% before you save the document.
4.Generate Invoice for Payment
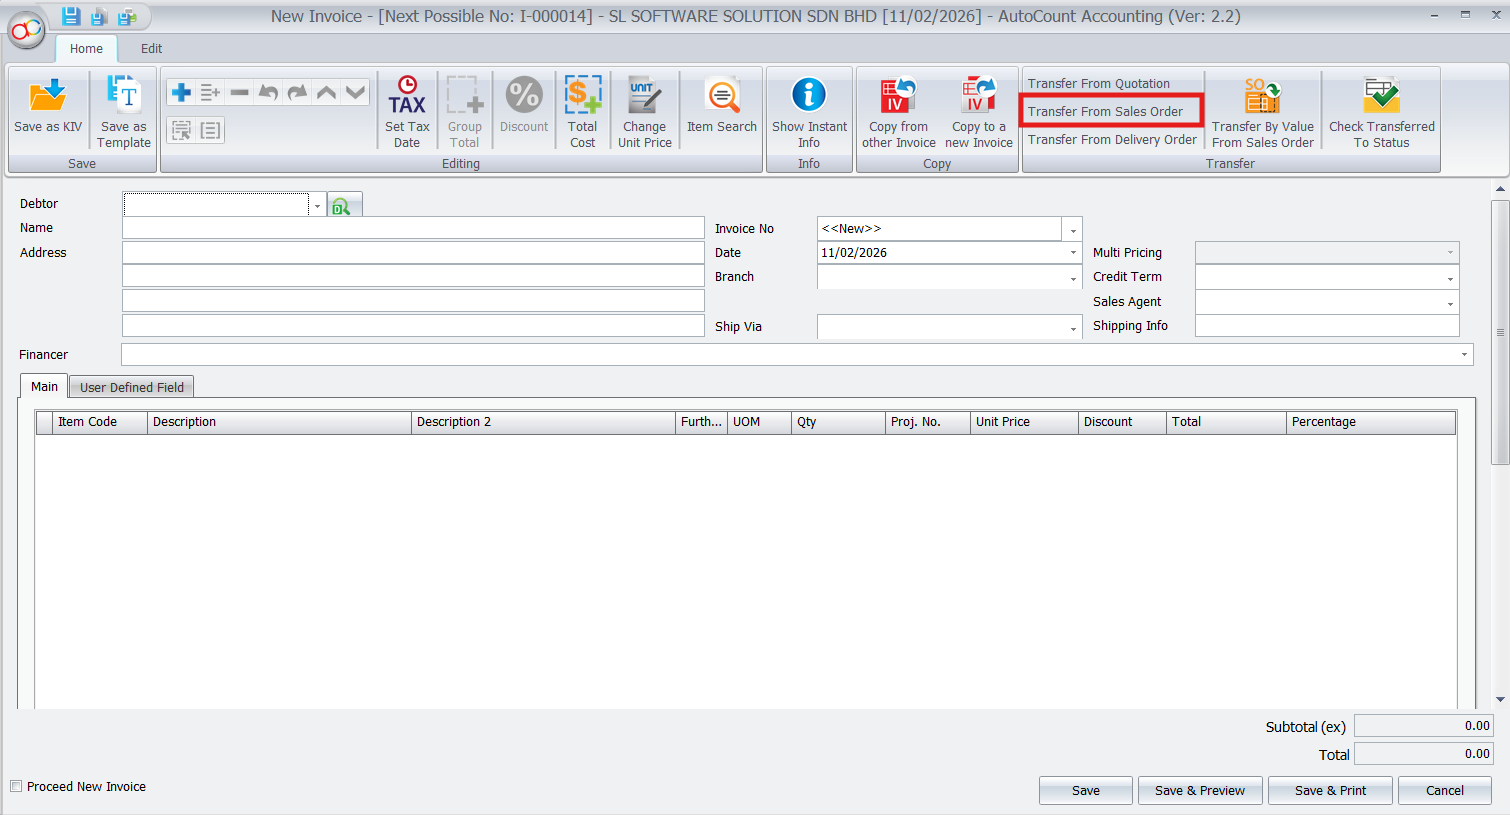
When a payment milestone is reached, you go to Sales > Invoice and clicked the “New” after that clicked “Transfer from Sales Order” function.
When it is time to bill your customer, transfer the data from your Sales Order to an Invoice.
- Navigate to Sales > Invoice and click New.
- Click the Transfer from Sales Order button.
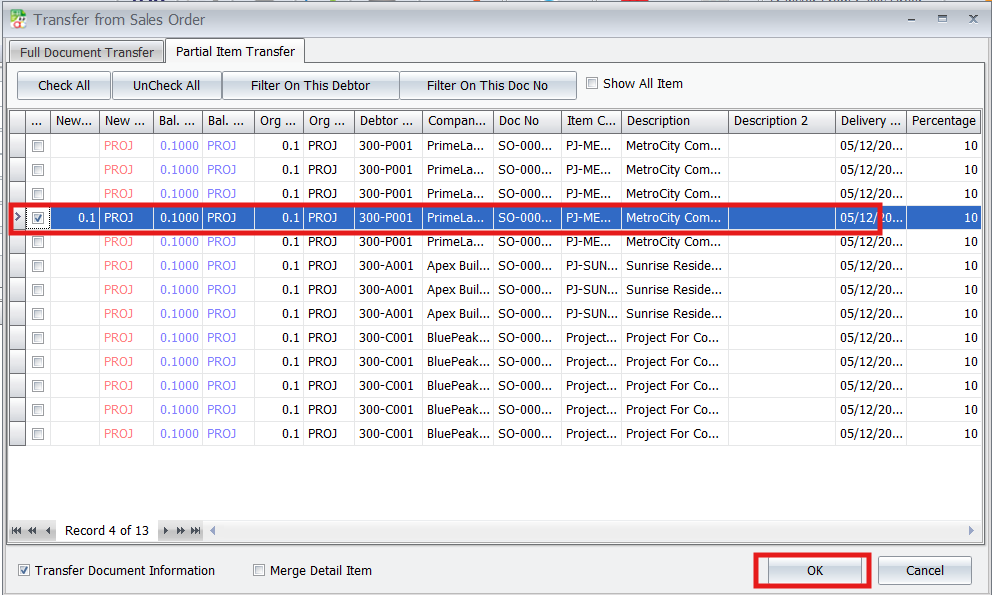
- Go to the Partial Item Transfer tab.
- Select the specific rows (billing stages) that are ready.
- Click OK to pull the data into your invoice.
Pro Tip:
Use Partial Item Transfer to bill only what is finished. This keeps your records clear and avoids billing the customer for work not yet done.
From the selection window, you tick only the specific rows or stages that are ready for billing and click “OK” to pull that data into the invoice for finalization.
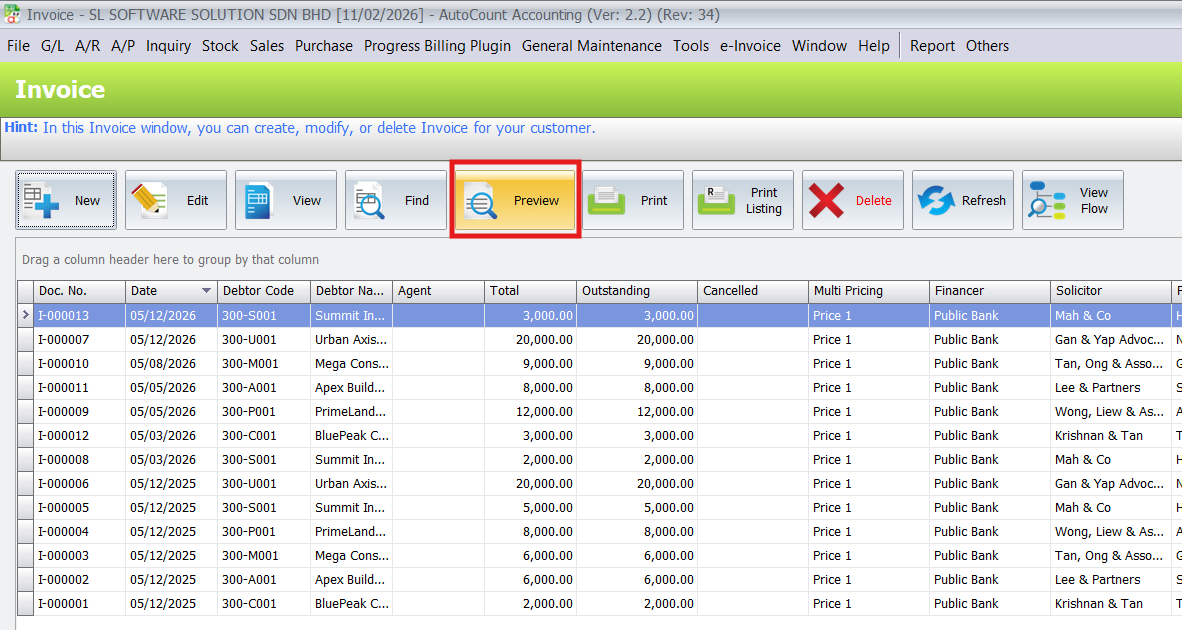
5.View Progress Billing Reports
The plugin provides three distinct report formats to help monitor project finances: Format 1 – Billing Summary, Format 2 – Billing Schedule, and Format 3 – Billing Status. You can access these by clicking the “Preview” button within the reporting module to gain insights into outstanding payments and overall project billing progress.
Use reports to track your project finances and outstanding payments.
- In the Invoice list, click the Preview button.
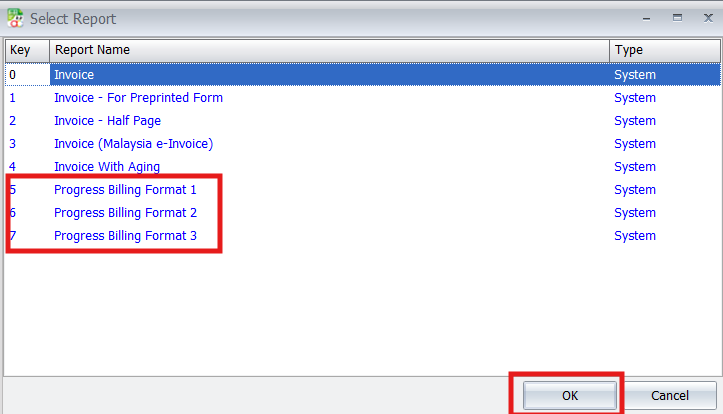
- Choose from three professional formats:
- Format 1: Billing Summary.
- Format 2: Billing Schedule.
- Format 3: Billing Status.
- Click OK to view the report.
Pro Tip:
Format 3 (Billing Status) is the best for a full overview. You can save it as a PDF to show your clients exactly how much work is finished and paid.
6.View Outstanding Sales Orders
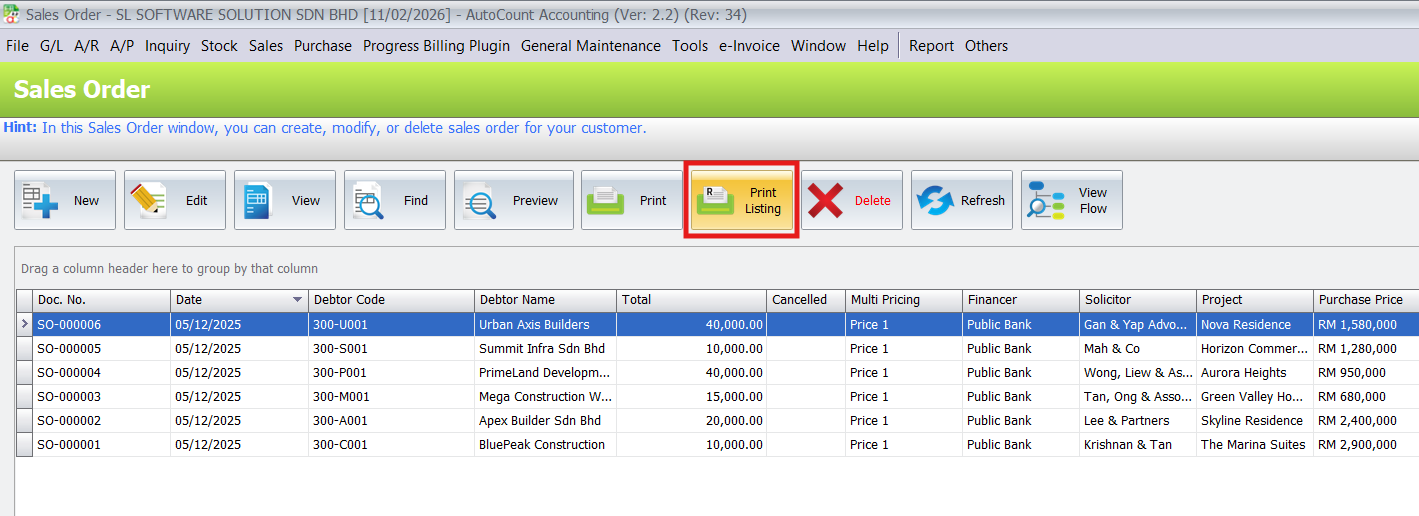
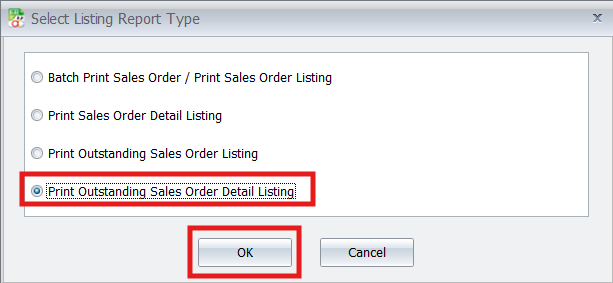
To begin, navigate to the Sales > Sales Order menu and select the Print Listing option. From the “Select Listing Report Type” window, you must specifically choose Print Outstanding Sales Order Detail Listing and then click OK to proceed.
Check which projects are still ongoing and need the next invoice.
- Go to Sales > Sales Order and click Print Listing.
- Select Print Outstanding Sales Order Detail Listing.
- Click OK.
Pro Tip:
Check this report every week. It helps you find projects that are stuck so you don’t forget to bill your customers on time.
7. View Fully Paid Sales Orders
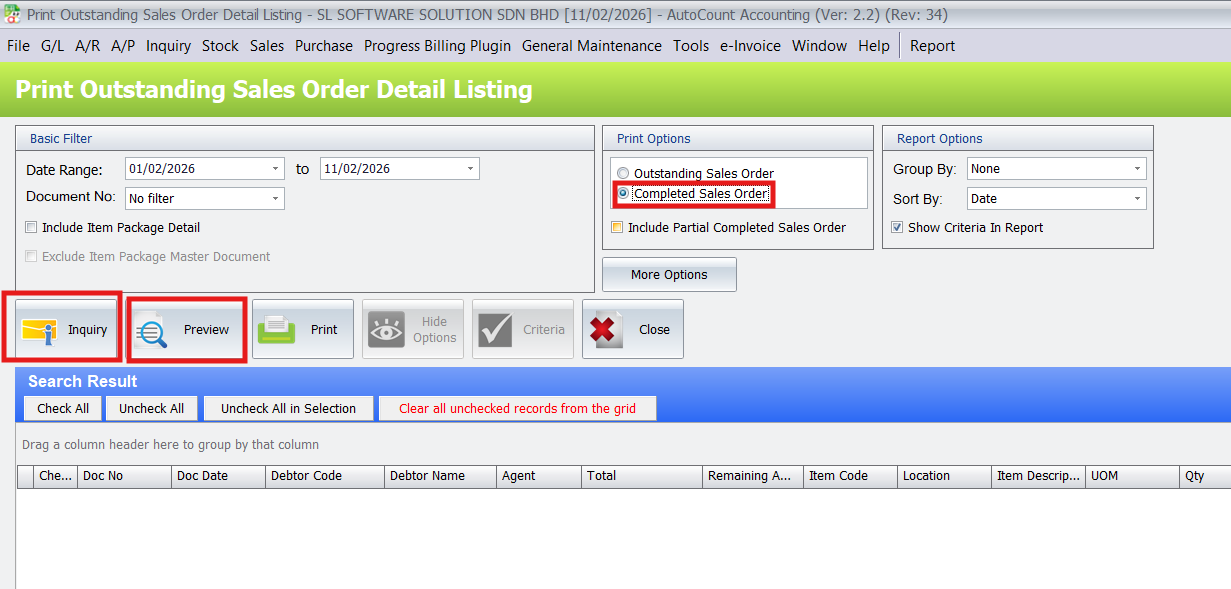
In the same report area, you can identify completed projects by changing the Print Option to Complete Sales Order. After clicking Inquiry, the system will display all transactions that have been fully invoiced and settled.
Use this report to identify projects that are 100% finished and fully paid.
- Stay in the Print Outstanding Sales Order Detail Listing window.
- Go to the Print Options section and select Completed Sales Order.
- Click the Inquiry button to refresh the list of projects.
- Click Preview to view or print the final status report.
Pro Tip:
Review this report at the end of every month. It helps you confirm that all project work is done and no payments are left to collect.
Core Benefits of the Progressive Billing Plugin
Better Efficiency
Automates your billing and project tracking to save you time and effort.
High Accuracy
Reduces human mistakes to ensure your invoices and totals are always correct.
Saves Time
Speeds up your work by handling milestone invoicing automatically.
Great Flexibility
Lets you customize payment schedules and invoice formats to fit your project needs.
Easy Integration
Works perfectly with other AutoCount features for a smoother workflow.
Conclusion
The Progressive Billing Plugin automates billing for projects, like in construction. It tracks progress, generates invoices, and seamlessly integrates with project management. Customizable and efficient, it simplifies financial management with payment tracking and compliance features, ensuring transparency and adaptability for businesses.
Frequently Asked Questions
How do I add the plugin to my software?
Go to Tools > Plug-In Manager and install the plugin file provided to you.
Can I track how much of a Sales Order is still outstanding?
Yes. You can view this by going to Sales Order > Print Listing. This helps you see which portions of the project have not yet been invoiced.
What decimal setting must be changed?
You must change the Quantity Decimal to 2 in the Options menu so the percentages work correctly.
How do I create the actual bill for the customer?
You create an Invoice and use the Transfer from Sales Order function to pick the stages that are finished.
Interested in Getting AutoCount for your Business?
Contact our sales team today to explore pricing options and get started with the perfect solution for you.