-
AutoCount Accounting Features
-
- Approval Workflow
- Audit Trail
- Auto Save in Draft Folder
- AutoCount Contra Account
- AutoCount License Setting Guide
- Deposit Tracking & Management
- Documents Numbering Format
- Full Transfer and Partial Transfer
- Import Data to AutoCount Accounting Using Excel
- Informative Charts and Analytical Data
- Layout Customization
- Multi Pricing
- Sales and Services Tax
- Schedule Backup
- Search Lookup Edit
- View Documents Flow
- AutoCount Feature Stock Take
- Column Chooser
- Show Remaining (3) Collapse
-
AutoCount Cloud Accounting
-
AutoCount E-Invoice
-
AutoCount HRMS User Guide
-
AutoCount Modules
-
- Activity Stream
- Advanced Financial Report
- Advanced Item
- Advanced Multi-UOM
- Advanced Quotation Module
- Basic Multi-UOM
- Budget Module
- Consignment
- Filter By Salesman
- FOC Quantity
- Formula
- Item Batch
- Item Package
- Landing Cost
- Multi-Currency
- Multi-Dimensional Analysis
- Multi-Location
- Project Account
- Recurrence
- Remote Credit Control Module
- Stock Assembly
- User Defined Fields (UDF)
- AutoCount SST Hidden Functions
- AutoCount SST Submission - Service Tax
- AutoCount Scripting Module User Guide
- AutoCount Bonus Point Module User Guide
- Show Remaining (11) Collapse
-
AutoCount Plugins
-
- Fixed Assets Management
- Goldsmith
- TD Ordering Mobile Apps
- TD Stock Mobile Apps
- Universal Import Plugin
- DMS Import Plugin
- AutoCount Item Scope Plugin
- AutoCount Easy Knock Off Plugin
- AutoCount Pick List Plugin User Guide
- AutoCount Agent Validation Plugin User Guide
- AutoCount Barcode Generator Plugin User Guide
- AutoCount Bill Remark Plugin User Guide
- AutoCount Easy Batch Number Entry Plugin User Guide
- AutoCount Recurring Invoice Plugin User Guide
- AutoCount Easy Photo 2.0 User Guide
- AutoCount Pain Tracker User Guide
- AutoCount Credit Memo Plugin User Guide
- Show Remaining (2) Collapse
-
- AutoCount Easy Recurrence Plugin
- AutoCount Recurring Billing Plugin
- Event Management System
- AutoCount To-Do List Plugin
- AutoCount AutoBank Reconciliation Plugin
- Intercompany Billing Plugin User Guide
- AutoCount Basket Plugin User Guide
- Lead Management 2.0 Plugin
- AutoCount Service Contract Plugin User Guide
- Autocount Repacking Plugin
- AutoCount Scale Barcode Plugin User Guide
- AutoCount Progressive Billing
- AutoCount Optical Plugin
- AutoCount Meter Reading Plugin User Guide
- AutoCount Car Tint Film Plugin
- AutoCount Leasing Plugin User Guide
- AutoCount Integrator Plugin
- AutoCount Procurement Planning Plugin
- Show Remaining (3) Collapse
-
-
Form Template
-
Report Template
-
- Advance Quotation
- Cash Sale
- Consignment
- Consignment Movement
- Credit Note
- Debit Note
- Delivery Order
- FOC Quantity Analysis By Document Report
- Invoice
- Item Package Sales Report
- Monthly Sales Analysis
- Outstanding Sales Order Listing
- Profit And Loss Of Documents
- Quotation
- Sales Agent Contribution Report
- Sales Order
- Top/Bottom Sales Ranking
- Show Remaining (2) Collapse
-
- Available Stock Status Report
- Expired Item Batch Listing
- Inventory Physical Worksheet
- Stock Adjustment
- Stock Aging Report
- Stock Assembly
- Stock Assembly Order
- Stock Balance By Location
- Stock Balance Report
- Stock Card Report
- Stock Disassembly
- Stock Issue
- Stock Item Profit Margin
- Stock Movement Report
- Stock Receive
- Stock Take
- Stock Transfer
- Stock Write Off
- Show Remaining (3) Collapse
AutoCount Accounting: Barcode Printing
This user guide will walk you through the steps to enable and use the Barcode Printing feature in AutoCount Accounting 2.0. To clarify, this features helps in allowing efficient printing, management, and export of barcodes for stock items and documents.
Introduction to AutoCount Barcode Printing
Firstly, this feature is an AutoCount Accounting 2.0 feature within the Stock Module that allows users to generate and print barcodes for stock items and documents. As a result, this feature streamlines inventory management by simplifying labeling and improving accuracy.
Prerequisites for Using Barcode Printing
Enabling the Stock Module
1. Go to Module Settings
- Firstly, navigate to Tools > Program Control > Module Setting.

2. Activate the Stock Module
- Secondly, in Module Settings, find “STOCK” and check the box next to it.
- After that, click OK to save the setting.

3. Confirm Activation
- Thirdly, after enabling, the Stock Module will appear under Tools.

Accessing Barcode Printing
1. Navigate to Barcode Printing
- Firstly, go to Tools > Print Bar Code.

2. Barcode Printing Interface
- Secondly, you’ll see the interface, where you can manage barcode data and printing options.


Importing Documents for Barcode Creation
1. Click on Import
- Firstly, in the interface, select the Import option.


2. Select Items for Barcode Printing
- Secondly, choose the items to generate barcodes for by enabling “Item” using the checkbox.
- To clarify, you can filter items as needed.

3. Confirm and Preview
- Finally, after selecting items, click OK to see a preview.

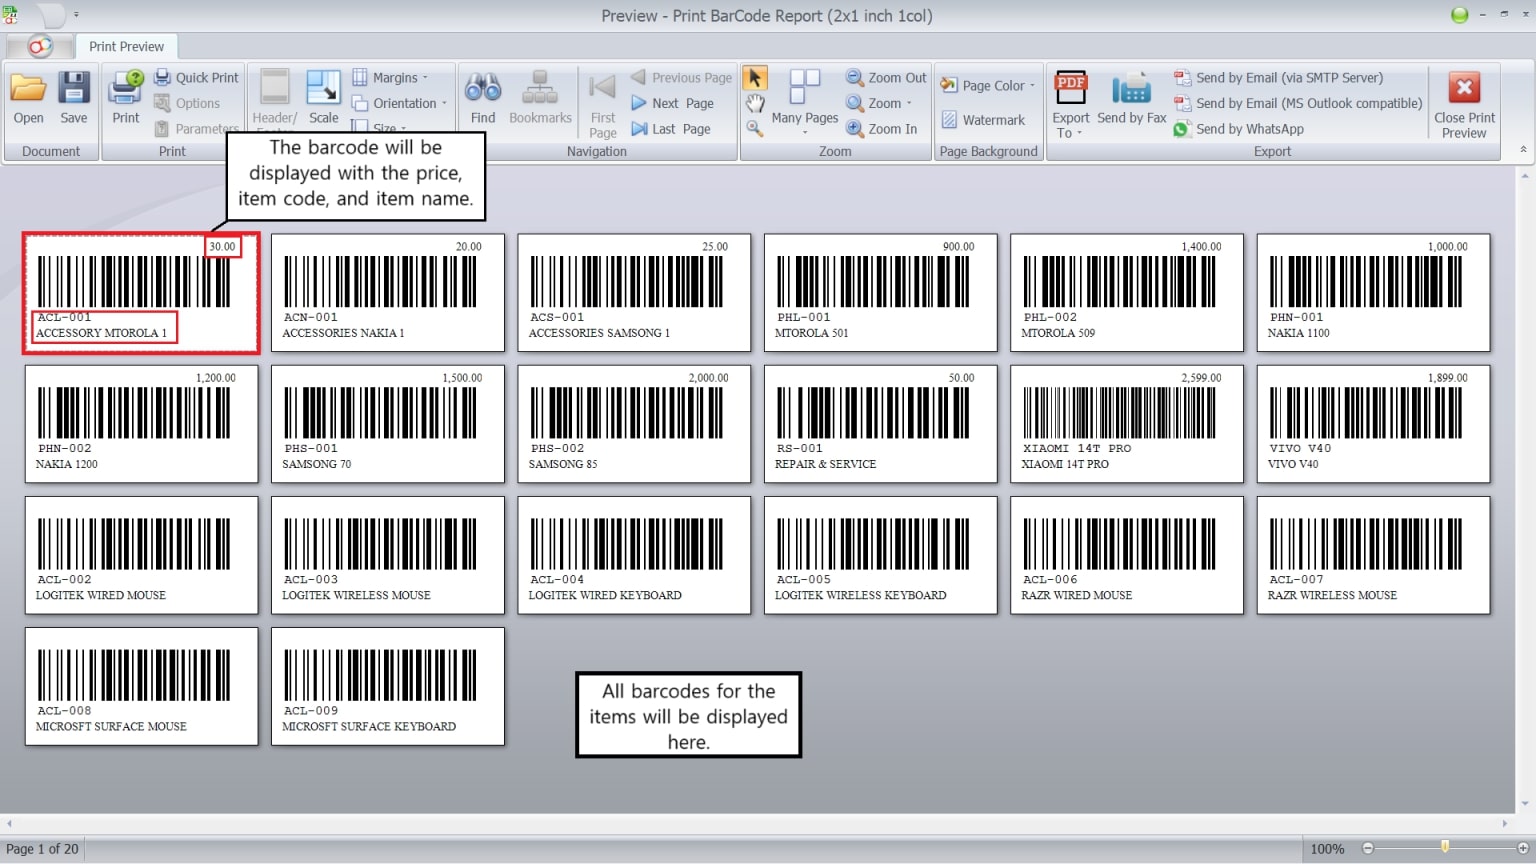
Printing Barcodes
1. Preview Barcode Format
- After selecting items, click Preview.

- Choose the type of barcode and format from the options available:
- Print BarCode Report (2×1 inch, 1col): Single column on 2×1-inch labels.
- Print BarCode Report (2×1 inch, 2col): Two columns on 2×1-inch labels.
- CodeSoft easy bar 4a: Format for the CodeSoft easy bar 4a machine.
- TSC TTP-244: Format for the TSC TTP-244 Barcode Printing Machine.
- A4 Size: Prints on A4 paper.

2. Print the Barcode
- Click Print to generate physical barcodes.

Exporting Barcode Data
1. Select Export Option
- Click on Export in the Barcode Printing interface.
2. Choose File Format
- Choose between CSV or DBase for export formats.

3. Export Data
- Confirm export settings and save the file. This exported data can be used for inventory analysis or as part of a backup.
Example of CVS file:

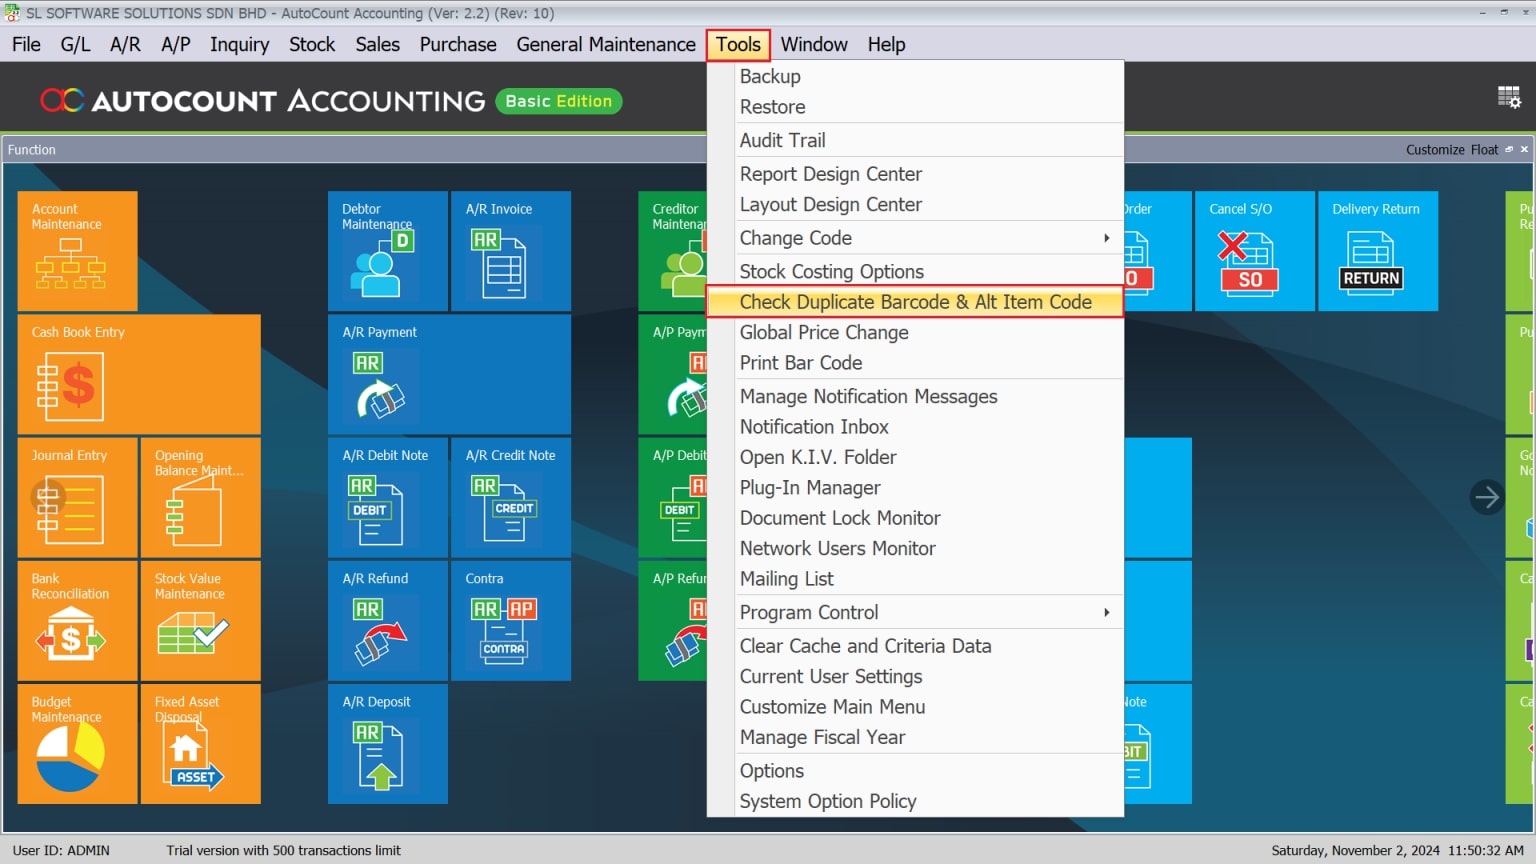
Checking Duplicate Barcodes
1. Access Duplicate Barcode Check
- Go to Tools > Check Duplicate BarCode and Alt Item Code.
2. Search for Duplicates
- Enter the barcode code you want to check, or leave the field blank to scan the entire barcode list.
- AutoCount will display any duplicate barcodes, allowing you to filter and resolve them.

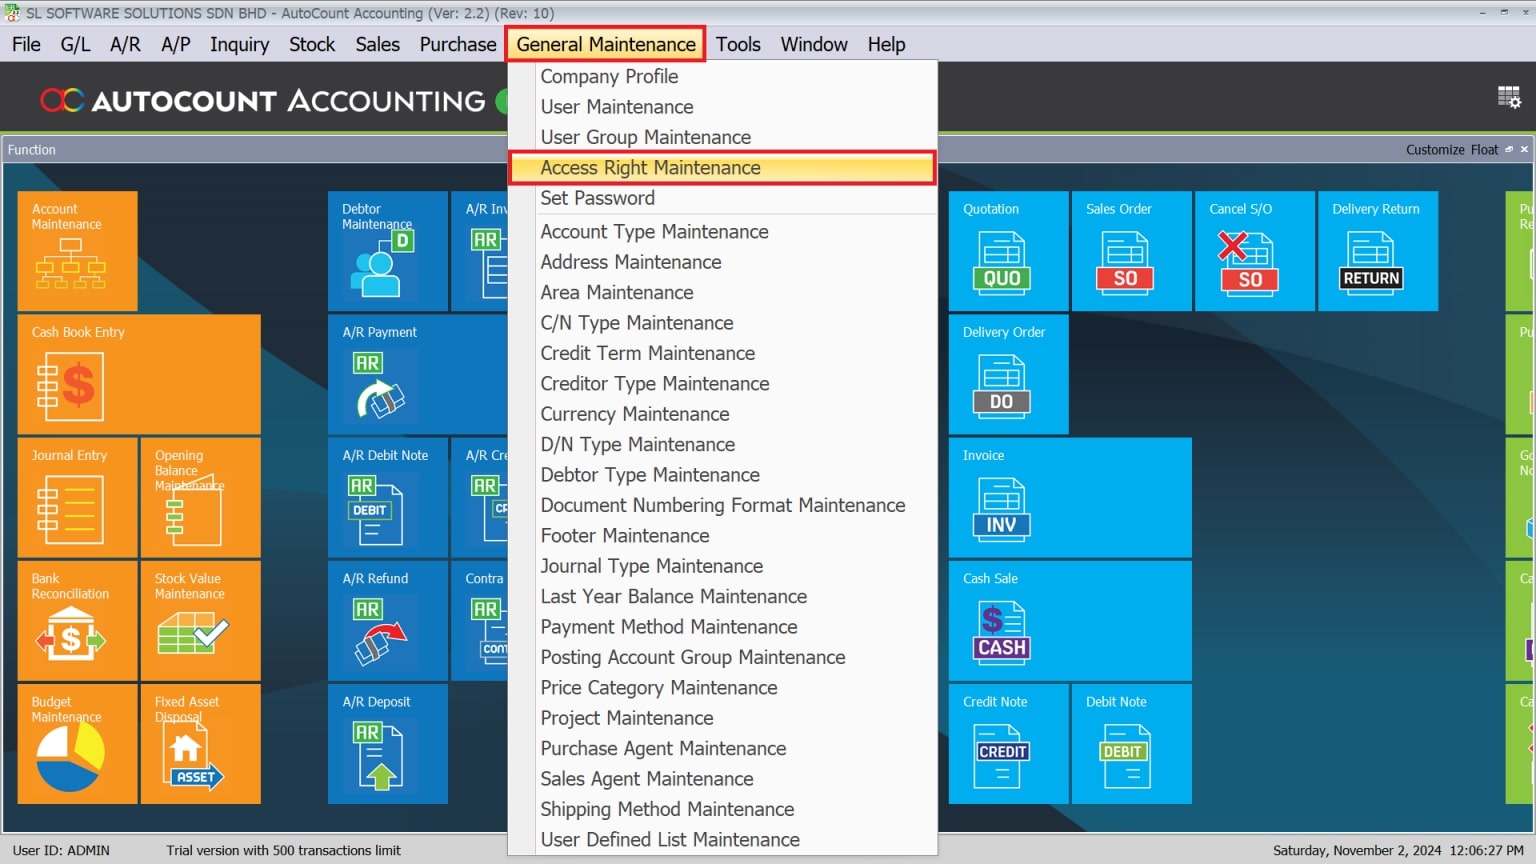
Managing User Access Rights
1. Navigate to Access Rights Maintenance
- Go to General Maintenance > Access Rights Maintenance.
2. Set Permissions
- Search for “BarCode” to locate barcode-related permissions.
- Assign permissions for checking, opening, or showing duplicate barcodes according to user roles.

Conclusion
To conclude, AutoCount Accounting 2.0’s Barcode Printing feature simplifies inventory management by enabling easy barcode generation, import/export options. In addition, it also enables duplicate checks. Therefore, with customizable printing formats and secure access rights, businesses can efficiently manage stock data and improve accuracy. In addition, this tool is ideal for streamlining labeling and enhancing stock tracking for businesses of any size.
Frequently Asked Questions
How do I activate barcode printing in AutoCount?
Activate the Stock Module in Tools > Program Control > Module Setting and check “STOCK.”
Can I import my stock data for barcode printing?
Yes, click on Import within the Barcode Printing interface to select items.
What formats are available for printing barcodes?
Options include single and double columns, CodeSoft and TSC compatibility, and A4 paper format.
How do I prevent duplicate barcodes?
Use the Duplicate Barcode Check under Tools to identify and resolve any duplicates.
Is it possible to export barcode data?
Yes, you can export data in CSV or DBase formats through the Export function.
How can I control who accesses barcode printing features?
Set permissions in General Maintenance > Access Rights Maintenance for specific user access.
Interested in Getting AutoCount for your Business?
Contact our sales team today to explore pricing options and get started with the perfect solution for you.