-
AutoCount Accounting Features
-
- Approval Workflow
- Audit Trail
- Auto Save in Draft Folder
- AutoCount Contra Account
- AutoCount License Setting Guide
- Deposit Tracking & Management
- Documents Numbering Format
- Full Transfer and Partial Transfer
- Import Data to AutoCount Accounting Using Excel
- Informative Charts and Analytical Data
- Layout Customization
- Multi Pricing
- Sales and Services Tax
- Schedule Backup
- Search Lookup Edit
- View Documents Flow
- AutoCount Feature Stock Take
- Column Chooser
- Show Remaining (3) Collapse
-
AutoCount Cloud Accounting
-
AutoCount E-Invoice
-
AutoCount HRMS User Guide
-
AutoCount Modules
-
- Activity Stream
- Advanced Financial Report
- Advanced Item
- Advanced Multi-UOM
- Advanced Quotation Module
- Basic Multi-UOM
- Budget Module
- Consignment
- Filter By Salesman
- FOC Quantity
- Formula
- Item Batch
- Item Package
- Landing Cost
- Multi-Currency
- Multi-Dimensional Analysis
- Multi-Location
- Project Account
- Recurrence
- Remote Credit Control Module
- Stock Assembly
- User Defined Fields (UDF)
- AutoCount SST Hidden Functions
- AutoCount SST Submission - Service Tax
- AutoCount Scripting Module User Guide
- AutoCount Bonus Point Module User Guide
- AutoCount Service Management Plugin User Guide
- Show Remaining (12) Collapse
-
AutoCount Plugins
-
- Fixed Assets Management
- Goldsmith
- TD Ordering Mobile Apps
- TD Stock Mobile Apps
- Universal Import Plugin
- DMS Import Plugin
- AutoCount Pick List Plugin User Guide
- AutoCount Credit Memo Plugin User Guide
- AutoCount Lock Price Plugin
- AutoCount Progressive Billing
- AutoCount Easy Recurrence Plugin
- Batch Update Unit Price Plugin
- AutoCount Production order
-
- Event Management System
- AutoCount To-Do List Plugin
- AutoCount AutoBank Reconciliation Plugin
- Intercompany Billing Plugin User Guide
- Lead Management 2.0 Plugin
- AutoCount Service Contract Plugin User Guide
- AutoCount Optical Plugin
- AutoCount Integrator Plugin
- AutoCount Procurement Planning Plugin
- Cage Management Plugin
- AutoCount Vehicle Plugin
- AutoCount Agent Validation Plugin User Guide
- AutoCount Barcode Generator Plugin User Guide
- AutoCount Easy Batch Number Entry Plugin User Guide
- Warranty 2.0 Plugin
- AutoCount Easy Photo 2.0 User Guide
- AutoCount Recurring Invoice Plugin User Guide
- AutoCount Scale Barcode Plugin User Guide
- AutoCount Recurrence Late Interest Plugin
- AutoCount Item Visibility Control
- AutoCount Bill Remark Plugin User Guide
- AutoCount Pain Tracker User Guide
- AutoCount Easy Payment
- AutoCount Easy Deposit Plugin
- AutoCount Easy Knock Off Plugin
- AutoCount Daily Collection Summary Plugin
- Timber Log Plugins
- Batch Transfer SODO Plugin
- AutoCount Plugin: Vege Basket Plugin
- AutoCount Plugin: Fruit Basket Plugin
- Show Remaining (15) Collapse
-
-
Form Template
-
Report Template
-
- Advance Quotation
- Cash Sale
- Consignment
- Consignment Movement
- Credit Note
- Debit Note
- Delivery Order
- FOC Quantity Analysis By Document Report
- Invoice
- Item Package Sales Report
- Monthly Sales Analysis
- Outstanding Sales Order Listing
- Profit And Loss Of Documents
- Quotation
- Sales Agent Contribution Report
- Sales Order
- Top/Bottom Sales Ranking
- Show Remaining (2) Collapse
-
- Available Stock Status Report
- Expired Item Batch Listing
- Inventory Physical Worksheet
- Stock Adjustment
- Stock Aging Report
- Stock Assembly
- Stock Assembly Order
- Stock Balance By Location
- Stock Balance Report
- Stock Card Report
- Stock Disassembly
- Stock Issue
- Stock Item Profit Margin
- Stock Movement Report
- Stock Receive
- Stock Take
- Stock Transfer
- Stock Write Off
- Show Remaining (3) Collapse
-
B2B ORDERING
-
AutoCount AI Agent
- Coming soon
AutoCount Accounting: Column Chooser
Introduction
In today’s fast-paced business environment, efficiency is key. AutoCount empowers users to take control of their interface with the powerful Column Chooser feature. This tool allows you to customize grid views—such as stock lists or invoice tables—without needing a developer. By tailoring the visibility and arrangement of columns, you can reduce on-screen clutter and focus on the data that matters most. This flexibility enhances workflow, boosts productivity, and ensures that your software adapts to your business, not the other way around.
AutoCount Column Chooser Video Guide
- AutoCount Column Chooser (EN)
Column Chooser Setup
Integration & Column Chooser Setup
- AutoCount Column Chooser (CN)
列选择器设置
集成和列选择器设置
What is the AutoCount Column Chooser?
The Column Chooser is a built-in customization tool available across various modules in AutoCount. It allows end-users to modify table displays through a simple, intuitive interface. Instead of sifting through irrelevant data, you can create a personalized view that streamlines daily tasks.
Key Concepts:
User-Driven Customization
Adjust layouts instantly without IT support.
Drag-and-Drop Interface
Add or hide columns by simply dragging them in and out of the grid.
Layout Management
Save unique layouts for different tasks or users and recall them anytime.
Key Features of the Column Chooser
Understanding the features available ensures you get the most out of your AutoCount experience.
Customizable Data Columns
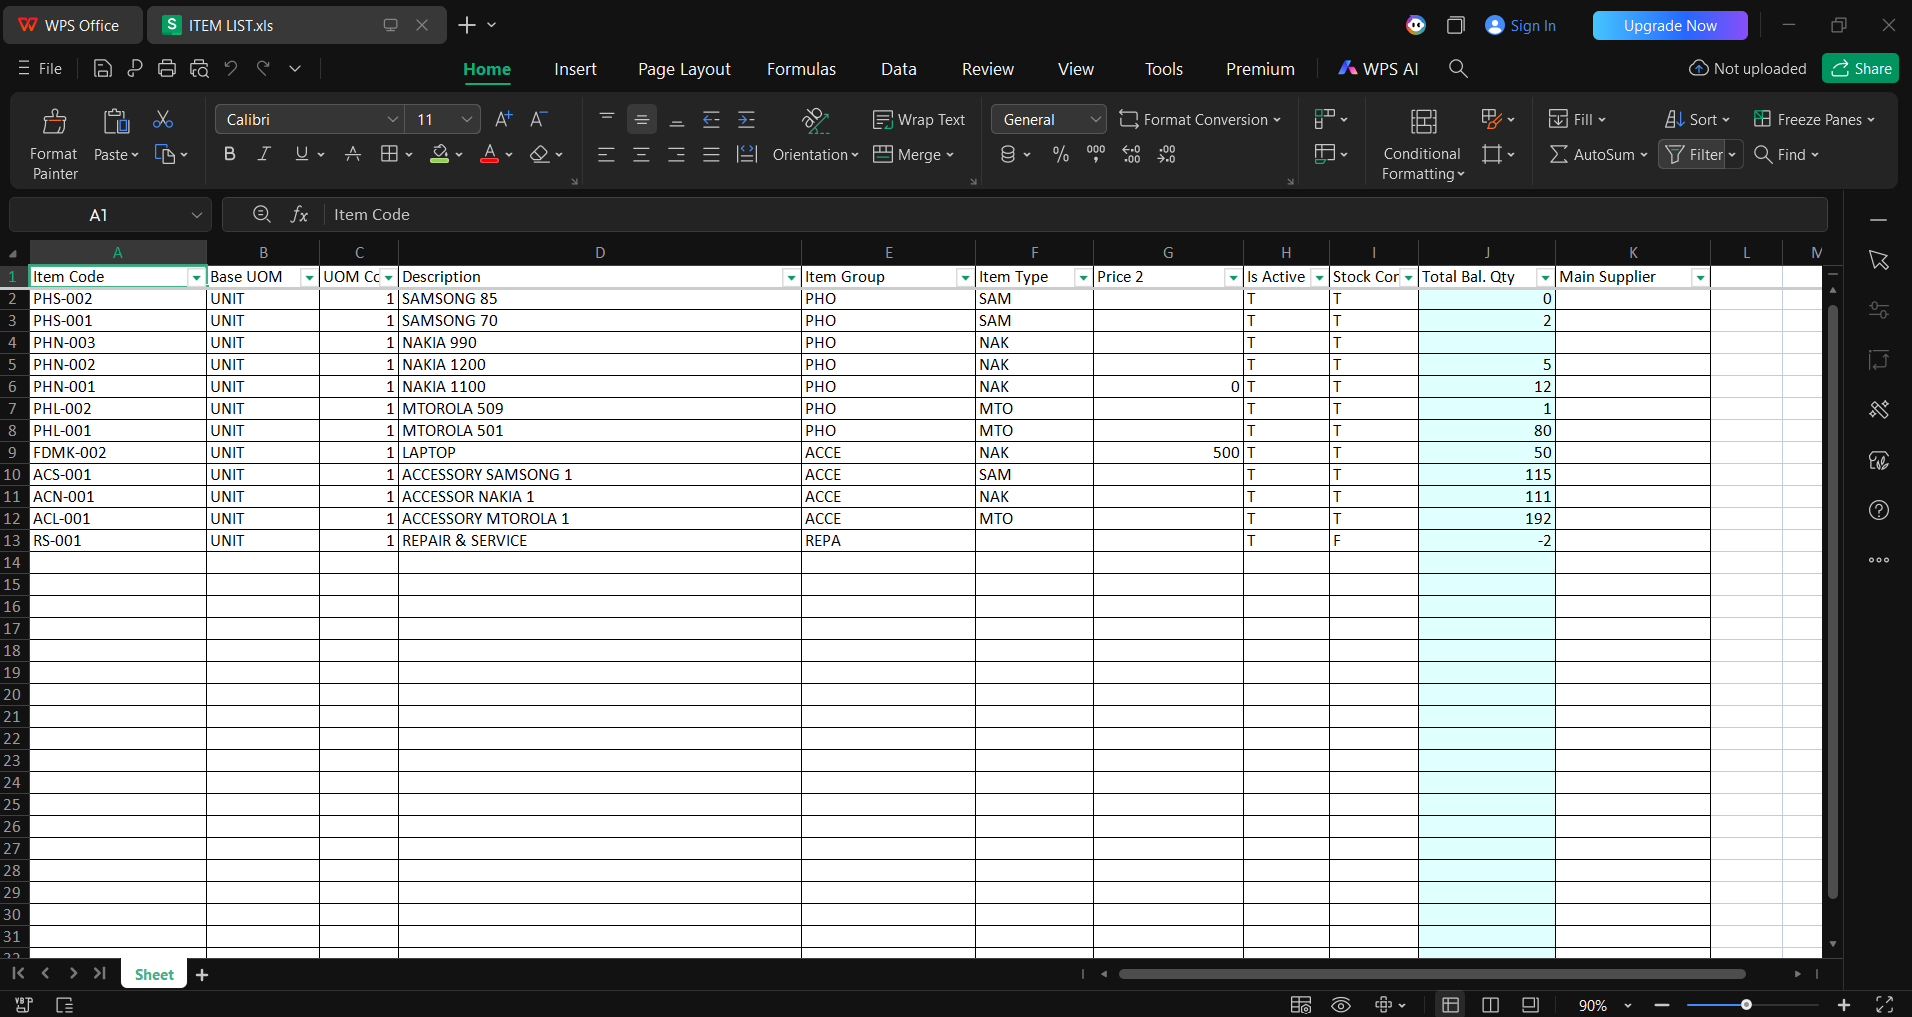
Remove clutter and focus on what matters. Tailor tables in modules like Stock Items or Invoices to display only essential fields, speeding up data entry and reducing errors.
Save and Reset Layouts
Save your preferred column setup for future use. If needed, revert to the default view instantly with the "Reset Layout" option, giving you complete flexibility.
Clean Export to Excel
Turn customized data into actionable reports. Export your tailored grid directly to Excel without hidden characters or extra spaces, making it ready for pivot tables and management analysis.
Advanced Filtering Options
Find data faster. Pair the Column Chooser with tools like the "Find Panel" and "Auto Filter Row" to drill down into specific records instantly.
Multi-Database Layout Migration
Maintain consistency across companies. Use the Layout Design Center to export custom layouts from one database and import them into another, eliminating redundant setup work.
User-Specific Role-Based Layouts
Give every user the right view. Assign unique layouts to specific users or security groups, ensuring your accounts team sees a different grid than your warehouse staff for optimized role-based workflows.
How to Use the Column Chooser: A Step-by-Step Guide
Customizing your data view in AutoCount is simple. Follow this guide to optimize your grid layouts and streamline your daily tasks.
1. Access the Column Chooser
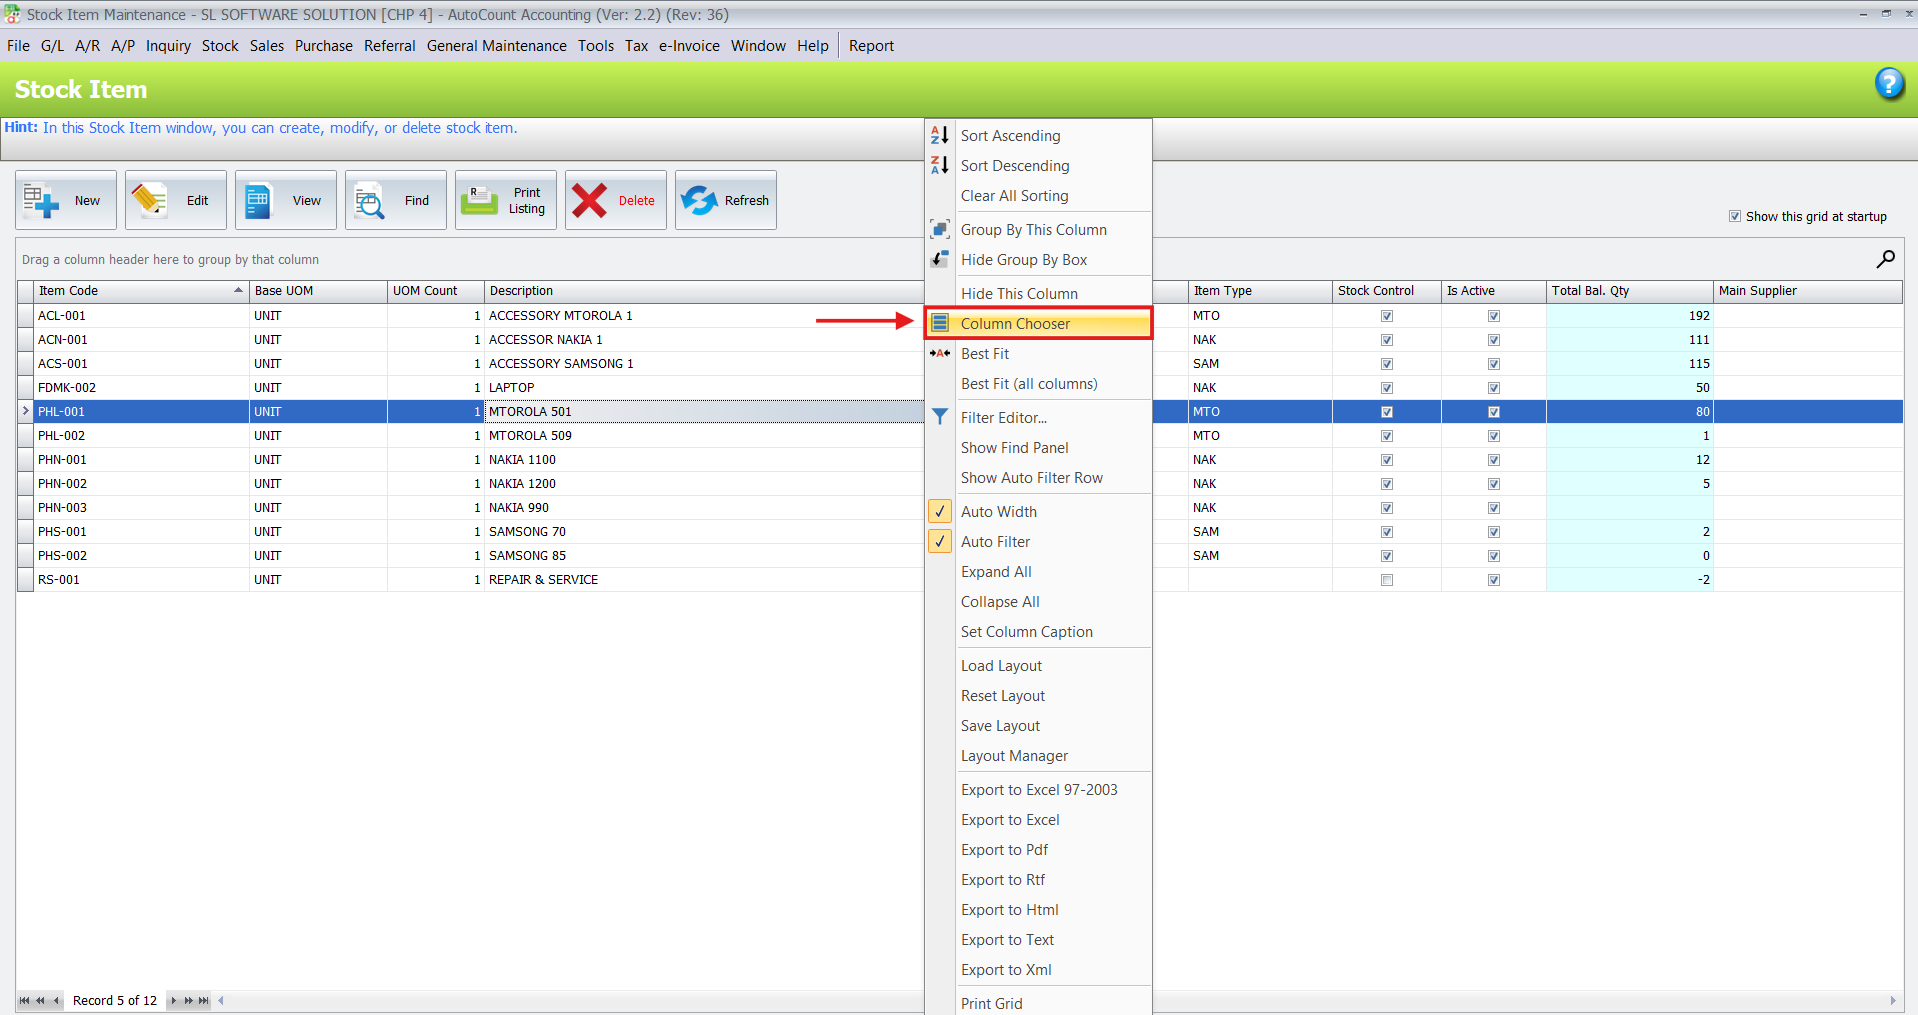
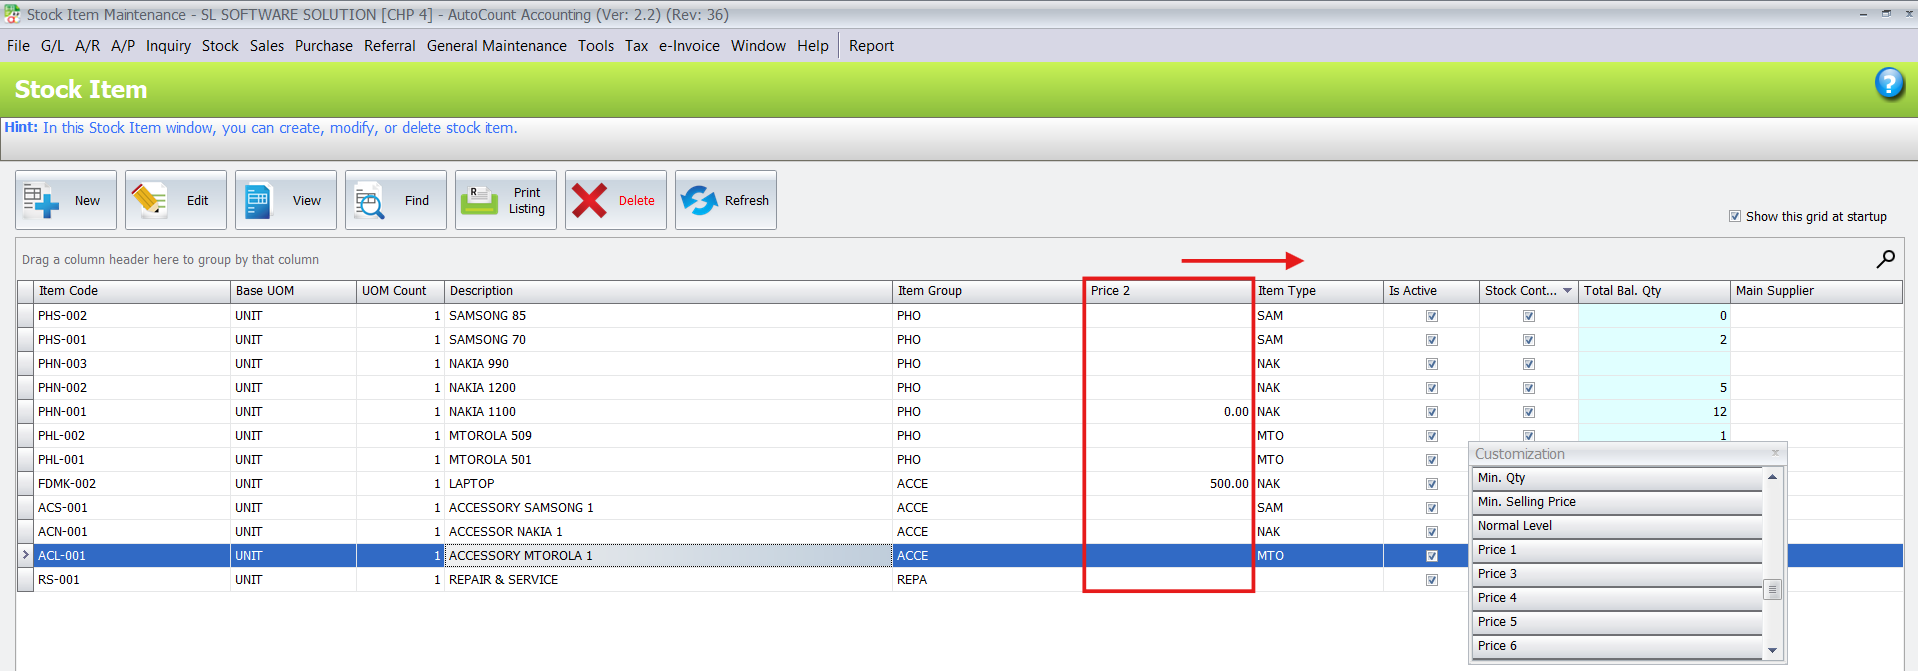
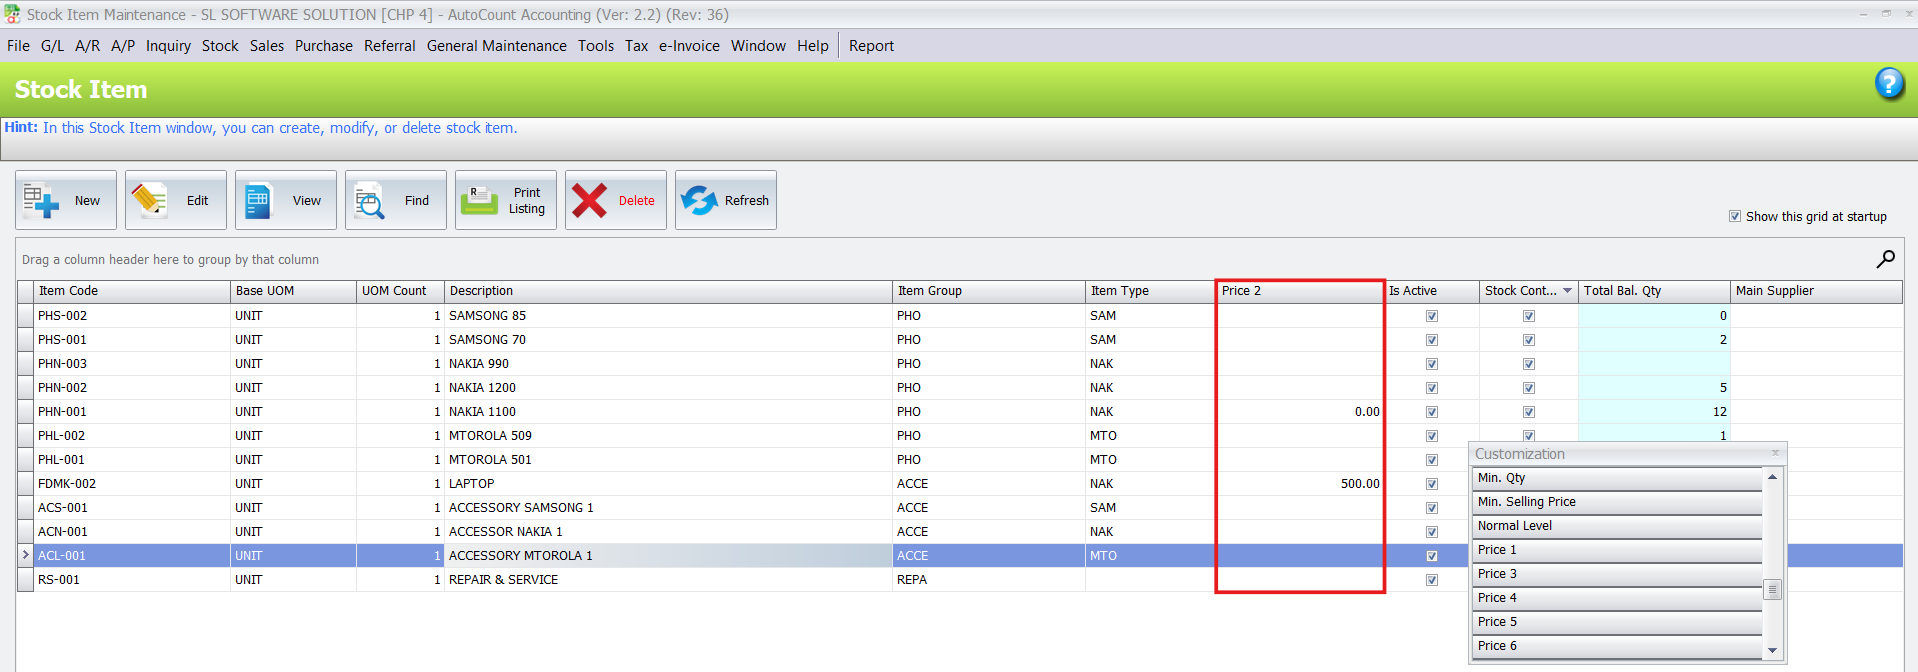
Navigate to any table-based module, for example Stock Items.
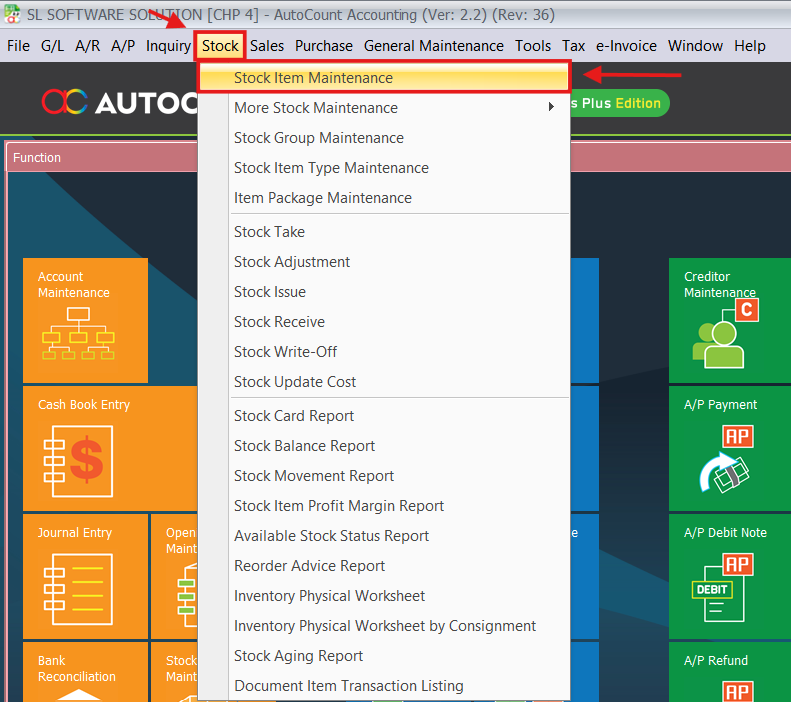
- Right-click on any column header in the data grid.
From the context menu that appears, select “Column Chooser”.
2. Customize Your View
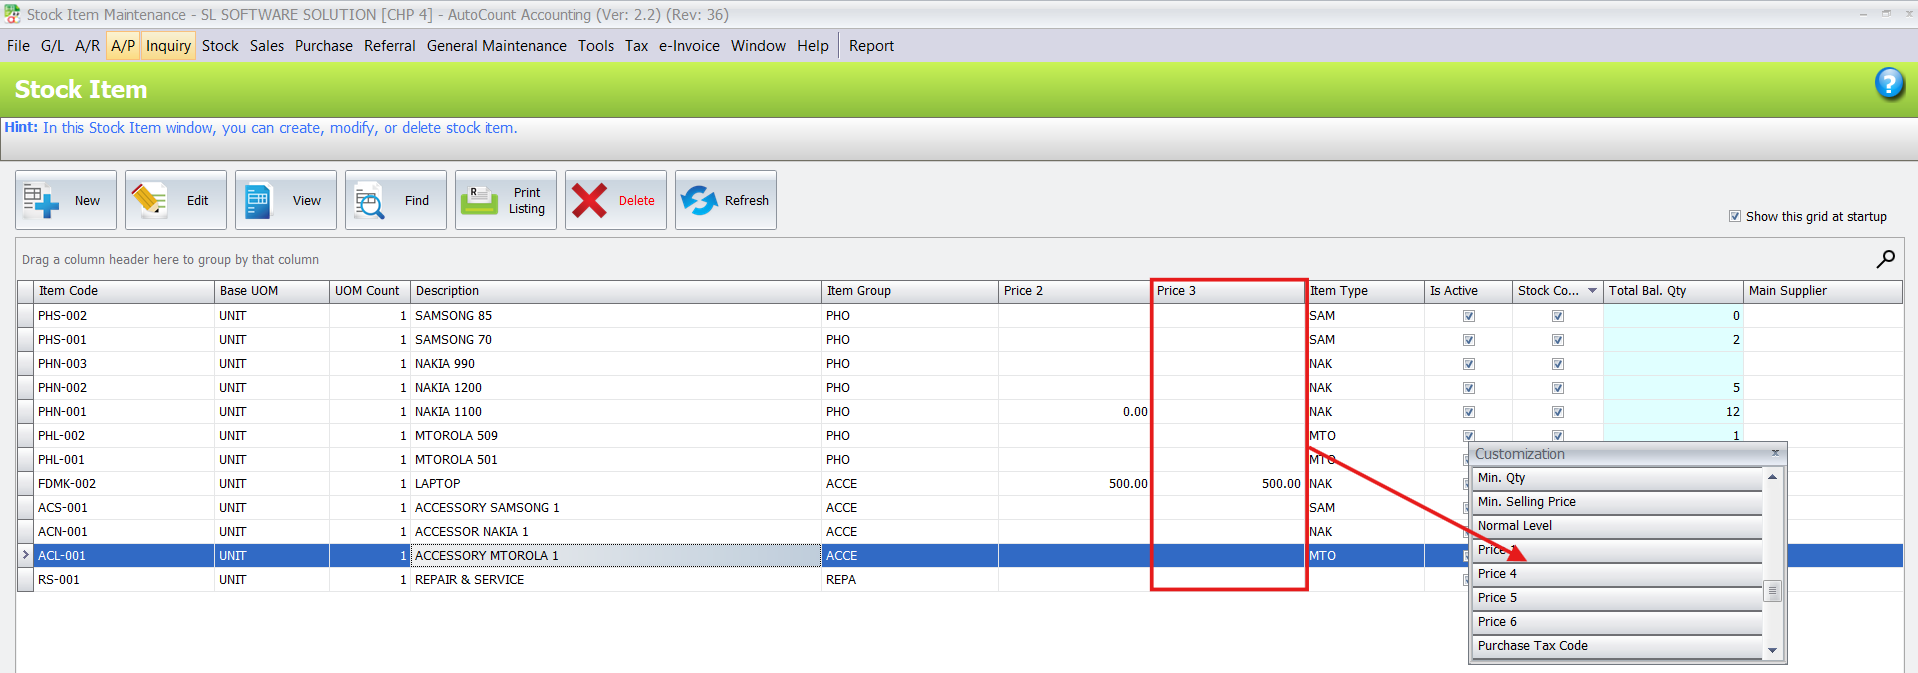
A floating window will pop up containing a list of all available columns for that specific grid. This is your customization panel.
To Add a Column: Simply click and hold a column name from the list, then drag and drop it into the desired position in the table header.
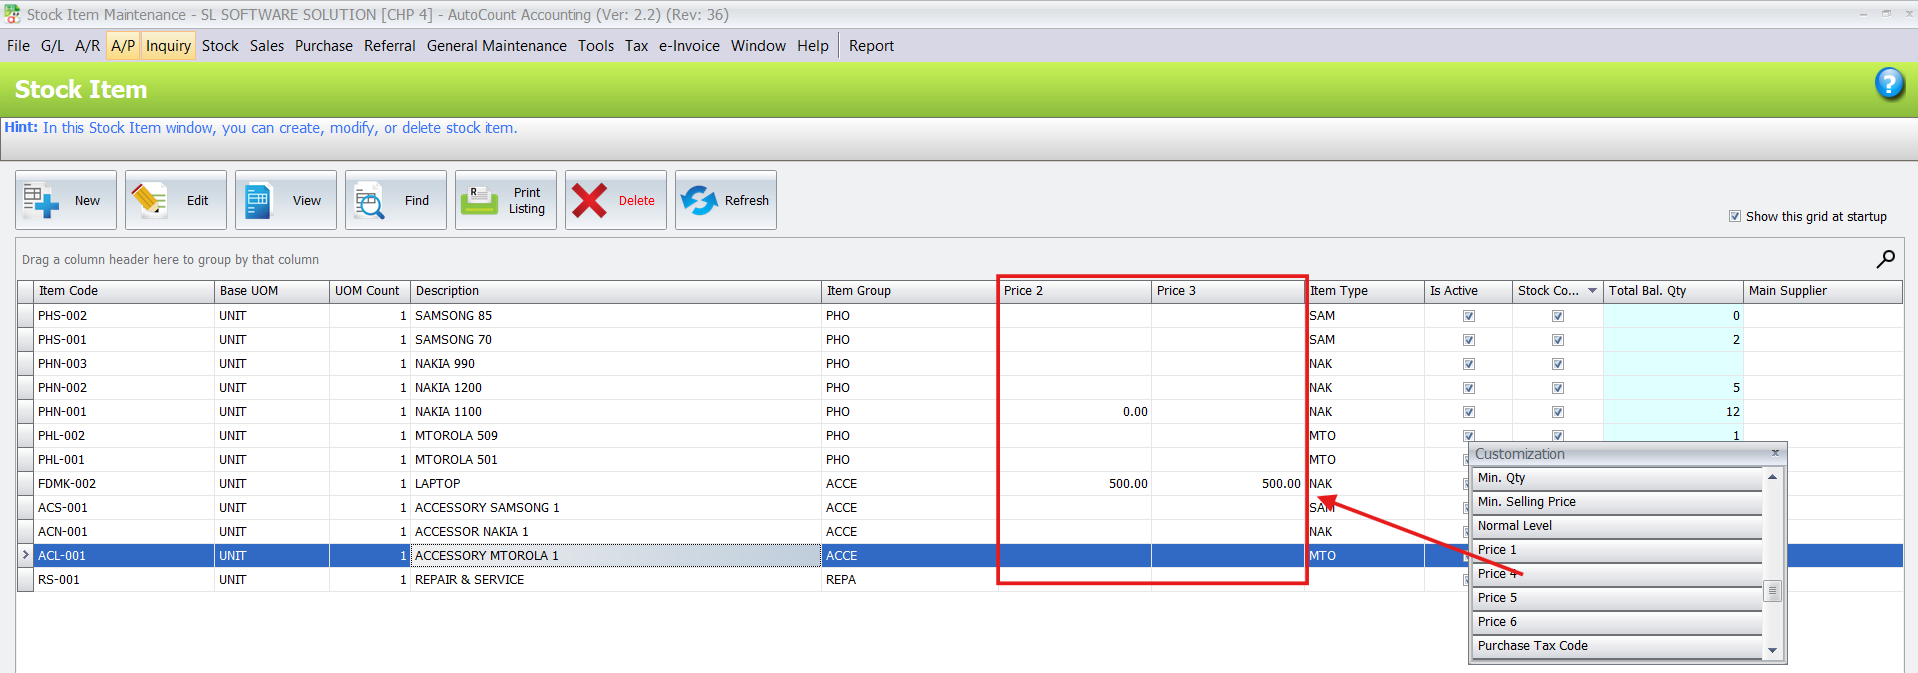
To Remove a Column: Click and hold the column header you wish to remove, then drag and drop it back into the Column Chooser window.
- To Re-arrange Columns: You can also click and drag existing column headers left or right within the table header to re-order them.
- Setting Column Captions: If you need to rename a column header (e.g., changing “Agent” to “Salesman”), you can use the “Set Column Caption” feature.

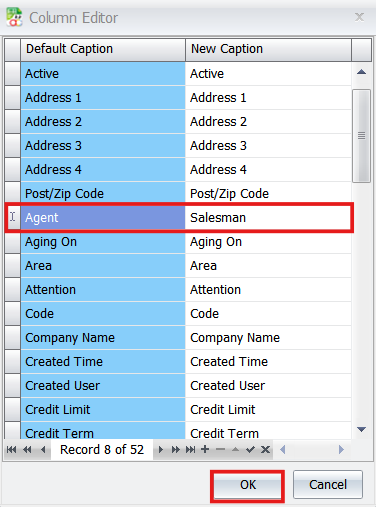
Note: Use this sparingly as it may confuse other users or support staff who are searching for original column names.
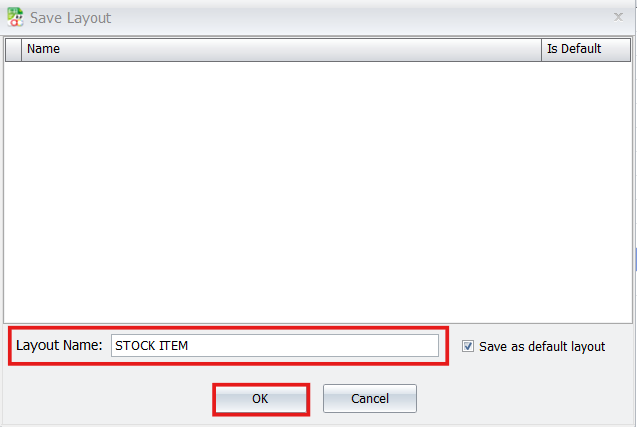
3. Save Your Layout
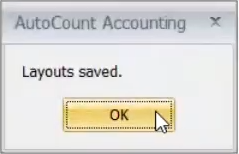
Once you have arranged the columns to your preference, you must save the configuration to retain it for future sessions.
Right-click on the column header again.
Select “Save Layout” from the menu. Your customized grid will now appear this way every time you access this module.
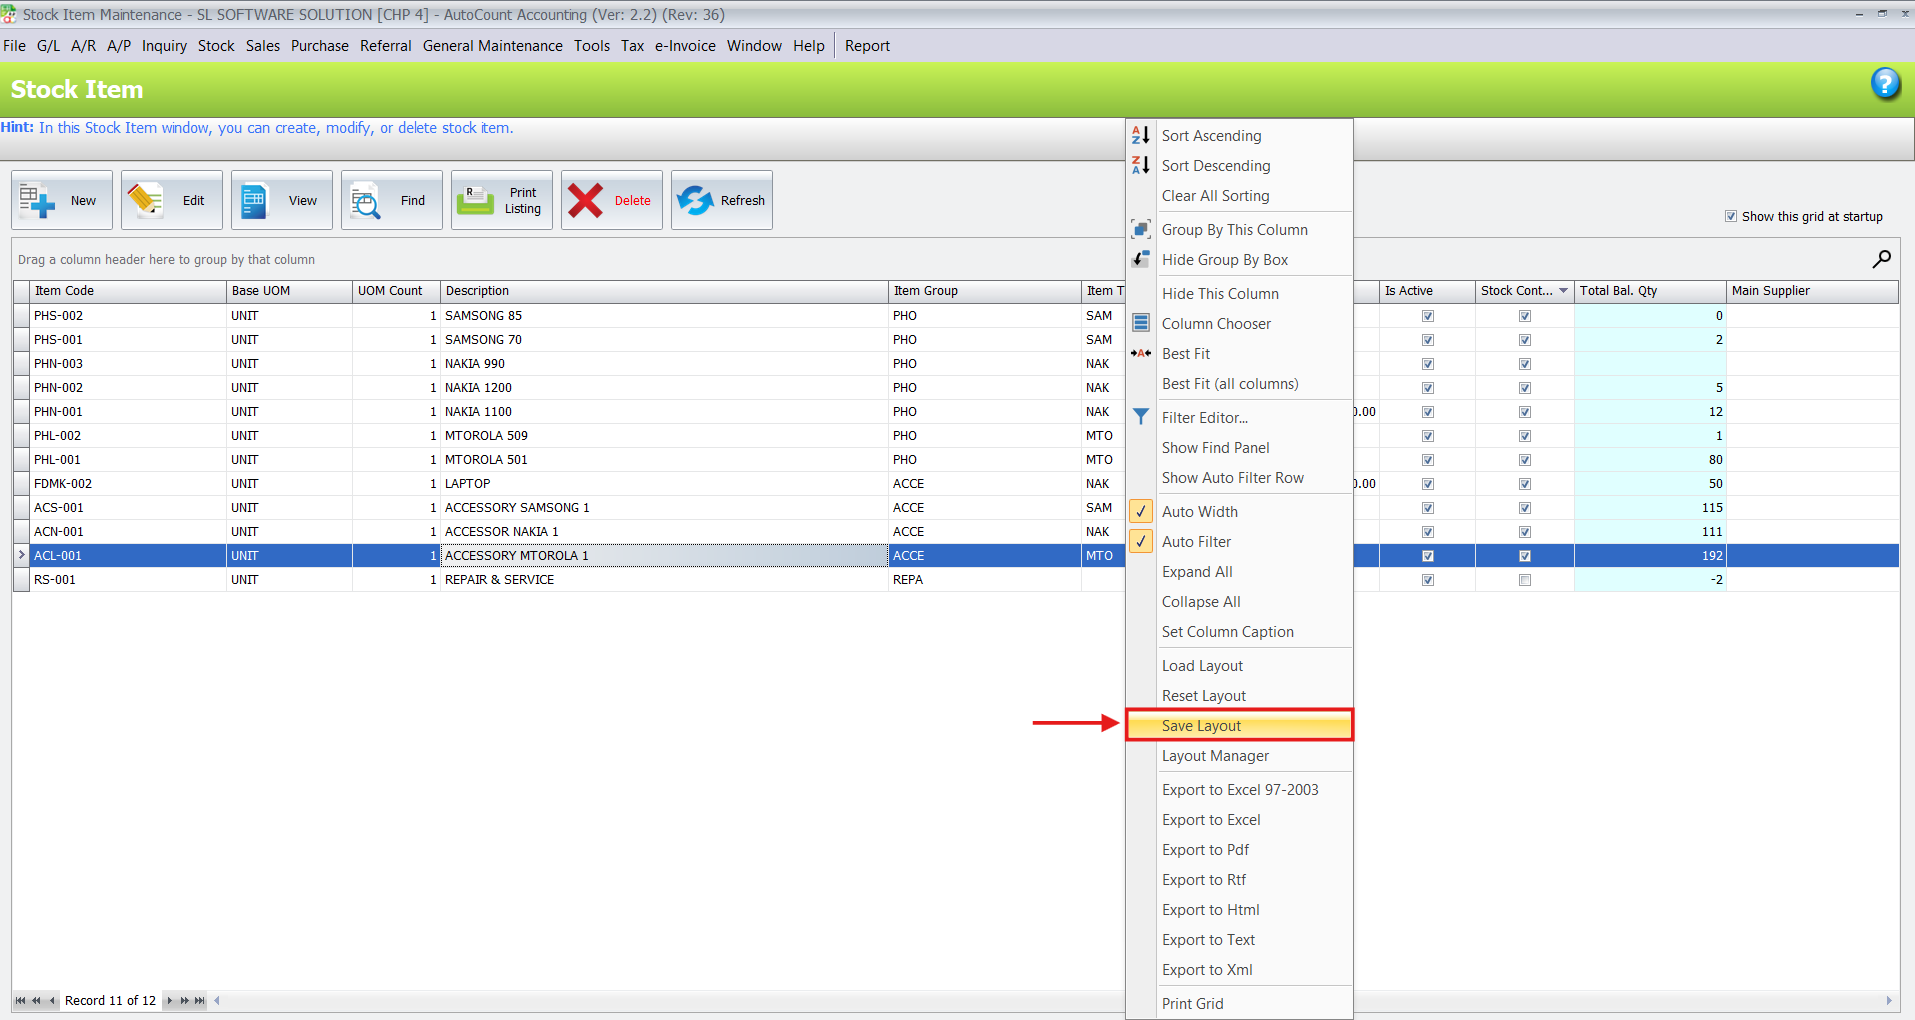
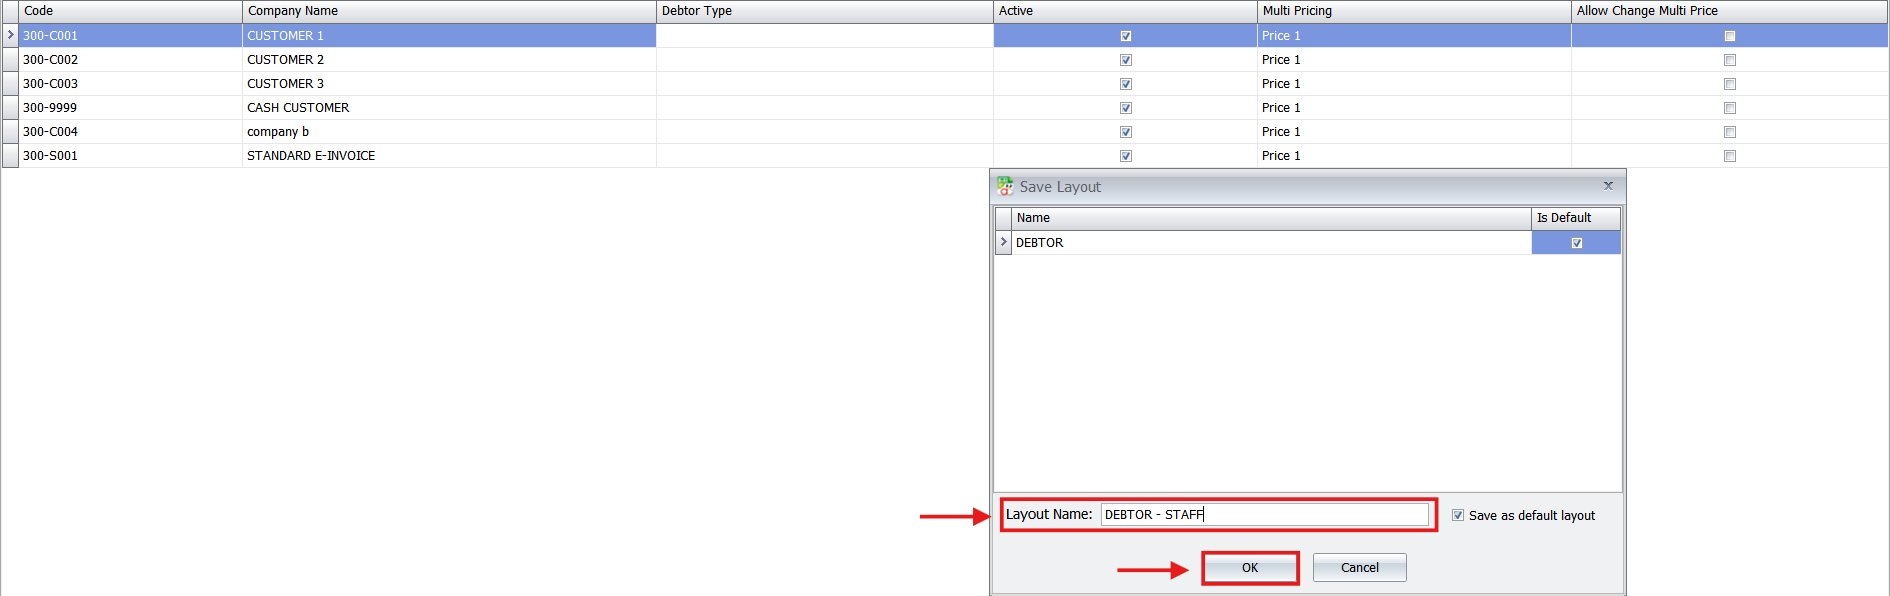
Global vs. User-Specific Layouts:
By default, when you click “Save Layout,” the current column configuration is saved for all users who access that module.
If you want different colleagues to see different views (e.g., normal staff should not see customer addresses), you need to create and save a separate layout with a distinct name, such as “Debtor – Staff.”
To create this:
Customize the columns as needed for that specific user role.
Right-click on the column header and select “Save Layout.” Give it a recognizable name (e.g., “Debtor – Staff”).
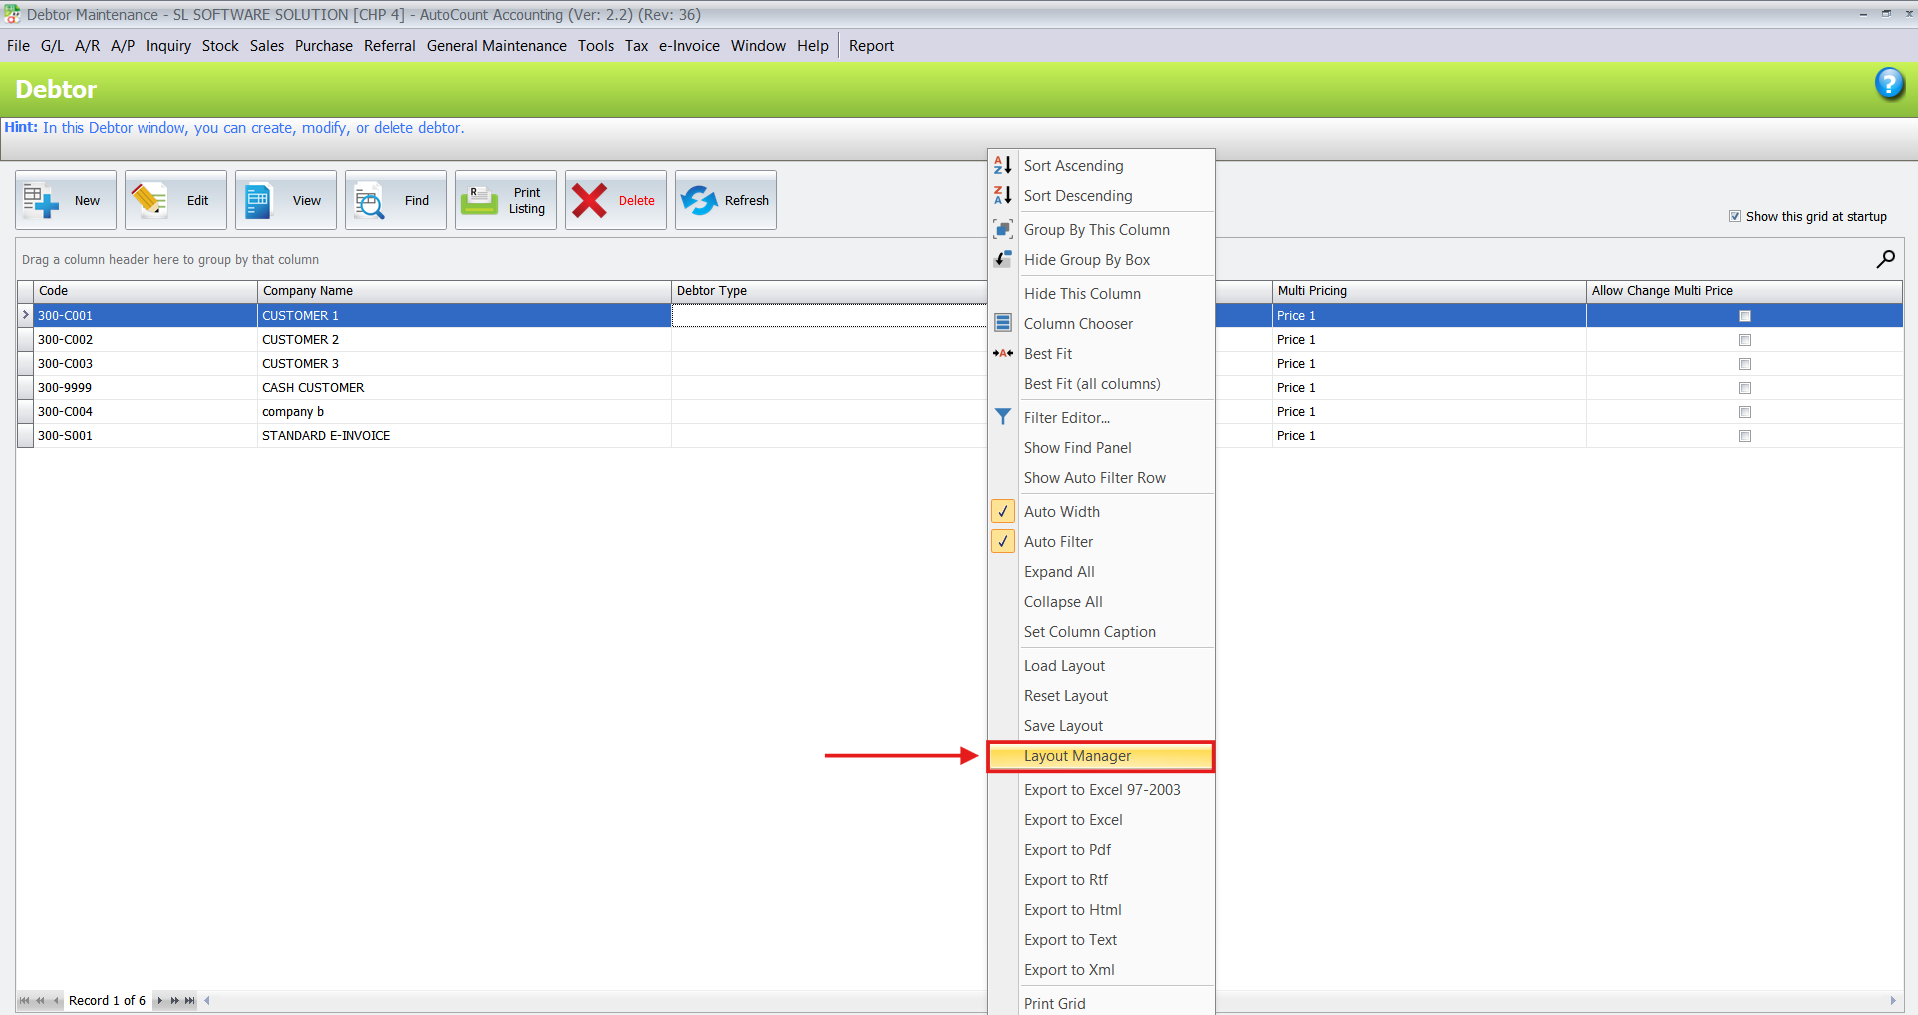
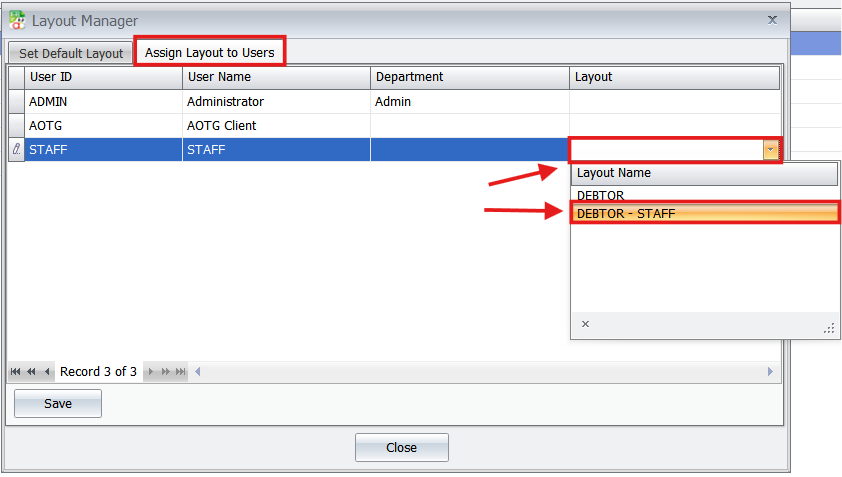
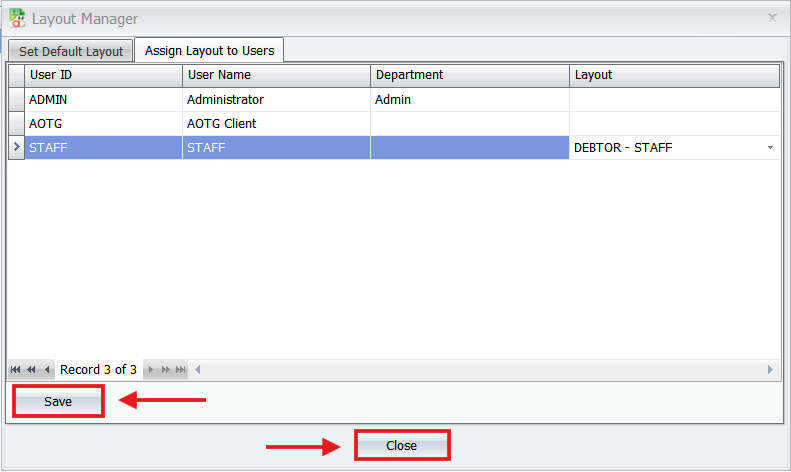
- After saving the named layout, you can assign it to specific individuals:
Right-click on the column header again.
Select “Layout Manager” from the context menu.
In the Layout Manager window, you can assign this specific layout to individual users. Click Save and Close.
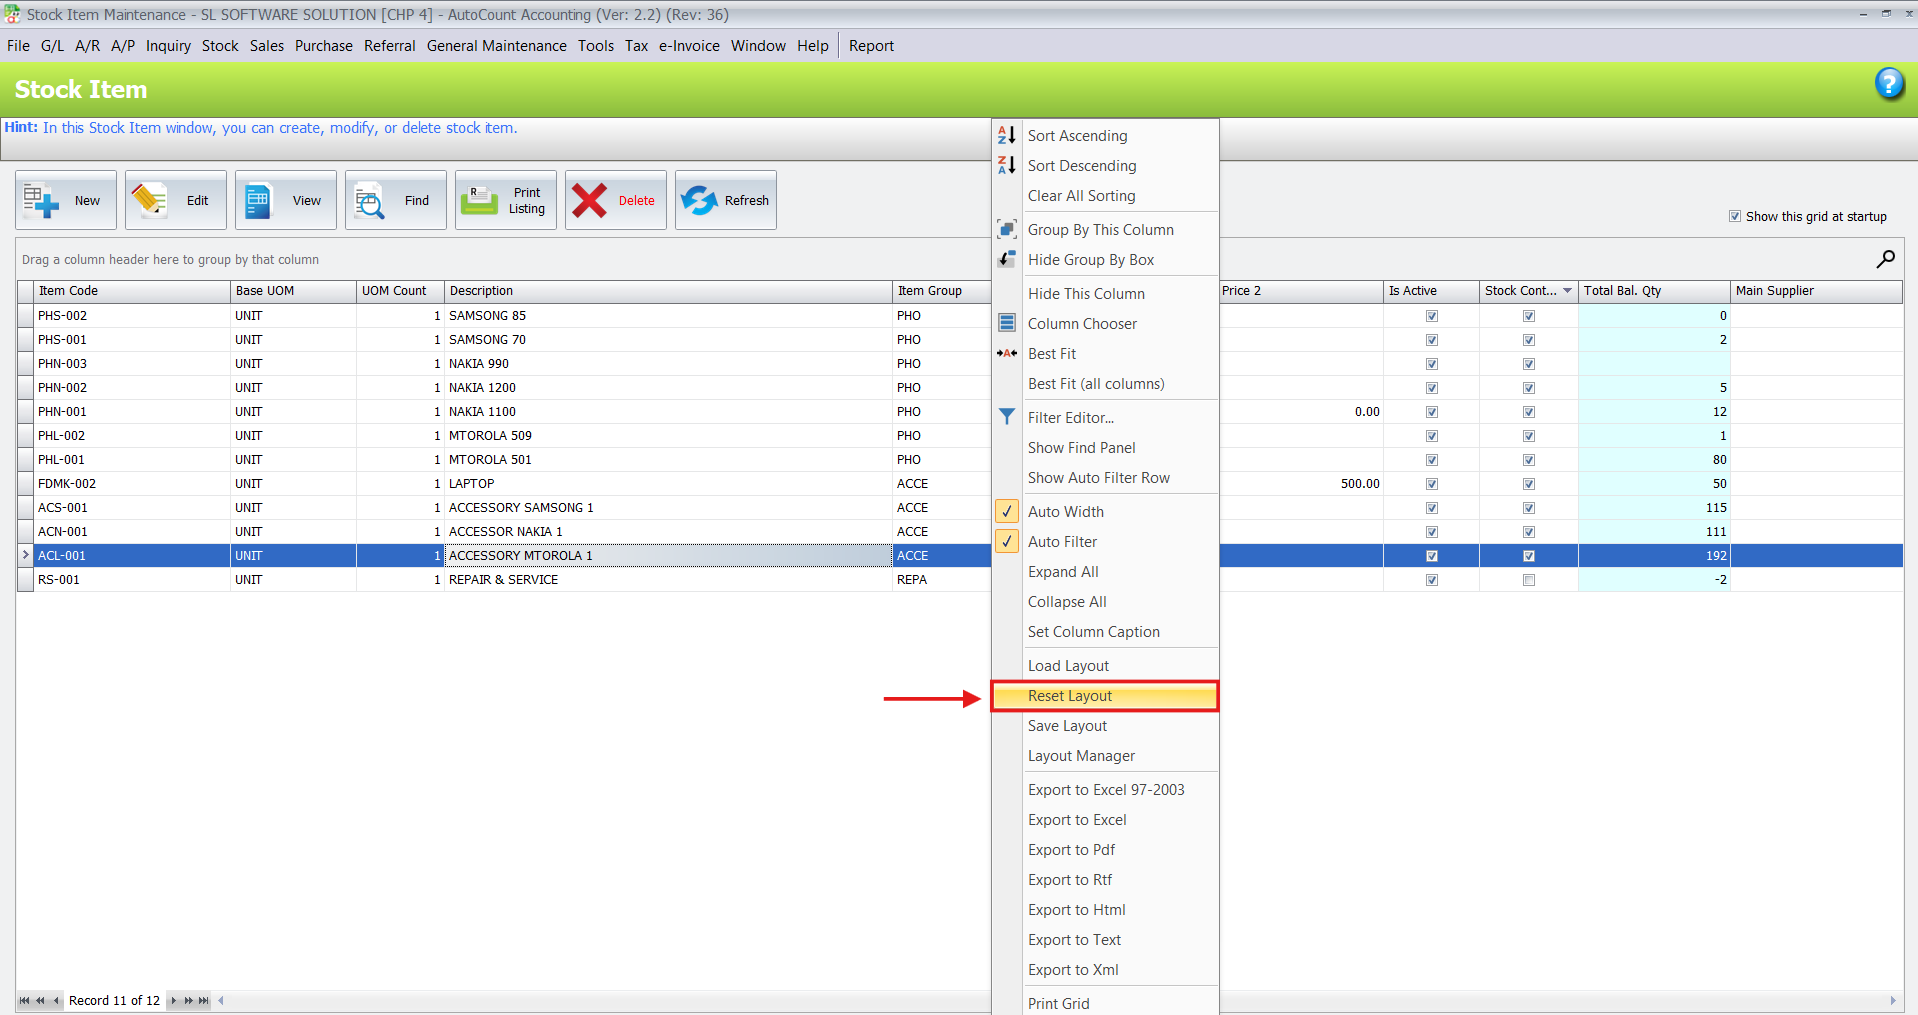
4. Reset if Necessary
If you ever need to revert to the system’s original default view, the reset option is readily available.
Right-click on the column header.
Choose “Reset Layout.” The grid will instantly return to its default column configuration
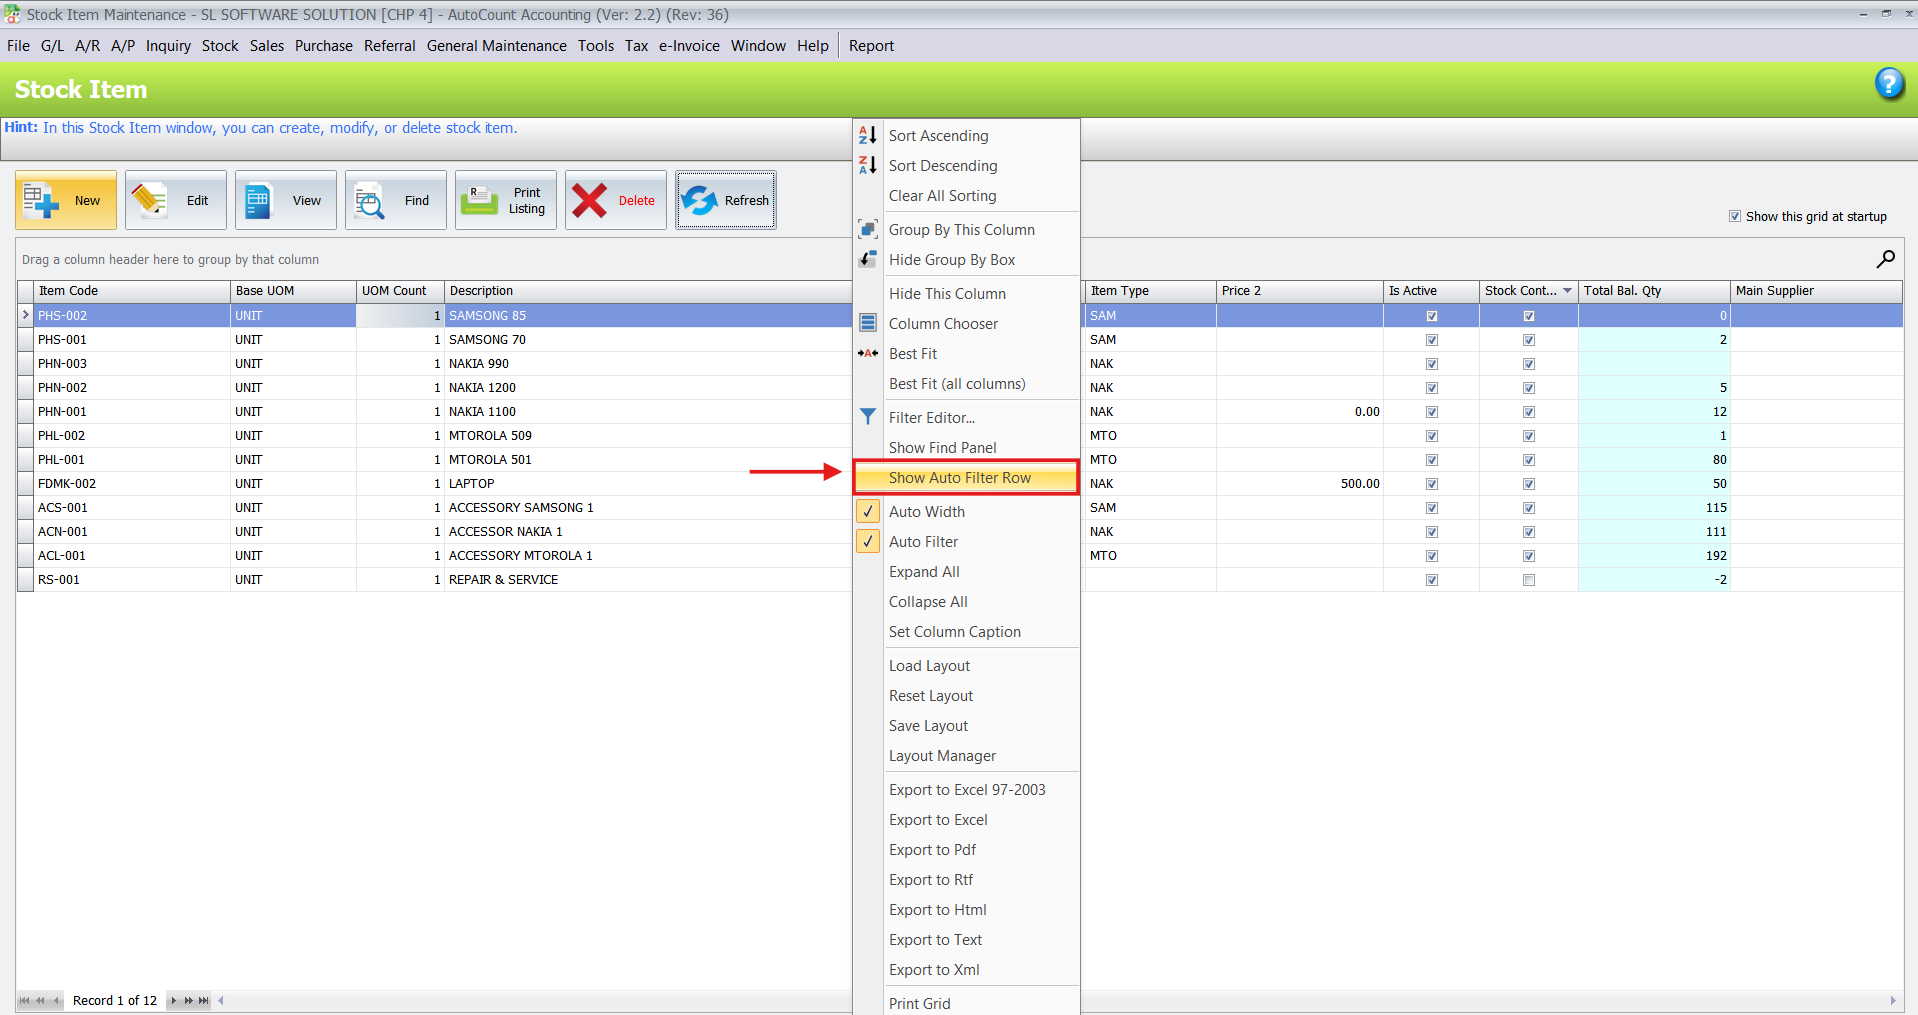
5. Use Advanced Filtering Tools
Enhance your customized grid with powerful filtering options to find data faster. You can also save the visibility of these filters into your layout.
The Find Panel: This tool allows you to type keywords or amounts (e.g., “acc”) to instantly search the entire screen for matching data across all columns.


- Auto Filter Row: This adds a dedicated search row directly below the column headers, allowing you to filter data specifically within each column.

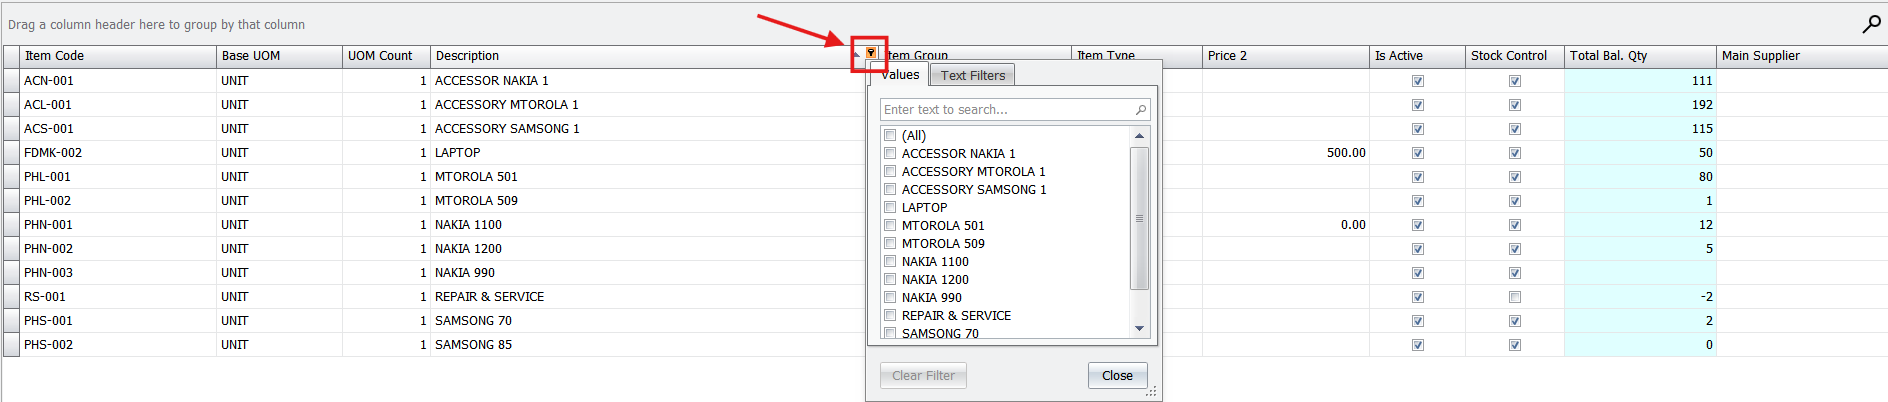
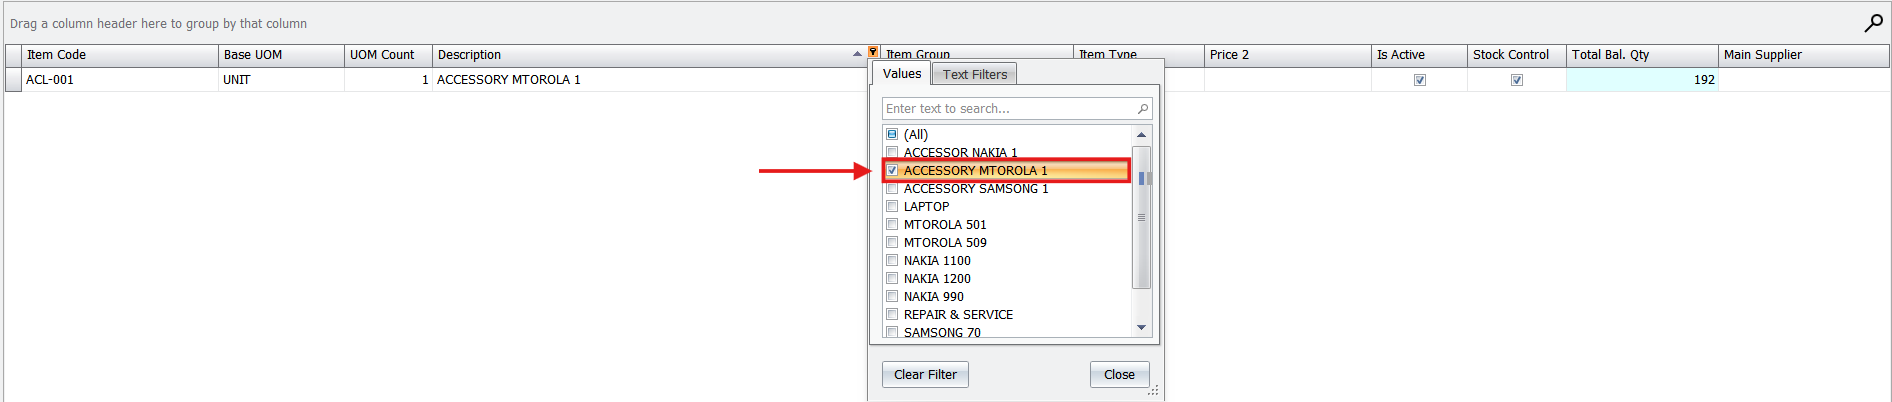
- Group Filtering: Click the small triangle (filter icon) on any column header to filter records by specific groups, values, or even date ranges.
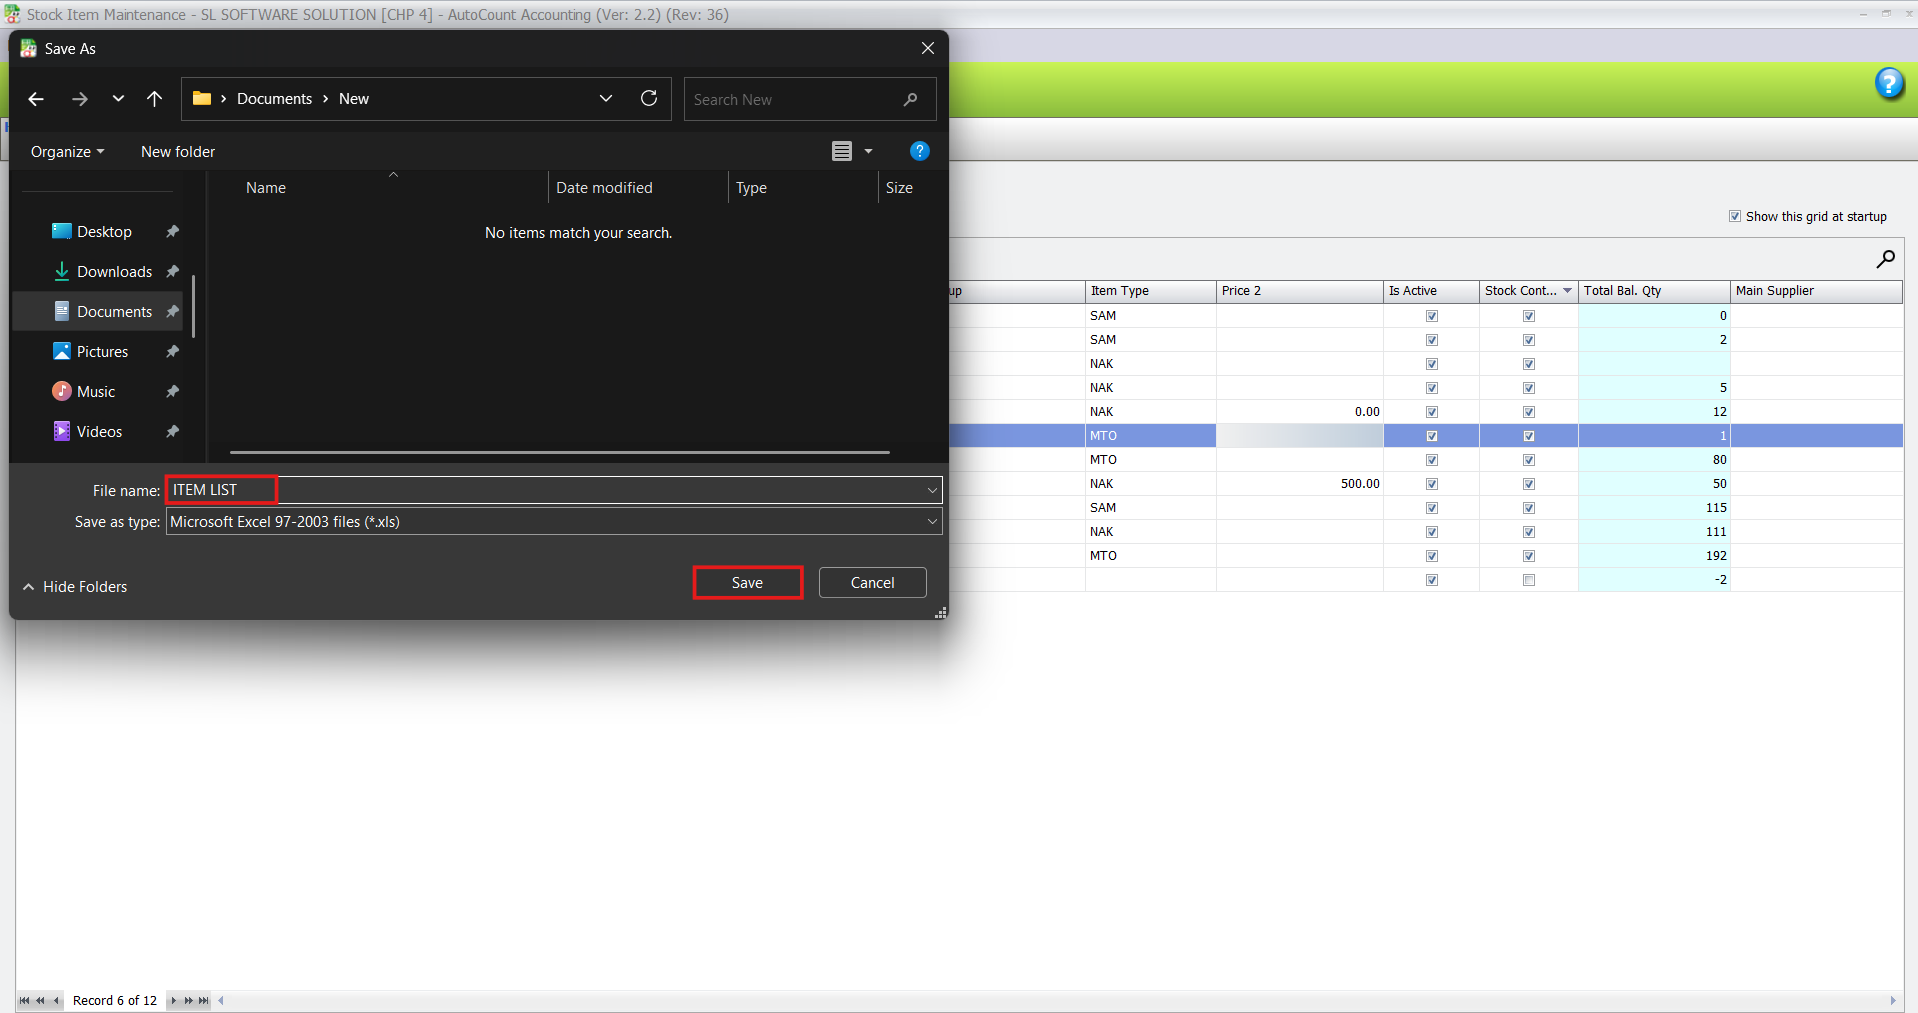
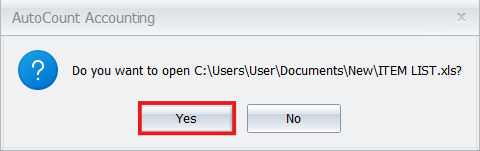
6. Export Your Data
With your tailored view set, you can easily export the visible data for external analysis or reporting.
Right-click anywhere within the data grid (not necessarily on the header).
Select “Export to Excel.”
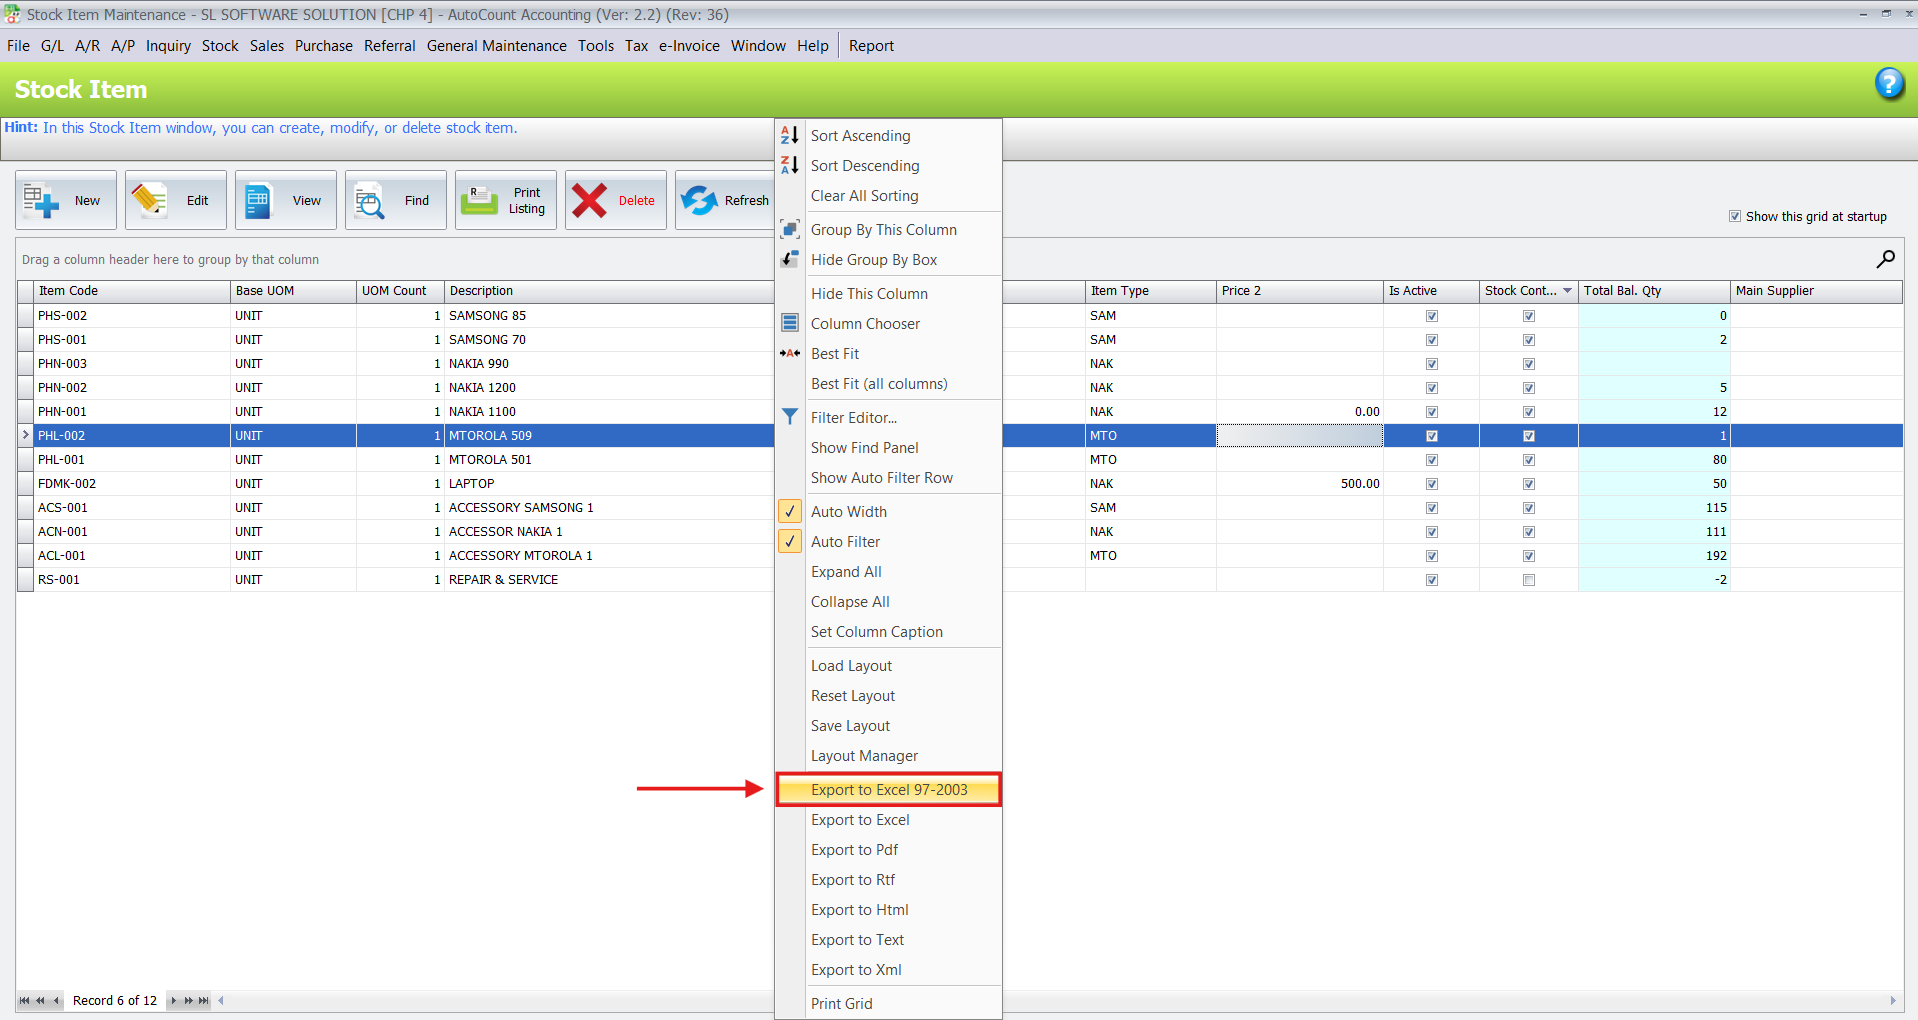
- AutoCount generates a clean Excel file containing only the columns you have chosen, formatted without extra spaces or hidden characters, making it ready for pivot tables or management reports.
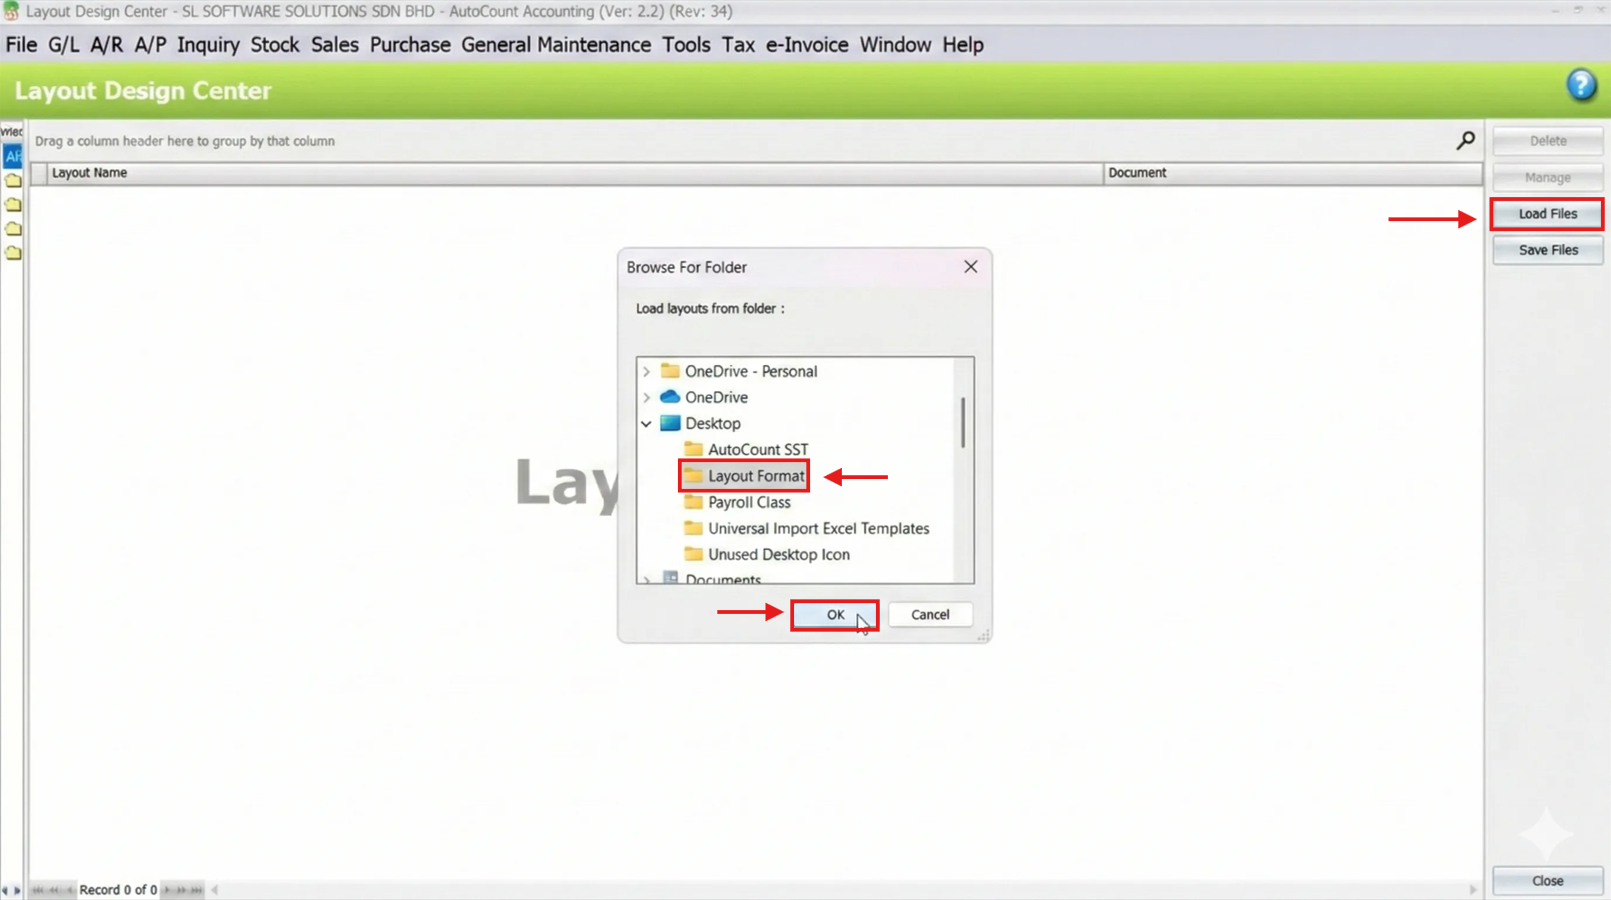
7. Manage Layouts with the Layout Design Center
For businesses needing to manage layouts across a team or multiple companies, advanced options are available.
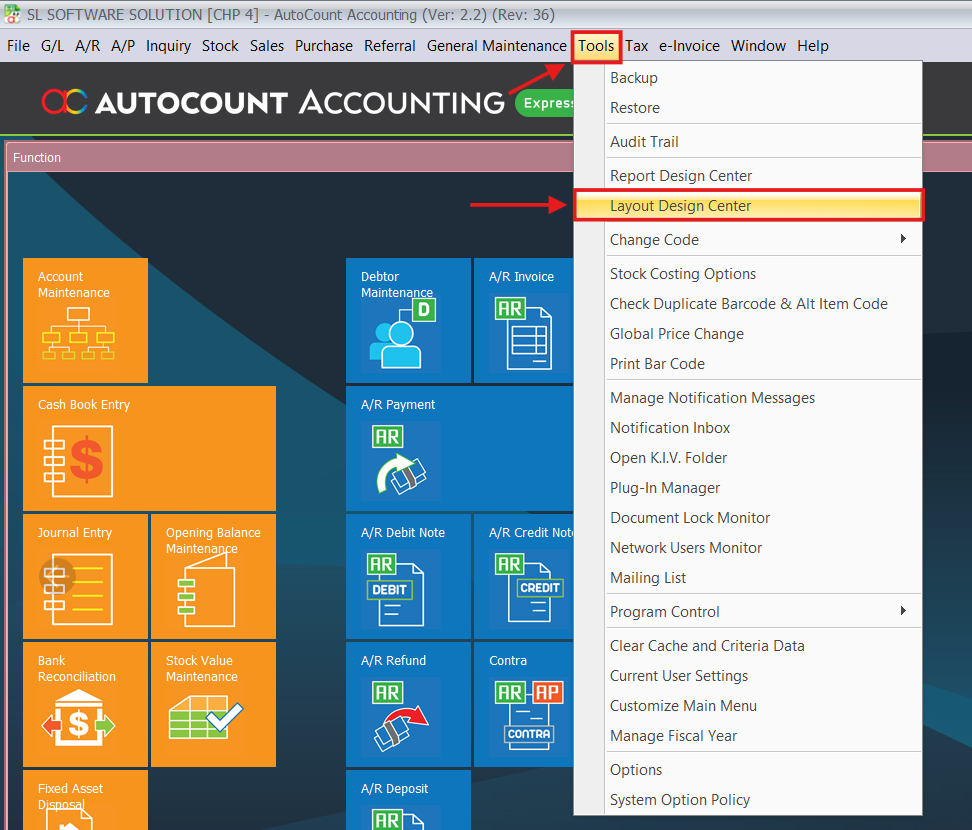
Navigate to the main menu and go to Tools > Layout Design Center.
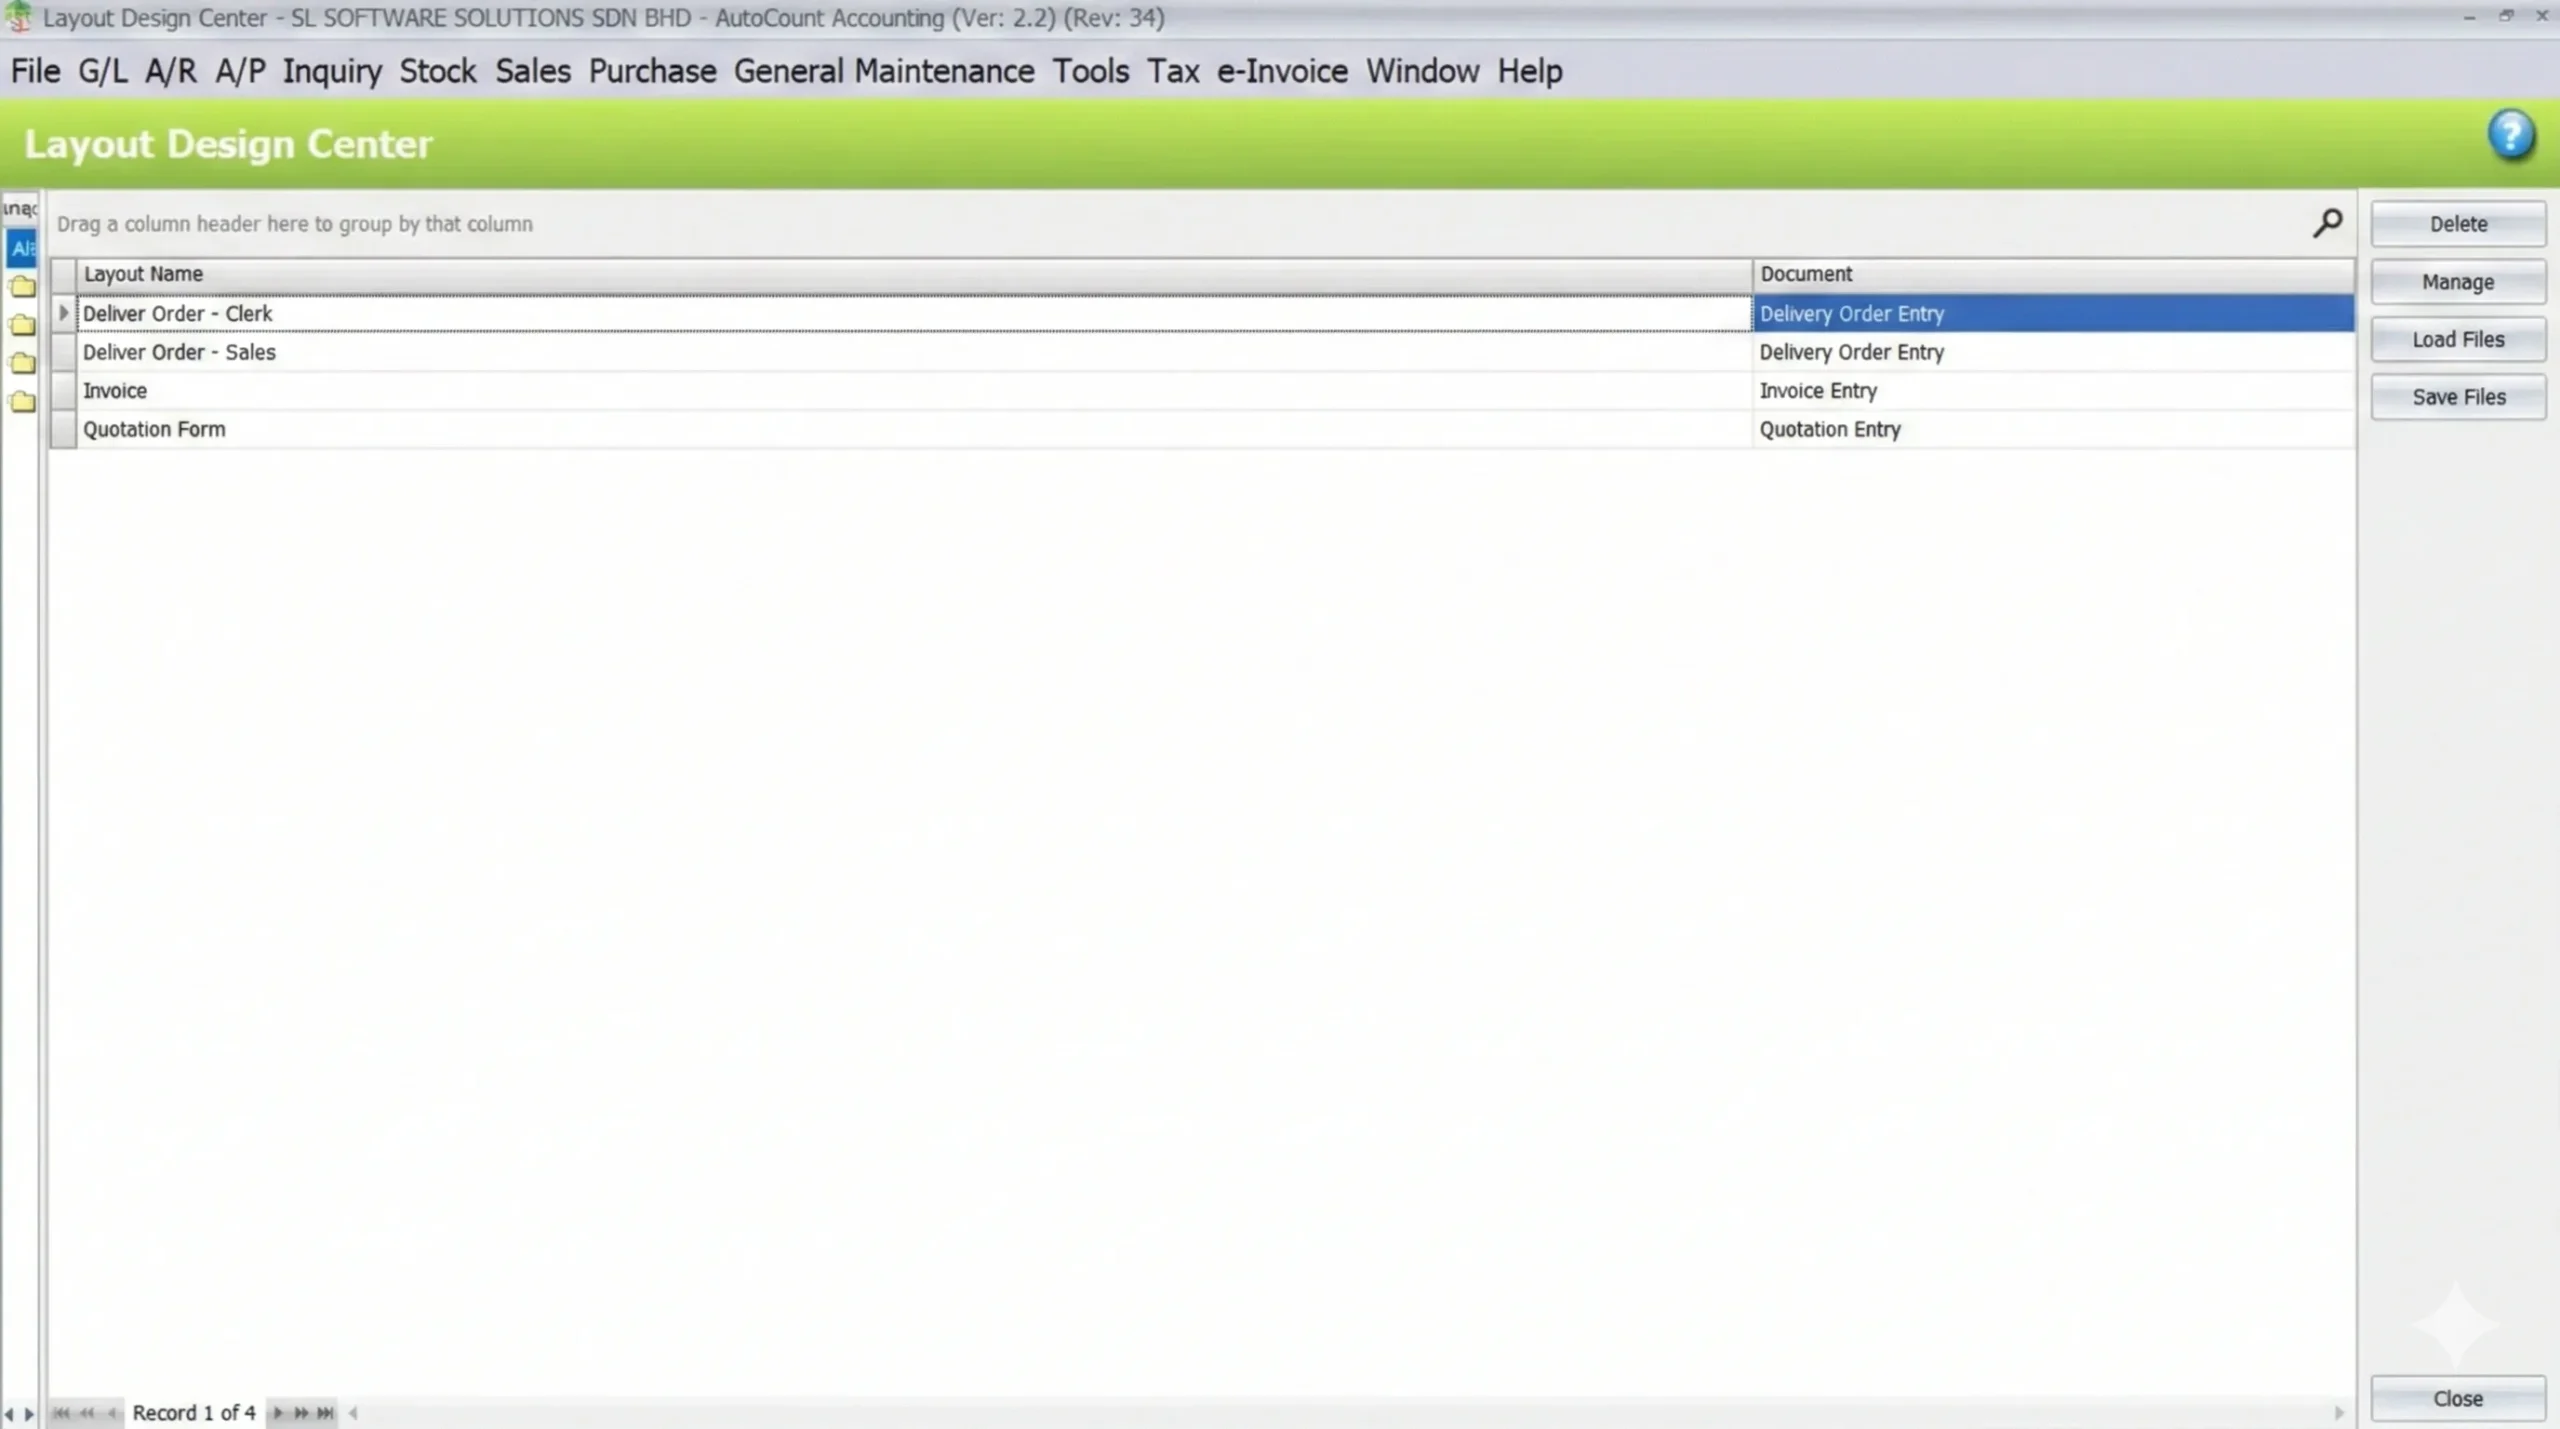
- Assign Layouts to Users: Here, you can assign specific saved layouts to individual users or security roles.
Batch Export/Import (Multi-Database): If you have multiple company databases and want to move your customized layouts without redesigning them:
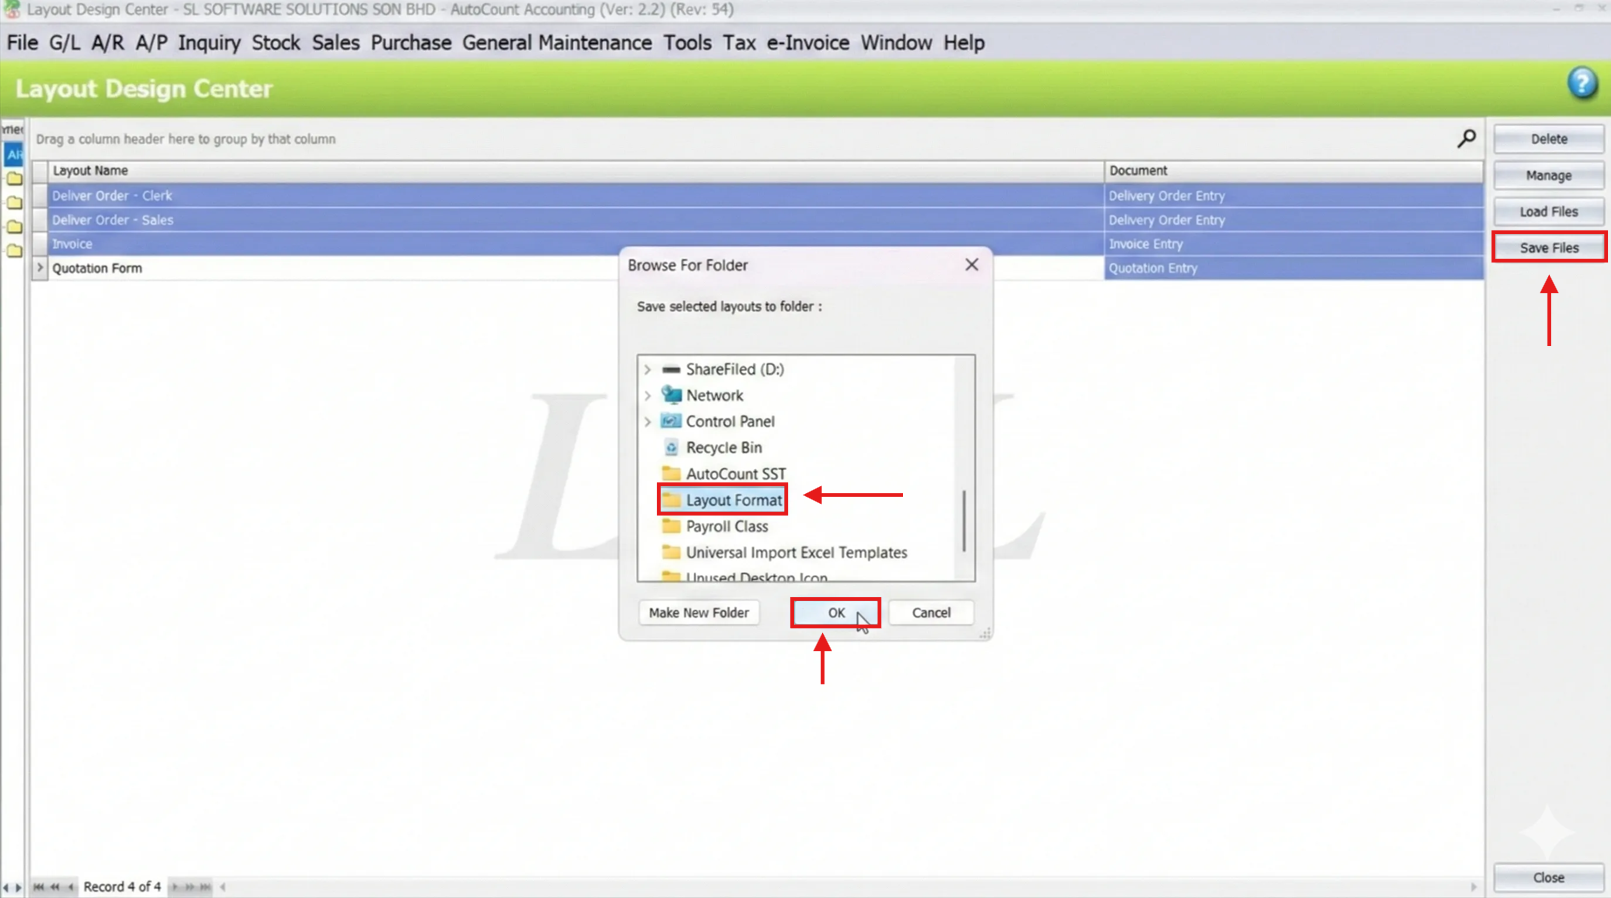
In your source database, select the layouts you want to move and save them to a folder on your desktop.
Log into your second database.
Go to the same menu (Tools > Layout Design Center) and load that folder. This saves significant setup time.
- Log into your second database.
- Go to the same menu (Tools > Layout Design Center) and load that folder. This saves significant setup time.
8. Configure Security Settings for Layouts
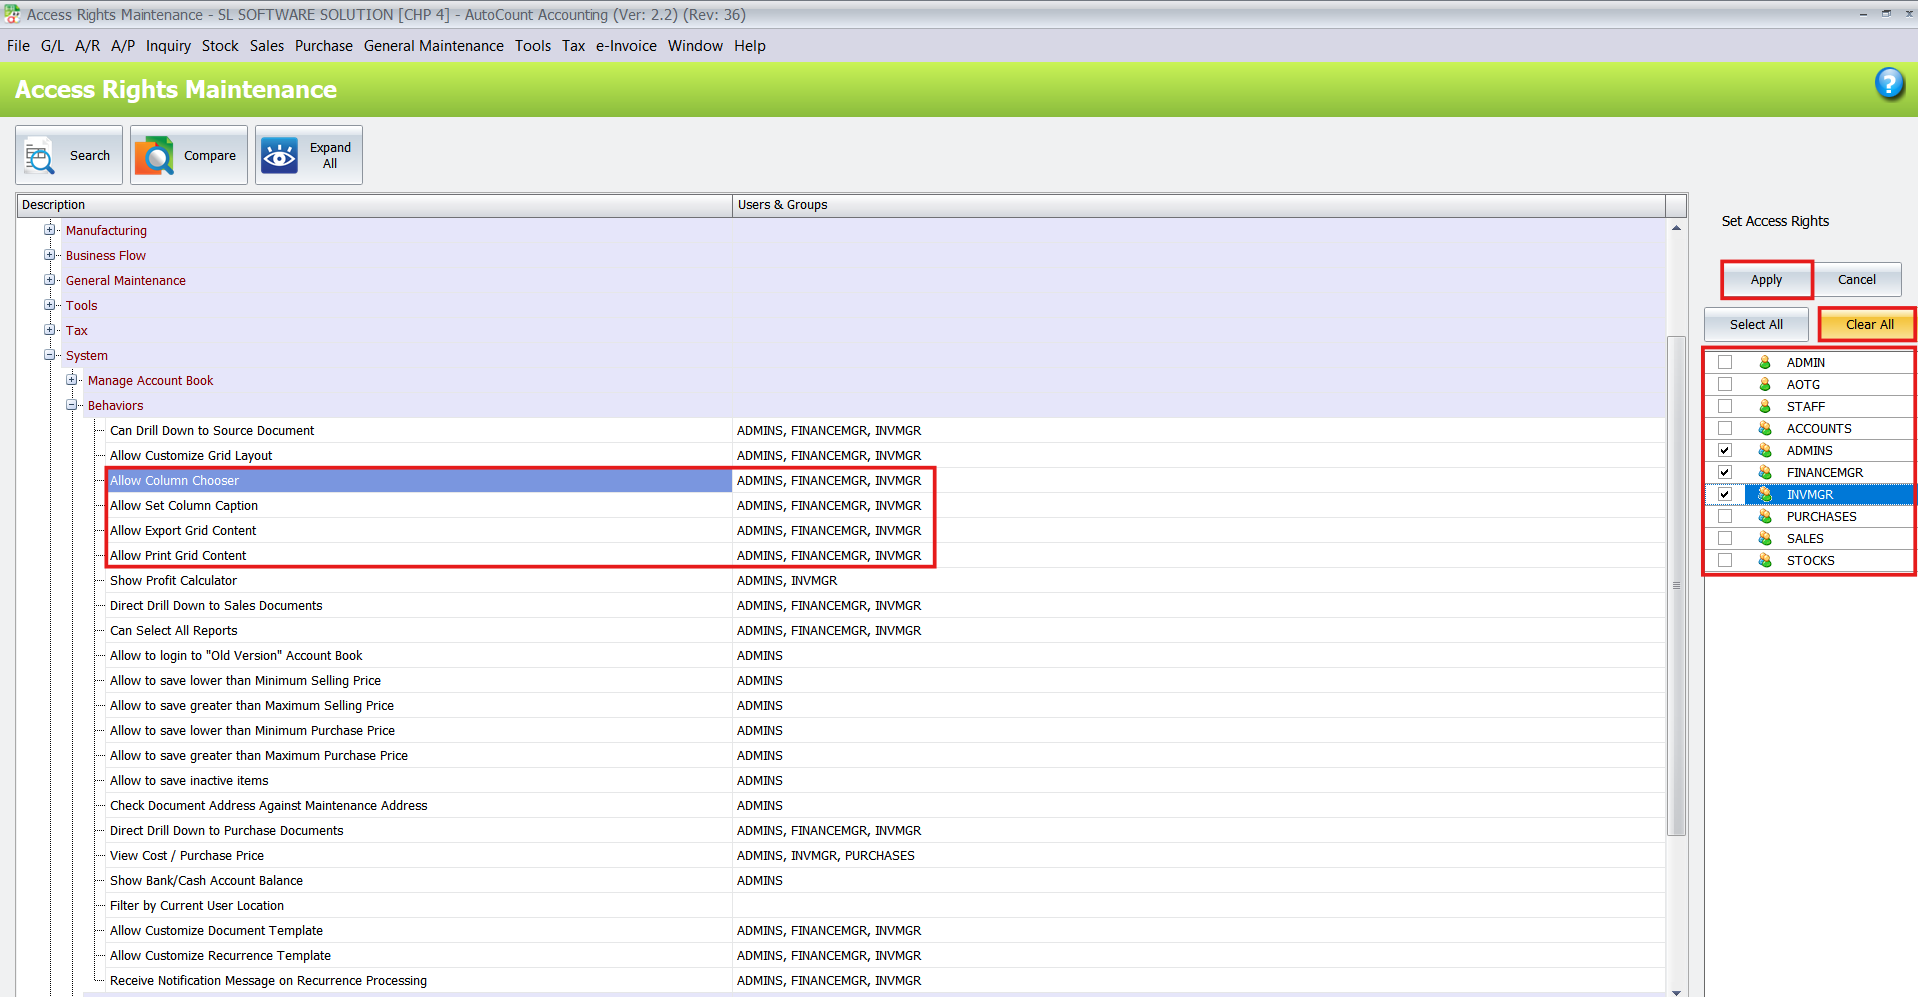
You can control which users have permission to modify or export data using Access Rights Maintenance. To access these settings, go to Tools > Access Rights Maintenance.
Column Chooser: Disable this right to prevent specific users from adding or removing columns.
Export/Print Grid: Disable these rights if you want to prevent staff from taking data out of the system.
Layout Designer: Control who can perform batch import/export or permanently delete layouts.
By following these steps, you can ensure that every user has a secure, efficient workspace tailored to their specific role and responsibilities.

Business Value and Benefits Of Using Column Chooser
Implementing the Column Chooser feature provides tangible benefits that impact your bottom line.
Boosted Efficiency
By displaying only relevant data, users spend less time searching for information and more time acting on it.
Enhanced Data Analysis
Clean exports to Excel facilitate accurate reporting, allowing management to make faster, data-driven decisions
Scalable Flexibility
As your business grows and your data needs change, you have the power to adjust your software interface immediately, without waiting for a developer.
Team Consistency
Standardize layouts across departments or roles to ensure everyone follows the same workflow, reducing errors and training time.
Conclusion
The AutoCount Column Chooser is more than just a display feature; it is a powerful tool for optimizing your daily operations. By putting layout control in the hands of the user, AutoCount ensures that your software evolves with your business needs.
Frequently Asked Questions
How do I revert to the original grid if I make a mistake?
You can easily restore the default settings. Simply right-click on the table header and select “Reset Layout.” This action reverts the grid to its original, out-of-the-box configuration.
Can I share my customized layout with my colleagues?
Yes. Using the Layout Design Center under the Tools menu, you can export your layout file and then import it into another user’s database or assign it to them directly.
Is the Column Chooser available in every part of AutoCount?
The Column Chooser is available in most modules that utilize grid views, including critical areas like Stock Items, Sales Invoices, Purchase Orders, and General Ledger transactions.
Does exporting to Excel retain my column customization?
Yes. When you export after customizing your columns, the resulting Excel file reflects your current view, showing only the columns you have selected and in the order you have arranged them.
Interested in Getting AutoCount for your Business?
Contact our sales team today to explore pricing options and get started with the perfect solution for you.