-
AutoCount Accounting Features
-
- Approval Workflow
- Audit Trail
- Auto Save in Draft Folder
- AutoCount Contra Account
- AutoCount License Setting Guide
- Deposit Tracking & Management
- Documents Numbering Format
- Full Transfer and Partial Transfer
- Import Data to AutoCount Accounting Using Excel
- Informative Charts and Analytical Data
- Layout Customization
- Multi Pricing
- Sales and Services Tax
- Schedule Backup
- Search Lookup Edit
- View Documents Flow
- AutoCount Feature Stock Take
- Column Chooser
- Show Remaining (3) Collapse
-
AutoCount Cloud Accounting
-
AutoCount E-Invoice
-
AutoCount HRMS User Guide
-
AutoCount Modules
-
- Activity Stream
- Advanced Financial Report
- Advanced Item
- Advanced Multi-UOM
- Advanced Quotation Module
- Basic Multi-UOM
- Budget Module
- Consignment
- Filter By Salesman
- FOC Quantity
- Formula
- Item Batch
- Item Package
- Landing Cost
- Multi-Currency
- Multi-Dimensional Analysis
- Multi-Location
- Project Account
- Recurrence
- Remote Credit Control Module
- Stock Assembly
- User Defined Fields (UDF)
- AutoCount SST Hidden Functions
- AutoCount SST Submission - Service Tax
- AutoCount Scripting Module User Guide
- AutoCount Bonus Point Module User Guide
- Show Remaining (11) Collapse
-
AutoCount Plugins
-
- Fixed Assets Management
- Goldsmith
- TD Ordering Mobile Apps
- TD Stock Mobile Apps
- Universal Import Plugin
- DMS Import Plugin
- AutoCount Item Scope Plugin
- AutoCount Easy Knock Off Plugin
- AutoCount Pick List Plugin User Guide
- AutoCount Agent Validation Plugin User Guide
- AutoCount Barcode Generator Plugin User Guide
- AutoCount Bill Remark Plugin User Guide
- AutoCount Easy Batch Number Entry Plugin User Guide
- AutoCount Recurring Invoice Plugin User Guide
- AutoCount Easy Photo 2.0 User Guide
- AutoCount Pain Tracker User Guide
- AutoCount Credit Memo Plugin User Guide
- Show Remaining (2) Collapse
-
- AutoCount Easy Recurrence Plugin
- AutoCount Recurring Billing Plugin
- Event Management System
- AutoCount To-Do List Plugin
- AutoCount AutoBank Reconciliation Plugin
- Intercompany Billing Plugin User Guide
- AutoCount Basket Plugin User Guide
- Lead Management 2.0 Plugin
- AutoCount Service Contract Plugin User Guide
- Autocount Repacking Plugin
- AutoCount Scale Barcode Plugin User Guide
- AutoCount Progressive Billing
- AutoCount Optical Plugin
- AutoCount Meter Reading Plugin User Guide
- AutoCount Car Tint Film Plugin
- AutoCount Leasing Plugin User Guide
- AutoCount Integrator Plugin
- AutoCount Procurement Planning Plugin
- Show Remaining (3) Collapse
-
-
Form Template
-
Report Template
-
- Advance Quotation
- Cash Sale
- Consignment
- Consignment Movement
- Credit Note
- Debit Note
- Delivery Order
- FOC Quantity Analysis By Document Report
- Invoice
- Item Package Sales Report
- Monthly Sales Analysis
- Outstanding Sales Order Listing
- Profit And Loss Of Documents
- Quotation
- Sales Agent Contribution Report
- Sales Order
- Top/Bottom Sales Ranking
- Show Remaining (2) Collapse
-
- Available Stock Status Report
- Expired Item Batch Listing
- Inventory Physical Worksheet
- Stock Adjustment
- Stock Aging Report
- Stock Assembly
- Stock Assembly Order
- Stock Balance By Location
- Stock Balance Report
- Stock Card Report
- Stock Disassembly
- Stock Issue
- Stock Item Profit Margin
- Stock Movement Report
- Stock Receive
- Stock Take
- Stock Transfer
- Stock Write Off
- Show Remaining (3) Collapse
AutoCount Plugin: AutoCount Pain Tracker Plugin User Guide
Understanding AutoCount Pain Tracker Plugin
The AutoCount Pain Tracker Plugin is designed to help businesses in healthcare, therapy, wellness, and beauty industries track customer pain conditions and treatment progress directly within AutoCount. This makes it easier to maintain structured treatment records and monitor improvement over time.This plugin is especially useful for businesses such as Traditional Chinese Medicine (TCM) centers, Physiotherapy clinics, Massage therapy centers, Beauty and wellness providers. It ensures treatment records remain organized, consistent, and easy to reference.
What Is The AutoCount Pain Tracker Plugin?
AutoCount Pain Tracker Plugin
The Pain Tracker Plugin enhances AutoCount by allowing users to record, monitor, and update customer pain conditions during treatment sessions. Instead of keeping manual notes or separate files, treatment information can be stored directly in the system alongside customer records. This improves documentation accuracy and provides better visibility into customer treatment history.
AutoCount Pain Tracker Plugin Video Guide
- AutoCount Pain Tracker Plugin (EN)
Pain Tracker Plugin Setup
Integration & Pain Tracker Setup
- AutoCount Pain Tracker Plugin (CN)
疼痛追踪器插件设置
集成和疼痛追踪器设置
Why It Matters?
Without a structured tracking system, treatment records may become inconsistent or difficult to review.
The Pain Tracker Plugin helps businesses:
Maintain organized treatment records
Monitor customer progress
Improve service consistency
Provide better customer care
This is particularly important for businesses that rely on repeat treatment sessions and progress tracking.
Key Features & Capabilities
Pain Record Tracking
Allows users to record customer pain areas and treatment notes during each visit.
Customer Treatment History
Stores pain-tracking records together with customer information for easy reference.
Progress Monitoring
Enables businesses to track improvement across multiple treatment sessions.
Industry-Focused Design
Built specifically for therapy, wellness, and healthcare-related businesses.
How AutoCount Pain Tracker Plugin Works
1. Access Rights Management
Before using the plugin, appropriate access rights must be assigned. Navigate to General Maintenance > Access Right Maintenance, expand SL Plug-In, then Pain Tracker. Select Pain Tracker and click Set Group Access Rights. Choose the appropriate user group (like Admin), change the permission from “Don’t Change” to “Add,” and click OK to save.
Before anyone can start tracking pain records, make sure the right people can use the plugin.
- Go to General Maintenance > Access Right Maintenance
- Expand SL Plug-In > Pain Tracker
- Assign permissions for the appropriate user group (e.g., Admin)
- Save settings
This protects sensitive client data and makes sure only authorized staff can use the plugin.
2. Plugin Installation Process
Install the Pain Tracker Plugin by going to Tools > Plug-In Manager in your AutoCount system. Click the Install button and browse for the Pain Tracker.app file. Review the plugin details in the pop-up window, then click Install and confirm with Yes when prompted. A success message will appear once installation is complete.
- Go to Tools > Plug-In Manager
- Click Install
- Select the Pain Tracker.app file
- Confirm installation when prompted
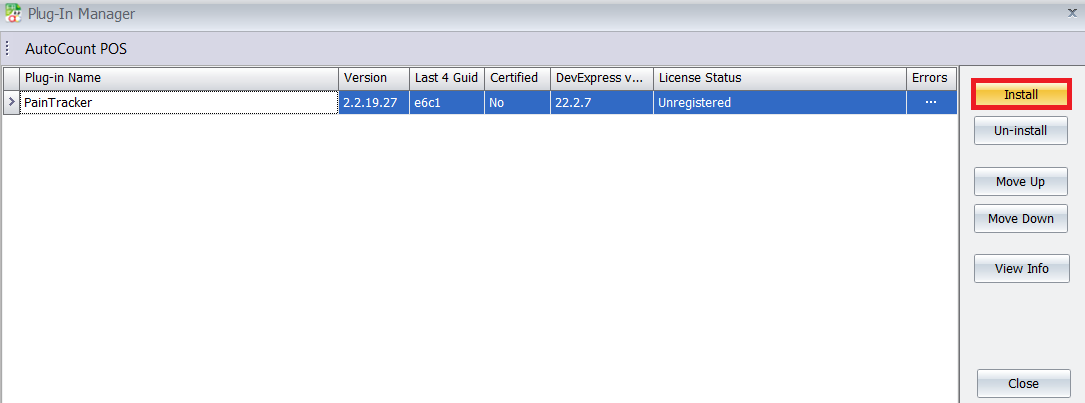
Note: If it doesn’t show in your menu after installation, try closing and reopening AutoCount — sometimes it refreshes better that way.
3. Recording a Session
Access the plugin via the main menu under Pain Tracker. Click the Profile Maintenance to view and set the part with item codes. Save it after finished select the part.
Before you start recording pain sessions, define the pain areas (like back, shoulder, neck, etc.) that your clinic uses.
- Open Pain Tracker from the main menu
- Click Profile Maintenance
- Pick the pain part (usually mapped to item codes)
- Save when done
Example:
If your clinic treats both acupuncture and physiotherapy, you might setup:
- Neck (NT001)
- Lower Back (LB002)
- Shoulder (SH003)
4. Create Sales Invoice
Navigating to Sales > Invoice to create a bill. Click the New button will provide the Pain Tracker button. Click it and select the point pressing that which area has an issue. Can put the remark in yellow box if have. Then click Ok and it will list out the details and click Save after confirmed the details are correct.
- Go to Sales > Invoice
- Click New to start a bill
- You’ll see the Pain Tracker button and click it
- From the list, select the pain area(s) being treated
- You can enter free text remarks in the yellow box for extra detail (e.g., “Pain worsened after weekend sports”)
- Click OK
- Confirm the details and Save the invoice
Pro Tip:
- If a client mentions specific triggers (e.g., “pain spikes at night”), put it in the yellow remark box — it makes later history much more useful.
- You can record multiple pain areas at once — just click each area relevant to that visit.
5. Reviewing History & Progress
Navigating to Debtor Maintenance to show the list. Open a client’s profile in the module and click to the History Record button to see all past sessions chronologically. Viewing this detailed history helps in preparing for appointments, reporting outcomes, and adjusting future treatment plans for better monitoring.
Once records are in the system, you can look back over them anytime.
Go here to review:
- Navigate to Debtor Maintenance
- Open the client profile
- Click History Record
Pro Tip:
Look for patterns over time — if a pain area keeps appearing or increasing, that’s a cue to adjust treatment plans.
Benefits of Using AutoCount Pain Tracker Plugin
Elevated Client Care
Access to full health records before each session allows for personalized, informed treatment, directly addressing the client’s evolving needs.
Operational Excellence
Streamlines documentation, reduces administrative errors, and frees up valuable staff time, boosting overall clinic efficiency.
Data-Driven Decisions
The accumulated data on treatment effectiveness provides insights to optimize service offerings and practitioner training.
Enhanced Compliance & Professionalism
Maintains audit-ready, standardized records for every client, which is crucial for professional standards and potential insurance requirements.
Conclusion
The AutoCount Pain Tracker Plugin is more than just a software add-on; it’s a strategic tool for any serious health and wellness business. It bridges the gap between administrative management and clinical care, enabling you to provide superior service based on solid health progress data. By centralizing wellness records, it not only improves daily operations but also becomes a cornerstone for business growth, client satisfaction, and professional reputation.
Frequently Asked Questions
Who is the ideal user for this plugin?
This plugin is ideal for physiotherapy clinics, TCM (Traditional Chinese Medicine) centers, chiropractic offices, massage therapy studios, and wellness or aesthetic clinics that require detailed tracking of client conditions and treatments.
Is the client's health data secure within AutoCount?
Yes. The plugin leverages AutoCount’s existing user security framework. Sensitive health records are only accessible to users with explicitly granted permissions, as configured in the Access Rights Management step.
Can I track progress for a specific pain area over time?
Absolutely. The plugin allows you to filter a client’s treatment history by specific pain areas or dates, making it easy to visualize and report on progress for a particular issue across multiple sessions.
Does the plugin work with the latest version of AutoCount Accounting?
The Pain Tracker Plugin is designed to be compatible with recent mainstream versions of AutoCount. For specific version compatibility, it is recommended to consult with your AutoCount solution provider.
Interested in Getting AutoCount for your Business?
Contact our sales team today to explore pricing options and get started with the perfect solution for you.