-
AutoCount Accounting Features
-
- Approval Workflow
- Audit Trail
- Auto Save in Draft Folder
- AutoCount Contra Account
- AutoCount License Setting Guide
- Deposit Tracking & Management
- Documents Numbering Format
- Full Transfer and Partial Transfer
- Import Data to AutoCount Accounting Using Excel
- Informative Charts and Analytical Data
- Layout Customization
- Multi Pricing
- Sales and Services Tax
- Schedule Backup
- Search Lookup Edit
- View Documents Flow
- AutoCount Feature Stock Take
- Column Chooser
- Show Remaining (3) Collapse
-
AutoCount Cloud Accounting
-
AutoCount E-Invoice
-
AutoCount HRMS User Guide
-
AutoCount Modules
-
- Activity Stream
- Advanced Financial Report
- Advanced Item
- Advanced Multi-UOM
- Advanced Quotation Module
- Basic Multi-UOM
- Budget Module
- Consignment
- Filter By Salesman
- FOC Quantity
- Formula
- Item Batch
- Item Package
- Landing Cost
- Multi-Currency
- Multi-Dimensional Analysis
- Multi-Location
- Project Account
- Recurrence
- Remote Credit Control Module
- Stock Assembly
- User Defined Fields (UDF)
- AutoCount SST Hidden Functions
- AutoCount SST Submission - Service Tax
- AutoCount Scripting Module User Guide
- AutoCount Bonus Point Module User Guide
- Show Remaining (11) Collapse
-
AutoCount Plugins
-
- Fixed Assets Management
- Goldsmith
- TD Ordering Mobile Apps
- TD Stock Mobile Apps
- Universal Import Plugin
- DMS Import Plugin
- AutoCount Item Visibility Control
- AutoCount Easy Knock Off Plugin
- AutoCount Pick List Plugin User Guide
- AutoCount Agent Validation Plugin User Guide
- AutoCount Barcode Generator Plugin User Guide
- AutoCount Bill Remark Plugin User Guide
- AutoCount Easy Batch Number Entry Plugin User Guide
- AutoCount Recurring Invoice Plugin User Guide
- AutoCount Easy Photo 2.0 User Guide
- AutoCount Pain Tracker User Guide
- AutoCount Credit Memo Plugin User Guide
- AutoCount Daily Collection Summary Plugin
- AutoCount Lock Price Plugin
- Show Remaining (4) Collapse
-
- AutoCount Easy Recurrence Plugin
- AutoCount Recurring Billing Plugin
- Event Management System
- AutoCount To-Do List Plugin
- AutoCount AutoBank Reconciliation Plugin
- Intercompany Billing Plugin User Guide
- AutoCount Basket Plugin User Guide
- Lead Management 2.0 Plugin
- AutoCount Service Contract Plugin User Guide
- Autocount Repacking Plugin
- AutoCount Scale Barcode Plugin User Guide
- AutoCount Progressive Billing
- AutoCount Optical Plugin
- AutoCount Meter Reading Plugin User Guide
- AutoCount Car Tint Film Plugin
- AutoCount Leasing Plugin User Guide
- AutoCount Integrator Plugin
- AutoCount Procurement Planning Plugin
- Cage Management Plugin
- AutoCount Service Management Plugin User Guide
- AutoCount Vehicle Plugin
- Show Remaining (6) Collapse
-
-
Form Template
-
Report Template
-
- Advance Quotation
- Cash Sale
- Consignment
- Consignment Movement
- Credit Note
- Debit Note
- Delivery Order
- FOC Quantity Analysis By Document Report
- Invoice
- Item Package Sales Report
- Monthly Sales Analysis
- Outstanding Sales Order Listing
- Profit And Loss Of Documents
- Quotation
- Sales Agent Contribution Report
- Sales Order
- Top/Bottom Sales Ranking
- Show Remaining (2) Collapse
-
- Available Stock Status Report
- Expired Item Batch Listing
- Inventory Physical Worksheet
- Stock Adjustment
- Stock Aging Report
- Stock Assembly
- Stock Assembly Order
- Stock Balance By Location
- Stock Balance Report
- Stock Card Report
- Stock Disassembly
- Stock Issue
- Stock Item Profit Margin
- Stock Movement Report
- Stock Receive
- Stock Take
- Stock Transfer
- Stock Write Off
- Show Remaining (3) Collapse
AutoCount Warranty 2.0 Plugin: Streamline Your After-Sales & Service Tracking
Why You Should Use Warranty 2.0 plugin
Increased Efficiency
Replace messy manual tracking with smart automation. Reduce admin work and manage all your warranty data in one centralized system.
Serial-Based Accuracy
Never lose a warranty record again. Track products precisely using their serial numbers to prevent mistakes and monitor expiry dates accurately.
Faster Claim Validation
Speed up your after-sales service. Quickly verify warranty statuses and approve customer claims faster to build long-lasting trust.
Seamless Integration
Say goodbye to disconnected spreadsheets. It integrates perfectly with your AutoCount modules and provides clear reporting for your service teams.
Key Features of Warranty 2.0 plugin
Smart Warranty Registration
Attach warranty details directly during sales. Easily link start dates, warranty periods, and serial numbers to specific customers and invoices.
Auto Expiry Calculation
Say goodbye to manual date tracking. The system automatically calculates warranty expiry dates based on predefined periods, eliminating human errors.
Comprehensive Claim Tracking
Keep detailed logs of all repair, service, and replacement histories. Easily monitor claim statuses and track frequencies for every single product.
Advanced Reporting & Monitoring
Generate instant reports for active or expiring warranties. Use these data-driven insights to analyze claim history and quickly identify problematic products.
Full AutoCount Integration
Works perfectly with Sales Invoices, Stock Items, and Serial Number Control. No more duplicate data entry or switching between different systems.
Who This Plugin is For
Electronics & IT Suppliers
Perfect for IT hardware and home appliance retailers who need strict serial number tracking for high-value products.
Machinery & Equipment
Ideal for machinery sellers handling long-term warranty coverage and complex after-sales service tracking.
Automotive Parts Sellers
Built for automotive suppliers requiring tight control over part warranties, replacements, and supplier claims.
Service & Repair Centers
Essential for businesses that provide after-sales service and process daily customer repair or replacement requests.
How AutoCount Warranty 2.0 Plugin Works
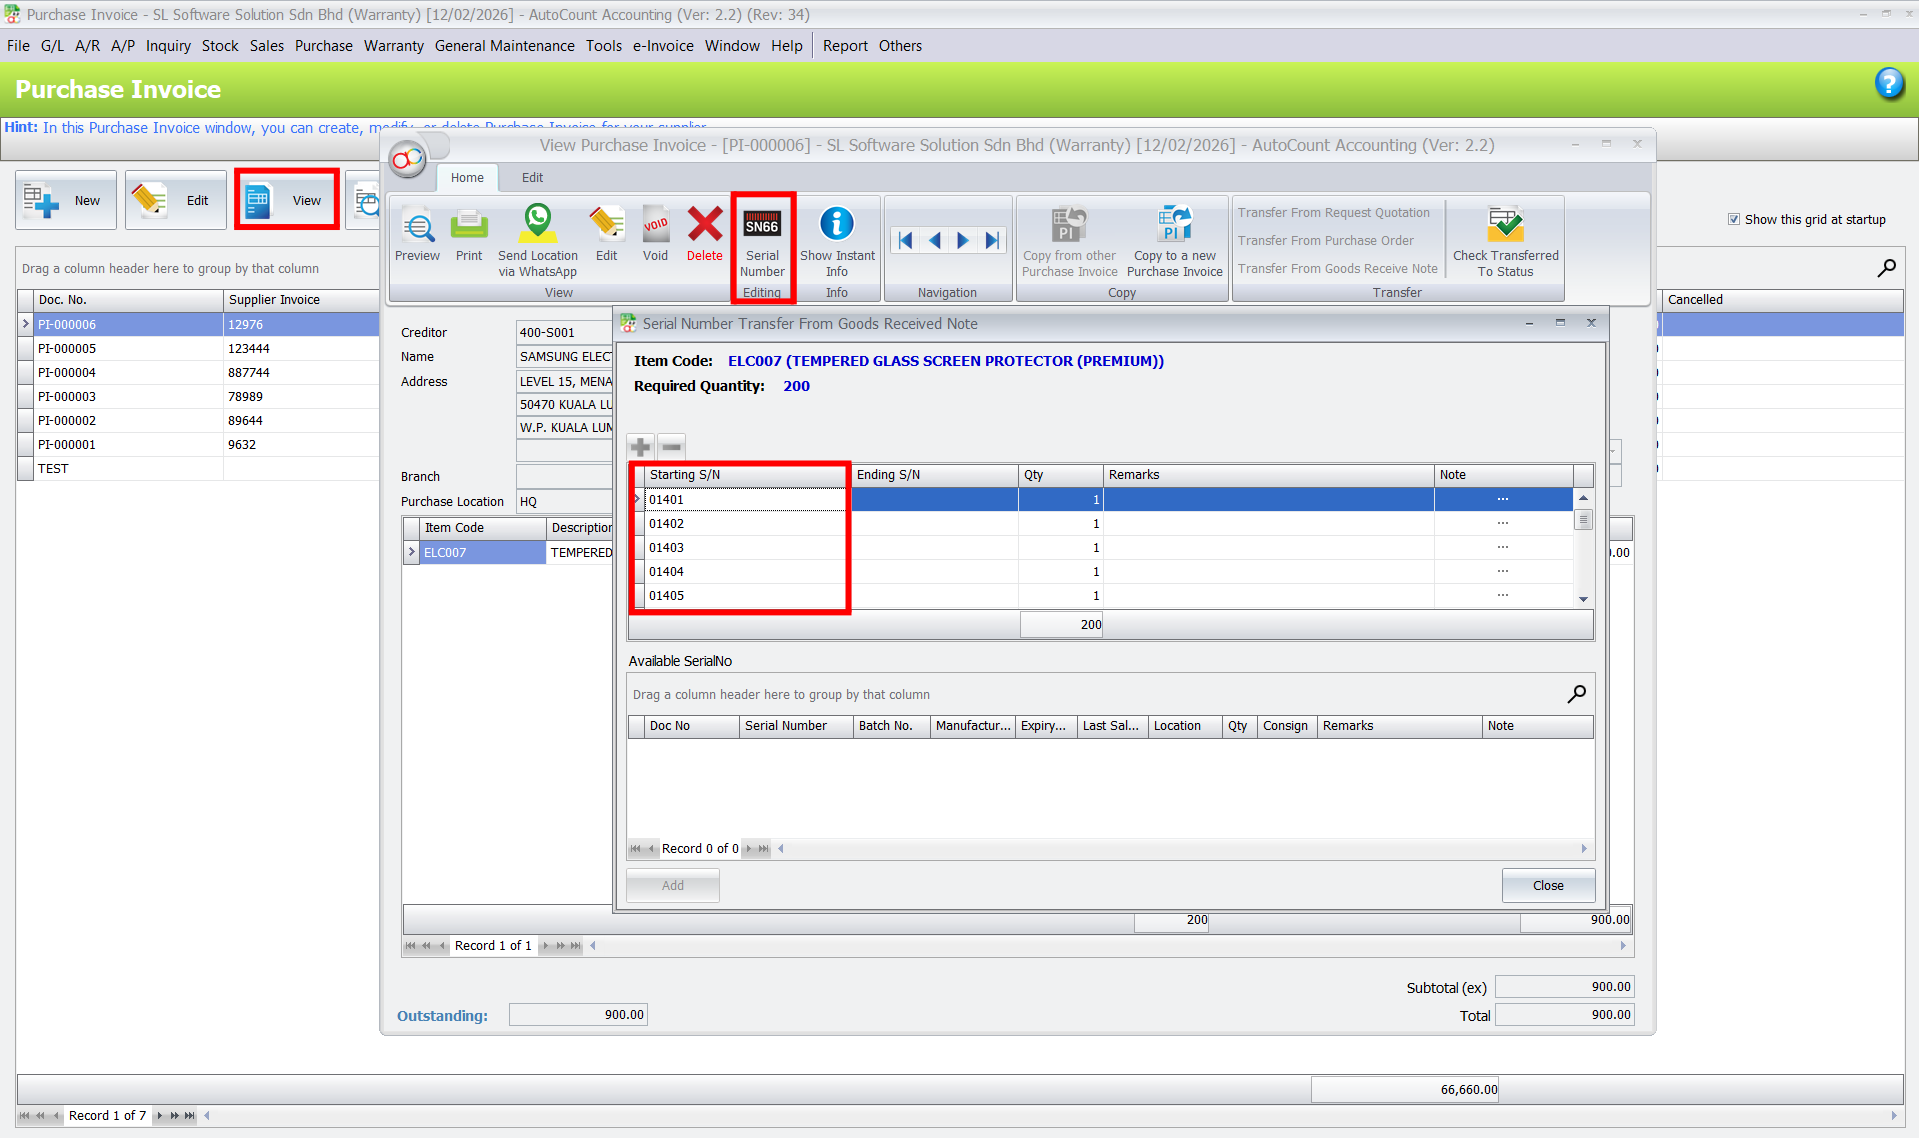
1. Access Purchase Invoice and Serial Number
Go to the Purchase Invoice section within AutoCount. Open the created invoice and click “View” at the top. In the top bar, you’ll find the “Serial Number” field — click on it to view the serial number associated with the product. Once the serial number is visible, you can close the window. This action associates the serial number with the warranty process and helps track the product efficiently.
Track exactly where and when your products came from.
- Go to the Purchase Invoice section and click View on a created invoice.
- Click the Serial Number button in the top bar to view the exact serial numbers recorded from your supplier.
- Close the window when done. This automatically links the item’s serial number to the future warranty process.
Pro Tip:
Always enable strict serial number tracking for high-value items (like IT hardware or machinery). This is your first line of defense against fraudulent warranty claims!
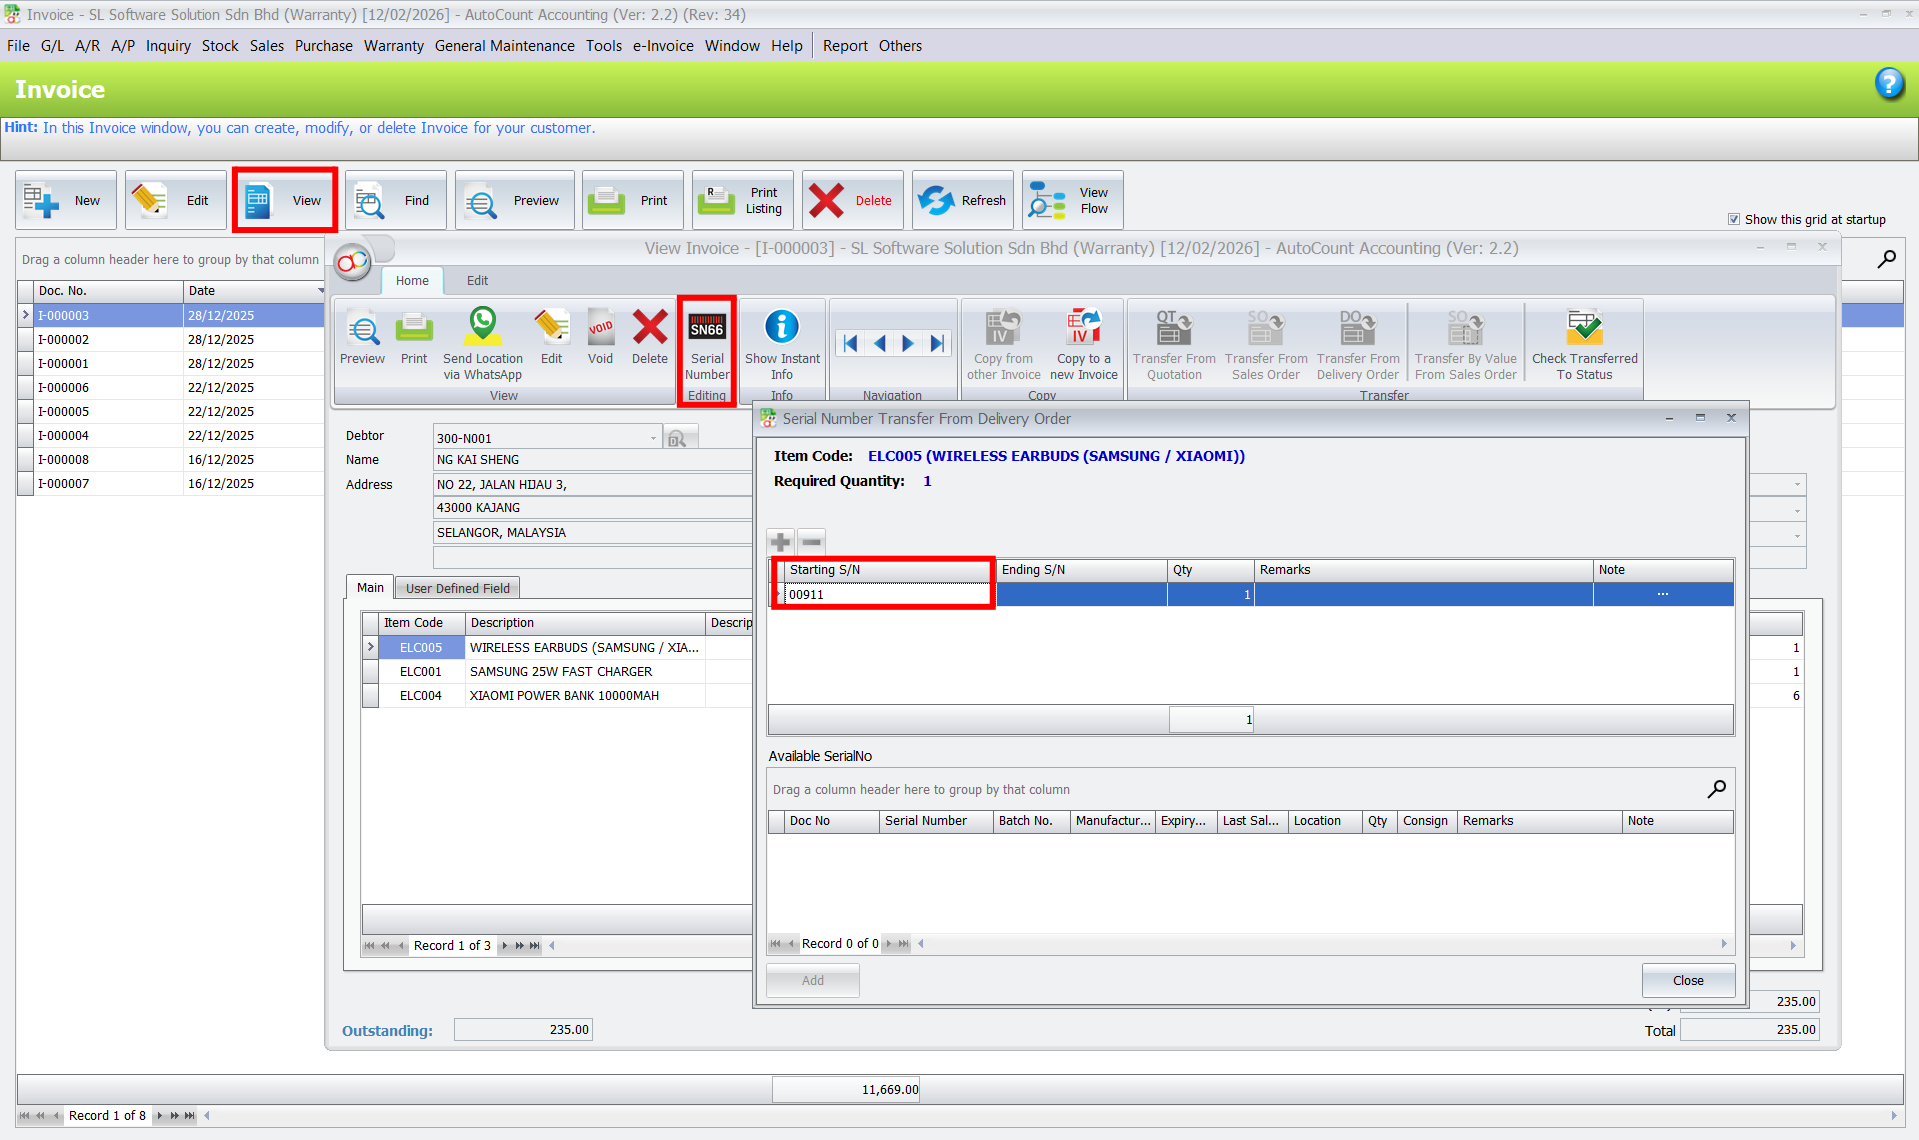
2. Access Sales Invoice and Serial Number
Go to the Sales Invoice section and select the invoice that you want to link with the warranty. Click on “View” to open the invoice. You will now be able to see the serial number of the product sold, which is crucial for warranty tracking.
Confirm the product belongs to your customer before accepting a claim.
- Go to the Sales Invoice section and select the invoice you want to link to the warranty.
- Click View to open the details.
- Check the Serial Number of the product sold. This proves the item was genuinely purchased from your store.
Pro Tip:
Linking serial numbers directly to sales invoices ensures you never accidentally provide free repair services for items bought from your competitors.
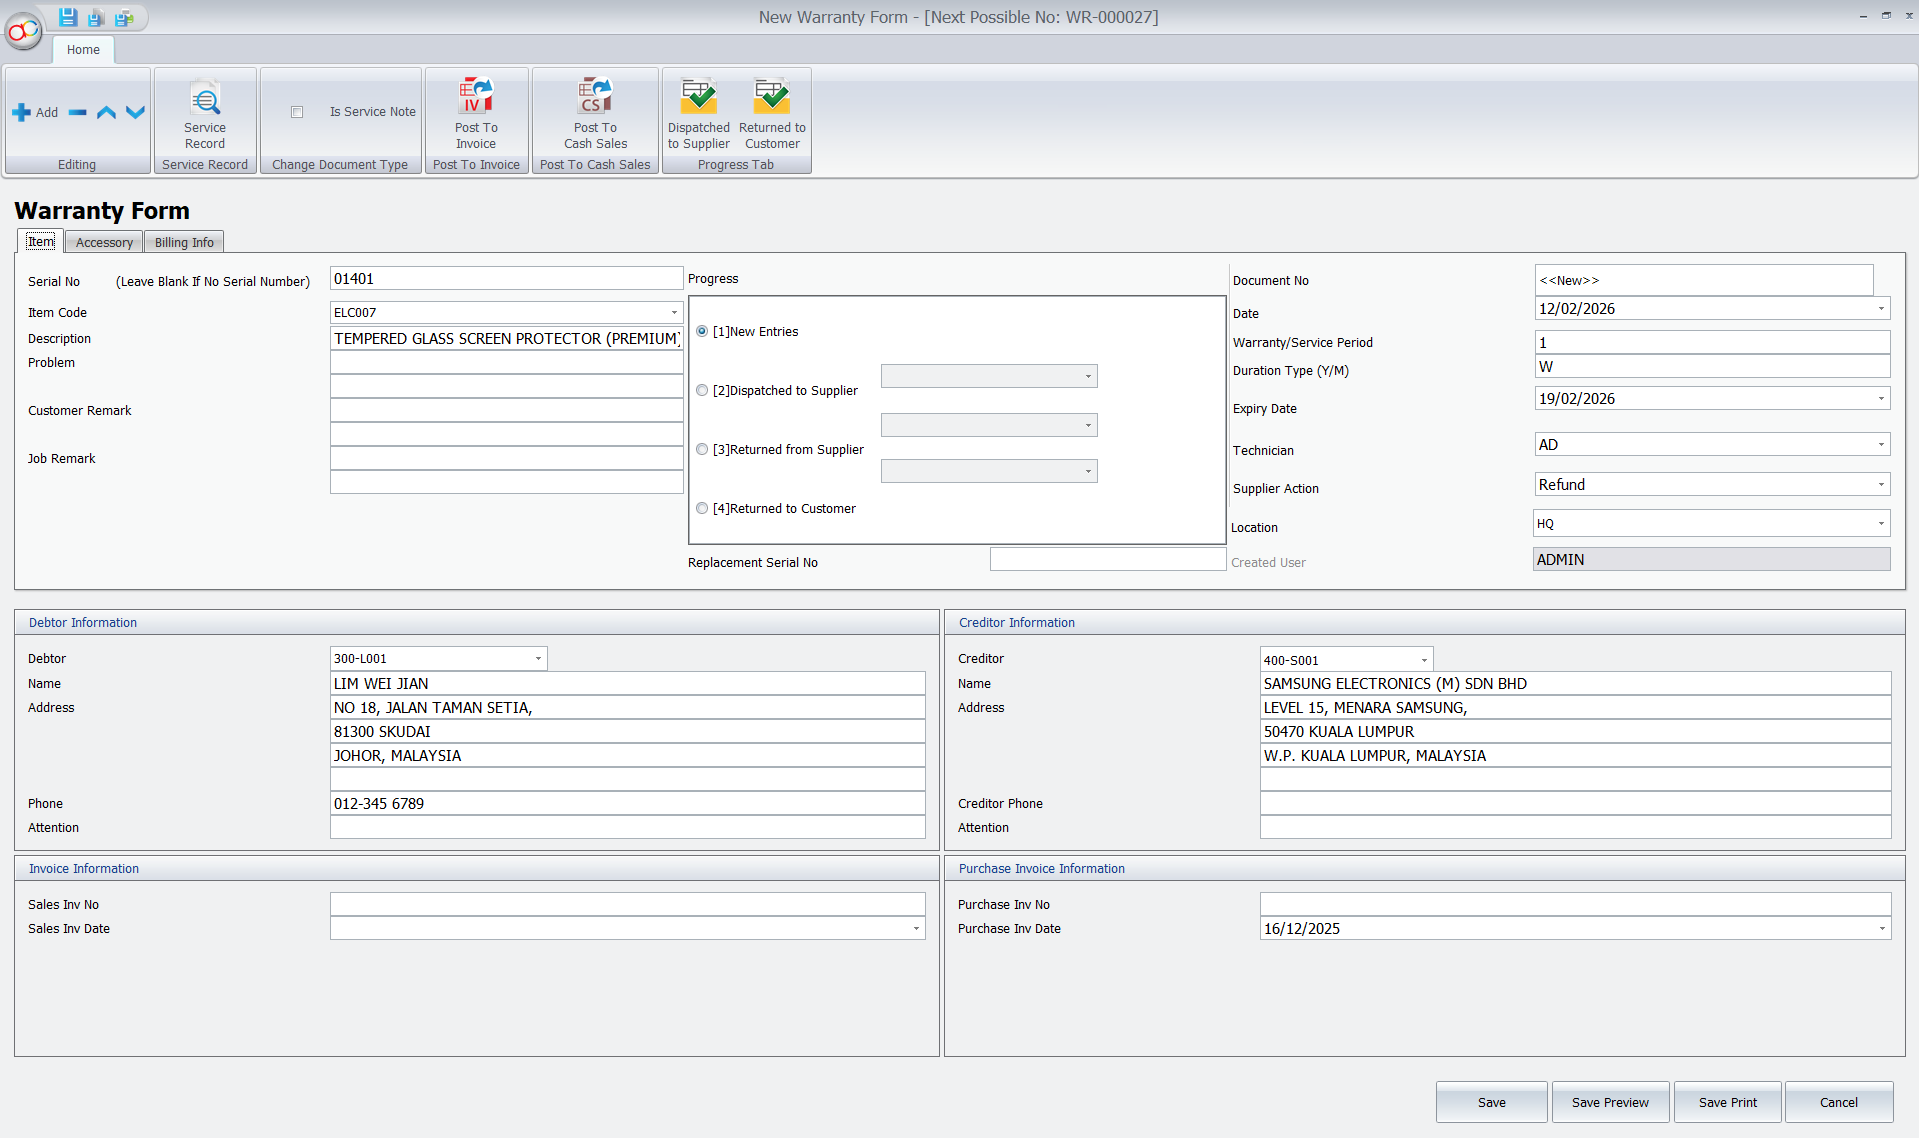
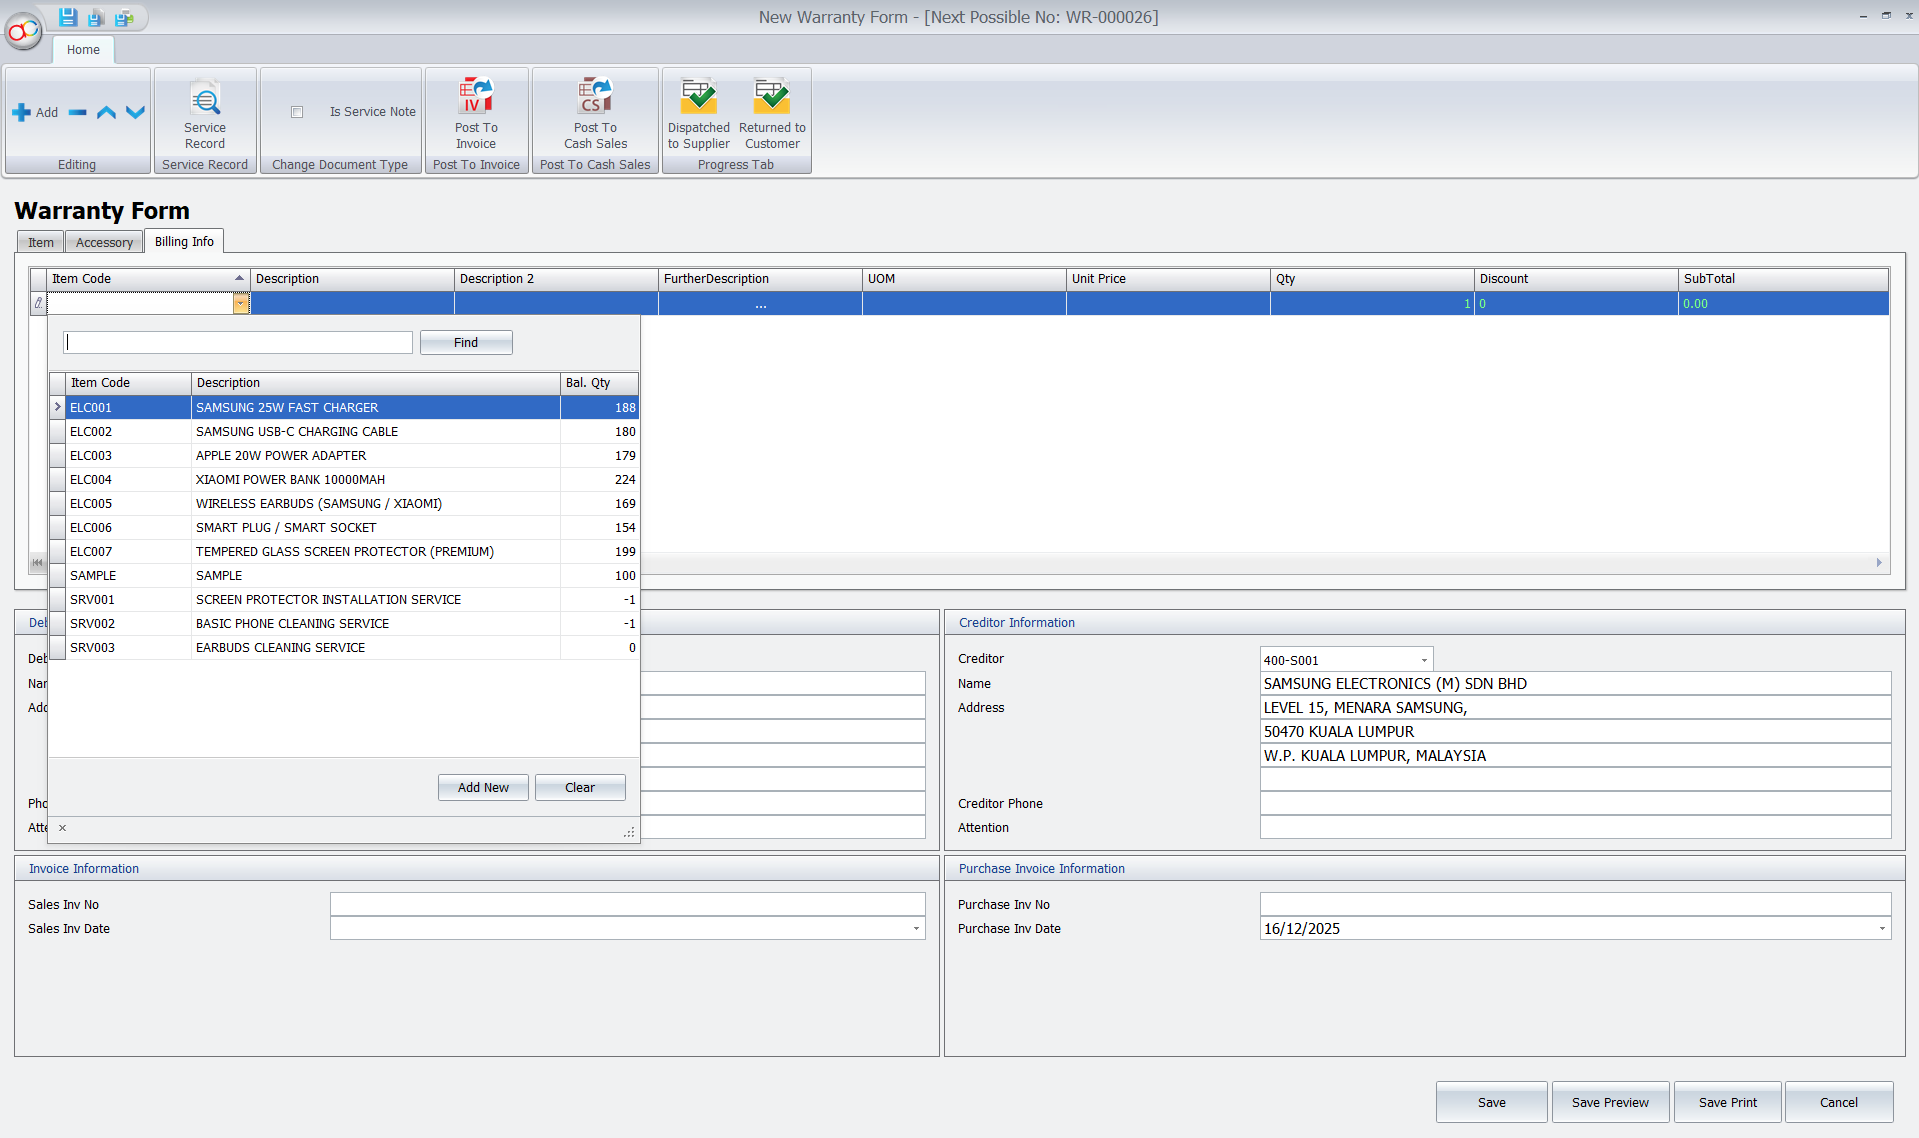
3. Open Warranty Maintenance and Enter Serial Number
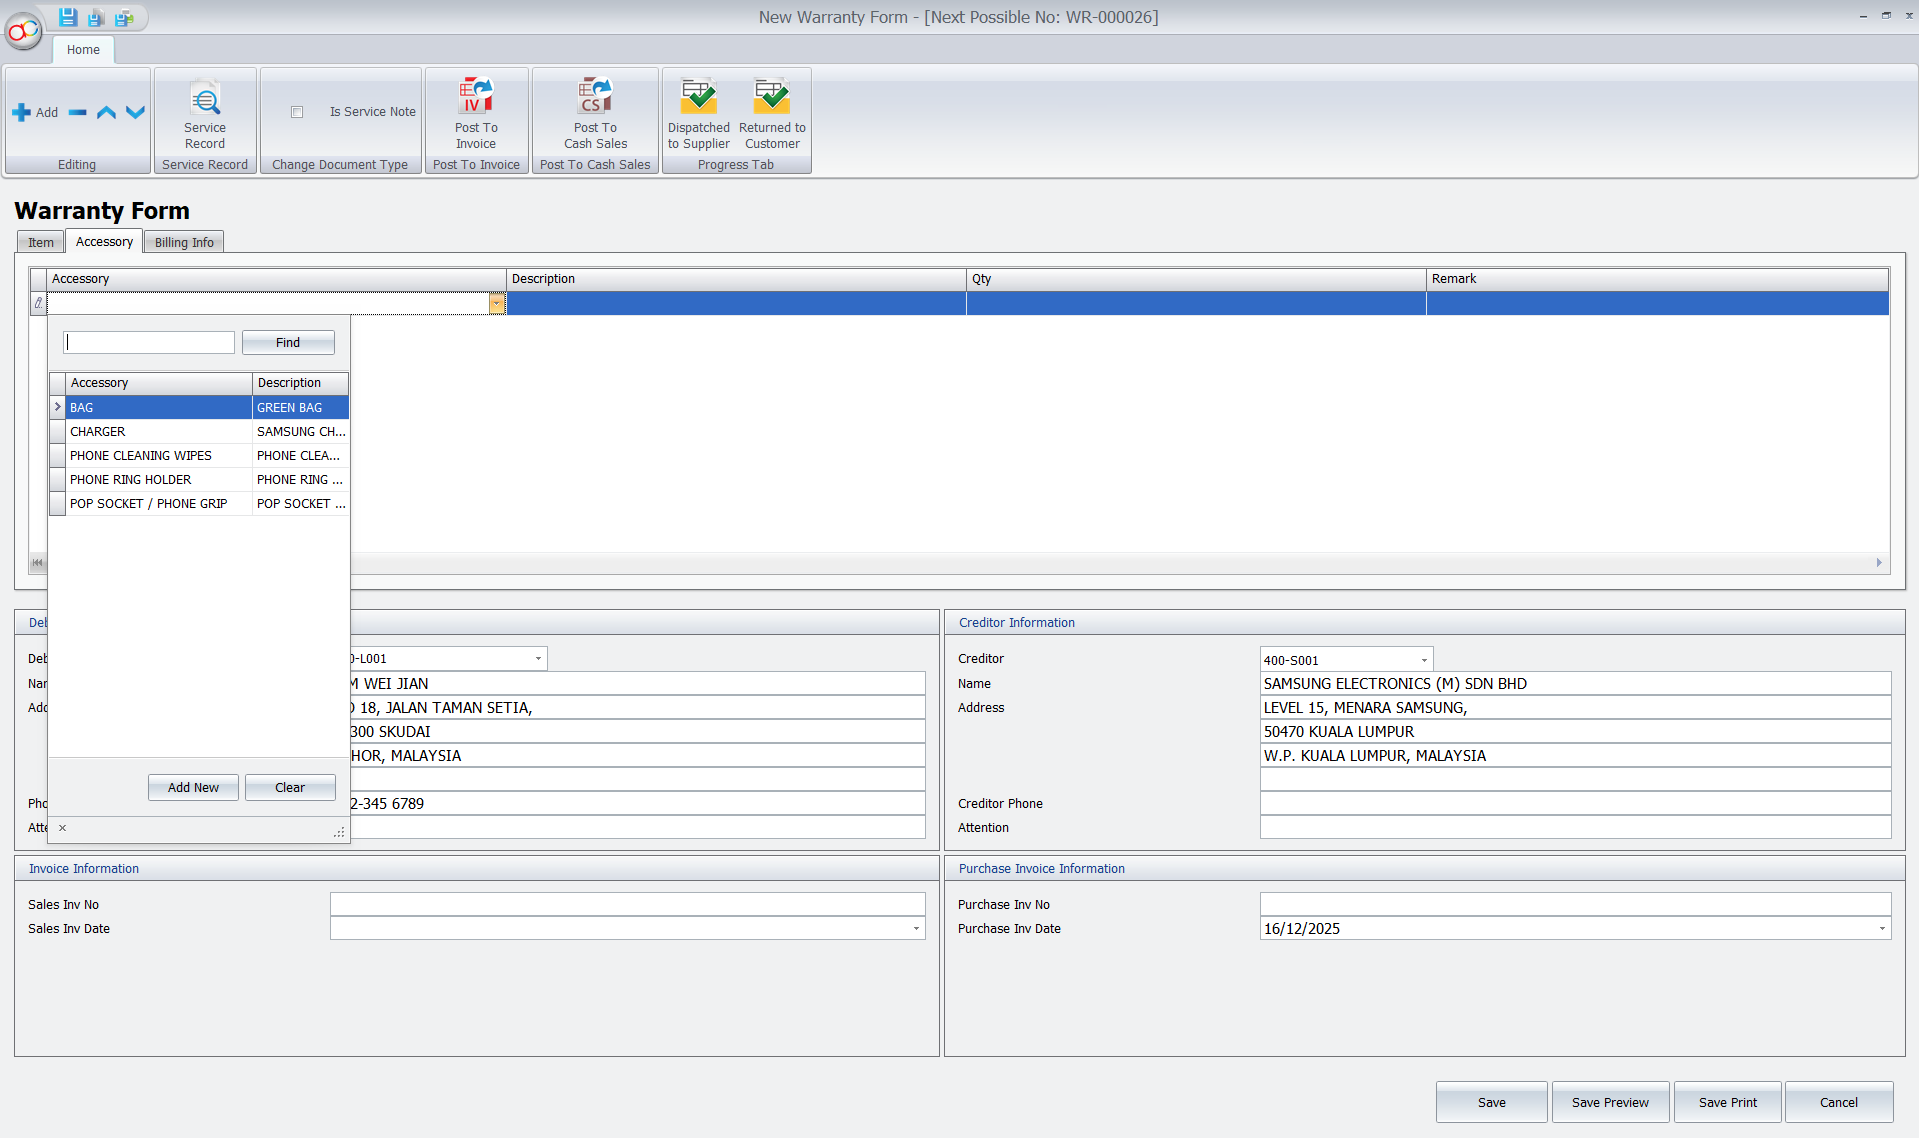
Now, go to Warranty Maintenance and click “New” to create a new warranty case. Enter the serial number that was recorded earlier. The system will automatically display all related product information, customer details, and purchase data. You can also add additional accessories such as bags, chargers, or other items that came with the product. Additionally, you can fill in the billing information.
Easily log a customer’s repair or service request in seconds.
- Go to Warranty Maintenance and click New.
- Enter the product’s Serial Number. The system will instantly auto-fill the customer details and purchase history.
- You can also record any additional accessories the customer brought in (e.g., bags, chargers) to avoid disputes later.
Pro Tip:
Standardize your warranty durations (e.g., 12 months, 24 months) in the Item Maintenance settings. The system will then auto-calculate the expiry date here, eliminating human calculation errors by your staff.
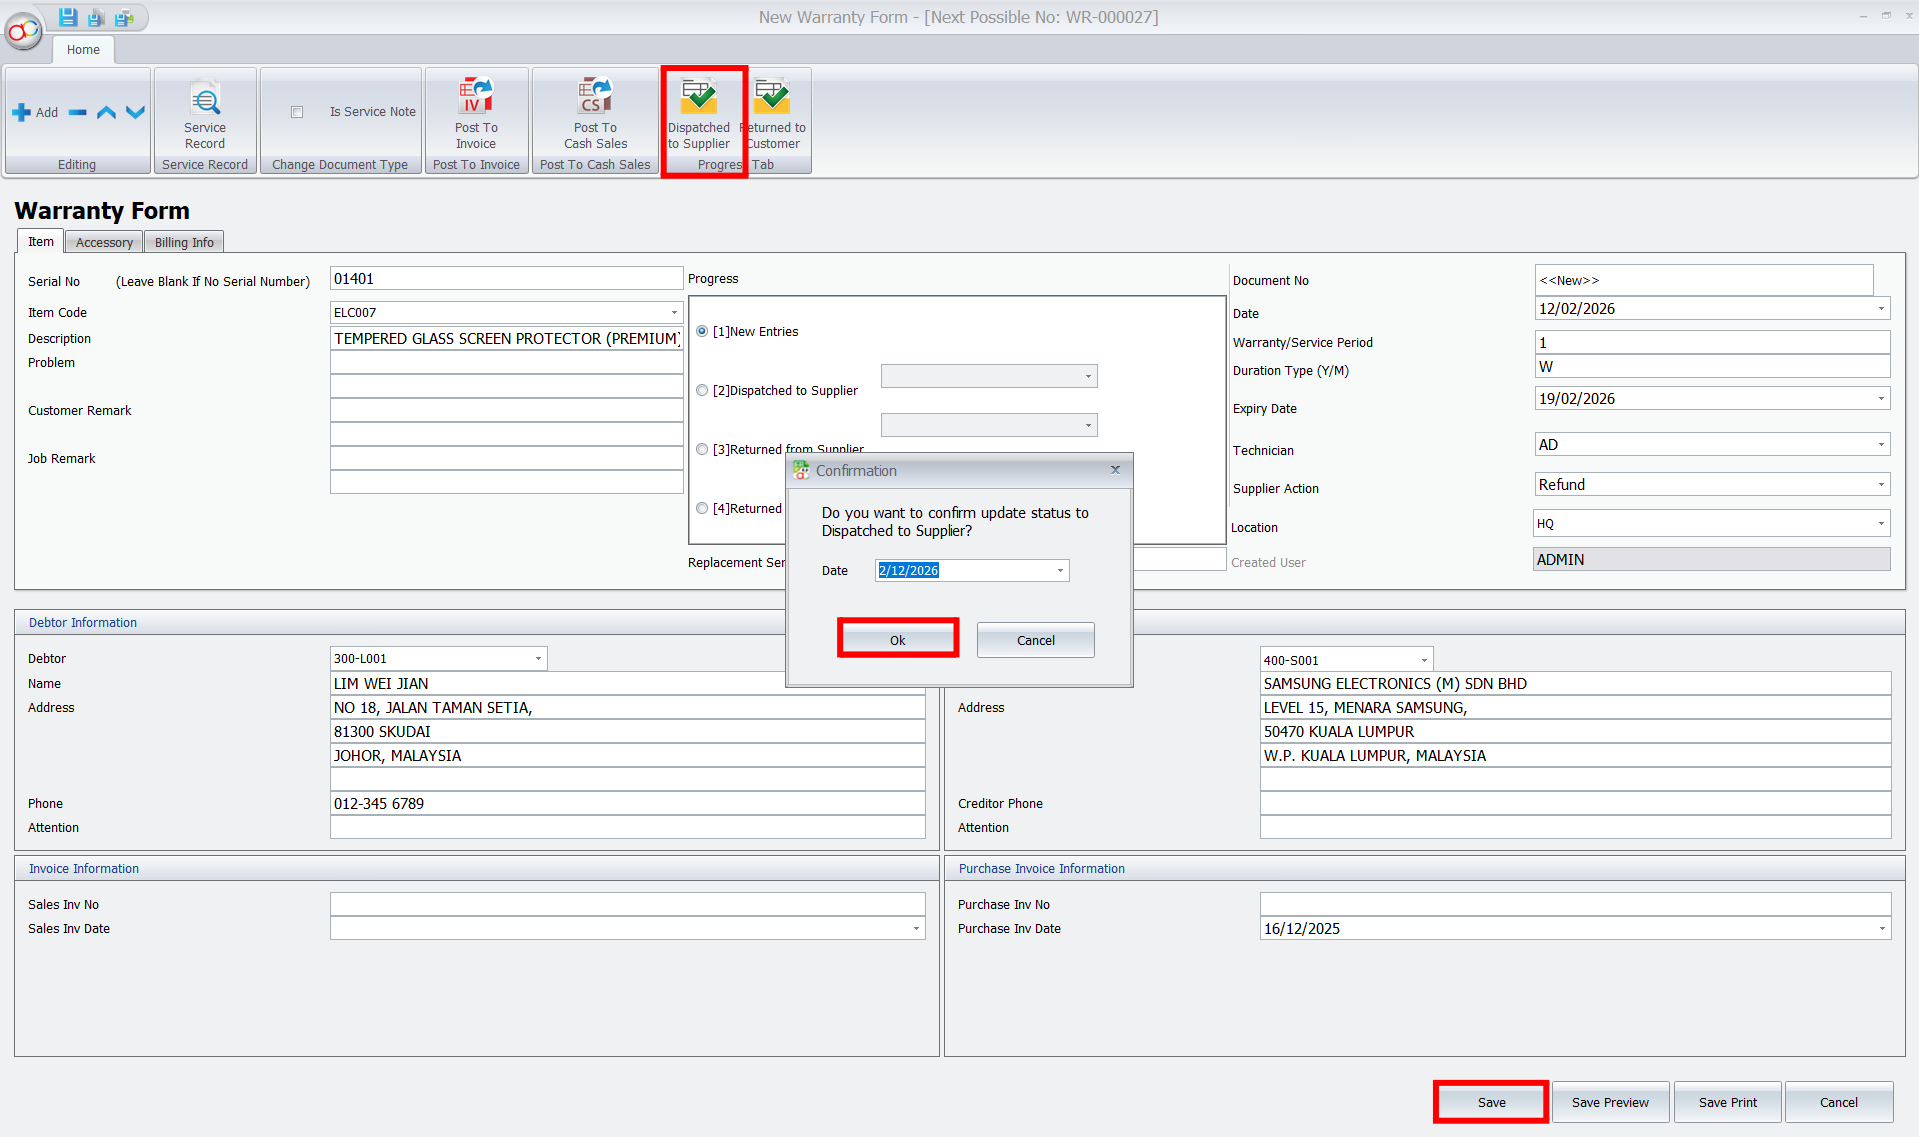
4. Edit Warranty Case and Update Status
After creating the warranty case, go to the top bar and select the status from the progress tab. For example, if the product is being sent for repair, select Dispatched to Supplier, and the system will auto-generate the appropriate date. Once the status is updated, click “Save” to record the changes.
Keep track of where the product is during the repair process.
- Open your warranty case and click on the Progress tab.
- Select the current status (for example, choose Dispatched to Supplier if you sent it back to the manufacturer).
- The system will auto-generate the date for this action. Click Save.
Pro Tip:
Update these statuses in real-time! It helps your customer service team provide instant and accurate answers when clients call to check on their repairs, greatly improving customer satisfaction.
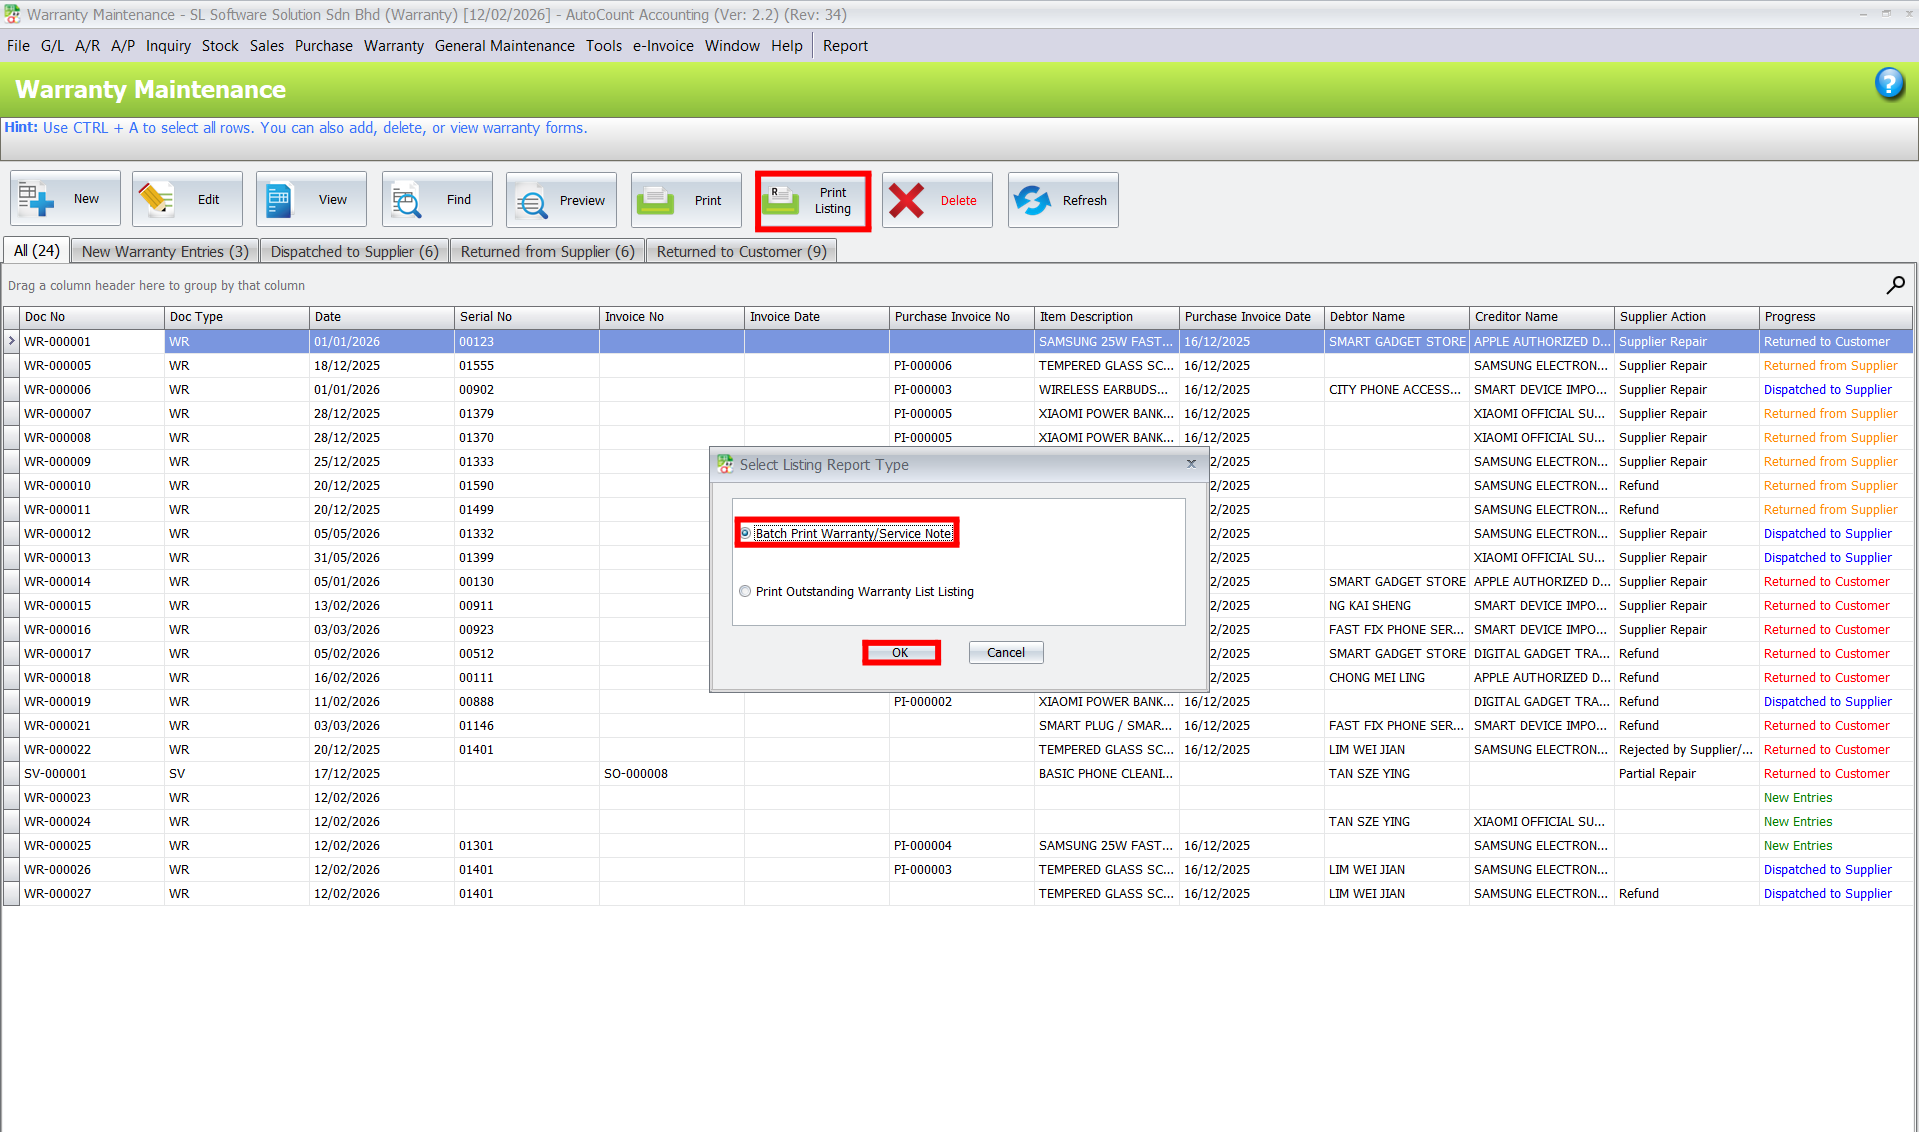
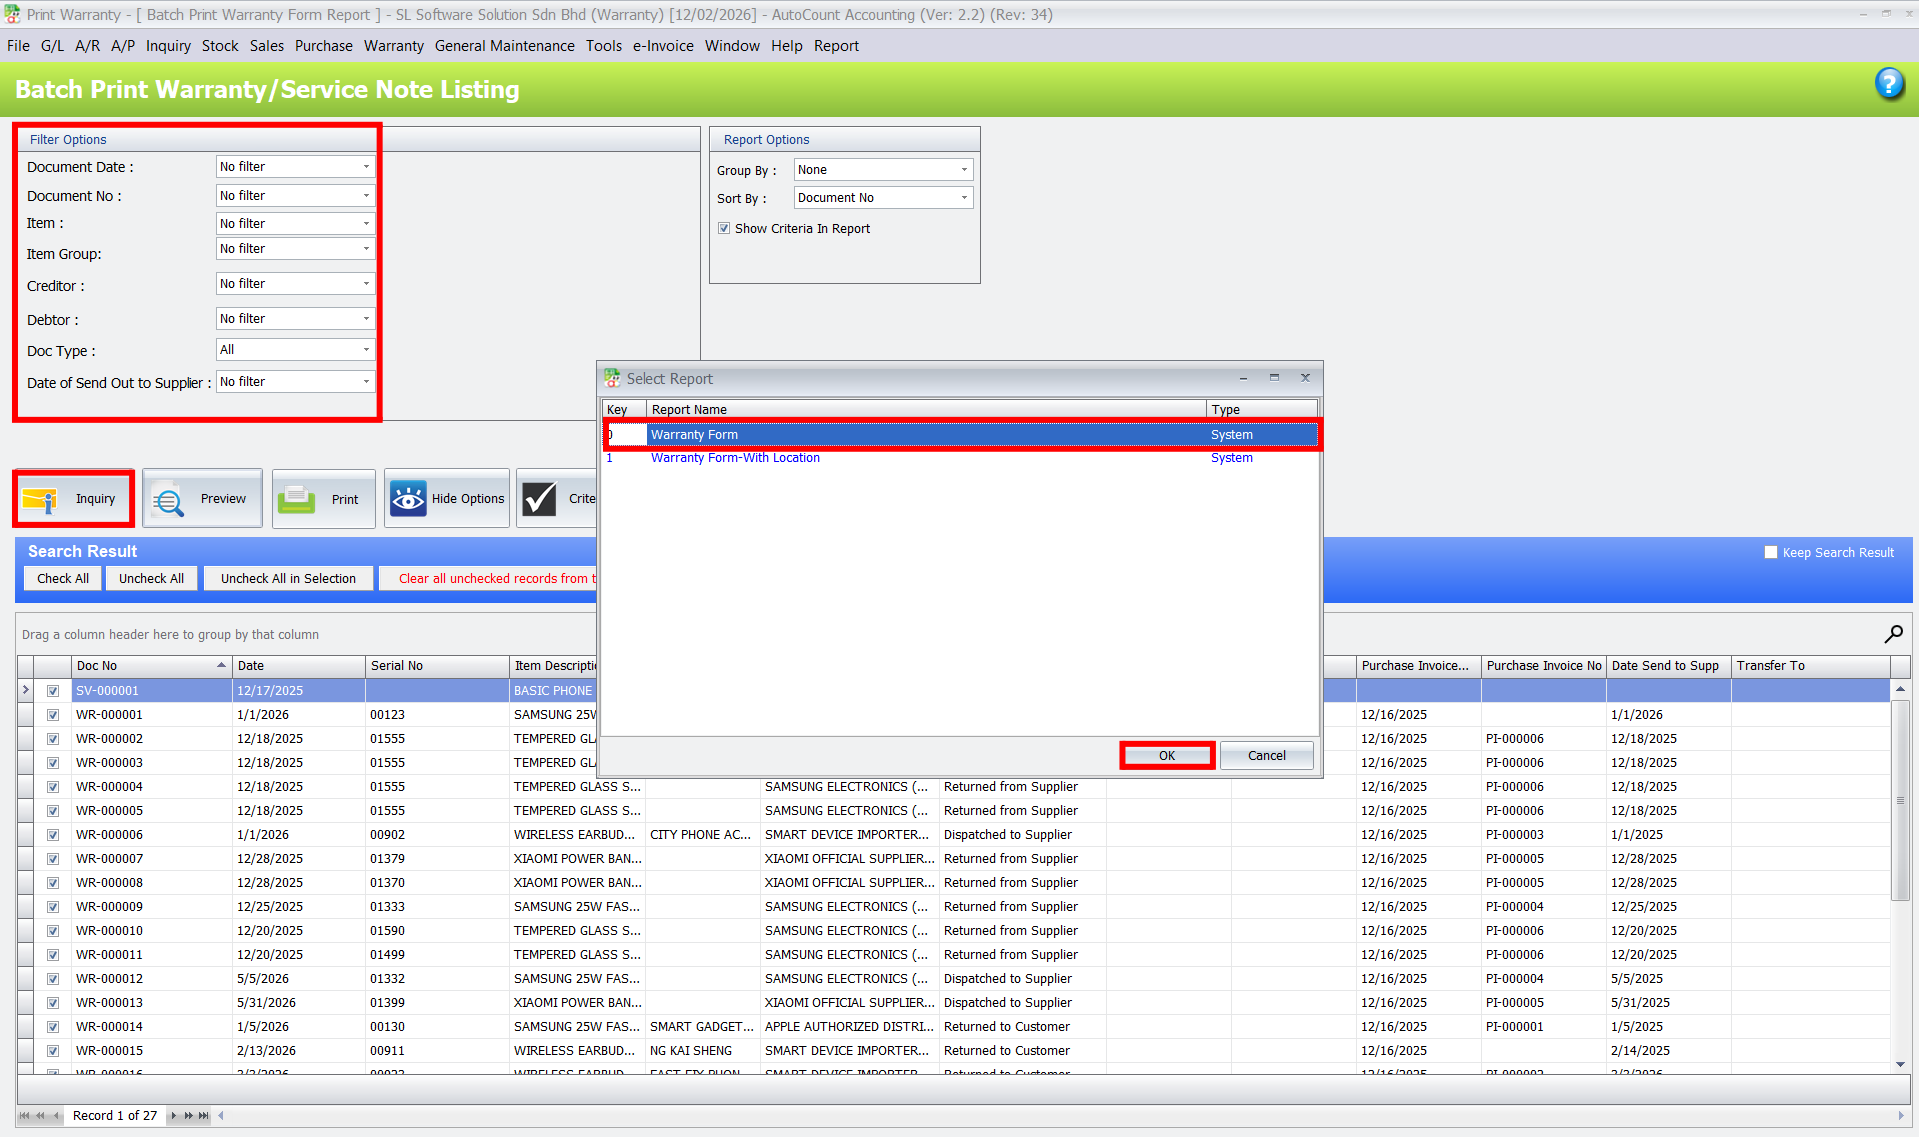
5. Print Warranty Listing
To generate a Warranty Listing, navigate to the Print Listing section in AutoCount. From there, select the “Batch Print Warranty/Service Note” option. You can filter the report by document date, item, debtor, or other criteria to narrow down your results. After setting the filters, click “OK” to generate the report.
You can then preview or print the warranty listing directly, showing all active, expired, or pending warranties.
Generate clear reports for all your after-sales activities.
- Go to the Print Listing icon at the top of the Warranty Maintenance screen.
- Select Batch Print Warranty/Service Note.
- Filter your report by document date, item, or customer, then click OK to preview or print your active, expired, or pending warranties.
Pro Tip:
Schedule monthly warranty expiry reports to proactively contact your customers. This is an excellent opportunity to upsell extended service contracts or replacement parts just before their coverage ends!

Core Benefits of the Warranty 2.0 Plugin
For Business Owners & Managers
Get clear business insights. Use warranty claim data to identify product quality trends, monitor supplier performance, and maintain 100% operational control.
For Frontline Employees
Increase daily efficiency. Automate warranty registrations and use precise serial-based tracking to quickly validate claims without digging through messy files.
For Your Customers
Experience better customer service. Provide instant, accurate warranty history checks and faster claim resolutions to build long-lasting trust.
Conclusion
The AutoCount Warranty 2.0 Plugin is a vital tool for businesses aiming to optimize their warranty management. Whether you’re a retailer, manufacturer, or service provider, this plugin streamlines processes, enhances customer satisfaction, and provides valuable data insights. Ready to boost your warranty handling efficiency? Explore the plugin today!
Frequently Asked Questions
What is the AutoCount Warranty 2.0 Plugin?
It is an add-on designed to help you manage product warranties directly inside AutoCount Accounting. It automatically records warranty details during sales and allows you to track expiry dates, claims, and service history all within one system.
Do I have to use serial numbers for this plugin to work?
While it is not strictly required, using serial number control is highly recommended, especially for high-value items. Tying a warranty to a unique serial number prevents duplicate claims and ensures 100% accuracy.
How does the system calculate warranty expiry dates?
No more manual guessing! You can set predefined warranty periods (e.g., 6, 12, or 24 months) for different items in your stock settings. The system will then automatically calculate the exact expiry date the moment a Sales Invoice is saved.
Can I track a product's full repair and claim history?
Yes. You can log all customer claims, repairs, replacements, and service progress under a single warranty record. This creates a complete, traceable after-sales audit trail for your team.
Can this plugin help me increase my sales?
Absolutely! You can easily generate reports for warranties that are expiring soon. Your sales team can use this data to proactively call customers and offer extended warranties or maintenance packages.
Does it fully integrate with my existing AutoCount system?
Yes, it integrates seamlessly. The plugin works perfectly with your existing Sales Invoices, Stock Items, and Debtor records. There is no need for double data entry or switching between different software programs.
Interested in Getting AutoCount for your Business?
Contact our sales team today to explore pricing options and get started with the perfect solution for you.