
-
AutoCount Accounting Features
-
- Approval Workflow
- Audit Trail
- Auto Save in Draft Folder
- AutoCount Contra Account
- AutoCount License Setting Guide
- Deposit Tracking & Management
- Documents Numbering Format
- Full Transfer and Partial Transfer
- Import Data to AutoCount Accounting Using Excel
- Informative Charts and Analytical Data
- Layout Customization
- Multi Pricing
- Sales and Services Tax
- Schedule Backup
- Search Lookup Edit
- View Documents Flow
- AutoCount Feature Stock Take
- Column Chooser
- Show Remaining (3) Collapse
-
AutoCount Cloud Accounting
-
AutoCount E-Invoice
-
AutoCount HRMS User Guide
-
AutoCount Modules
-
- Activity Stream
- Advanced Financial Report
- Advanced Item
- Advanced Multi-UOM
- Advanced Quotation Module
- Basic Multi-UOM
- Budget Module
- Consignment
- Filter By Salesman
- FOC Quantity
- Formula
- Item Batch
- Item Package
- Landing Cost
- Multi-Currency
- Multi-Dimensional Analysis
- Multi-Location
- Project Account
- Recurrence
- Remote Credit Control Module
- Stock Assembly
- User Defined Fields (UDF)
- AutoCount SST Hidden Functions
- AutoCount SST Submission - Service Tax
- AutoCount Scripting Module User Guide
- AutoCount Bonus Point Module User Guide
- AutoCount Service Management Plugin User Guide
- Show Remaining (12) Collapse
-
AutoCount Plugins
-
- Fixed Assets Management
- Goldsmith
- TD Ordering Mobile Apps
- TD Stock Mobile Apps
- Universal Import Plugin
- DMS Import Plugin
- AutoCount Pick List Plugin User Guide
- AutoCount Credit Memo Plugin User Guide
- AutoCount Lock Price Plugin
- AutoCount Progressive Billing
- AutoCount Easy Recurrence Plugin
- Batch Update Unit Price Plugin
- AutoCount Production order
- AutoCount Car Tint Film Plugin
-
- Event Management System
- AutoCount To-Do List Plugin
- AutoCount AutoBank Reconciliation Plugin
- Intercompany Billing Plugin User Guide
- Lead Management 2.0 Plugin
- AutoCount Service Contract Plugin User Guide
- AutoCount Optical Plugin
- AutoCount Integrator Plugin
- AutoCount Procurement Planning Plugin
- Cage Management Plugin
- AutoCount Vehicle Plugin
- AutoCount Agent Validation Plugin User Guide
- AutoCount Barcode Generator Plugin User Guide
- AutoCount Easy Batch Number Entry Plugin User Guide
- Warranty 2.0 Plugin
- AutoCount Easy Photo 2.0 User Guide
- AutoCount Recurring Invoice Plugin User Guide
- AutoCount Scale Barcode Plugin User Guide
- AutoCount Recurrence Late Interest Plugin
- AutoCount Item Visibility Control
- AutoCount Bill Remark Plugin User Guide
- AutoCount Pain Tracker User Guide
- AutoCount Easy Payment
- AutoCount Easy Deposit Plugin
- AutoCount Easy Knock Off Plugin
- AutoCount Daily Collection Summary Plugin
- Timber Log Plugins
- Batch Transfer SODO Plugin
- AutoCount Vege Basket Plugin Guide
- AutoCount Fruit Basket Plugin Guide
- Referral Management Plugin
- AutoCount Migrator Plugin
- AutoCount Email&WhatsApp Plugin
- AutoCount Multi Company Knock Off Plugin
- AutoCount Advance Aging Format Plugin
- AutoCount Payment Request Plugin
- AutoCount Vehicle Master Plugin
- AutoCount Advance Deposit Plugin
- AutoCount IC Checker Plugin
- AutoCount RMA Plugin
- AutoCount Historical Outstanding DO Listing Plugin
- AutoCount Project Department Visibility Control Plugin
- AutoCount MRP Order Plugin
- AutoCount GridToExcel Plugin
- AutoCount Stock Availability Report Plugin
- AutoCount Batch Transfer SO DO Plugin
- AutoCount Centralized Kitchen Management Plugin
- SL AutoCount API
- AutoCount InterCompany Billing Plugin
- AutoCount Sales Commission Plugin
- AutoCount Advanced Credit Term Plugin
- AutoCount Advanced Stock Assembly Plugin
- AutoCount Shipment Plugin
- AutoCount Tour Plugin
- AutoCount Smart Analysis
- AutoCount Rental Management
- Show Remaining (41) Collapse
-
-
Form Template
-
Report Template
-
- Advance Quotation
- Cash Sale
- Consignment
- Consignment Movement
- Credit Note
- Debit Note
- Delivery Order
- FOC Quantity Analysis By Document Report
- Invoice
- Item Package Sales Report
- Monthly Sales Analysis
- Outstanding Sales Order Listing
- Profit And Loss Of Documents
- Quotation
- Sales Agent Contribution Report
- Sales Order
- Top/Bottom Sales Ranking
- Show Remaining (2) Collapse
-
- Available Stock Status Report
- Expired Item Batch Listing
- Inventory Physical Worksheet
- Stock Adjustment
- Stock Aging Report
- Stock Assembly
- Stock Assembly Order
- Stock Balance By Location
- Stock Balance Report
- Stock Card Report
- Stock Disassembly
- Stock Issue
- Stock Item Profit Margin
- Stock Movement Report
- Stock Receive
- Stock Take
- Stock Transfer
- Stock Write Off
- Show Remaining (3) Collapse
-
B2B ORDERING
-
AutoCount AI Agent
AutoCount Optical Plugin User Guide
What Is The AutoCount Optical Plugin?
The AutoCount Optical Plugin is designed for optical shops, eyewear retailers, optometrists, and multi-branch optical businesses that need a better way to manage customer prescription records, lens and frame inventory, sales orders, deposits, invoices, and daily collection reports in AutoCount.
AutoCount Optical Plugin Video Guide
- AutoCount Optical Plugin Video Guide (EN)
Optical Plugin Video Guide
- AutoCount Optical Plugin Video Guide (CN)
光学插件视频指南
Why Use AutoCount Optical Plugin?
Patient Eye Records
Record and retrieve patient eye exam data instantly. Keep track of every prescription history without flipping through paper files.
Frames & Lens Inventory
Seamless Accounting
Boost Shop Efficiency
Key Features of AutoCount Optical Plugin
Eye Examination Record Management
Easily record and track detailed eye examination data for each customer, including refractive power and lens type.
Automated Real-Time Inventory Sync
Automatically update inventory levels in real-time to prevent stockouts and ensure product availability.
Seamless Accounting Integration
Integrate with AutoCount Accounting for efficient financial tracking, real-time sales reporting, and simplified reconciliation.
Fully Customizable Settings
Tailor the plugin to suit your shop’s unique needs with customizable features for inventory and customer management.
Who Should Use AutoCount Optical Plugin?
Optometrists & Eye Clinics
For professionals who need a reliable system to accurately store and track patient vision history and refractive power.
Eyewear Retail Stores
Perfect for shops managing a wide variety of frames, sunglasses, and daily contact lenses to prevent stockouts.
Custom Lens Specialists
Ideal for businesses that handle custom lens orders and require a system that smoothly manages customer deposits and balances.
Multi-Branch Optical Chains
Built for businesses looking to synchronize patient records and inventory data across multiple shop locations using AutoCount.
How AutoCount Optical Plugin Works?
1. Create Examiner Profile
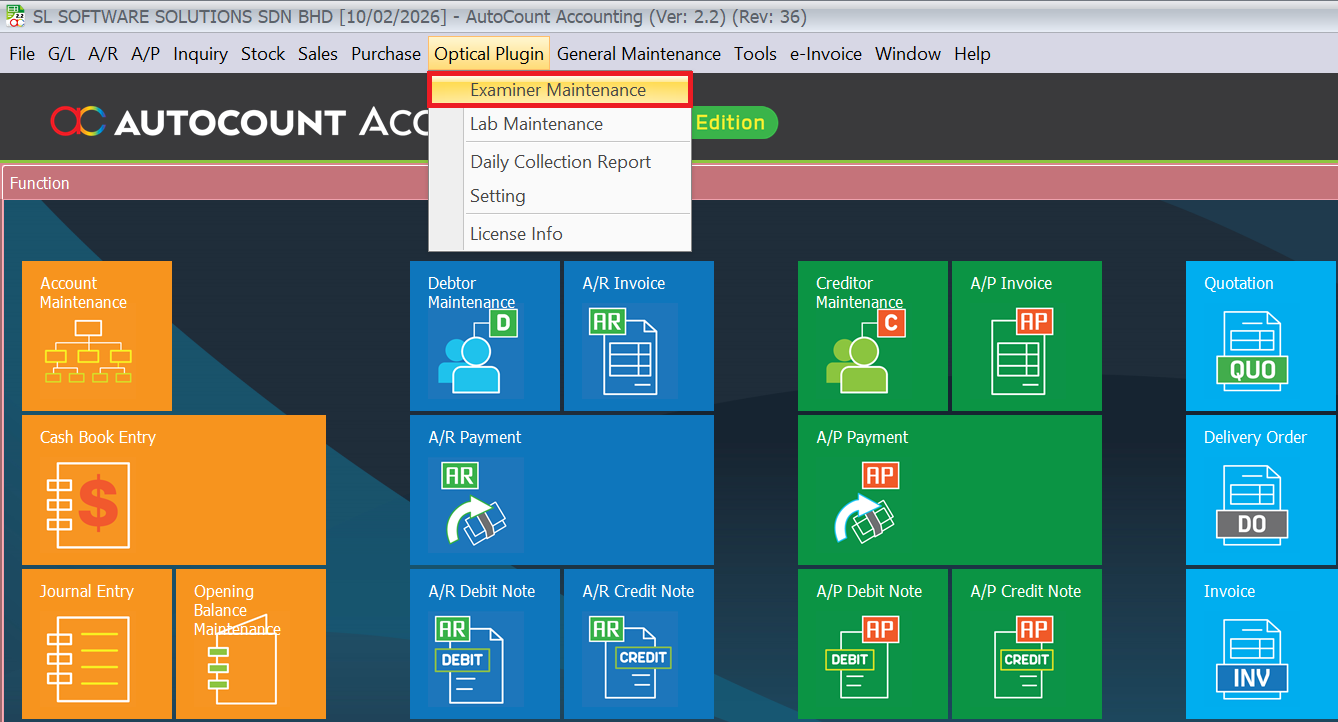
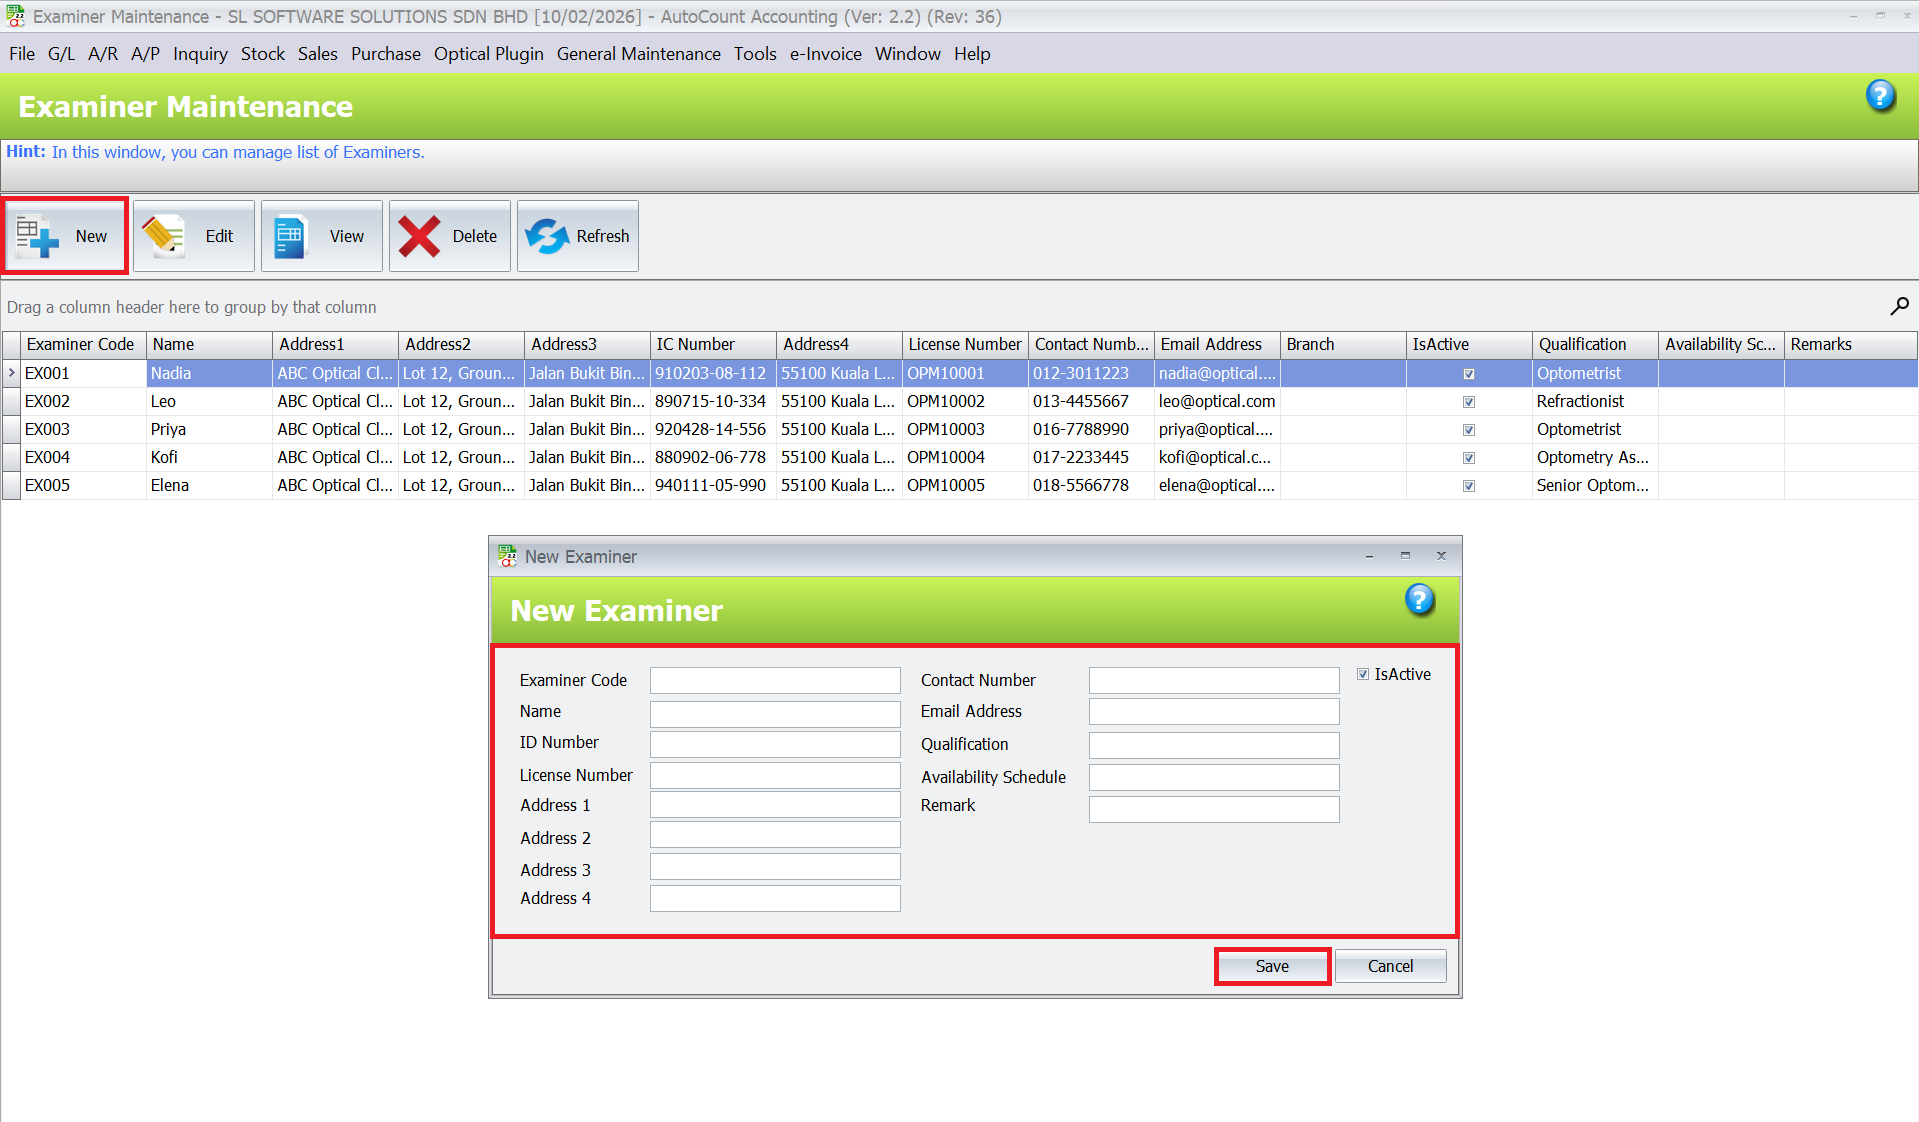
To create an examiner profile, first, go to the Optical Plugin and select “Examiner Maintenance.” Then, click on “New” to begin entering the examiner’s information. Once all the required details are filled in, click on “Save” to create the new debtor profile.
Set up the profiles for your optometrists or eye examiners before recording prescriptions.
- Go to Optical Plugin > Examiner Maintenance.
- Click on New to begin entering the examiner’s information.
- Fill in all the required details.
- Click Save to create the new profile.
2. Set Up Lab Maintenance
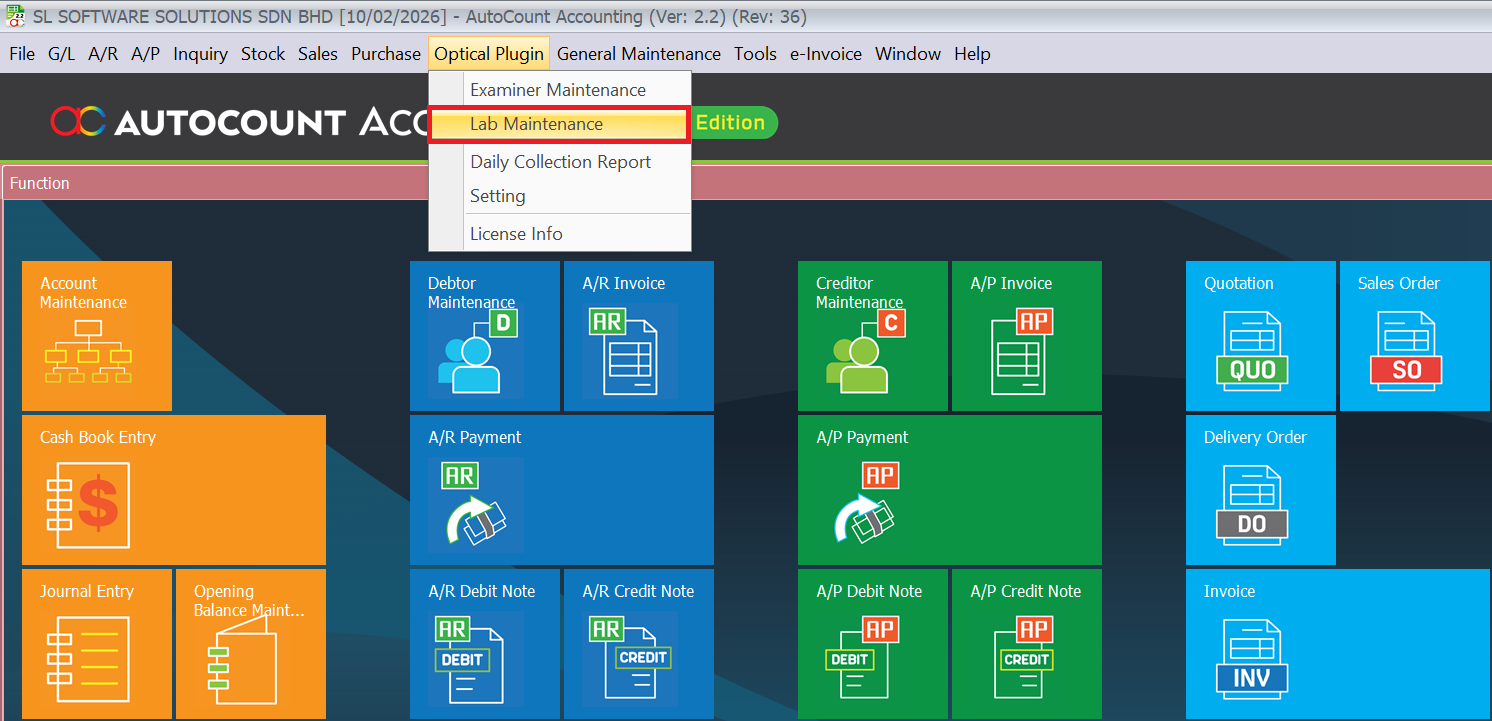
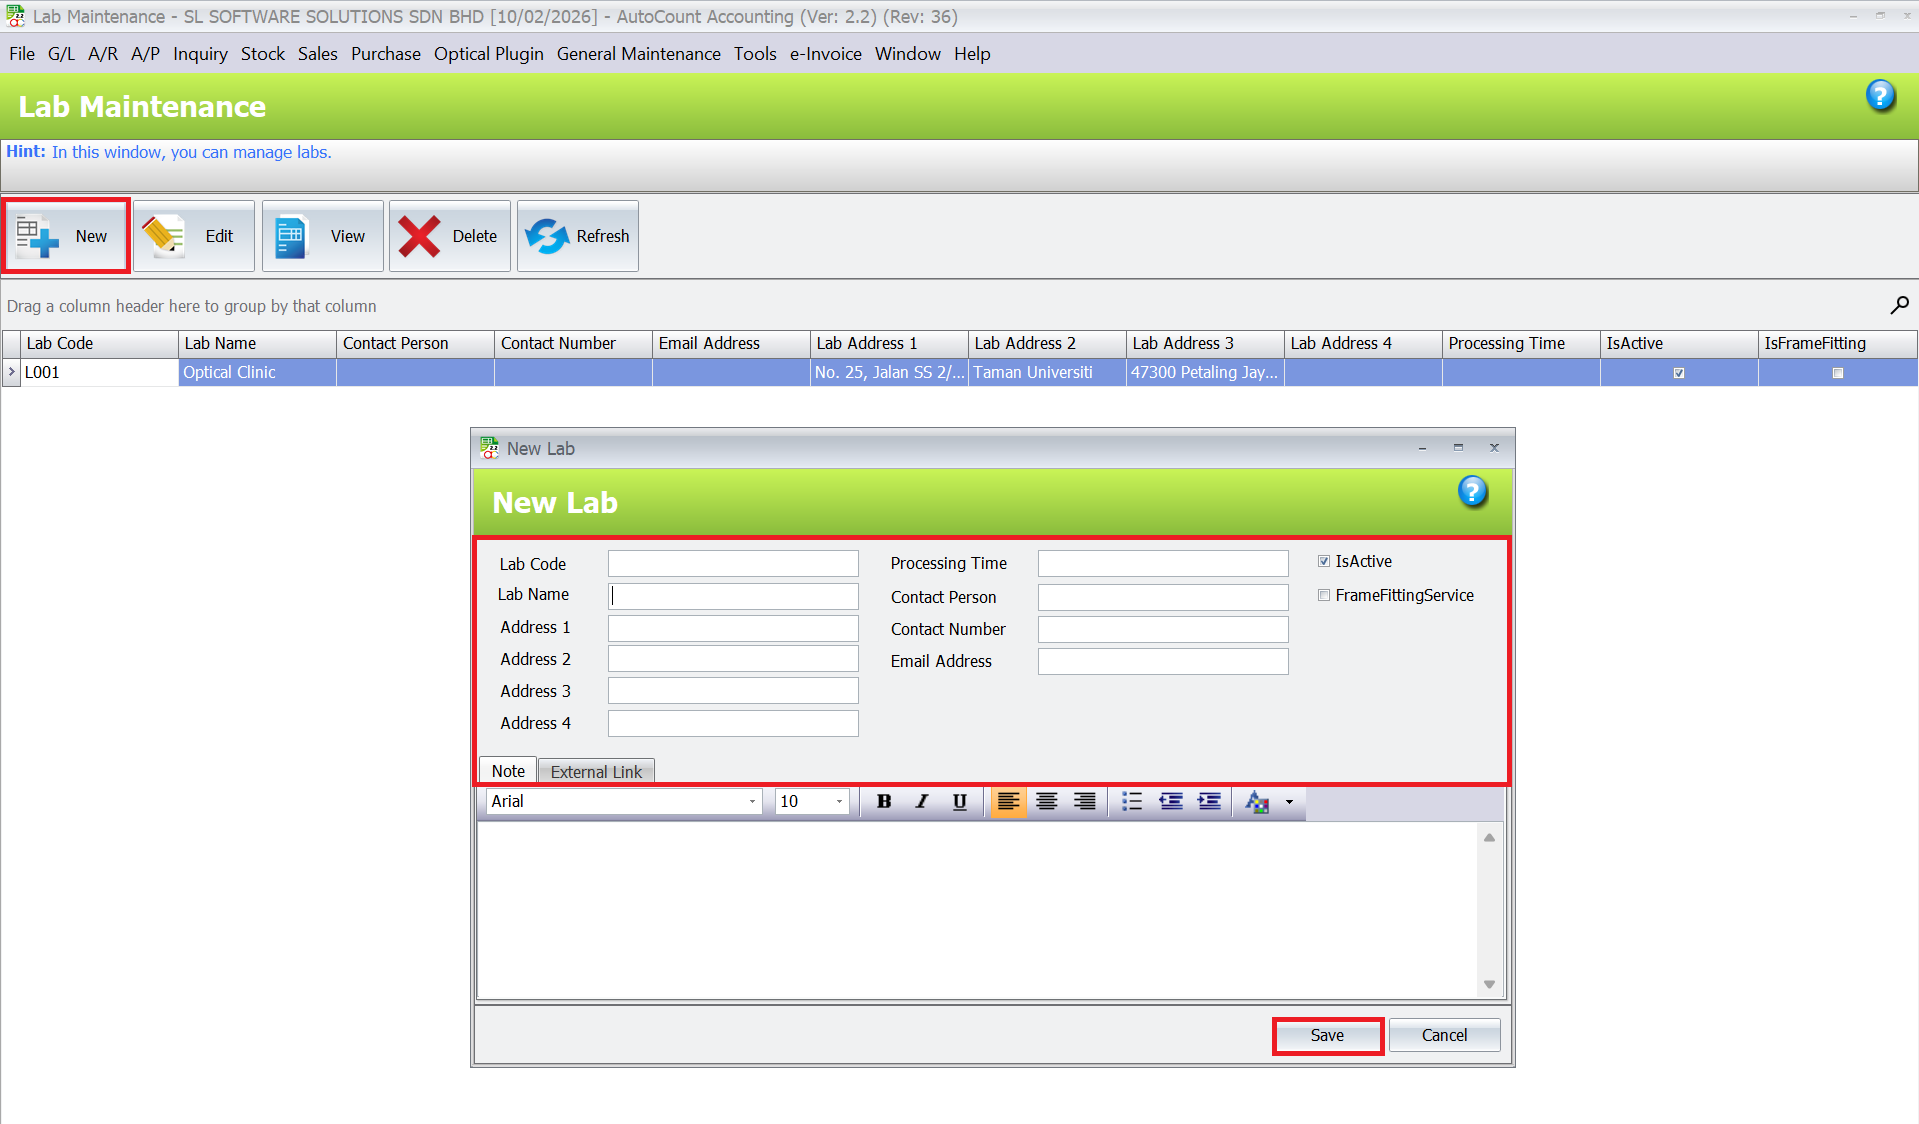
To manage your eye examination rooms, go to the Optical Plugin and select “Lab Maintenance.” Enter the necessary lab details such as name, location, and other information. Once all the details are filled in, click “Save” to update the information.
Manage and register your eye examination rooms or lab locations in the system.
- Go to Optical Plugin > Lab Maintenance.
- Click New to add a lab.
- Enter the necessary lab details such as name and location.
- Click Save to update the information.
3. Create a Quotation (QO)
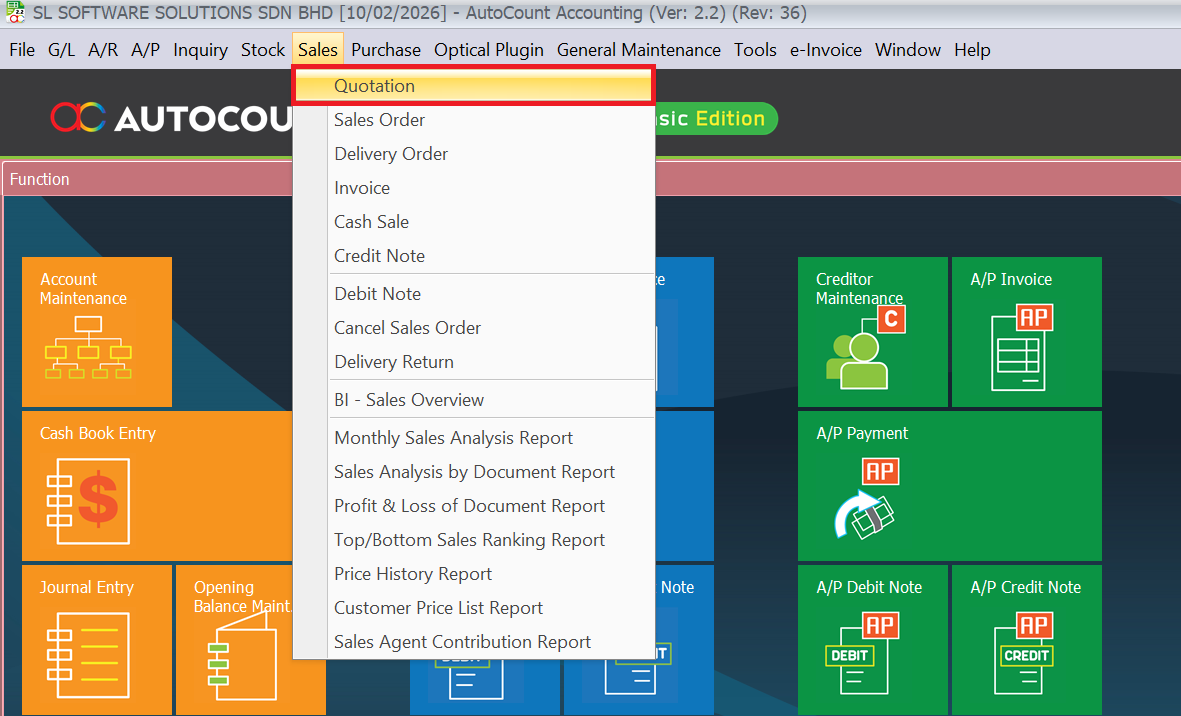
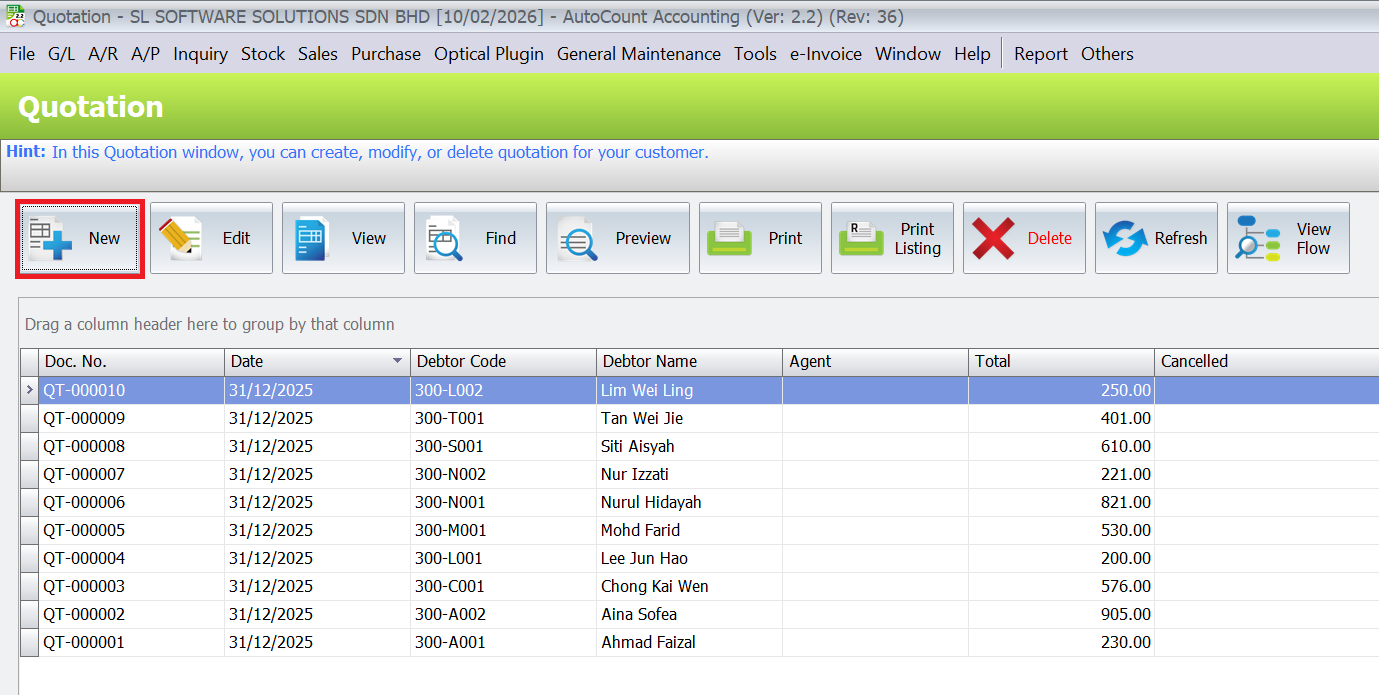
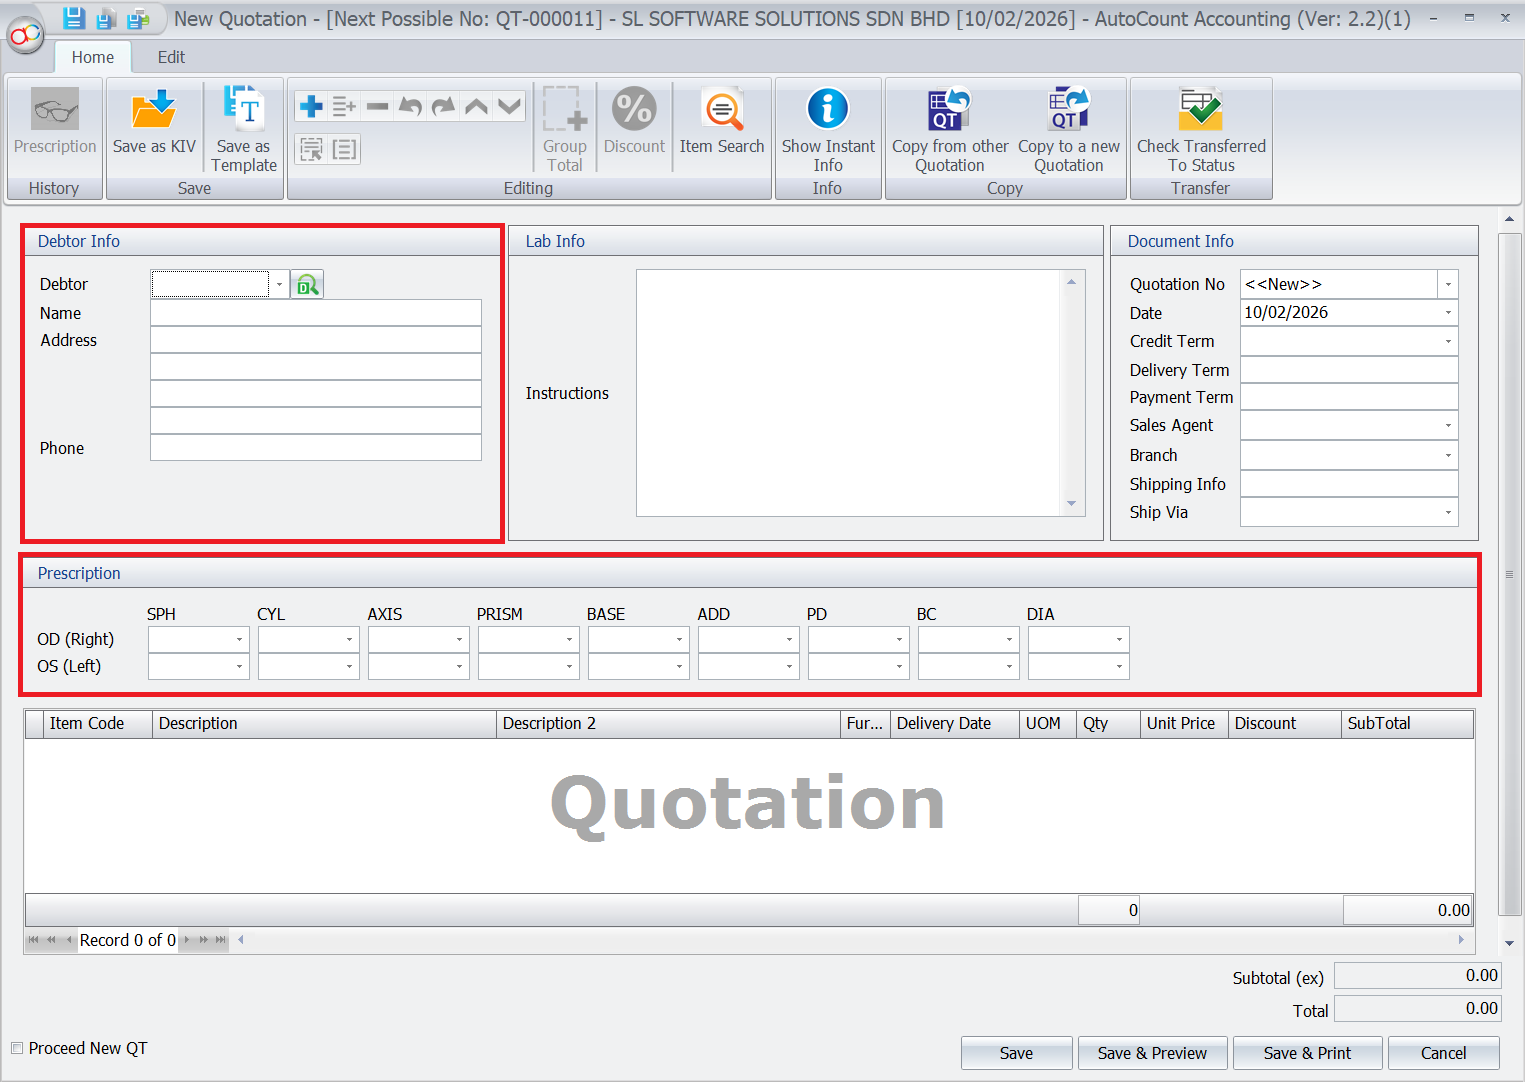
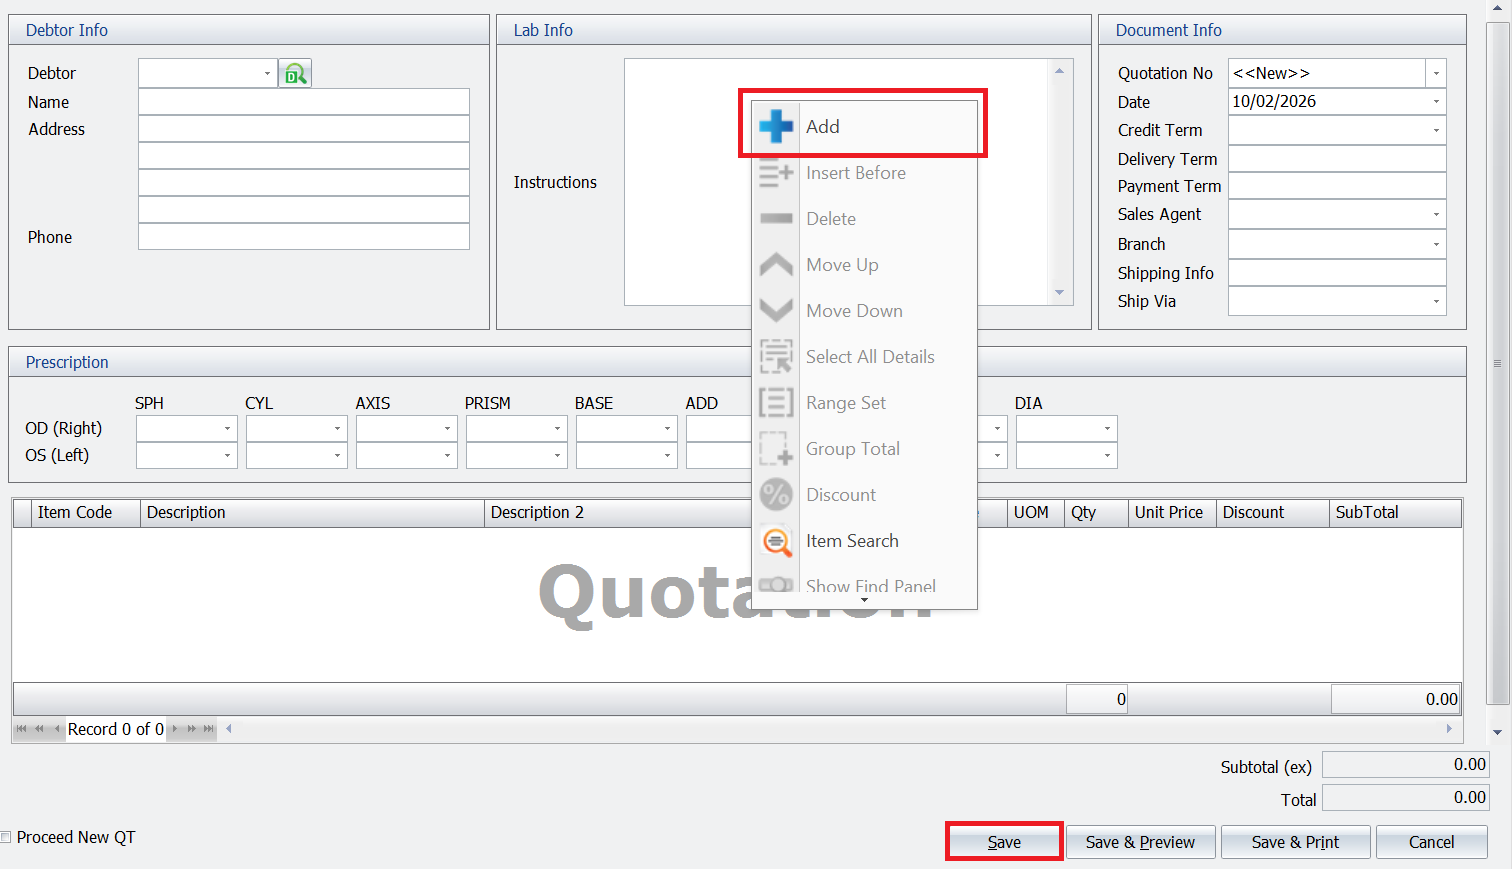
To record a customer’s order with prescription details, go to Sales and select “Quotation.” Next, click on “New” and select the customer. Then, right-click on “Add” and choose the items based on the customer’s requirements. Once everything is selected, click “Save” to complete the order.
Record a customer’s eyewear order along with their prescription details.
- Go to Sales > Quotation and click New.
- Select your customer from the list.
- Right-click on Add and choose the items based on the customer’s requirements.
- Click Save to complete the order.
4. Transfer to Sales Order (SO)
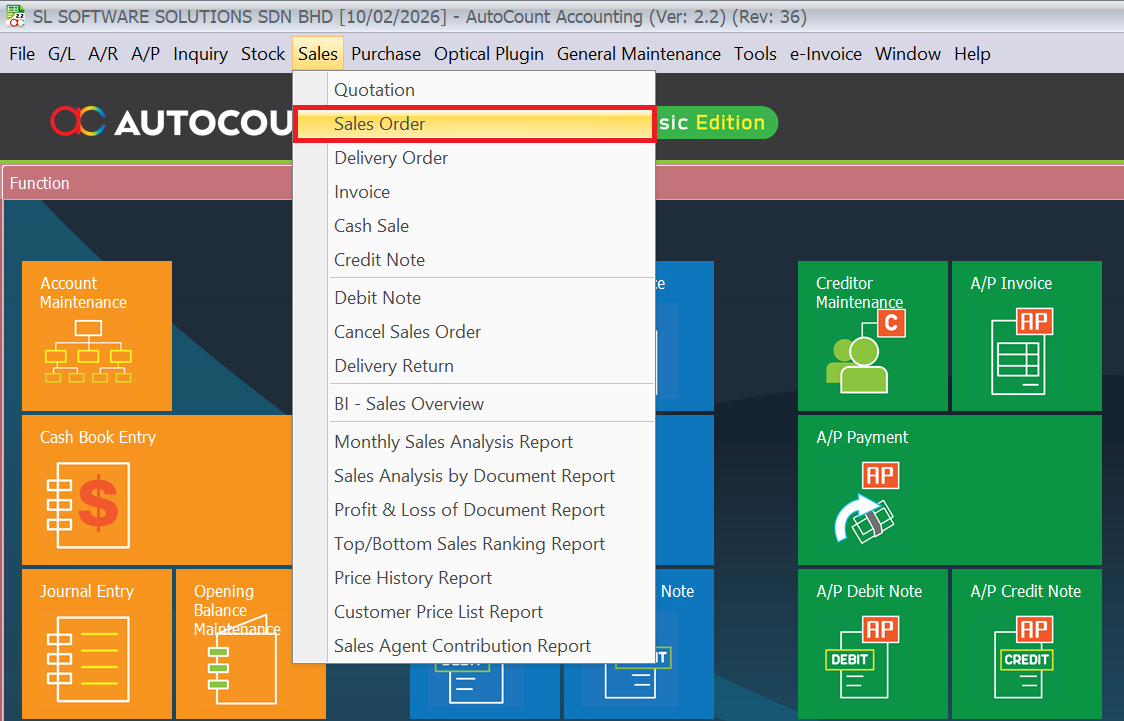
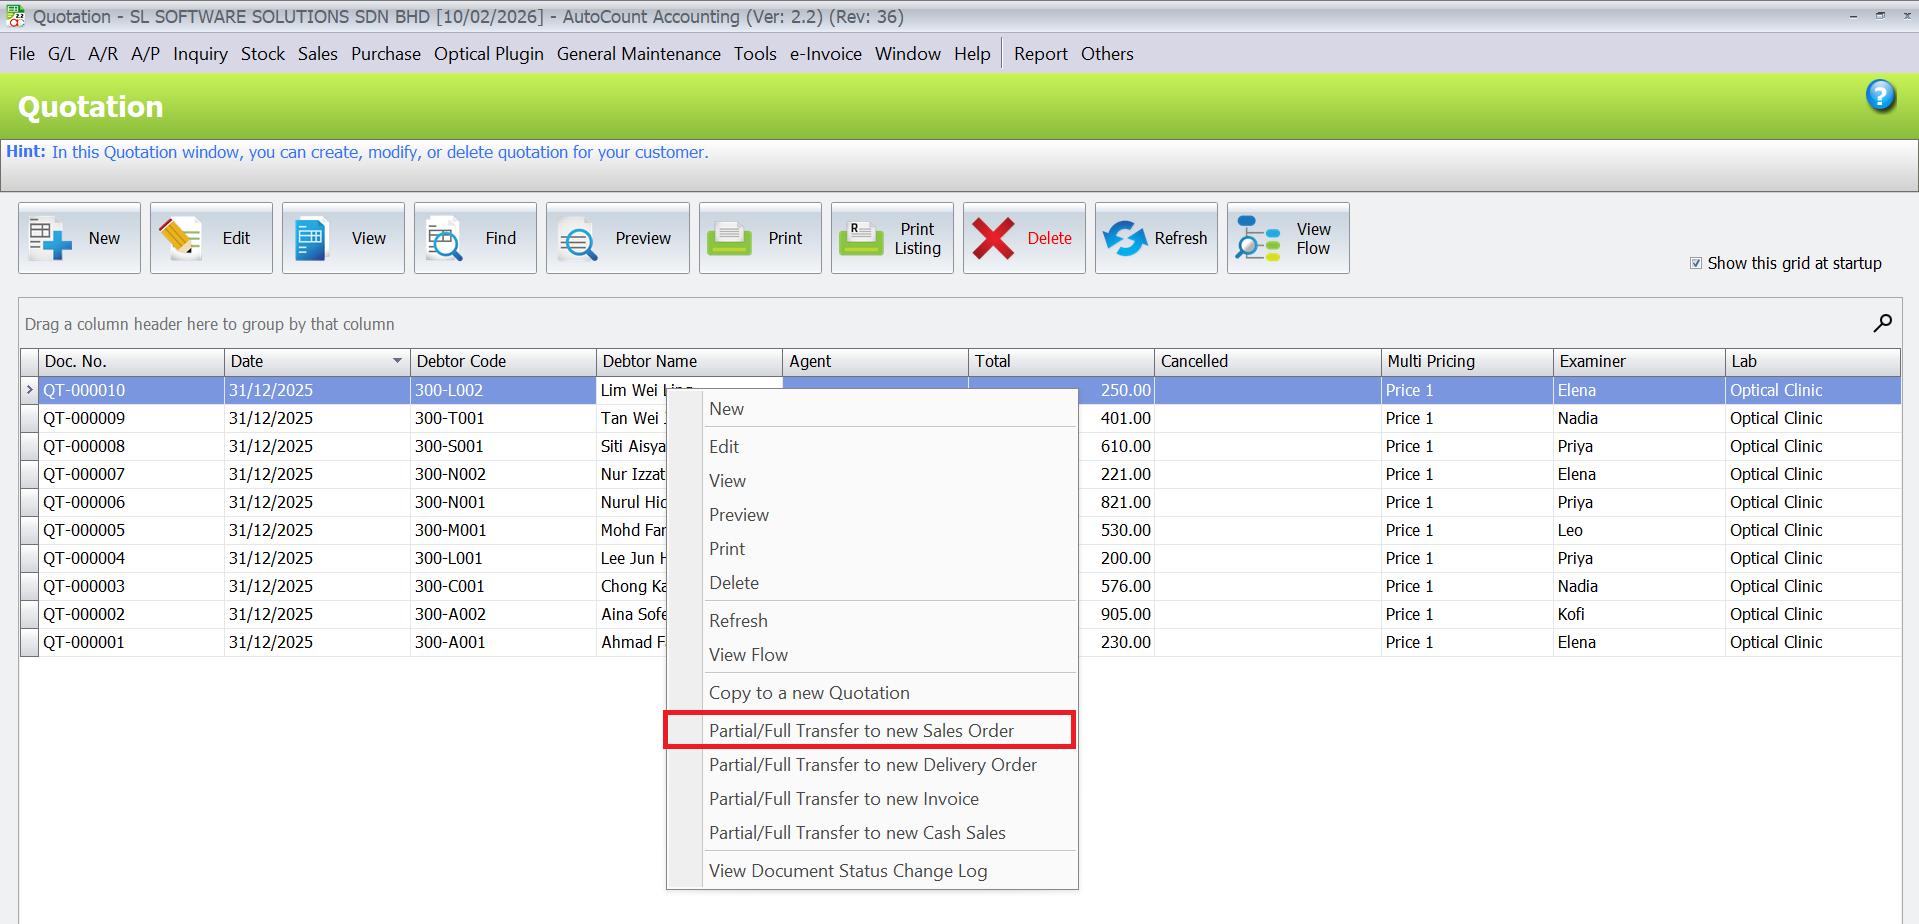
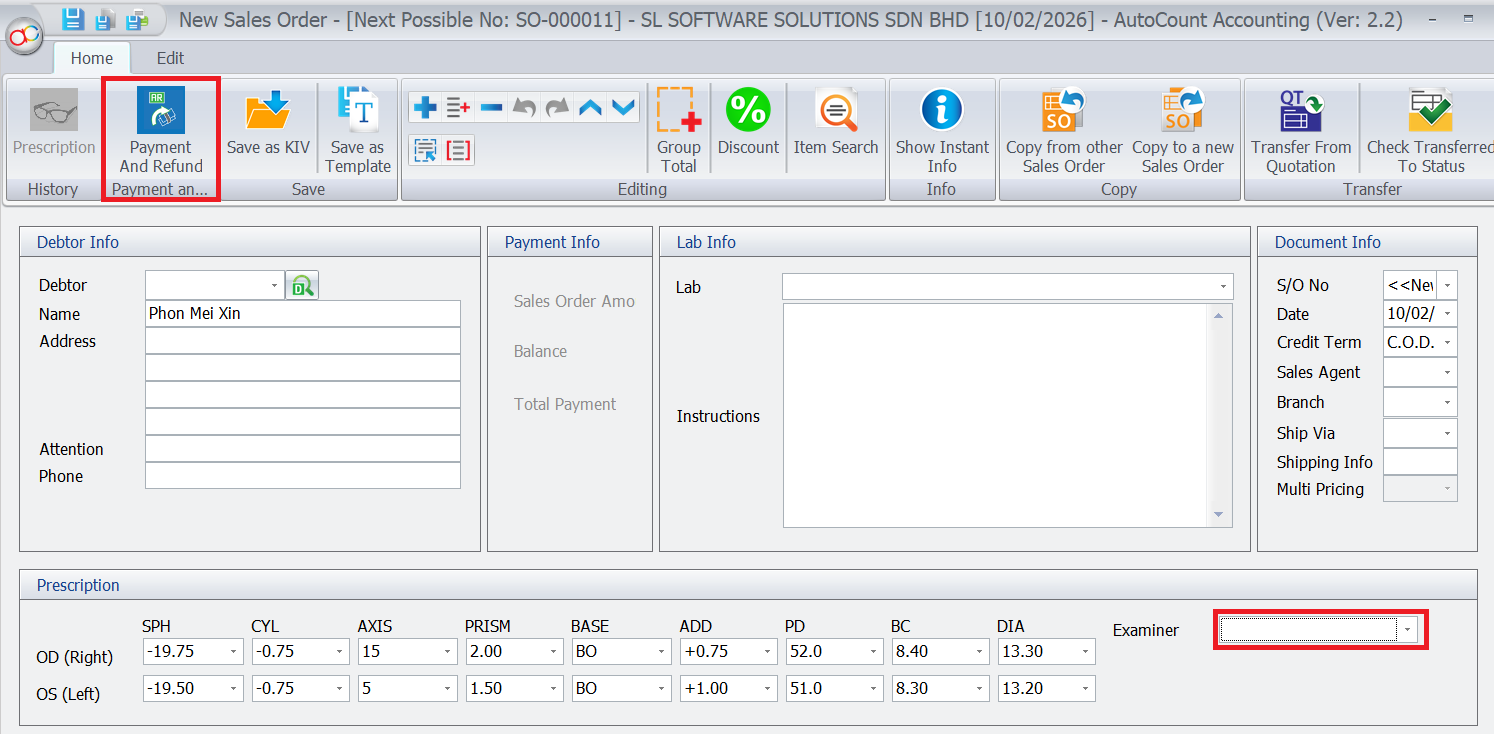
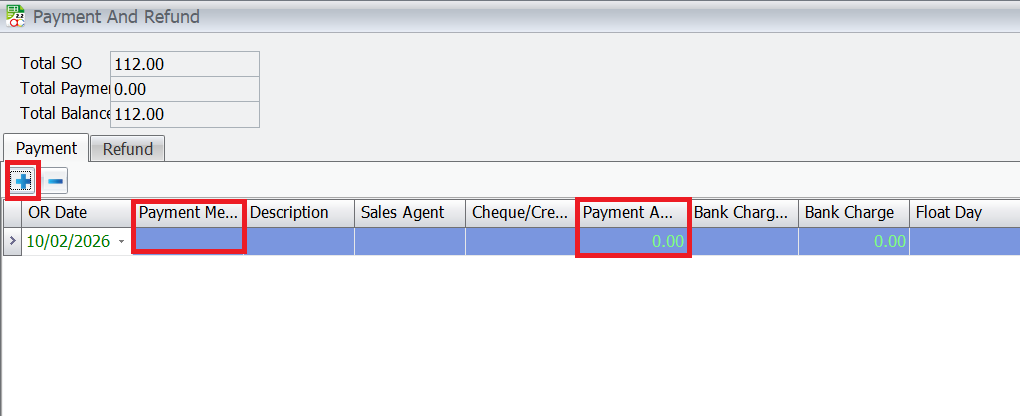
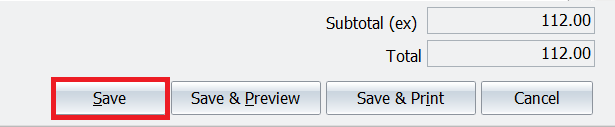
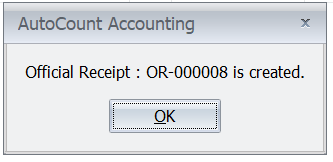
Once the quotation is ready, it can be transferred to a Sales Order. First, go to Sales and select “Sales Order.” Right-click the quotation and select “Transfer to new SO.” After that, select the examiner, then click on “Payment and Refund.” Click the “+” to add a new deposit, select the payment method, and fill in the payment amount. Finally, click the “Close” button and then “Save” to record the deposit payment.
Confirm the order and quickly record the customer’s upfront deposit payment.
- Go to Sales > Sales Order and select Transfer to new SO from your quotation.
- Select the correct Examiner for the order.
- Click on Payment and Refund, then click the “+” icon to add a new deposit.
- Select the payment method, fill in the amount, click Close, and hit Save.
5. Transfer to Invoice (IV)
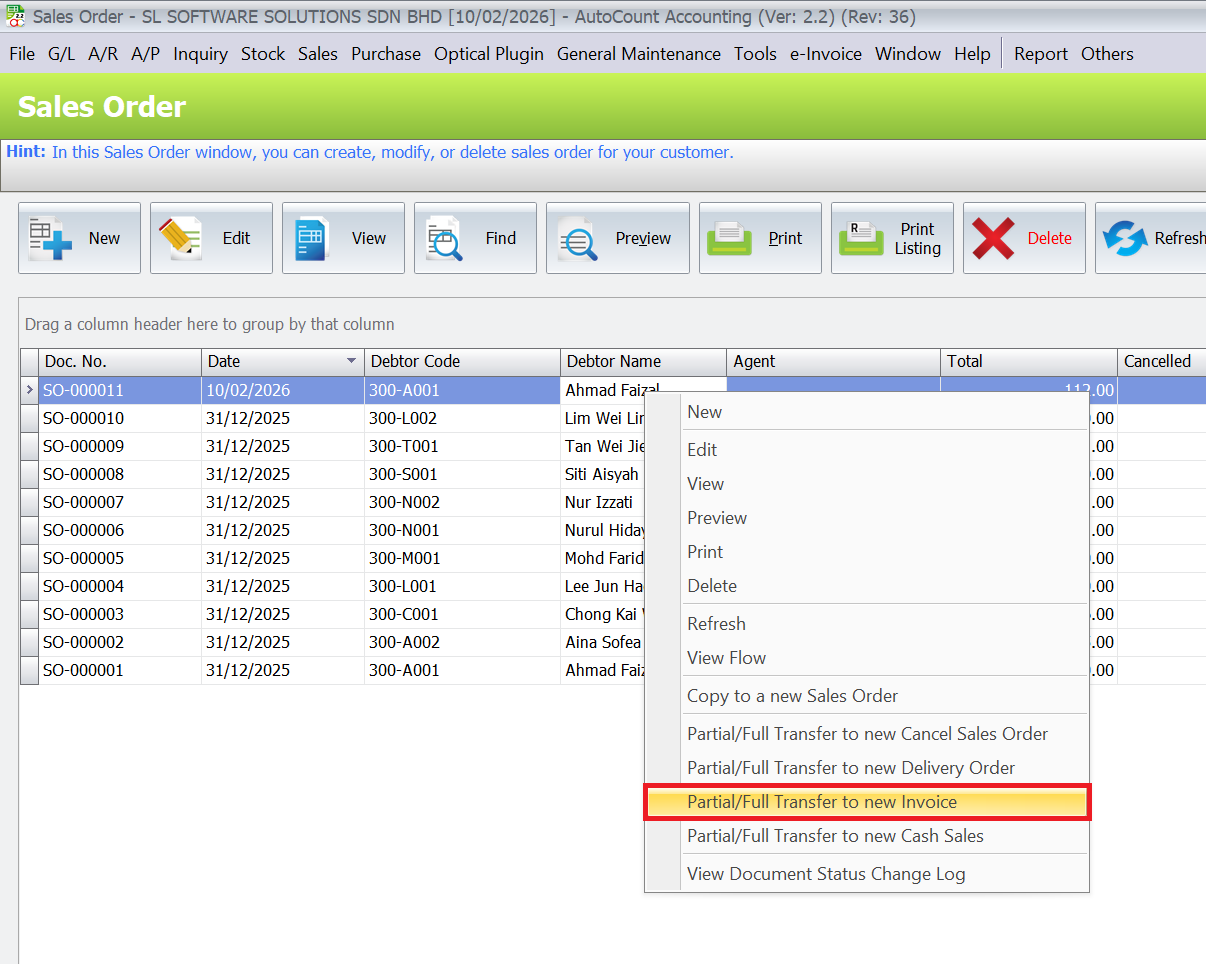
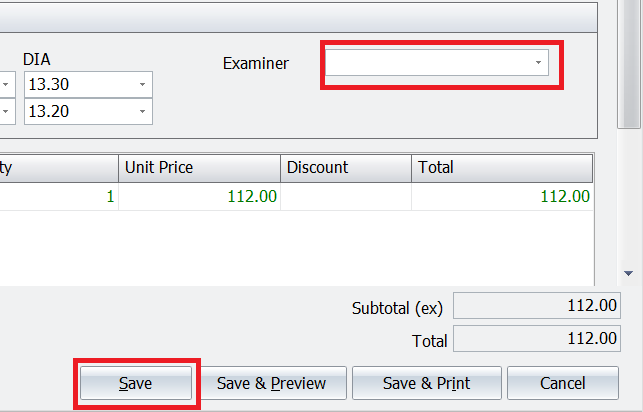
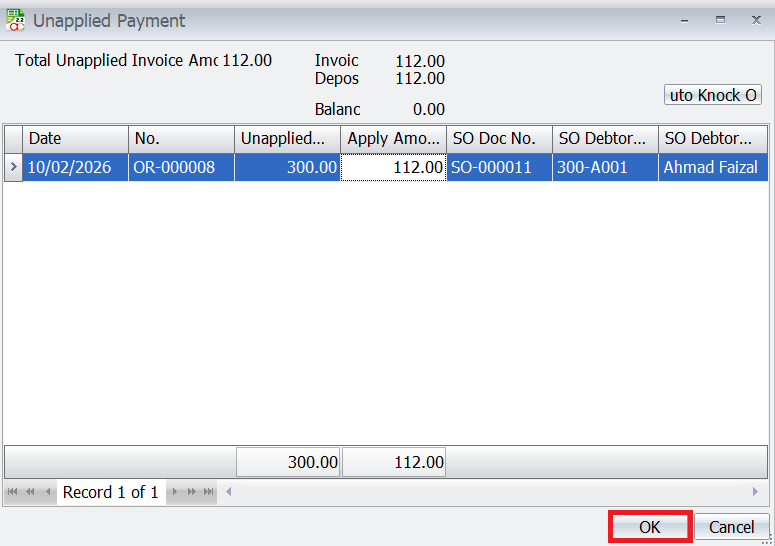
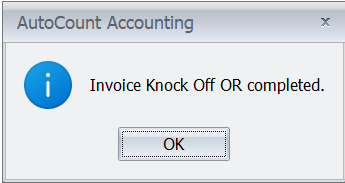
To transfer a quotation to an invoice, go to Sales and select “Sales Order.” Right-click the quotation and select “Partial/Full Transfer to New Invoice.” Then, select the examiner and click Save. An Unapplied Payment dialog box will appear—click OK to automatically apply the payment.
Finalize the sale and automatically apply the deposit to the final bill.
- Go to Sales > Invoice (or transfer directly from the Sales Order).
- Select Partial/Full Transfer to New Invoice.
- Select the Examiner and click Save.
- When the Unapplied Payment dialog box appears, simply click OK to automatically apply the deposit.
6. Check Daily Collection Report
Monitor your daily sales performance and cash collections easily.
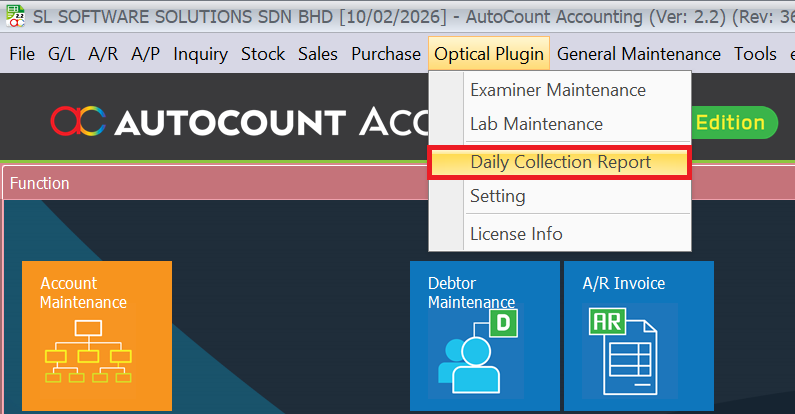
- Go to Optical Plugin > Daily Collection Report.
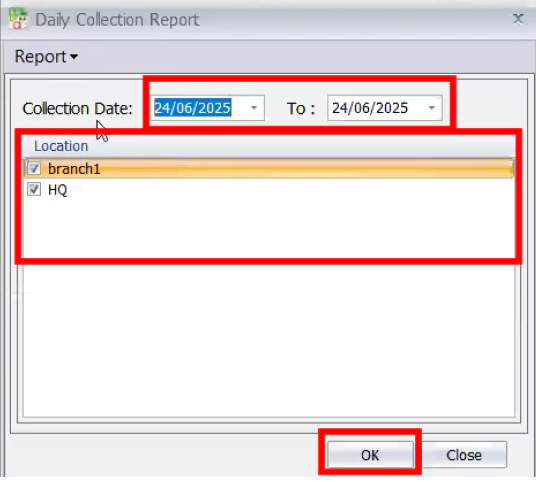
- Choose your desired Date Range and select the Branch.
- Click OK to view the report preview.
Core Benefits of the Optical Plugin
Increased Operational Efficiency
Automating tasks such as inventory management, customer records, and sales tracking saves valuable time, reducing manual work and errors.
Data-Driven Decision-Making
With real-time data on inventory, sales, and customer preferences, the plugin helps you make informed business decisions quickly, driving smarter strategies and growth.
Accurate Inventory Management
Real-time updates and automatic syncing ensure accurate stock levels, preventing stockouts and ensuring product availability when customers need it most.
Streamlined Financial Processes
Integration with AutoCount Accounting simplifies financial tracking, reporting, and reconciliation, giving you accurate financial data with less effort.
Conclusion
Frequently Asked Questions
Can AutoCount Optical Plugin handle customer eye examination data?
Yes, the plugin allows you to easily record and manage detailed customer eye examination data, including refractive power, pupil distance, and lens specifications.
Can I customize the settings for my optical shop?
Yes, the plugin offers fully customizable settings, allowing you to tailor features for inventory management, customer data, and more, based on your shop’s unique needs.
How does AutoCount Optical Plugin integrate with AutoCount Accounting?
The plugin integrates seamlessly with AutoCount Accounting, syncing sales data, inventory, and financial records to make accounting and reporting easier and more accurate.
Is AutoCount Optical Plugin suitable for multi-location optical shops?
Yes, the AutoCount Optical Plugin is scalable and can be used across multiple store locations, allowing centralized inventory and customer management.
Can AutoCount Optical Plugin manage deposits for customer orders?
Yes. The plugin supports deposit recording during the sales order process, helping optical shops track how much the customer has paid and the remaining balance before invoicing.
Interested in Getting AutoCount for your Business?
Contact our sales team today to explore pricing options and get started with the perfect solution for you.