
-
AutoCount Accounting Features
-
- Approval Workflow
- Audit Trail
- Auto Save in Draft Folder
- AutoCount Contra Account
- AutoCount Feature Stock Take
- AutoCount License Setting Guide
- Column Chooser
- Deposit Tracking & Management
- Documents Numbering Format
- Full Transfer and Partial Transfer
- Import Data to AutoCount Accounting Using Excel
- Informative Charts and Analytical Data
- Layout Customization
- Multi Pricing
- Sales and Services Tax
- Schedule Backup
- Search Lookup Edit
- View Documents Flow
- Show Remaining (3) Collapse
-
AutoCount Cloud Accounting
-
AutoCount E-Invoice
- AutoCount E-Invoicing Tutorial
- E-Invoice Guide and Preparation for AutoCount Users
- Employee Handbook Template for E-Invoicing
- How E-Invoice Works in AutoCount Accounting?
- How to Enable and Submit SVDP e-Invoices in AutoCount 2.0
- How to Use AutoCount Accounting for LHDN e-Invoice
- What is E-Invoicing?
-
AutoCount Payroll & HRMS
-
- Coming soon
-
- Coming soon
-
AutoCount Modules
-
- Activity Stream
- Advanced Financial Report
- Advanced Item
- Advanced Multi-UOM
- Advanced Quotation Module
- AutoCount Bonus Point Module User Guide
- AutoCount Scripting Module User Guide
- AutoCount Service Management Plugin User Guide
- AutoCount SST Hidden Functions
- AutoCount SST Submission - Service Tax
- Basic Multi-UOM
- Budget Module
- Consignment
- Filter By Salesman
- FOC Quantity
- Formula
- Item Batch
- Item Package
- Landing Cost
- Multi-Currency
- Multi-Dimensional Analysis
- Multi-Location
- Project Account
- Recurrence
- Remote Credit Control Module
- Stock Assembly
- User Defined Fields (UDF)
- Show Remaining (12) Collapse
-
AutoCount Plugins
-
- AutoCount Car Tint Film Plugin
- AutoCount Credit Memo Plugin User Guide
- AutoCount Easy Recurrence Plugin
- AutoCount Lock Price Plugin
- AutoCount Pick List Plugin User Guide
- AutoCount Production order
- AutoCount Progressive Billing
- Batch Update Unit Price Plugin
- DMS Import Plugin
- Fixed Assets Management
- Goldsmith
- TD Ordering Mobile Apps
- TD Stock Mobile Apps
- Universal Import Plugin
-
- AutoCount Advance Aging Format Plugin
- AutoCount Advance Deposit Plugin
- AutoCount Advanced Credit Term Plugin User Guide
- AutoCount Advanced Stock Assembly Plugin User Guide
- AutoCount Agent Validation Plugin User Guide
- AutoCount AutoBank Reconciliation Plugin User Guide
- AutoCount Barcode Generator Plugin User Guide
- AutoCount Batch Transfer SO DO Plugin
- AutoCount Bill Remark Plugin User Guide
- AutoCount Cage Management Plugin User Guide
- AutoCount Centralized Kitchen Management Plugin
- AutoCount Daily Collection Summary Plugin User Guide
- AutoCount Easy Batch Number Entry Plugin User Guide
- AutoCount Easy Deposit Plugin User Guide
- AutoCount Easy Knock Off Plugin
- AutoCount Easy Payment Plugin User Guide
- AutoCount Easy Photo 2.0 User Guide
- AutoCount Email & WhatsApp Plugin User Guide
- AutoCount Event Management System Plugin User Guide
- AutoCount Fruit Basket Plugin Guide
- AutoCount GridToExcel Plugin
- AutoCount Historical Outstanding DO Listing Plugin
- AutoCount IC Checker Plugin
- AutoCount Integrator Plugin
- AutoCount InterCompany Billing Plugin
- AutoCount Item Visibility Control Plugin User Guide
- AutoCount Migrator Plugin
- AutoCount MRP Order Plugin
- AutoCount Multi Company Knock Off Plugin
- AutoCount Optical Plugin
- AutoCount Pain Tracker Plugin User Guide
- AutoCount Payment Request Plugin
- AutoCount Procurement Planning Plugin User Guide
- AutoCount Project Department Visibility Control Plugin
- AutoCount Recurrence Late Interest Plugin
- AutoCount Recurring Invoice Plugin User Guide
- AutoCount Referral Management Plugin User Guide
- AutoCount Rental Management
- AutoCount RMA Plugin
- AutoCount Sales Commission Plugin
- AutoCount Scale Barcode Plugin User Guide
- AutoCount Service Contract Plugin User Guide
- AutoCount Shipment Plugin User Guide
- AutoCount Smart Analysis Plugin User Guide
- AutoCount Stock Availability Report Plugin
- AutoCount Timber Log Plugin User Guide
- AutoCount To-Do List Plugin User Guide
- AutoCount Tour Plugin User Guide
- AutoCount Vege Basket Plugin User Guide
- AutoCount Vehicle Master Plugin User Guide
- AutoCount Vehicle Plugin
- AutoCount Warranty 2.0 Plugin User Guide
- Batch Transfer SODO Plugin
- Intercompany Billing Plugin User Guide
- Lead Management 2.0 Plugin
- SL AutoCount API
- Show Remaining (41) Collapse
-
-
Form Template
-
Report Template
-
- Advance Quotation
- Cash Sale
- Consignment
- Consignment Movement
- Credit Note
- Debit Note
- Delivery Order
- FOC Quantity Analysis By Document Report
- Invoice
- Item Package Sales Report
- Monthly Sales Analysis
- Outstanding Sales Order Listing
- Profit And Loss Of Documents
- Quotation
- Sales Agent Contribution Report
- Sales Order
- Top/Bottom Sales Ranking
- Show Remaining (2) Collapse
-
- Available Stock Status Report
- Expired Item Batch Listing
- Inventory Physical Worksheet
- Stock Adjustment
- Stock Aging Report
- Stock Assembly
- Stock Assembly Order
- Stock Balance By Location
- Stock Balance Report
- Stock Card Report
- Stock Disassembly
- Stock Issue
- Stock Item Profit Margin
- Stock Movement Report
- Stock Receive
- Stock Take
- Stock Transfer
- Stock Write Off
- Show Remaining (3) Collapse
-
B2B ORDERING
-
AutoCount AI Agent
-
AutoCount FAQ & Troubleshooting
-
AutoCount F&B
-
- How to Accept or Reject QR Orders in AutoCount F&B POS
- How to Connect AutoCount POS Backend to QR Ordering Using an API Key
- How to Create a Restaurant in AutoCount QR Ordering Backend
- How to Customize AutoCount QR Ordering Customer View and Operating Hours
- How to Print and Test AutoCount F&B Table QR Codes
- How to Publish Menu Items to AutoCount F&B QR Ordering
- How to Set Up AutoCount F&B QR Ordering: Complete Guide
- How to Set Up Table QR Codes in AutoCount F&B
-
-
AutoCount Unicart Integration
- How Customer, Supplier and Order Field Mapping Works
- How Does a SiteGiant iSKU Map to an AutoCount Item Code?
- How Does the System Check Duplicate iSKU Mapping?
- How Is the Stock Sync Quantity Calculated?
- How Shipping, Discounts, Vouchers and Marketplace Charges Post to AutoCount?
- How Should a New AutoCount Item and SiteGiant iSKU Be Created?
- How SiteGiant Members and Bonus Points Sync with AutoCount POS
- How SiteGiant Orders Sync to AutoCount: Manual or Automatic
- How SiteGiant Purchase Flow Posts to AutoCount GRN
- How to Auto Sync AutoCount Price & Cost to SiteGiant Inventory
- How to Choose the Stock Master in SiteGiant and AutoCount
- How to Connect SiteGiant ERP to AutoCount and Confirm the Connection
- How to Handle Cancelled, Returned or Refunded Online Orders?
- How to Handle Fulfilled by Shopee Stock in AutoCount
- How to Handle SiteGiant Bundle / KIT Items
- How to Map Different UOMs for the Same Item?
- How to Reconcile Marketplace Settlements Using Bulk Knock Off
- How to Set the Posting Rules for Each Sales Channel
- How to Sync Stock from AutoCount to SiteGiant: Manual or Automatic
- Show Remaining (4) Collapse
AutoCount Event Management System Plugin User Guide
Follow the workflows below to maintain calendar types, create events, configure reminders and recurrence, send WhatsApp notifications, and synchronise Google Calendar.
On this page
AutoCount Event Management System Plugin video guide
Watch the available English and Chinese video guides, then follow the written workflows below for the complete sequence.
English video guide
Chinese video guide
Calendar Type Maintenance
One of the standout features of the AutoCount Event Management System Plugin is its Calendar Type Maintenance function. This feature enables users to create and customize different calendar types based on their unique requirements.
1. Creating Custom Calendar Types
Navigate to Event > Calendar Type Maintenance to create various calendar types. You can create categories like “Work Appointments,” “Client Meetings,” or “Personal Tasks.” Make sure to assign clear and descriptive names to each calendar type for better organization and clarity.
Define the categories you’ll use to group events.
Create Calendar Categories:
- Go to Event > Calendar Type Maintenance. Create names like “Work Appointments,” “Client Meetings,” or “Personal Tasks.”
Assign clear names so your team can pick the right type every time.

2. Assigning Colors for Better Visibility
Use distinct colors to categorize each calendar type. For example, assign blue for “Work Appointments,” green for “Client Meetings,” and yellow for “Personal Tasks.” This visual distinction makes it easier to quickly identify and manage events at a glance.
- Assign Colors for Visibility: Pick distinct colors (e.g., blue for internal events, green for client meetings) so events are easy to spot.

Pro Tip:
Use colors consistently (e.g., all customer-facing events in one color) so your calendar tells a story at a glance.
Event Entry
Managing individual appointments is seamless with the Event Entry System.
1. Creating and Managing Appointments
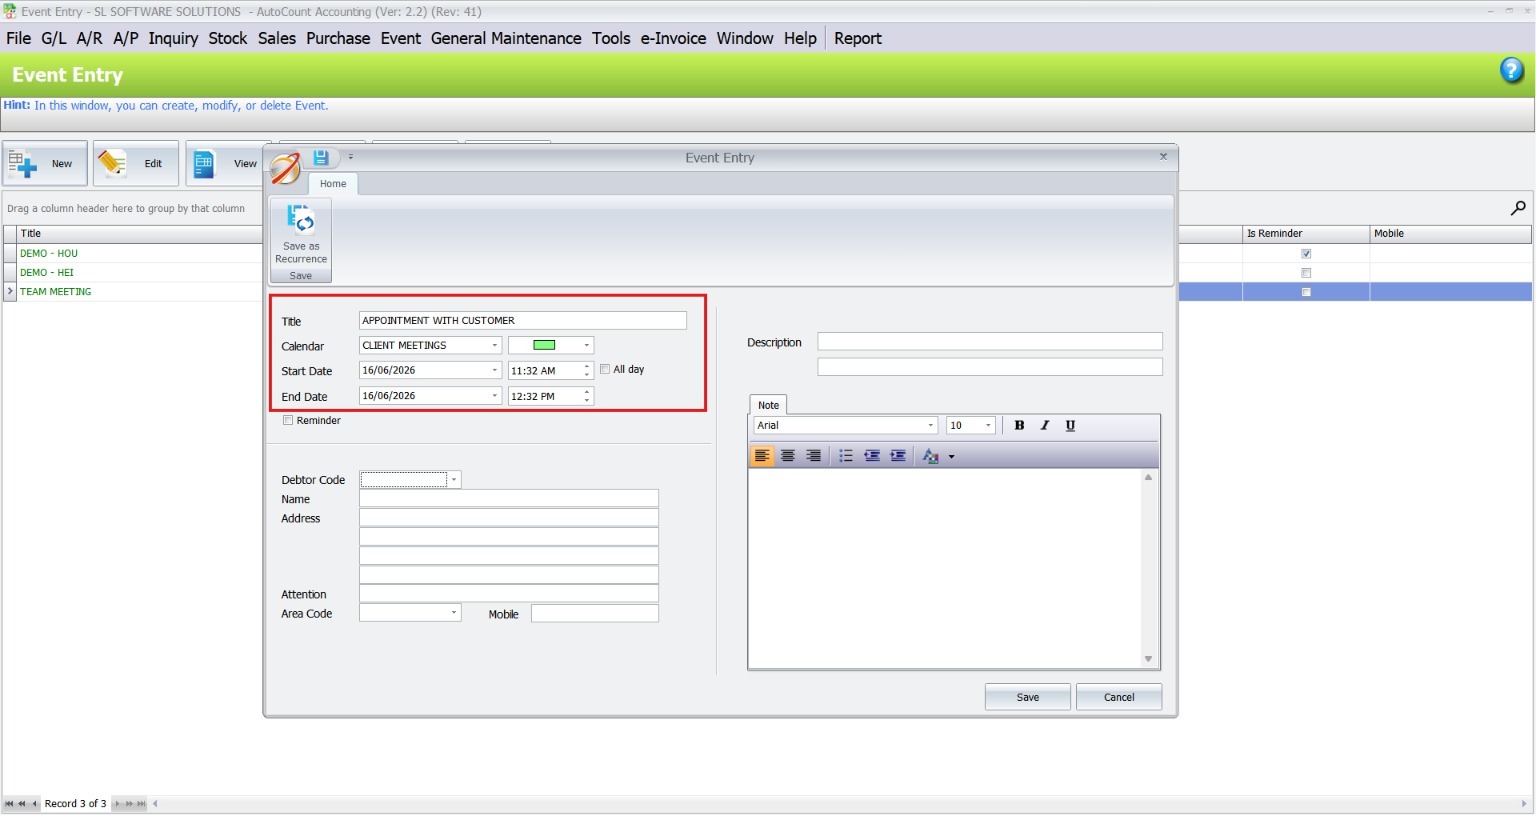
Go to Event > Event Entry to add new schedules. Enter key details such as the event name, calendar type, and time. Assign a specific color to the event to ensure it’s categorized correctly and easily identifiable.
Schedule specific events, appointments, or tasks.
Open Event Entry:
- Go to Event > Event Entry and click New to add a schedule.
Fill in Event Details:
- Event Name
- Calendar Type
- Date / Time
- Color for quick identification
2. Adding Remarks and Client Details
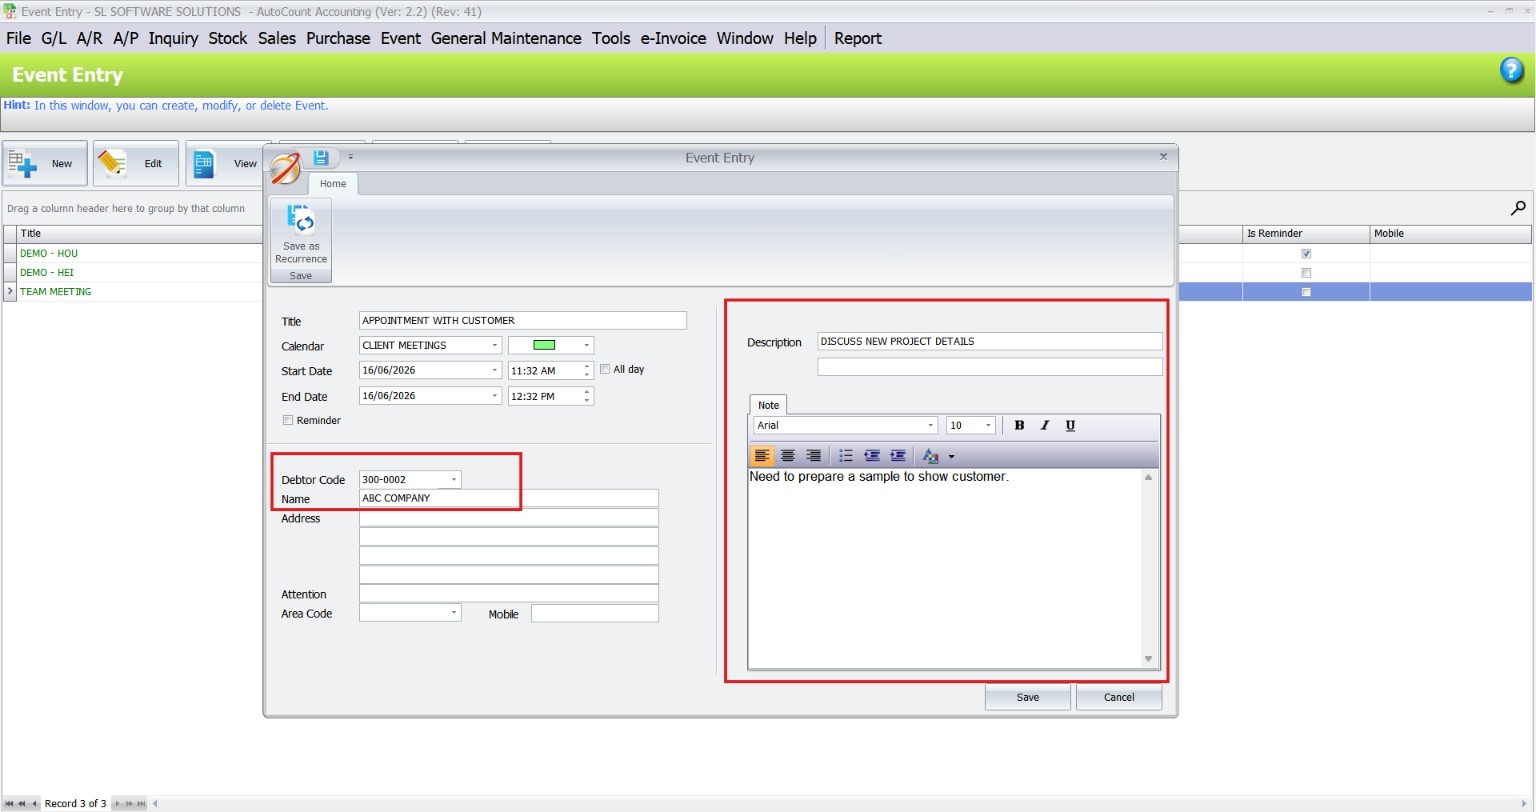
In the Debtor Code field, select the client associated with the event. You can also add remarks or additional notes about the appointment, such as meeting objectives or required materials. Once all details are entered, save the entry to have it reflected in the main calendar.
- Add Client Details & Notes: In Debtor Code, select the customer (if applicable). Add remarks like goals, location, or notes about materials needed.
Pro Tip:
Include a phone number or reference in remarks — this helps when including WhatsApp notifications or follow-ups.
Reminder Notifications
Staying ahead of tasks is easy with the plugin’s built-in Reminder Notification System.
1. Setting Timely Alerts
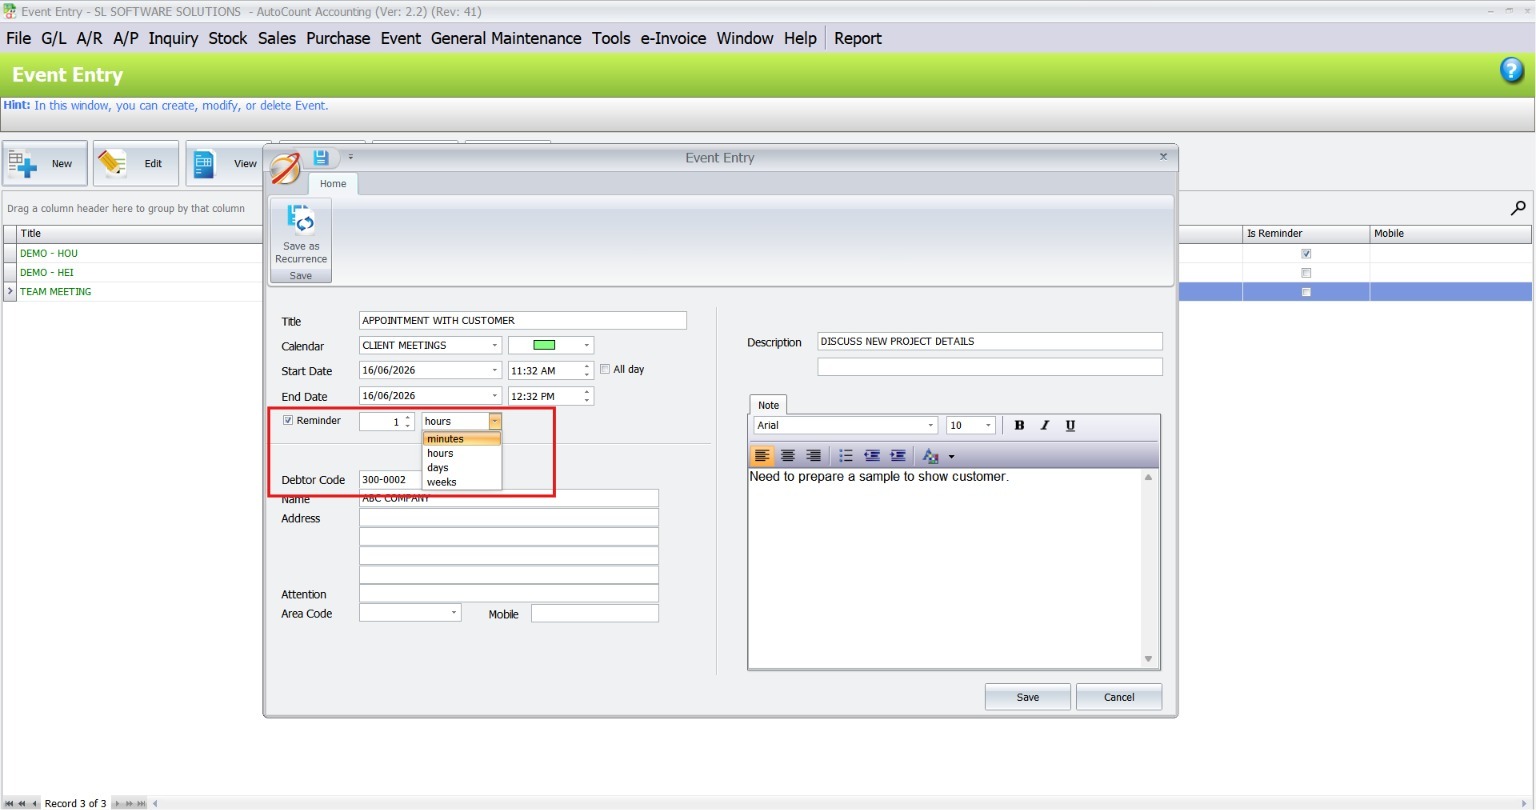
For each appointment, you can enable a reminder by editing the event and selecting the Reminder checkbox. Choose the preferred notification time frame, such as minutes, hours, days, or weeks before the event, to ensure timely reminders.
Keep your team ahead of time so tasks aren’t forgotten.
- Enable Reminder Alerts: Edit an event and tick Reminder. Choose when you want alerted — minutes, hours, days, or weeks before.
2. Managing Reminders Effectively
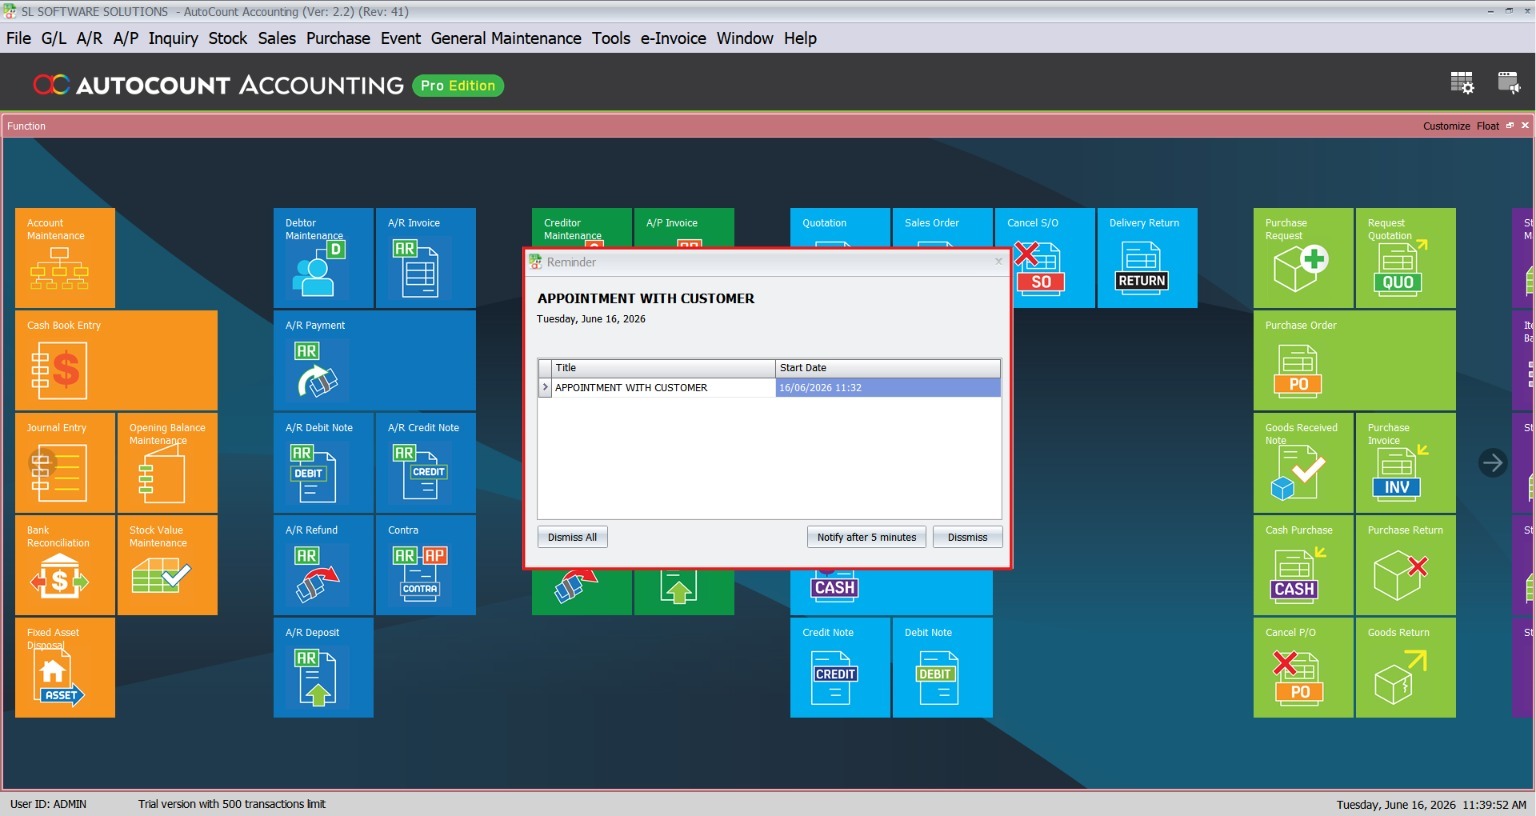
When the reminder window appears, you can dismiss it by clicking Dismiss All or Dismiss. If you’d like to postpone the reminder, select Notify After 5 Minutes to delay it for a more convenient time.
- Manage Reminders: When a reminder pops up, click Dismiss All / Dismiss to clear, or choose Notify After 5 Minutes to delay.
Pro Tip:
For customer appointments, set reminders a few hours before so you can check materials or confirm travel time
Recurrence Settings
The Recurrence Feature is ideal for automating repetitive schedules, such as weekly meetings or monthly reviews.
1. Automating Regular Schedules
Edit an event and select Save as Recurrence to enable this feature. You can then configure the recurrence intervals, choosing from daily, weekly, monthly, or annually, depending on your needs.
Ideal for repeat schedules like weekly meetings or monthly check-ins.
- Enable Recurrence: Open an event and select Save as Recurrence.
- Set Interval: Choose how often it repeats — daily, weekly, monthly, or annually
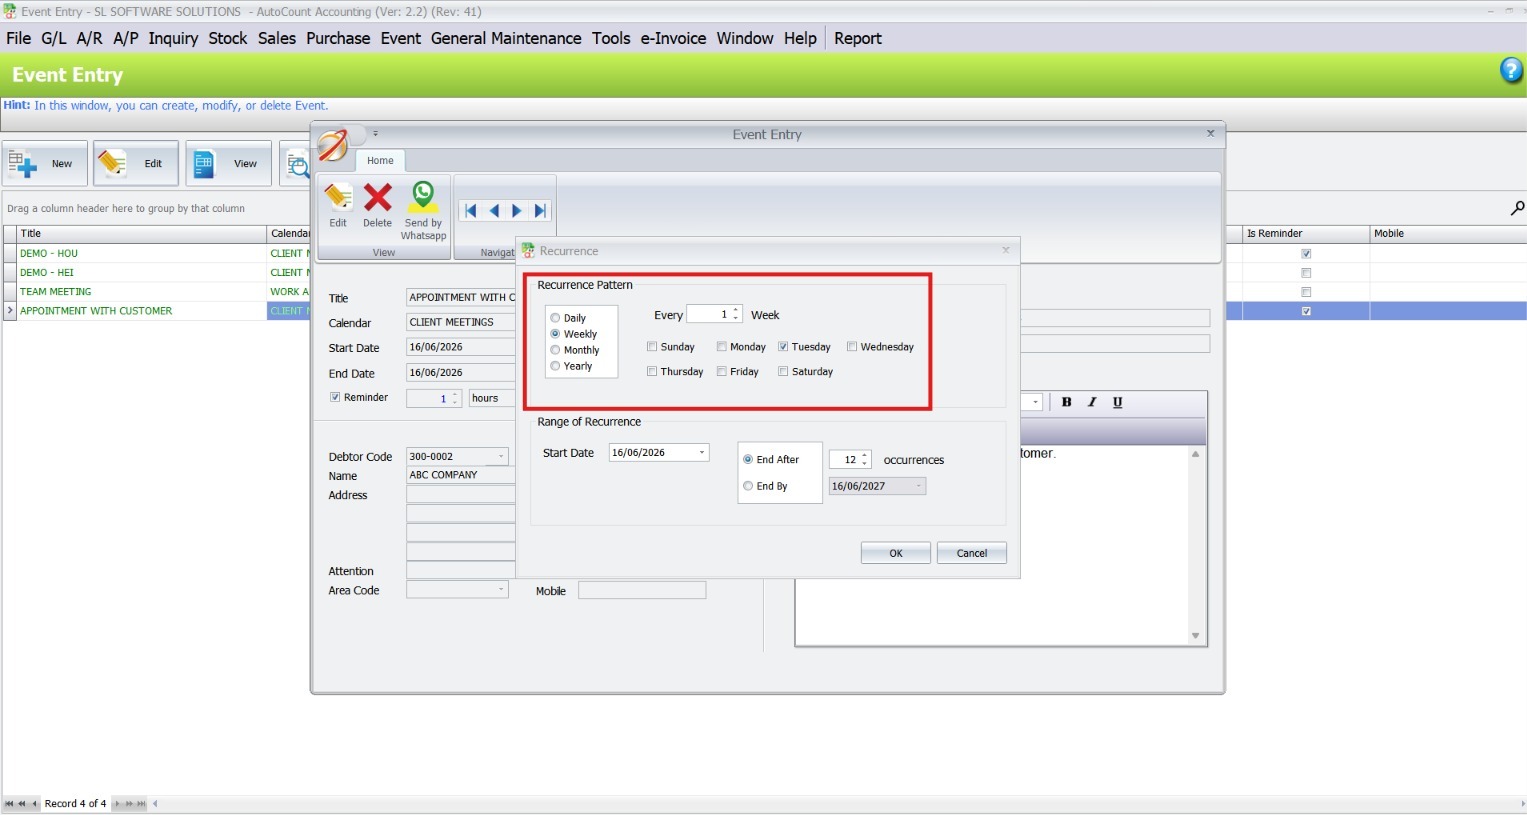
2. Configuring Start and End Dates
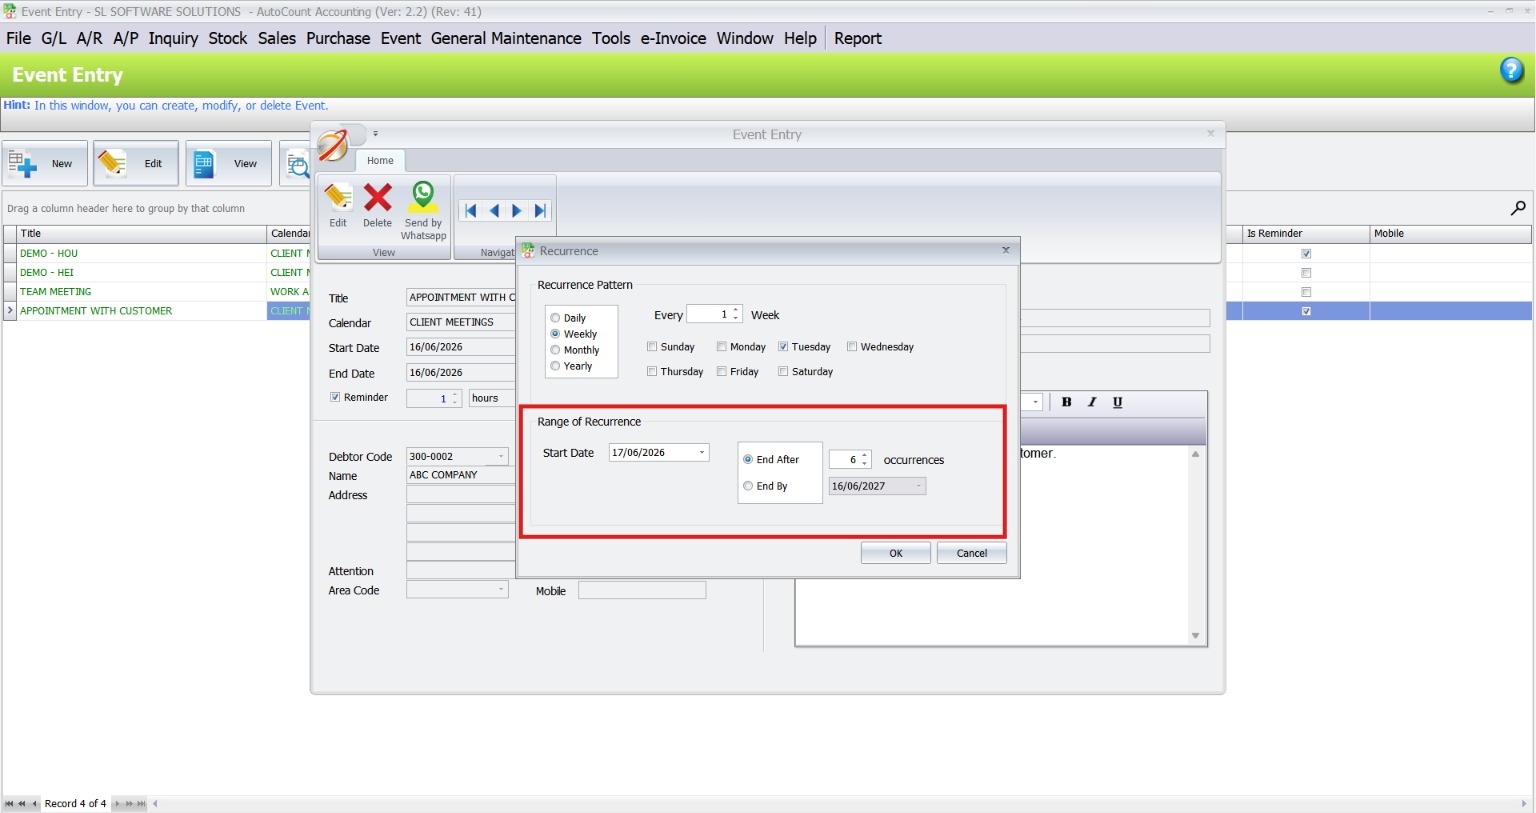
Define the recurrence’s start and end dates to align with your scheduling needs. For example, you can set a recurring meeting every Monday for the next six weeks.
- Define Start & End: Select the dates where the recurring pattern begins and ends.
Pro Tip:
Use this for things like “Weekly Staff Sync” or “Monthly Billing Review” so you don’t create the same event manually each time.
WhatsApp Notification Integration
The plugin’s WhatsApp Notification Integration is a unique feature that simplifies client communication.
1. Sending Appointment Confirmations
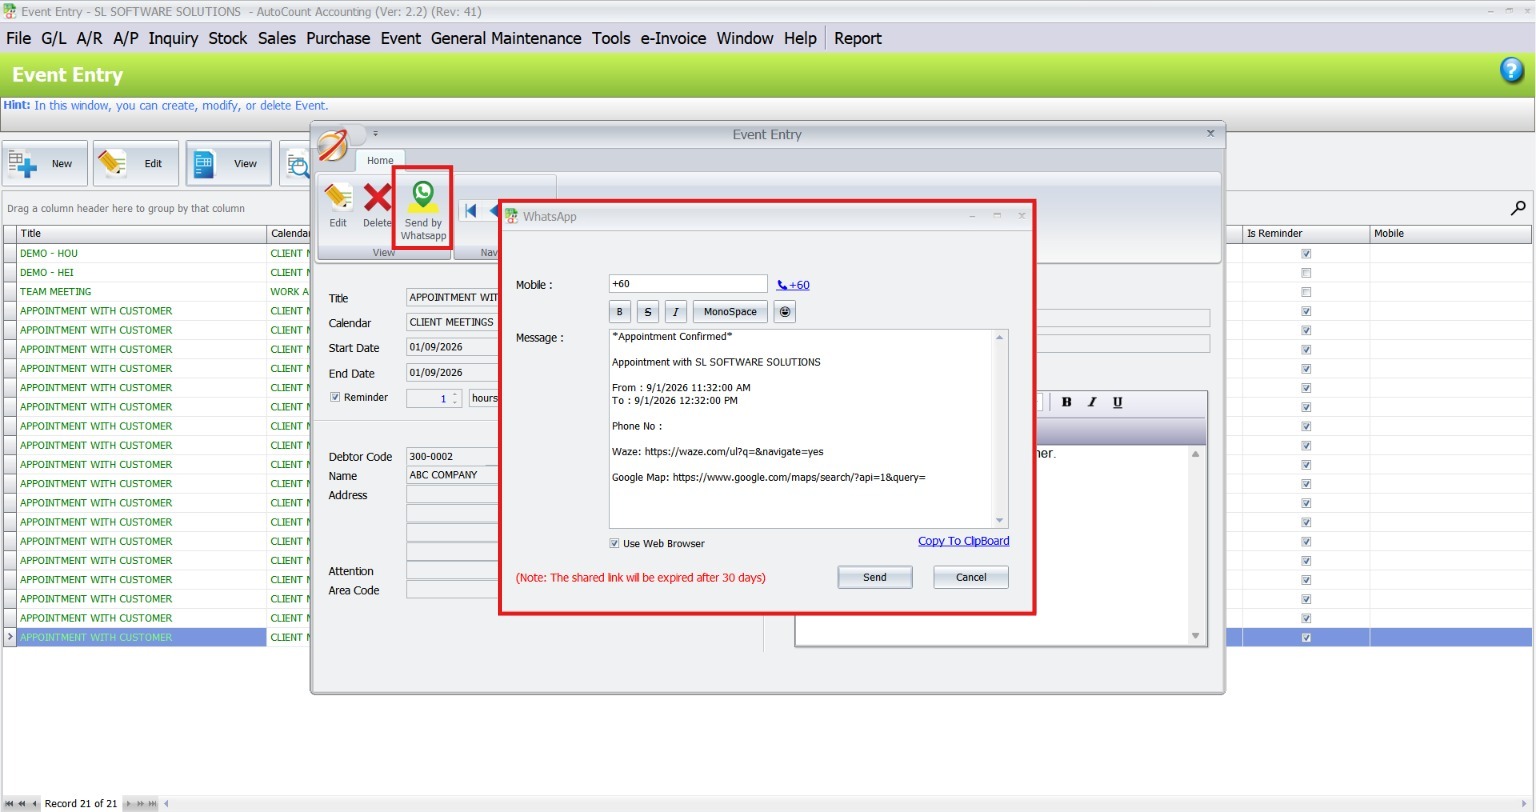
Select the desired appointment and click View > Send by WhatsApp. Enter the client’s phone number and send the notification with a single click. Use this feature to remind clients about upcoming meetings or confirm their attendance. This helps reduce no-shows and ensures clear communication between both parties.
This feature helps reduce missed appointments.
- Select an Event: Choose the appointment you want to notify about.
- Send via WhatsApp: Click View > Send by WhatsApp, confirm or enter the client’s phone number, and send.
Pro Tip:
Use WhatsApp notifications to confirm bookings or remind customers the day before — this cuts down no-shows.
Calendar View Options
The AutoCount Event Management System Plugin offers flexible Calendar View Options to cater to different user preferences.
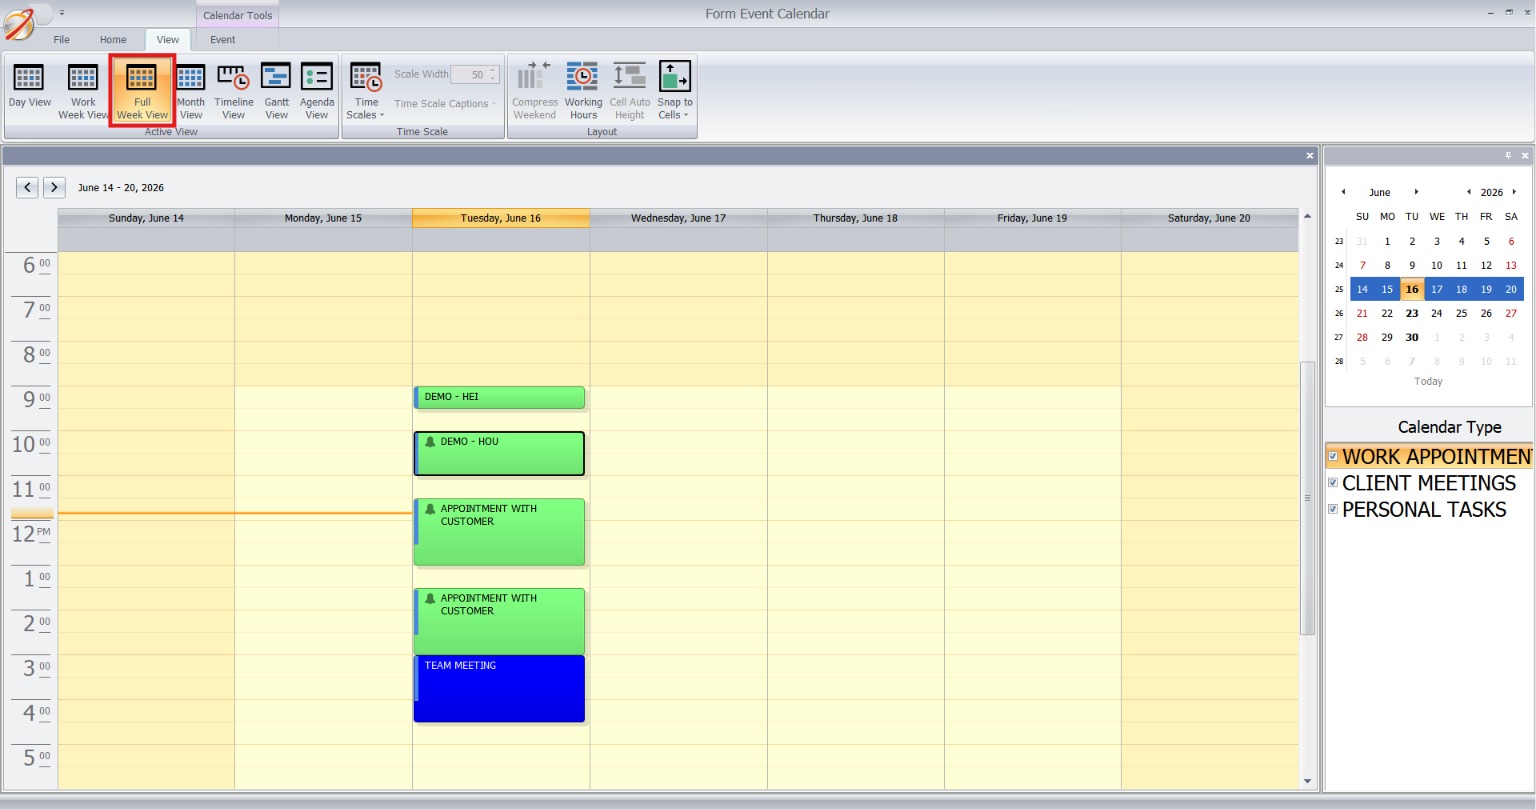
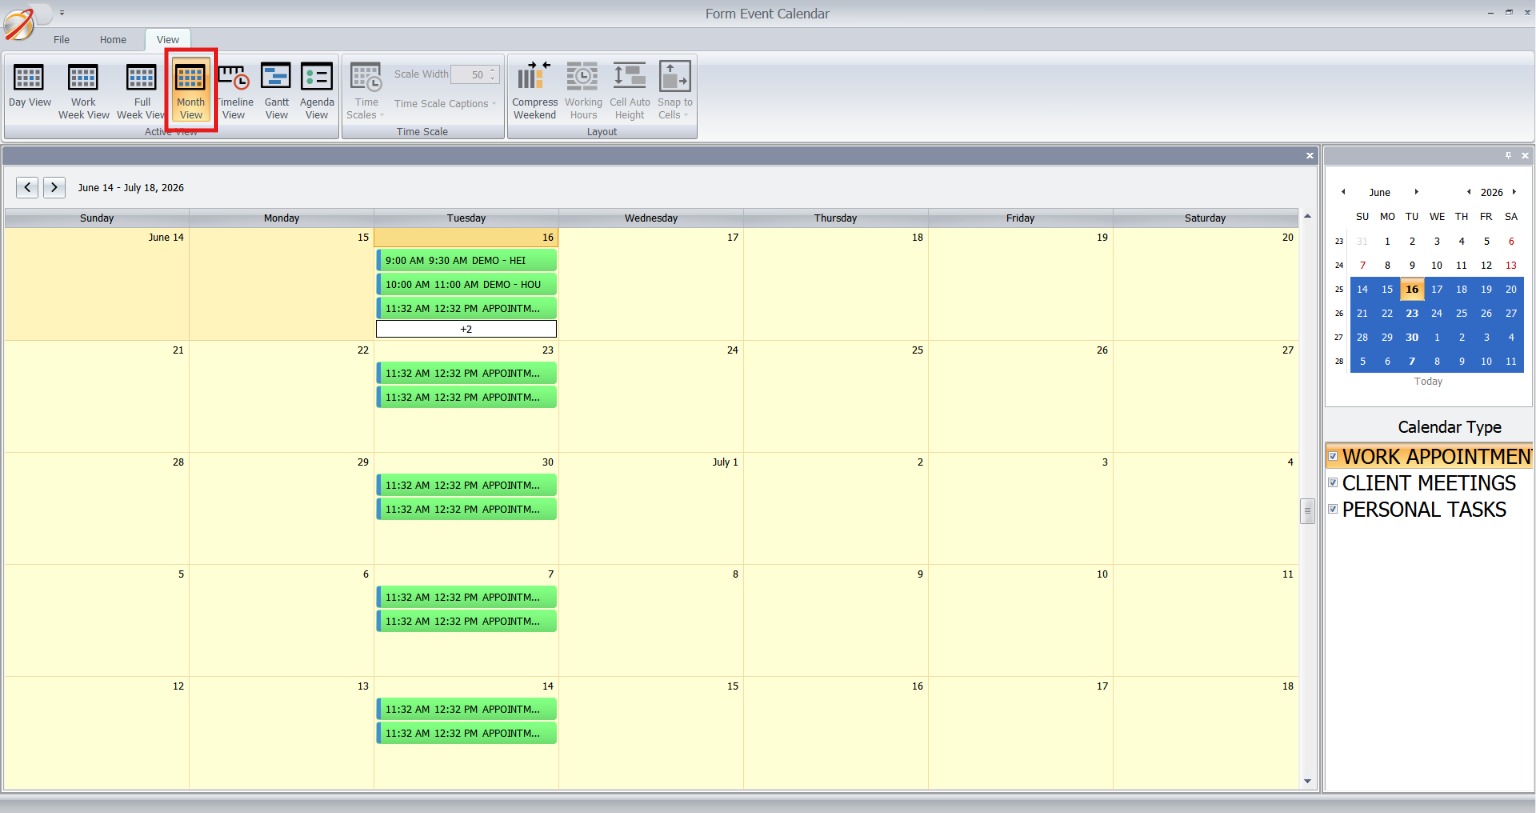
1. Day, Week, and Month Previews
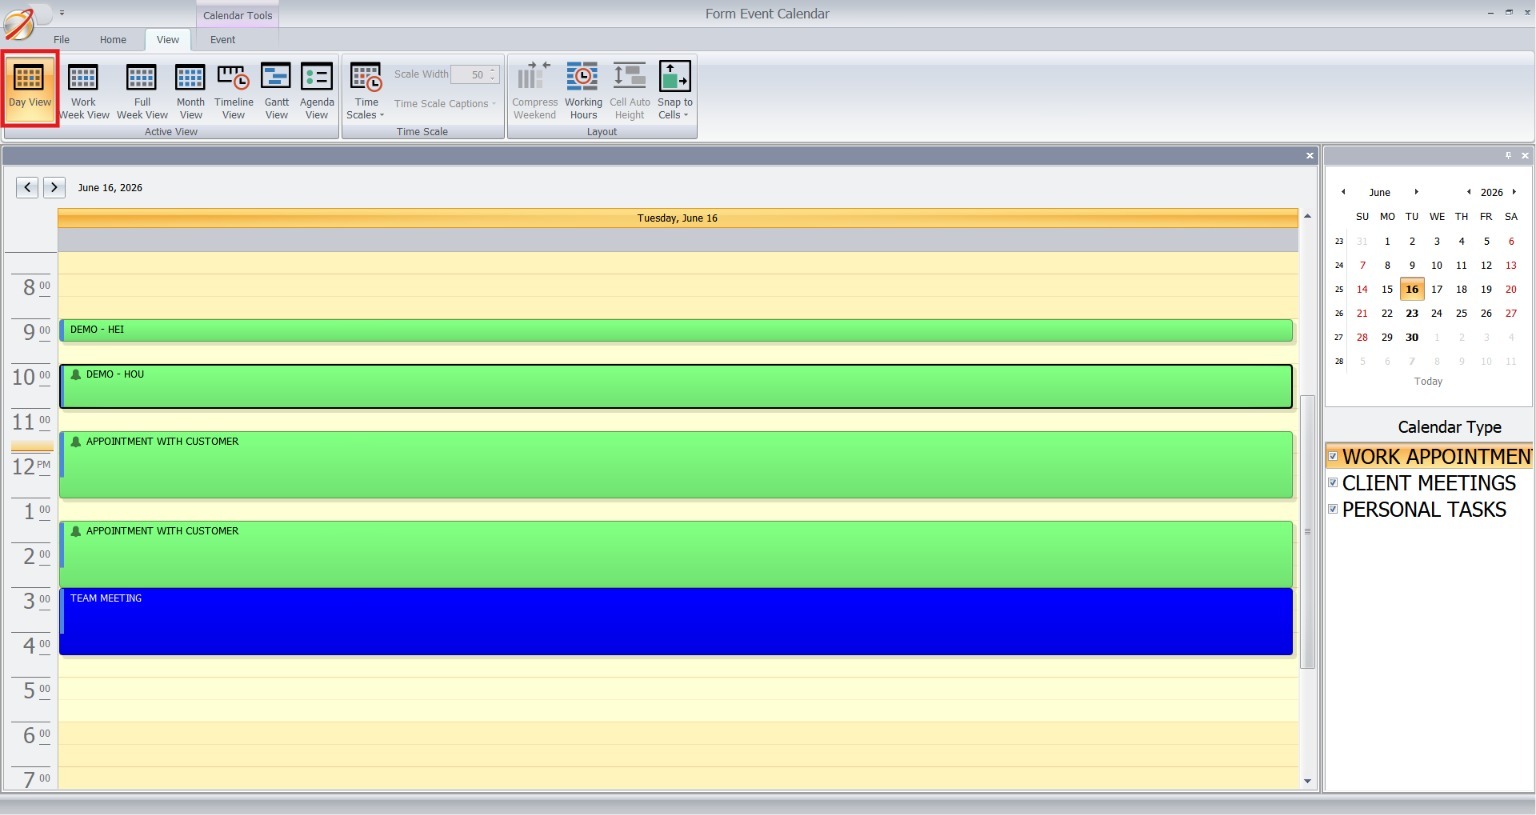
Switch between daily, weekly, and monthly views to suit your needs. Use the Day View for a detailed breakdown of events or the Month View for a broader perspective of your schedule.
View your schedule in ways that make your planning easier.
- Day View: Focused look at detailed timelines.
- Week View: Balanced view to plan blocks of tasks.
- Month View: Big-picture perspective for long-term planning.
2. Creating and Editing Events Directly from Calendar
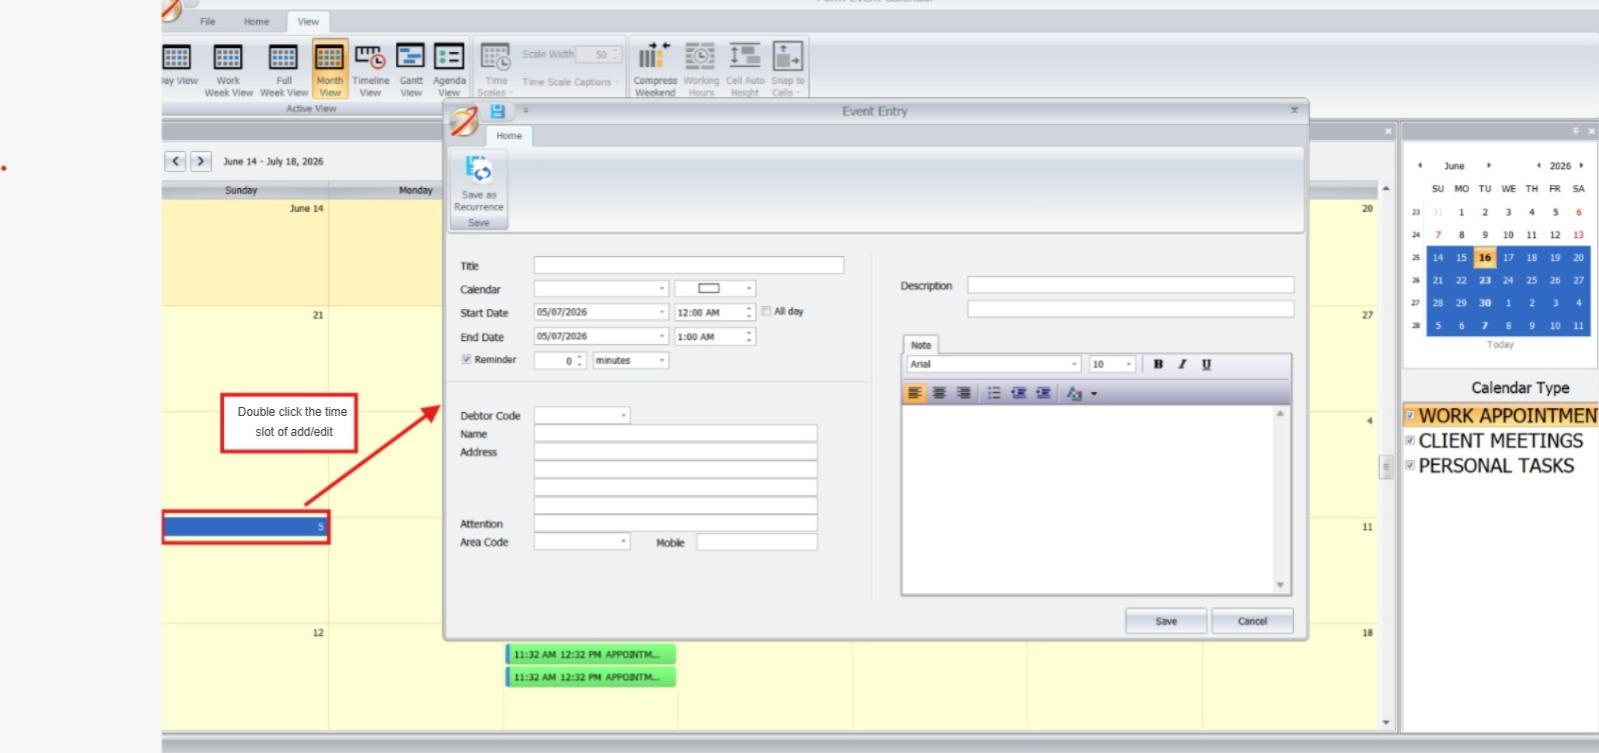
Double-click any time slot on the calendar to quickly add or modify events. This feature simplifies making last-minute changes and ensures your schedule stays up-to-date.
- Edit Directly From Calendar: Double-click any time slot to add or modify events without opening a separate screen.
Google Calendar Integration
The Google Calendar Sync feature helps keep AutoCount events connected with Google Calendar, making it easier for users to manage appointments, meetings, and reminders in one place.
1. Enabling Google Calendar Sync
Ideal for businesses that want AutoCount appointments to appear in Google Calendar automatically.
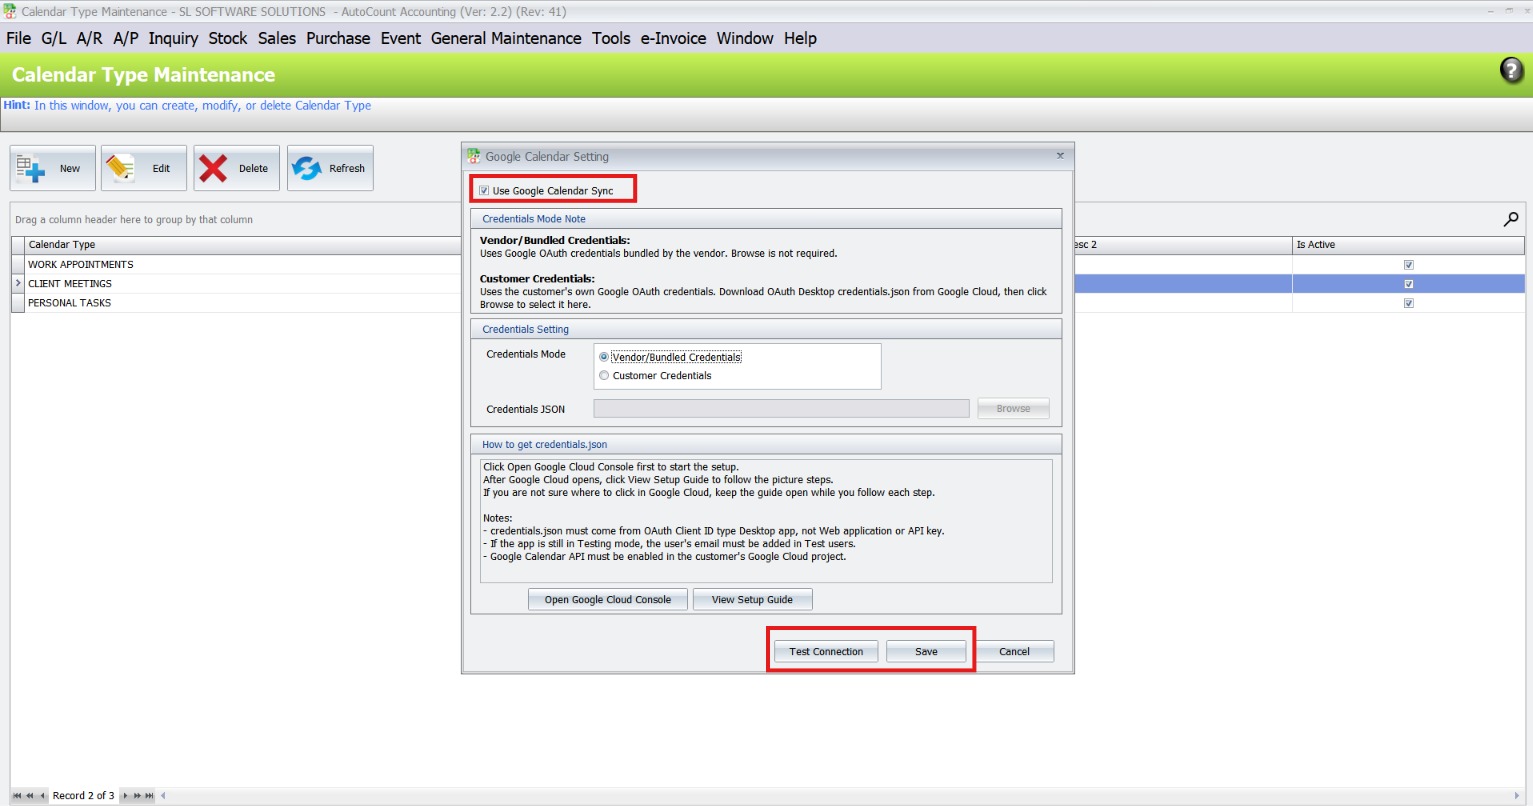
- Enable Sync: Google Calendar Setting : Tick Use Google Calendar Sync
- Test & Save: Click Test Connection to verify the setup, then click Save to activate syncing.
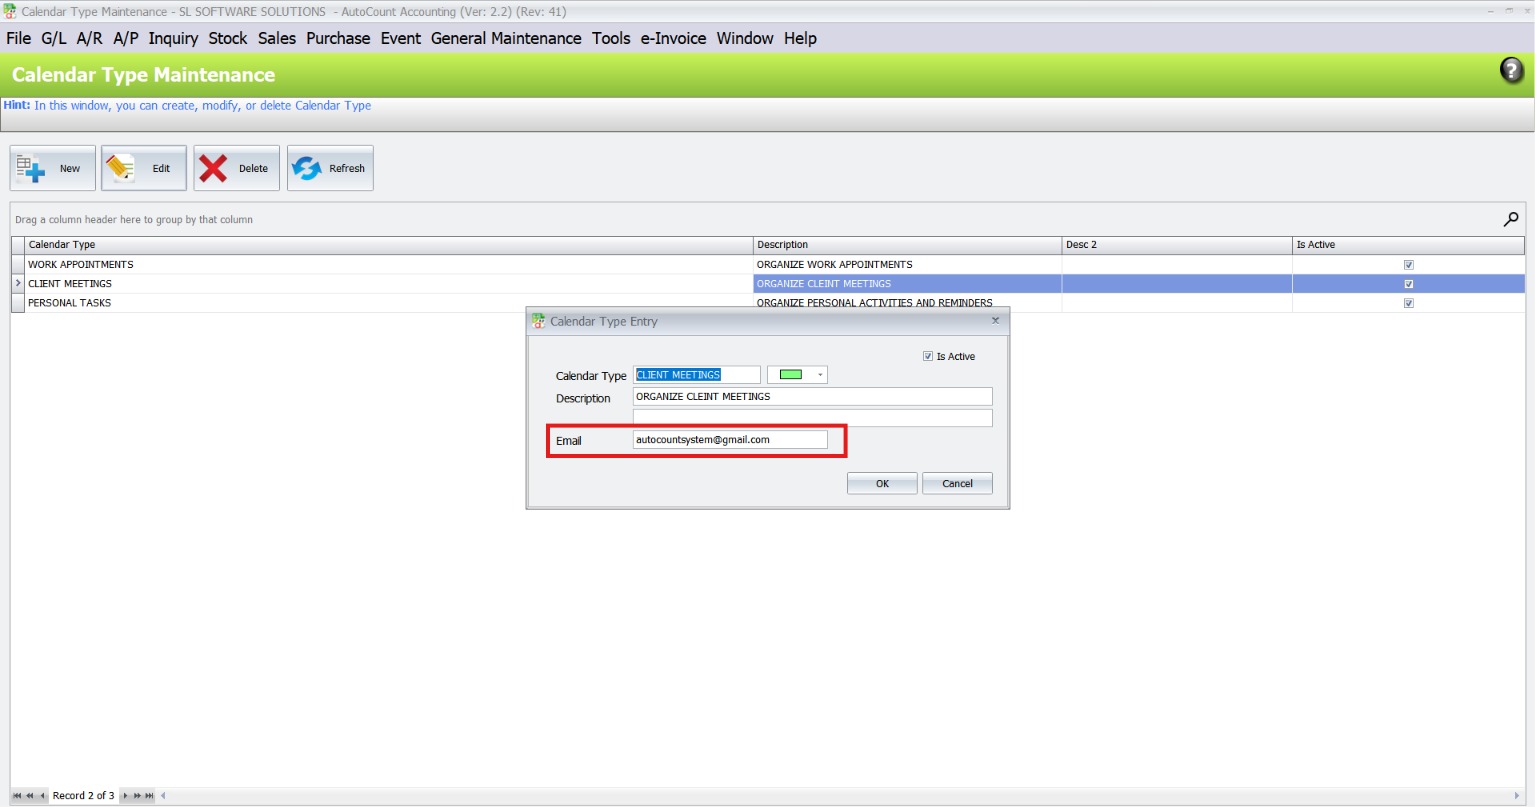
2. Setting Calendar Type Email
- Select Calendar Type: Choose Calendar Type you want to sync calendar with.
- Enter Email Address: Add the email and save settings
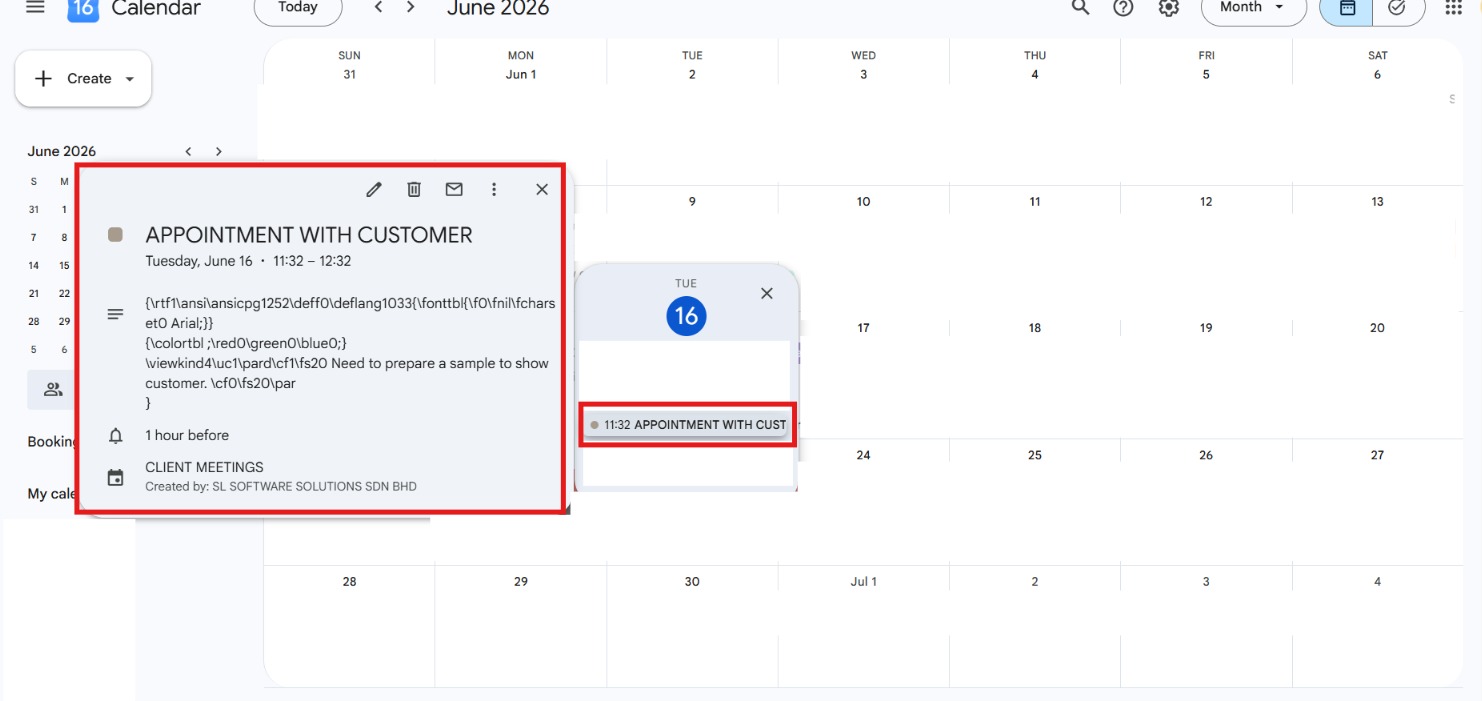
3. View Synced Events in Google Calendar
- Synced Appointment Details: Event title, date, time, reminder, and calendar type are shown in Google Calendar.
- Easy Schedule Tracking: Users can view upcoming appointments from Google Calendar without opening AutoCount.
Frequently asked questions
What is the cost of the plugin?
The cost depends on your subscription plan with AutoCount. Contact support for detailed pricing.
Can reminders be customized?
Yes, reminders can be set to notify minutes, hours, or even days in advance.
How secure is the plugin?
The plugin integrates with AutoCount’s secure infrastructure, ensuring data protection.
Does it support integrations beyond WhatsApp?
Currently, WhatsApp is the primary notification feature, but future updates may expand integrations.
Can multiple users access the same calendar?
Yes, the plugin supports multi-user access for collaborative event management.
Is it suitable for large enterprises?
While designed for businesses of all sizes, the plugin excels in small to medium enterprises.
Related resources and technical support
Continue exploring AutoCount or get assistance with the steps in this guide.
Browse the Knowledge Base
Find practical instructions for other AutoCount functions, modules and plugins.
TECHNICAL SUPPORT
Need help with Event Management System Plugin?
Send the details below so our team can understand the issue and review the relevant workflow.
Have these details ready
- AutoCount and Event Management System Plugin versions
- Function or screen being used
- Relevant document number
- Exact error message
Before sharing a screenshot: hide customer, financial and personal details.