-
AutoCount Accounting Features
-
- Approval Workflow
- Audit Trail
- Auto Save in Draft Folder
- AutoCount Contra Account
- AutoCount License Setting Guide
- Deposit Tracking & Management
- Documents Numbering Format
- Full Transfer and Partial Transfer
- Import Data to AutoCount Accounting Using Excel
- Informative Charts and Analytical Data
- Layout Customization
- Multi Pricing
- Sales and Services Tax
- Schedule Backup
- Search Lookup Edit
- View Documents Flow
- AutoCount Feature Stock Take
- Column Chooser
- Show Remaining (3) Collapse
-
AutoCount Cloud Accounting
-
AutoCount E-Invoice
-
AutoCount HRMS User Guide
-
AutoCount Modules
-
- Activity Stream
- Advanced Financial Report
- Advanced Item
- Advanced Multi-UOM
- Advanced Quotation Module
- Basic Multi-UOM
- Budget Module
- Consignment
- Filter By Salesman
- FOC Quantity
- Formula
- Item Batch
- Item Package
- Landing Cost
- Multi-Currency
- Multi-Dimensional Analysis
- Multi-Location
- Project Account
- Recurrence
- Remote Credit Control Module
- Stock Assembly
- User Defined Fields (UDF)
- AutoCount SST Hidden Functions
- AutoCount SST Submission - Service Tax
- AutoCount Scripting Module User Guide
- AutoCount Bonus Point Module User Guide
- Show Remaining (11) Collapse
-
AutoCount Plugins
-
- Fixed Assets Management
- Goldsmith
- TD Ordering Mobile Apps
- TD Stock Mobile Apps
- Universal Import Plugin
- DMS Import Plugin
- AutoCount Item Visibility Control
- AutoCount Easy Knock Off Plugin
- AutoCount Pick List Plugin User Guide
- AutoCount Agent Validation Plugin User Guide
- AutoCount Barcode Generator Plugin User Guide
- AutoCount Bill Remark Plugin User Guide
- AutoCount Easy Batch Number Entry Plugin User Guide
- AutoCount Recurring Invoice Plugin User Guide
- AutoCount Easy Photo 2.0 User Guide
- AutoCount Pain Tracker User Guide
- AutoCount Credit Memo Plugin User Guide
- AutoCount Daily Collection Summary Plugin
- AutoCount Lock Price Plugin
- Show Remaining (4) Collapse
-
- AutoCount Easy Recurrence Plugin
- AutoCount Recurring Billing Plugin
- Event Management System
- AutoCount To-Do List Plugin
- AutoCount AutoBank Reconciliation Plugin
- Intercompany Billing Plugin User Guide
- AutoCount Basket Plugin User Guide
- Lead Management 2.0 Plugin
- AutoCount Service Contract Plugin User Guide
- Autocount Repacking Plugin
- AutoCount Scale Barcode Plugin User Guide
- AutoCount Progressive Billing
- AutoCount Optical Plugin
- AutoCount Meter Reading Plugin User Guide
- AutoCount Car Tint Film Plugin
- AutoCount Leasing Plugin User Guide
- AutoCount Integrator Plugin
- AutoCount Procurement Planning Plugin
- Cage Management Plugin
- AutoCount Service Management Plugin User Guide
- AutoCount Vehicle Plugin
- Show Remaining (6) Collapse
-
-
Form Template
-
Report Template
-
- Advance Quotation
- Cash Sale
- Consignment
- Consignment Movement
- Credit Note
- Debit Note
- Delivery Order
- FOC Quantity Analysis By Document Report
- Invoice
- Item Package Sales Report
- Monthly Sales Analysis
- Outstanding Sales Order Listing
- Profit And Loss Of Documents
- Quotation
- Sales Agent Contribution Report
- Sales Order
- Top/Bottom Sales Ranking
- Show Remaining (2) Collapse
-
- Available Stock Status Report
- Expired Item Batch Listing
- Inventory Physical Worksheet
- Stock Adjustment
- Stock Aging Report
- Stock Assembly
- Stock Assembly Order
- Stock Balance By Location
- Stock Balance Report
- Stock Card Report
- Stock Disassembly
- Stock Issue
- Stock Item Profit Margin
- Stock Movement Report
- Stock Receive
- Stock Take
- Stock Transfer
- Stock Write Off
- Show Remaining (3) Collapse
AutoCount Service Management Plugin User Guide
What Is AutoCount Service Management Plugin?
The AutoCount Service Management Plugin is designed to streamline your service-related workflows. It helps businesses manage customer service requests, track service performance, automate tasks, and integrate seamlessly with other AutoCount modules to enhance overall operations.
AutoCount Service Management plugin Video Guide (CN)
Why Use AutoCount Service Management Plugin?
This plugin helps your business work smarter by speeding up repetitive service tasks and reducing the need for manual data entry. By automating workflows like service tracking, job scheduling, and status updates, it cuts down on errors that often happen when staff enter information by hand. This means teams spend less time on administrative work and more time actually completing service jobs, leading to fewer mistakes, faster turnaround, and better overall accuracy in your service records.
Key Features of AutoCount Service Management Plugin
Technician Code Management
Call Type Categorization
Problem Code Diagnostics
Solution Code Repository
Seamless Integration with Event Plugin
Service Note and Billing Tracking
Who Should Use AutoCount Service Management Plugin?
Repair & Maintenance Services
Electrical repair shops, aircon servicing, or computer repair centers. Log the customer's complaint, assign the correct technician, track the cost of replacement parts, and generate the final invoice—all from one screen.
Healthcare Equipment Providers
Hospitals and labs renting or servicing ventilators and diagnostic machines. Track calibration schedules, log recurring error codes, and ensure biomedical engineers are dispatched on time.
Software & IT Support
Managed service providers (MSPs) handling client IT issues. While the To-Do List handles internal tasks, the Service Plugin manages external client tickets with specific solution codes for common network fixes.
Retail & Warranty Handling
Electronics retailers managing product returns and repairs. Use Call Types to distinguish between "1-to-1 Exchange" and "Vendor Repair," ensuring customers get the correct resolution without delay.
Field Service Operations
Water filter installation or elevator maintenance teams. Schedule appointments via the Event Plugin, assign technician codes, and track chargeable travel fees under the Charges Item tab.
How to Set Up AutoCount Service Management Plugin
1. Set Up Your Master Data
Before you start creating and tracking service jobs, you need to build the key master records that the system will use every day:
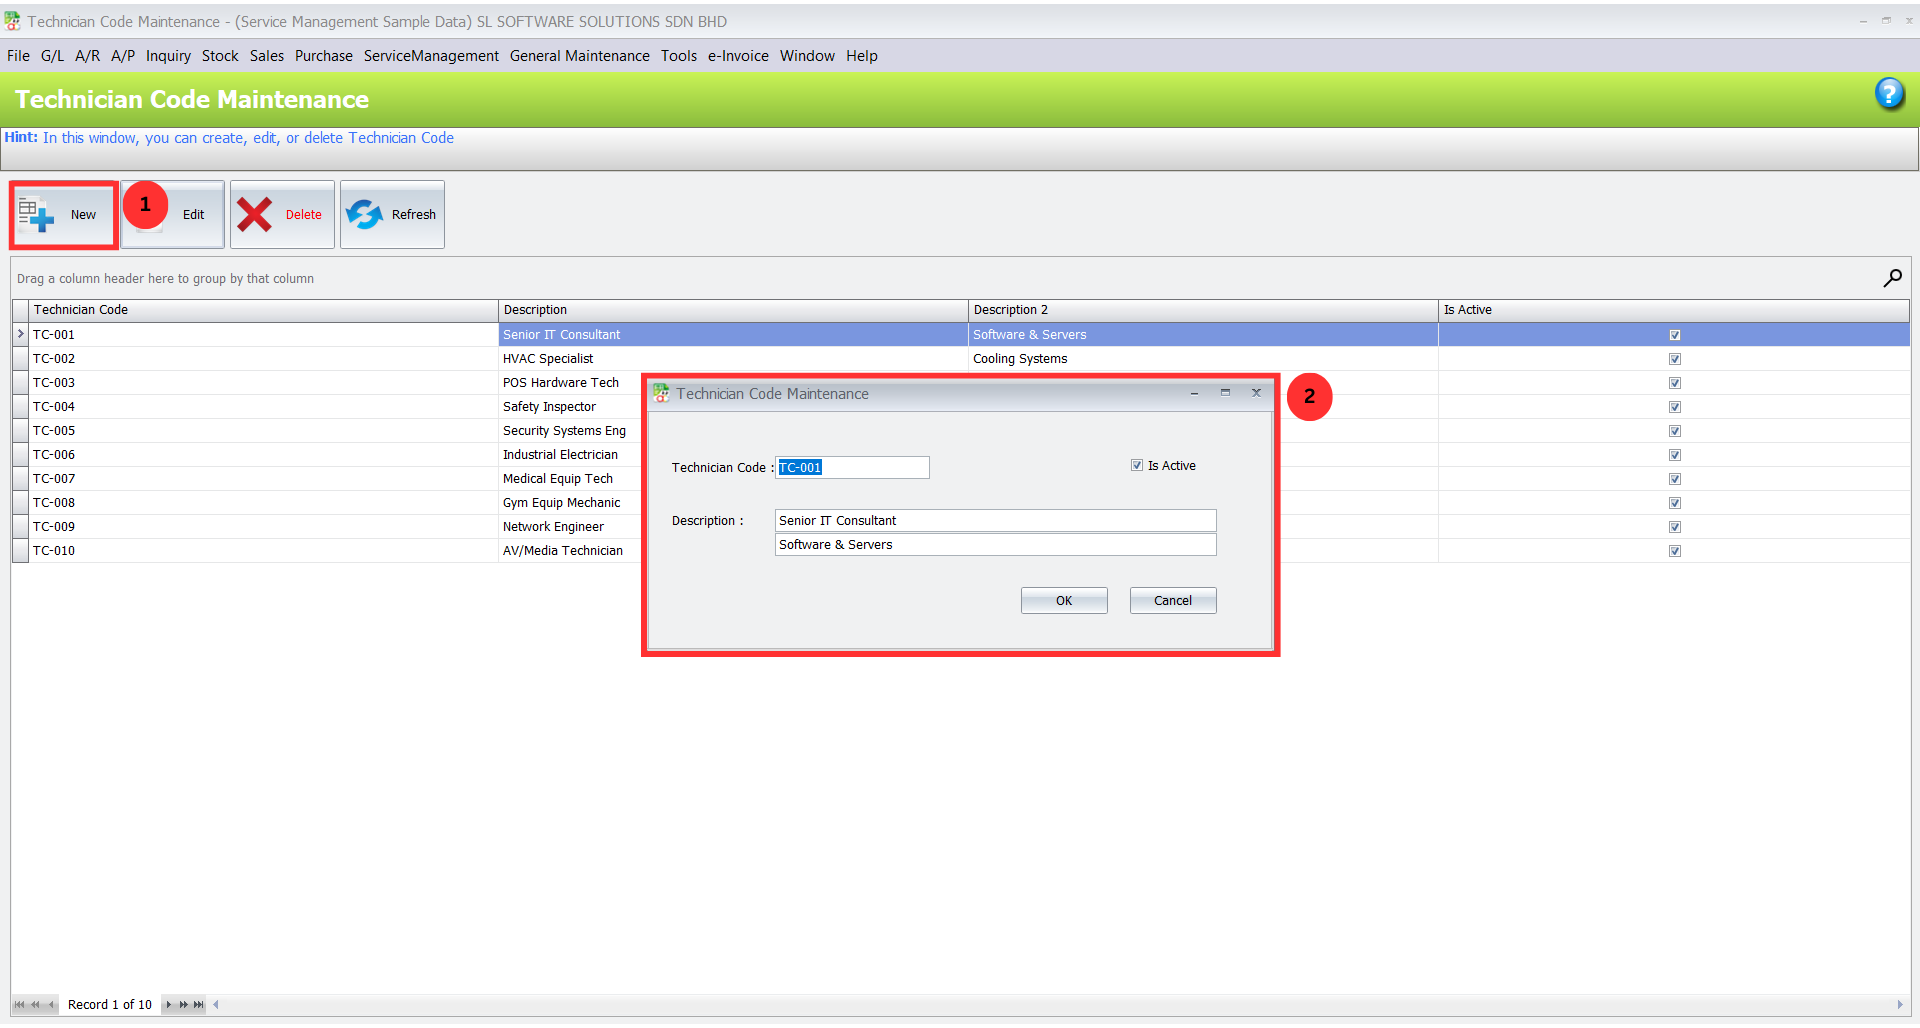
Technician Codes: Go to Service > Technician Code Maintenance and click New. Assign a unique Technician Code and Description for each team member. Click OK to save.
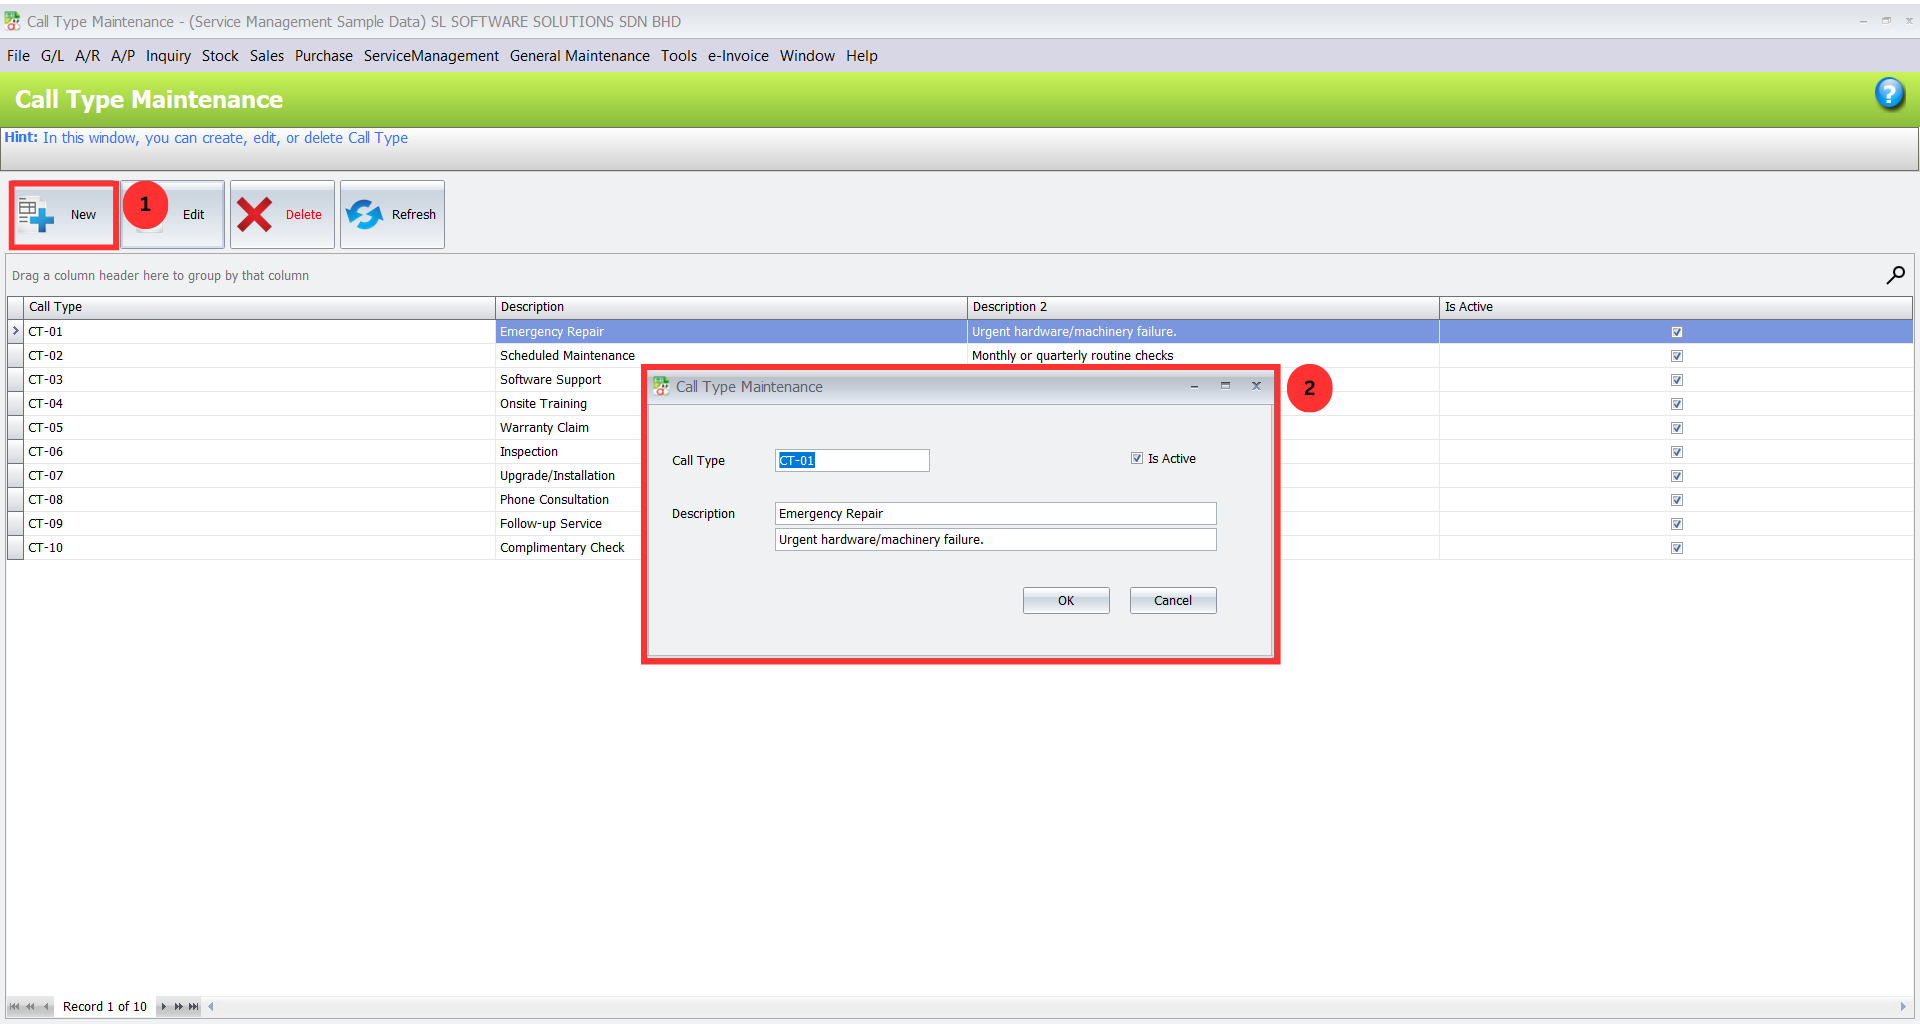
- Call Types: Go to Service > Call Type Maintenance and click New. Define how customers call in (e.g., “On‑Site Request,” “Phone Support”). Click OK to save.
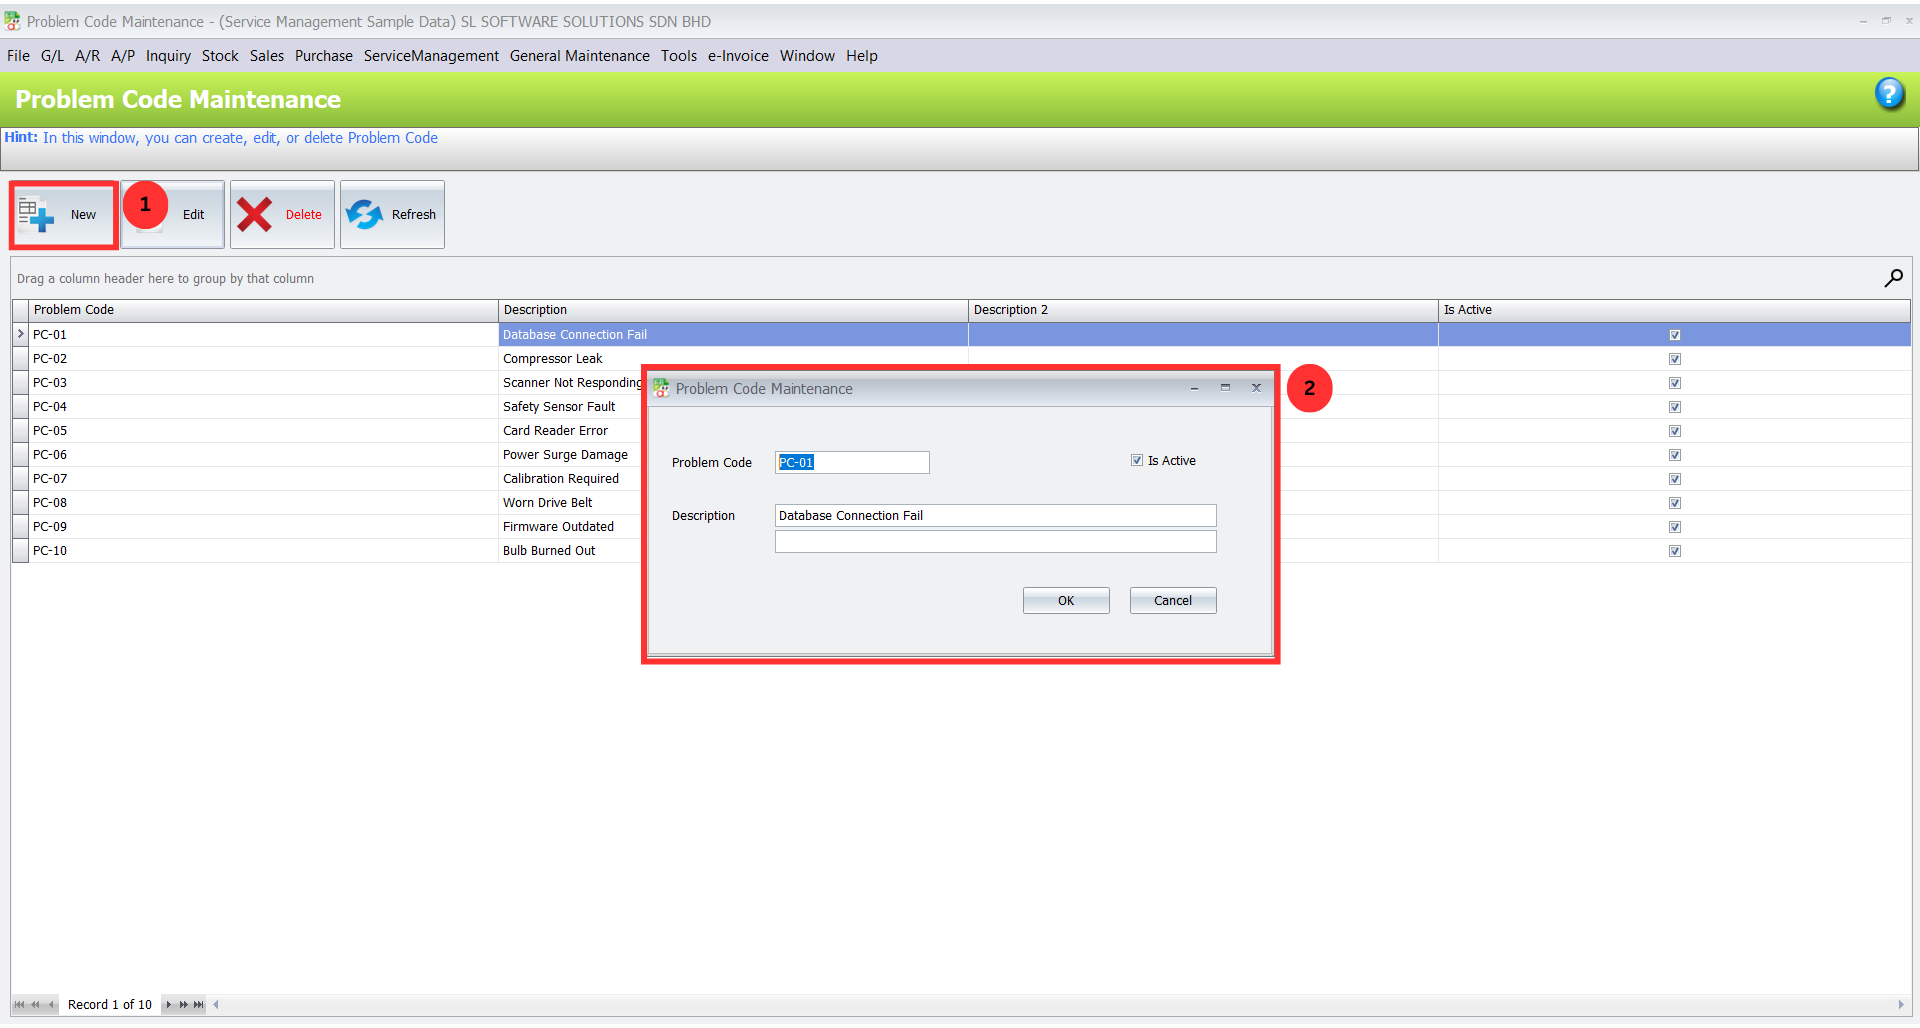
Problem Codes: Go to Service > Problem Code Maintenance and click New. Enter common problem types your customers report. Click OK to save.
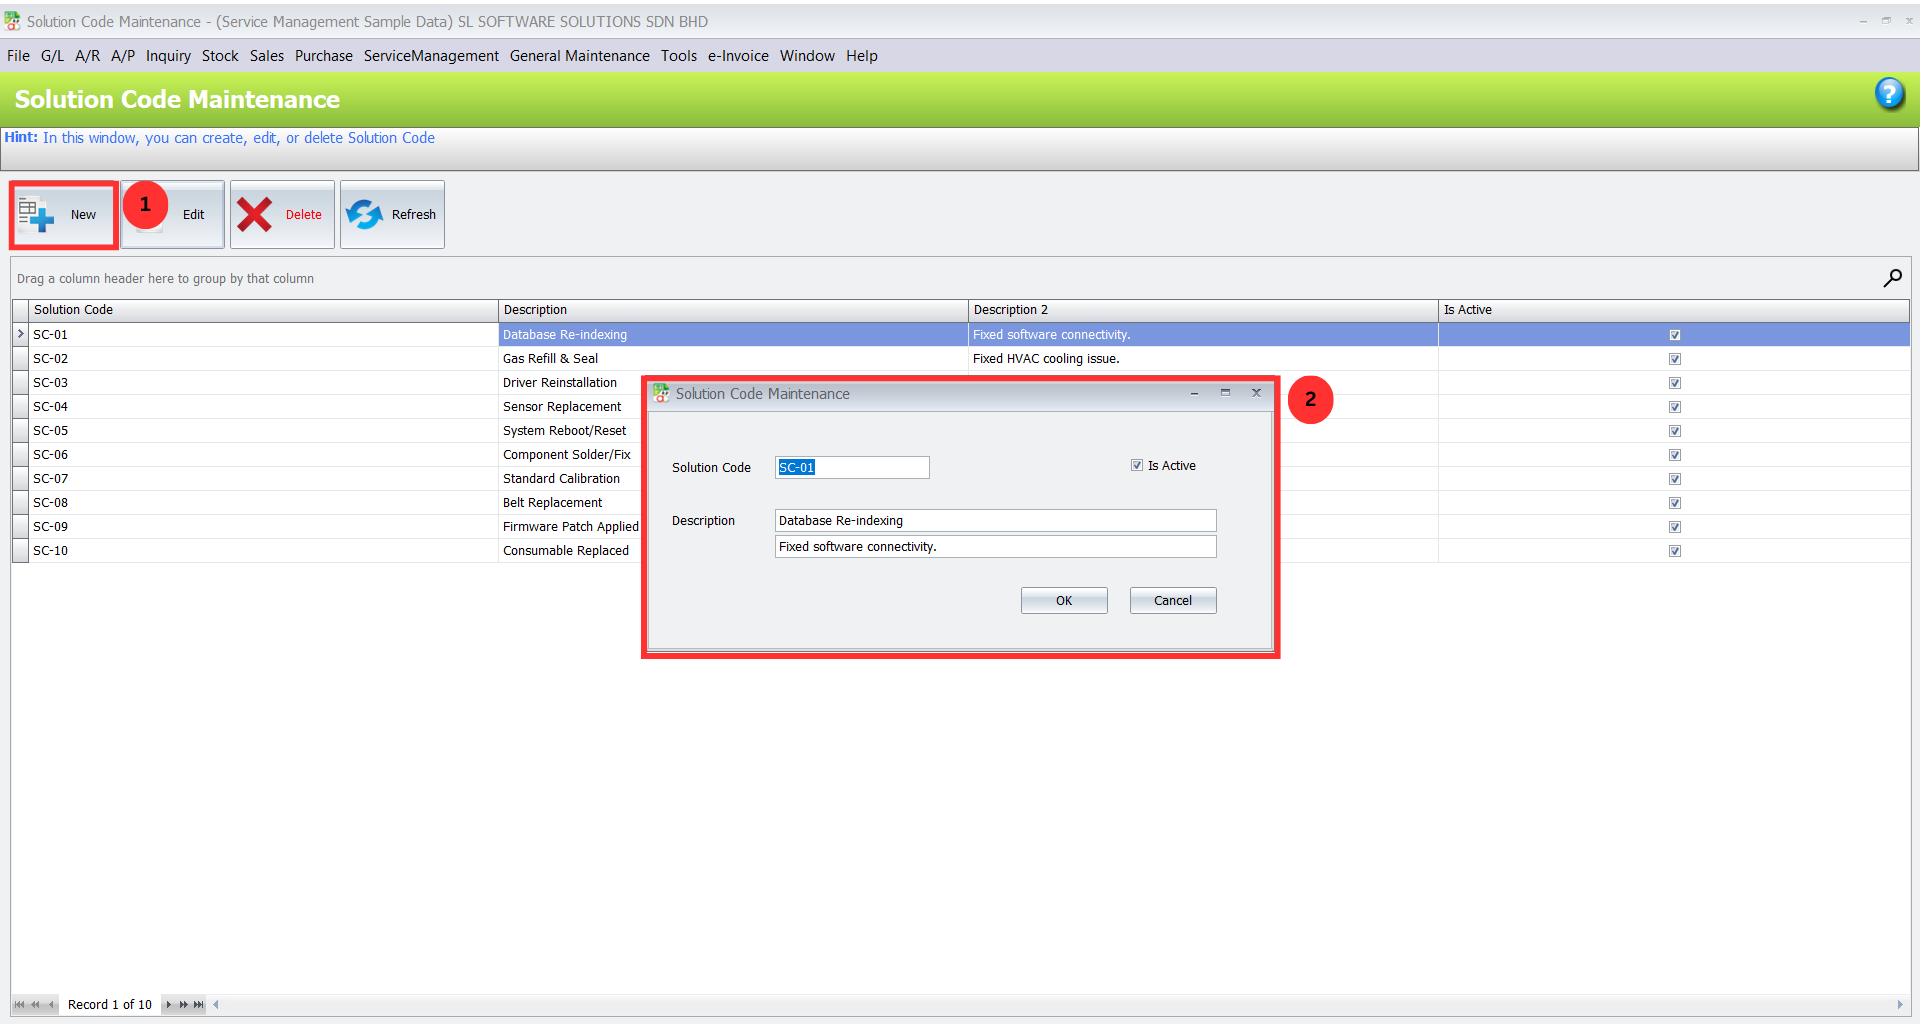
- Solution Codes: Go to Service > Solution Code Maintenance and click New. Enter standard fix actions your team performs. Click OK to save.
2. Create a New Service Note
This is where you log the customer’s actual service request:
Go to Service > Service Note and click New.
Select the Debtor Code to pull in customer details. If they have multiple branches, choose the correct Branch Code for this job.
Choose the Call Type (how the request came in), then the Problem Code that matches the issue.
Add any Remarks if needed.
Assign a Solution Code and pick the right Technician Code for the job.
Schedule it: set the Appointment Date (expected by customer), and the Attend Date/Time for your technician’s visit.

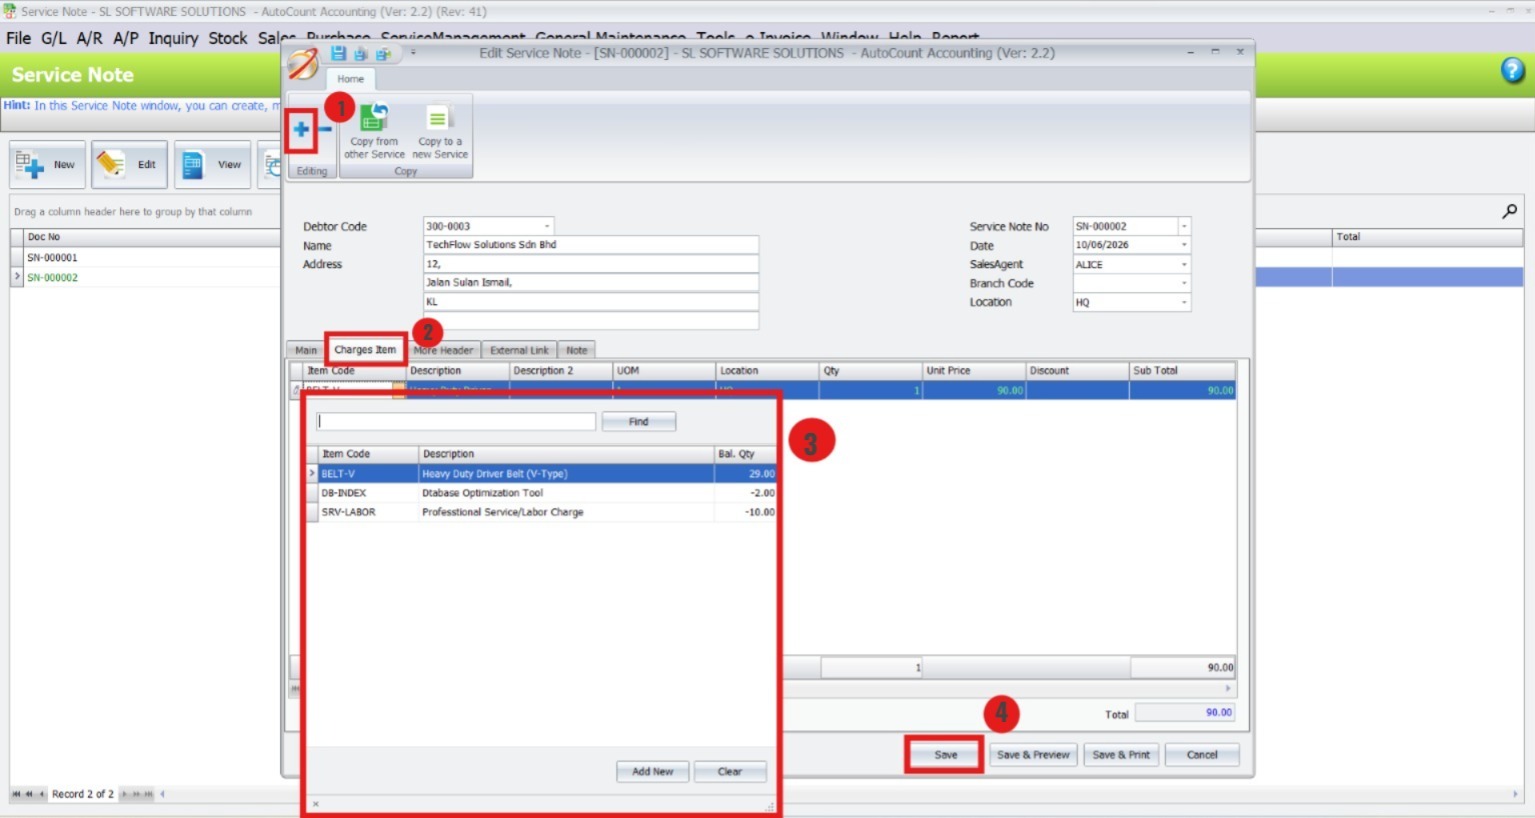
3. Add Chargeable Items
If there are billable parts or services for this job:
Navigate to the Charges Item tab inside the service note.
Click the Add (+) button.
Select the item or service (e.g., On‑Site Service Fee, spare parts), and input the proper amounts.
This ensures all costs are captured accurately for billing.
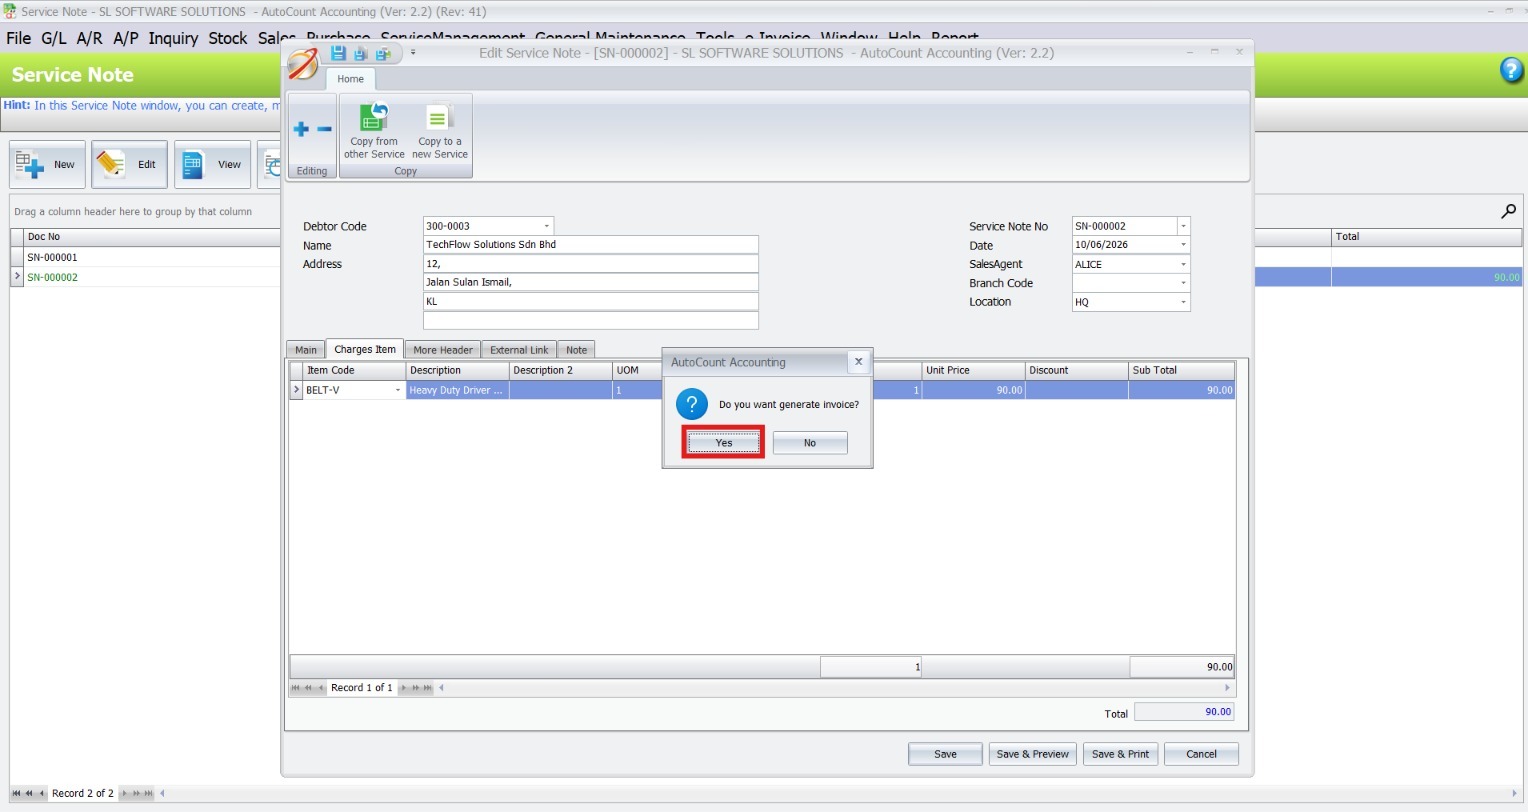
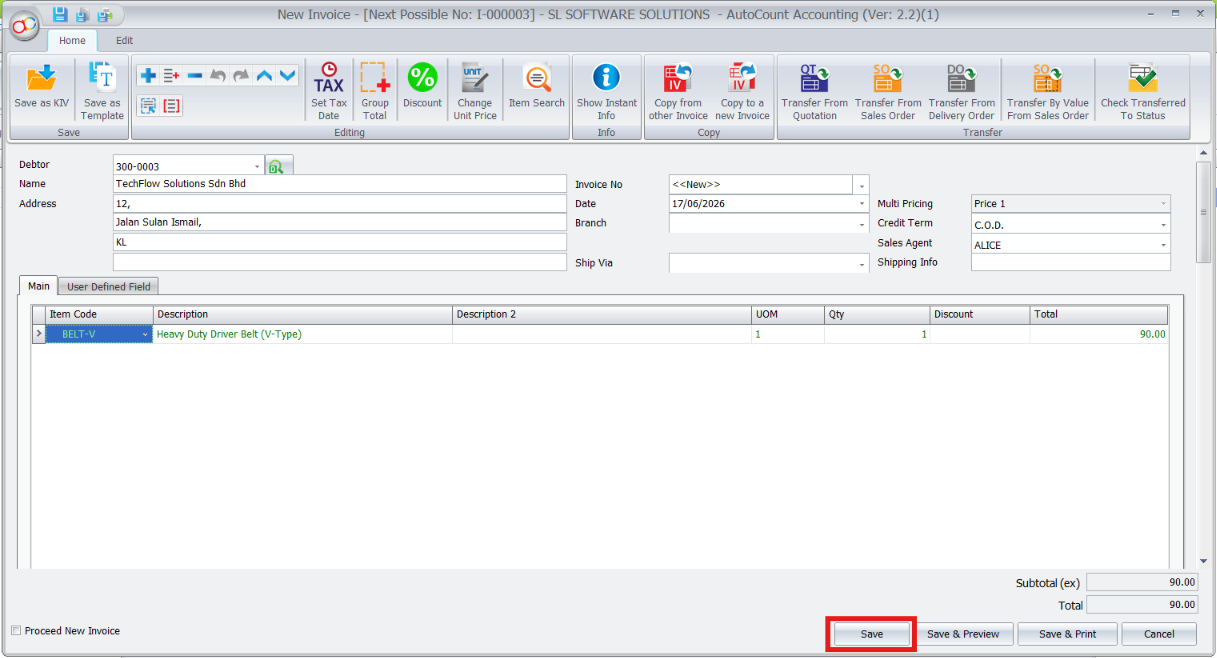
4. Generate Invoice Automatically
Once your service note is complete and includes chargeable items:
Save the service note.
The system will ask “Do you want to generate invoice?”
Click Yes and the plugin automatically creates a Sales Invoice with all the job’s details.
All customer and charge data carry over, saving you double entry.
Benefits of AutoCount Service Management Plugin
Increased Efficiency
Automates service-related tasks, reducing manual labor.
Improved Accuracy
Minimized data entry errors for more accurate service tracking.
Seamless Integration
Works well with AutoCount’s other modules, improving overall business workflow.
Time-Saving
Automated processes save valuable time, allowing employees to focus on other tasks.
Best Practices for Managing Service Jobs
Standardize Your Codes and Processes
Keep your codes (like Technician, Call Type, Problem, and Solution Codes) clear and consistent so everyone uses the same terms. This makes creating, tracking, and reviewing service records easier and more accurate.
Schedule Service Visits with Clear Priorities
Always assign job priorities and expected response times when creating service notes. Use appointment dates and attend times to prioritize urgent jobs over routine ones, and review your calendar regularly to avoid conflicts.
Review and Clean Up Old Service Records Regularly
Periodically check your service data to close outdated tickets, correct unfinished entries, or remove duplicate records. This keeps your system clean and ensures you only work with relevant, actionable information.
Conclusion
Frequently Asked Questions
Is AutoCount Service Management Plugin suitable for field service teams?
Can I use Service Management Plugin without Event Plugin?
How do I track service history for a customer?
Can I customize the Service Note form?
Do I need to buy a license for every technician?
Ready to Professionalize Your Service Operations?
Manual tracking leads to missed appointments, unbilled work, and frustrated customers. The AutoCount Service Management Plugin gives you the tools to run your service department with the same accuracy and professionalism as your accounting department.