-
AutoCount Accounting Features
-
- Approval Workflow
- Audit Trail
- Auto Save in Draft Folder
- AutoCount Contra Account
- AutoCount License Setting Guide
- Deposit Tracking & Management
- Documents Numbering Format
- Full Transfer and Partial Transfer
- Import Data to AutoCount Accounting Using Excel
- Informative Charts and Analytical Data
- Layout Customization
- Multi Pricing
- Sales and Services Tax
- Schedule Backup
- Search Lookup Edit
- View Documents Flow
- AutoCount Feature Stock Take
- Column Chooser
- Show Remaining (3) Collapse
-
AutoCount Cloud Accounting
-
AutoCount E-Invoice
-
AutoCount HRMS User Guide
-
AutoCount Modules
-
- Activity Stream
- Advanced Financial Report
- Advanced Item
- Advanced Multi-UOM
- Advanced Quotation Module
- Basic Multi-UOM
- Budget Module
- Consignment
- Filter By Salesman
- FOC Quantity
- Formula
- Item Batch
- Item Package
- Landing Cost
- Multi-Currency
- Multi-Dimensional Analysis
- Multi-Location
- Project Account
- Recurrence
- Remote Credit Control Module
- Stock Assembly
- User Defined Fields (UDF)
- AutoCount SST Hidden Functions
- AutoCount SST Submission - Service Tax
- AutoCount Scripting Module User Guide
- AutoCount Bonus Point Module User Guide
- Show Remaining (11) Collapse
-
AutoCount Plugins
-
- Fixed Assets Management
- Goldsmith
- TD Ordering Mobile Apps
- TD Stock Mobile Apps
- Universal Import Plugin
- DMS Import Plugin
- AutoCount Item Visibility Control
- AutoCount Easy Knock Off Plugin
- AutoCount Pick List Plugin User Guide
- AutoCount Agent Validation Plugin User Guide
- AutoCount Barcode Generator Plugin User Guide
- AutoCount Bill Remark Plugin User Guide
- AutoCount Easy Batch Number Entry Plugin User Guide
- AutoCount Recurring Invoice Plugin User Guide
- AutoCount Easy Photo 2.0 User Guide
- AutoCount Pain Tracker User Guide
- AutoCount Credit Memo Plugin User Guide
- Show Remaining (2) Collapse
-
- AutoCount Easy Recurrence Plugin
- AutoCount Recurring Billing Plugin
- Event Management System
- AutoCount To-Do List Plugin
- AutoCount AutoBank Reconciliation Plugin
- Intercompany Billing Plugin User Guide
- AutoCount Basket Plugin User Guide
- Lead Management 2.0 Plugin
- AutoCount Service Contract Plugin User Guide
- Autocount Repacking Plugin
- AutoCount Scale Barcode Plugin User Guide
- AutoCount Progressive Billing
- AutoCount Optical Plugin
- AutoCount Meter Reading Plugin User Guide
- AutoCount Car Tint Film Plugin
- AutoCount Leasing Plugin User Guide
- AutoCount Integrator Plugin
- AutoCount Procurement Planning Plugin
- Show Remaining (3) Collapse
-
-
Form Template
-
Report Template
-
- Advance Quotation
- Cash Sale
- Consignment
- Consignment Movement
- Credit Note
- Debit Note
- Delivery Order
- FOC Quantity Analysis By Document Report
- Invoice
- Item Package Sales Report
- Monthly Sales Analysis
- Outstanding Sales Order Listing
- Profit And Loss Of Documents
- Quotation
- Sales Agent Contribution Report
- Sales Order
- Top/Bottom Sales Ranking
- Show Remaining (2) Collapse
-
- Available Stock Status Report
- Expired Item Batch Listing
- Inventory Physical Worksheet
- Stock Adjustment
- Stock Aging Report
- Stock Assembly
- Stock Assembly Order
- Stock Balance By Location
- Stock Balance Report
- Stock Card Report
- Stock Disassembly
- Stock Issue
- Stock Item Profit Margin
- Stock Movement Report
- Stock Receive
- Stock Take
- Stock Transfer
- Stock Write Off
- Show Remaining (3) Collapse
AutoCount Plugin: Item Visibility Control Plugin
Control What Employees Can See and Sell
The AutoCount Item Visibility Plugin empowers businesses to control which inventory items specific users can view and interact with in AutoCount. Instead of everyone seeing all products, administrators can define item scopes based on attributes like brand or category and assign them to roles or individual users — so sales, purchasing, warehouse, and reporting staff only see what’s relevant to their responsibilities. This capability is especially valuable for companies with multiple brands, product divisions, or specialist teams, ensuring employees work only within their authorized product range.
Item Visibility Definition
The core function of the plugin is to let administrators define item visibility templates. These templates control which inventory items each user is allowed to view or select, based on attributes such as: Stock Item, Stock Group, Stock Item Type.
Why You Should Use it?
This plugin helps businesses control item access by user, so each staff member only sees the products relevant to their role. It reduces the risk of selecting, selling, purchasing, or reporting on the wrong items, while keeping AutoCount screens cleaner and easier to manage. It is especially useful for companies with many stock items, multiple brands, different product teams, or users who should only handle specific product ranges.
Key Features & Capabilities
User Item Visibility Maintenance
Assign item visibility settings to each AutoCount user from one control screen
Item Template Assignment
Create or reuse item templates to define which products a user is allowed to view or select.
Product Range Filtering
Control item access by Stock Item, Stock Group, or Stock Item Type etc.
Document Option Control
Apply item visibility rules to selected Sales, Purchase, Stock, and Report modules.
Restricted Item Search
Items outside the user’s assigned visibility will be hidden from item lists and search results.
Who This Plugin is For
Businesses with Large Item Lists
Companies that manage many stock items and need to control which products each user can view or select.
Teams with Different Product Responsibilities
Sales, purchasing, warehouse, or branch teams that should only access items related to their assigned product range.
Businesses Managing Multiple Brands or Item Groups
Companies that separate products by brand, category, stock group, or item type, such as phone brands, accessories, spare parts, or service items.
Managers Who Need User-Level Item Control
Administrators who want to assign item visibility by user to reduce mistakes and prevent unauthorized product access.
Step-by-Step Guide to Set Up Item Visibility Control in AutoCount
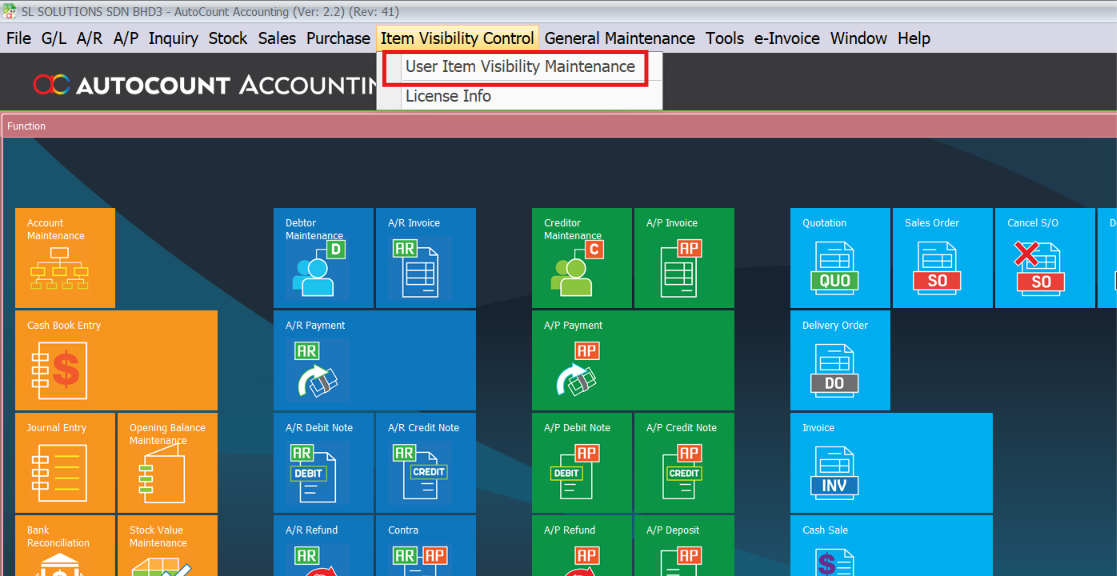
1. Access User Item Visibility Maintenance
- Click on Item Visibility Control > User Item Visibility Maintenance.
- This will open the main control window where you can manage which stock items each AutoCount user is allowed to view and use.
2. Select the User
- In the User Item Visibility Maintenance screen, select the user you want to configure, for example USER1.
- Click Edit to modify the selected user’s item visibility setting.

3. Create Item Visibility Entry
- Select or enter the Item Template for the user.
- Tick the allowed Stock Item, Stock Group, or Stock Item Type.
- Use Tick or Untick All Stock Item if you need to select or clear many items at once.
- Then tick the applicable documents under Document Option, such as Sales Order, Delivery Order, Invoice, Purchase Order, Stock Adjustment, or Reports.
- The system will apply the selected item visibility rule to the user. After completing the item filters and document options, click Save.
Pro Tip: Use a clear Item Template name, because the same template can be reused for multiple users.
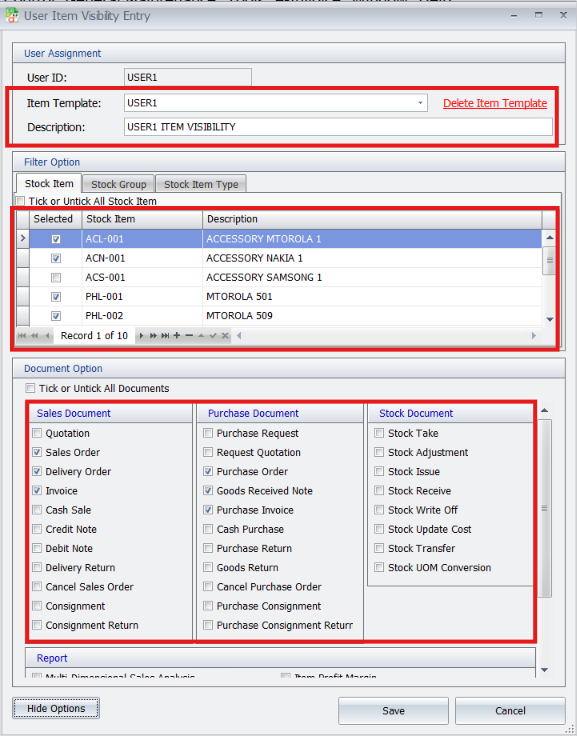
4. Set Report Options and Save
Scroll down to the Report section.
Tick the reports that should follow the item visibility control, such as Stock Balance, Stock Card, or Stock Status.
If the Report option is not ticked, restricted items may still appear in report preview or printed reports.
Click Hide Options to hide the Document and Report options area. This gives more space to view the item filter list.
Click Save after completing the setup.

Important: To block restricted items from reports and print preview, tick the related options under Report.
Step-by-Step Guide to Test User Permissions
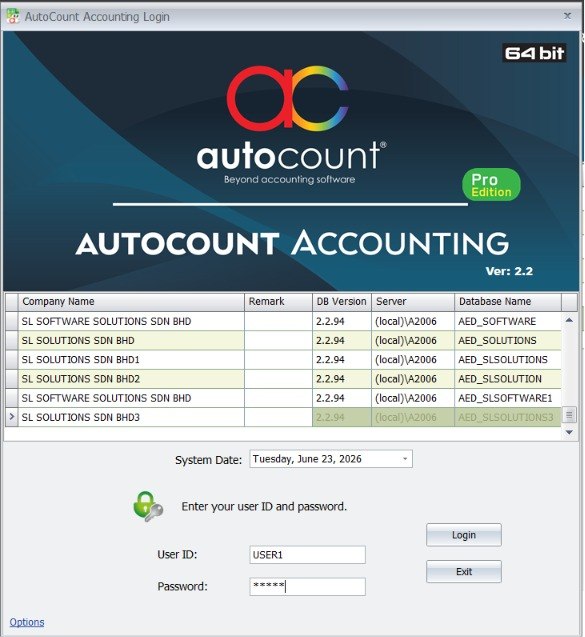
1. Log In as Restricted User
Log out of the Admin account and log back in using the restricted user’s ID. This is necessary to view the system exactly as they would see it.
2. Access Stock Maintenance
Check the inventory list. Navigate to Stock > Stock Item Maintenance. This is the best place to verify if the visibility filters are working correctly.
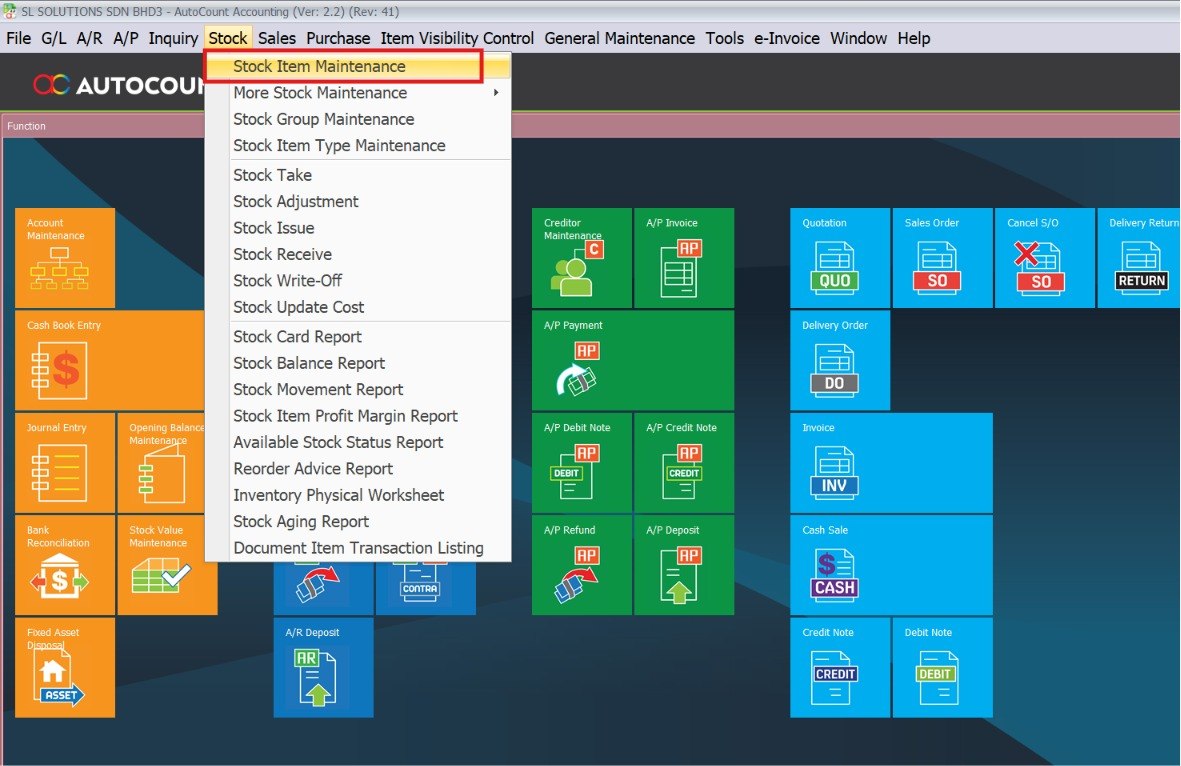
3. Verify Authorized Items
Review the item list. You should only see the products defined in the Scope (e.g., Nakia/Motorola). All other brands should be completely hidden from this view.
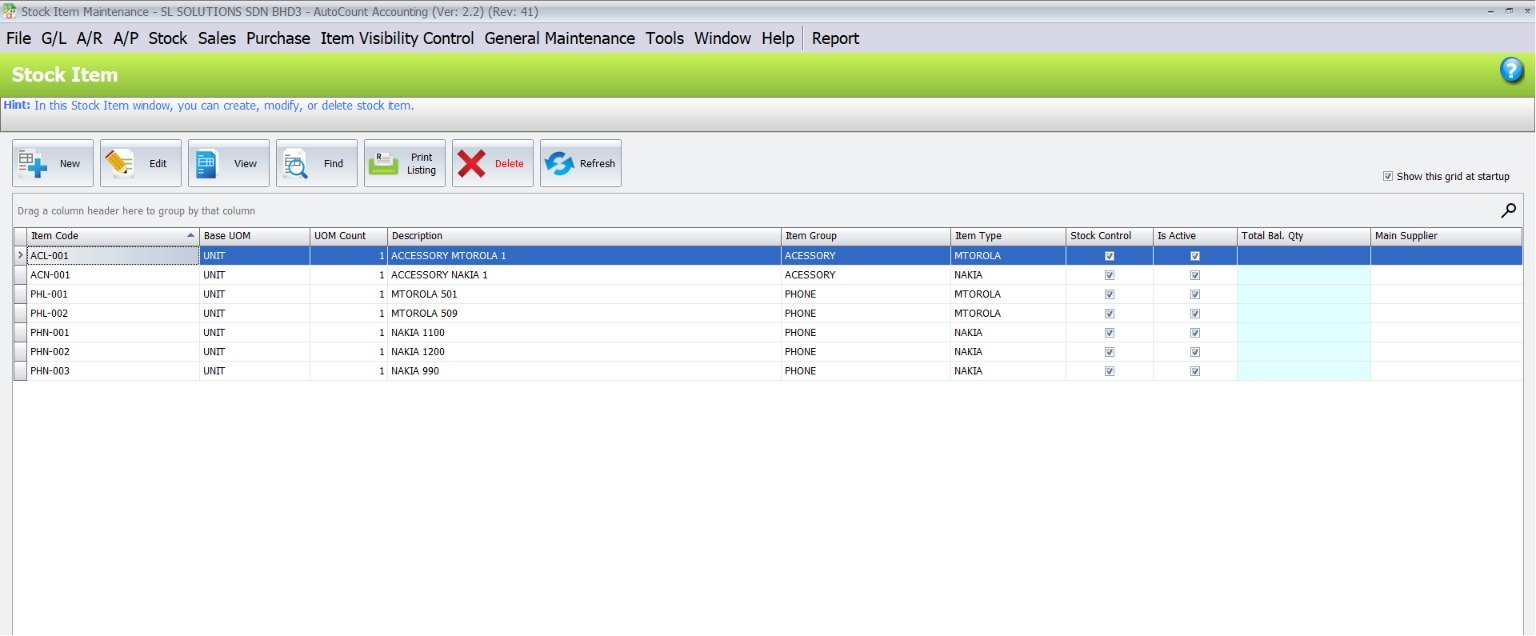
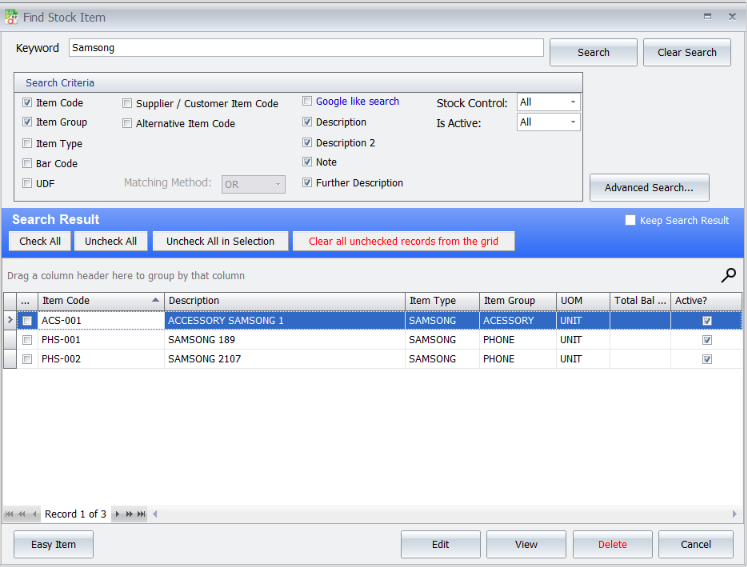
Blocked items may still appear in the Find Stock Item search window, depending on AutoCount’s default search behavior.
Benefits & Business Value
The Item Visibility Control adds intelligent access control to your AutoCount system:
Access Control
Only authorized users see designated products.
Operational Efficiency
Teams work within defined product boundaries, reducing selection errors and improving speed.
Reporting Accuracy
Sales and inventory reports reflect relevant product sets for each user.
Security & Compliance
Sensitive product data remains shielded from users without scope permission.
This functionality enhances internal process control and accountability — particularly in environments with multi‑brand portfolios or segmented business units.
Advanced Item Module Integration
1. Enable Advanced Item Module
Go to the top menu and select Tools > Program Control > Module Setting. Enable the feature. In the pop-up window, locate and check the box for “Advanced Item”, then click OK.
Why do this? This integration unlocks essential product details (like Brand, Category, and Class). Without this module enabled, you won’t be able to filter your Item Scopes by Brand, which limits the plugin’s effectiveness.

Core benefits of the Advanced Item Module include:
Advanced Item Categorization for precise inventory logic.
Flexible Filtering & Reporting across detailed item attributes.
Batch Processing for efficient updates.
Seamless Integration with core modules like stock, BOM, sales, and POS.
Custom Item Applications tailored to sales, purchasing, or point of sale workflows.
This module lays the foundation for more intelligent control of item visibility via scopes.
Tips & Best Practices
Plan Scopes by Role
Define scopes according to job functions or responsibilities for clarity and consistency.
Use Brand or Category Filters
Efficiently group items using metadata to reduce manual scope maintenance.
Preview Scope Definitions
Before assignment, confirm that scope criteria capture the intended item set.
Maintain Scopes
Review and update item scopes periodically as inventory evolves.
Note: New products do not automatically join existing scopes unless the scope criteria include their attributes.
Important Before You Start — Set Access Rights First
Before you start creating item scopes and assigning users, make sure the right employees have permission to use the Item Scope Plugin.
Reminder: If a user doesn’t have Item Scope access rights, they won’t even see the Item Scope functions in AutoCount, even if you’ve already configured scopes.
1. Open Access Right Maintenance
Go to General Maintenance > Access Right Maintenance. Navigate to the maintenance menu to ensure the right employees have permission to use the Item Scope Plugin.

2. Configure Group Access
Select users via “Set Group Access Rights”. In the pop-up window, find the specific user (e.g., “USER”) and change their permission status to “Add”. This explicitly grants them the right to use the plugin.

3. Save Access Settings
Click “OK” to save. Confirm your settings to ensure that the authorized users can successfully see and use the Item Scope functions in AutoCount.

Conclusion
The Item Visibility Control gives you powerful, role‑based inventory visibility control. By defining item scopes and linking them to users, you can streamline workflows, enforce access boundaries, and improve data accuracy across key business processes. This plugin helps you make your AutoCount system both efficient and secure, tailored to your organizational needs.
Frequently Asked Questions
Will this plugin affect existing data?
No — it applies visibility filters without altering underlying item or transaction data.
Does it work with core AutoCount modules?
Yes — it works with Sales, Purchase, Inventory, and Reporting modules. For specialized modules, consult your dealer.
Are there limits on how many scopes I can create?
No — you can define as many item scopes as required to align with your business structure.
Can one product be included in multiple scopes?
Yes — this allows flexible combinations of access across roles.
What happens if a scope is removed?
Users previously assigned to the deleted scope will no longer have access to the items defined by that scope. Reassign or adjust scopes as needed to maintain continuity.
Will performance be impacted?
The plugin operates at the database query level, so performance effects are minimal.
Can I export/import scope configurations?
Not currently — configuration is managed manually per company file.
What if a user has multiple scopes?
The visible item set is the combined union of all assigned scopes.
Interested in Getting AutoCount for your Business?
Contact our sales team today to explore pricing options and get started with the perfect solution for you.