-
AutoCount Accounting Features
-
- Approval Workflow
- Audit Trail
- Auto Save in Draft Folder
- AutoCount Contra Account
- AutoCount License Setting Guide
- Deposit Tracking & Management
- Documents Numbering Format
- Full Transfer and Partial Transfer
- Import Data to AutoCount Accounting Using Excel
- Informative Charts and Analytical Data
- Layout Customization
- Multi Pricing
- Sales and Services Tax
- Schedule Backup
- Search Lookup Edit
- View Documents Flow
- AutoCount Feature Stock Take
- Column Chooser
- Show Remaining (3) Collapse
-
AutoCount Cloud Accounting
-
AutoCount E-Invoice
-
AutoCount HRMS User Guide
-
AutoCount Modules
-
- Activity Stream
- Advanced Financial Report
- Advanced Item
- Advanced Multi-UOM
- Advanced Quotation Module
- Basic Multi-UOM
- Budget Module
- Consignment
- Filter By Salesman
- FOC Quantity
- Formula
- Item Batch
- Item Package
- Landing Cost
- Multi-Currency
- Multi-Dimensional Analysis
- Multi-Location
- Project Account
- Recurrence
- Remote Credit Control Module
- Stock Assembly
- User Defined Fields (UDF)
- AutoCount SST Hidden Functions
- AutoCount SST Submission - Service Tax
- AutoCount Scripting Module User Guide
- AutoCount Bonus Point Module User Guide
- Show Remaining (11) Collapse
-
AutoCount Plugins
-
- Fixed Assets Management
- Goldsmith
- TD Ordering Mobile Apps
- TD Stock Mobile Apps
- Universal Import Plugin
- DMS Import Plugin
- AutoCount Item Visibility Control
- AutoCount Easy Knock Off Plugin
- AutoCount Pick List Plugin User Guide
- AutoCount Agent Validation Plugin User Guide
- AutoCount Barcode Generator Plugin User Guide
- AutoCount Bill Remark Plugin User Guide
- AutoCount Easy Batch Number Entry Plugin User Guide
- AutoCount Recurring Invoice Plugin User Guide
- AutoCount Easy Photo 2.0 User Guide
- AutoCount Pain Tracker User Guide
- AutoCount Credit Memo Plugin User Guide
- AutoCount Daily Collection Summary Plugin
- AutoCount Lock Price Plugin
- Show Remaining (4) Collapse
-
- AutoCount Easy Recurrence Plugin
- AutoCount Recurring Billing Plugin
- Event Management System
- AutoCount To-Do List Plugin
- AutoCount AutoBank Reconciliation Plugin
- Intercompany Billing Plugin User Guide
- AutoCount Basket Plugin User Guide
- Lead Management 2.0 Plugin
- AutoCount Service Contract Plugin User Guide
- Autocount Repacking Plugin
- AutoCount Scale Barcode Plugin User Guide
- AutoCount Progressive Billing
- AutoCount Optical Plugin
- AutoCount Meter Reading Plugin User Guide
- AutoCount Car Tint Film Plugin
- AutoCount Leasing Plugin User Guide
- AutoCount Integrator Plugin
- AutoCount Procurement Planning Plugin
- Cage Management Plugin
- AutoCount Service Management Plugin User Guide
- AutoCount Vehicle Plugin
- Show Remaining (6) Collapse
-
-
Form Template
-
Report Template
-
- Advance Quotation
- Cash Sale
- Consignment
- Consignment Movement
- Credit Note
- Debit Note
- Delivery Order
- FOC Quantity Analysis By Document Report
- Invoice
- Item Package Sales Report
- Monthly Sales Analysis
- Outstanding Sales Order Listing
- Profit And Loss Of Documents
- Quotation
- Sales Agent Contribution Report
- Sales Order
- Top/Bottom Sales Ranking
- Show Remaining (2) Collapse
-
- Available Stock Status Report
- Expired Item Batch Listing
- Inventory Physical Worksheet
- Stock Adjustment
- Stock Aging Report
- Stock Assembly
- Stock Assembly Order
- Stock Balance By Location
- Stock Balance Report
- Stock Card Report
- Stock Disassembly
- Stock Issue
- Stock Item Profit Margin
- Stock Movement Report
- Stock Receive
- Stock Take
- Stock Transfer
- Stock Write Off
- Show Remaining (3) Collapse
-
B2B ORDERING
AutoCount Module: Multi-Location Module
AutoCount Multi-Location Module: The Complete Guide to Seamless Inventory Management
Firstly, managing inventory across multiple branches, warehouses, or locations has long been a challenge for businesses. To clarify, balancing stock levels, tracking movements, and generating accurate reports across different sites often lead to inefficiencies when done manually or with non-specialized tools. Therefore, the AutoCount Multi-Location Module offers a powerful solution tailored to solve these challenges effectively. So in this comprehensive guide, we’ll explore every detail about the module. Thus, ensuring you understand its full potential.
AutoCount Multi-Location Module 1.0 Video Guide
- AutoCount Multi-Location Module 1.0 (EN)
Multi-Location Module 1.0 Setup
Integration & Multi-Location Module 1.0 Setup
- AutoCount Multi-Location Module 1.0 (CN)
多地点模块 1.0 安装
集成和多地点模块 1.0 设置
Introduction to AutoCount Multi-Location Module
Firstly, the AutoCount Multi-Location Module is a centralized inventory management system designed to streamline operations for businesses with multiple storage or sales locations. So, whether you’re managing warehouses across cities or retail outlets in different regions, this module provides real-time visibility and control over your stock. In addition, it simplifies inventory transfers, enhances reporting accuracy, and minimizes operational delays, all from one user-friendly interface.
Why Multi-Location Management Matters
For businesses with operations spanning different locations, efficient stock management ensures:
Optimized Stock Levels
Firstly, it prevents overstocking or stockouts at individual locations.
Reduced Errors
Secondly, its centralized tracking reduces manual entry errors and mismatched records.
Enhanced Decision-Making
Thirdly, its location-specific data insights improve procurement and transfer planning.
Core Benefits of the AutoCount Module
Centralized Oversight
Firstly, it helps you to manage all stock locations within one system.
Real-Time Stock Visibility
Secondly, you can get up-to-date inventory data for every branch or warehouse.
Cost Efficiency
Thirdly, it helps you to save time and reduce labor costs with automated processes.
Features of the Multi-Location Module
Standard Features
Location Maintenance
Add, edit, and manage multiple stock locations with ease.
Stock Transfers
Move inventory between locations seamlessly, including one-to-one transfers.
Location-Based Reports
Generate insightful reports by filtering data per location.
Advanced Features
Access Controls
Set default locations and restrict data access by user.
Customizable Plugins
Add functionalities like Rack Management, Goods in Transit, and Stock Replenishment for specialized needs.
Automated Alerts
Use reorder level settings to automate stock replenishment processes.
Setting Up Multi-Location Stock Management
Steps to Add and Manage Locations
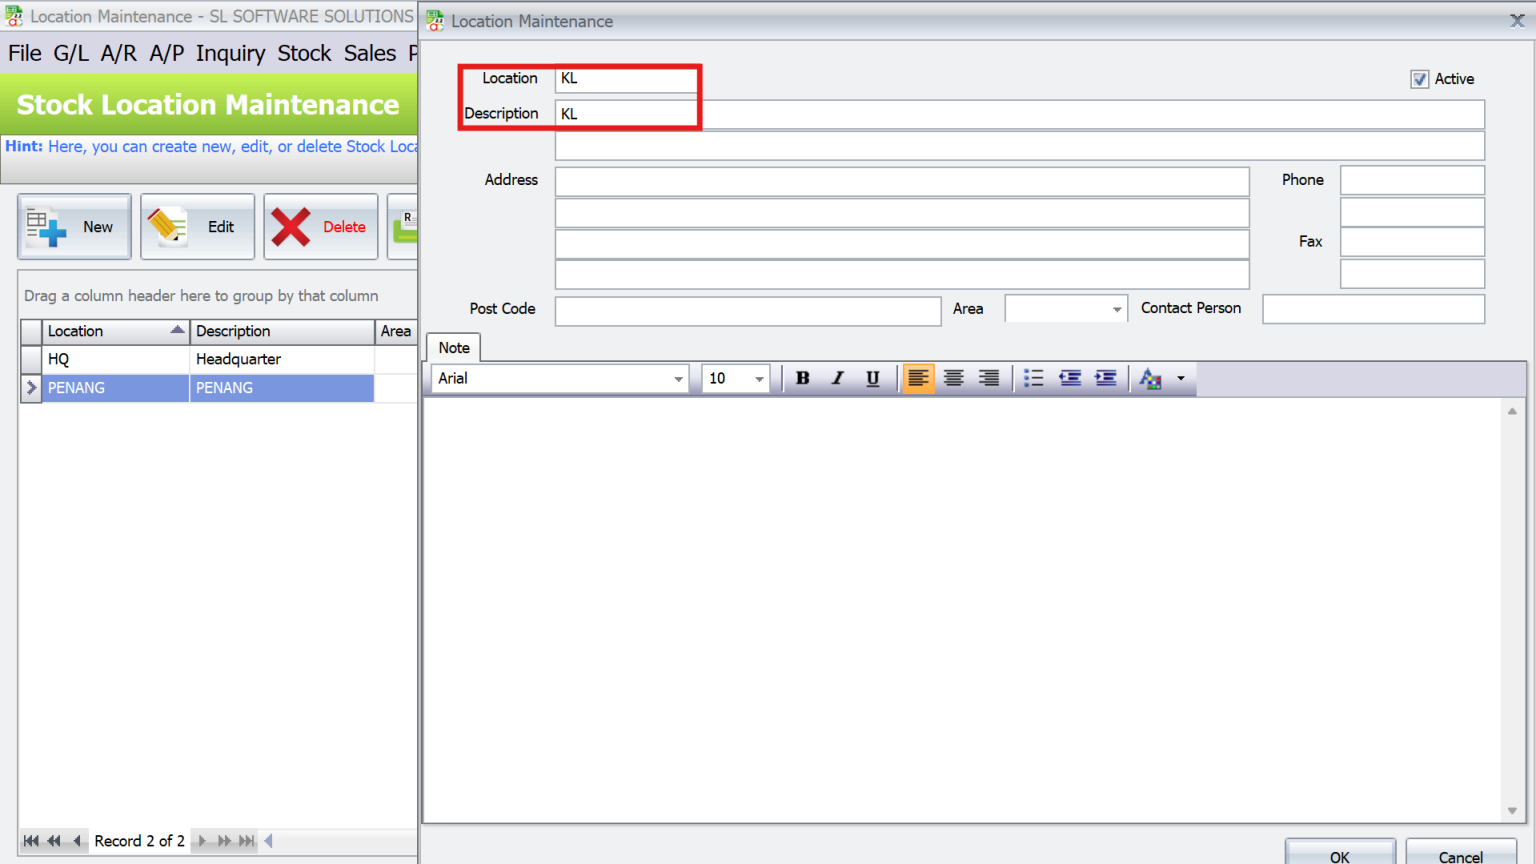
- Firstly, navigate to Stock > Stock Location Maintenance to define or add new locations (e.g., KL ).
- Existing default locations (e.g., HQ) can be edited or renamed to suit operational needs.
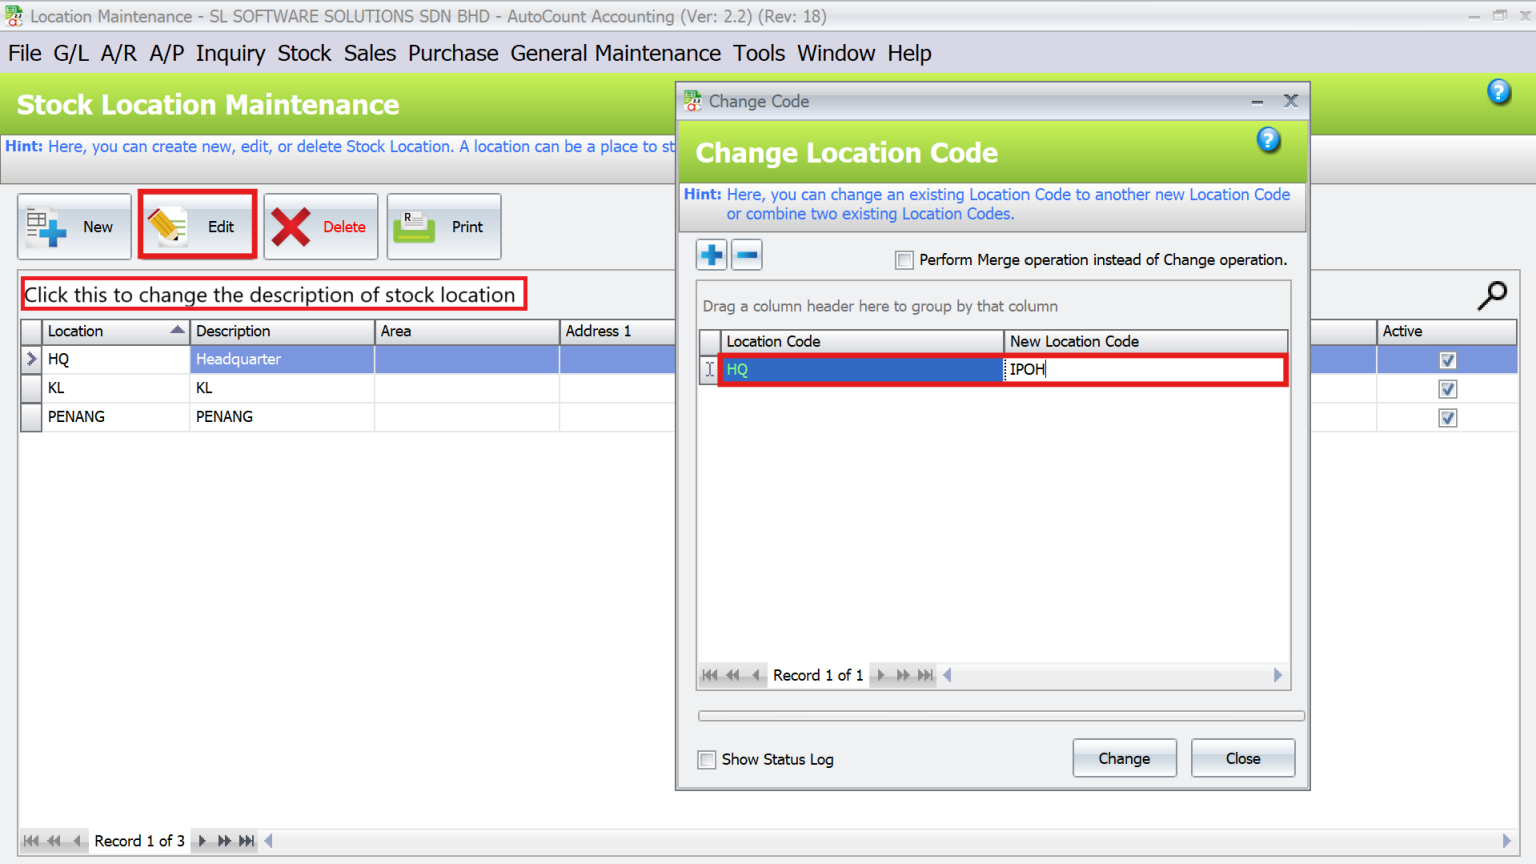
- To rename existing locations (e.g., HQ to Ipoh), use Tools > Change Code > Change Location and save changes.
- In addition, you can update location descriptions by clicking “Edit”.
Purchase and Sales Management
Integrate location-specific inventory management into your purchase and sales workflows:
Purchase Document Data Entry
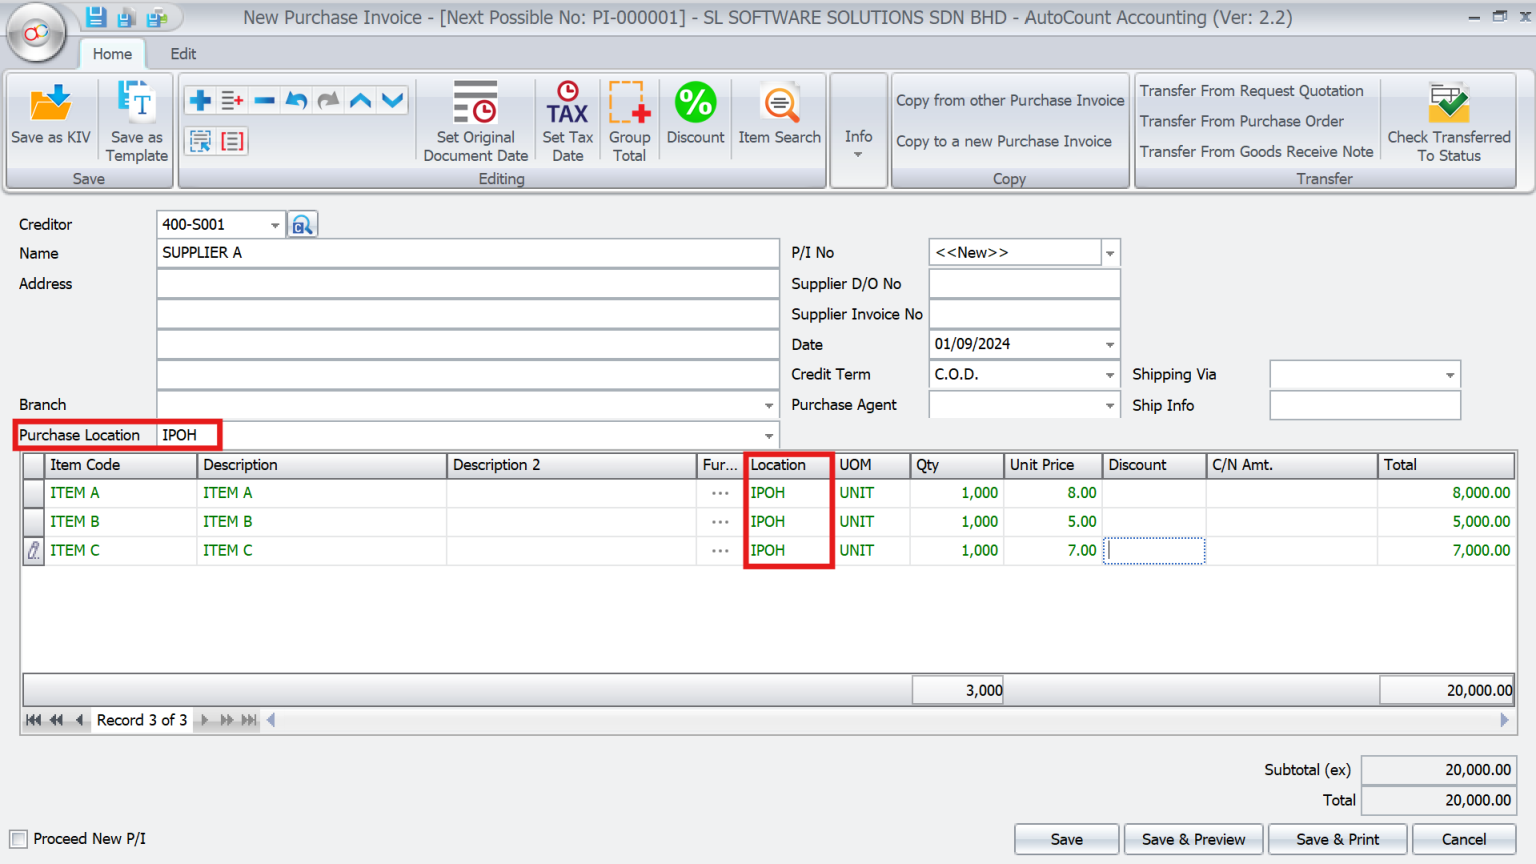
- Firstly, open Purchase > New Purchase Invoice.
- Secondly, select the Purchase Location (e.g., IPOH)
- After that, add items and quantities. The system updates the stock balance for the specified location automatically.
Sales Document Data Entry
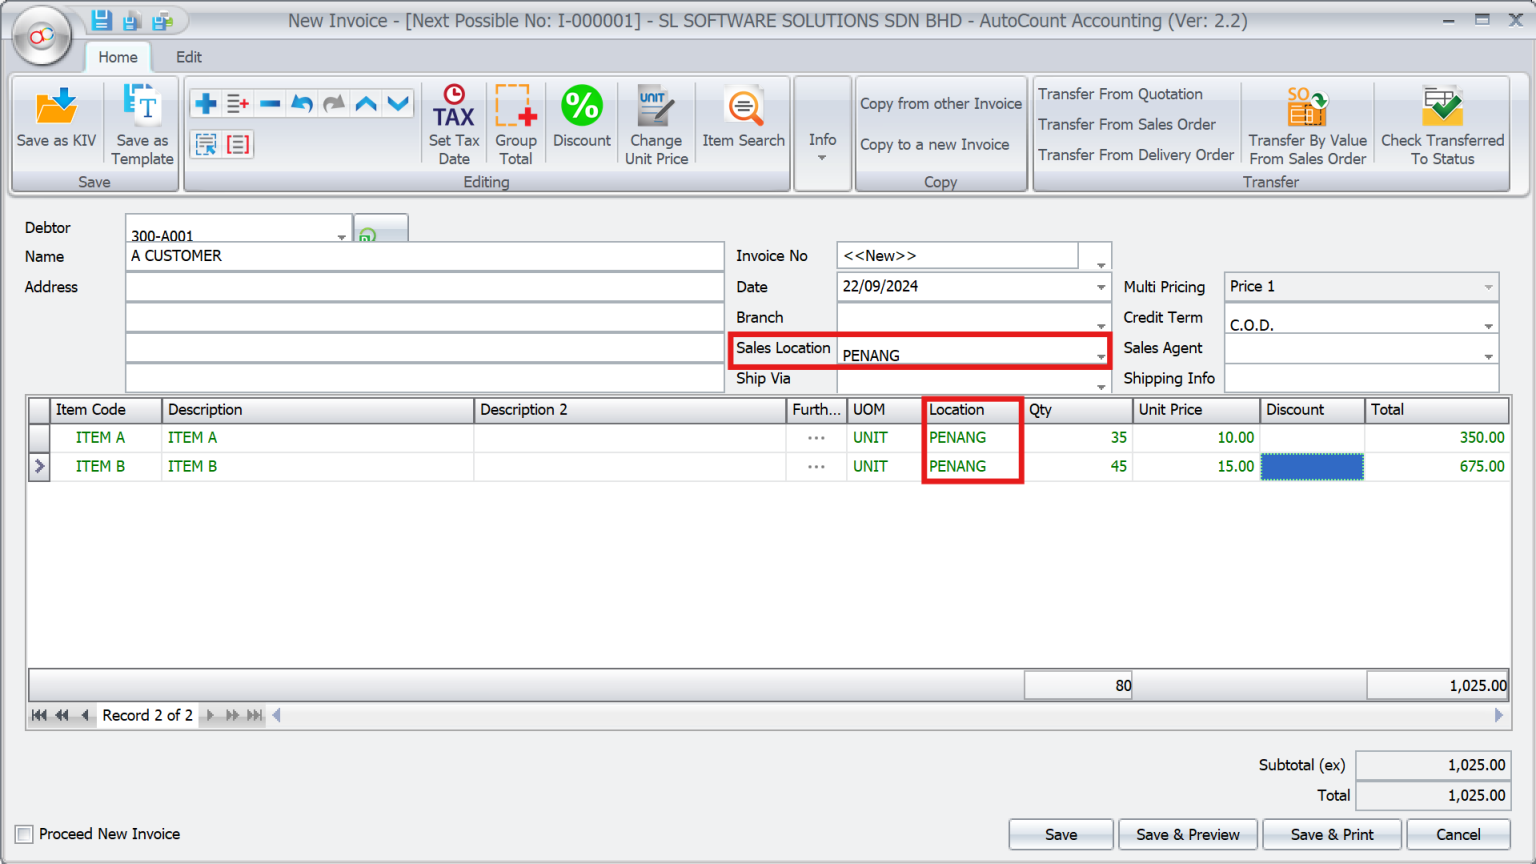
- Firstly, go to Sales > New Invoice.
- Secondly, select the Sales Location (e.g., PENANG).
- After that, add the items being sold and confirm the sale. The stock is deducted from the selected location automatically.
Stock Transfers Between Locations
Stock transfers form the backbone of multi-location management. Here’s how the AutoCount Multi-Location Module simplifies it:
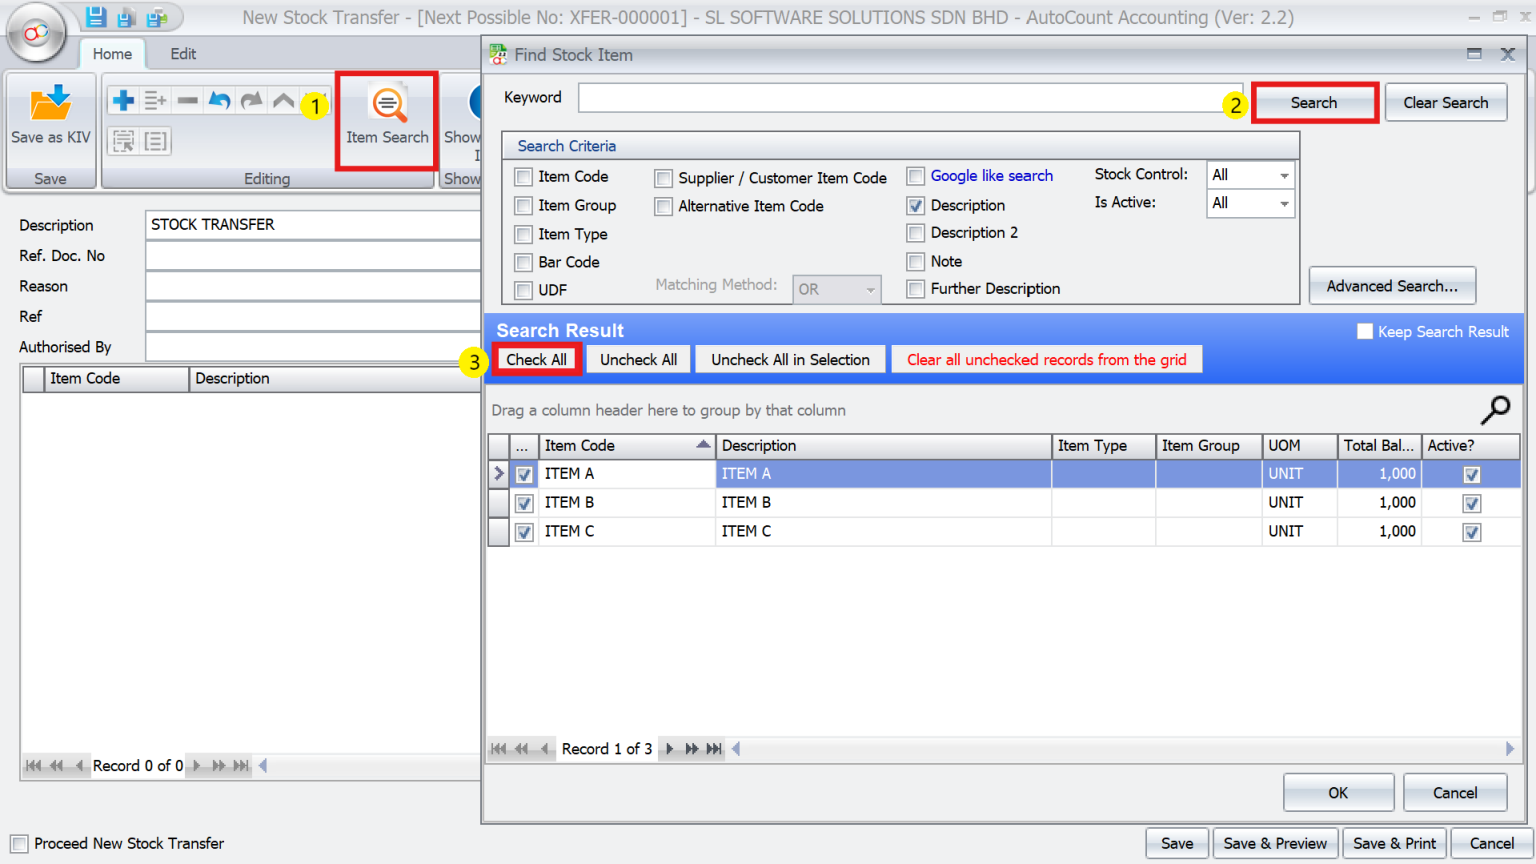
One-to-One Transfers
Easily transfer inventory between two locations:
- Firstly, navigate to Stock > Stock Transfer.
- Secondly, select the From Location (e.g., Ipoh) and To Location (e.g., KL)
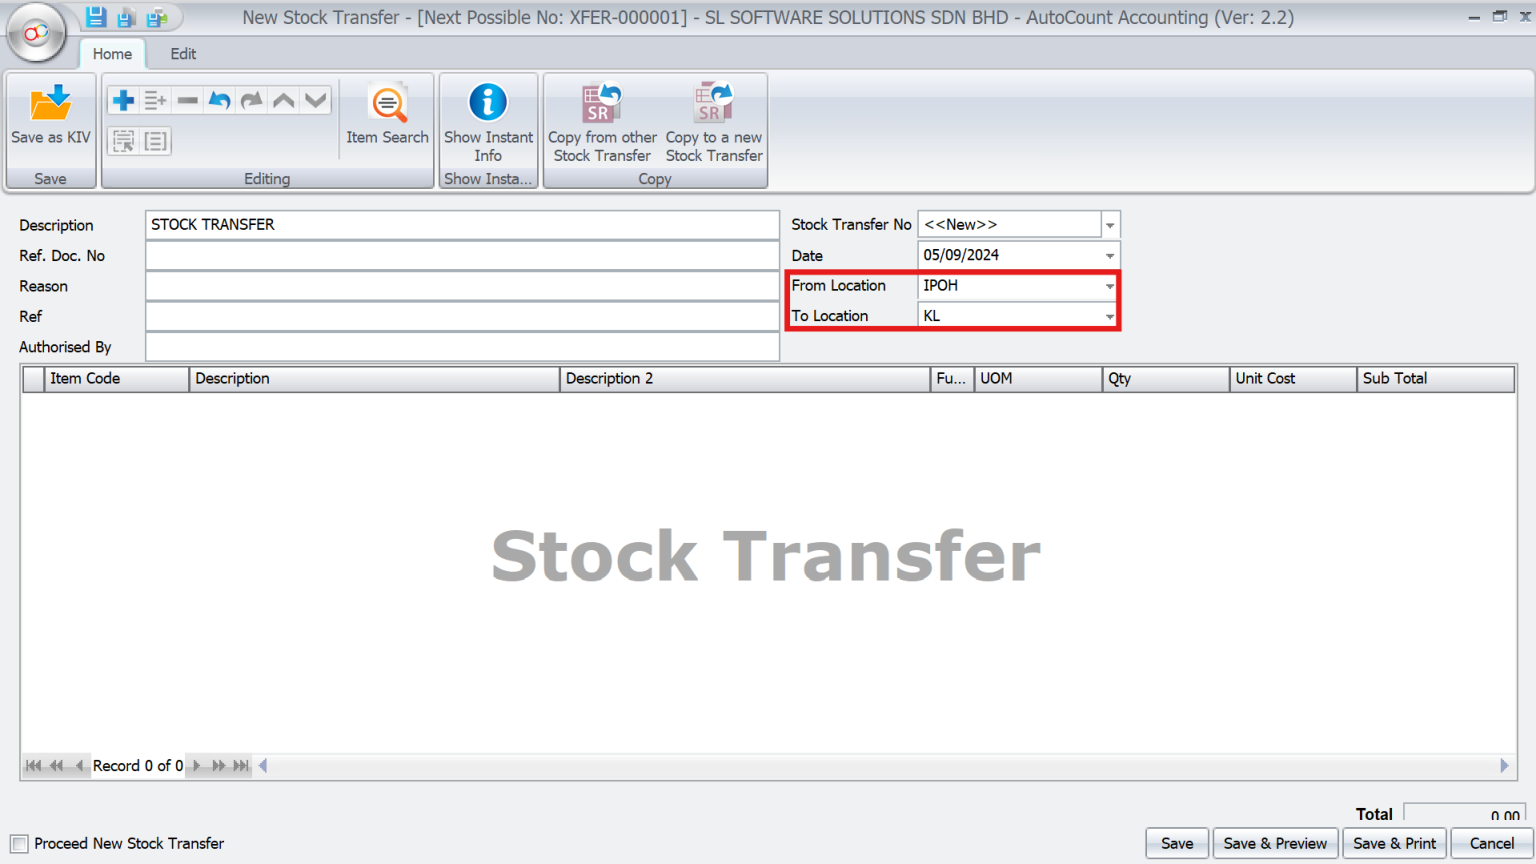
- Next, use Item Search > Search > Check All for batch transfers.
- After that, add items and their quantities.
- Finally, confirm the transfer. The stock levels for both locations will be updated accordingly.
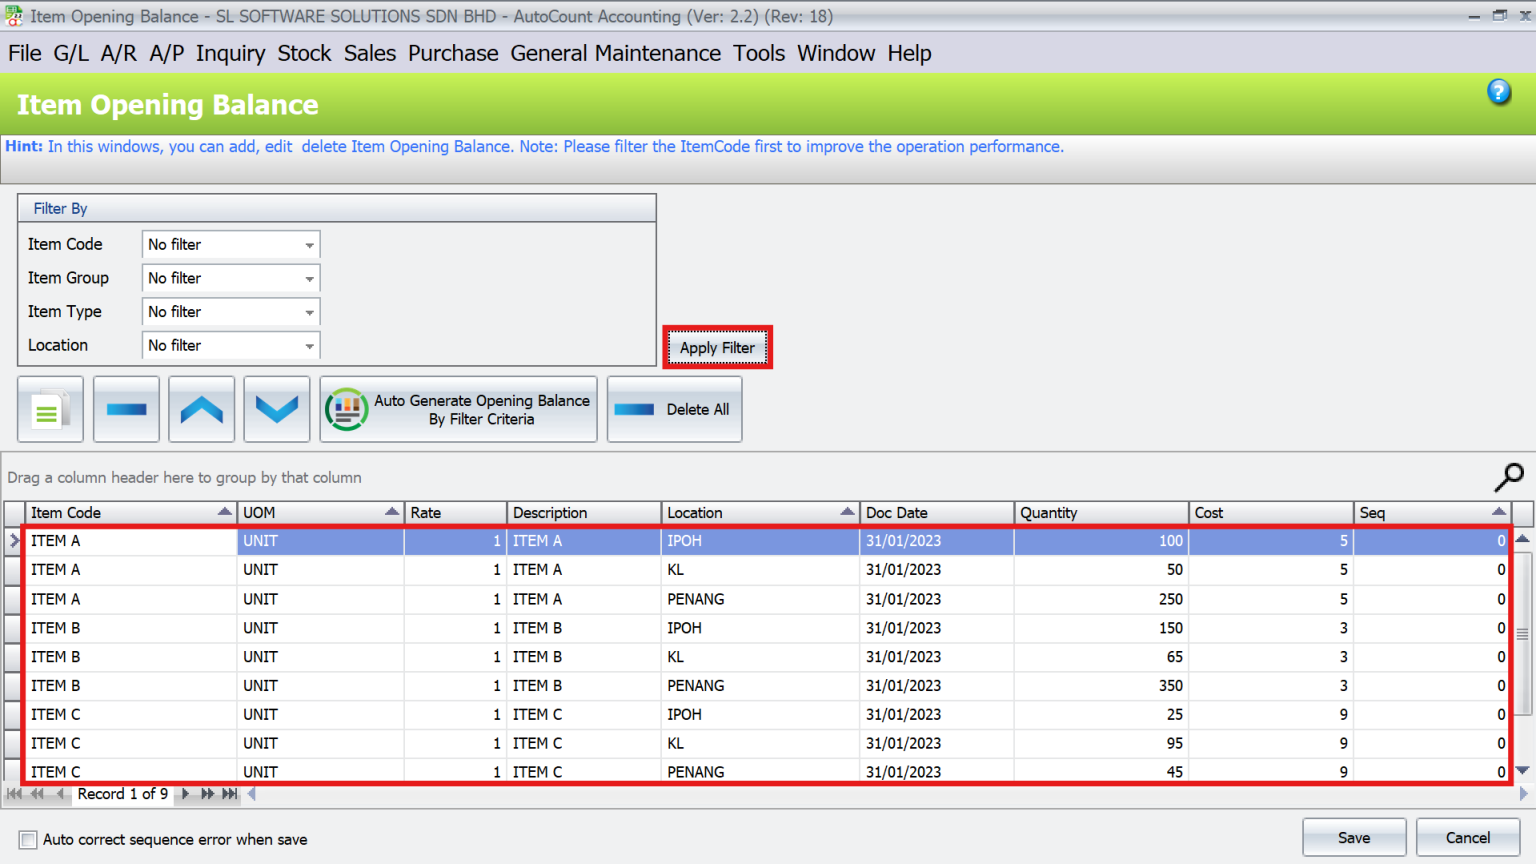
Opening Balances by Location
Accurate opening balances are essential when implementing the module:
Using Excel for Bulk Import
- Firstly, open AutoCount Accounting Management Studio and navigate to Import > Import Stock Item Opening.
- Secondly, copy the data from Excel and paste it using Paste from Clipboard.
- After that, verify the data and click Import.

- Go back system, Stock > More Stock Maintenance > Item Opening Balance Maintenance > Apply Filter to check the balances.
Generating Reports for Multi-Locations
Detailed reporting allows businesses to make informed decisions:
1. Filters by Location
Generate location-specific purchase, sales, or stock reports:
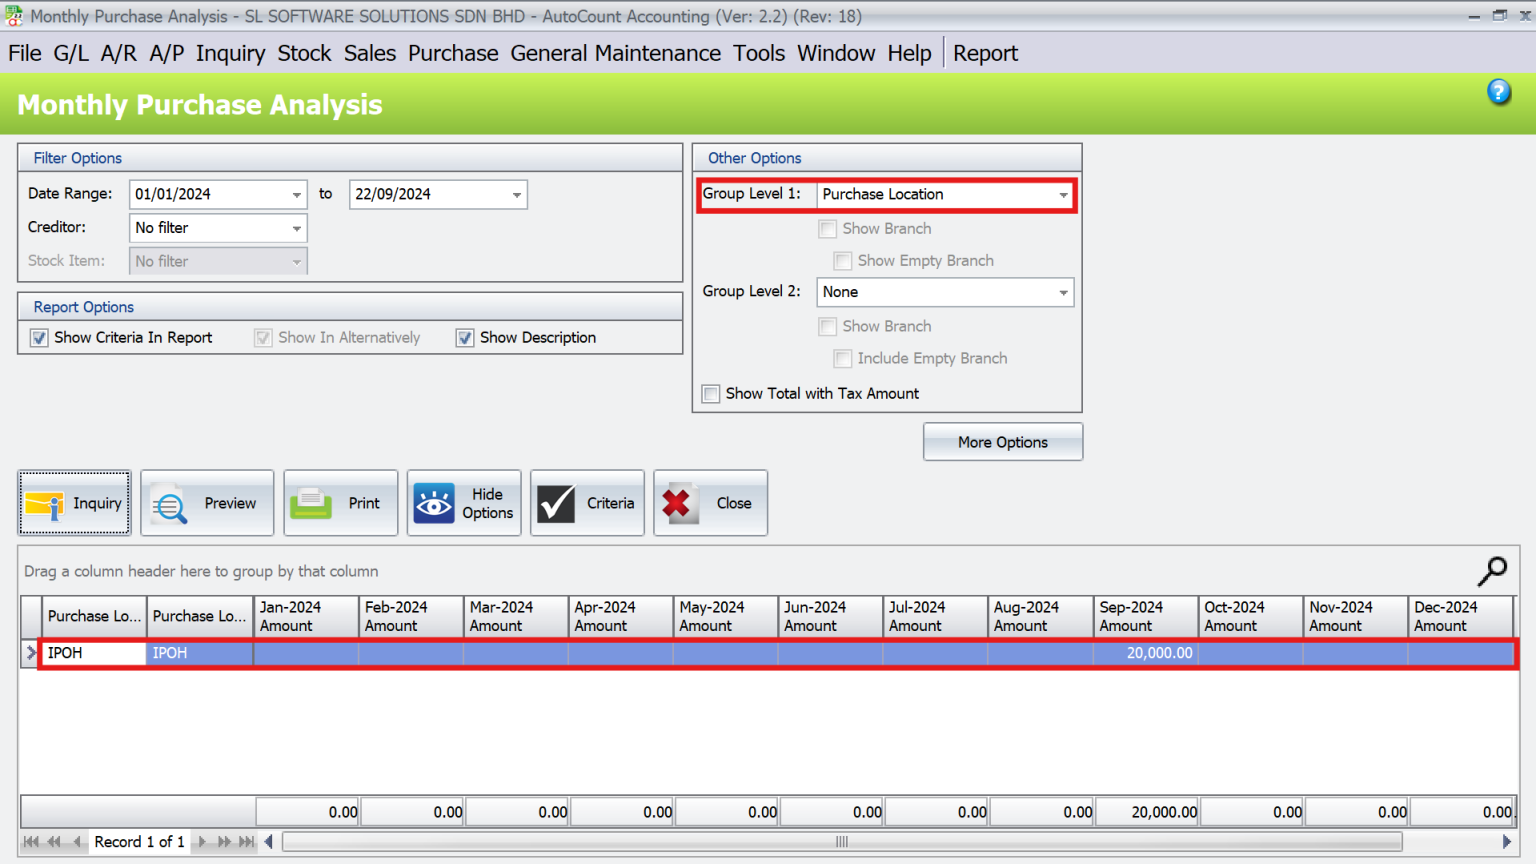
- Navigate to a report such as Monthly Purchase Analysis Report and click on More Options to access filter settings.
- Select a specific location (e.g., IPOH) under the Purchase Location field
- Similar filters exist for stock and sales reports.
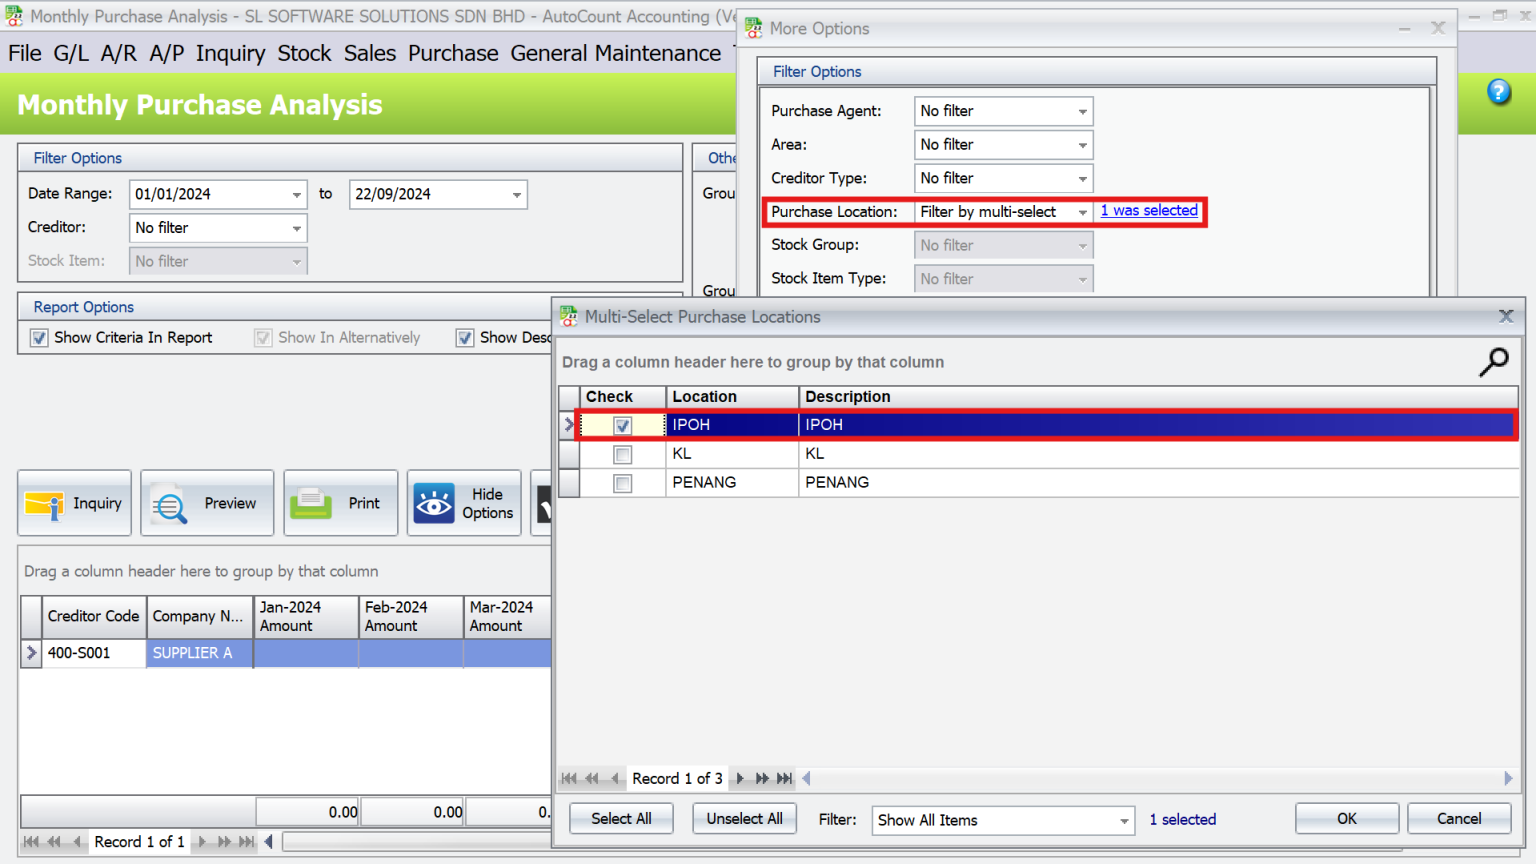
Use the Group Level field to organize the report:
- Choose Purchase Location to group data by the selected location.
2. Stock Balance Report
- Navigate to Stock > Stock Balance Report.
- Select Inquiry > Preview > Stock Balance for Single UOM.
- The report will display a list of items with their total balances across all locations, arranged from top to bottom.

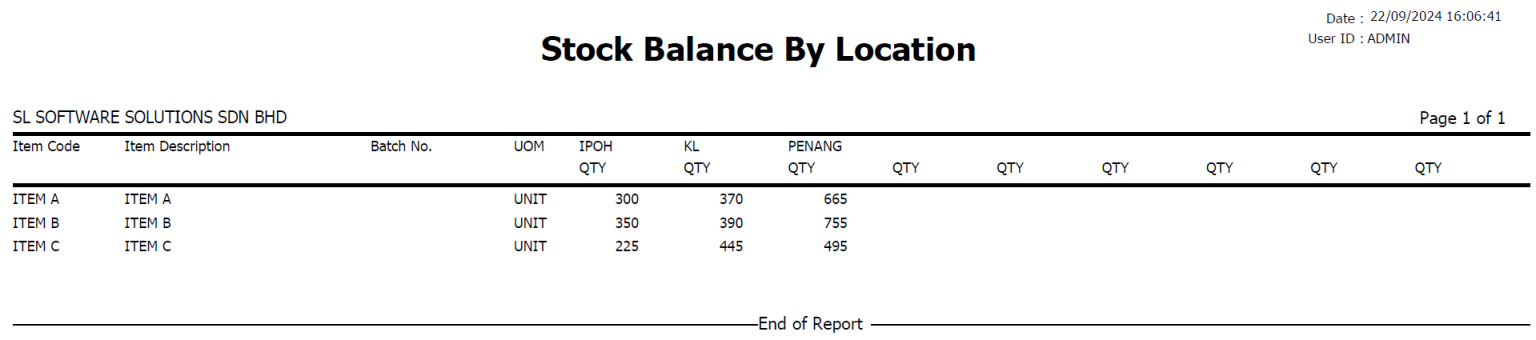
3. Stock Balance by Location Report
- Navigate to Stock > Stock Balance by Location Report.
- Select More Options and tick the Stock Location checkbox.
- Choose Inquiry > Preview > Stock Balance by Location (Qty Only) to view the balances in a horizontal layout for easy comparison.
4. Stock Card Reports
Track inventory movement, costs, and balances over time with the Stock Card Report.
- Navigate to Stock > Stock Card Report.
- Select Inquiry > Preview.

Real-Time Stock Visibility
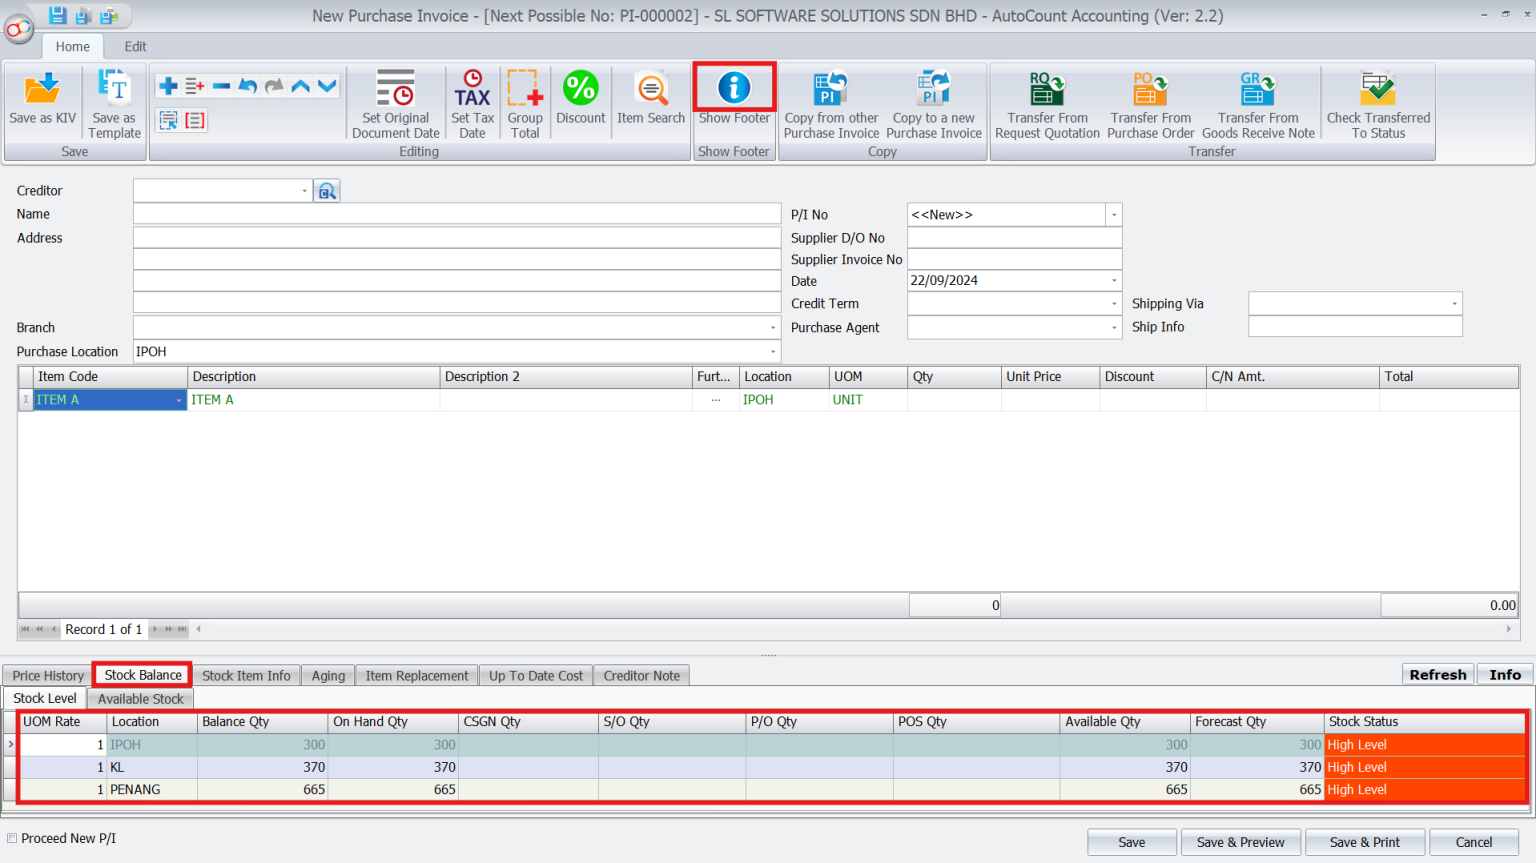
Access Show Instant Info in Stock, Purchase, or Sales module to view stock levels at any location instantly.
Steps to Access Show Instant Info in a Transaction:
- Open a purchase invoice or other transaction screen.
- Add the item and click the Show Instant Info button.
- A pop-up window will display real-time stock balances, grouped by location.
AutoCount Multi-Location Module 2.0 Video Guide
- AutoCount Multi-Location Module 2.0 (EN)
Multi-Location Module 2.0 Setup
Integration & Multi-Location Module 2.0 Setup
- AutoCount Multi-Location Module 2.0 (CN)
多地点模块 2.0 设置
集成和多地点模块 2.0 设置
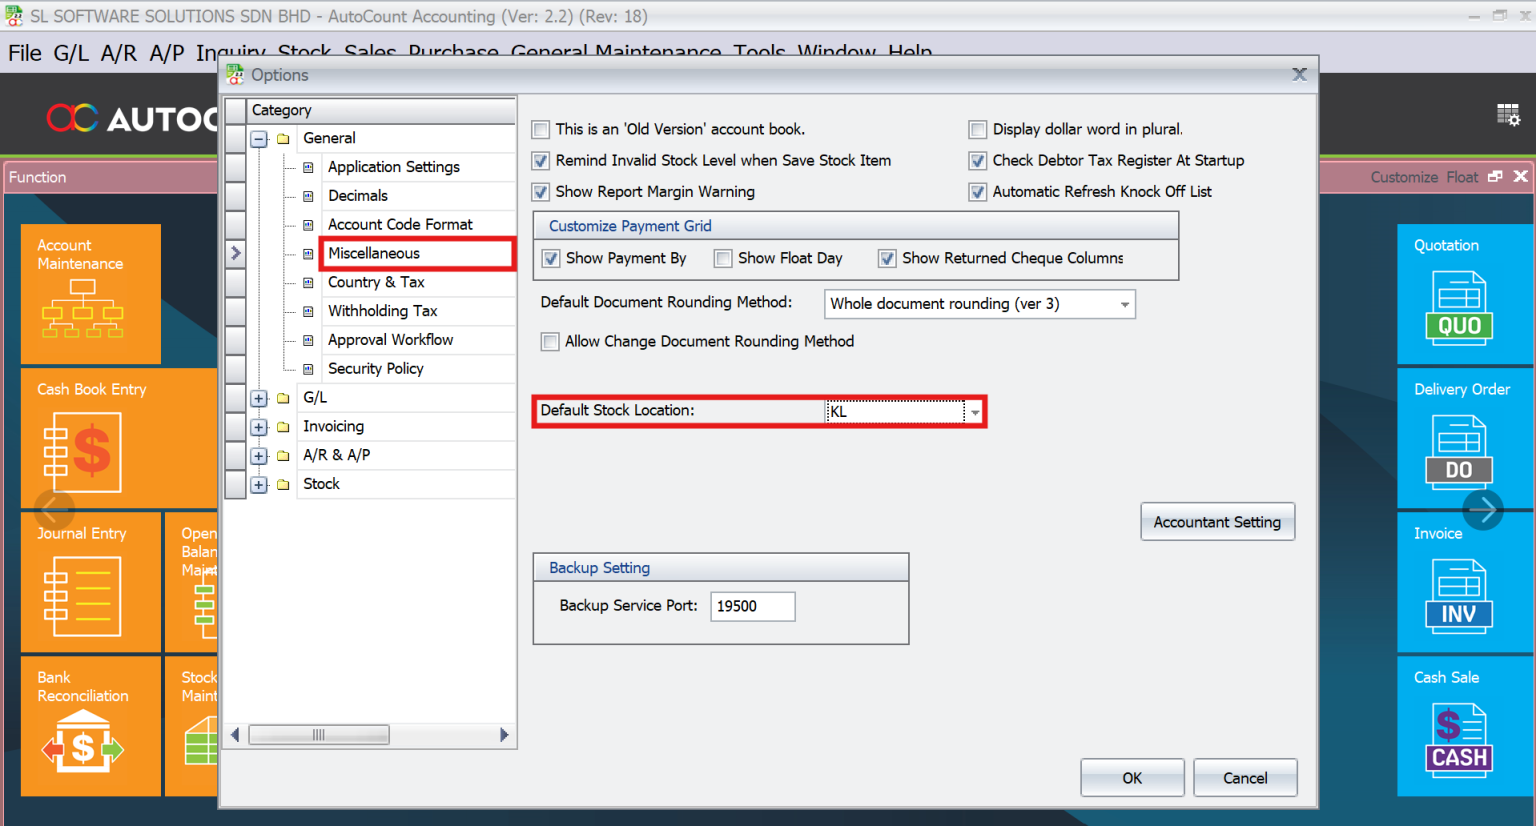
Default Location by System
Set default locations for users or system-wide
- Go to Tools > Options > Miscellaneous to define the default stock location.
- Save changes and re-login to apply updates for all transactions.
Access Control for Location-Based Management
Control access to inventory data and transactions by user or location:
1. Default Location by User
- Go to General Maintenance > User Maintenance.
- Assign a default stock location for each user (e.g., “LOW” is assigned Penang).
- Save the changes. Every time the user logs in, their default location will be pre-selected.

Steps to Configure Document Numbering Format:
- Navigate to General Maintenance > Document Numbering Format Maintenance.
- Create unique document numbering formats for each location. (e.g., PG/IV-<000000> for Penang)
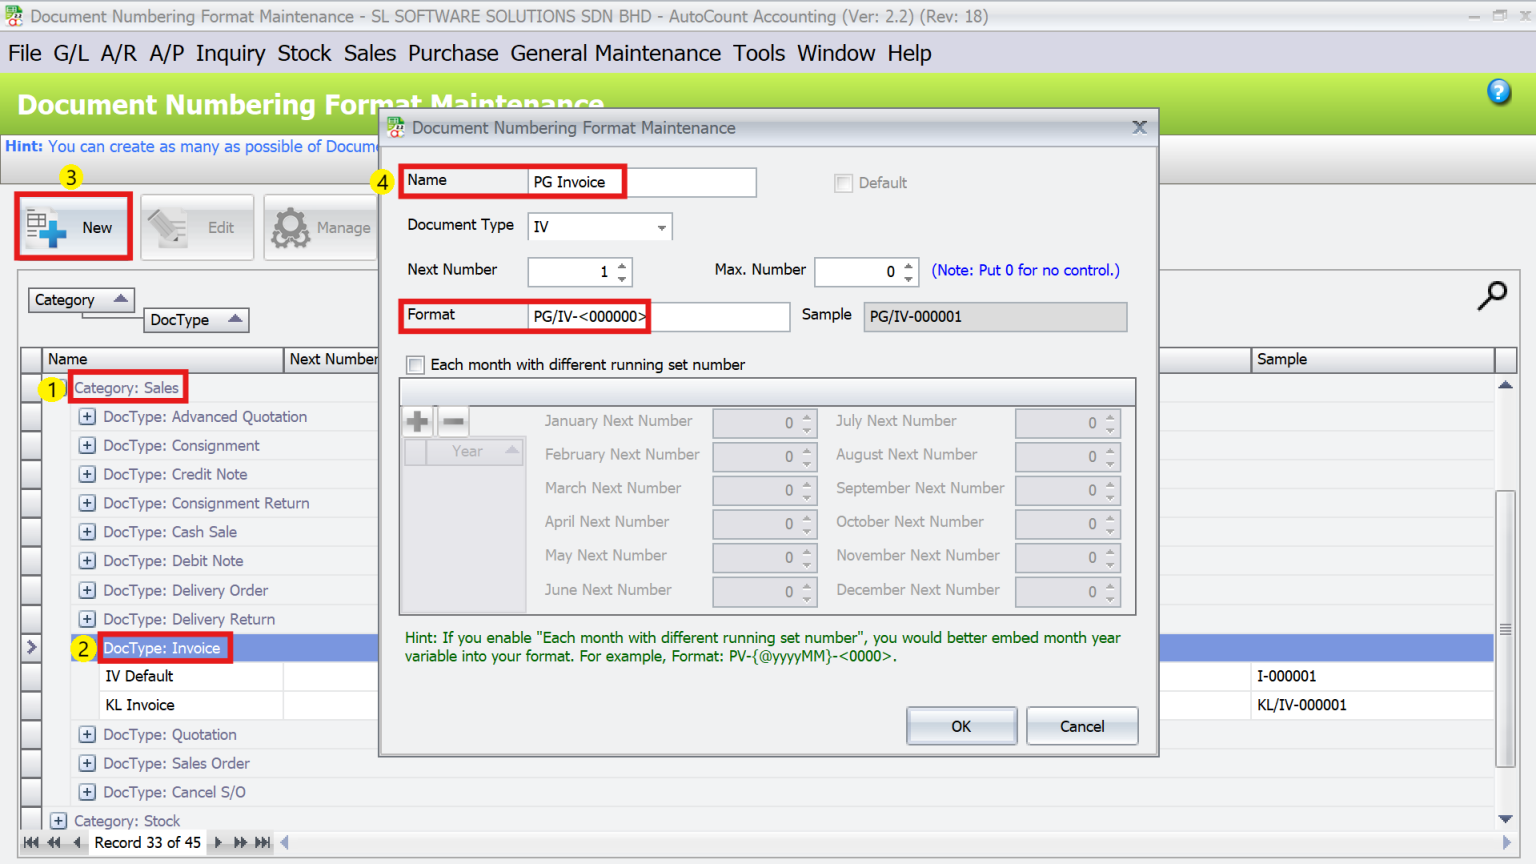
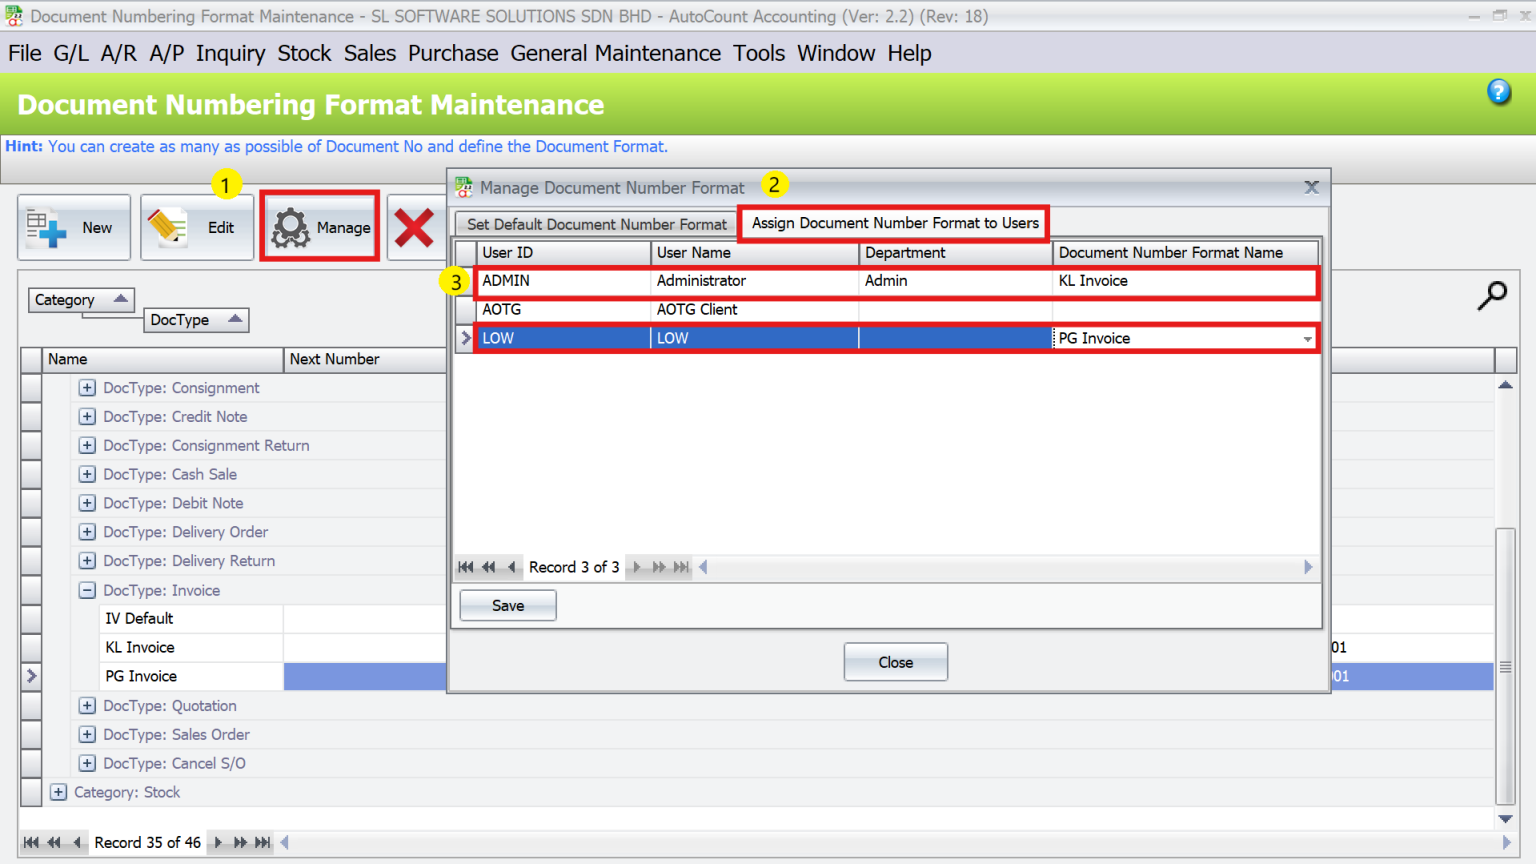
Assign the numbering formats to users:
- Go to Manage > Assign Document Number Format to Users.
- Assign the appropriate format to each user (e.g., KL Invoice to Admin and PG Invoice to Low).
2. Filter by Current User Location
Restrict users’ access to data for their assigned location, enhancing data security.
Enable the Filter Option
- Go to Tools > System Option Policy.
- Tick Enable Filter by Current User Location for both Access Rights and In Data Entry

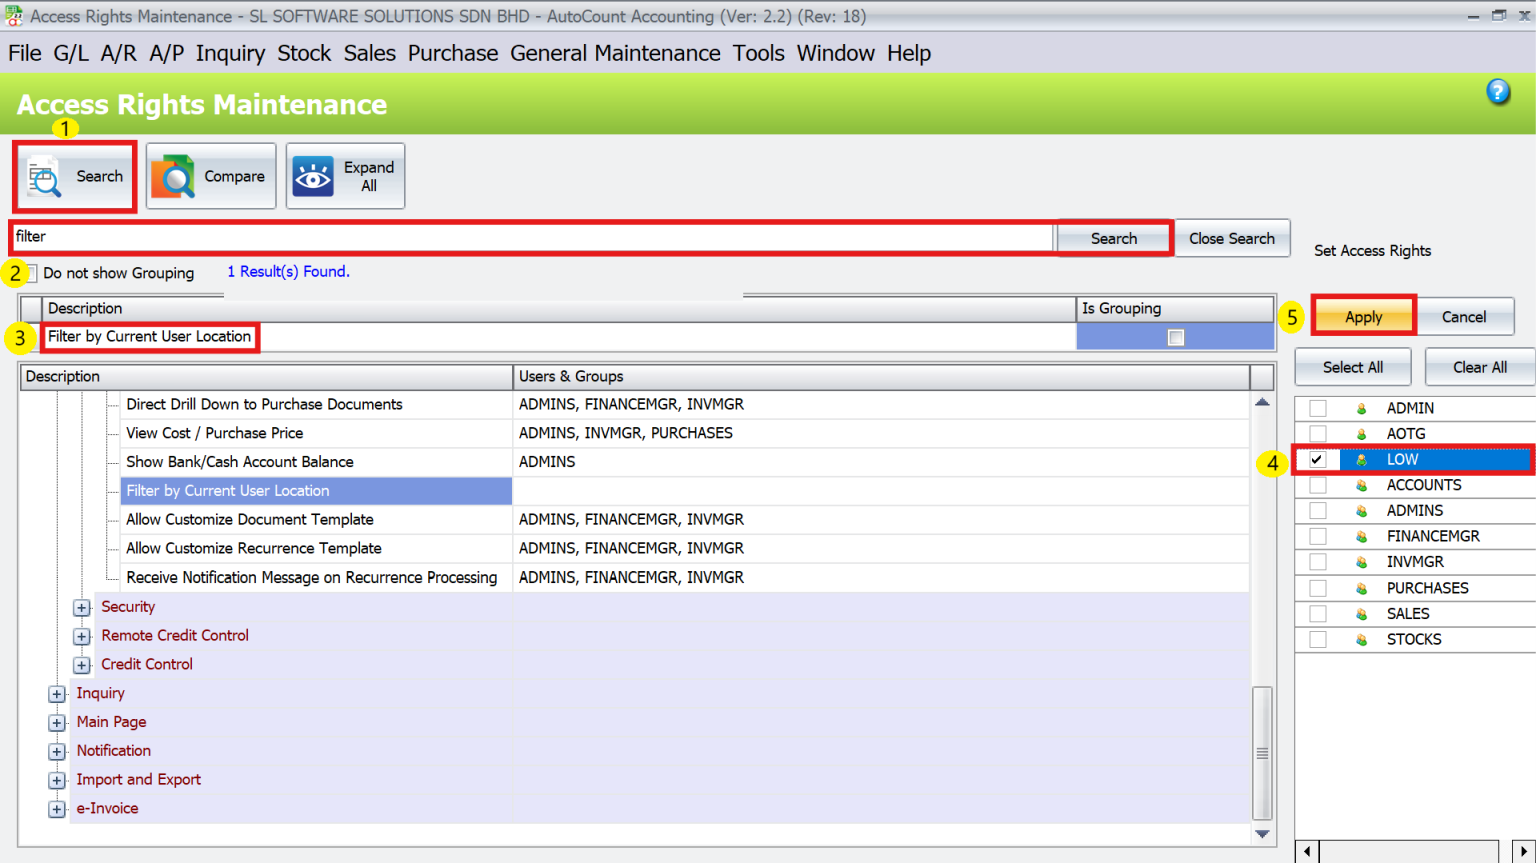
Assign Access Rights to Users
- Navigate to General Maintenance > Access Right Maintenance.
- Search for the keyword Filter in the access list to locate the Filter by Current User Location option.
- Assign the right to specific users or groups (e.g., LOW) and click Apply.
Automation in Inventory Replenishment
Avoid stockouts or excess inventory with automated replenishment tools:
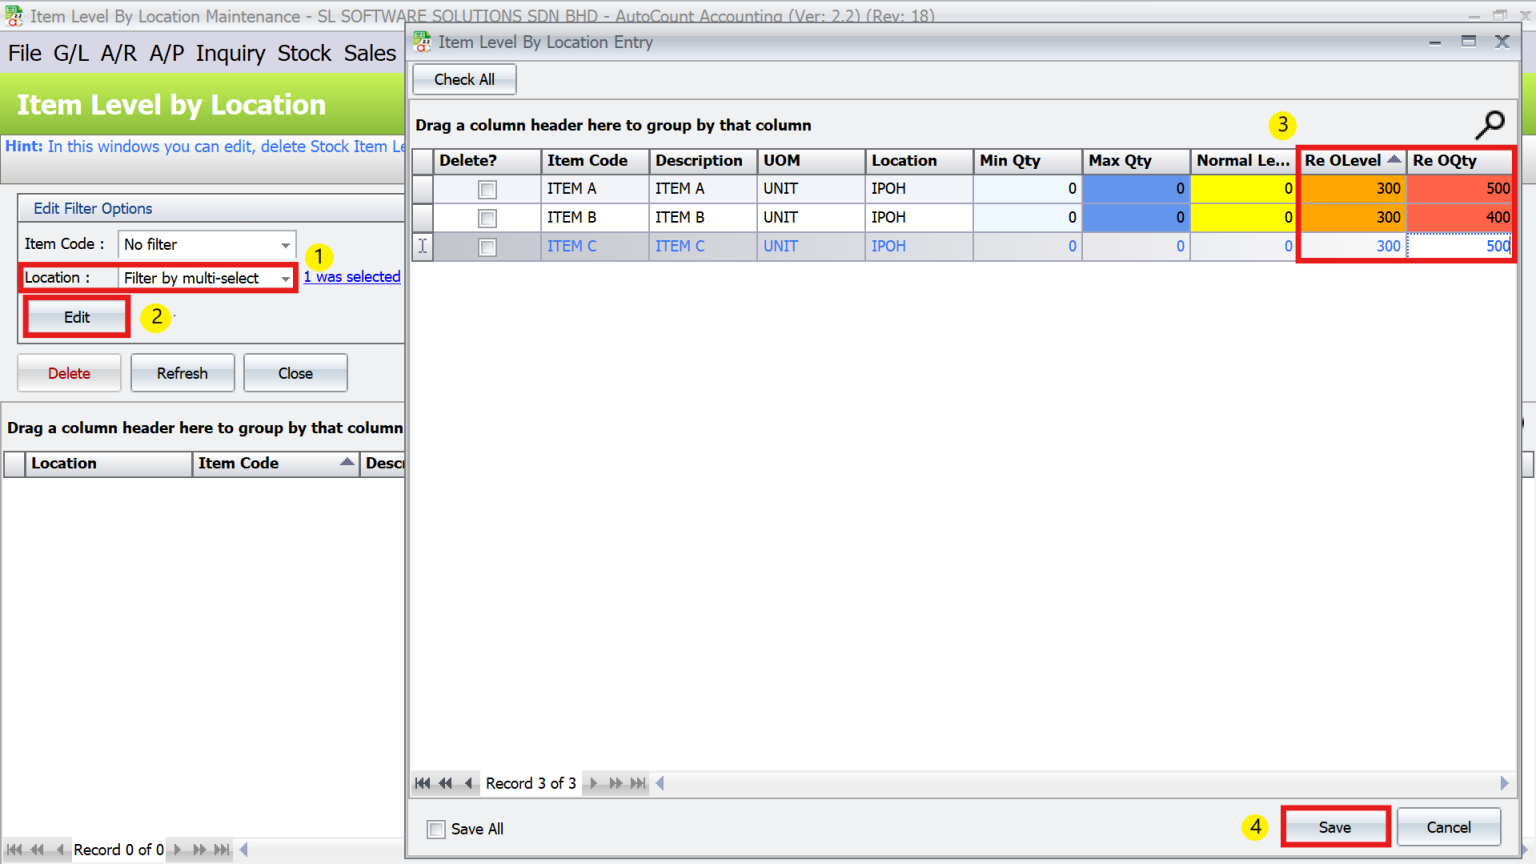
1. Steps to Configure Item Level by Location
- Navigate to Stock > More Stock Maintenance > Item Level by Location Maintenance.
- Use the Location Filter (e.g., IPOH) to display items for a specific branch or warehouse.
- Click Edit and then specify the Reorder Level (minimum stock level) and Quantity.
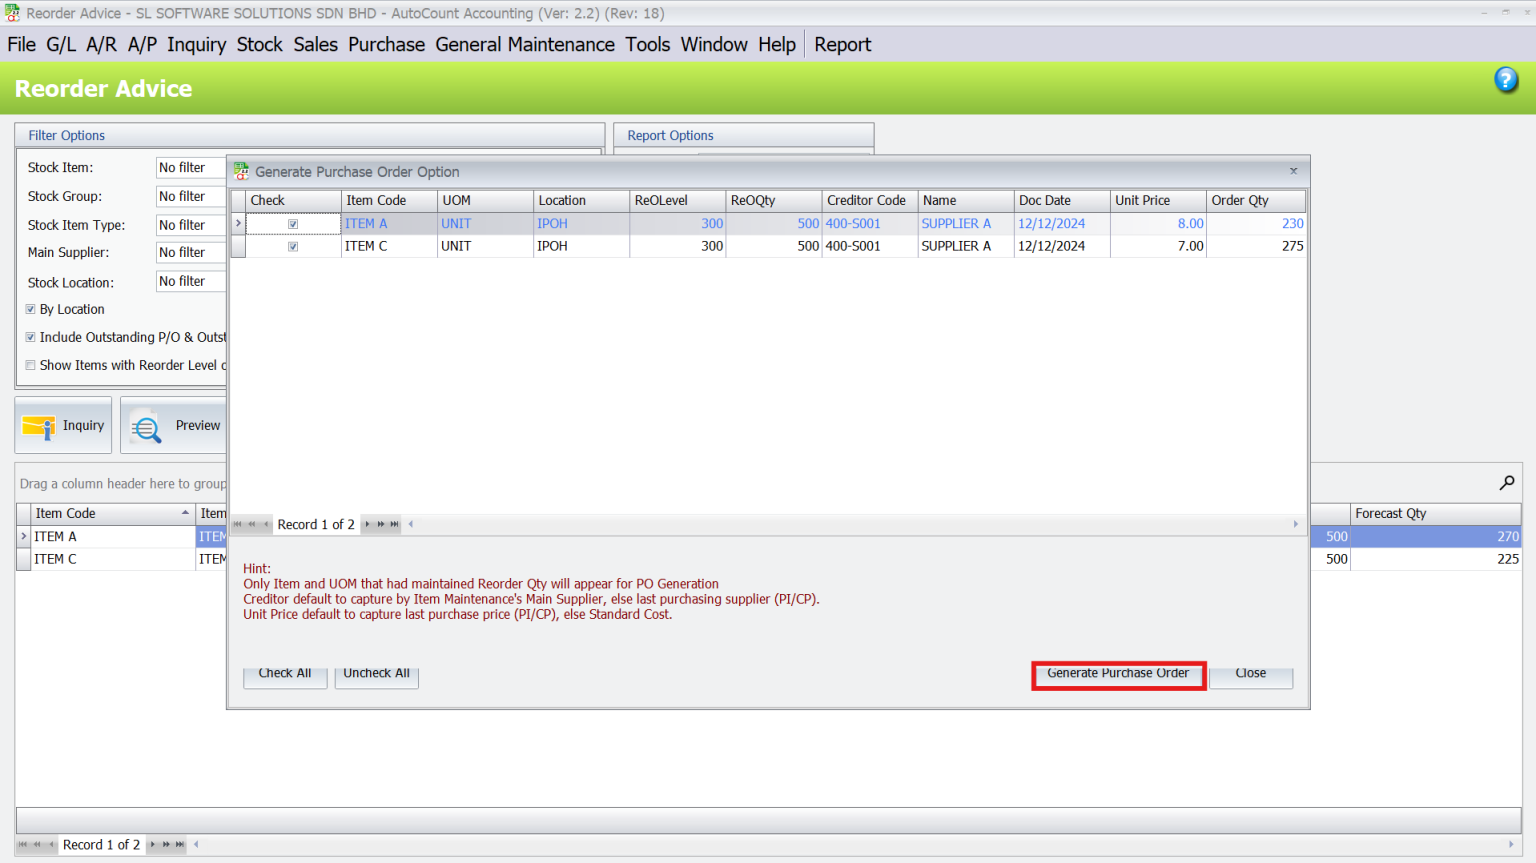
2. Generating Reorder Advice Reports
- Go to Stock > Reorder Advice Report.
- Tick the option By Location to generate a location-specific reorder report.
- Review items below their reorder levels for each branch.
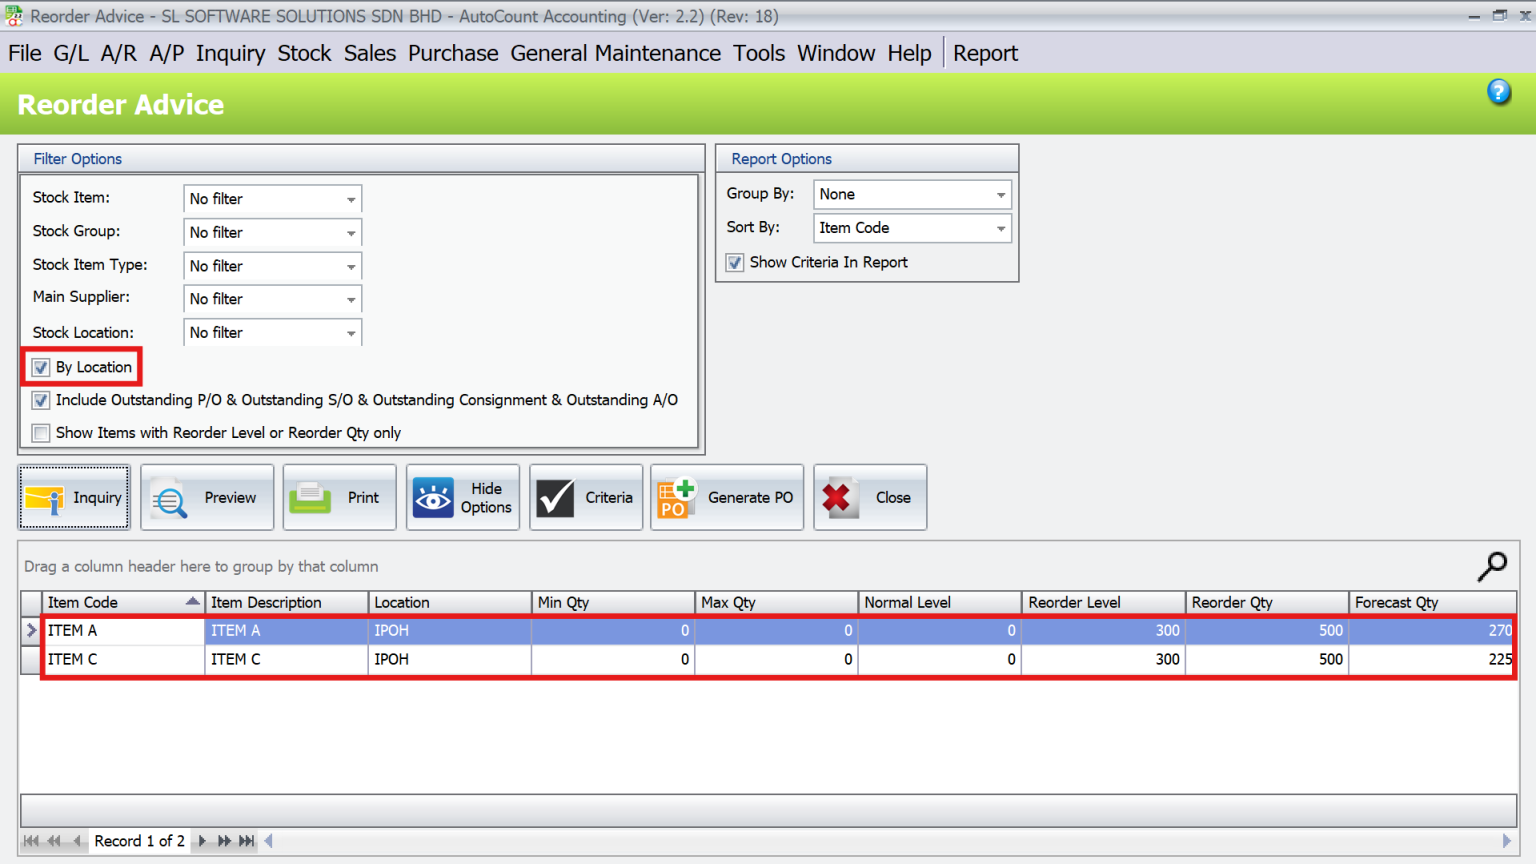
- Click Generate PO > Generate Purchase Order to create purchase orders directly from the report.
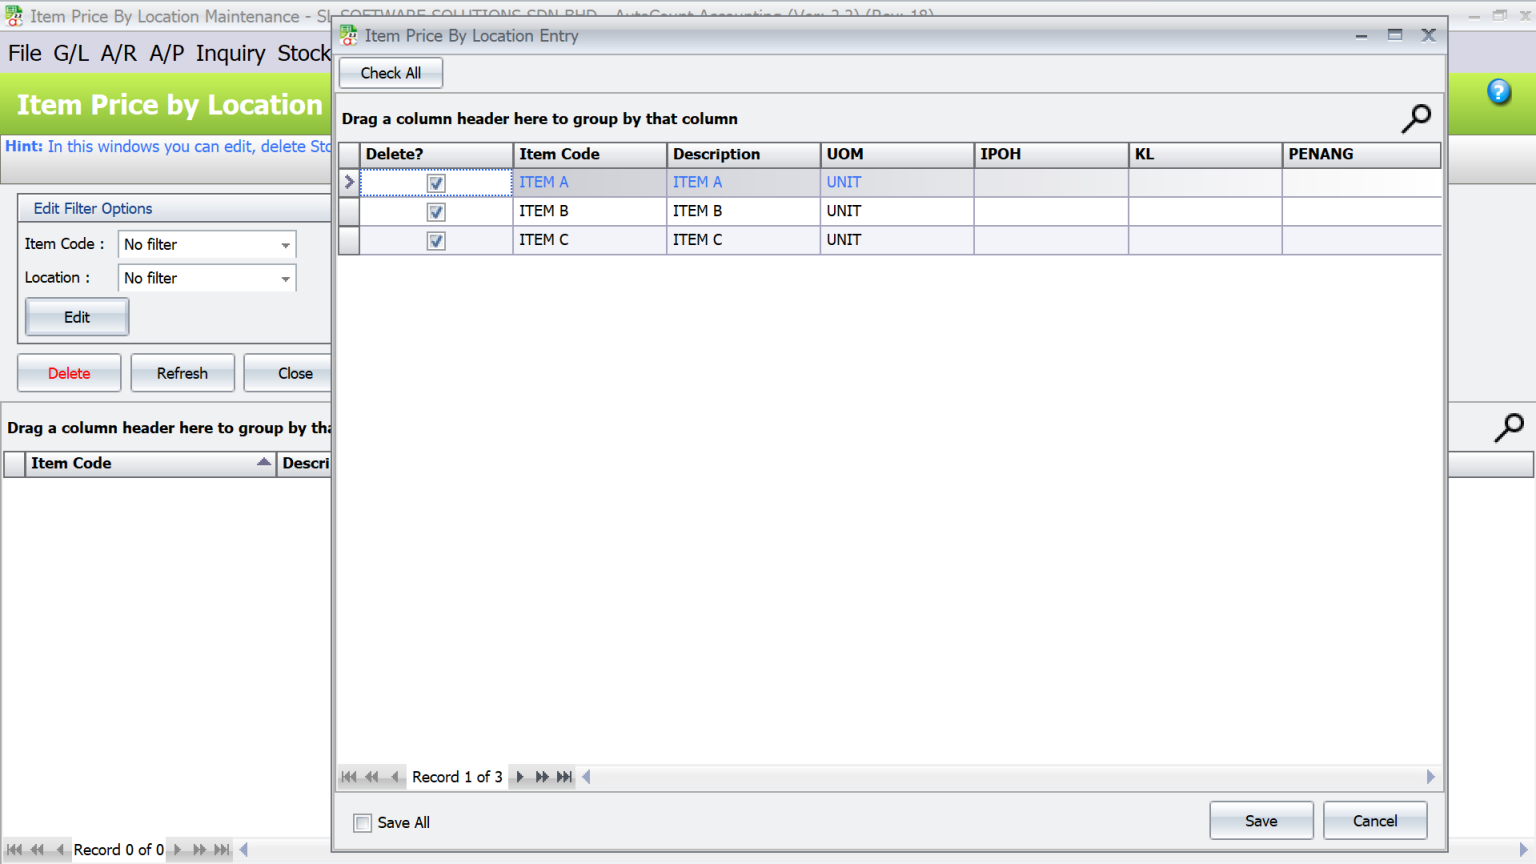
Item Price by Location (Applicable for POS Module only)
Steps to Configure Item Price by Location
- Navigate to Stock > More Stock Maintenance > Item Price by Location Maintenance.
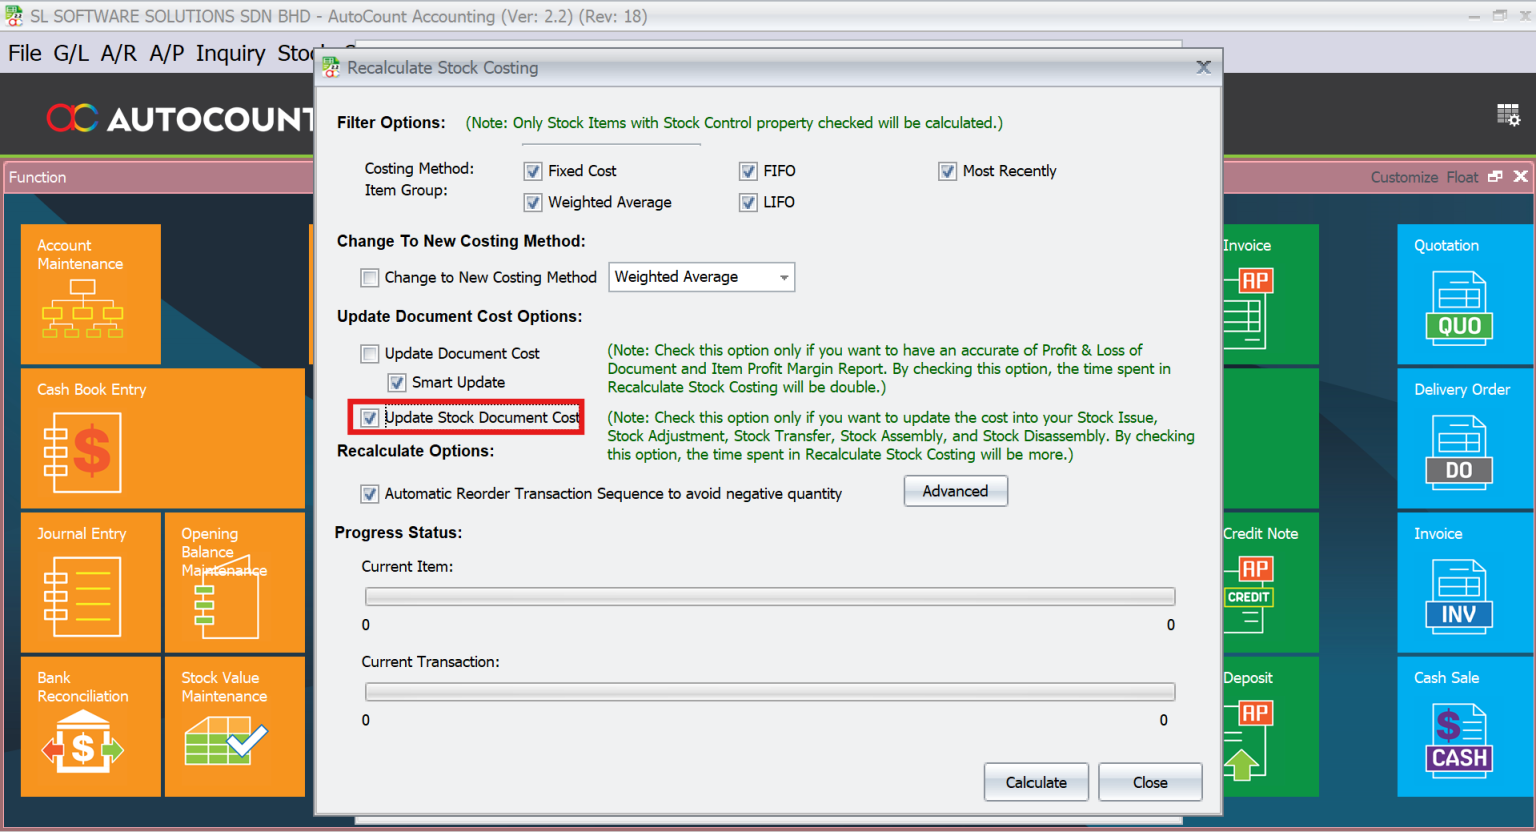
Recalculate Costing Across Locations
For companies dealing with varying costs at different branches, you can standardize costs:
Steps to Recalculate Stock Costing by Ignoring Location
- Go to Tools > Stock Costing Options > Advanced Costing Option.
- Tick Ignore Location in Costing Calculation and set a default costing location (e.g., IPOH).
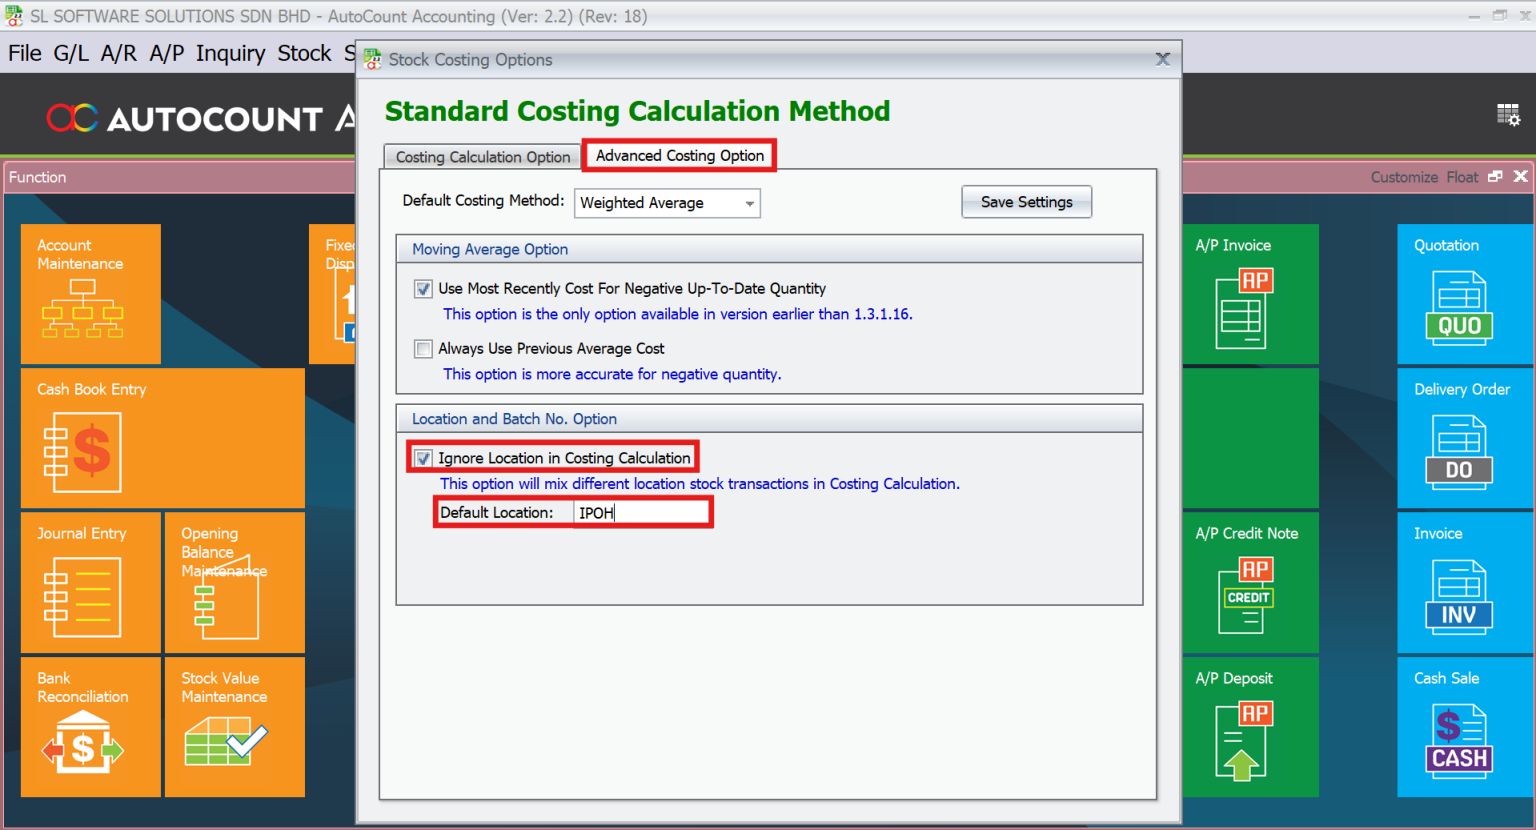
- Go back to Stock Costing Options and click Recalculate Stock Costing.
- If previous transactions contain errors, tick the option Update Stock Document Cost before running the recalculation
Plugins to Enhance Functionality
Take inventory management to the next level with these add-ons:
Stock Request
Streamlines branch-level stock requisitions.
Goods In Transit
Tracks inventory during inter-location stock transfers.
Rack Management
Adds detailed inventory tracking by rack within warehouses.
Stock Replenishment
Automates stock refill calculations based on historical data.
Many-to-Many
Enables bulk multi-location stock transfer efficiently.
Note: These plugins require dealer activation.
Best Practices for Multi-Location Inventory Management
To ensure seamless operations:
Train employees on module features and best practices.
Regularly update system policies to reflect operational changes.
Leverage advanced plugins to streamline workflows.
Conclusion
The AutoCount Multi-Location Module is a powerful tool that transforms how businesses manage inventory across multiple locations. From real-time stock visibility to advanced plugins for automation, it offers everything a business needs to thrive. With proper setup and usage, businesses can achieve streamlined operations, reduced costs, and improved customer satisfaction.
Frequently Asked Questions
How do I enable advanced plugins?
Contact your AutoCount dealer for plugin activation and setup.
Can this module integrate with POS systems?
Yes, it integrates seamlessly with the AutoCount POS Module.
What happens if stock data is mismatched?
Use reconciliation tools like Stock Balance Reports to identify and resolve discrepancies.
Is this module suitable for SMEs?
Absolutely! It caters to businesses of all sizes.
Does it support multi-currency transactions?
Yes, AutoCount supports multi-currency environments.
How do I manage user-specific restrictions?
Use the Filter by Current User Location feature to restrict access and enhance security.
Interested in Getting AutoCount for your Business?
Contact our sales team today to explore pricing options and get started with the perfect solution for you.