
Need Help?
-
AutoCount Accounting Features
-
- Approval Workflow
- Audit Trail
- Auto Save in Draft Folder
- AutoCount Contra Account
- AutoCount License Setting Guide
- Deposit Tracking & Management
- Documents Numbering Format
- Full Transfer and Partial Transfer
- Import Data to AutoCount Accounting Using Excel
- Informative Charts and Analytical Data
- Layout Customization
- Multi Pricing
- Sales and Services Tax
- Schedule Backup
- Search Lookup Edit
- View Documents Flow
- AutoCount Feature Stock Take
- Column Chooser
- Show Remaining (3) Collapse
-
AutoCount Cloud Accounting
-
AutoCount E-Invoice
-
AutoCount HRMS User Guide
-
AutoCount Modules
-
- Activity Stream
- Advanced Financial Report
- Advanced Item
- Advanced Multi-UOM
- Advanced Quotation Module
- Basic Multi-UOM
- Budget Module
- Consignment
- Filter By Salesman
- FOC Quantity
- Formula
- Item Batch
- Item Package
- Landing Cost
- Multi-Currency
- Multi-Dimensional Analysis
- Multi-Location
- Project Account
- Recurrence
- Remote Credit Control Module
- Stock Assembly
- User Defined Fields (UDF)
- AutoCount SST Hidden Functions
- AutoCount SST Submission - Service Tax
- AutoCount Scripting Module User Guide
- AutoCount Bonus Point Module User Guide
- AutoCount Service Management Plugin User Guide
- Show Remaining (12) Collapse
-
AutoCount Plugins
-
- Fixed Assets Management
- Goldsmith
- TD Ordering Mobile Apps
- TD Stock Mobile Apps
- Universal Import Plugin
- DMS Import Plugin
- AutoCount Pick List Plugin User Guide
- AutoCount Credit Memo Plugin User Guide
- AutoCount Lock Price Plugin
- AutoCount Progressive Billing
- AutoCount Easy Recurrence Plugin
- Batch Update Unit Price Plugin
- AutoCount Production order
- AutoCount Car Tint Film Plugin
-
- Event Management System
- AutoCount To-Do List Plugin
- AutoCount AutoBank Reconciliation Plugin
- Intercompany Billing Plugin User Guide
- Lead Management 2.0 Plugin
- AutoCount Service Contract Plugin User Guide
- AutoCount Optical Plugin
- AutoCount Integrator Plugin
- AutoCount Procurement Planning Plugin
- Cage Management Plugin
- AutoCount Vehicle Plugin
- AutoCount Agent Validation Plugin User Guide
- AutoCount Barcode Generator Plugin User Guide
- AutoCount Easy Batch Number Entry Plugin User Guide
- Warranty 2.0 Plugin
- AutoCount Easy Photo 2.0 User Guide
- AutoCount Recurring Invoice Plugin User Guide
- AutoCount Scale Barcode Plugin User Guide
- AutoCount Recurrence Late Interest Plugin
- AutoCount Item Visibility Control
- AutoCount Bill Remark Plugin User Guide
- AutoCount Pain Tracker User Guide
- AutoCount Easy Payment
- AutoCount Easy Deposit Plugin
- AutoCount Easy Knock Off Plugin
- AutoCount Daily Collection Summary Plugin
- Timber Log Plugins
- Batch Transfer SODO Plugin
- AutoCount Vege Basket Plugin Guide
- AutoCount Fruit Basket Plugin Guide
- Referral Management Plugin
- AutoCount Migrator Plugin
- AutoCount Email & WhatsApp Plugin
- AutoCount Multi Company Knock Off Plugin
- AutoCount Advance Aging Format Plugin
- AutoCount Payment Request Plugin
- AutoCount Vehicle Master Plugin
- AutoCount Advance Deposit Plugin
- AutoCount IC Checker Plugin
- AutoCount RMA Plugin
- AutoCount Historical Outstanding DO Listing Plugin
- AutoCount Project Department Visibility Control Plugin
- AutoCount MRP Order Plugin
- AutoCount GridToExcel Plugin
- AutoCount Stock Availability Report Plugin
- AutoCount Batch Transfer SO DO Plugin
- AutoCount Centralized Kitchen Management Plugin
- SL AutoCount API
- AutoCount InterCompany Billing Plugin
- AutoCount Sales Commission Plugin
- AutoCount Advanced Credit Term Plugin
- AutoCount Advanced Stock Assembly Plugin
- AutoCount Shipment Plugin
- AutoCount Tour Plugin
- AutoCount Smart Analysis
- AutoCount Rental Management
- Show Remaining (41) Collapse
-
-
Form Template
-
Report Template
-
- Advance Quotation
- Cash Sale
- Consignment
- Consignment Movement
- Credit Note
- Debit Note
- Delivery Order
- FOC Quantity Analysis By Document Report
- Invoice
- Item Package Sales Report
- Monthly Sales Analysis
- Outstanding Sales Order Listing
- Profit And Loss Of Documents
- Quotation
- Sales Agent Contribution Report
- Sales Order
- Top/Bottom Sales Ranking
- Show Remaining (2) Collapse
-
- Available Stock Status Report
- Expired Item Batch Listing
- Inventory Physical Worksheet
- Stock Adjustment
- Stock Aging Report
- Stock Assembly
- Stock Assembly Order
- Stock Balance By Location
- Stock Balance Report
- Stock Card Report
- Stock Disassembly
- Stock Issue
- Stock Item Profit Margin
- Stock Movement Report
- Stock Receive
- Stock Take
- Stock Transfer
- Stock Write Off
- Show Remaining (3) Collapse
-
B2B ORDERING
-
AutoCount AI Agent
B2B Ordering Portal & Dashboard Guide
What Is the B2B Ordering Portal?
The B2B Ordering Portal provides separate access for administrators and customers. Administrators can manage companies, users, branding, settings and portal access, while authorised customers can review account information, browse the catalogue, prepare orders and check their latest transaction records.
The portal is connected to AutoCount so that orders, item information, invoices and statements can be made available through one online interface. This guide explains the main portal functions and how each area is used.
How Does the B2B Ordering Portal Work?
The portal contains two main working areas:
- Admin Console — used to manage companies, portal settings and authorised users.
- Customer Portal — used by customers to browse items, prepare orders, review invoices and download statements.
Each user should only be given access to the companies or subsidiary accounts that they are authorised to manage.
A business with several data codes or subsidiary companies may provide:
- One main account that can access multiple companies
- Separate accounts for individual branches or subsidiary companies
- Different users with access limited to their assigned company
Portal Maintenance and User Access
1. Select the Company to Manage
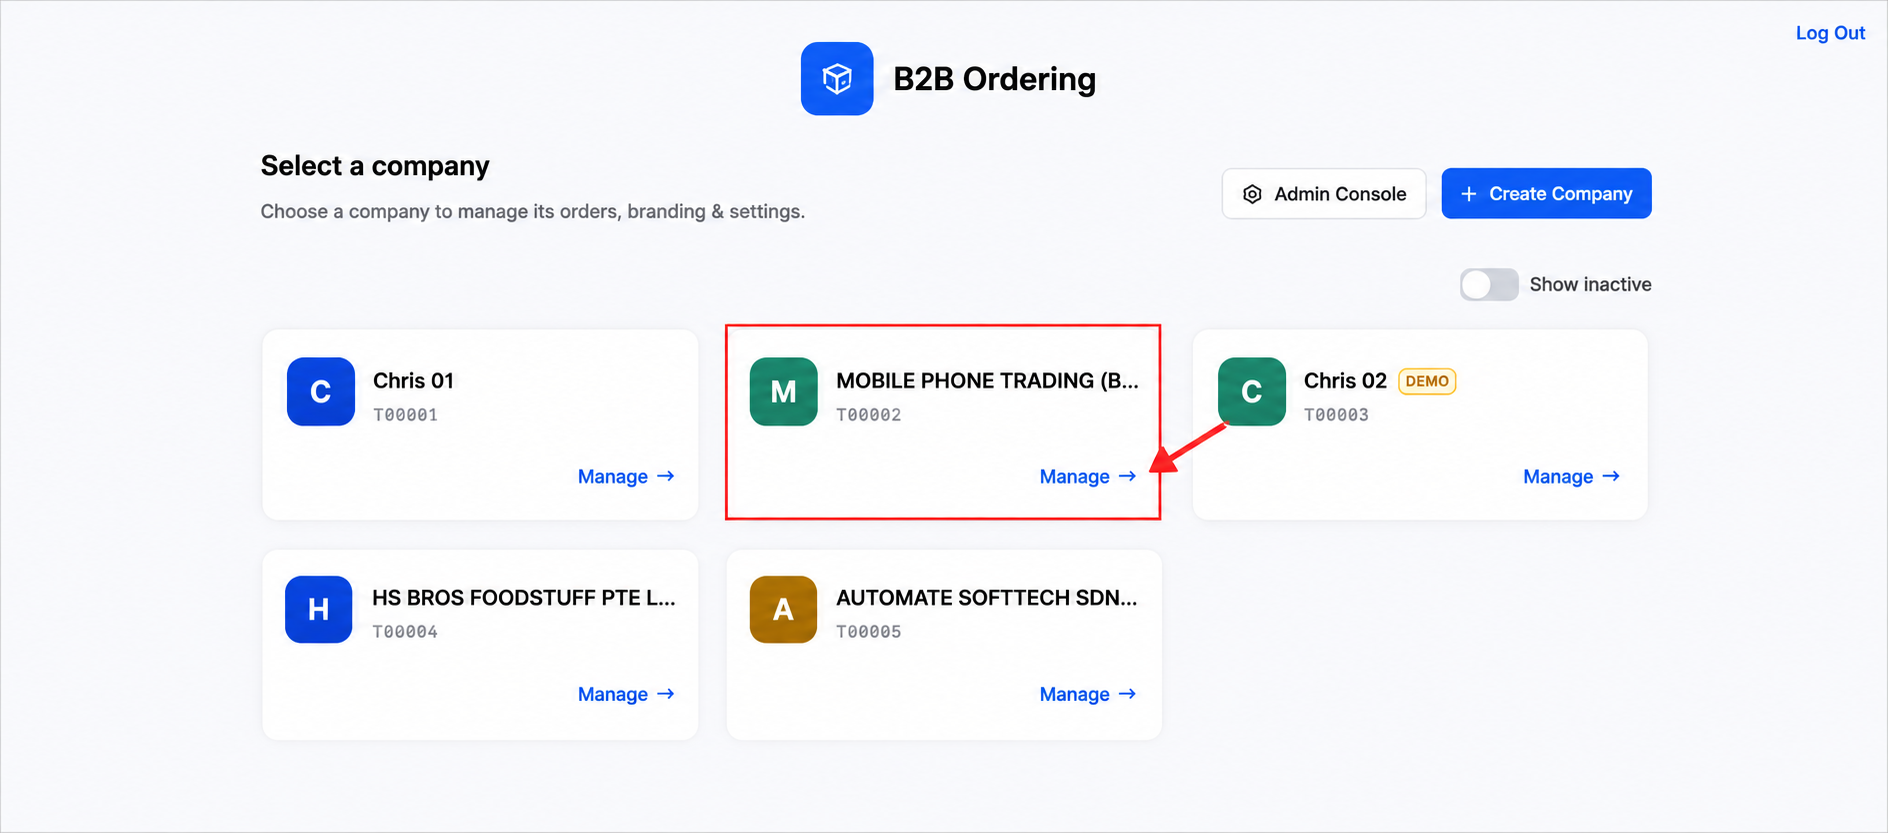
After signing in to the administration portal, the company selection page displays the companies available under the account.
To continue:
- Locate the required company.
- Click Manage beside the company name.
- Confirm that the correct company is displayed in the left-side panel before changing any settings.
- Use Show inactive when an inactive company needs to be reviewed.
2. Open User Maintenance
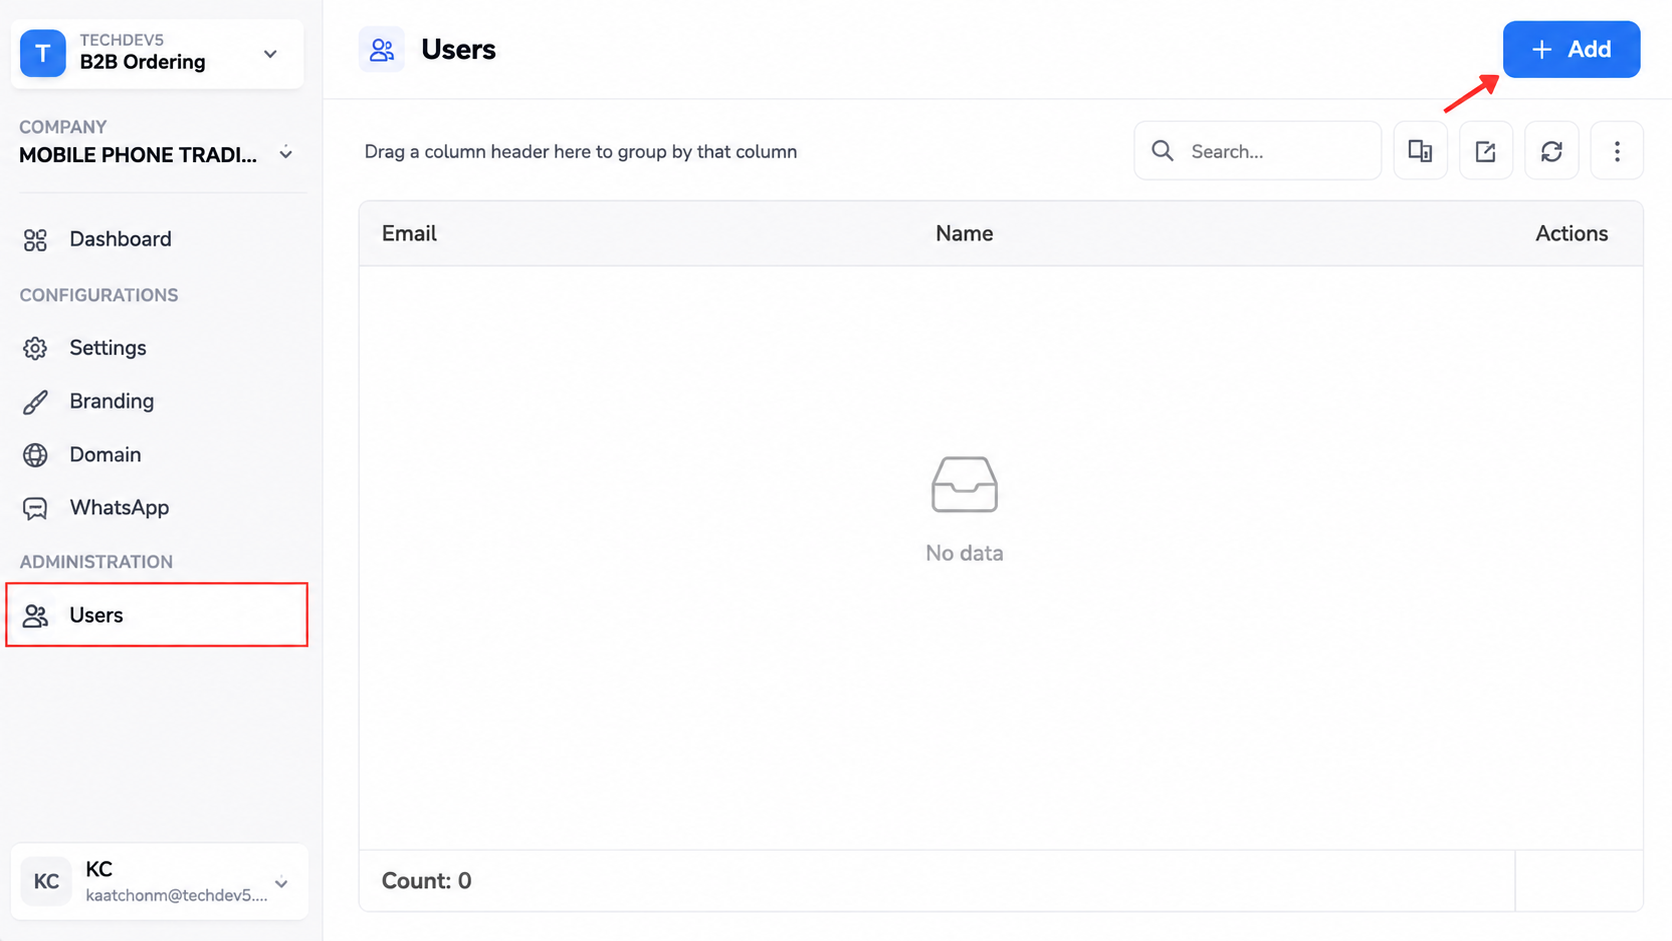
Within the selected company, open Users under the Administration section.
This page shows the users who have been invited to access the company portal. Available functions may include:
- Adding a new user
- Searching for an existing user
- Reviewing the user’s email address and name
- Managing access according to the authorised company
3. Invite a User
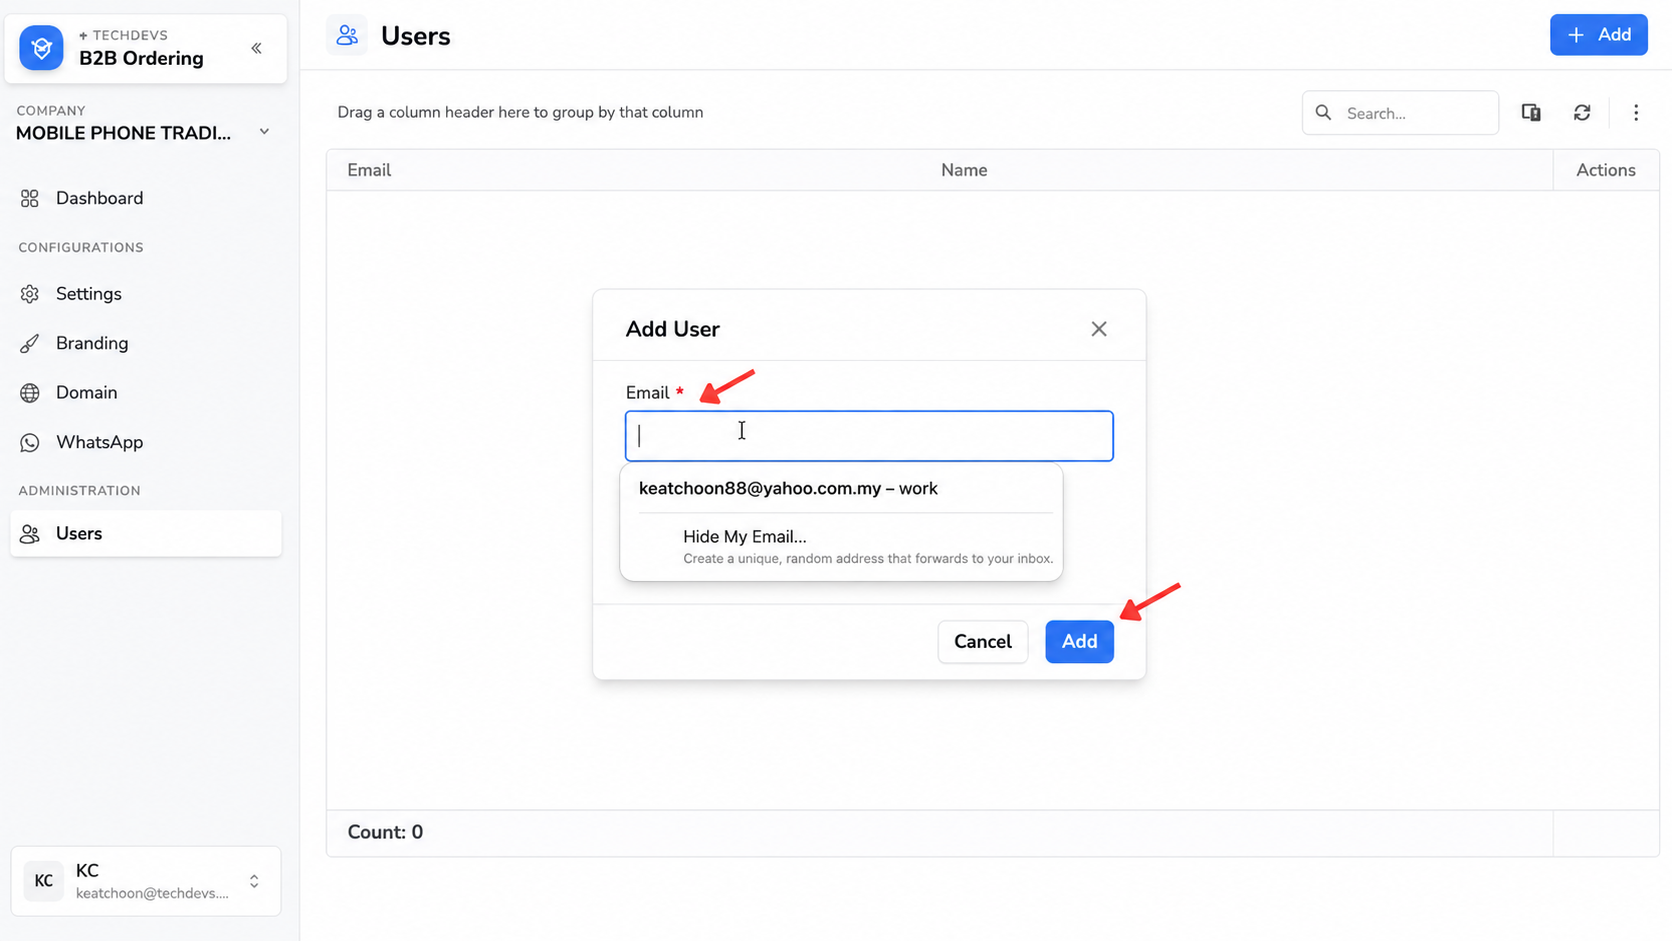
To invite a new user:
- Click Add.
- Enter the user’s email address.
- Click Add in the confirmation window.
- Confirm that the user appears in the Users list after the invitation is completed.
The invited user should only be able to view the company or companies assigned to the account.
Important:
Do not provide access to a company until the user’s email address and authorised company have been verified.
4. Maintain Company Configuration
The Admin Console may provide configuration areas such as:
- Settings
- Branding
- Domain
- Users
For detailed instructions on branding, stock display and customer-facing message settings, refer to the B2B Portal and Dashboard Customization Guide.
These areas are used to maintain how the portal is presented and who can access it. Only authorised administrators should change these settings.
Understanding the Dashboard and Customer Portal
The system provides different dashboard views for administrators and customers. The information shown depends on the user’s account and assigned access.
1. Review the Administration Dashboard
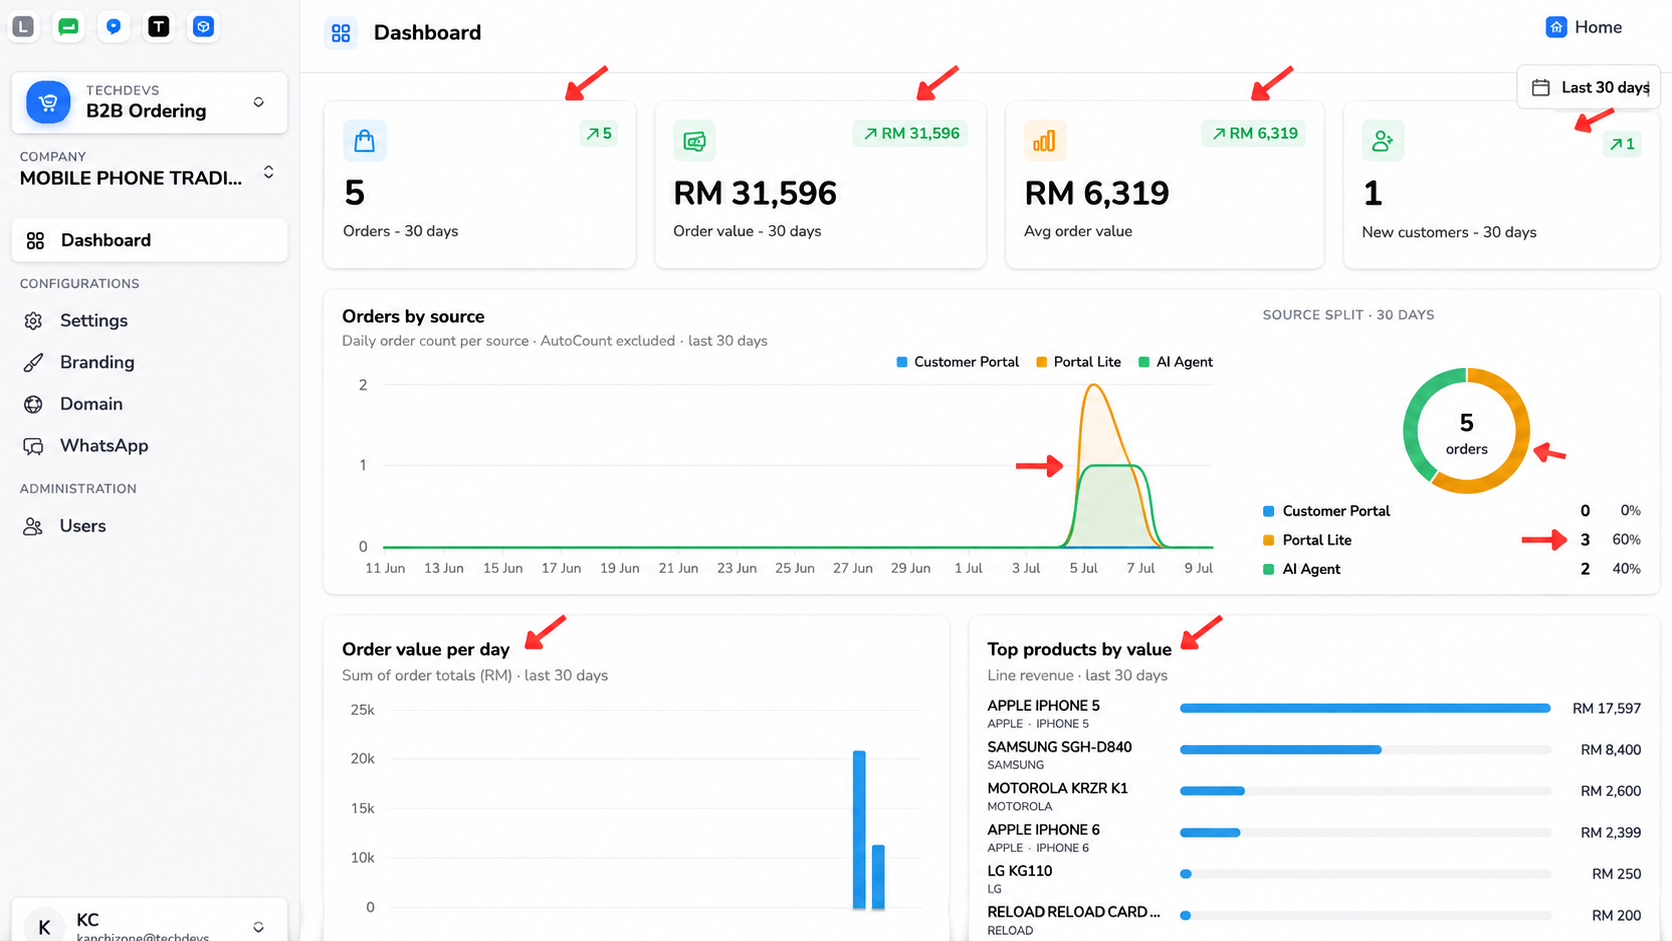
The administration dashboard provides an overview of B2B ordering activity for the selected period. It may display:
- Total number of orders
- Total order value
- Average order value
- Number of new customers
- Daily orders by source
- Order source distribution
- Daily order value
- Top products by sales value
Orders can be separated according to their source, such as:
- B2B Ordering Portal
- Mobile Ordering
- WhatsApp AI Agent
This helps administrators understand how customers are placing orders and which ordering channels are being used most frequently.
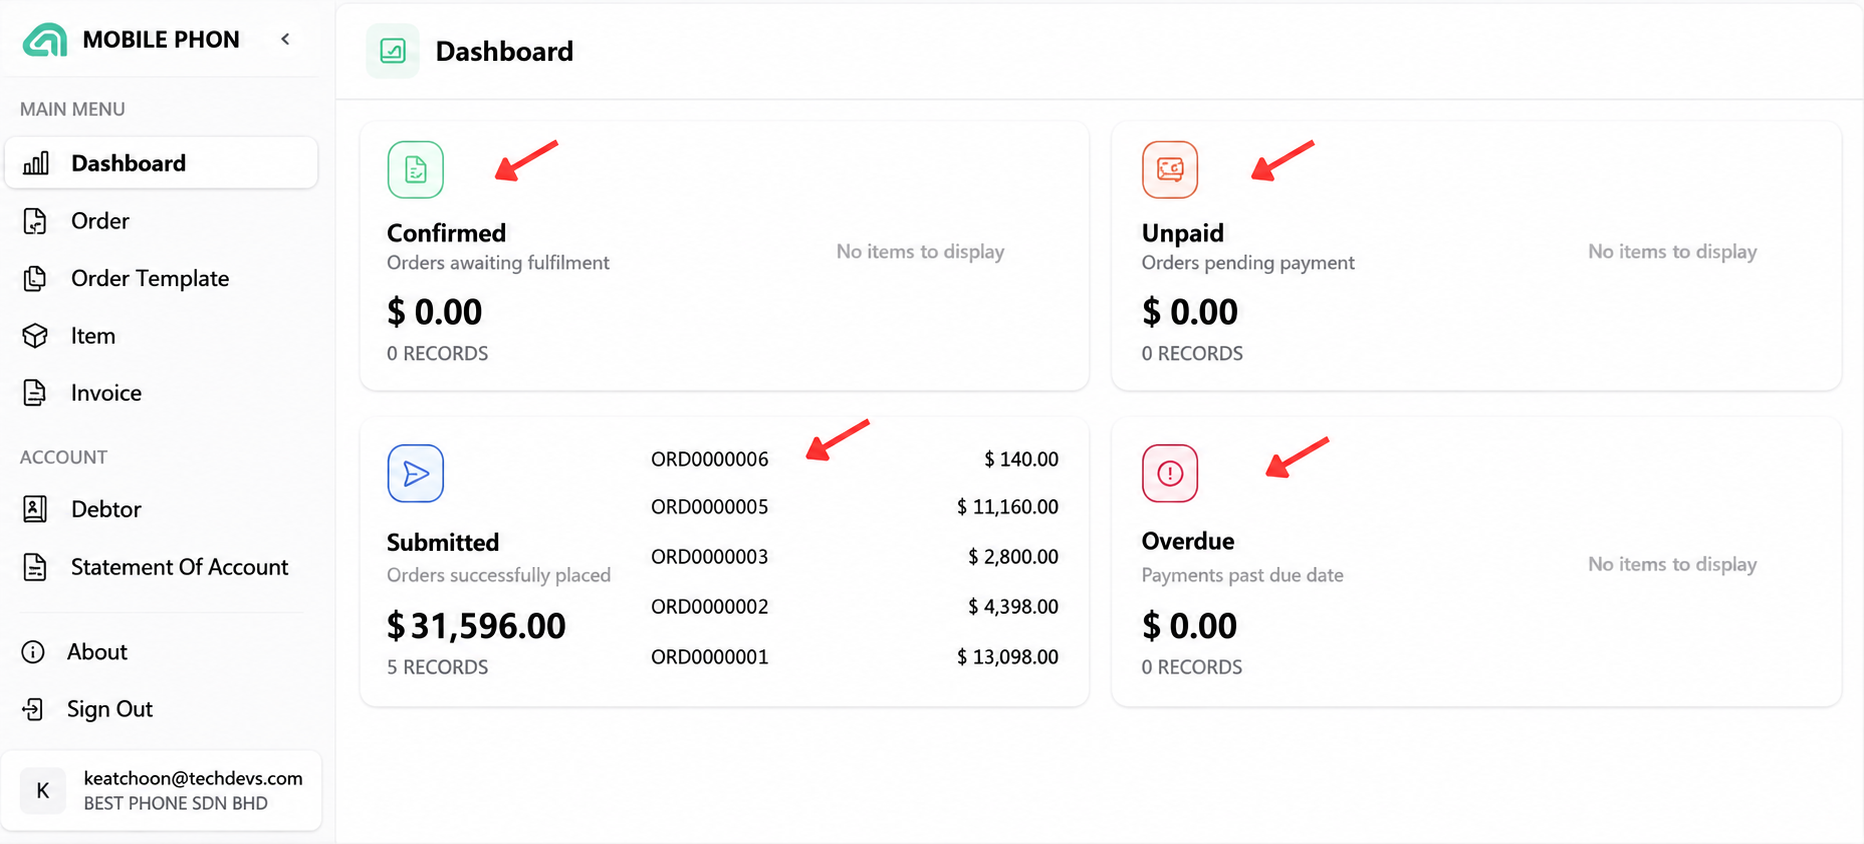
2. Review the Customer Dashboard
Customers see a simplified dashboard after signing in to the portal. The dashboard focuses on their own transactions and account status. The available sections may include:
- Confirmed — Orders awaiting fulfilment
- Submitted — Orders successfully placed
- Unpaid — Orders with pending payment
- Overdue — Payments that have passed their due date
Customers can use the side menu to access functions such as:
- Orders
- Order templates
- Items
- Invoices
- Debtor information
- Statements of account
Note:
Dashboard information is displayed according to the signed-in account. Where agent filtering is enabled, salespersons can be limited to the customers assigned to them.
Order Functions
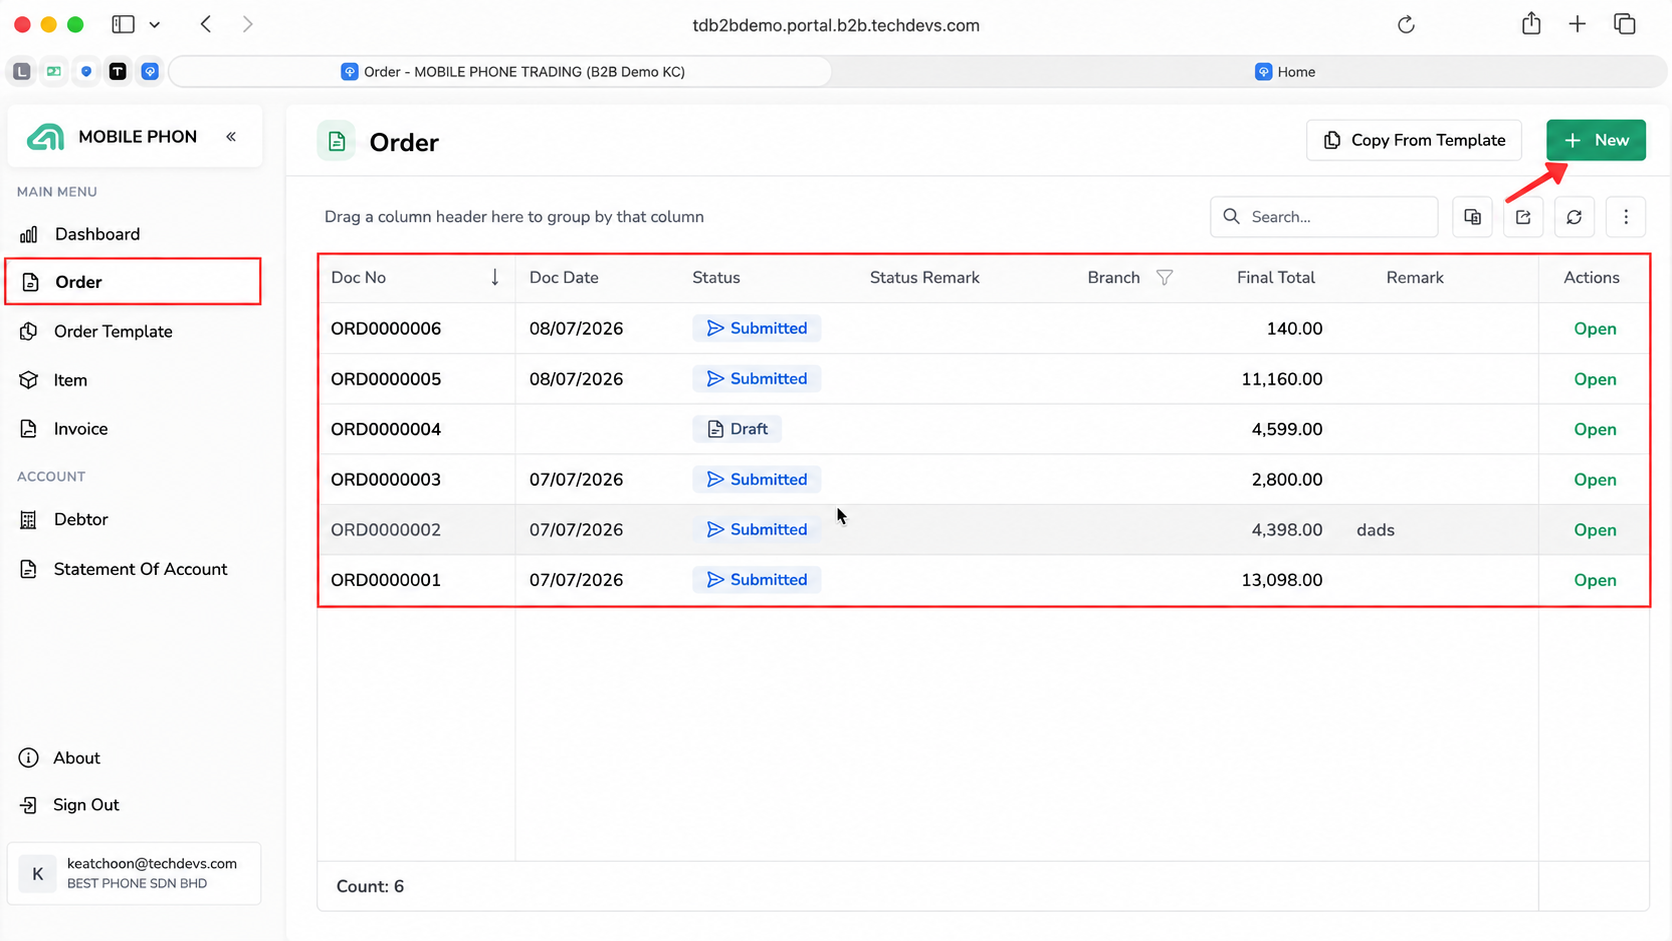
Open Order. from the left-side menu to review and prepare customer orders.
The Order page shows information such as:
- Document number
- Document date
- Status
- Status remark
- Branch
- Final total
- Remark
- Available actions
1. Create a New Order
To prepare an order manually:
- Open Order
- Click New
- Select the relevant branch when required
- Confirm the delivery address
- Search for and add the required items
- Enter or adjust the quantity
- Review the price and total
- Enter a remark when necessary
- Save the order
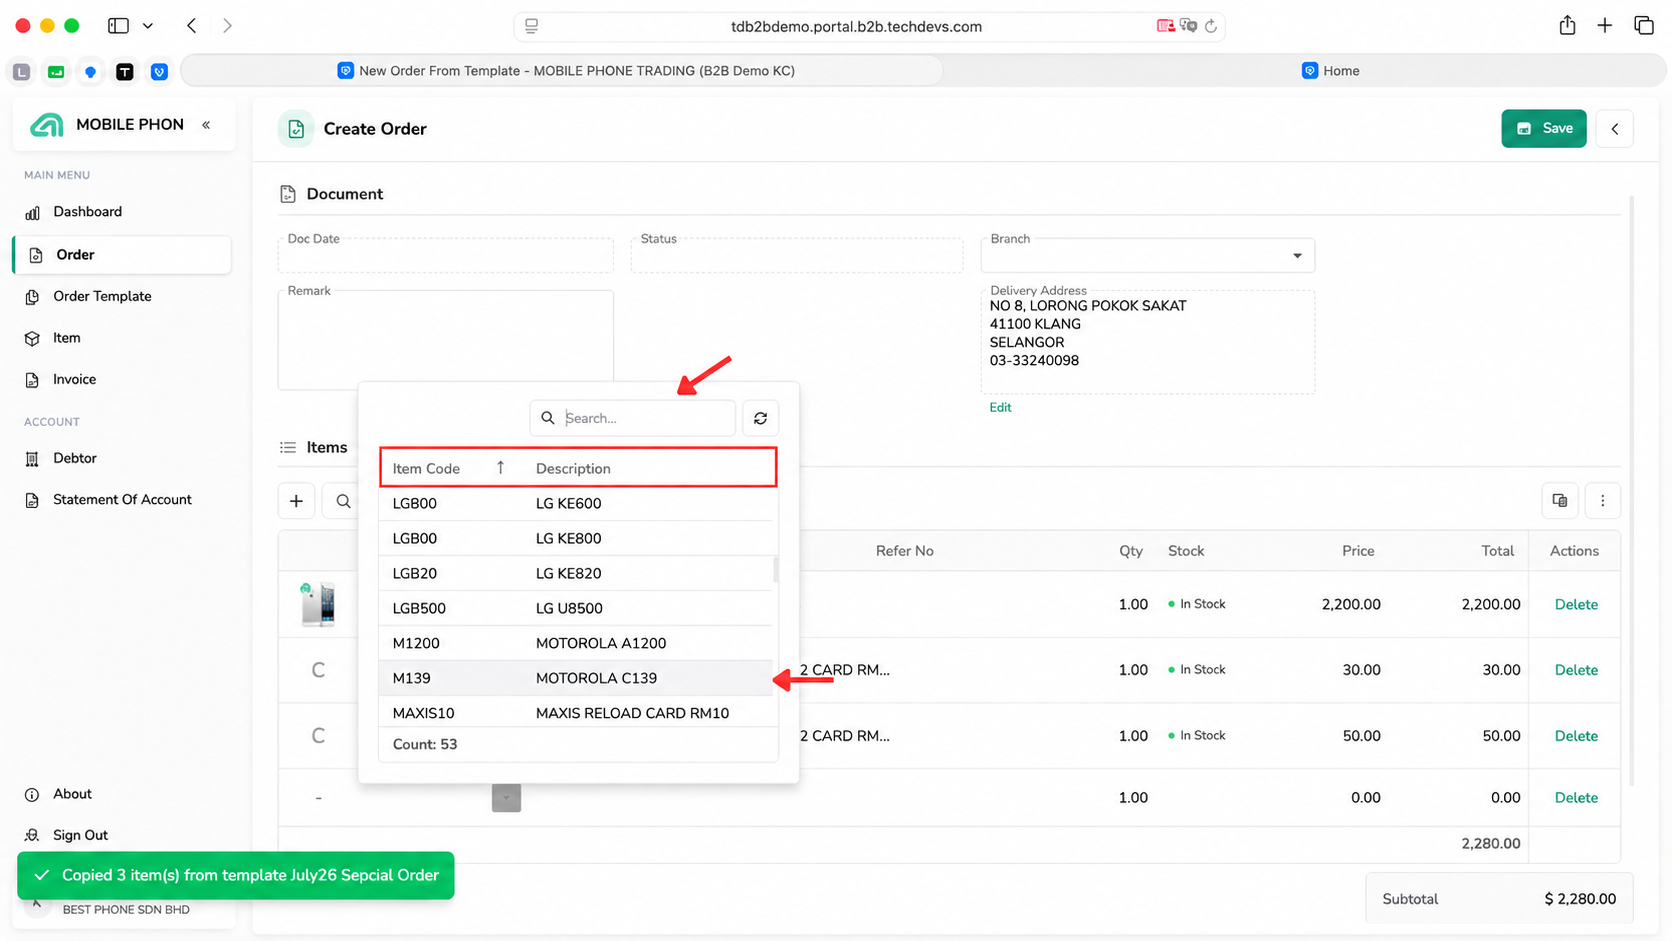
2. Search for Additional Items
Within the order entry screen, use the item search function to locate another product. Items can be searched using the available item information, such as:
- Item code
- Description
- Product name
Select the required item to add it to the order.
3. Copy an Order from a Template
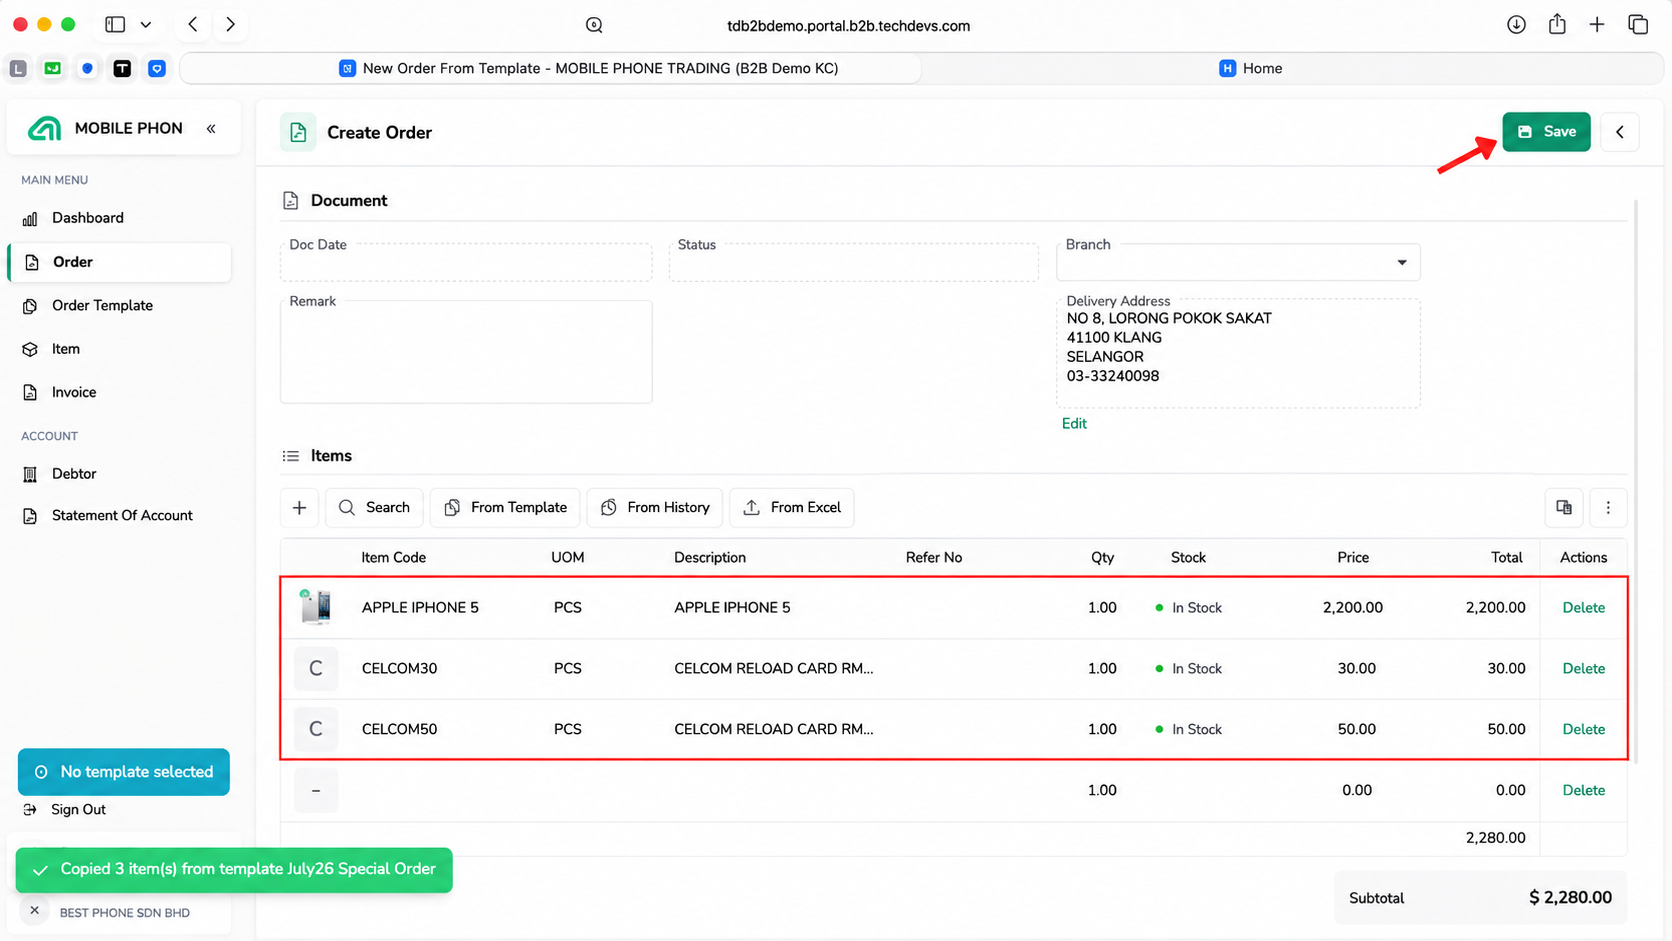
Order templates help customers prepare frequently repeated orders. To use a template:
- Open Order
- Click Copy From Template
- Select the required template
- Expand the template to review its items
- Select the template
- Click Copy
- Review the copied items in the new order
- Change quantities, remove items or add other items when necessary
- Save or submit the order
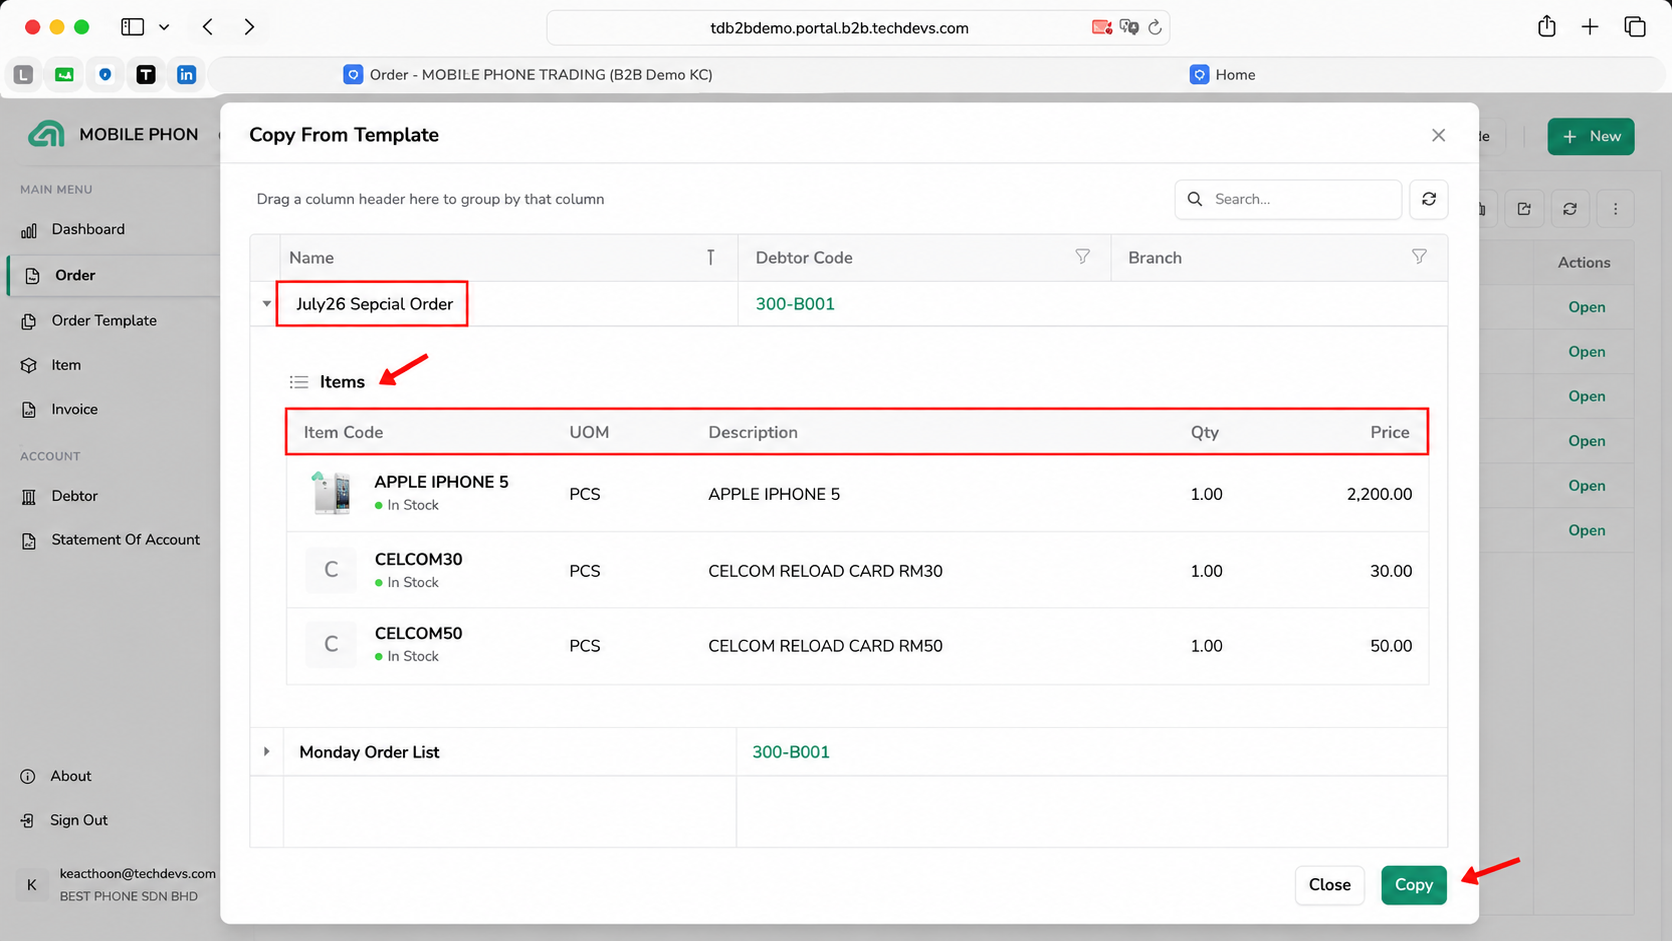
After the template is copied, the selected items are inserted into a new order.
4. Copy Items from Order History
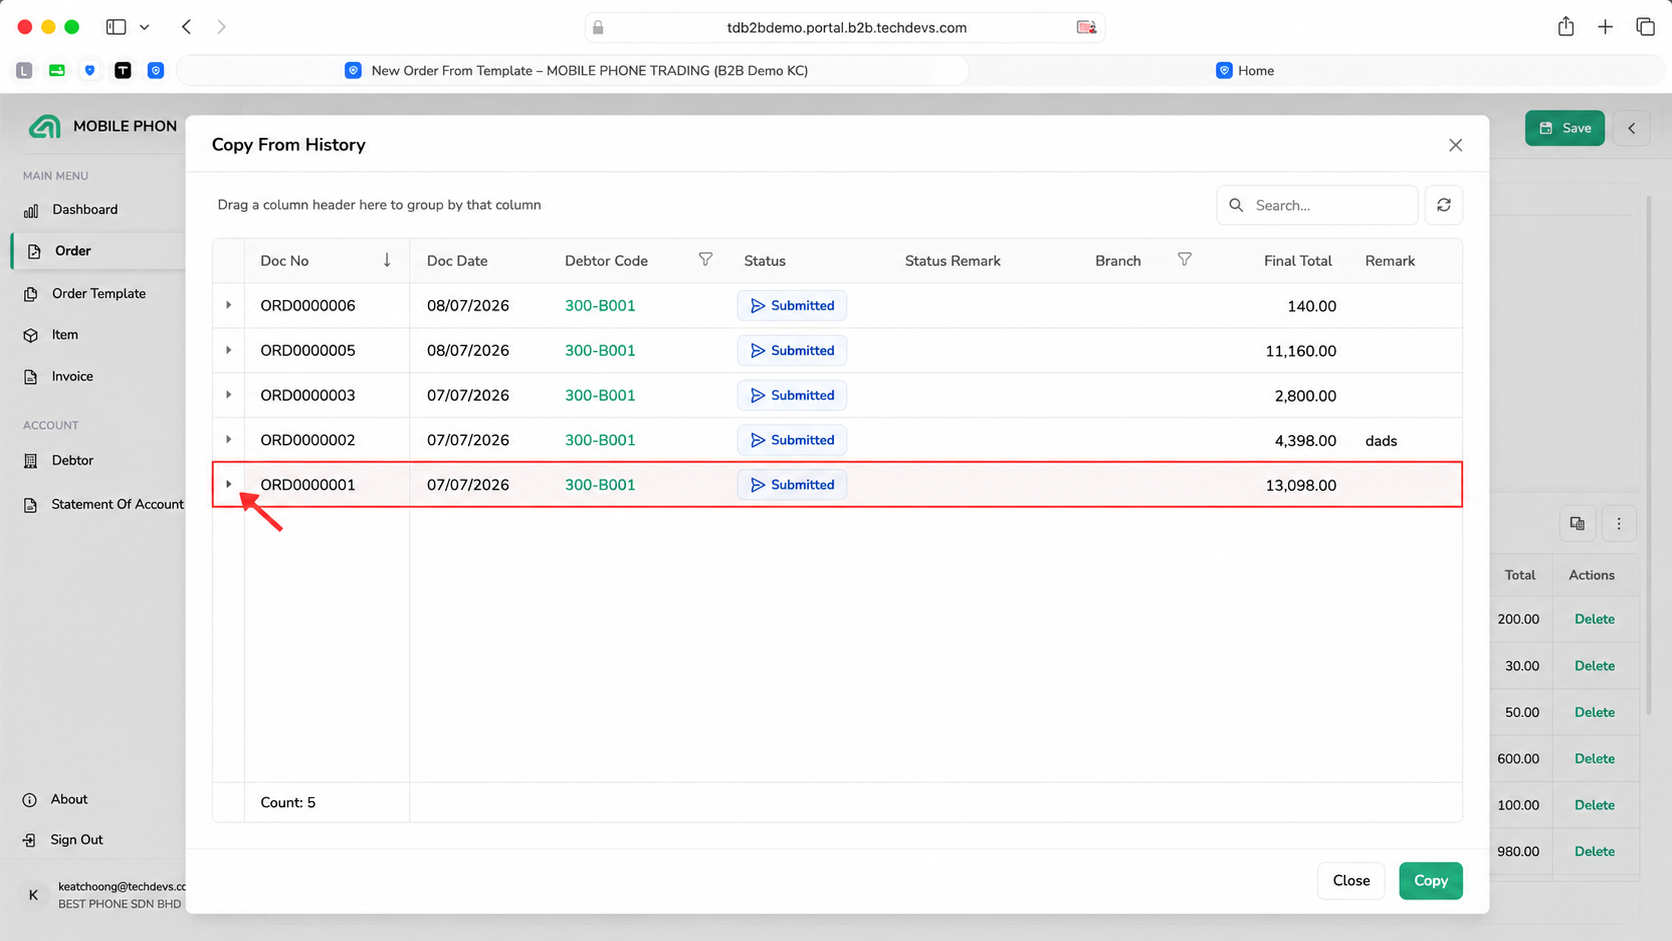
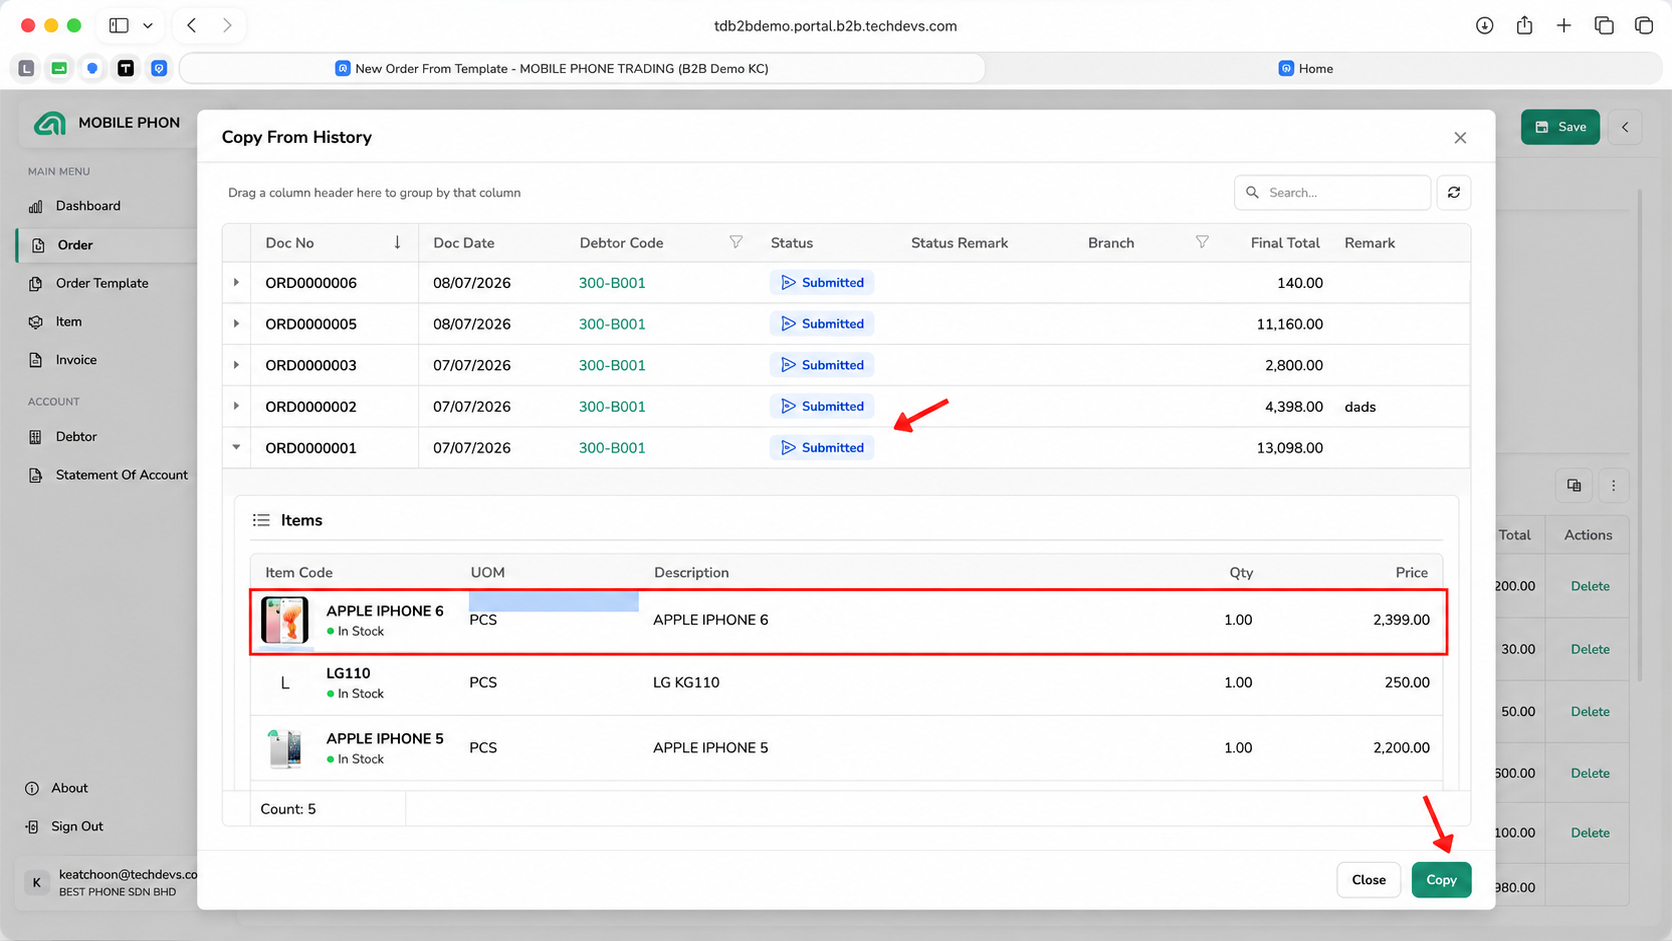
A previous order can also be used as the starting point for a new order. To copy from history:
- Open a new order
- Select From History
- Locate the required previous order
- Expand the order to review its items
- Select the order or required items
- Click Copy
- Review the items transferred into the new order
- Adjust the quantities before saving
5. Import an Order from Excel
Excel import can be used when a customer prepares an order using their own item codes. To import the file:
- Open the Excel import function from the order screen
- Click Download Template when the required format is needed
- Complete the Excel file using the required columns
- Click Select File
- Choose the completed Excel file
- Click Import
- Review all imported items before saving the order
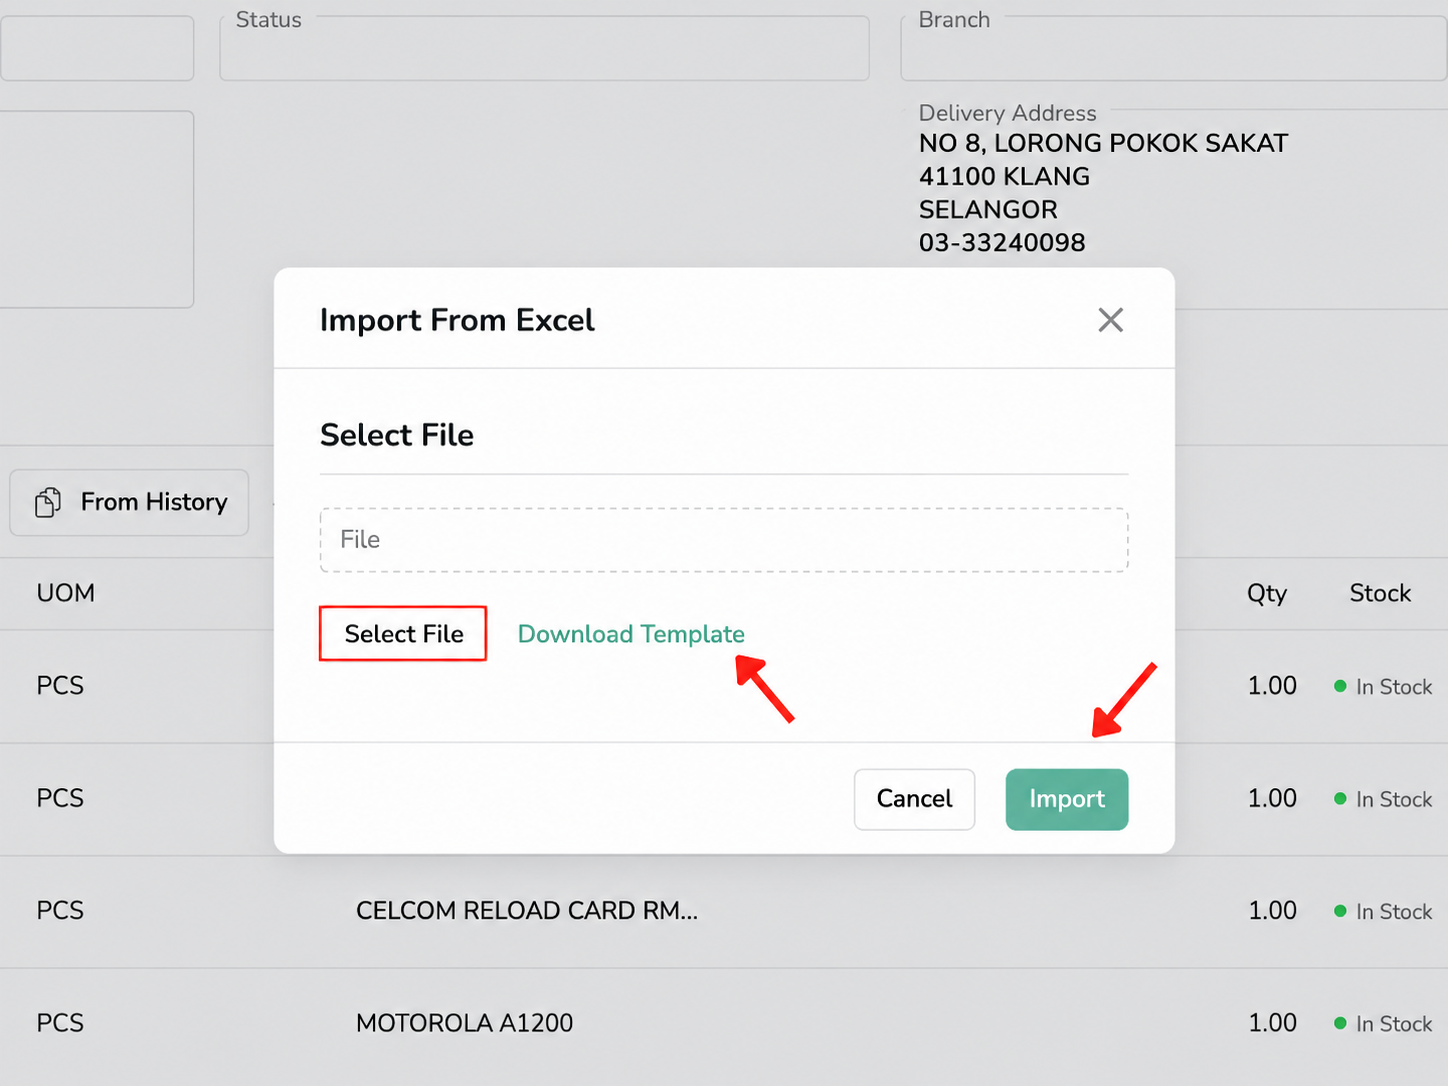
Customer item codes must be maintained and mapped to the corresponding AutoCount inventory item codes before the import can be processed correctly.
Important:
Always check the imported item, UOM and quantity before submitting the order.
6. Save as Draft or Submit the Order
An unfinished order may be saved as a draft so that the user can continue working on it later. Use the appropriate status based on the order’s progress:
- Draft — the order is still being prepared and may require changes
- Submitted — the order has been sent for processing
Once an order has been submitted, it should not be treated as an editable draft. Review the item, quantity, delivery address and total before submission.
Order Template Functions
Order templates can be prepared for frequently purchased items, seasonal orders or recurring product combinations. Templates may be created by:
- The company on behalf of the customer
- An authorised customer through the customer portal
Examples include:
- Weekly replenishment list
- Monday order list
- Chinese New Year product list
- Standard branch restocking list
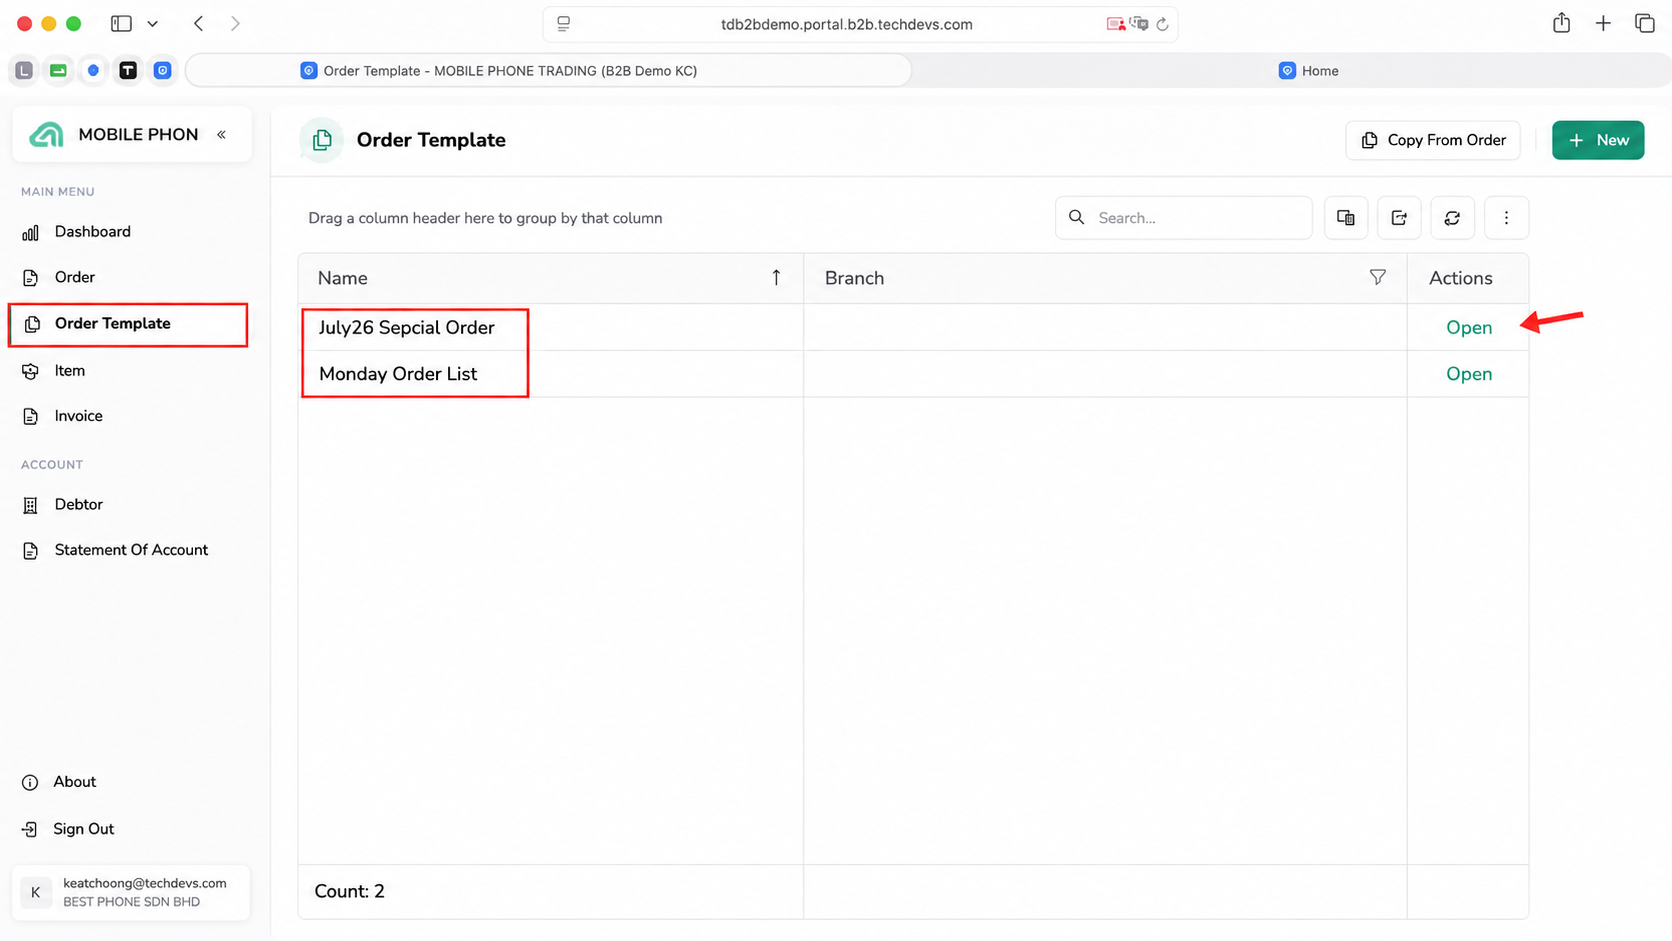
1. Review Existing Templates
Open Order Template to view the templates available to the customer. The page displays information such as:
- Template name
- Branch
- Available action
Click Open to review an existing template.
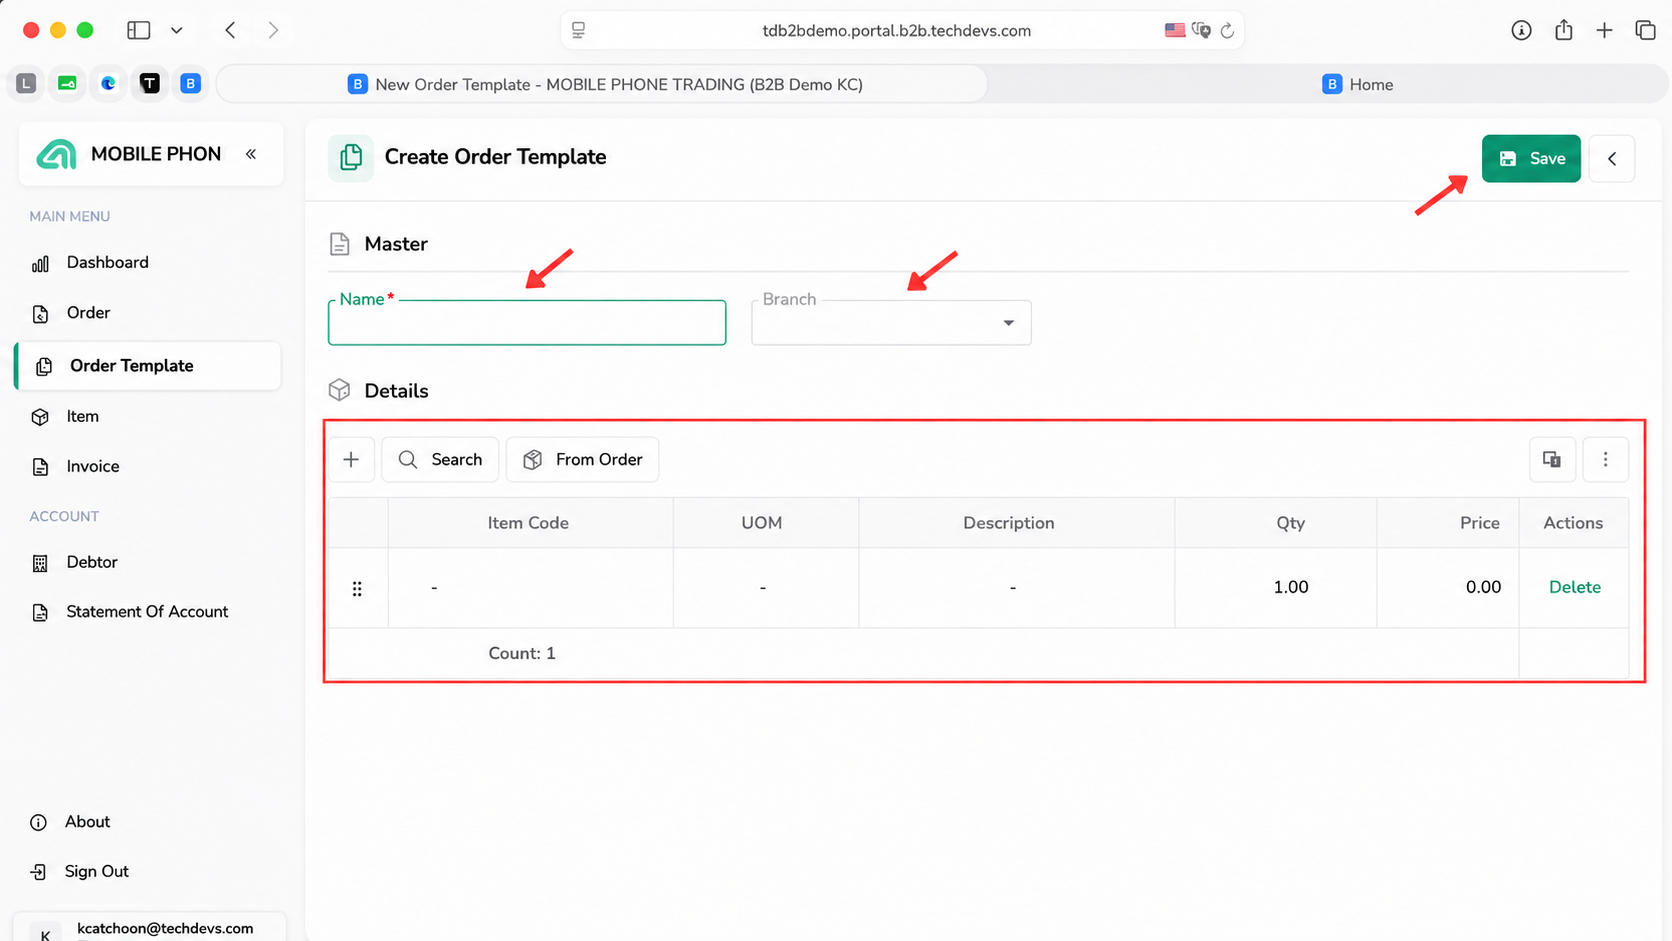
2. Create a New Order Template
To create a template:
- Open Order Template
- Click New
- Enter a clear template name
- Select the branch when required
- Add the products that should be included
- Review the item codes, UOM and quantities
- Click Save
The template name should help the customer understand when it should be used.
A template may also be created from an existing order by using Copy From Order or From Order, where available.
Catalogue and Item Information
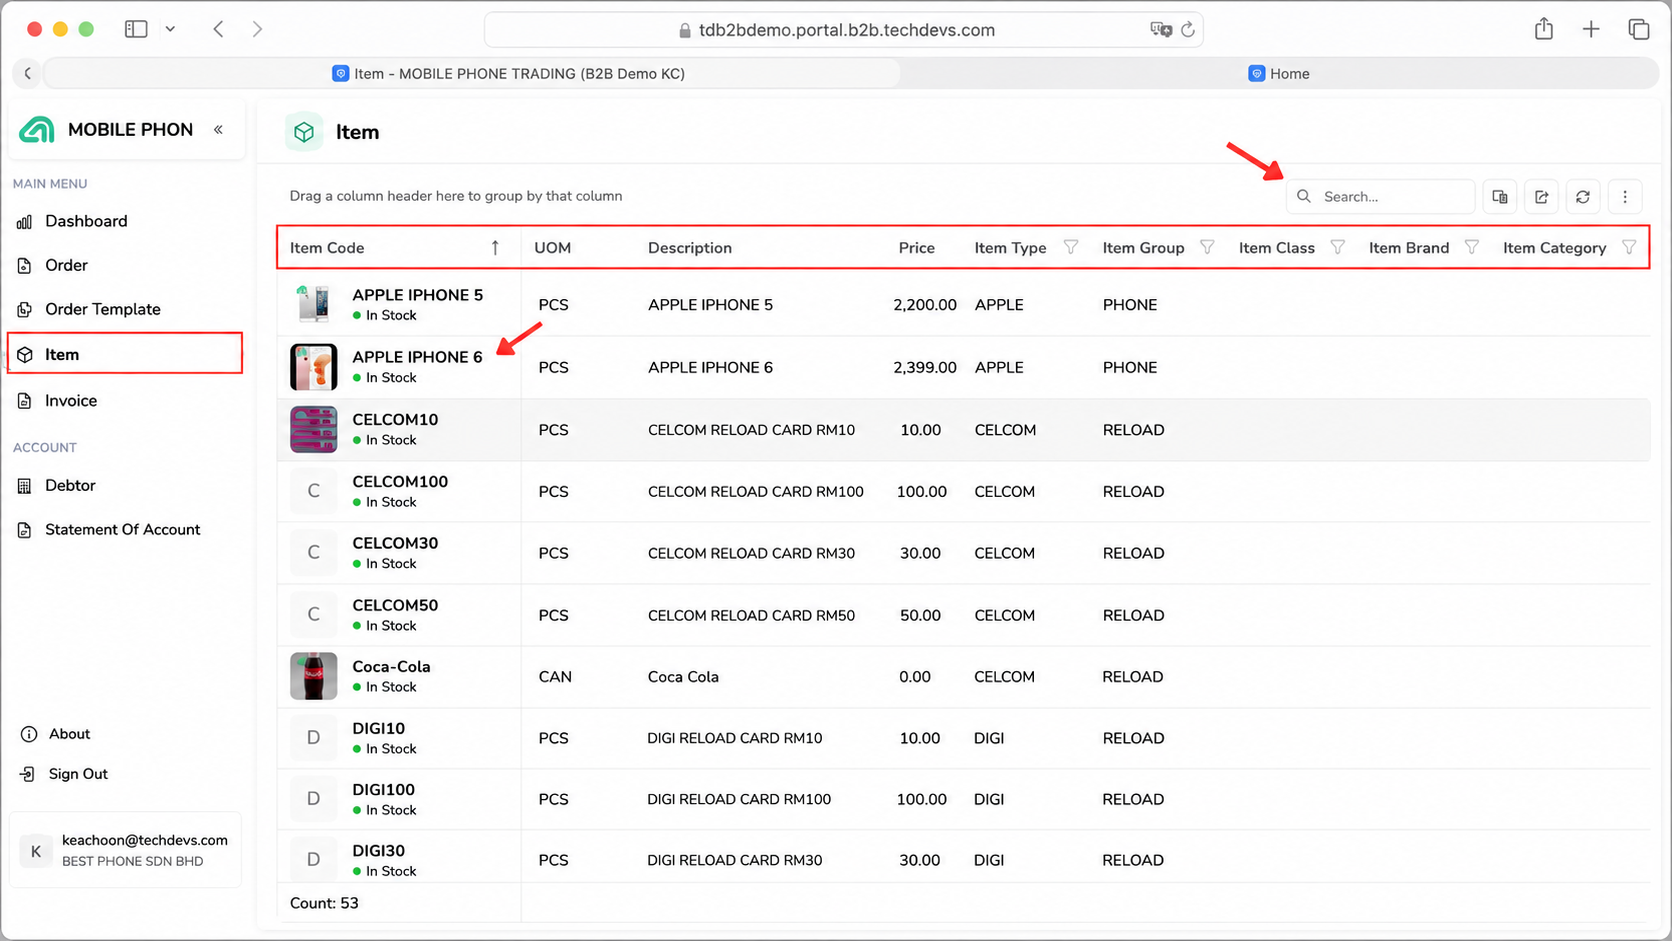
Open Item to browse the products made available to the customer. The item catalogue may display:
- Product image
- Item code
- UOM
- Description
- Price
- Stock status
- Item type
- Item group
- Item class
- Item brand
- Item category
Product Images and Descriptions
Move the pointer over an available product image to preview a larger image.
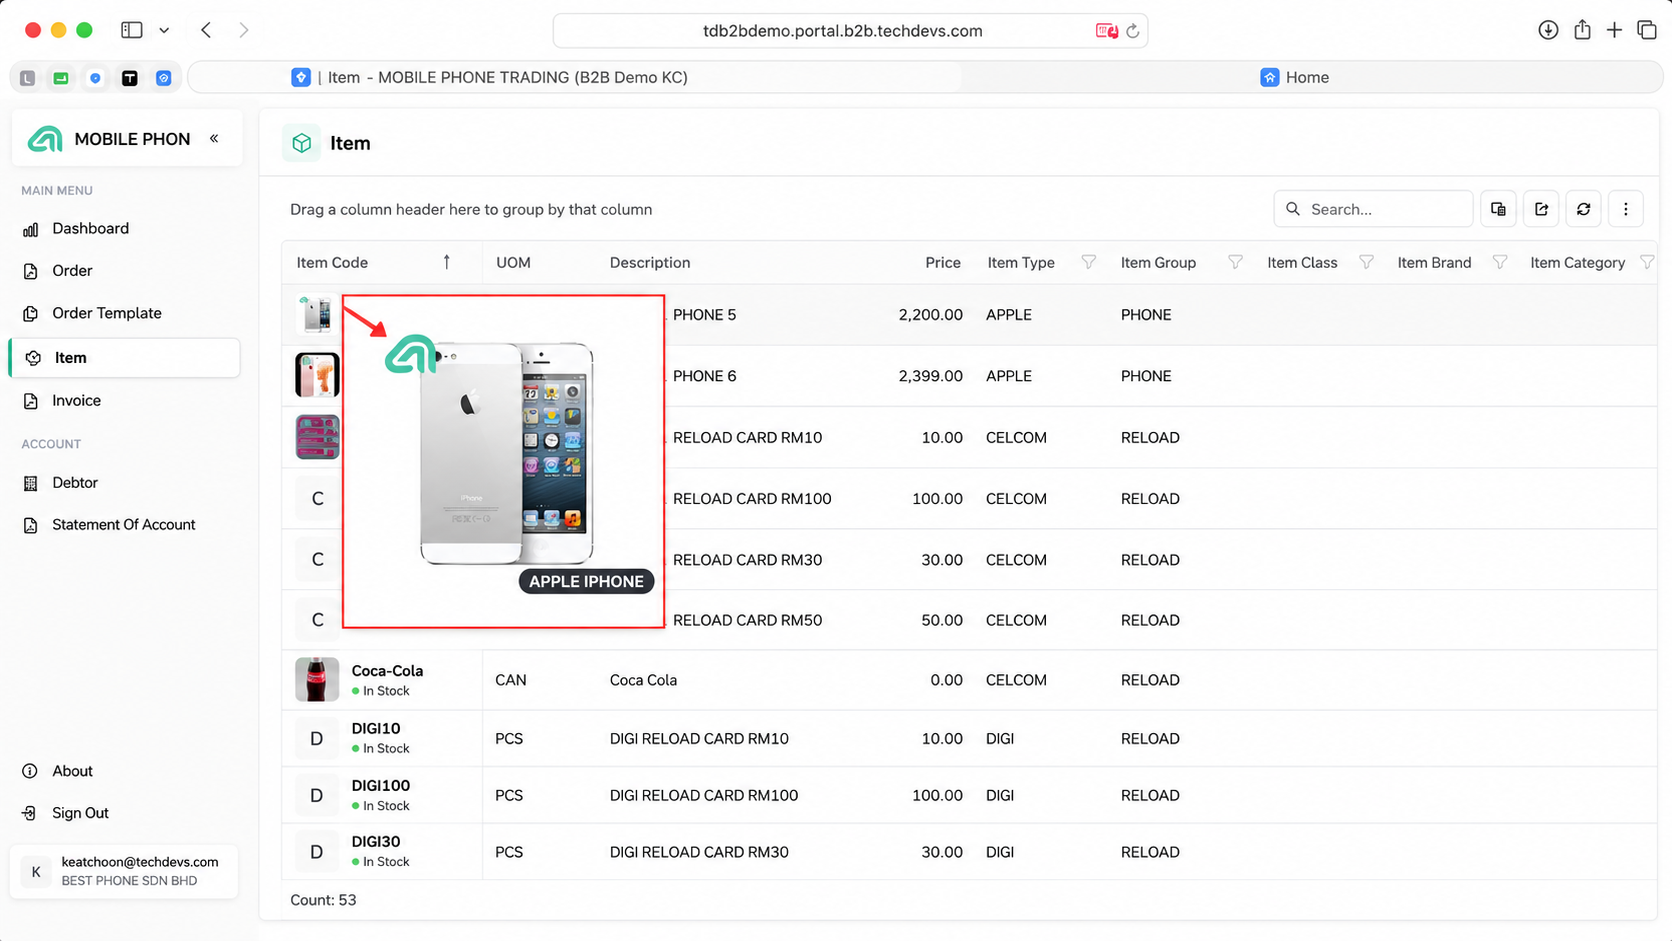
Depending on the maintained catalogue information, an item may include:
- Multiple product images
- Product description
- Packing information
- Company logo watermark
- Brand or category information
Descriptions and related product information should be maintained accurately before they are made available to customers.
Stock Display
The portal may display stock availability based on the configured stock method. The customer may see:
- In Stock
- Out of Stock
Depending on the configuration, the portal may use:
- The available inventory balance
- A manually maintained stock status
A manually defined stock status is useful when the quantity recorded in AutoCount should not be shown directly to customers.
Invoice and Account Information
The customer portal can provide access to invoices and account statements made available from AutoCount.
Invoice
Open Invoice to review available invoice records. The invoice list may show:
- Document number
- Document date
- Related order
- Final total
- Outstanding amount
- Payment
- Overdue date
- Available action
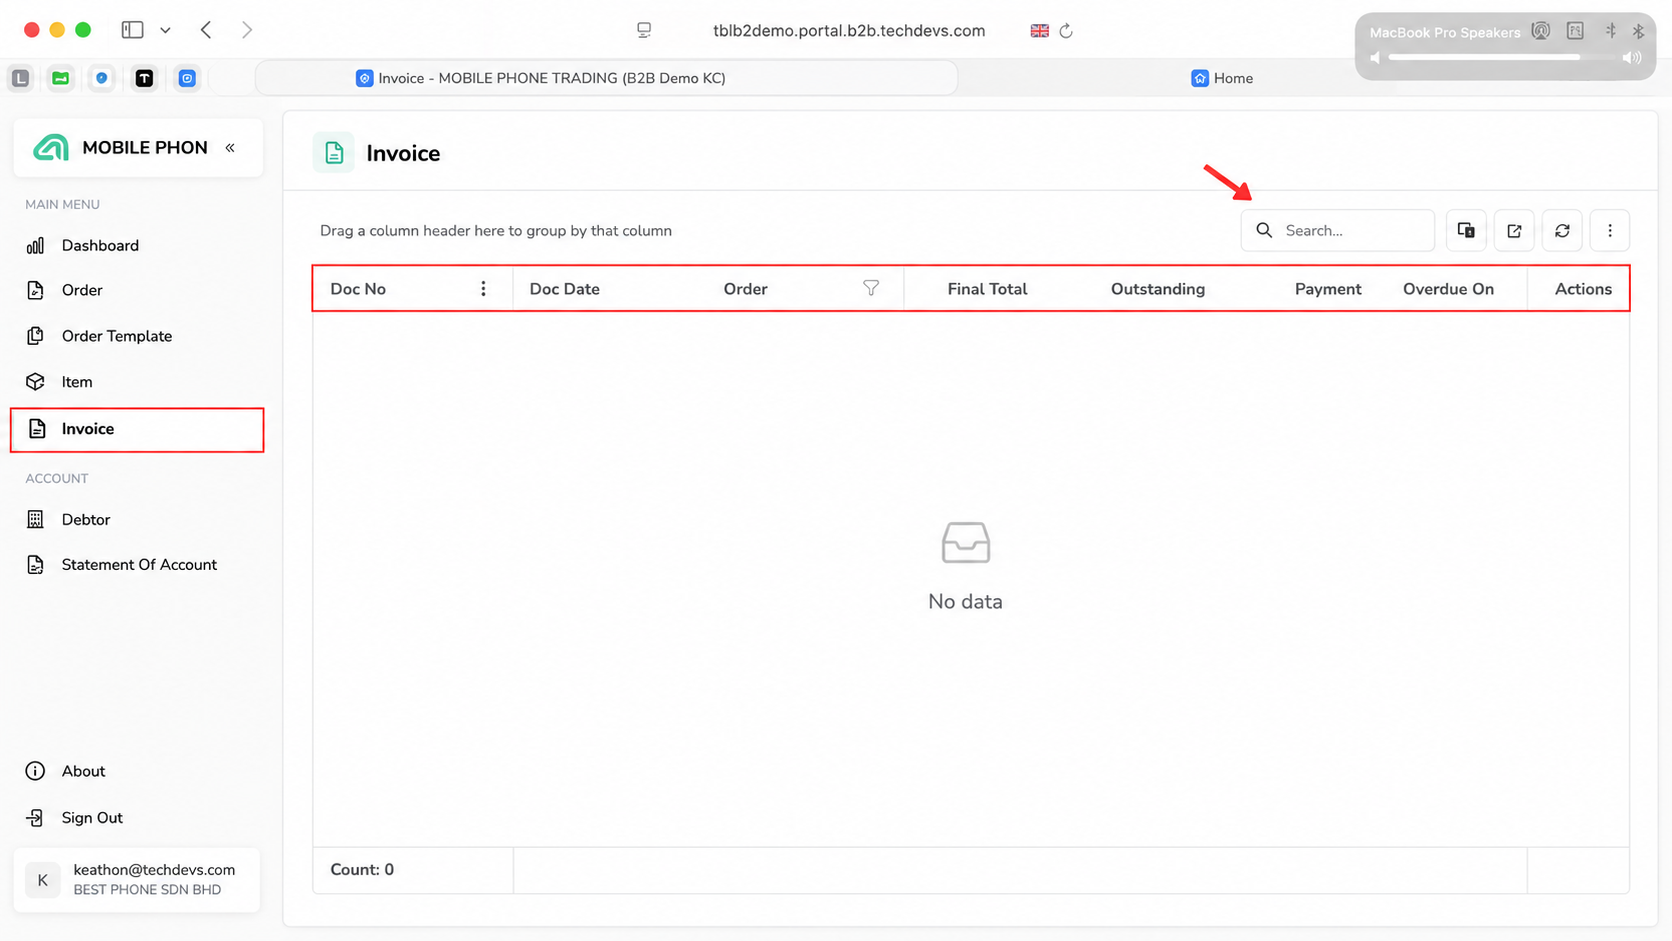
When a Sales Order is converted into an invoice in AutoCount, the invoice can be made available in the portal according to the configured process. Older transactions may also be made available when historical records are pushed to the portal. This allows a customer who starts using the portal later to review selected earlier transactions.
Debtor Information
Open Debtor to review the customer account information made available to the portal user. The user should only be able to access debtor information linked to the authorised account or company.
Statement of Account
To generate the latest statement:
- Open Statement Of Account
- Enter the required From Date
- Enter the required To Date
- Select Include fully paid transactions when those transactions should be included.
- Click Download
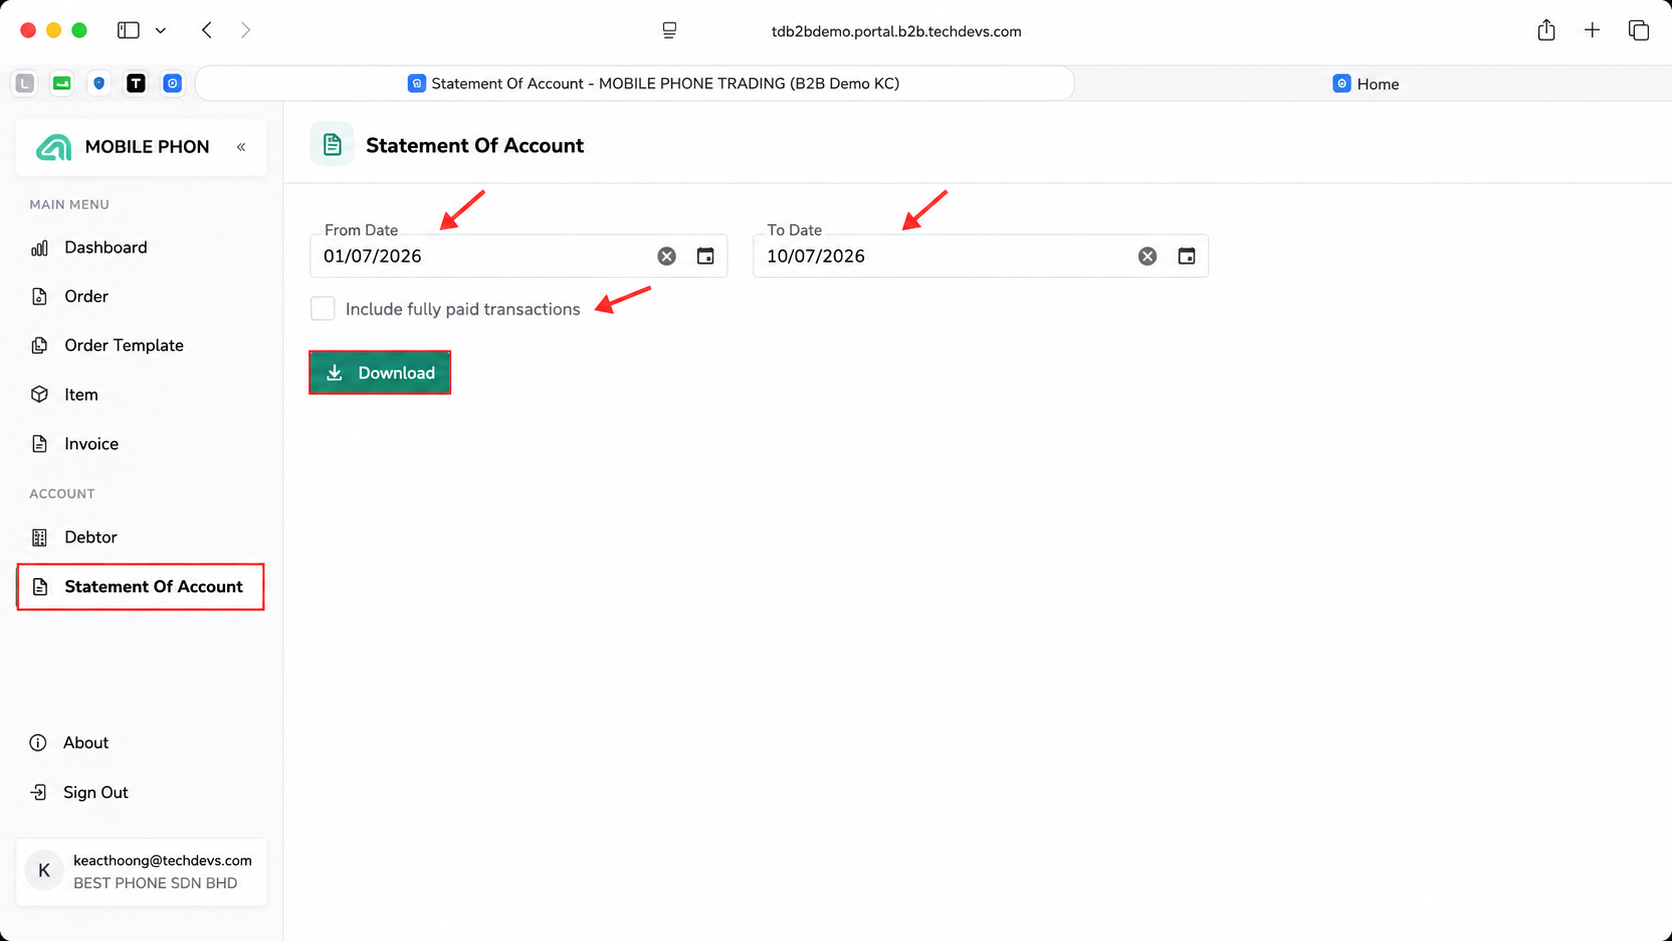
The statement is generated using current account information retrieved from AutoCount.
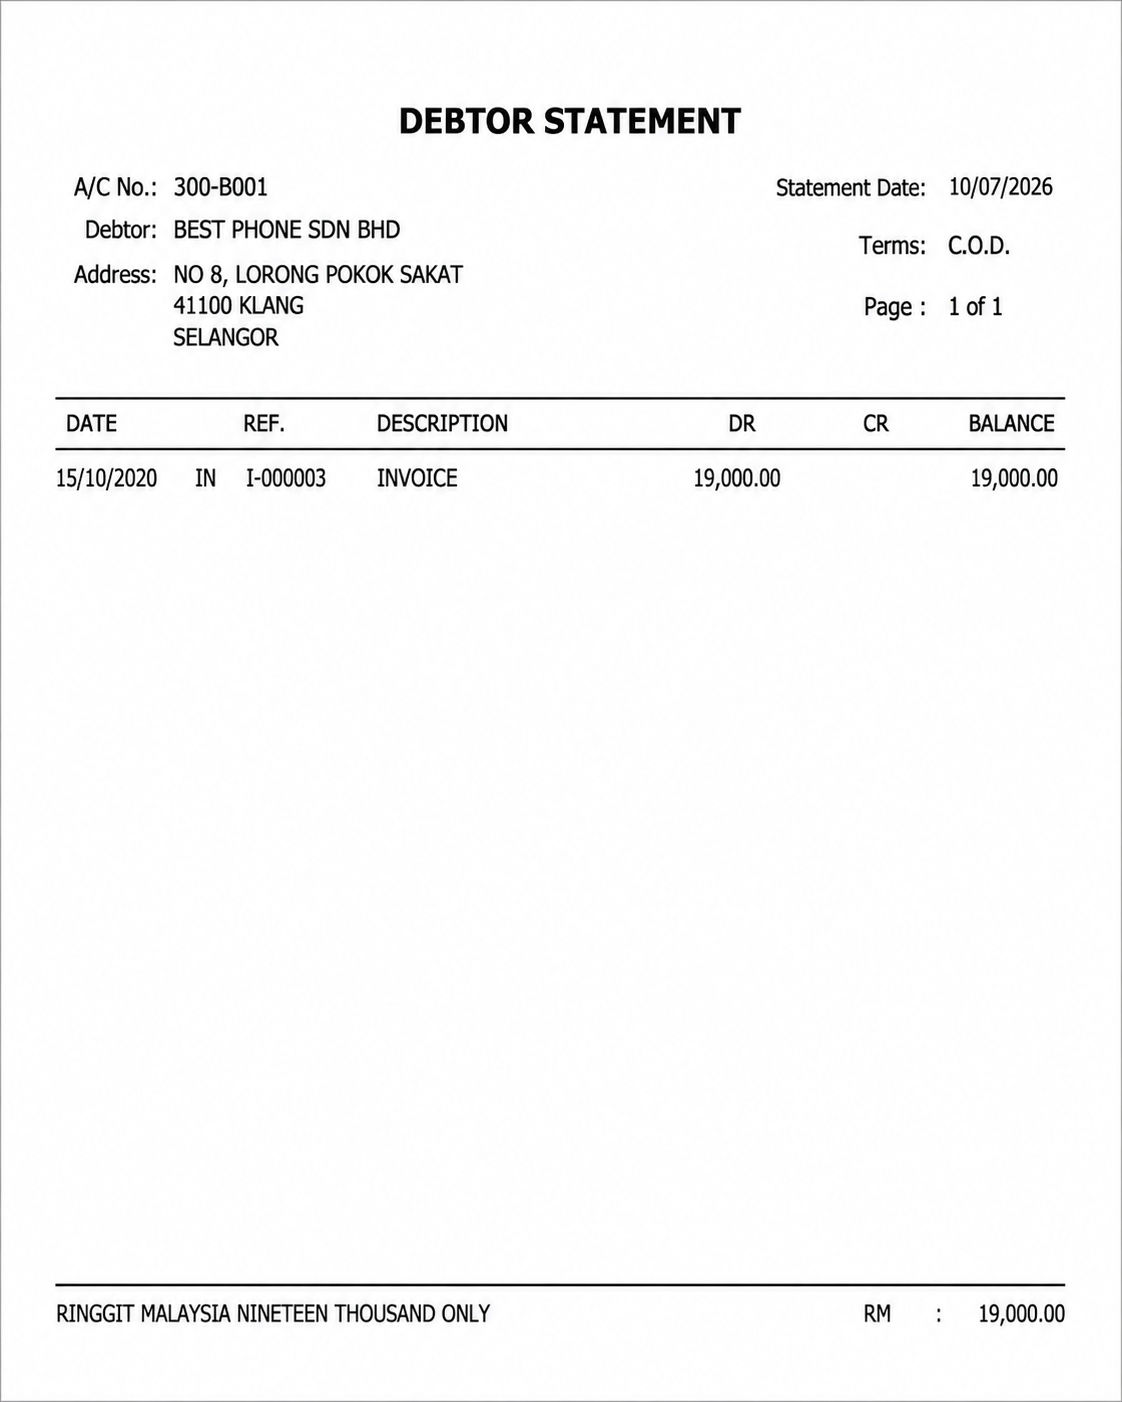
Depending on the configured reporting format, invoices and statements may follow the relevant AutoCount report layout.
Conclusion
The B2B Ordering Portal brings company access, customer ordering, catalogue information, invoices and account statements into one connected interface. Administrators can control company and user access, while customers can prepare orders using new entry, templates, order history or Excel import.
Administrators who need to synchronise customers, products and pricing can continue with the B2B Ordering Backend Management Guide.
Correct user permissions, accurate item maintenance and a final order review are important for ensuring that customers see the correct information and submit the intended order
Frequently Asked Questions
Can one user access several subsidiary companies?
Yes. A main account may be authorised to access several subsidiary companies or data codes. Access should be assigned according to the user’s responsibilities.
Can each subsidiary have a separate login?
Yes. A separate user can be created for each subsidiary so that the user only views information and places orders for the assigned company.
Can customers create their own order templates?
Yes. An authorised customer can create an order template and add frequently ordered products. The company may also prepare templates for the customer.
Can a customer repeat a previous order?
Yes. The customer can use From History to select a previous order and copy its items into a new order.
Can customers import an order using their own item codes?
Yes, provided the customer item codes have been maintained and mapped to the corresponding AutoCount inventory item codes.
Can a submitted order be changed?
A submitted order should not be treated as an editable draft because it has already been sent for processing. The customer should review the order carefully before submission.
Is the Statement of Account up to date?
The statement function retrieves the latest available account information from AutoCount when the customer generates it.
Need Help with TD B2B Ordering Portal?
Having trouble accessing the portal, managing users, reviewing dashboard information, creating orders or viewing invoices and statements? Contact your supplier or AutoCount support representative for assistance.
Table Of Content