
-
AutoCount Accounting Features
-
- Approval Workflow
- Audit Trail
- Auto Save in Draft Folder
- AutoCount Contra Account
- AutoCount License Setting Guide
- Deposit Tracking & Management
- Documents Numbering Format
- Full Transfer and Partial Transfer
- Import Data to AutoCount Accounting Using Excel
- Informative Charts and Analytical Data
- Layout Customization
- Multi Pricing
- Sales and Services Tax
- Schedule Backup
- Search Lookup Edit
- View Documents Flow
- AutoCount Feature Stock Take
- Column Chooser
- Show Remaining (3) Collapse
-
AutoCount Cloud Accounting
-
AutoCount E-Invoice
-
AutoCount HRMS User Guide
-
AutoCount Modules
-
- Activity Stream
- Advanced Financial Report
- Advanced Item
- Advanced Multi-UOM
- Advanced Quotation Module
- Basic Multi-UOM
- Budget Module
- Consignment
- Filter By Salesman
- FOC Quantity
- Formula
- Item Batch
- Item Package
- Landing Cost
- Multi-Currency
- Multi-Dimensional Analysis
- Multi-Location
- Project Account
- Recurrence
- Remote Credit Control Module
- Stock Assembly
- User Defined Fields (UDF)
- AutoCount SST Hidden Functions
- AutoCount SST Submission - Service Tax
- AutoCount Scripting Module User Guide
- AutoCount Bonus Point Module User Guide
- AutoCount Service Management Plugin User Guide
- Show Remaining (12) Collapse
-
AutoCount Plugins
-
- Fixed Assets Management
- Goldsmith
- TD Ordering Mobile Apps
- TD Stock Mobile Apps
- Universal Import Plugin
- DMS Import Plugin
- AutoCount Pick List Plugin User Guide
- AutoCount Credit Memo Plugin User Guide
- AutoCount Lock Price Plugin
- AutoCount Progressive Billing
- AutoCount Easy Recurrence Plugin
- Batch Update Unit Price Plugin
- AutoCount Production order
- AutoCount Car Tint Film Plugin
-
- Event Management System
- AutoCount To-Do List Plugin
- AutoCount AutoBank Reconciliation Plugin
- Intercompany Billing Plugin User Guide
- Lead Management 2.0 Plugin
- AutoCount Service Contract Plugin User Guide
- AutoCount Optical Plugin
- AutoCount Integrator Plugin
- AutoCount Procurement Planning Plugin
- Cage Management Plugin
- AutoCount Vehicle Plugin
- AutoCount Agent Validation Plugin User Guide
- AutoCount Barcode Generator Plugin User Guide
- AutoCount Easy Batch Number Entry Plugin User Guide
- Warranty 2.0 Plugin
- AutoCount Easy Photo 2.0 User Guide
- AutoCount Recurring Invoice Plugin User Guide
- AutoCount Scale Barcode Plugin User Guide
- AutoCount Recurrence Late Interest Plugin
- AutoCount Item Visibility Control
- AutoCount Bill Remark Plugin User Guide
- AutoCount Pain Tracker User Guide
- AutoCount Easy Payment
- AutoCount Easy Deposit Plugin
- AutoCount Easy Knock Off Plugin
- AutoCount Daily Collection Summary Plugin
- Timber Log Plugins
- Batch Transfer SODO Plugin
- AutoCount Vege Basket Plugin Guide
- AutoCount Fruit Basket Plugin Guide
- Show Remaining (15) Collapse
-
-
Form Template
-
Report Template
-
- Advance Quotation
- Cash Sale
- Consignment
- Consignment Movement
- Credit Note
- Debit Note
- Delivery Order
- FOC Quantity Analysis By Document Report
- Invoice
- Item Package Sales Report
- Monthly Sales Analysis
- Outstanding Sales Order Listing
- Profit And Loss Of Documents
- Quotation
- Sales Agent Contribution Report
- Sales Order
- Top/Bottom Sales Ranking
- Show Remaining (2) Collapse
-
- Available Stock Status Report
- Expired Item Batch Listing
- Inventory Physical Worksheet
- Stock Adjustment
- Stock Aging Report
- Stock Assembly
- Stock Assembly Order
- Stock Balance By Location
- Stock Balance Report
- Stock Card Report
- Stock Disassembly
- Stock Issue
- Stock Item Profit Margin
- Stock Movement Report
- Stock Receive
- Stock Take
- Stock Transfer
- Stock Write Off
- Show Remaining (3) Collapse
-
B2B ORDERING
-
AutoCount AI Agent
How to Issue Self-Billed e-Invoice in AutoCount Cloud Accounting
Introduction
This guide shows how to issue a self-billed e-Invoice in AutoCount Cloud Accounting using the two examples by importation from a foreign supplier and rental payment to an individual property owner. It covers direct entry, copying from a Payment Voucher, submitting the document, checking its validation status, and sharing the local self-billed document when required.
Before You Start
Before issuing a self-billed e-Invoice in AutoCount Cloud Accounting, make sure the following information is ready:
Supplier Tax Entity
Make sure the relevant supplier’s Tax Entity information is already available in AutoCount Cloud Accounting before creating the self-billed e-Invoice.
Rental Owner Tax Entity
For rental payments, make sure the owner is maintained as a supplier with the correct Tax Entity information, such as MyKad for an individual owner.
Free Subscription
If you are using the free AutoCount Cloud Accounting subscription, create the self-billed document directly instead of copying it from another transaction.
(EN) Video Guide: How to Issue Self-Billed e-Invoice
Scenario 1: Importation from a Foreign Supplier — Create the Self-Billed Invoice Directly
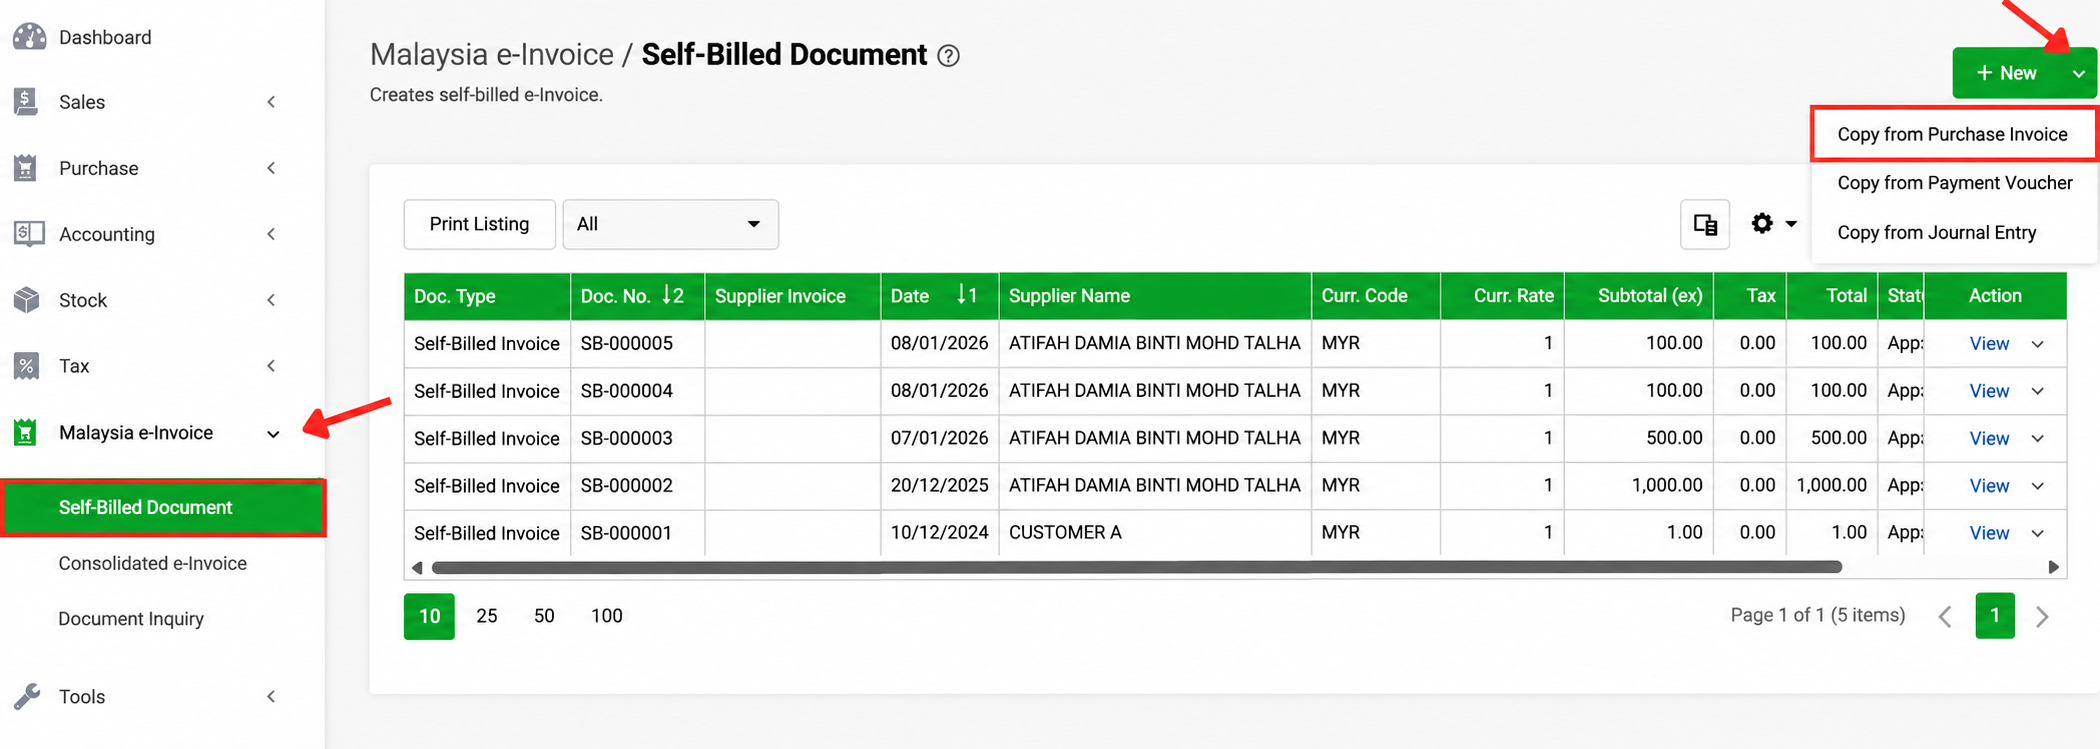
1. Open Self-Billed Document
- On the left menu, open Malaysia e-Invoice.
- Click Self-Billed Document.
- Click New to create the self-billed document directly.
2. Select the Document Type and Foreign Supplier
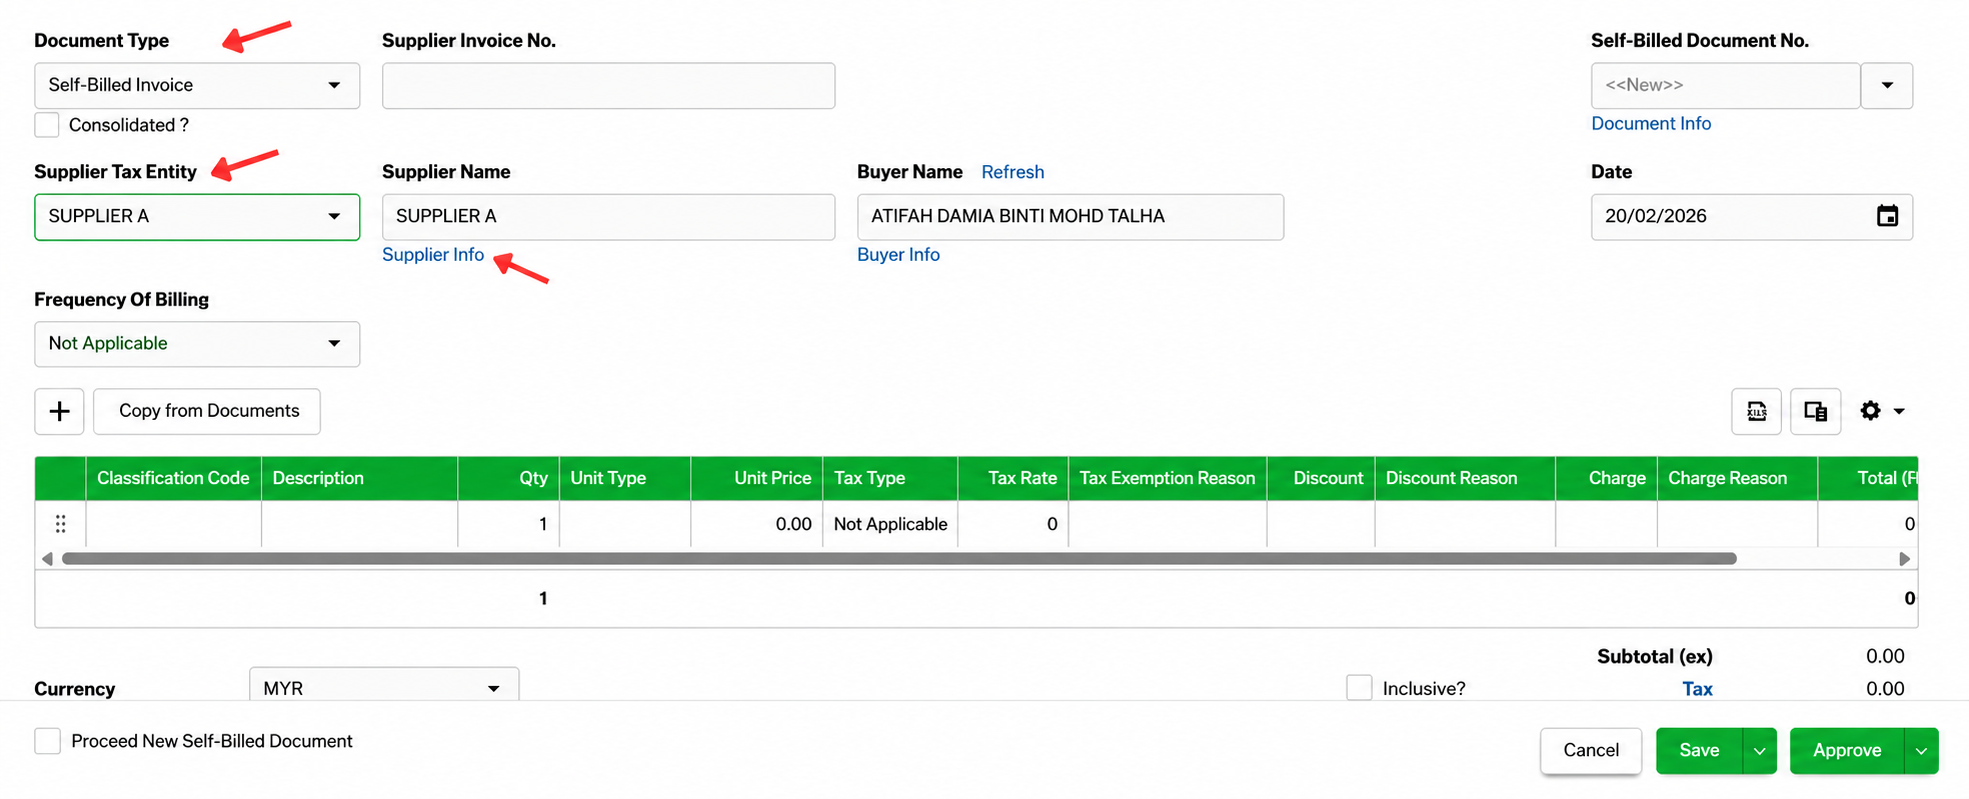
- Set Document Type to Self-Billed Invoice. The same menu also provides self-billed credit note, debit note and refund note document types.
- Select the foreign supplier under Supplier Tax Entity.
- Check the supplier information. In the tutorial example, the foreign supplier uses the general TIN provided by LHDN, business type, MSIC code 00000, and the supplier email, phone, address, postcode, city, state and country.
3. Enter the Classification and Transaction Details
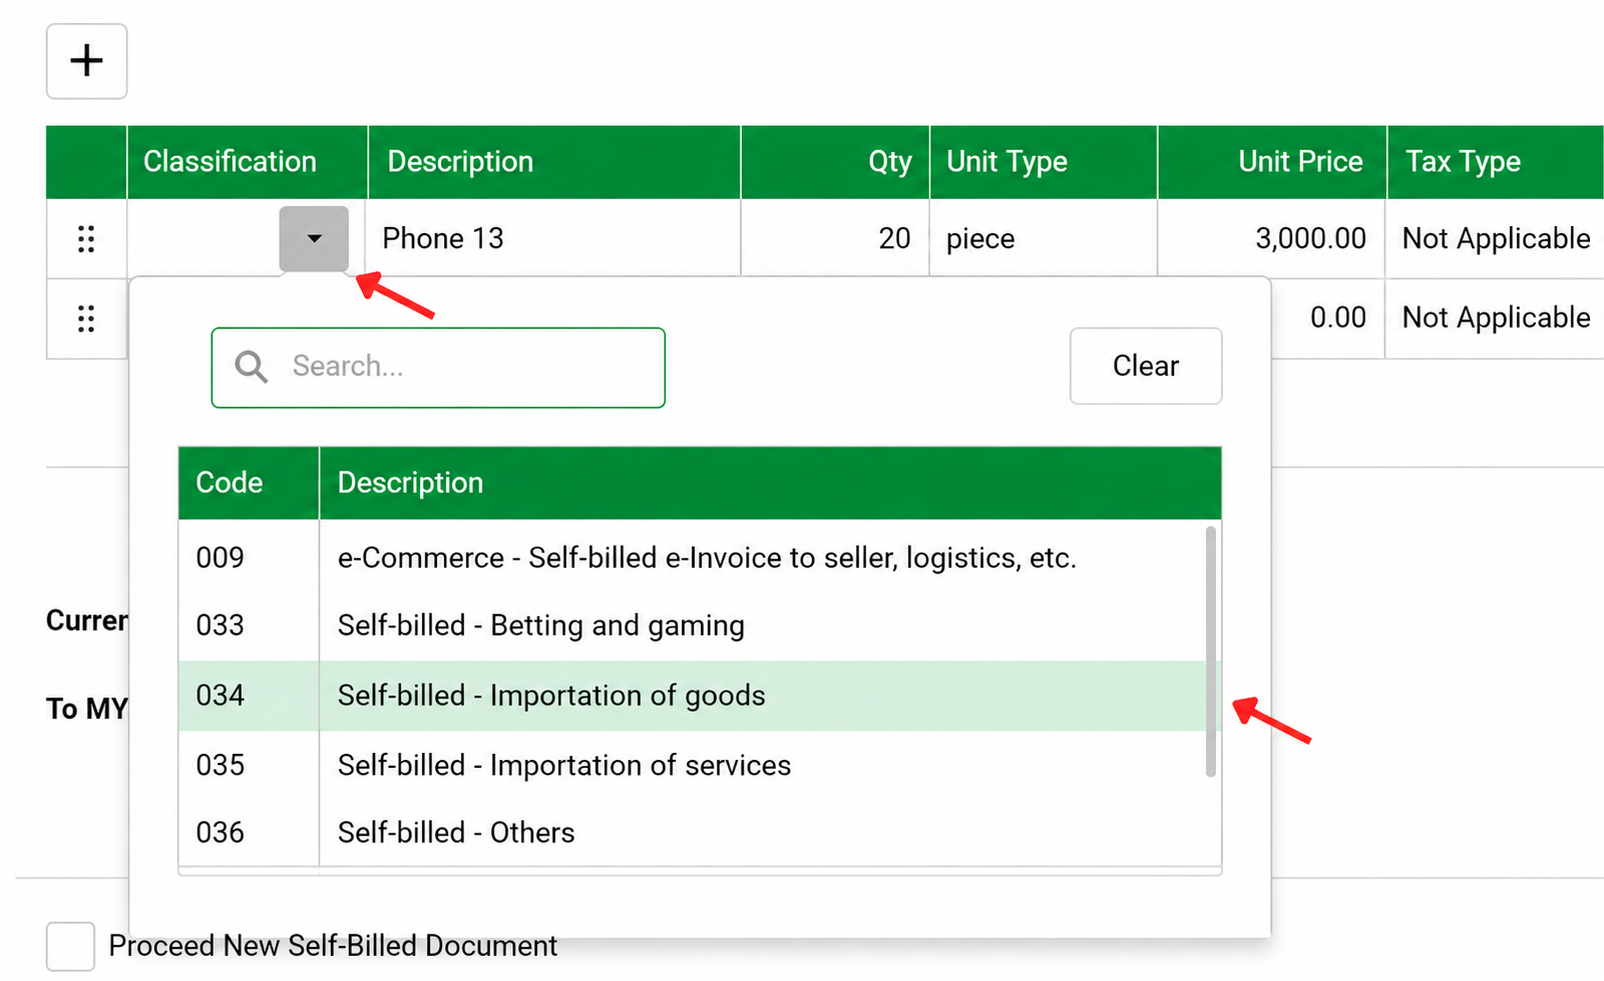
- For imported goods, set Classification to 034 — Self-billed - Importation of goods.
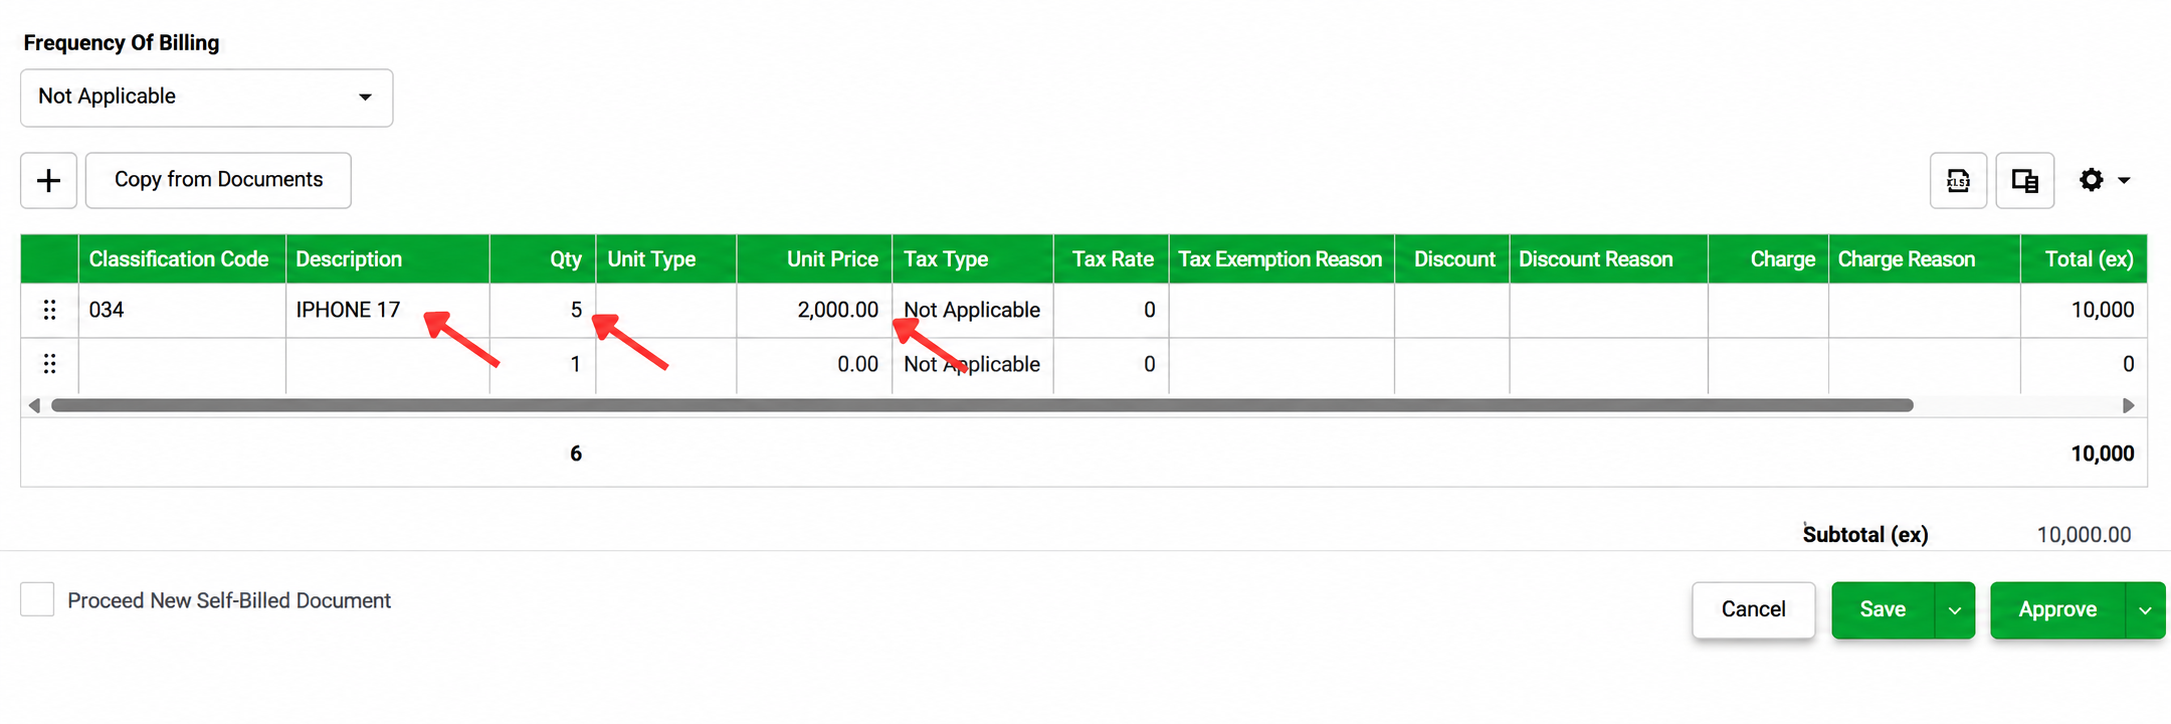
- Enter the transaction description and amount details. In the tutorial sample, the description is iPhone 7, quantity 5 and unit price 2,000.
4. Approve and Check the Validation Status
- After checking the information, click Approve.
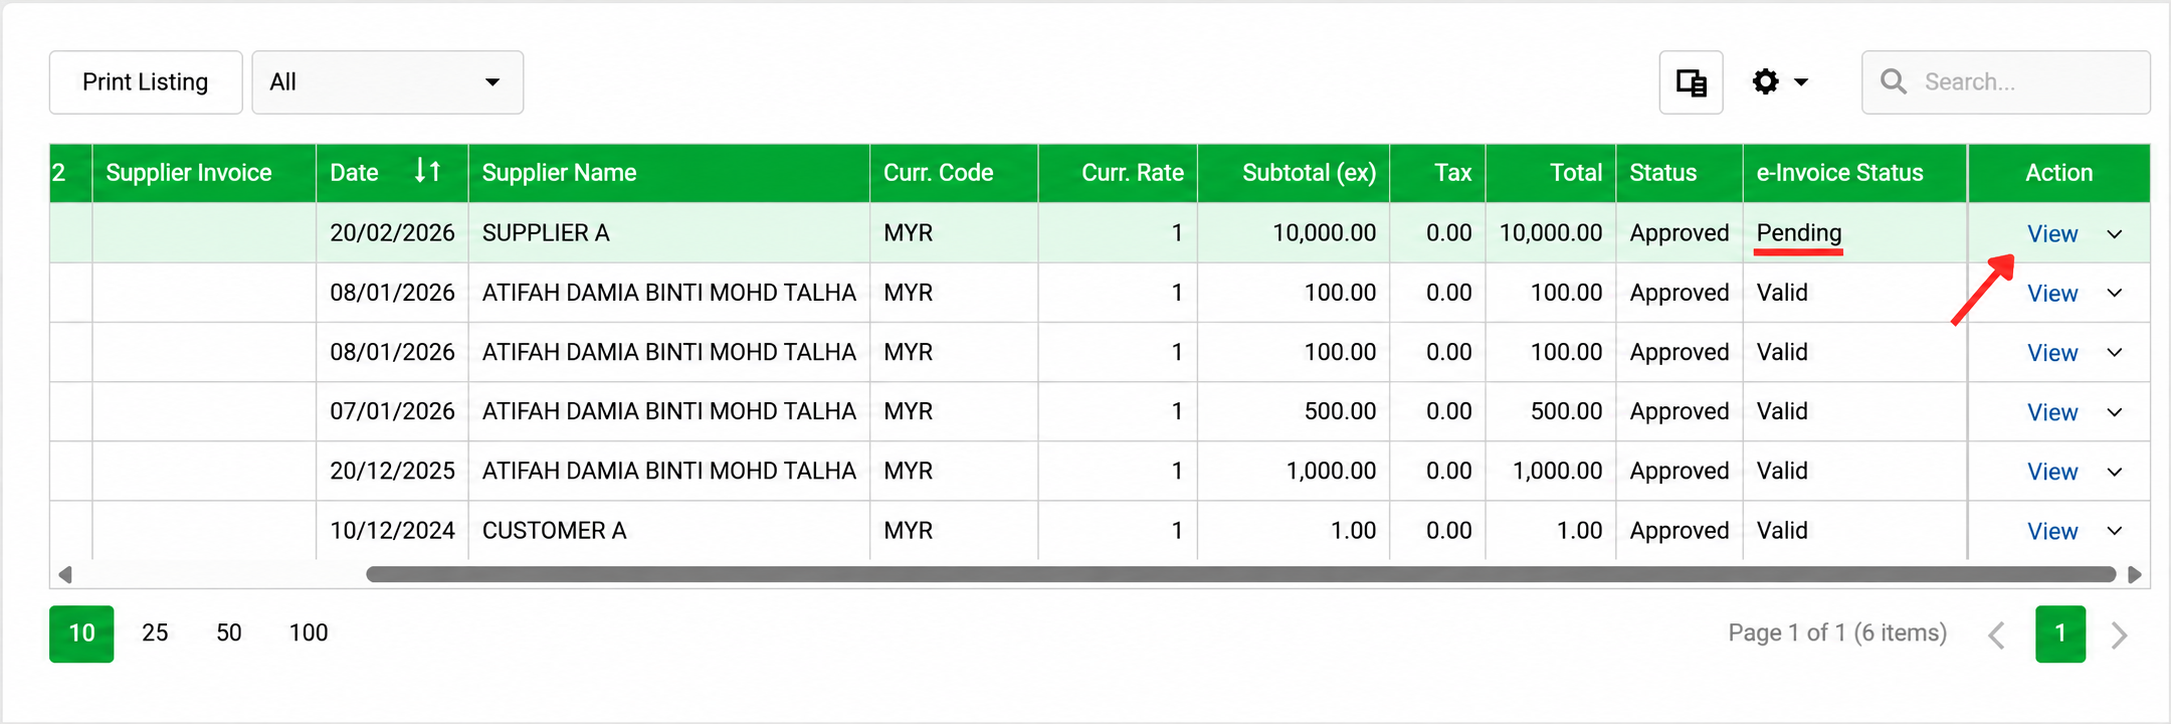
- The document first shows a Pending status after submission to the MyInvois portal.
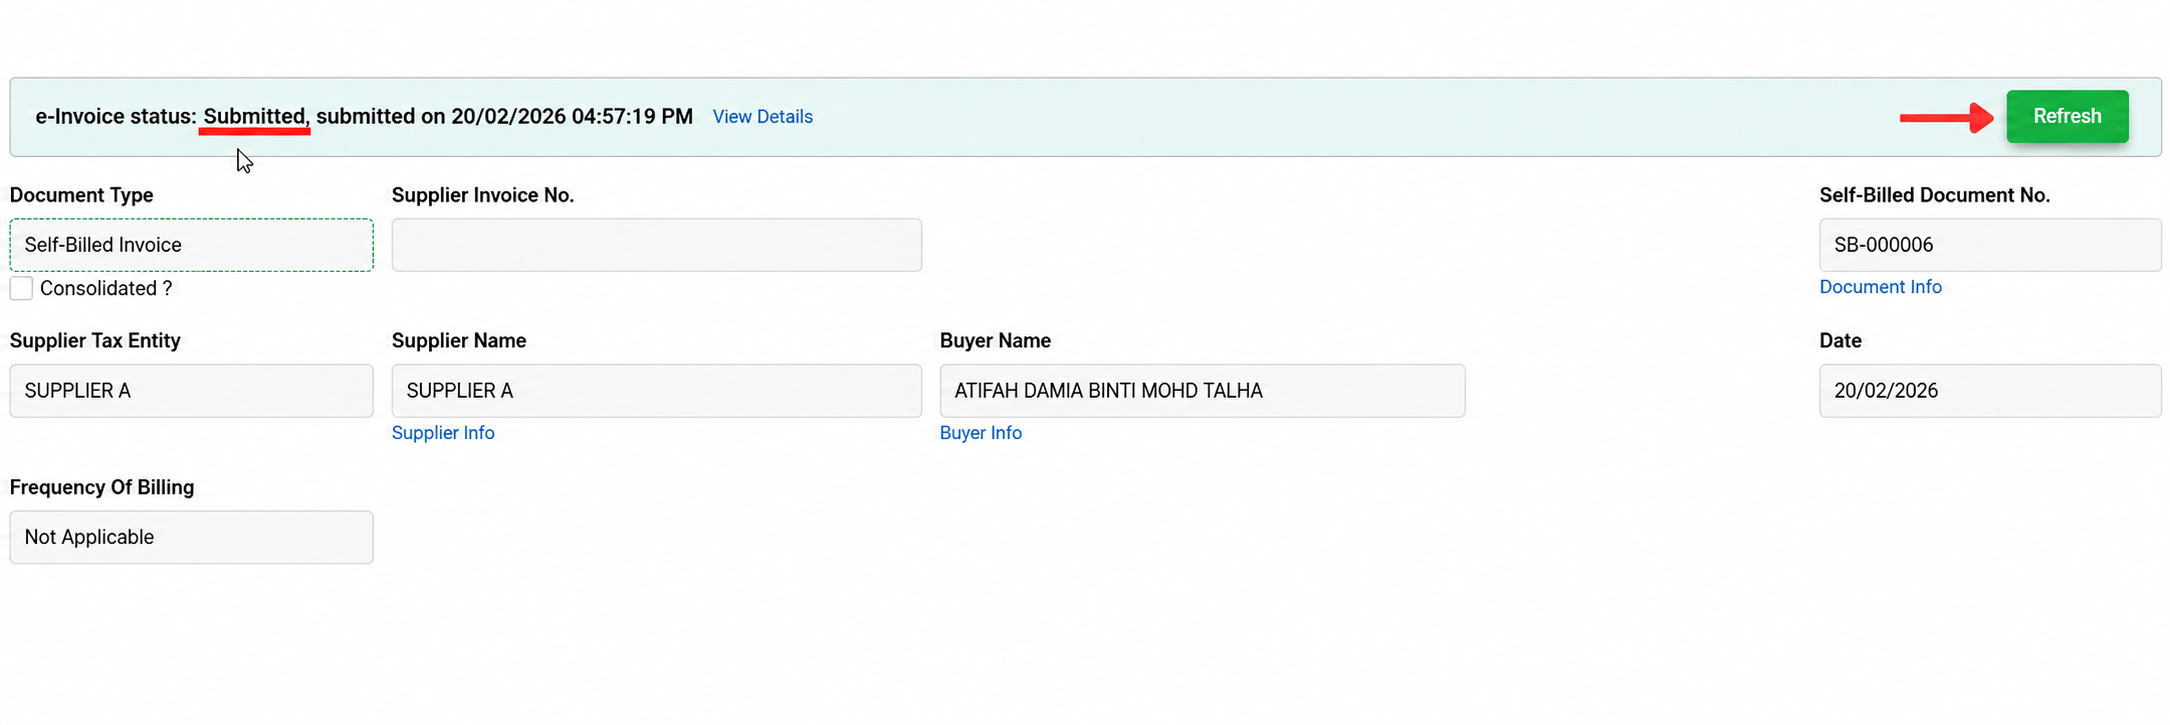
- Click View to check the e-Invoice status. Refresh until the status changes from submitted to Valid.
5. Keep the Foreign-Supplier Self-Billed e-Invoice for Record
Note:
For the overseas-supplier, once the document is valid, keep the validated self-billed e-Invoice for your record rather than sharing it with the overseas supplier.
Scenario 2: Rental Paid to an Individual Owner — Copy from a Payment Voucher
For rental payments, first check whether the property owner is a business or an individual. If the owner is a business, the owner should issue the invoice to your company. If the owner is an individual who does not conduct business, you can issue a self-billed e-Invoice for the rental payment.
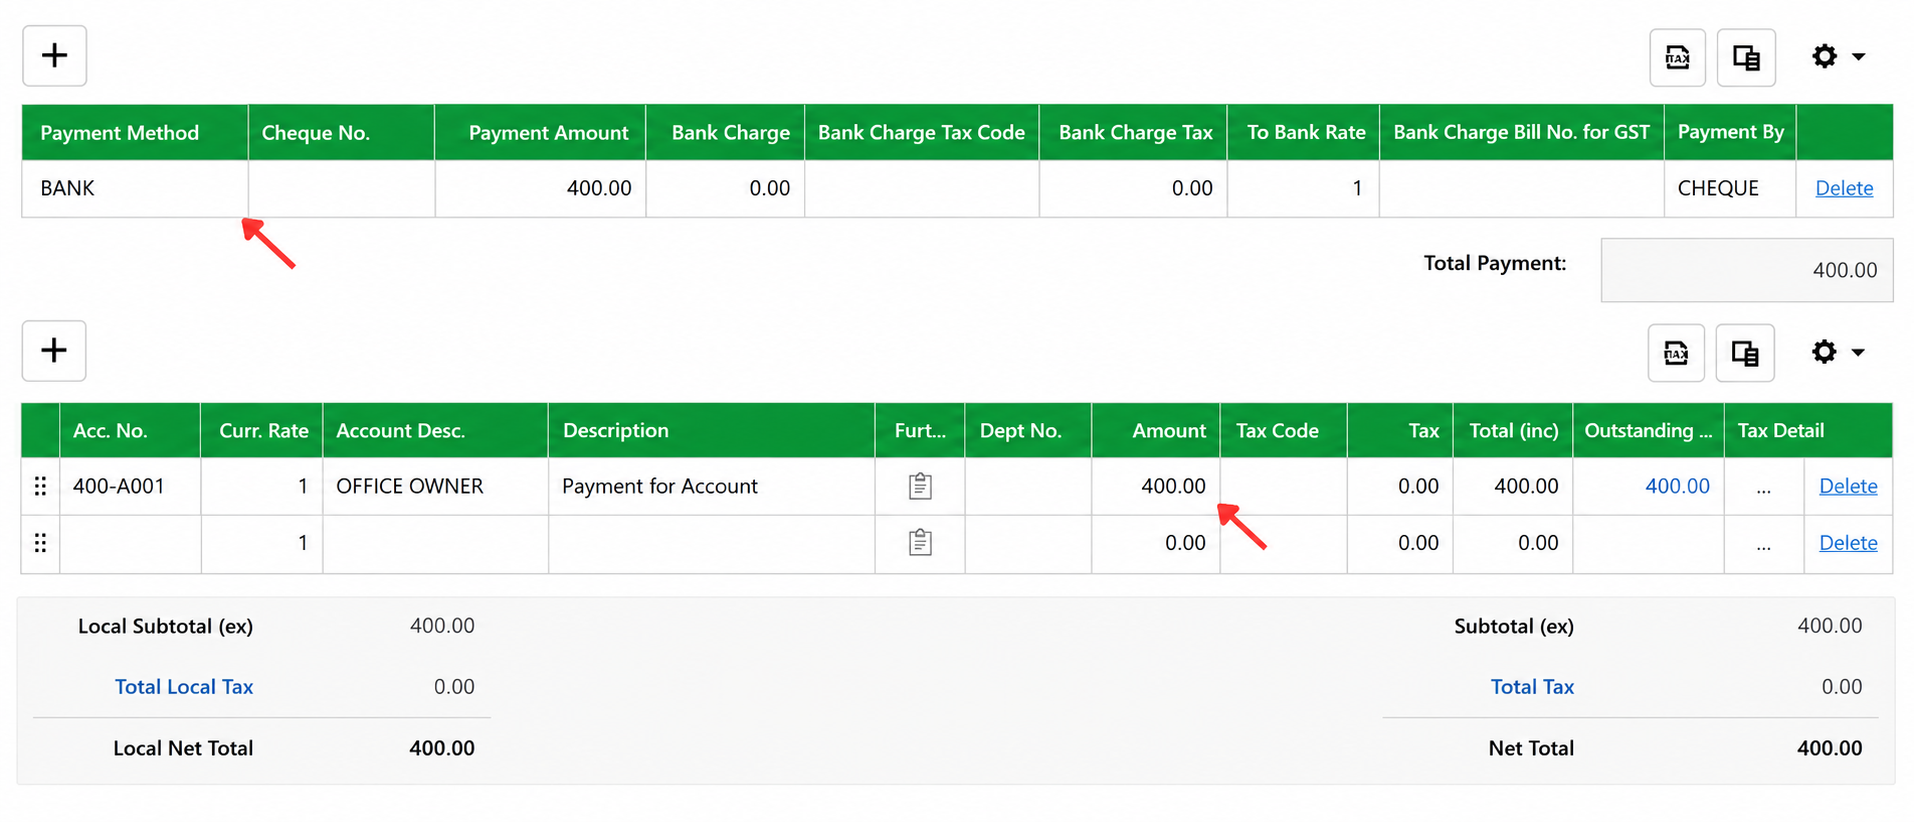
1. Create the Rental Payment Voucher
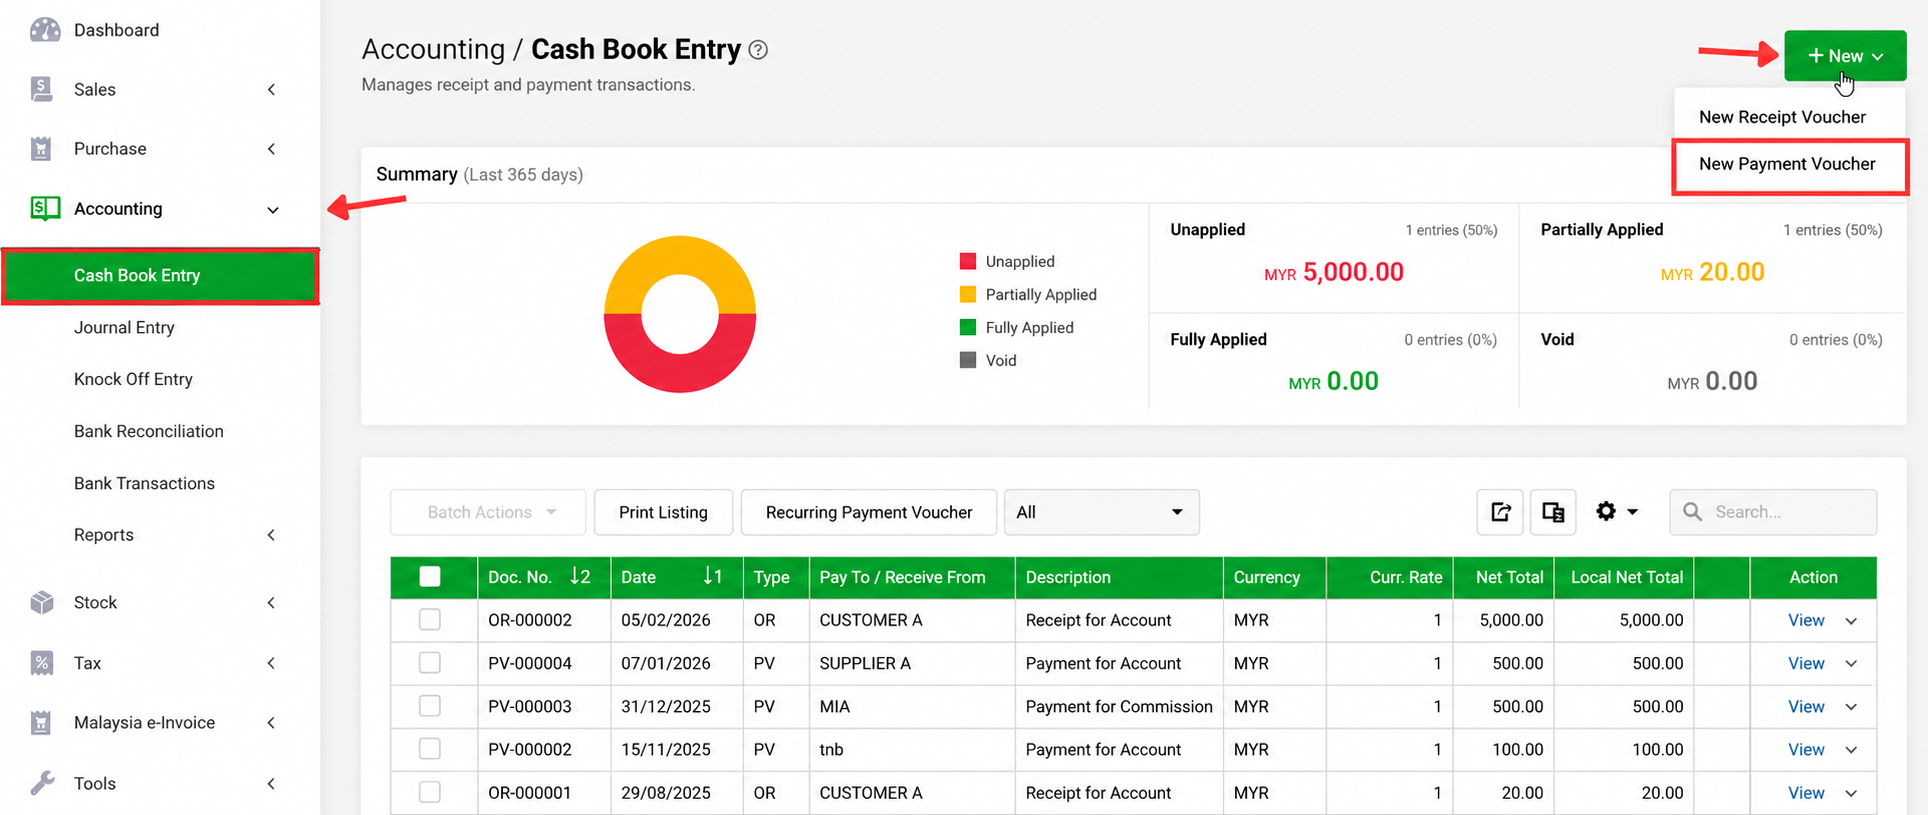
- Go to Accounting > Cash Book Entry
- Create a new Payment Voucher.
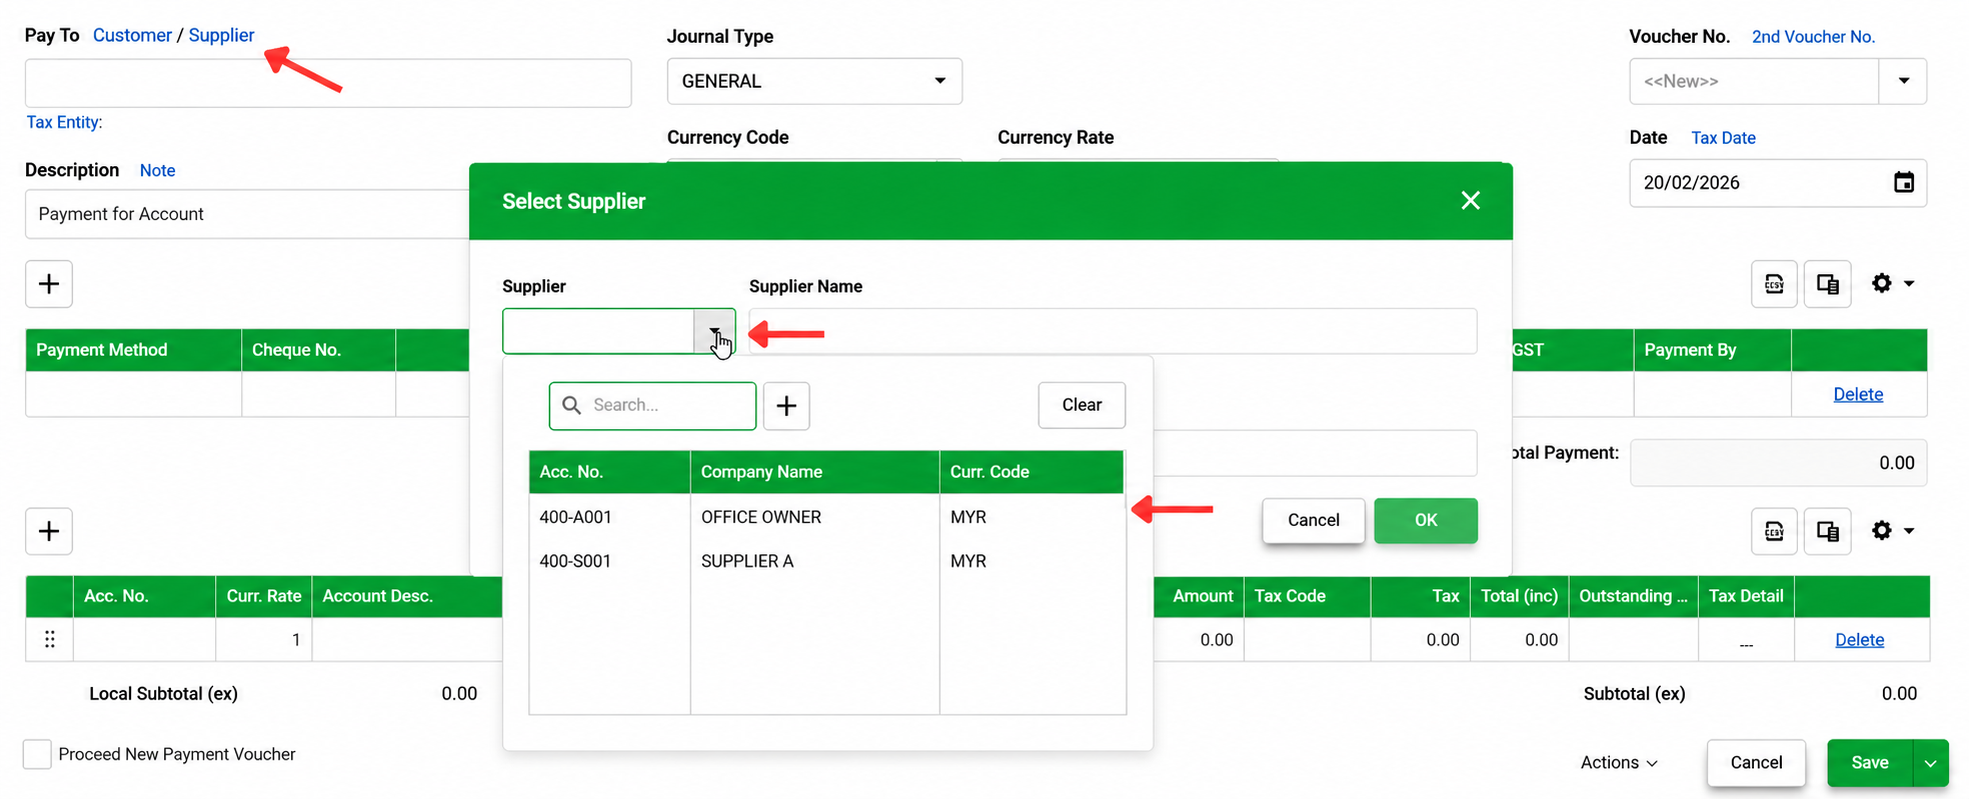
- Select the property owner from the supplier list if the owner has already been maintained there.
- Check that the owner Tax Entity is available. The tutorial example uses a MyKad Tax Entity.
- Select the payment account. The tutorial pays from Bank and enters 400 as the sample rental amount.
- Click Save. The tutorial does not create a Knock Off Entry for this sample.
2. Copy the Payment Voucher to a Self-Billed e-Invoice
- Go to Malaysia e-Invoice > Self-Billed Document.
- Click the down arrow beside New and choose Copy from Payment Voucher.
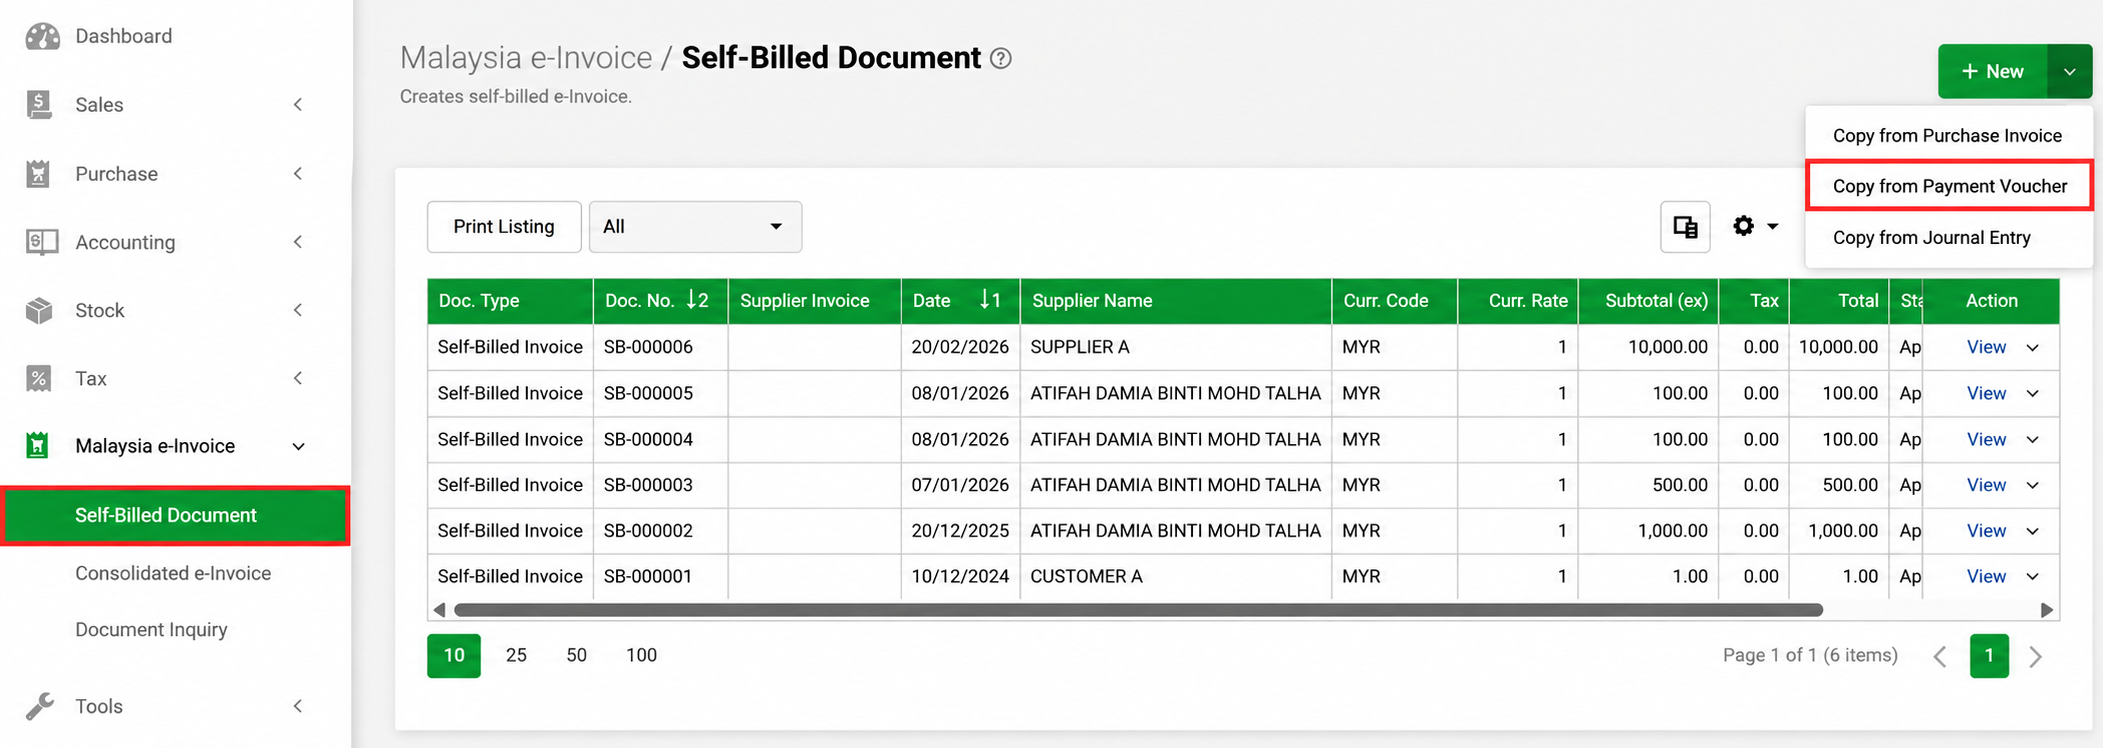
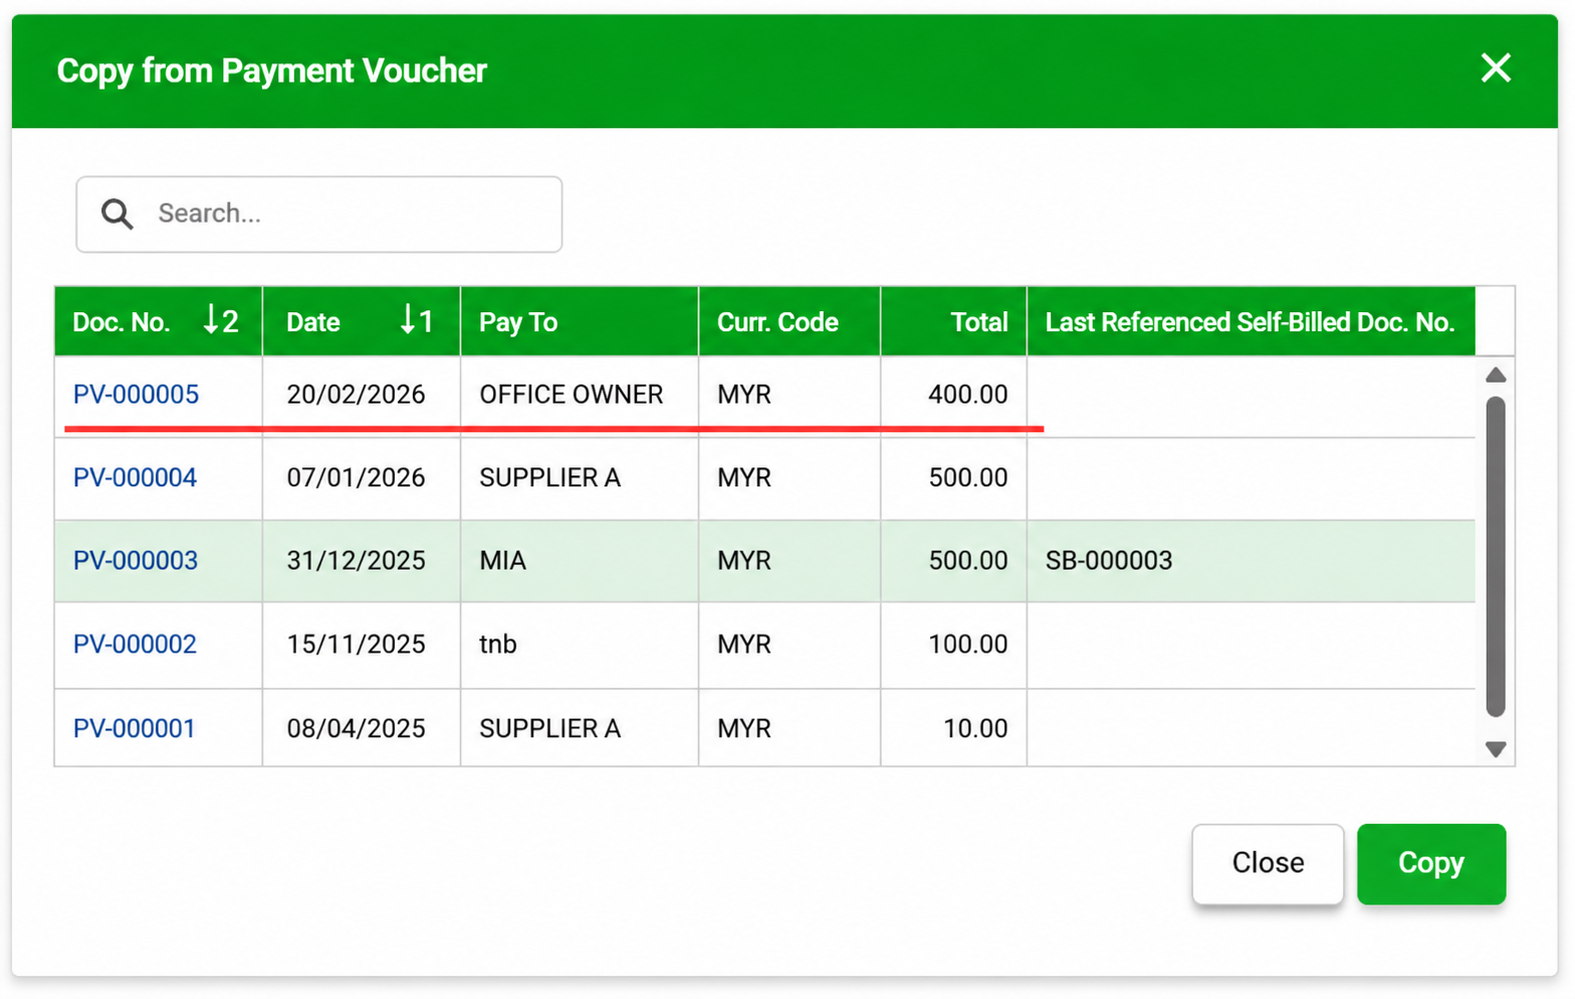
- Select the required Payment Voucher.
- Make sure the Tax Entity is available, then click Copy.
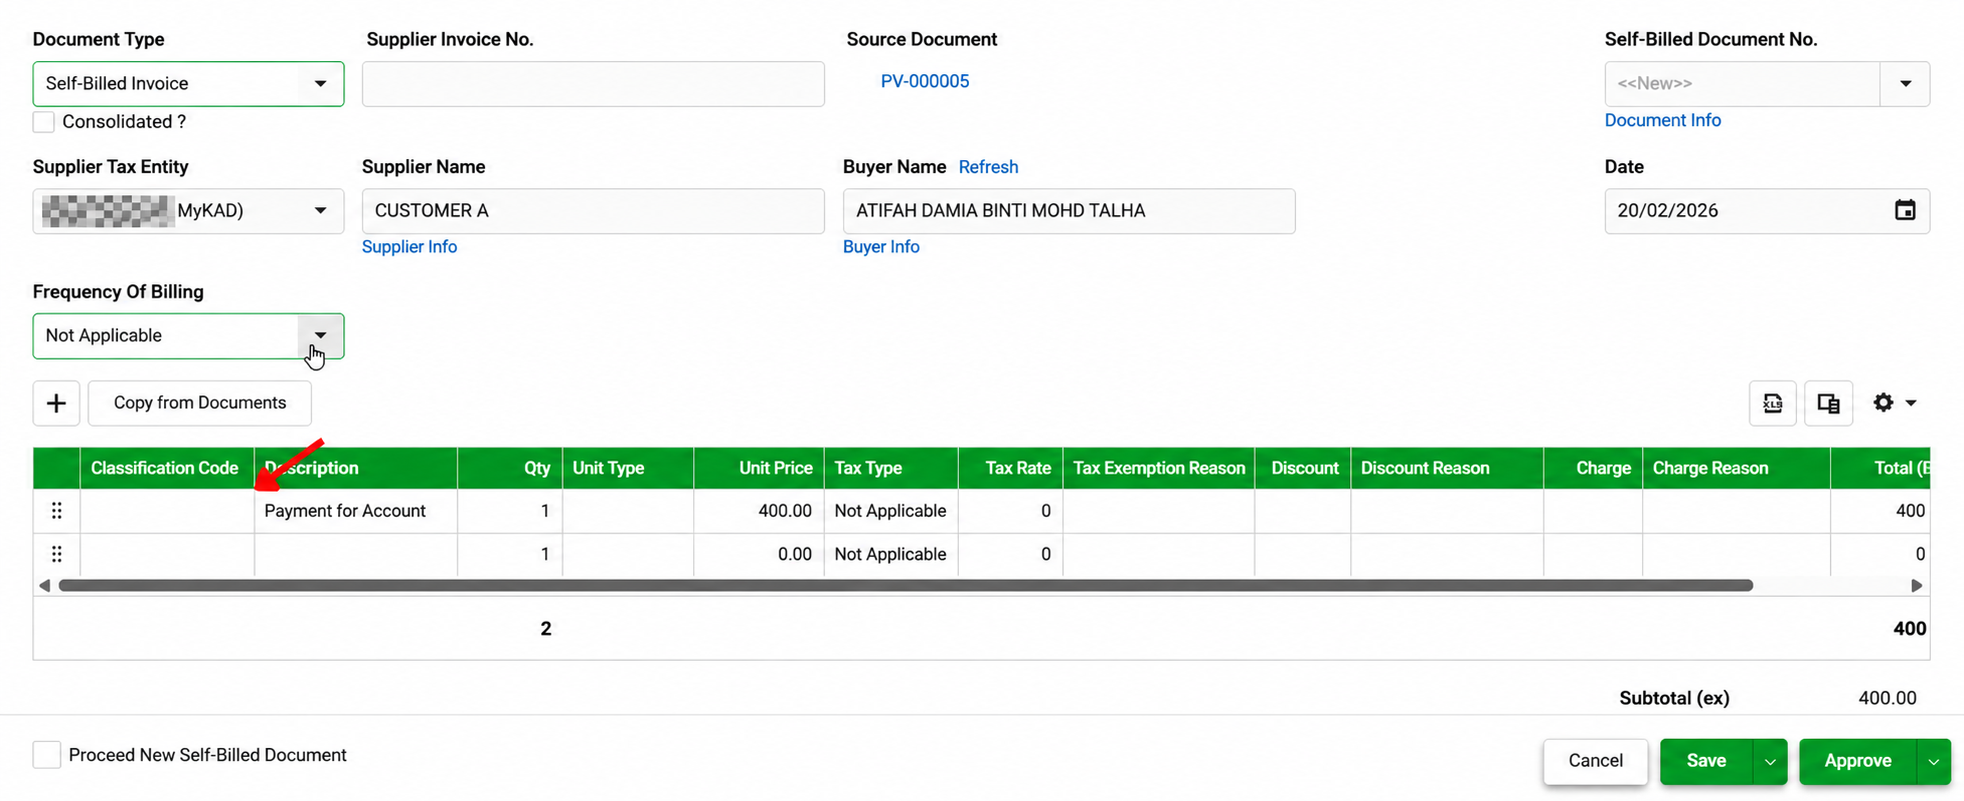
3. Update the Self-Billed Invoice Classification
- Confirm Document Type is Self-Billed Invoice.
- Confirm the owner under Supplier Tax Entity.
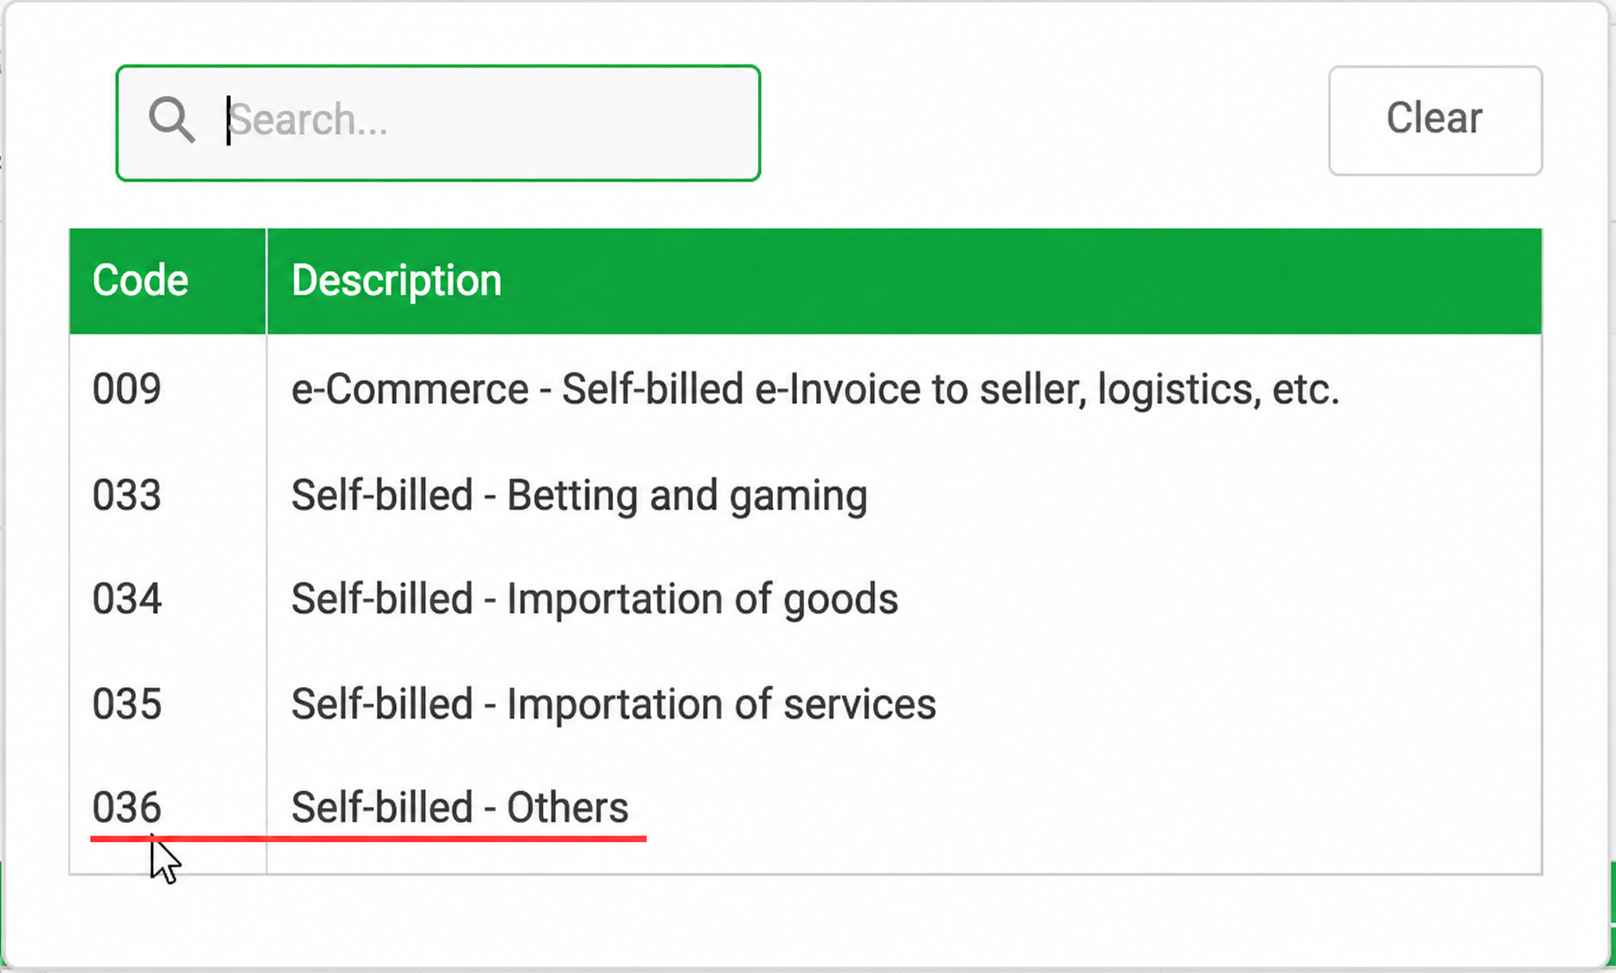
- Set Classification to 036 — Self-billed - Others for the rental example.
4. Add Another Payment Document if Needed
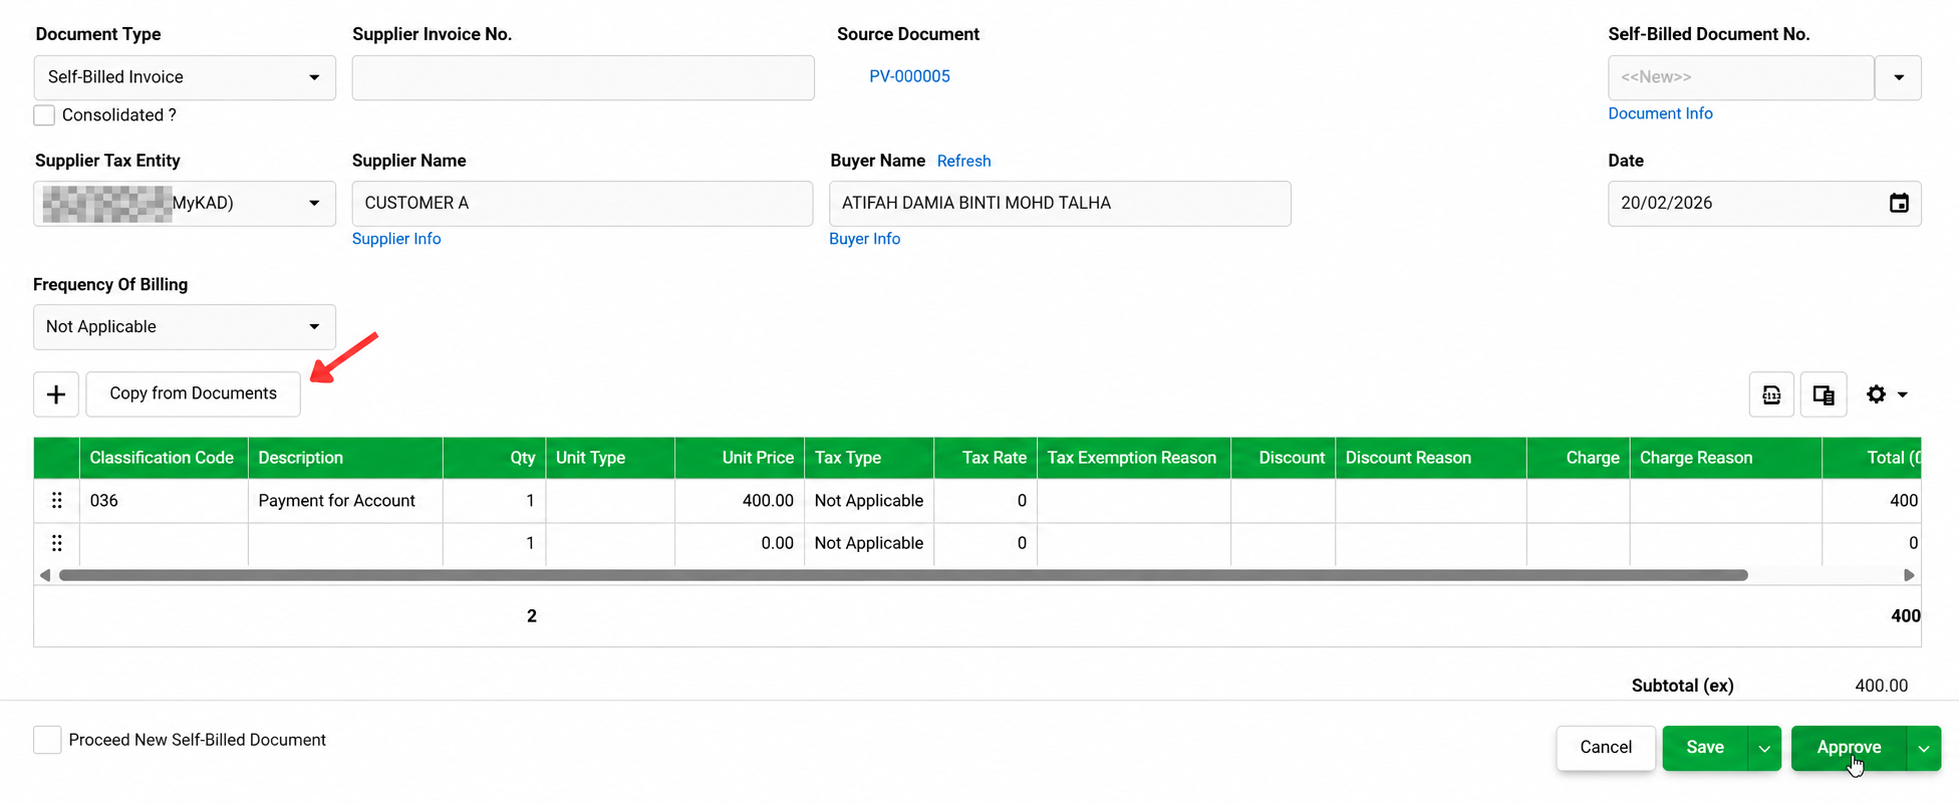
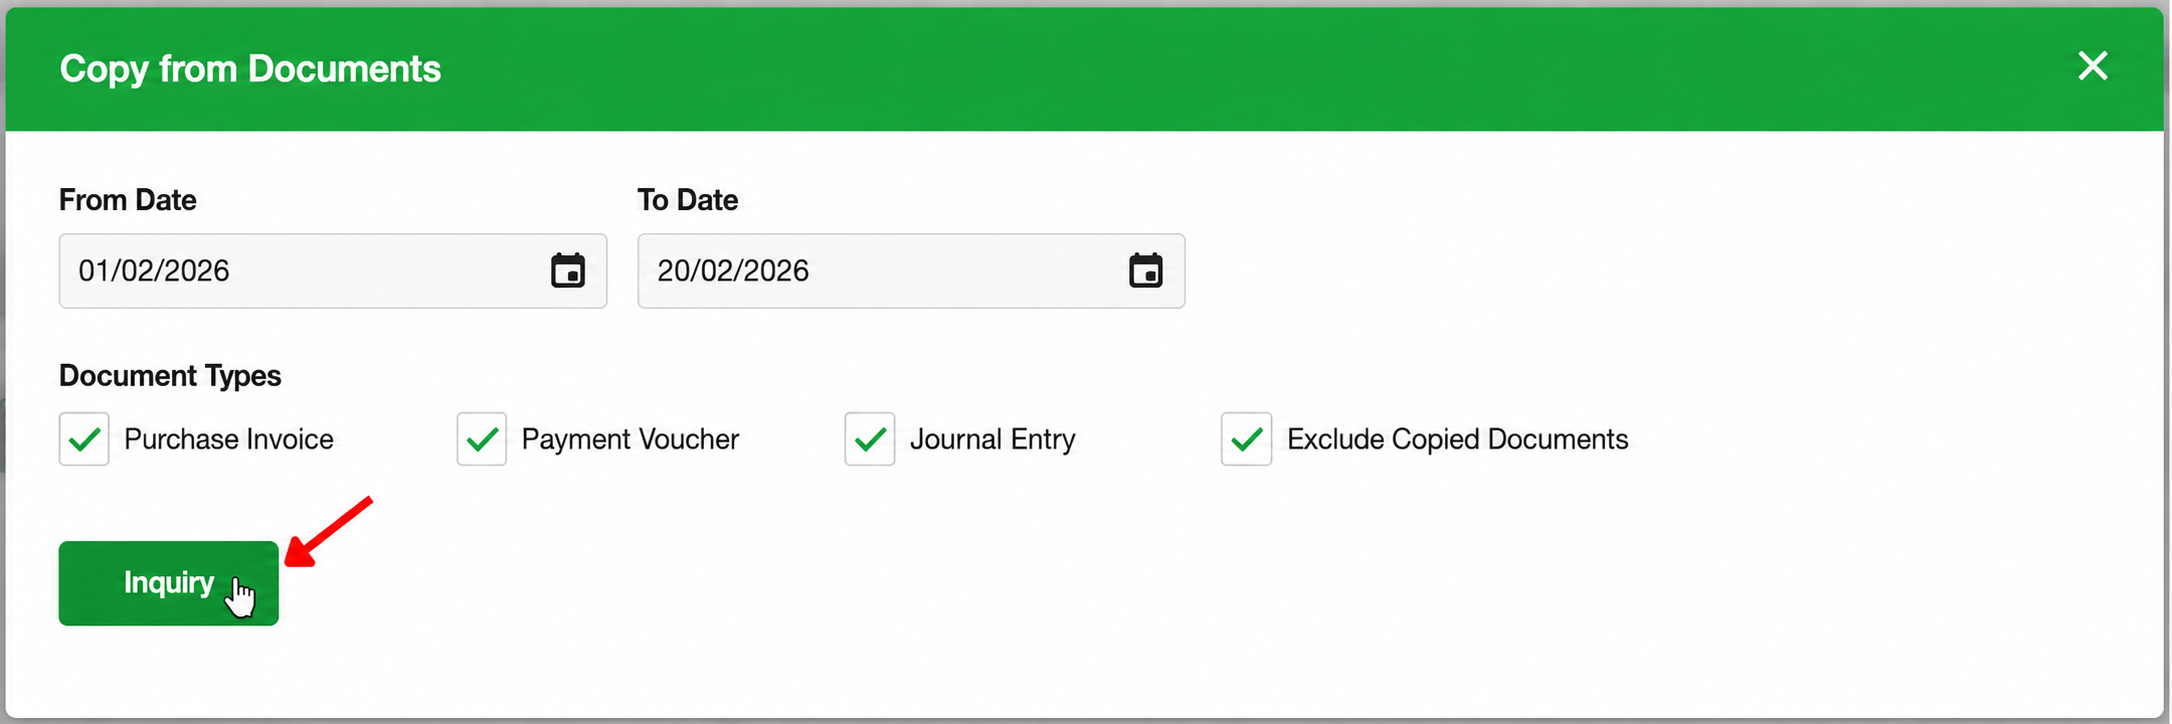
- If you have another payment under the same owner, such as a utilities payment, use Copy from Document.
- Click Inquiry
- Search for the additional document and click Copy to add it before approval.
5. Approve and Confirm the Document Is Valid
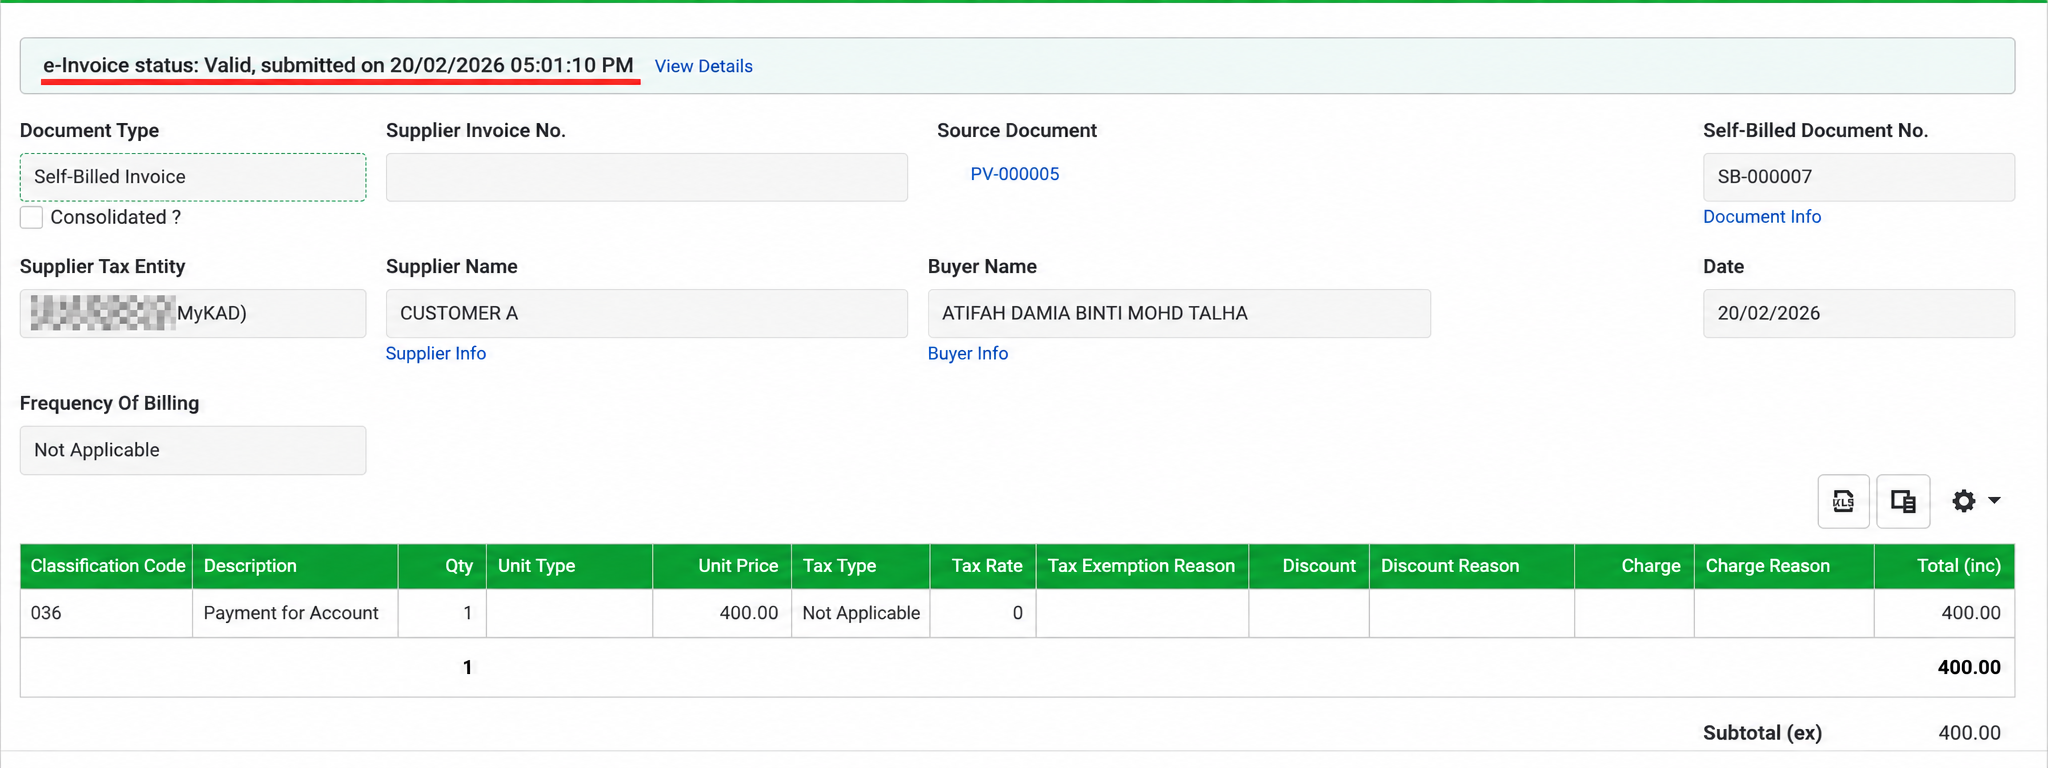
- After checking the information, click Approve.
- Open the document and check the e-Invoice status until it becomes Valid.
Conclusion
Issuing a self-billed e-Invoice in AutoCount Cloud Accounting can be done either by creating a new self-billed document directly or by copying from an existing transaction such as a Payment Voucher. Make sure the supplier Tax Entity, classification code, and document details are correct before approving the e-Invoice. After submission, check that the e-Invoice status changes to Valid to confirm that it has been successfully processed.
Frequently Asked Questions
When do I need to issue a self-billed e-Invoice for rental payments?
If the property owner is a business, the owner should issue an invoice to your company. If the property owner is an individual who does not conduct business, you can issue a self-billed e-Invoice for the rental payment.
Can I create a self-billed e-Invoice from an existing Payment Voucher?
Yes. Go to Malaysia e-Invoice > Self-Billed Document, click the dropdown beside New, and select Copy from Payment Voucher. Choose the relevant Payment Voucher and copy it into the self-billed document.
Which Classification Code should I use for imported goods?
For the importation of goods, select Classification Code 034 – Self-billed: Importation of goods before approving the self-billed e-Invoice.
Which Classification Code should I use for a rental self-billed e-Invoice?
For the rental example shown in this guide, select Classification Code 036 – Self-billed: Others.
How do I know whether my self-billed e-Invoice has been successfully validated?
After approving the document, check the e-Invoice Status. It may first appear as Pending or Submitted. Refresh the status and confirm that it changes to Valid.
Need Help with AutoCount Self-Billed e-Invoice?
Our team can assist you with setting up and issuing Self-Billed e-Invoices in AutoCount Cloud Accounting for scenarios such as foreign suppliers and rental payments.