
-
AutoCount Accounting Features
-
- Approval Workflow
- Audit Trail
- Auto Save in Draft Folder
- AutoCount Contra Account
- AutoCount License Setting Guide
- Deposit Tracking & Management
- Documents Numbering Format
- Full Transfer and Partial Transfer
- Import Data to AutoCount Accounting Using Excel
- Informative Charts and Analytical Data
- Layout Customization
- Multi Pricing
- Sales and Services Tax
- Schedule Backup
- Search Lookup Edit
- View Documents Flow
- AutoCount Feature Stock Take
- Column Chooser
- Show Remaining (3) Collapse
-
AutoCount Cloud Accounting
-
AutoCount E-Invoice
-
AutoCount HRMS User Guide
-
AutoCount Modules
-
- Activity Stream
- Advanced Financial Report
- Advanced Item
- Advanced Multi-UOM
- Advanced Quotation Module
- Basic Multi-UOM
- Budget Module
- Consignment
- Filter By Salesman
- FOC Quantity
- Formula
- Item Batch
- Item Package
- Landing Cost
- Multi-Currency
- Multi-Dimensional Analysis
- Multi-Location
- Project Account
- Recurrence
- Remote Credit Control Module
- Stock Assembly
- User Defined Fields (UDF)
- AutoCount SST Hidden Functions
- AutoCount SST Submission - Service Tax
- AutoCount Scripting Module User Guide
- AutoCount Bonus Point Module User Guide
- AutoCount Service Management Plugin User Guide
- Show Remaining (12) Collapse
-
AutoCount Plugins
-
- Fixed Assets Management
- Goldsmith
- TD Ordering Mobile Apps
- TD Stock Mobile Apps
- Universal Import Plugin
- DMS Import Plugin
- AutoCount Pick List Plugin User Guide
- AutoCount Credit Memo Plugin User Guide
- AutoCount Lock Price Plugin
- AutoCount Progressive Billing
- AutoCount Easy Recurrence Plugin
- Batch Update Unit Price Plugin
- AutoCount Production order
- AutoCount Car Tint Film Plugin
-
- Event Management System
- AutoCount To-Do List Plugin
- AutoCount AutoBank Reconciliation Plugin
- Intercompany Billing Plugin User Guide
- Lead Management 2.0 Plugin
- AutoCount Service Contract Plugin User Guide
- AutoCount Optical Plugin
- AutoCount Integrator Plugin
- AutoCount Procurement Planning Plugin
- Cage Management Plugin
- AutoCount Vehicle Plugin
- AutoCount Agent Validation Plugin User Guide
- AutoCount Barcode Generator Plugin User Guide
- AutoCount Easy Batch Number Entry Plugin User Guide
- Warranty 2.0 Plugin
- AutoCount Easy Photo 2.0 User Guide
- AutoCount Recurring Invoice Plugin User Guide
- AutoCount Scale Barcode Plugin User Guide
- AutoCount Recurrence Late Interest Plugin
- AutoCount Item Visibility Control
- AutoCount Bill Remark Plugin User Guide
- AutoCount Pain Tracker User Guide
- AutoCount Easy Payment
- AutoCount Easy Deposit Plugin
- AutoCount Easy Knock Off Plugin
- AutoCount Daily Collection Summary Plugin
- Timber Log Plugins
- Batch Transfer SODO Plugin
- AutoCount Vege Basket Plugin Guide
- AutoCount Fruit Basket Plugin Guide
- Referral Management Plugin
- AutoCount Migrator Plugin
- AutoCount Email&WhatsApp Plugin
- AutoCount Multi Company Knock Off Plugin
- AutoCount Advance Aging Format Plugin
- AutoCount Payment Request Plugin
- AutoCount Vehicle Master Plugin
- AutoCount Advance Deposit Plugin
- Show Remaining (23) Collapse
-
-
Form Template
-
Report Template
-
- Advance Quotation
- Cash Sale
- Consignment
- Consignment Movement
- Credit Note
- Debit Note
- Delivery Order
- FOC Quantity Analysis By Document Report
- Invoice
- Item Package Sales Report
- Monthly Sales Analysis
- Outstanding Sales Order Listing
- Profit And Loss Of Documents
- Quotation
- Sales Agent Contribution Report
- Sales Order
- Top/Bottom Sales Ranking
- Show Remaining (2) Collapse
-
- Available Stock Status Report
- Expired Item Batch Listing
- Inventory Physical Worksheet
- Stock Adjustment
- Stock Aging Report
- Stock Assembly
- Stock Assembly Order
- Stock Balance By Location
- Stock Balance Report
- Stock Card Report
- Stock Disassembly
- Stock Issue
- Stock Item Profit Margin
- Stock Movement Report
- Stock Receive
- Stock Take
- Stock Transfer
- Stock Write Off
- Show Remaining (3) Collapse
-
B2B ORDERING
-
AutoCount AI Agent
AutoCount Email & WhatsApp Plugin Setup Guide
Benefits of Using the Email & WhatsApp Plugin
Automates Email and WhatsApp document sending
Reduces manual follow-up
Schedules customer reminders
Standardizes message templates
Tracks delivery progress
How AutoCount Email & WhatsApp Plugin Works
A. Assign Access Rights
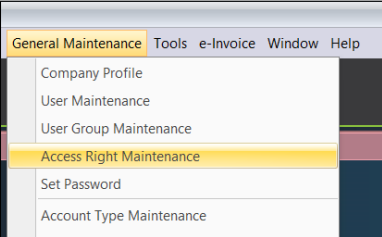
- Go to General Maintainance > Access Right Maintainance.
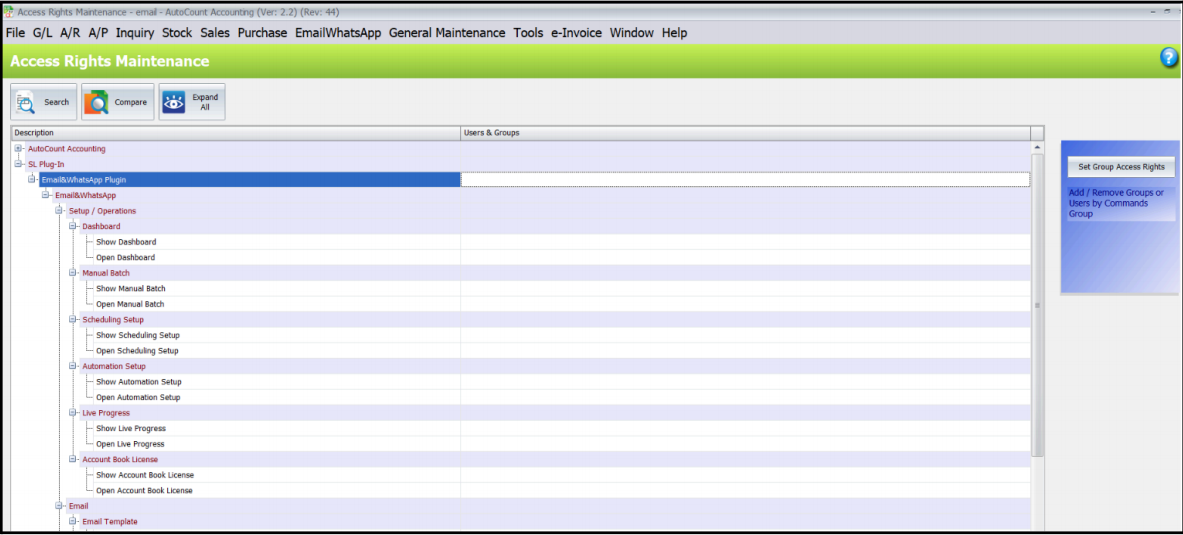
- Expand the SL Plugins section and select Email & WhatsApp Plugin.
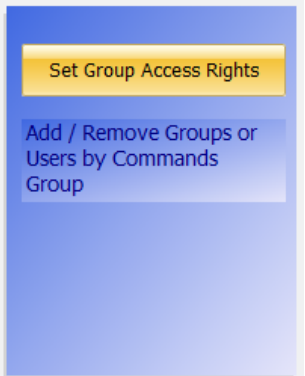
- Click Set Group Access Rights.
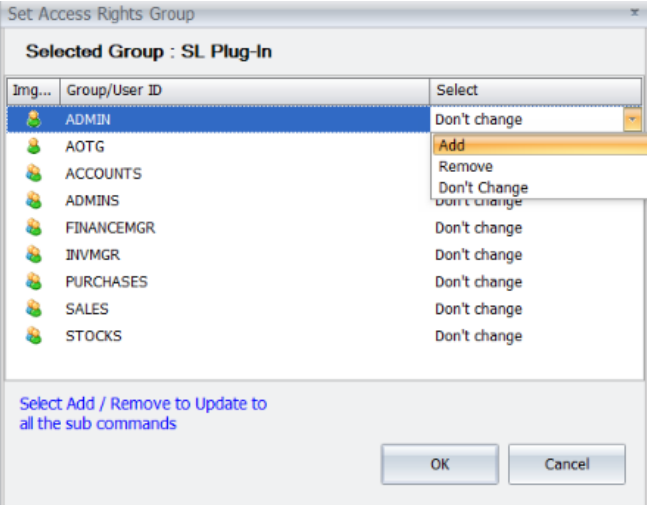
- Select the relevant user group, example; Admin. Change the permission from Don’t Change to Add. Click OK.
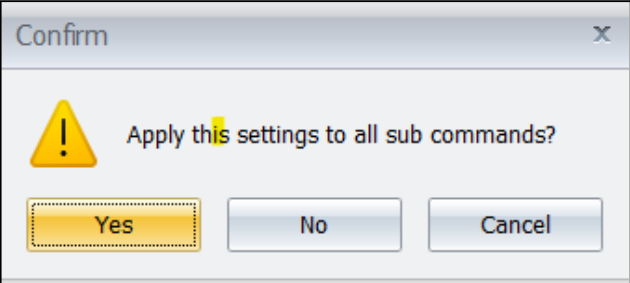
- Click Yes to apply the access rights to all sub-commands.
B.1 First Time Setup Configuration
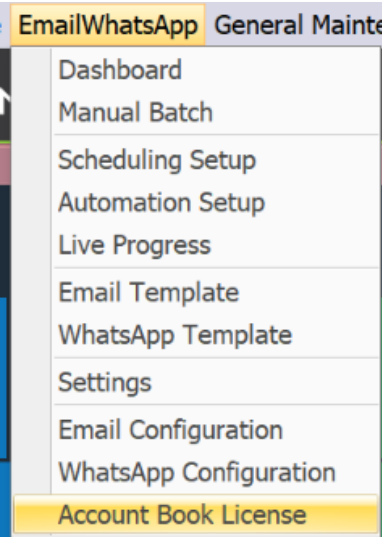
- Go to EmailWhatsApp >Account Book License
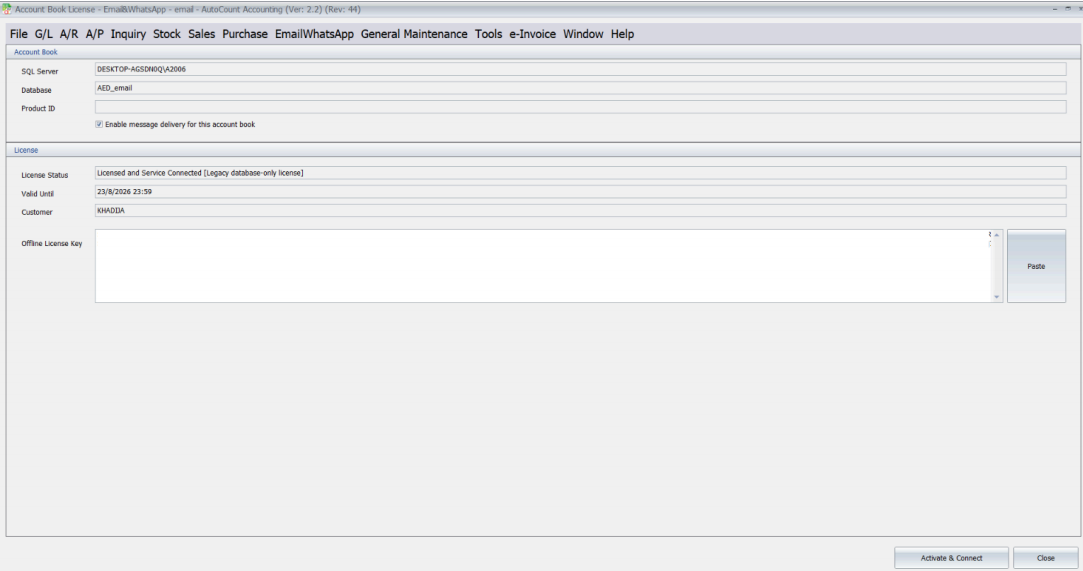
- Tick Enable message delivery for this account book to send the messages.
- Enter the license information issued for this account book.
- Click Activate & Connect.
- Confirm that the status is Licensed and Service Connected
B.2 Email Configuration
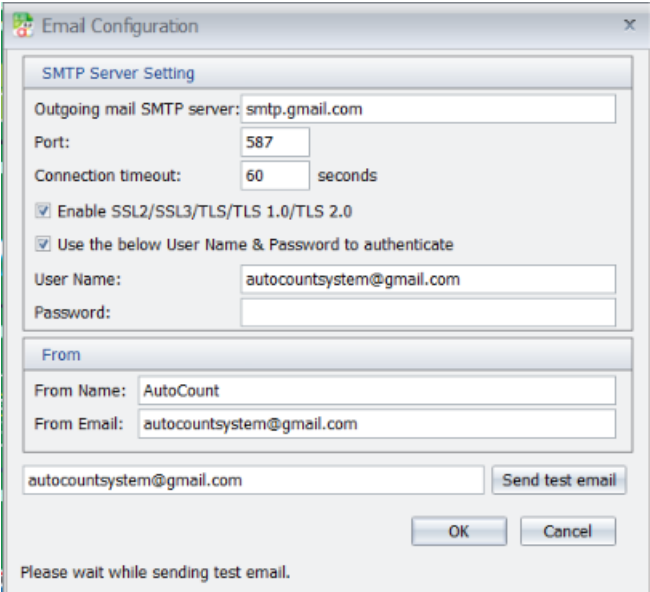
Configure the SMTP mailbox used for outgoing document emails. Confirm the sender address and test the connection before continuing.
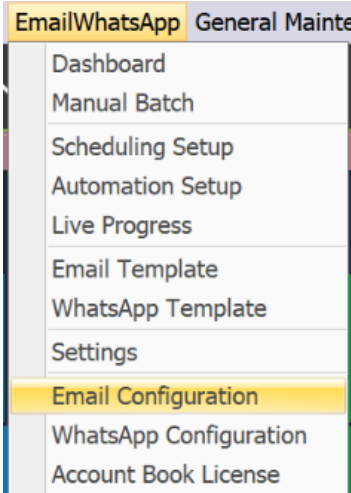
- Open Email & WhatsApp > Email Configuration.
- Enter the SMTP host and port supplied by the email provider.
- Enable SSL when required by the provider.
- Enter the SMTP username, password, sender email, and sender name.
- Click Save SMTP or the equivalent save button.
- Use the test email action and verify delivery to a test mailbox.
B.3 WhatsApp Configuration
Connect the WhatsApp provider and confirm that the configured sender number can be used by the plugin.
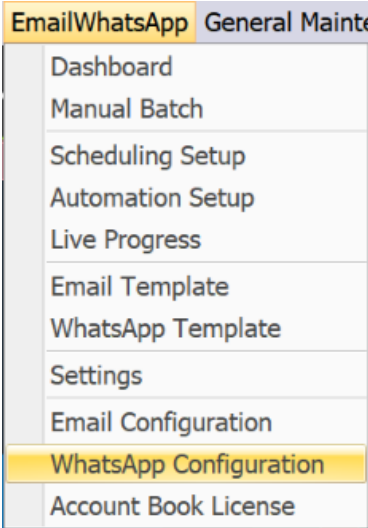
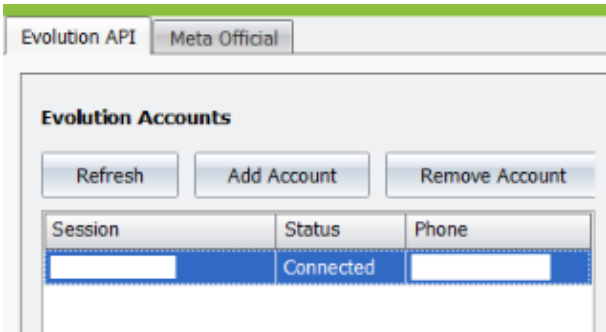
- Open Email & WhatsApp > WhatsApp Configuration.
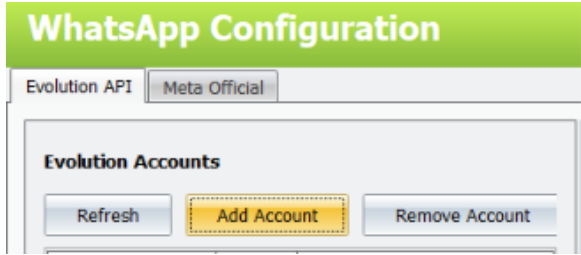
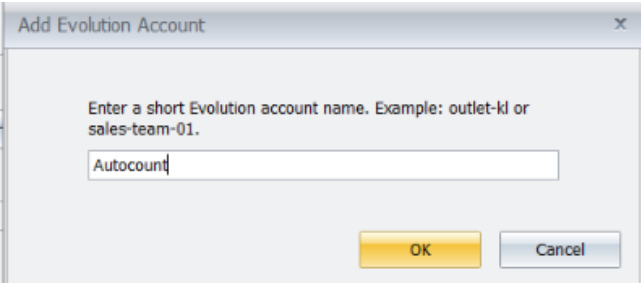
- Click Add Account >> A short name for the account, click OK
- Click Connect with QR >> scan the displayed QR code.
- Wait for the connected or ready status.
B.4 Settings
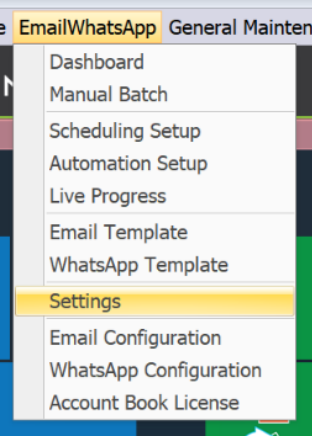
The Settings menu controls the maximum time allowed for one delivery host run.
- Open Email & WhatsApp > Settings.
- Under Delivery Host Runtime, enter the Host Timeout in seconds:
○ 30-300 seconds for testing or small batches.
○ 600 seconds for normal daily delivery.
○ 1,200 seconds for large batches or delivery runs with many Email/WhatsApp recipients.
Click OK to save the setting.
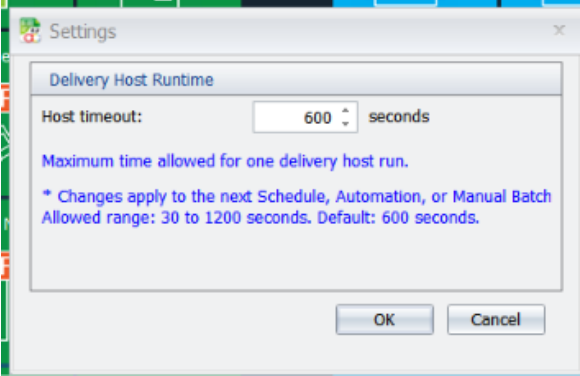
A longer timeout gives the delivery host more time to complete a large send before it is treated as timed out. The allowed range is 30 to 1,200 seconds, and the setting applies to the next Schedule, Automation, or Manual Batch run.
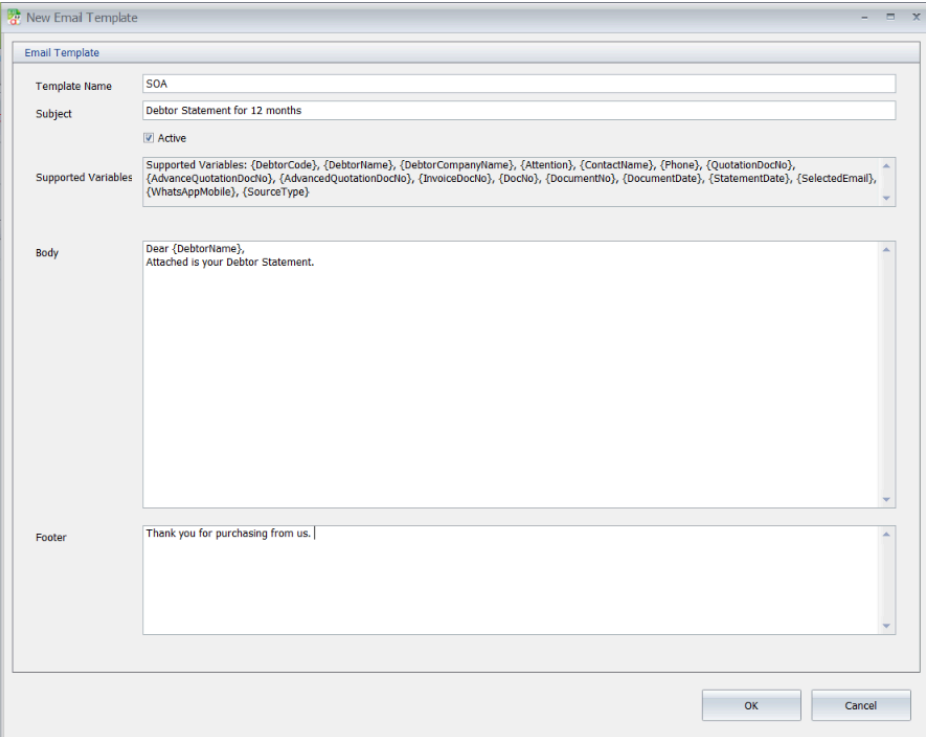
C. Email Template
- Open Email & WhatsApp > Email Template.
- Click New to Create a Template.
- Enter the email subject and message body.
- Save the template and confirm it appears in the listing.
D. WhatsApp Template
WhatsApp messages must use a template that matches the provider or Meta-approved template contract where applicable.
- Open Email & WhatsApp > WhatsApp Template.
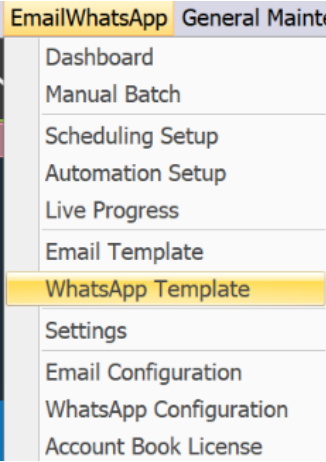
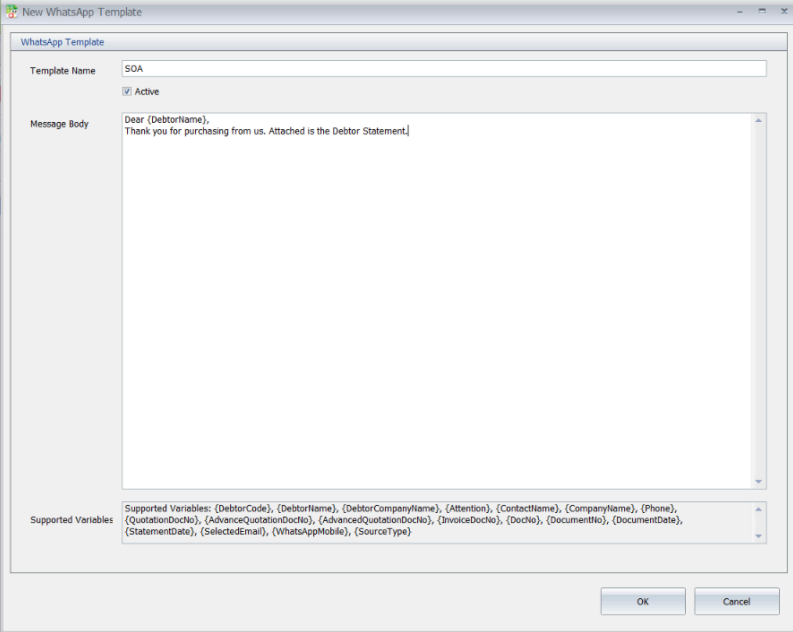
- Click New Template to Create Template.
- Enter the template name and the message.
- Save the template and confirm it appears in the listing.
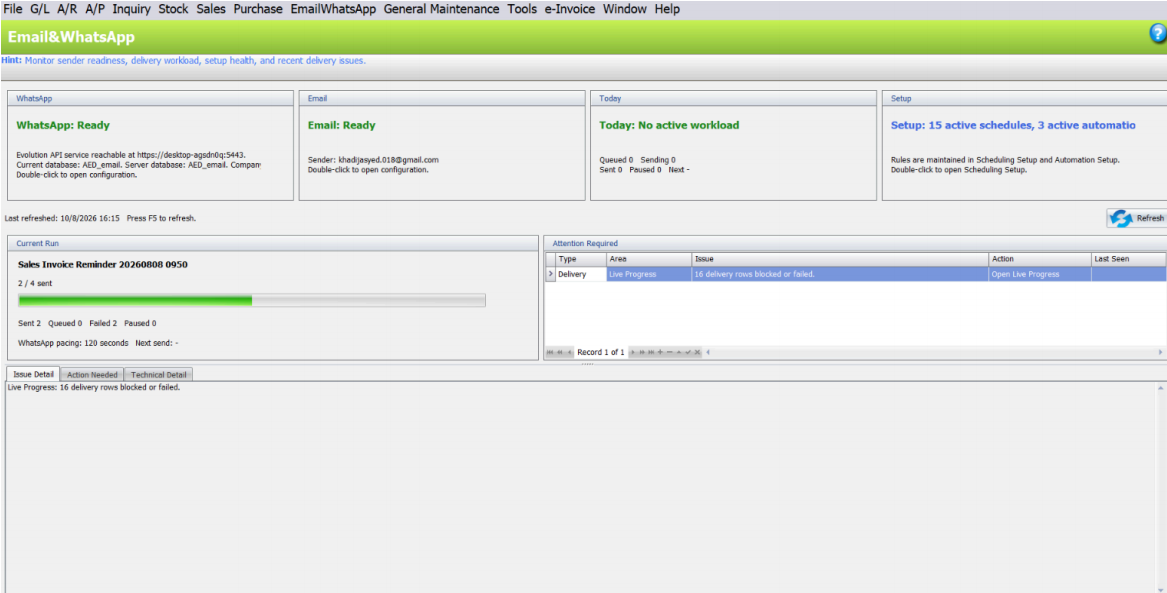
E. Dashboard
Use the Dashboard as the starting point for daily operations and to review delivery activity across Email and WhatsApp.
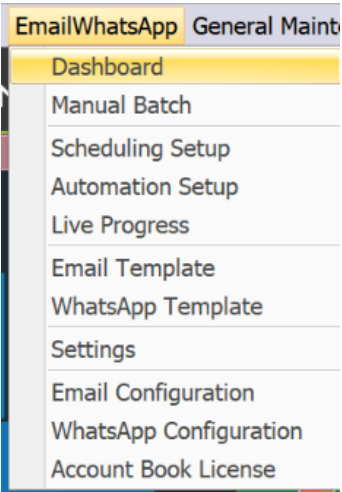
- Open Email & WhatsApp > Dashboard.
- Review the summary counts and current delivery status.
- Open a campaign or batch to review its details.
- Refresh the dashboard after sending or recovering failed items.
F. Manual Batch
Manual Batch is used when an operator wants to select documents or recipients and queue a delivery immediately.
- Open Email & WhatsApp > Manual Batch.
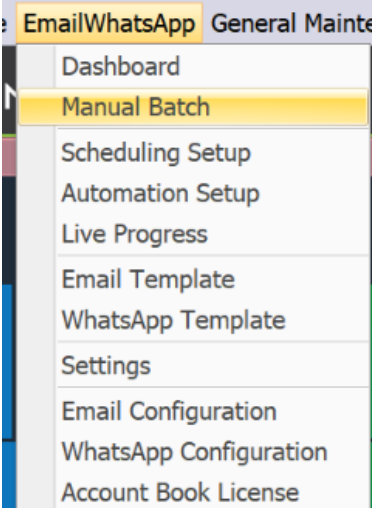
- Select the document type, such as Credit Note, SOA, or Invoice.
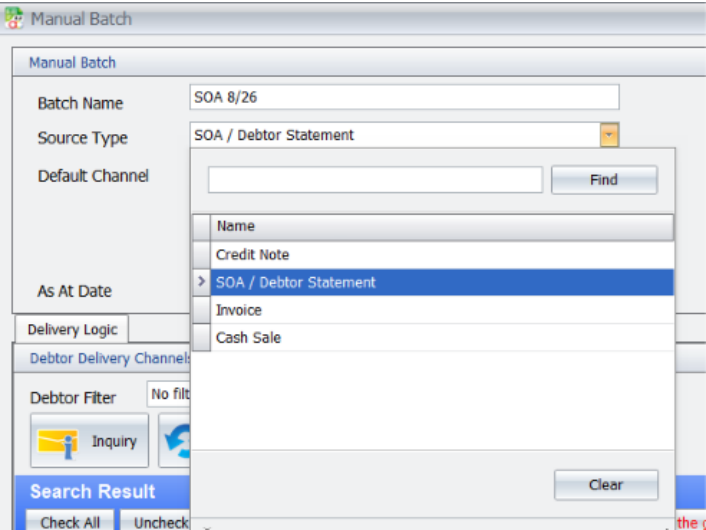
- Enter the date range, as-at date, or debtor filter.
- Click Inquiry to display eligible rows.
- Review the recipient contact fields and select the delivery channel: Email, WhatsApp, or Both.
- Preview the selected rows and resolve any validation or duplicate warnings.
- Select the approved template and click Queue Batch or Send.
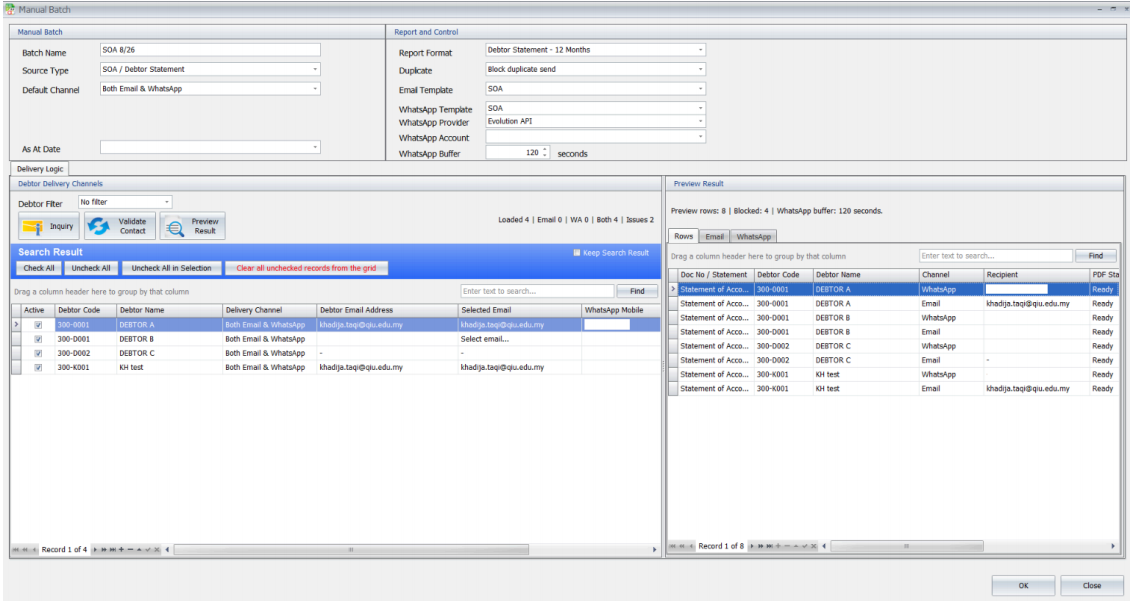
- Confirm the queue result and monitor progress from Live Progress.
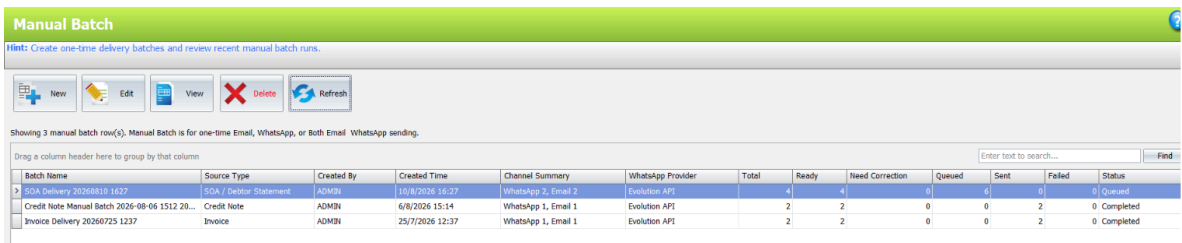
Important: Check duplicate warnings and blocked or invalid recipients.
F.1 Invoice Print Listing - Manual Batch Sending
- Open Sales > Invoice > Print Invoice Listing.
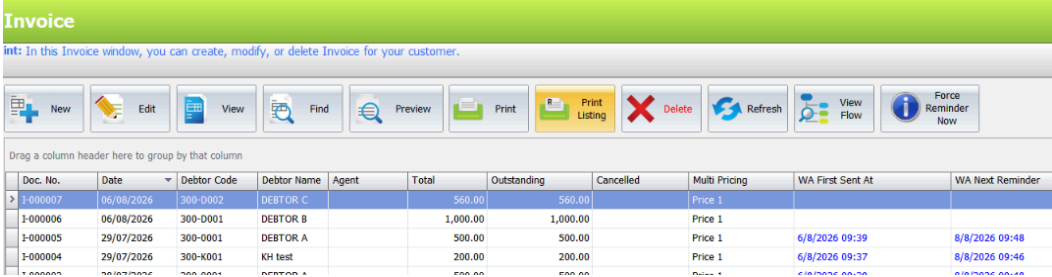
- Apply the required filters and click Inquiry.
- Select the invoices to send and click Manual Batch.
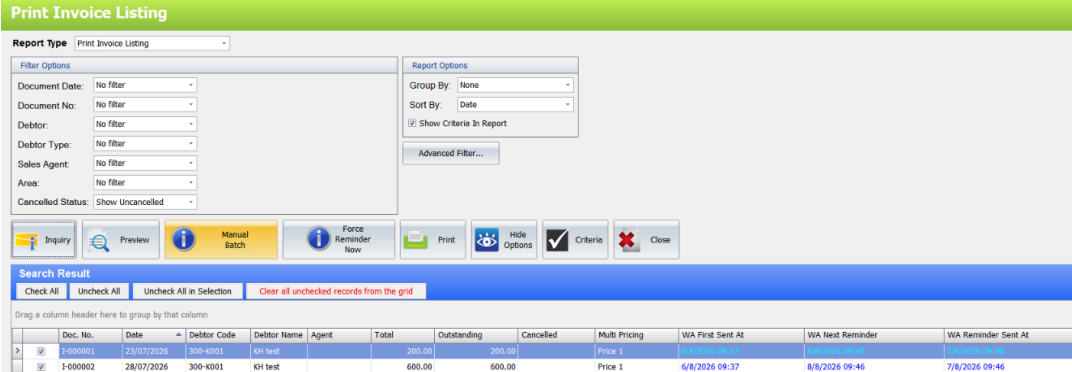
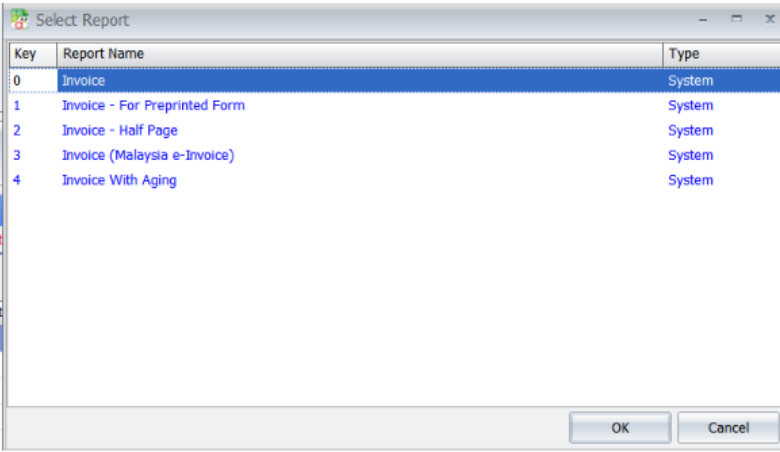
- Select the report format and click ok.
- Click Manual Batch Button in preview.

- Select the debtors, edit the message body.
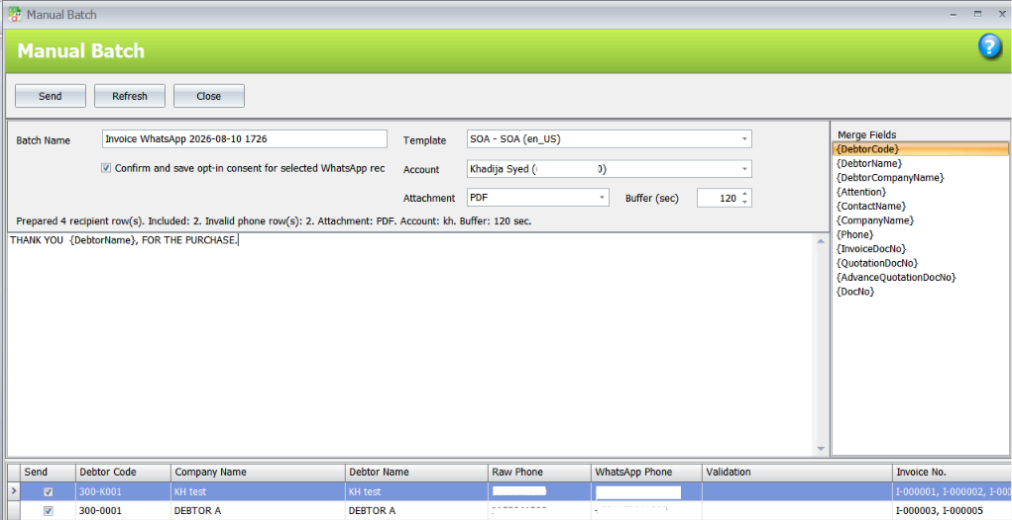
- Review the recipients, templates, channels, and combined PDF before confirming the send.
The plugin groups all selected invoices belonging to the same debtor into one PDF attachment, instead of sending a separate file for each invoice.
F.2 Force Reminder Now
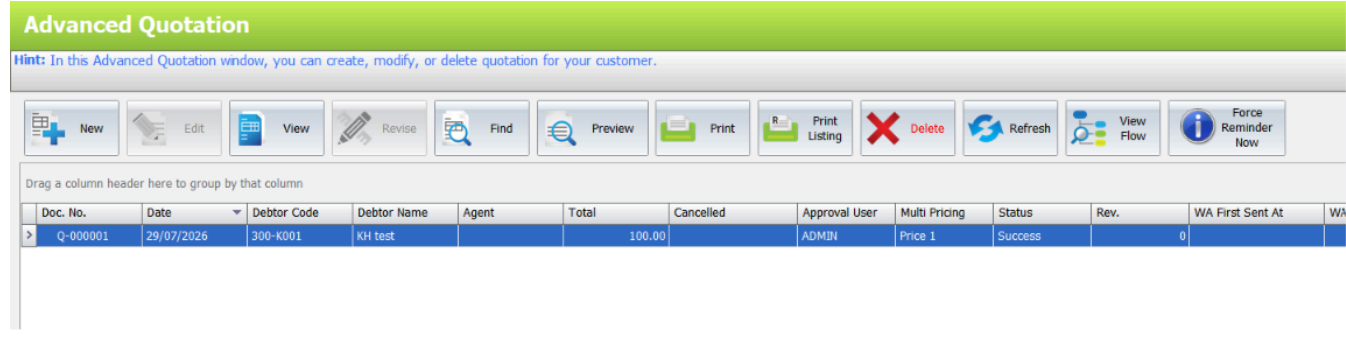
For supported documents – Advanced Quotation, Sales Quotation, Sales Order, Delivery Order, and Sales Invoice, select the required rows and click Force Reminder Now to trigger reminders immediately.
The action bypasses the waiting period but still follows the configured open rule, maximum reminder count, template, report, and contact validation.
G. Scheduling Setup
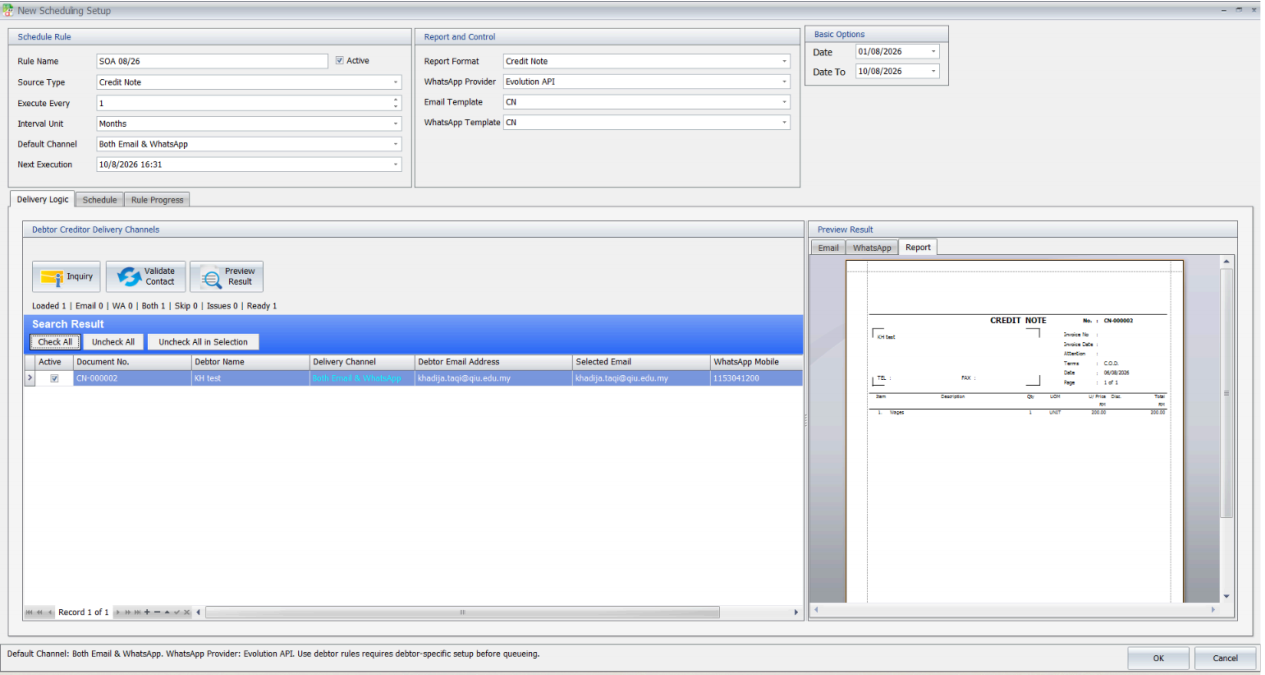
Scheduling Setup creates recurring rules for document delivery by frequency, date, time, document type, and channel.
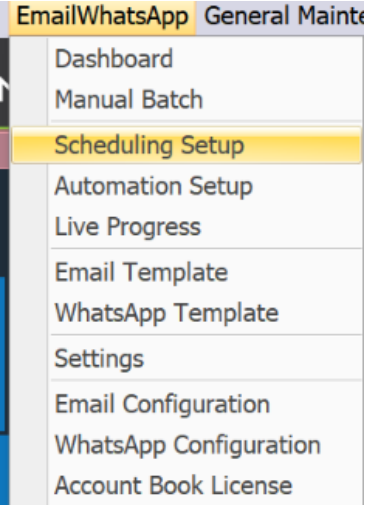
- Open Email & WhatsApp > Scheduling Setup.
- Click New Schedule.
- Select the document type and delivery channel.
- Choose the execution frequency and send date/time policy.
- Select the Report Format, Email & WhatsApp Template.
- Apply document filters where required.
- Click Inquiry to view the result.
- Validate Contact and preview result.
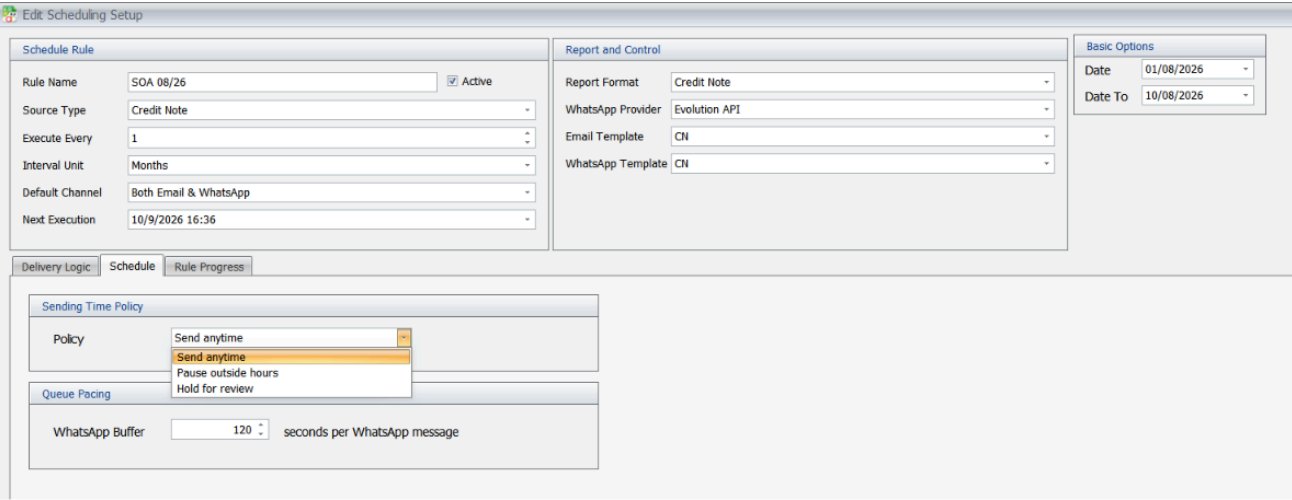
- Set sending policy, such as sending anytime, pausing outside permitted hours, or holding messages for review.
Set the WhatsApp queue pacing delay, for example 120 seconds between each WhatsApp message.
- Save the rule.
- Use Edit, or Delete to maintain an existing rule.
- Use Rule Progress to review schedule-specific runs.
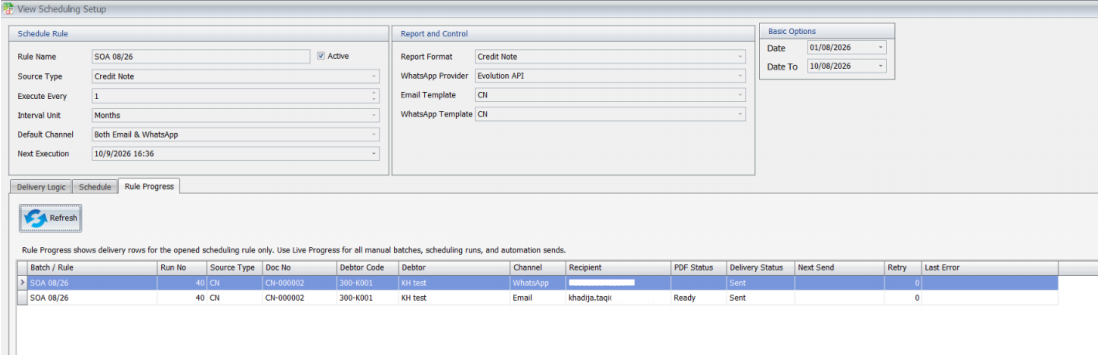
Tip: Review recipients, phone numbers, email addresses, and attachments before queueing.
H. Automation Setup
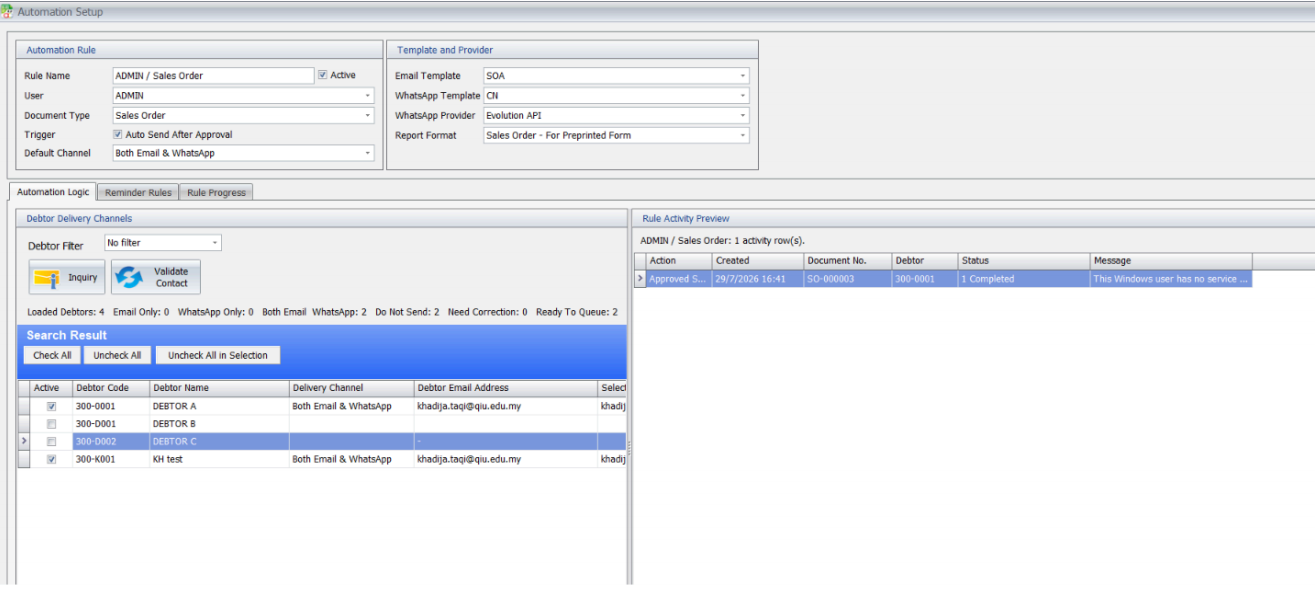
Automation Setup defines automatic delivery rules for Quotation, Invoice, Sales Order, Delivery Order and debtor reminders.
- Open Email & WhatsApp > Automation Setup.
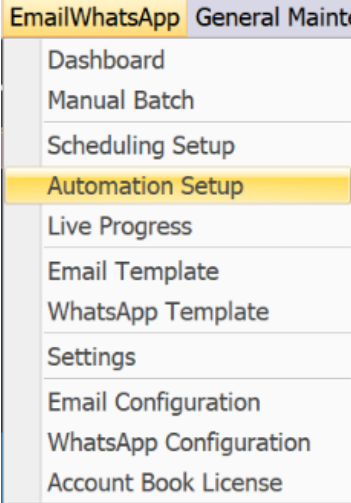
- Click New Automation Rule.
- Select the document type and enable the Auto-Send after Approval to send the reminder immediately after save.
Important: Auto Send After Approval applies only to documents created after this setting is enabled.
- Configure the delivery channel, template, attachment, and recipient fields.
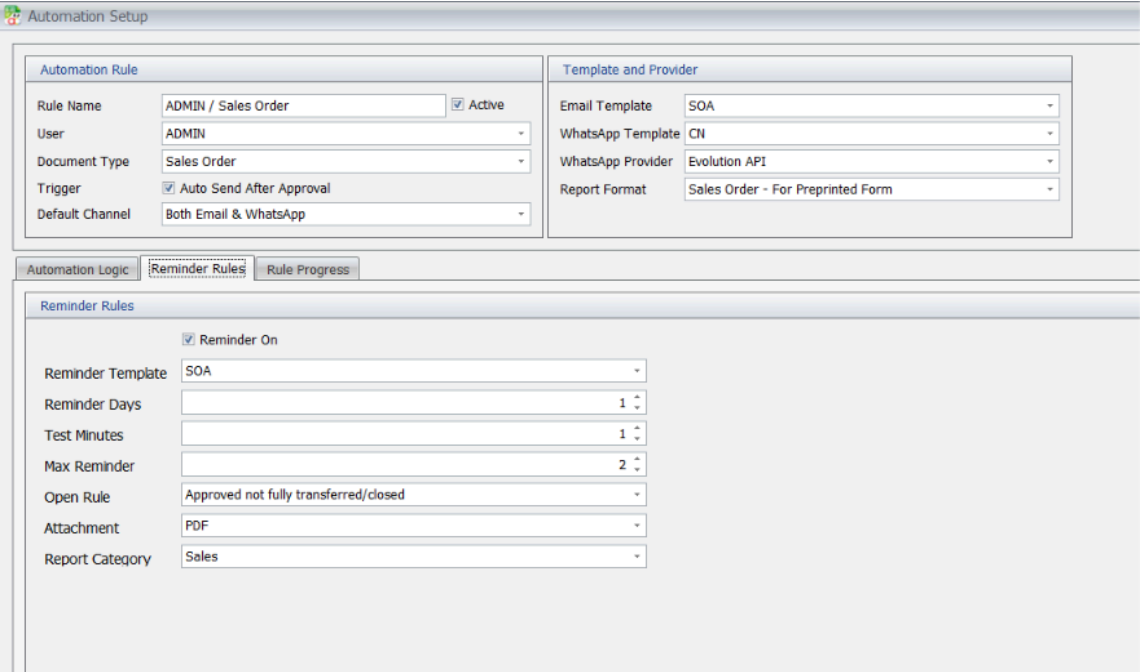
- For reminders, select the reminder basis and attachment option where required.
Reminder On → Enable this option to activate automatic reminders.
Reminder Days → Set the number of days before or after the due date to trigger the reminder.
Test Minutes → Set the waiting period used for testing the reminder rule.
Max Reminder → Set the maximum number of reminders allowed for one document.
Open Rule → Select the document status that qualifies for a reminder.
- Save the rule and confirm the automation is active.
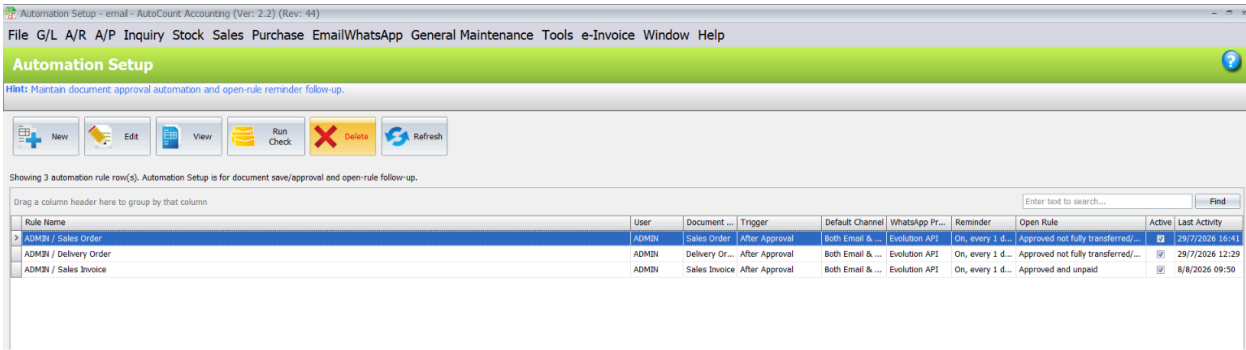
- Review the resulting deliveries from Dashboard or Live Progress.
I. Live Progress
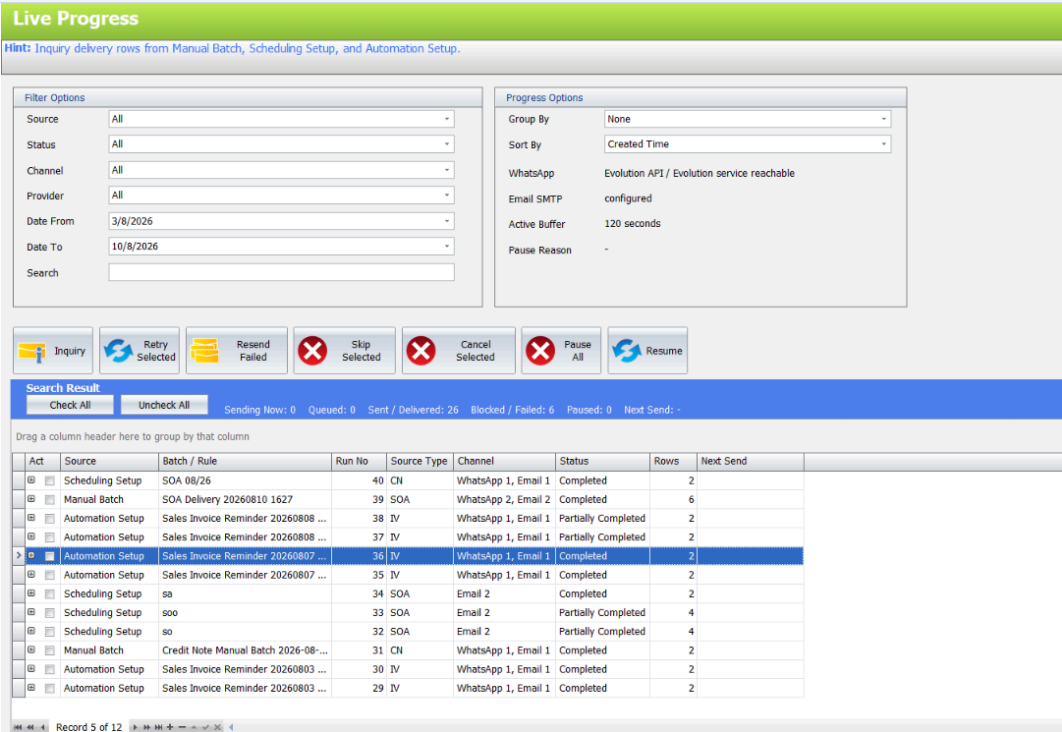
Live Progress provides the operational view of queued, processing, completed, and failed Email and WhatsApp deliveries.
- Open Email & WhatsApp > Live Progress.
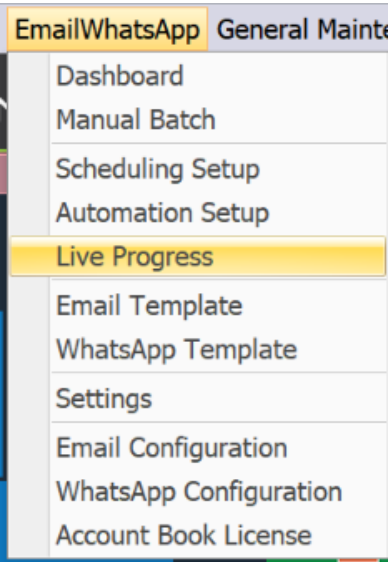
- Review the batch, recipient, and current status columns.
- Select a row to view the message, PDF, provider, or error details.
- Use Inquiry to obtain the latest service status.
- Select failed recipients and use Retry or Resend when appropriate.
- Confirm that recovered rows move to the expected completed status.
Important: Confirm the account book is licensed and service-connected.
Key Features & Capabilities
Email & WhatsApp Sending
Send AutoCount documents to customers through Email, WhatsApp, or both channels from the plugin.
Manual Batch Sending
Select multiple documents or recipients and send them immediately using Manual Batch, with recipient and template validation before sending.
Scheduling & Automation
Create scheduled delivery rules and automatic reminders based on document type, date, time, status, and delivery channel.
Email & WhatsApp Templates
Create reusable Email and WhatsApp message templates to standardize customer communication and reduce repetitive typing.
Dashboard & Live Progress
Monitor queued, processing, completed, and failed messages through the Dashboard and Live Progress screens, including retry and resend options.
Frequently Asked Questions
What does the AutoCount Email & WhatsApp Plugin do?
It allows users to send AutoCount documents and reminders to customers through Email and WhatsApp, either manually, according to a schedule, or automatically
Can I send documents through both Email and WhatsApp?
Yes. The plugin supports Email, WhatsApp, or Both as delivery channels for supported sending functions.
Can the plugin send reminders automatically?
Yes. Users can configure Automation Rules with reminder days, maximum reminder count, document status, templates, and delivery channels.
Can I schedule documents to be sent at a specific time?
Yes. Scheduling Setup allows recurring delivery rules to be configured based on frequency, date, time, document type, and delivery channel.
How can I check whether a message was successfully sent?
Open Dashboard or Live Progress to review queued, processing, completed, and failed deliveries. Failed records can also be retried or resent when appropriate.
Start Automating Your Customer Communication Today!
The AutoCount Email & WhatsApp Plugin helps businesses send documents, reminders, and customer notifications through Email and WhatsApp. With manual batch sending, scheduling, automation rules, reusable templates, and delivery tracking, businesses can reduce repetitive work and manage customer communication more efficiently.