
-
AutoCount Accounting Features
-
- Approval Workflow
- Audit Trail
- Auto Save in Draft Folder
- AutoCount Contra Account
- AutoCount License Setting Guide
- Deposit Tracking & Management
- Documents Numbering Format
- Full Transfer and Partial Transfer
- Import Data to AutoCount Accounting Using Excel
- Informative Charts and Analytical Data
- Layout Customization
- Multi Pricing
- Sales and Services Tax
- Schedule Backup
- Search Lookup Edit
- View Documents Flow
- AutoCount Feature Stock Take
- Column Chooser
- Show Remaining (3) Collapse
-
AutoCount Cloud Accounting
-
AutoCount E-Invoice
-
AutoCount HRMS User Guide
-
AutoCount Modules
-
- Activity Stream
- Advanced Financial Report
- Advanced Item
- Advanced Multi-UOM
- Advanced Quotation Module
- Basic Multi-UOM
- Budget Module
- Consignment
- Filter By Salesman
- FOC Quantity
- Formula
- Item Batch
- Item Package
- Landing Cost
- Multi-Currency
- Multi-Dimensional Analysis
- Multi-Location
- Project Account
- Recurrence
- Remote Credit Control Module
- Stock Assembly
- User Defined Fields (UDF)
- AutoCount SST Hidden Functions
- AutoCount SST Submission - Service Tax
- AutoCount Scripting Module User Guide
- AutoCount Bonus Point Module User Guide
- AutoCount Service Management Plugin User Guide
- Show Remaining (12) Collapse
-
AutoCount Plugins
-
- Fixed Assets Management
- Goldsmith
- TD Ordering Mobile Apps
- TD Stock Mobile Apps
- Universal Import Plugin
- DMS Import Plugin
- AutoCount Pick List Plugin User Guide
- AutoCount Credit Memo Plugin User Guide
- AutoCount Lock Price Plugin
- AutoCount Progressive Billing
- AutoCount Easy Recurrence Plugin
- Batch Update Unit Price Plugin
- AutoCount Production order
- AutoCount Car Tint Film Plugin
-
- Event Management System
- AutoCount To-Do List Plugin
- AutoCount AutoBank Reconciliation Plugin
- Intercompany Billing Plugin User Guide
- Lead Management 2.0 Plugin
- AutoCount Service Contract Plugin User Guide
- AutoCount Optical Plugin
- AutoCount Integrator Plugin
- AutoCount Procurement Planning Plugin
- Cage Management Plugin
- AutoCount Vehicle Plugin
- AutoCount Agent Validation Plugin User Guide
- AutoCount Barcode Generator Plugin User Guide
- AutoCount Easy Batch Number Entry Plugin User Guide
- Warranty 2.0 Plugin
- AutoCount Easy Photo 2.0 User Guide
- AutoCount Recurring Invoice Plugin User Guide
- AutoCount Scale Barcode Plugin User Guide
- AutoCount Recurrence Late Interest Plugin
- AutoCount Item Visibility Control
- AutoCount Bill Remark Plugin User Guide
- AutoCount Pain Tracker User Guide
- AutoCount Easy Payment
- AutoCount Easy Deposit Plugin
- AutoCount Easy Knock Off Plugin
- AutoCount Daily Collection Summary Plugin
- Timber Log Plugins
- Batch Transfer SODO Plugin
- AutoCount Vege Basket Plugin Guide
- AutoCount Fruit Basket Plugin Guide
- Referral Management Plugin
- AutoCount Migrator Plugin
- AutoCount Email&WhatsApp Plugin
- AutoCount Multi Company Knock Off Plugin
- AutoCount Advance Aging Format Plugin
- AutoCount Payment Request Plugin
- AutoCount Vehicle Master Plugin
- AutoCount Advance Deposit Plugin
- AutoCount IC Checker Plugin
- AutoCount RMA Plugin
- AutoCount Historical Outstanding DO Listing Plugin
- AutoCount Project Department Visibility Control Plugin
- AutoCount MRP Order Plugin
- AutoCount GridToExcel Plugin
- AutoCount Stock Availability Report Plugin
- AutoCount Batch Transfer SO DO Plugin
- AutoCount Centralized Kitchen Management Plugin
- SL AutoCount API
- AutoCount InterCompany Billing Plugin
- AutoCount Sales Commission Plugin
- AutoCount Advanced Credit Term Plugin
- AutoCount Advanced Stock Assembly Plugin
- AutoCount Shipment Plugin
- AutoCount Tour Plugin
- AutoCount Smart Analysis
- AutoCount Rental Management
- Show Remaining (41) Collapse
-
-
Form Template
-
Report Template
-
- Advance Quotation
- Cash Sale
- Consignment
- Consignment Movement
- Credit Note
- Debit Note
- Delivery Order
- FOC Quantity Analysis By Document Report
- Invoice
- Item Package Sales Report
- Monthly Sales Analysis
- Outstanding Sales Order Listing
- Profit And Loss Of Documents
- Quotation
- Sales Agent Contribution Report
- Sales Order
- Top/Bottom Sales Ranking
- Show Remaining (2) Collapse
-
- Available Stock Status Report
- Expired Item Batch Listing
- Inventory Physical Worksheet
- Stock Adjustment
- Stock Aging Report
- Stock Assembly
- Stock Assembly Order
- Stock Balance By Location
- Stock Balance Report
- Stock Card Report
- Stock Disassembly
- Stock Issue
- Stock Item Profit Margin
- Stock Movement Report
- Stock Receive
- Stock Take
- Stock Transfer
- Stock Write Off
- Show Remaining (3) Collapse
-
B2B ORDERING
-
AutoCount AI Agent
AutoCount Payment Request Plugin User Guide User Guide
Understanding Payment Request Plugin
AutoCount Payment Request Plugin streamlines customer debt collection and settlement workflows by organizing outstanding receivables into formal payment requests. Users can generate billing requests by selecting overdue invoices and debit notes, preview and issue billing notes, track request progress across categorized status tabs, and convert approved requests into official A/R payments with automatic balance updates and full access control.
Why Use AutoCount Payment Request Plugin?
This plugin helps businesses follow up on collection in an organised way. Each request lists the exact documents the customer is being asked to pay, and its status updates as payment is received, so nothing is chased twice or forgotten.
Key Features of the AutoCount Payment Request Plugin
Payment Request Creation
Select a debtor and tick the outstanding invoices and debit notes to include in the request.
Billing Note Printing
Preview, print or export the request as a billing note to send to the customer.
Transfer to A/R Payment
Transfer one or many payment requests to AutoCount A/R Payment when the customer pays.
Payment Status Tracking
Follow each request through Awaiting Payment, Partially Payment, Payment Received and Void.
Who Should Use AutoCount Payment Request Plugin?
Businesses Selling on Credit Terms
If your customers pay on credit, this plugin gives your accounts team a formal document to send when invoices fall due.
Businesses with Regular Collection Runs
Got a weekly or monthly routine for chasing overdue accounts? The plugin keeps every request in one listing, sorted by payment status.
Credit Control and Accounts Teams
For teams that share collection work, the listing shows who created each request, how much has been paid and what is still outstanding.
How AutoCount Payment Request Plugin Works
A. Access Rights
Administrators control which Payment Request functions each user or user group can use.
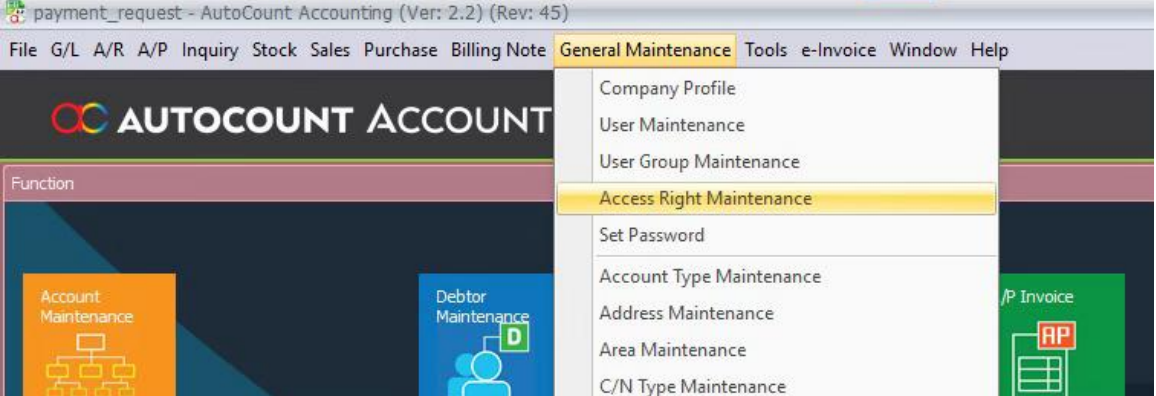
1. Open General Maintenance > Access Right Maintenance.
2. Select the user or user group, then expand SL Plug-In > Payment Request.
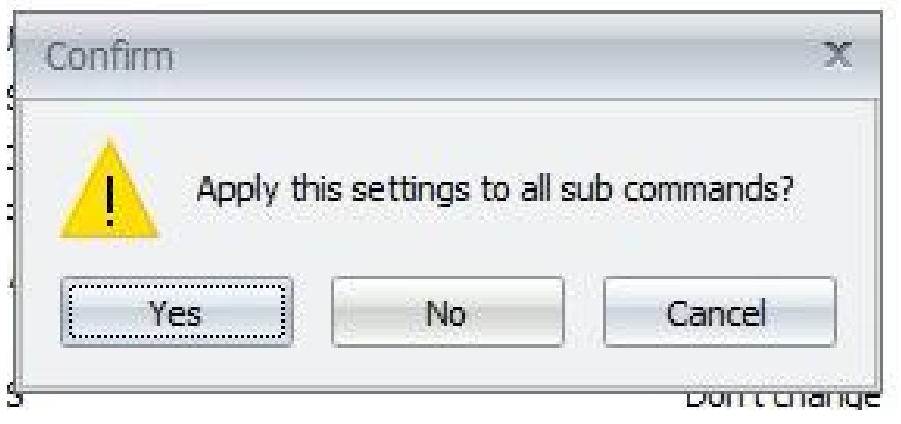
3. Enable only the required rights: Preview Report, Print Report, Export Report, Create Payment Request, View Payment Request, Edit Payment Request, Delete Payment Request, Void Payment Request, Transfer Payment Request to A/R Payment, and Show License Control.
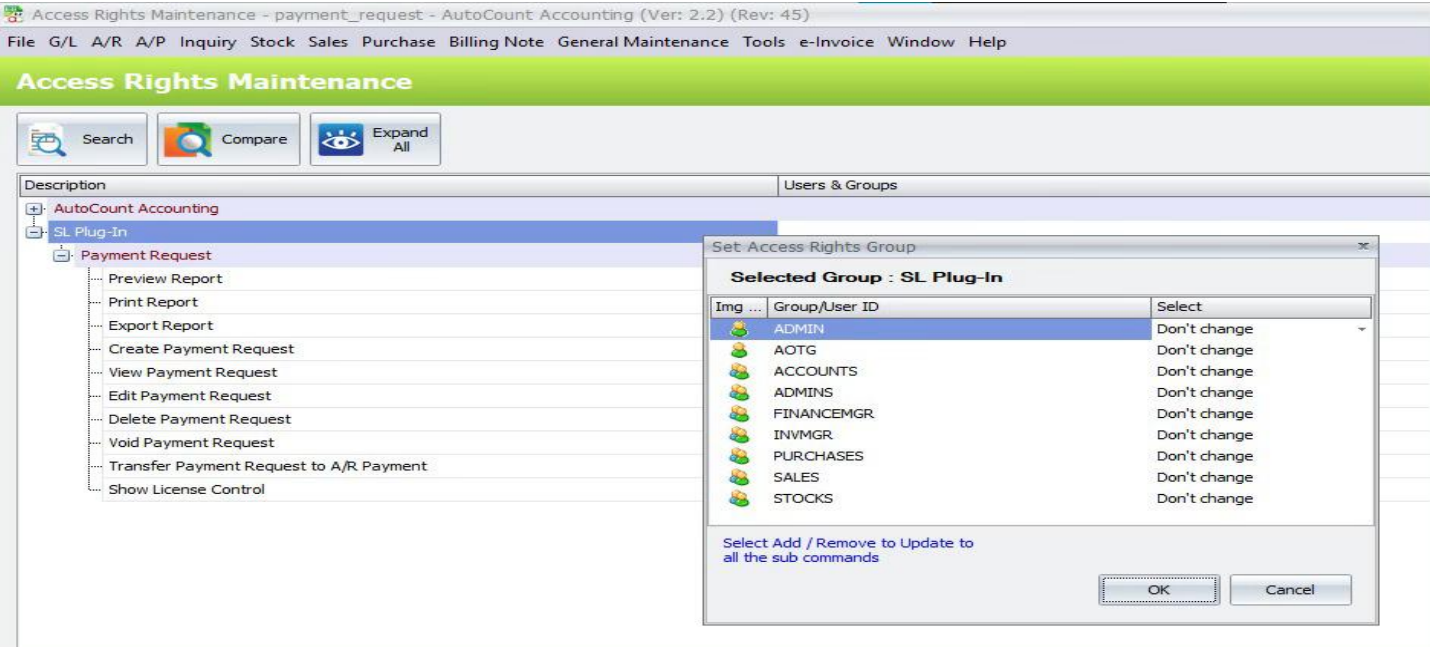
4. Save the access-right changes.
B. Payment Request Listing
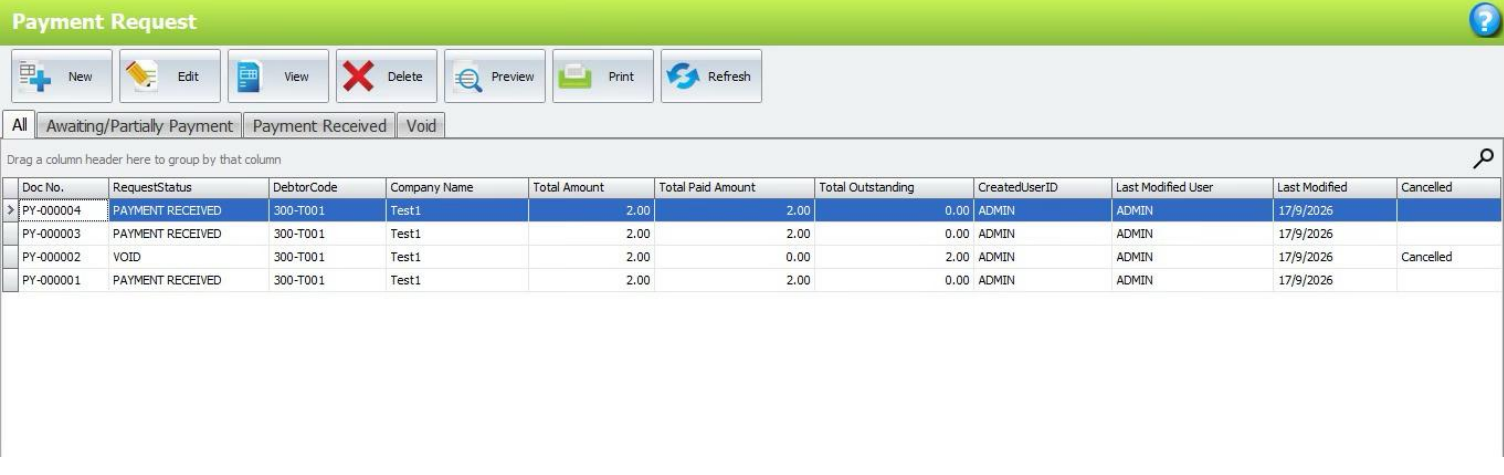
The Payment Request listing is used to create, review and manage customer payment requests.
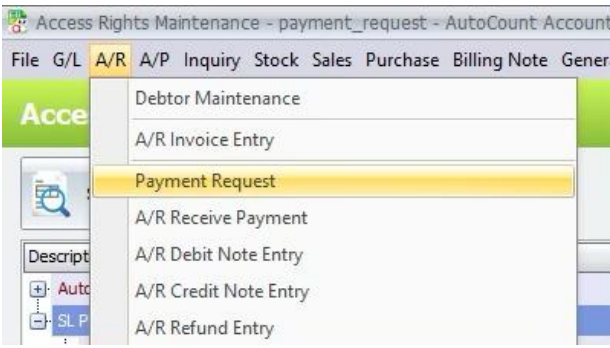
1. Open A/R > Payment Request.
2. Use All to review all Payment Request records.
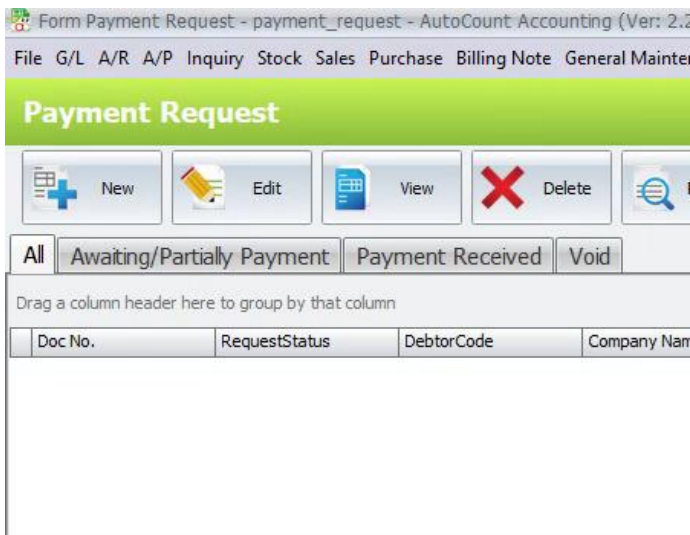
3. Use Awaiting/Partially Payment for active requests, Payment Received for completed requests, andVoid for cancelled requests.
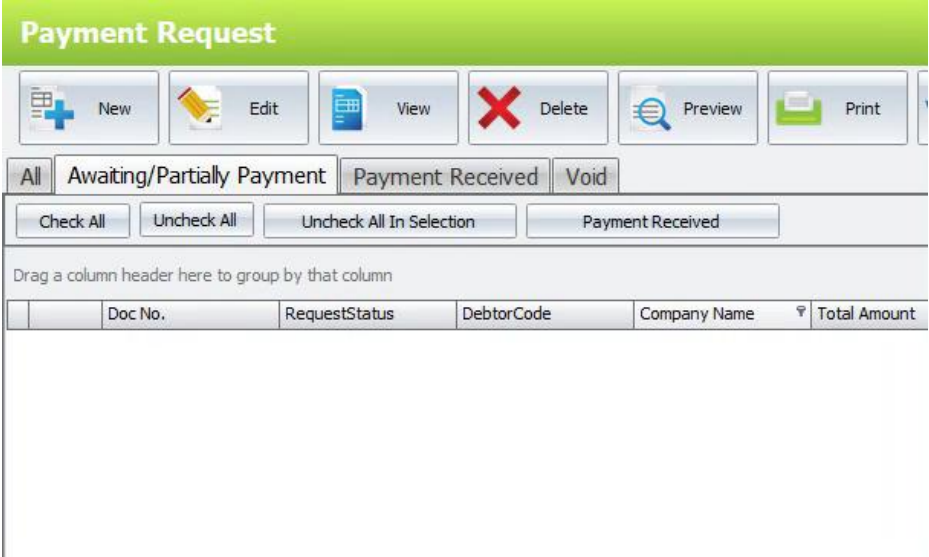
4. Select a row and use Edit, View, Delete, Preview, Print or Refresh as required.
Keyboard shortcuts: Insert = New, F2 = Edit, F12 = View, Delete = Delete, F5 = Refresh, F8 = Preview, F7= Print, and Esc = Close.
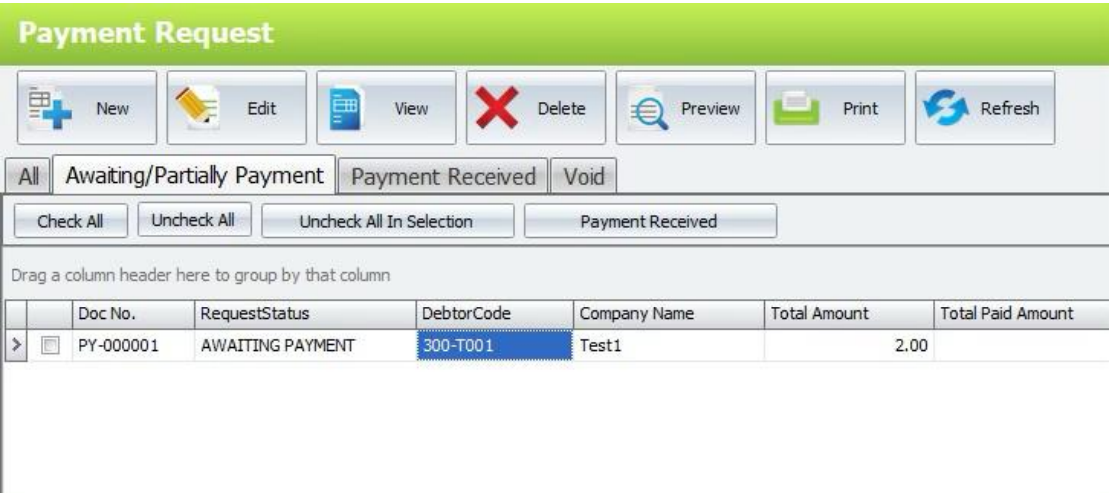
C. Create Payment Request
Create a Payment Request by selecting a debtor and the outstanding A/R documents that shouldbeincluded in the request.
1. Open A/R > Payment Request and click New.
2. Under Debtor Info, select the Debtor Code. Review the debtor name and address shown by thesystem.
3. Under Document Info, review the Date and document number. Enter Remark 1 to Remark 4 whenneeded.
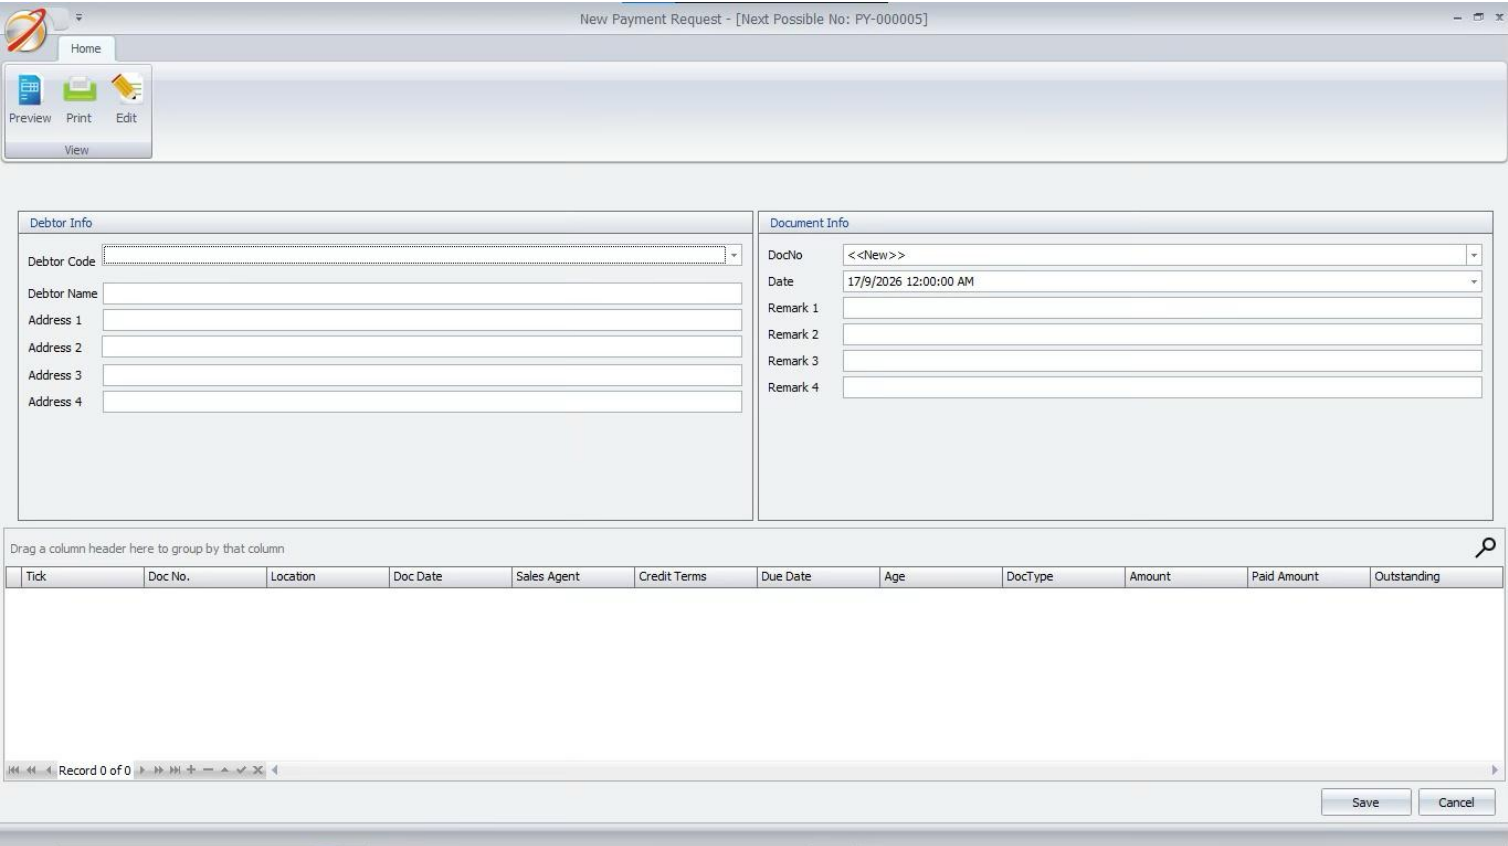
4. Review the outstanding documents loaded for the selected debtor. The list may show InvoiceandDebit
Note documents with their outstanding amount and due information.
5. Tick the document rows to include in this Payment Request.
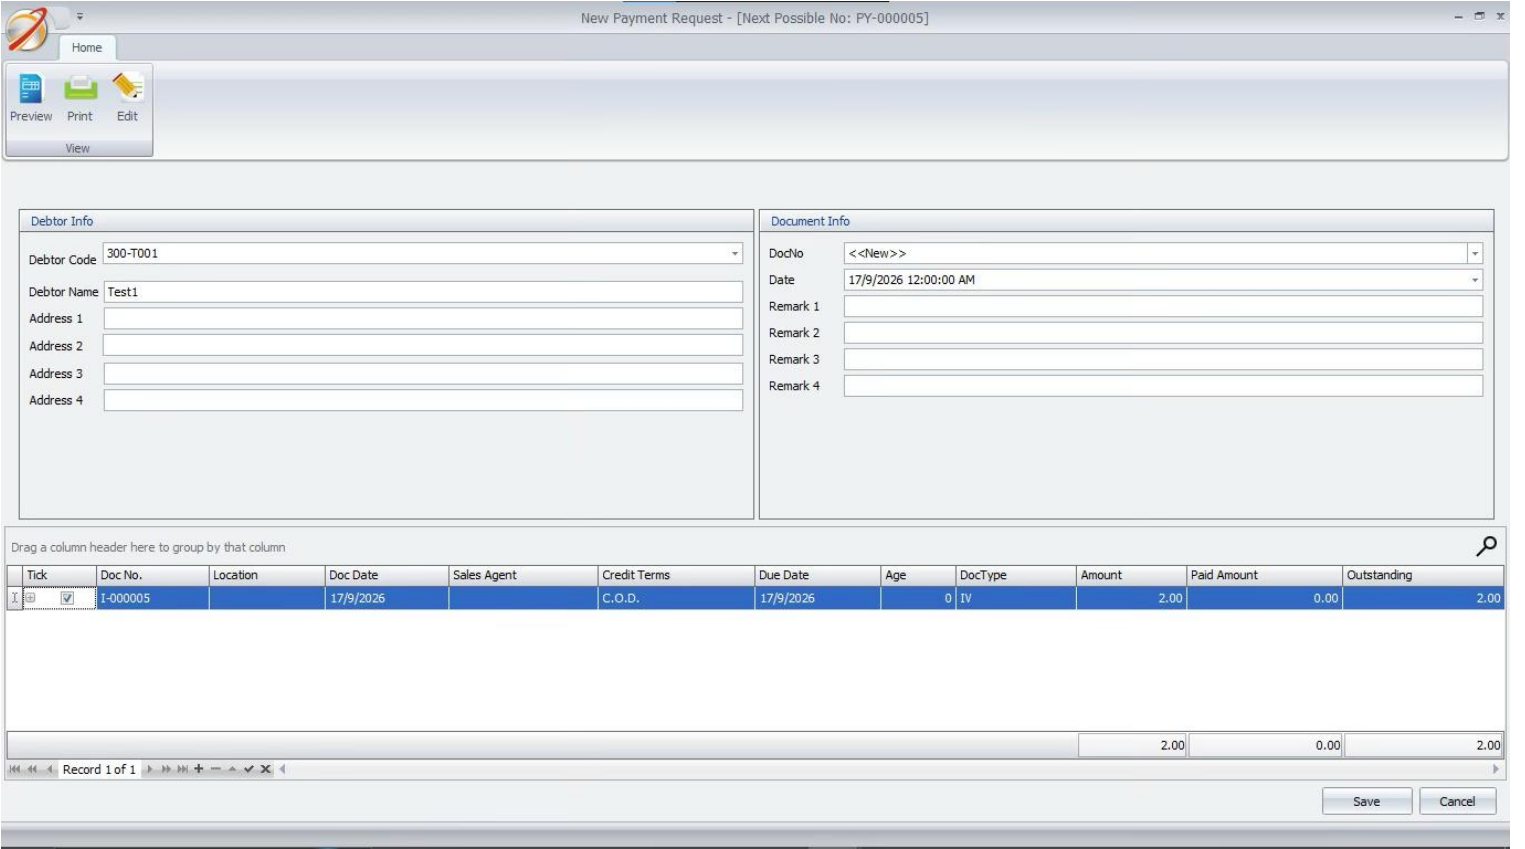
6. Click Save. The request is saved with AWAITING PAYMENT status.
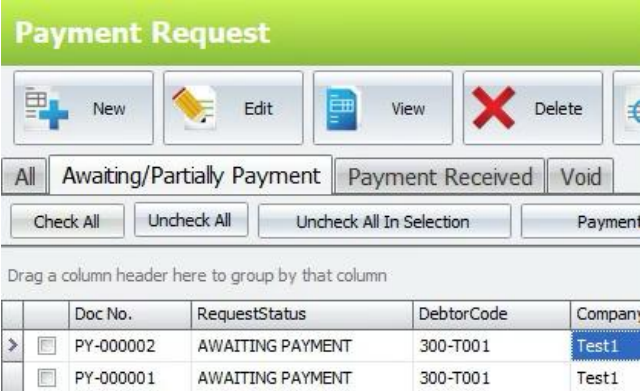
D. View and Edit Payment Request
Use View to review a saved request and Edit to change an active request when editing is allowed.
1. Open A/R > Payment Request and select the required record.
2. Click View or press F12 to open the Payment Request in view mode.
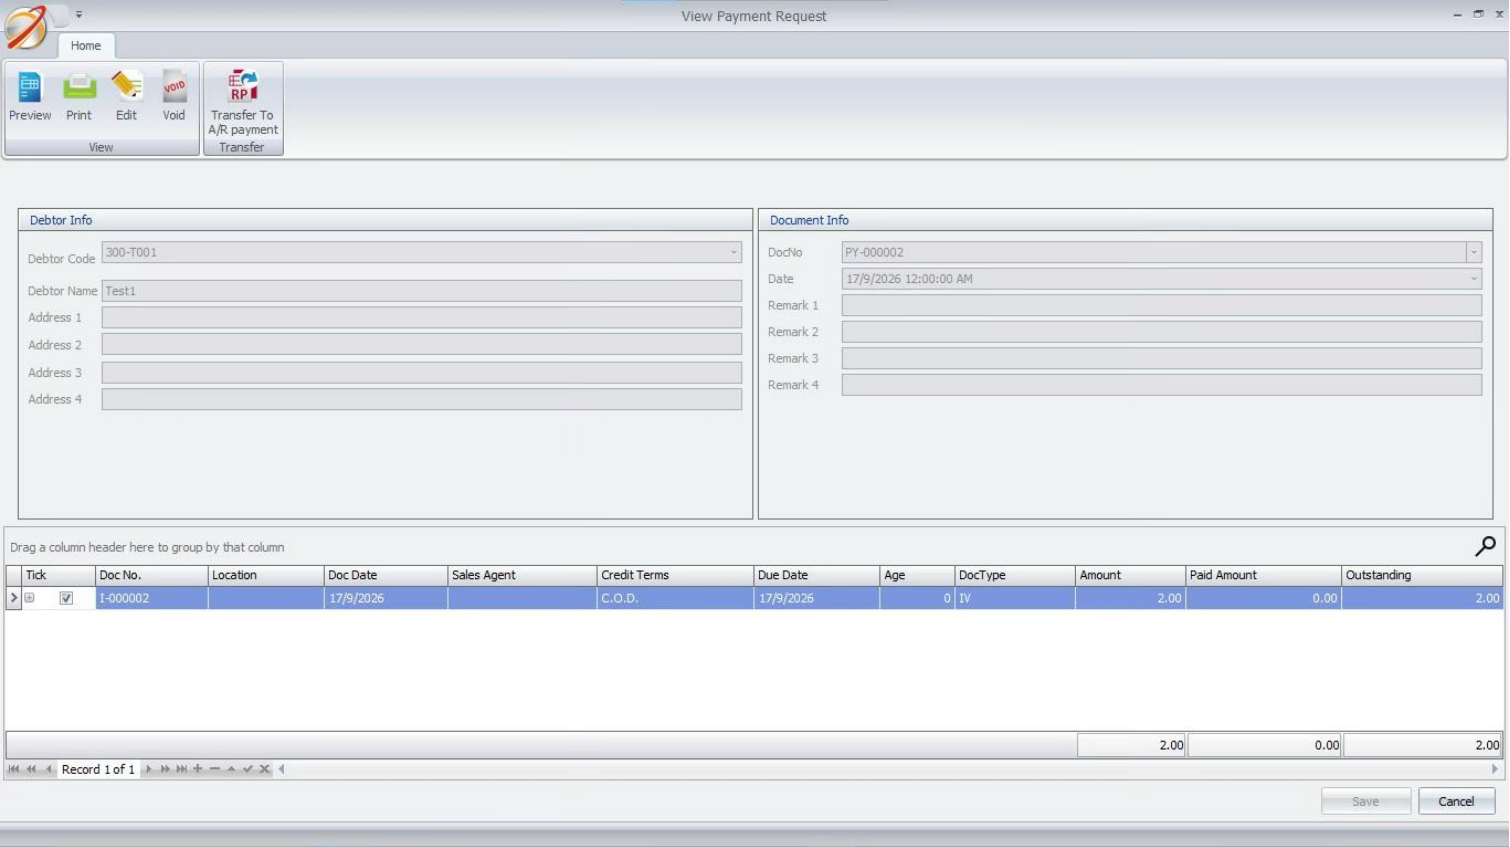
4. To change an open request, click Edit or press F2.
5. Update the Date, debtor information, remarks or document selection as allowed by the current request
state, then click Save.
The original Doc No and Debtor Code stay fixed in Edit mode. When an active linked A/RPayment exists,
the outstanding-document grid is read-only.
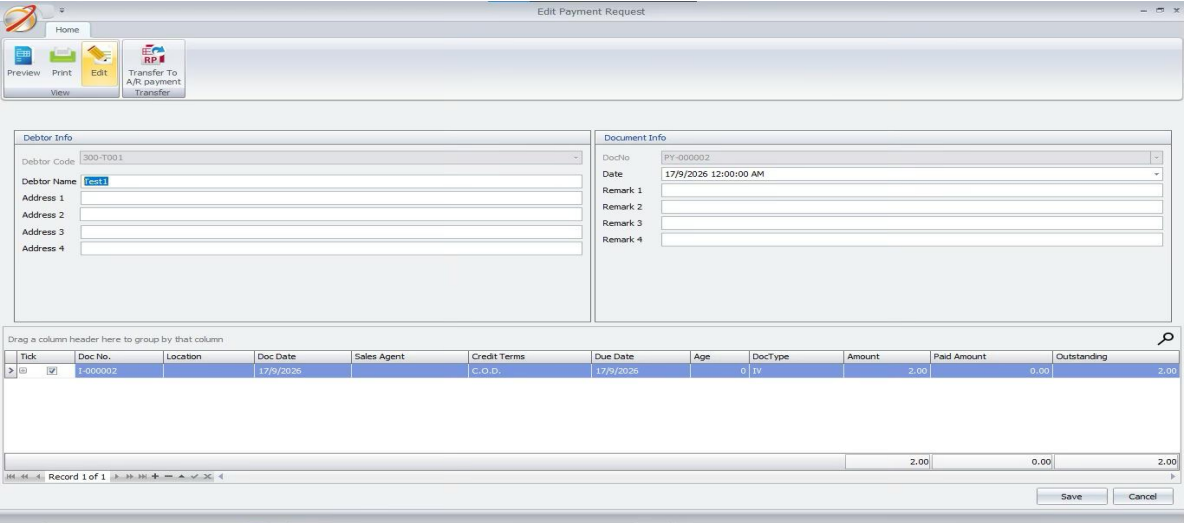
E. Delete and Void Payment Request
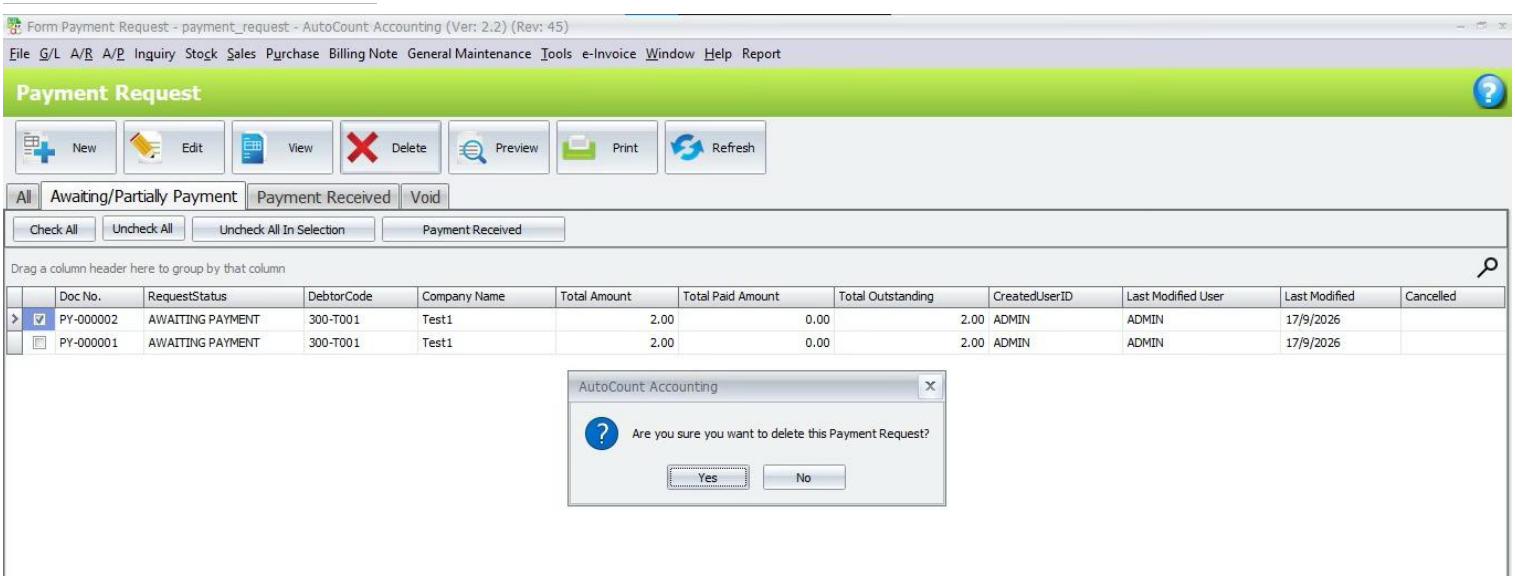
Delete Payment Request
1. Select the Payment Request from the listing.
2. Click Delete or press the Delete key.
3. Confirm the delete message. The record is removed when deletion is allowed and the user has DeletePayment Request access.
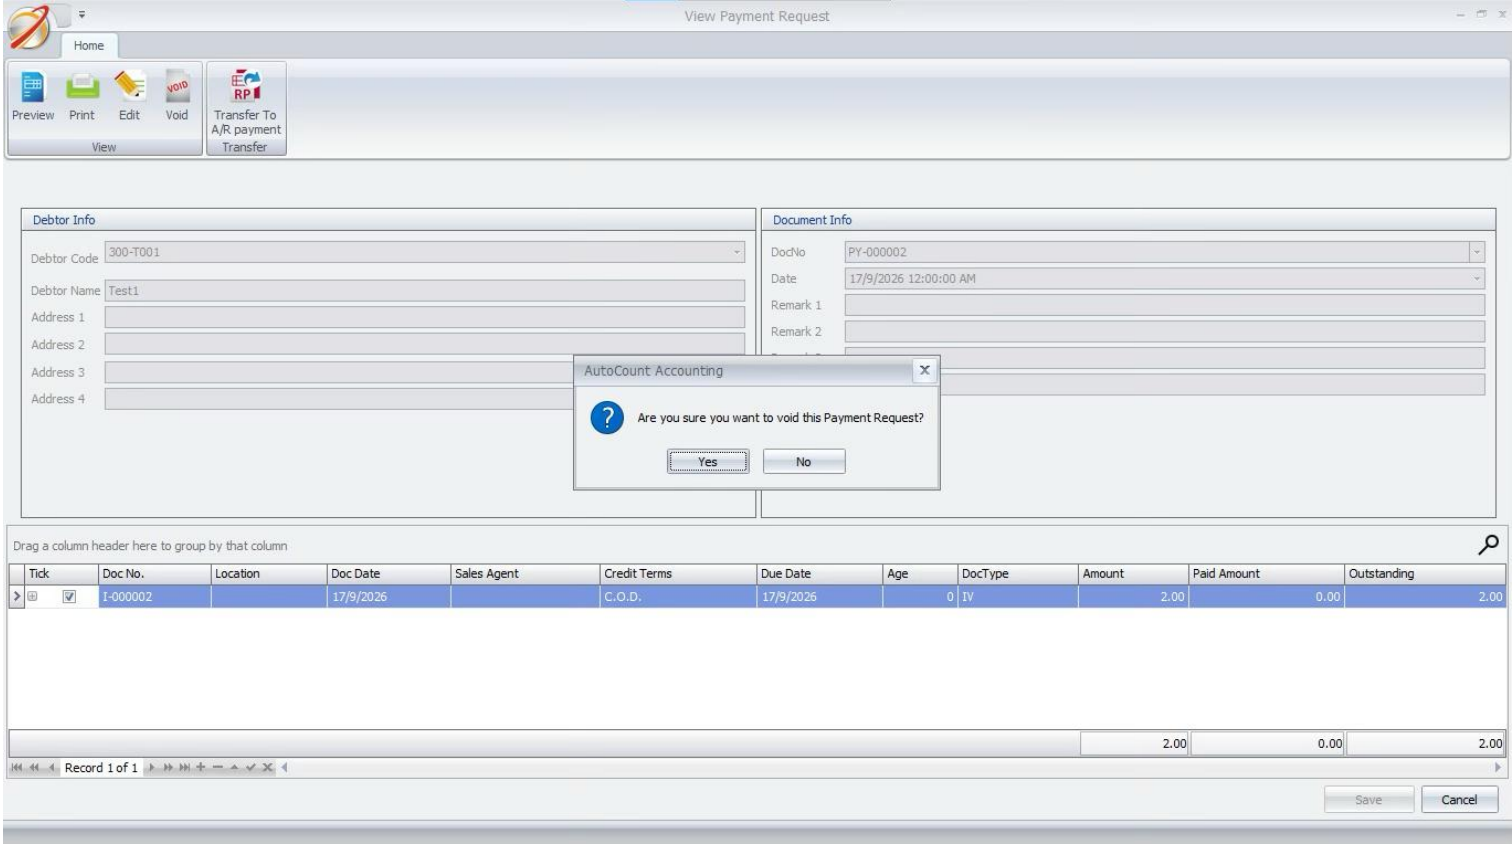
Void Payment Request
1. Select the Payment Request and click View.
2. On the Home ribbon, click Void and confirm the message.
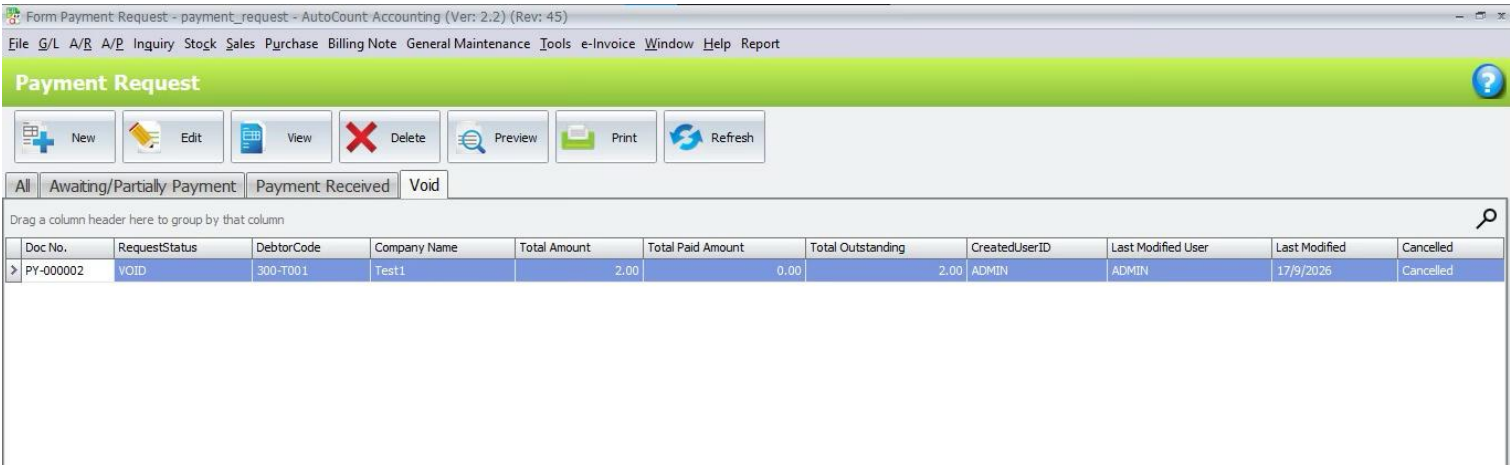
3. The request appears under the Void tab and Transfer To A/R payment is no longer available.
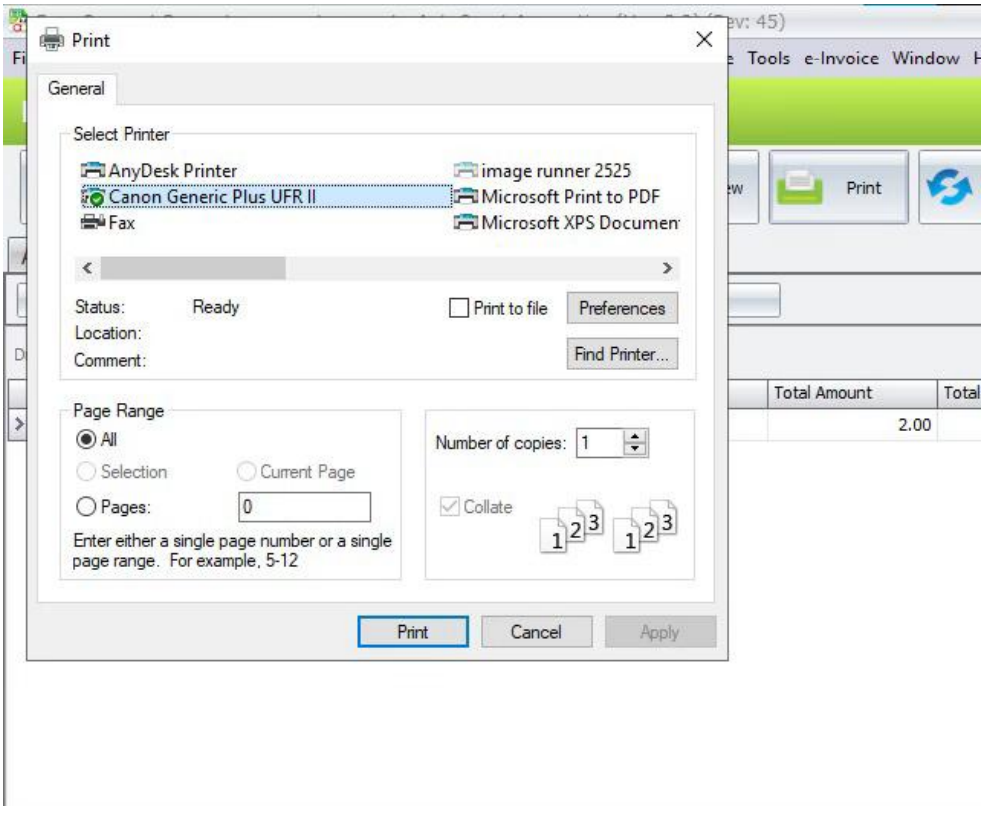
F. Preview and Print Payment Request
Preview and Print output the Payment Request report for the selected document.
1. Open A/R > Payment Request and select the required Payment Request.
2. Click Preview or press F8 to open the report preview.
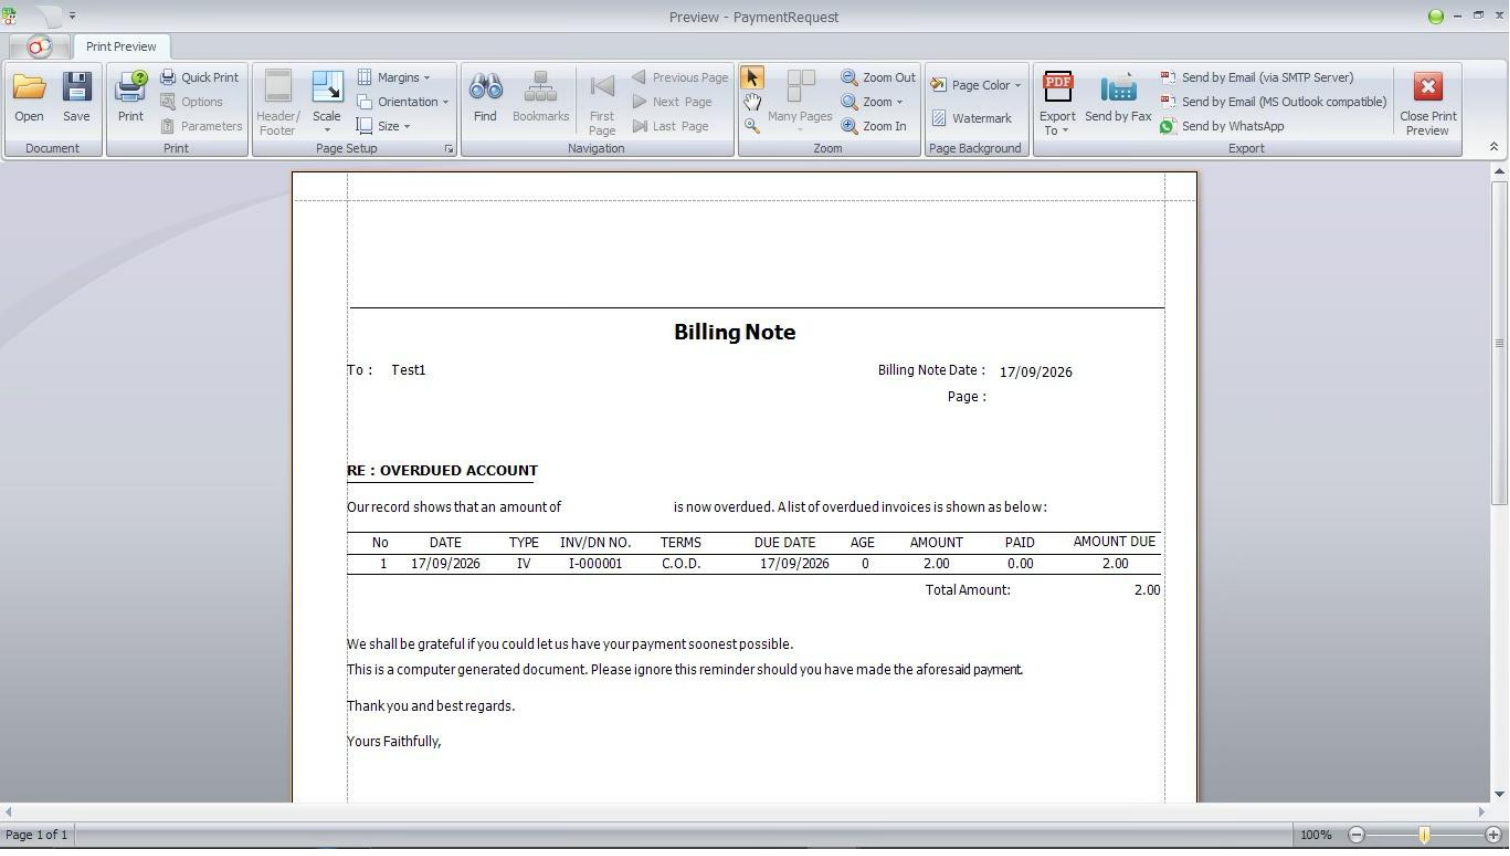
3. Review the report. Export from the report viewer follows the Export Report access right.
4. Click Print or press F7 to send the report to the selected printer.
G. Transfer Payment Request to A/R Payment
Payment Requests with AWAITING PAYMENT or PARTIALLY PAYMENT status can be transferredtoAutoCount A/R Payment.
Transfer One Payment Request
1. Open an AWAITING PAYMENT or PARTIALLY PAYMENT request in View or Edit mode.
2. On the Home ribbon, click Transfer To A/R payment.
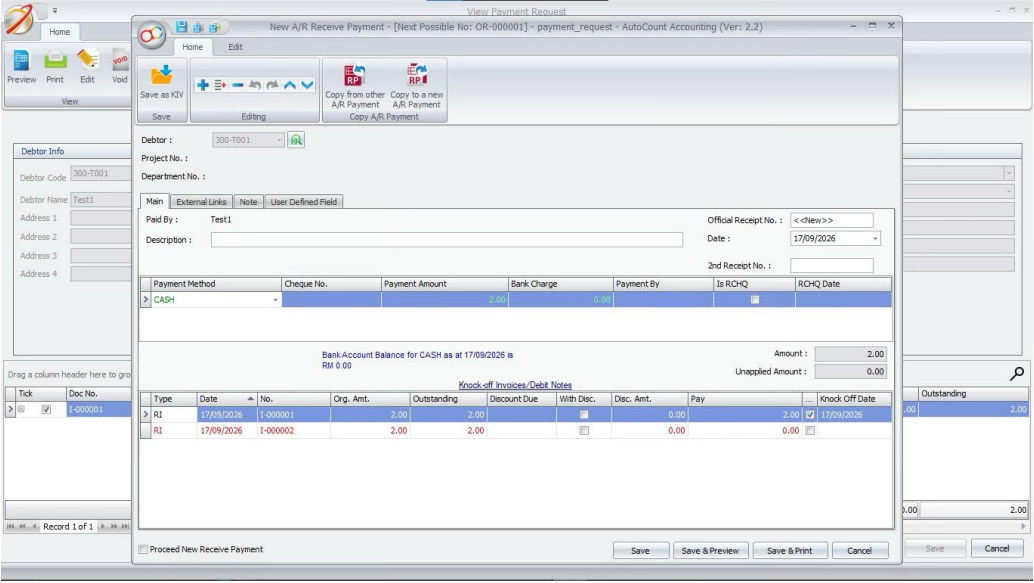
3. Review the A/R Payment screen, including payment amount and knock-off details.
4. Save the A/R Payment using the normal AutoCount A/R Payment flow.
Transfer Multiple Payment Requests
1. Open A/R > Payment Request and select the Awaiting/Partially Payment tab.
2. Tick the Payment Requests to process. Use Check All when required.
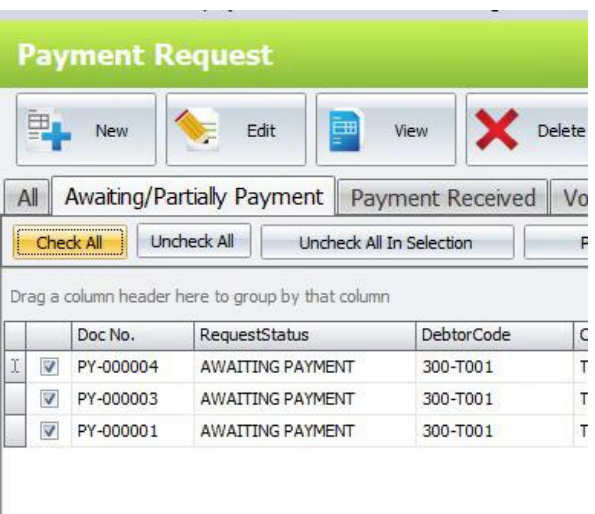
3. Click Payment Received and confirm the number of selected Payment Requests.
4. Complete the A/R Payment forms opened for the selected requests. The Payment Request statusupdates after the linked payment is saved.
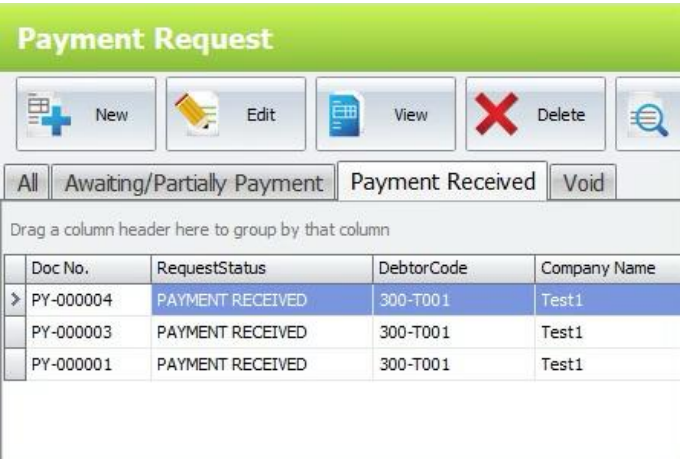
H. Payment Request Status and Tabs
The Payment Request list separates records by payment status so users can follow up open requestsandreview completed or cancelled requests.
• All – shows all Payment Request records.
• Awaiting/Partially Payment – shows active requests with AWAITING PAYMENT or PARTIALLYPAYMENT status.
• Payment Received – shows requests with PAYMENT RECEIVED status.
• Void – shows Payment Requests with the cancelled flag.
• AWAITING PAYMENT – no linked payment amount has been received.
• PARTIALLY PAYMENT – some payment has been received and an amount is still outstanding.
• PAYMENT RECEIVED – the Payment Request is fully paid.
• SOURCE INVOICE CANCELLED – a linked source Invoice was voided and the Payment Request iscancelled.
If a linked A/R Payment is deleted, the plugin recalculates the Payment Request and can reopenit basedon the remaining paid and outstanding amounts.
Benefits of AutoCount Payment Request Plugin
Organised Collection Follow-Up
Every payment request sits in one listing with its status, total, paid amount and outstanding balance.
Faster Payment Entry
Transferring a request to A/R Payment carries over the documents to knock off, which reduces re-keying.
Clear Communication with Customers
The billing note tells the customer exactly which invoices are due and how much to pay.
Best Practices for Managing Service Contracts
Review Awaiting Requests Regularly
Check the Awaiting/Partially Payment tab each week and follow up on requests that have not moved.
Void Instead of Deleting
Void requests that are no longer valid so that a record of the request remains.
Limit Transfer and Void Rights
Give Transfer, Void and Delete rights only to staff who are responsible for receiving payment.
Conclusion
The AutoCount Referral Management Plugin offers an organised way to manage referrers, commission plans and commission payouts. By generating commission from paid sales and reporting each referrer’s contribution, it improves accuracy, saves time and helps you reward the referrers who grow your business.
Frequently Asked Questions
What does the Payment Request Plugin do?
It consolidates outstanding debtor invoices and debit notes into formal payment requests that can be printed as billing notes and converted into A/R payments.
Why should I use the Payment Request Plugin?
It accelerates receivable collections, provides structured tracking across payment stages, and eliminates double-entry when recording official receipts.
How do I create a new payment request?
Open A/R > Payment Request, click New, select the debtor code to load overdue records, tick the specific invoices or debit notes, and click Save.
How are request statuses tracked in the system?
Requests are organized into tabs including All, Awaiting/Partially Payment, Payment Received, and Void to easily distinguish active follow-ups from completed claims.
How do I transfer a payment request to an official A/R Payment?
Open an active request and click Transfer To A/R payment, or select multiple requests from the listing and click Payment Received to generate receipt vouchers.
What happens if a linked A/R Payment or invoice is cancelled?
If a linked payment is deleted, the plugin recalculates balances and reopens the request; if the source invoice is voided, the request updates to Source Invoice Cancelled.
Start Managing Your Payment Requests Today!
This plugin enables us to consolidate overdue customer invoices, generate official billing notes, and track collection progress across structured status tabs. We can efficiently streamline debtor follow-ups, convert payment requests directly into A/R payments, and ensure accurate financial reconciliation through automated balance updates.