
-
AutoCount Accounting Features
-
- Approval Workflow
- Audit Trail
- Auto Save in Draft Folder
- AutoCount Contra Account
- AutoCount License Setting Guide
- Deposit Tracking & Management
- Documents Numbering Format
- Full Transfer and Partial Transfer
- Import Data to AutoCount Accounting Using Excel
- Informative Charts and Analytical Data
- Layout Customization
- Multi Pricing
- Sales and Services Tax
- Schedule Backup
- Search Lookup Edit
- View Documents Flow
- AutoCount Feature Stock Take
- Column Chooser
- Show Remaining (3) Collapse
-
AutoCount Cloud Accounting
-
AutoCount E-Invoice
-
AutoCount HRMS User Guide
-
AutoCount Modules
-
- Activity Stream
- Advanced Financial Report
- Advanced Item
- Advanced Multi-UOM
- Advanced Quotation Module
- Basic Multi-UOM
- Budget Module
- Consignment
- Filter By Salesman
- FOC Quantity
- Formula
- Item Batch
- Item Package
- Landing Cost
- Multi-Currency
- Multi-Dimensional Analysis
- Multi-Location
- Project Account
- Recurrence
- Remote Credit Control Module
- Stock Assembly
- User Defined Fields (UDF)
- AutoCount SST Hidden Functions
- AutoCount SST Submission - Service Tax
- AutoCount Scripting Module User Guide
- AutoCount Bonus Point Module User Guide
- AutoCount Service Management Plugin User Guide
- Show Remaining (12) Collapse
-
AutoCount Plugins
-
- Fixed Assets Management
- Goldsmith
- TD Ordering Mobile Apps
- TD Stock Mobile Apps
- Universal Import Plugin
- DMS Import Plugin
- AutoCount Pick List Plugin User Guide
- AutoCount Credit Memo Plugin User Guide
- AutoCount Lock Price Plugin
- AutoCount Progressive Billing
- AutoCount Easy Recurrence Plugin
- Batch Update Unit Price Plugin
- AutoCount Production order
- AutoCount Car Tint Film Plugin
-
- Event Management System
- AutoCount To-Do List Plugin
- AutoCount AutoBank Reconciliation Plugin
- Intercompany Billing Plugin User Guide
- Lead Management 2.0 Plugin
- AutoCount Service Contract Plugin User Guide
- AutoCount Optical Plugin
- AutoCount Integrator Plugin
- AutoCount Procurement Planning Plugin
- Cage Management Plugin
- AutoCount Vehicle Plugin
- AutoCount Agent Validation Plugin User Guide
- AutoCount Barcode Generator Plugin User Guide
- AutoCount Easy Batch Number Entry Plugin User Guide
- Warranty 2.0 Plugin
- AutoCount Easy Photo 2.0 User Guide
- AutoCount Recurring Invoice Plugin User Guide
- AutoCount Scale Barcode Plugin User Guide
- AutoCount Recurrence Late Interest Plugin
- AutoCount Item Visibility Control
- AutoCount Bill Remark Plugin User Guide
- AutoCount Pain Tracker User Guide
- AutoCount Easy Payment
- AutoCount Easy Deposit Plugin
- AutoCount Easy Knock Off Plugin
- AutoCount Daily Collection Summary Plugin
- Timber Log Plugins
- Batch Transfer SODO Plugin
- AutoCount Vege Basket Plugin Guide
- AutoCount Fruit Basket Plugin Guide
- Referral Management Plugin
- AutoCount Migrator Plugin
- AutoCount Email&WhatsApp Plugin
- AutoCount Multi Company Knock Off Plugin
- AutoCount Advance Aging Format Plugin
- AutoCount Payment Request Plugin
- AutoCount Vehicle Master Plugin
- AutoCount Advance Deposit Plugin
- AutoCount IC Checker Plugin
- AutoCount RMA Plugin
- AutoCount Historical Outstanding DO Listing Plugin
- AutoCount Project Department Visibility Control Plugin
- AutoCount MRP Order Plugin
- AutoCount GridToExcel Plugin
- AutoCount Stock Availability Report Plugin
- AutoCount Batch Transfer SO DO Plugin
- AutoCount Centralized Kitchen Management Plugin
- SL AutoCount API
- AutoCount InterCompany Billing Plugin
- AutoCount Sales Commission Plugin
- AutoCount Advanced Credit Term Plugin
- AutoCount Advanced Stock Assembly Plugin
- AutoCount Shipment Plugin
- AutoCount Tour Plugin
- AutoCount Smart Analysis
- AutoCount Rental Management
- Show Remaining (41) Collapse
-
-
Form Template
-
Report Template
-
- Advance Quotation
- Cash Sale
- Consignment
- Consignment Movement
- Credit Note
- Debit Note
- Delivery Order
- FOC Quantity Analysis By Document Report
- Invoice
- Item Package Sales Report
- Monthly Sales Analysis
- Outstanding Sales Order Listing
- Profit And Loss Of Documents
- Quotation
- Sales Agent Contribution Report
- Sales Order
- Top/Bottom Sales Ranking
- Show Remaining (2) Collapse
-
- Available Stock Status Report
- Expired Item Batch Listing
- Inventory Physical Worksheet
- Stock Adjustment
- Stock Aging Report
- Stock Assembly
- Stock Assembly Order
- Stock Balance By Location
- Stock Balance Report
- Stock Card Report
- Stock Disassembly
- Stock Issue
- Stock Item Profit Margin
- Stock Movement Report
- Stock Receive
- Stock Take
- Stock Transfer
- Stock Write Off
- Show Remaining (3) Collapse
-
B2B ORDERING
-
AutoCount AI Agent
Why Use AutoCount Migrator Plugin?
Changing codes one record at a time, or keying in hundreds of maintenance records by hand, is slow and easy to get wrong. The Migrator Plugin helps businesses:
Change codes in bulk
Import master data from Excel
Reduce manual data entry errors
Control who can change or import data
This is particularly important for businesses that are migrating data into AutoCount or restructuring existing codes.
Key Features of AutoCount Migrator Plugin
Batch Change Code
Replaces an existing code with a new one across the supported records. Covers account number, area, branch, currency, item code, item UOM, member number, payment method, purchase agent, sales agent and user ID.
Clipboard Import for General Maintenance
Imports area, creditor type, debtor type, price category, purchase agent, sales agent, sub project, top level project and user records by copying rows from Excel.
Clipboard Import for Stock Maintenance and Item BOM
Enables businesses to track improvement across multiple treatment sessions.
Status Check and Access Control
Shows a status for every row before and after import, and protects each function with its own Show, Open, and Apply or Import access right.
Who Should Use AutoCount Migrator Plugin?
Businesses Migrating to AutoCount
Helps companies switching from another accounting system bring their master data into AutoCount without re-keying every record.
Businesses Restructuring Their Codes
Allows companies to rename or renumber account, item, agent and other codes after a reorganisation, while keeping the linked records consistent.
Manufacturing and Assembly Businesses
Useful for businesses that maintain many bills of material and want to load or update them from a spreadsheet.
Implementers and System Administrators
Helps consultants and admins set up new account books faster and keep code changes under controlled access.
How AutoCount Migrator Plugin Works
A. Set Access Rights
Administrators assign Migrator Plugin rights before users can open or apply a batch-change or import
function.
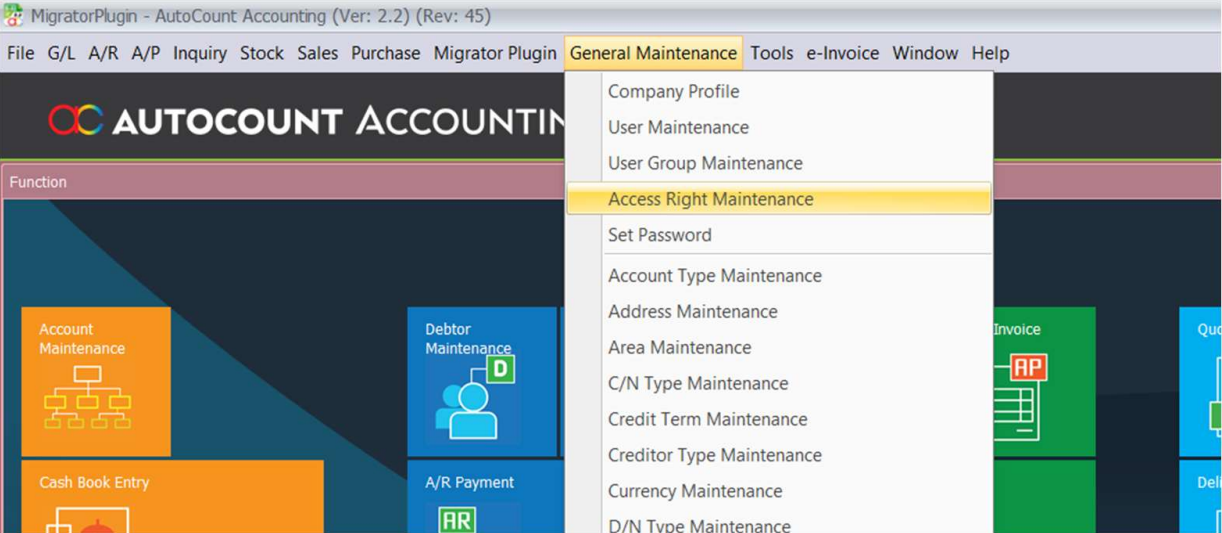
1. Open Access Rights and expand PlugIns > Migrator Plugin.
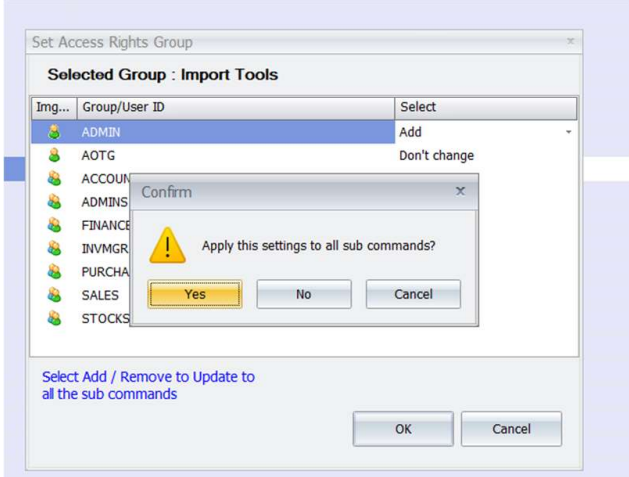
2. Assign the applicable Show, Open, and Apply rights for each Batch Change Code function the
user needs.
3. Assign the applicable Show, Open, and Import rights for each Import Tools function the user
needs.
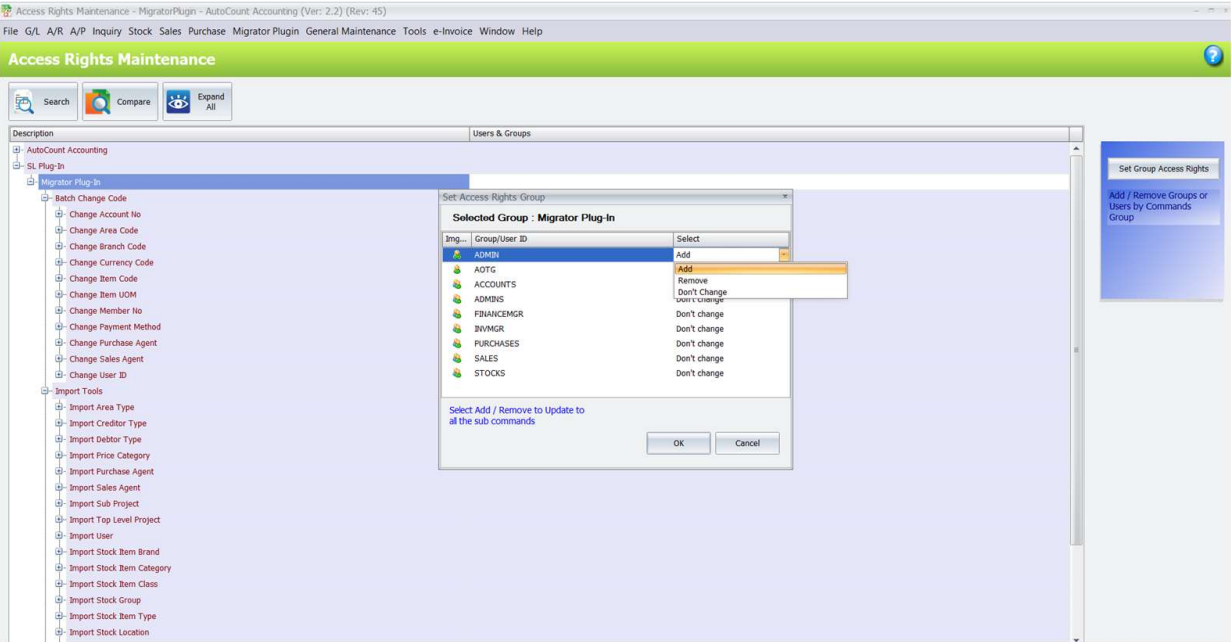
4. Save the changes. A user without the assigned right cannot use the related protected action.
B. Batch Change Code
Batch Change Code functions replace a selected code throughout the supported records. Each function
follows the same controlled change process.
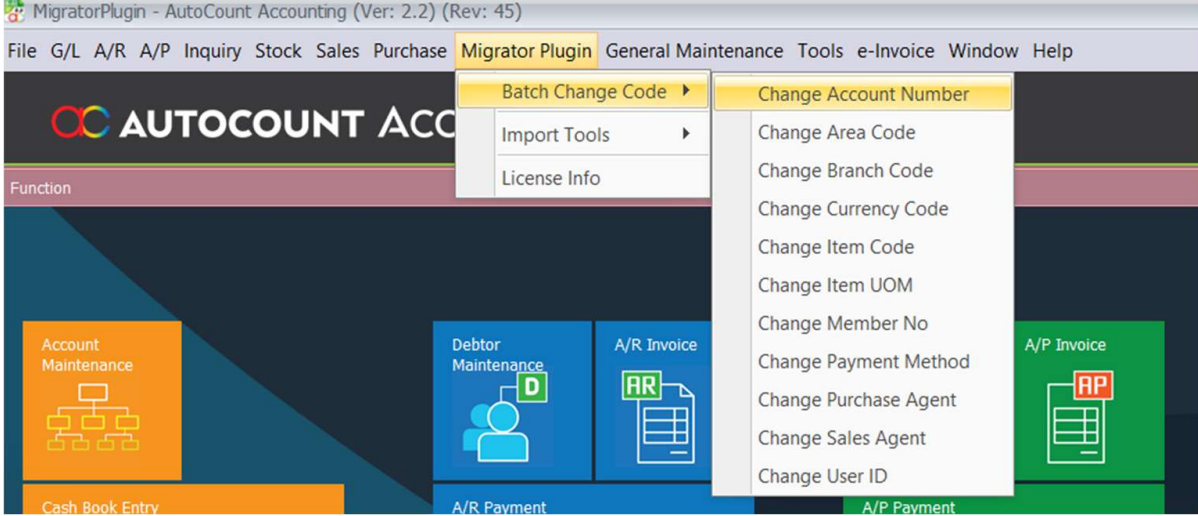
1. Open Migrator Plugin > Batch Change Code and select the required change screen: Account
Code, Area Code, Branch Code, Currency Code, Item Code, Member Code, Payment Method,
Purchase Agent, Sales Agent, or User ID.
2. Select the existing code or record to change, then select or enter the replacement value shown by
the screen.
3. Review the selected records and the replacement value before applying the change.
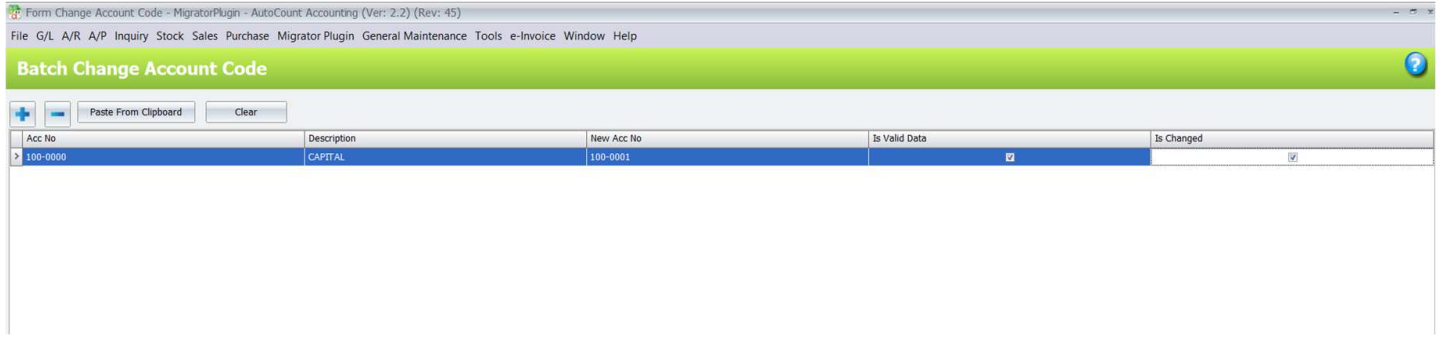
4. Click Apply. The function updates the records only when the user has the matching Apply right.
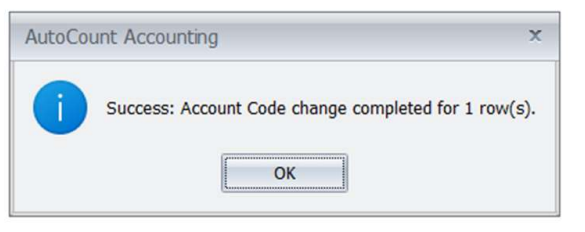
C. Import General Maintenance Data
The plugin provides clipboard import screens for General Maintenance records. Each import screen
includes Paste from clipboard, an overwrite or update option, status information, and Import.
1. Open Migrator Plugin > Import Tools and select the required screen: Import Area Type, Import
Creditor Type, Import Debtor Type, Import Price Package, Import Purchase Agent, Import Sales
Agent, Import Sub Project, Import Top Level Project, or Import User.
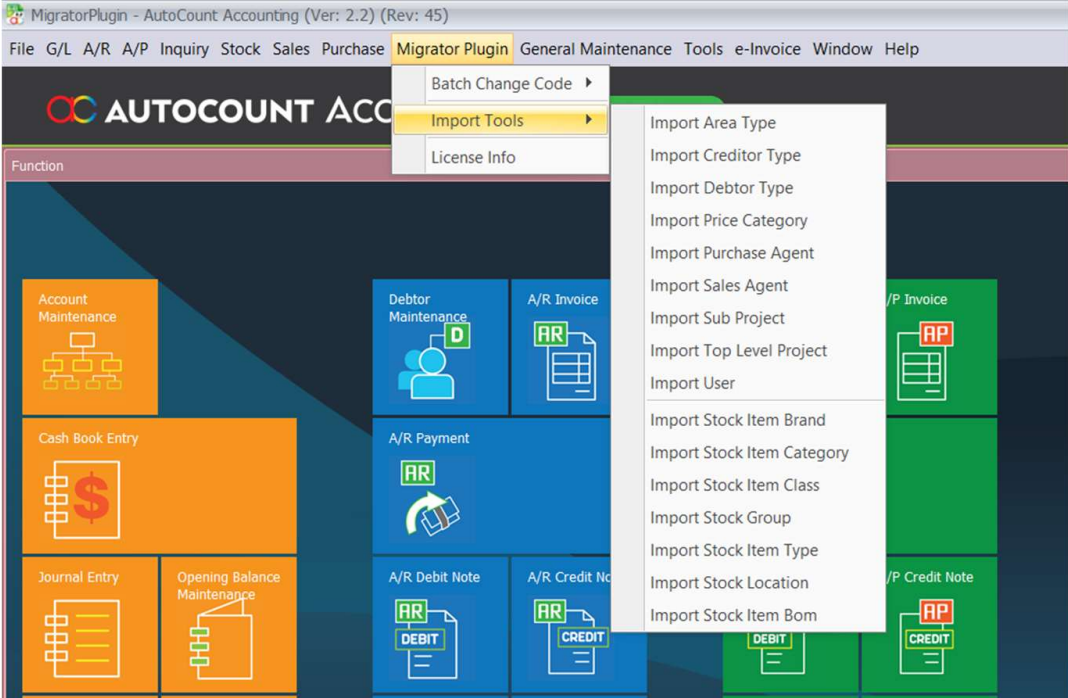
2. Copy the prepared rows from the source spreadsheet to the clipboard.

3. Click Paste from clipboard and review the imported rows and their Status values.
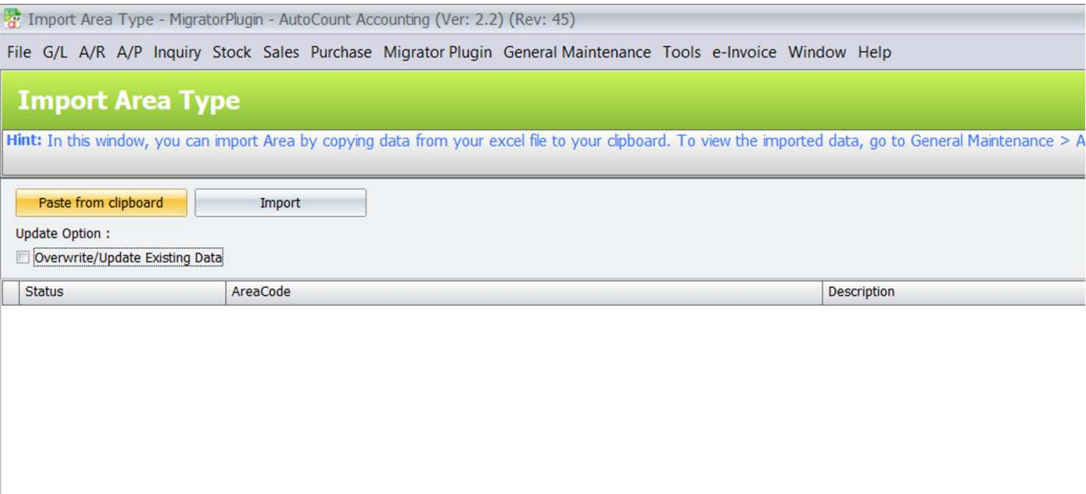
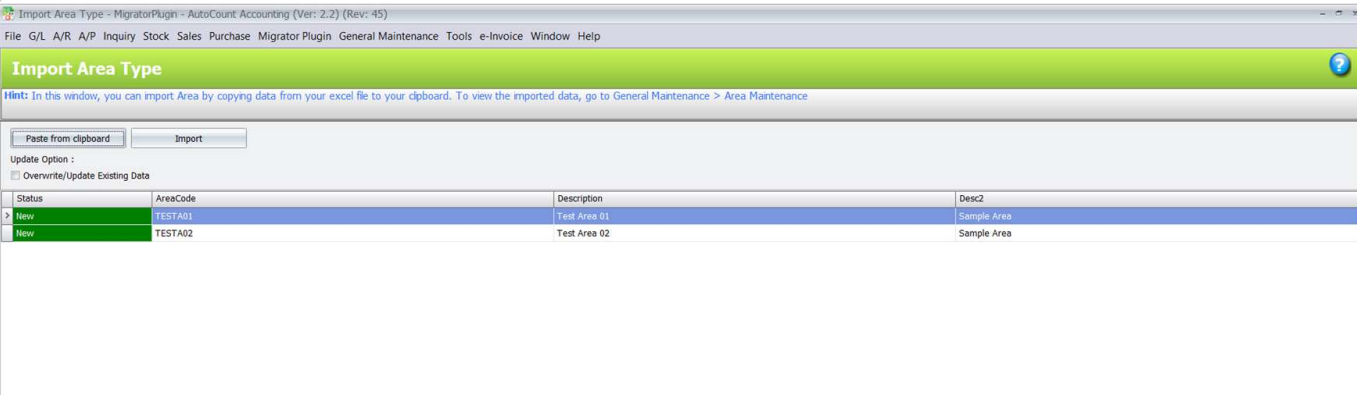
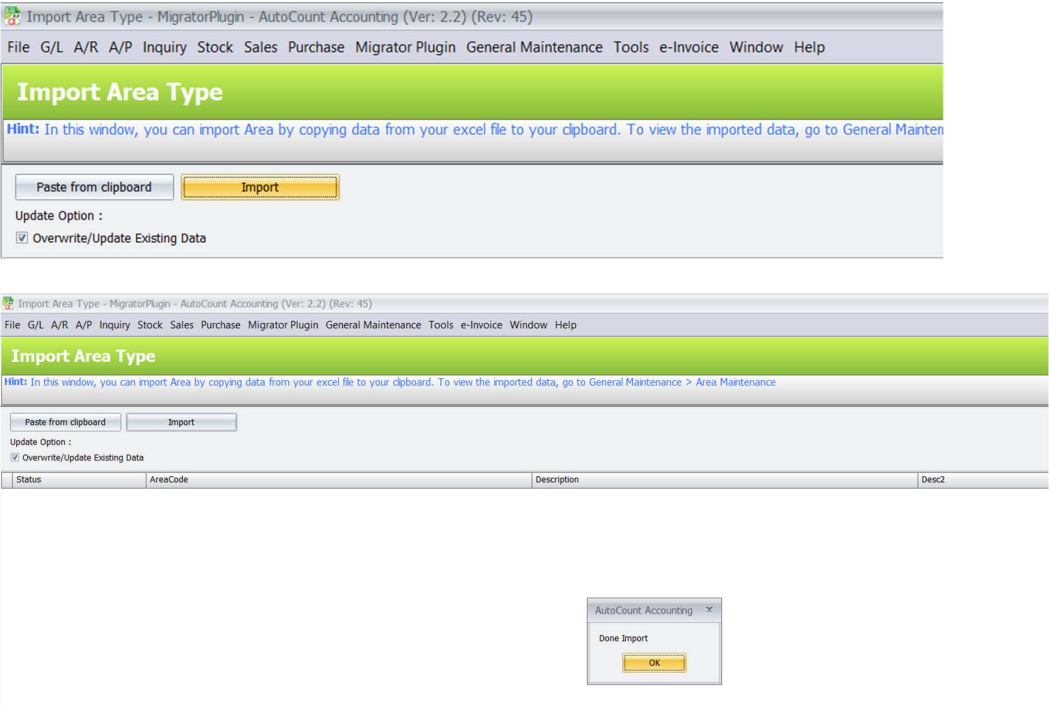
4. Select Overwrite/Update Existing Data only when existing matching records should be updated.
5. Click Import and review Successed and Status results for each row.
D. Import Stock Maintenance Data
Stock Maintenance import screens use the same clipboard workflow for stock-related master data.
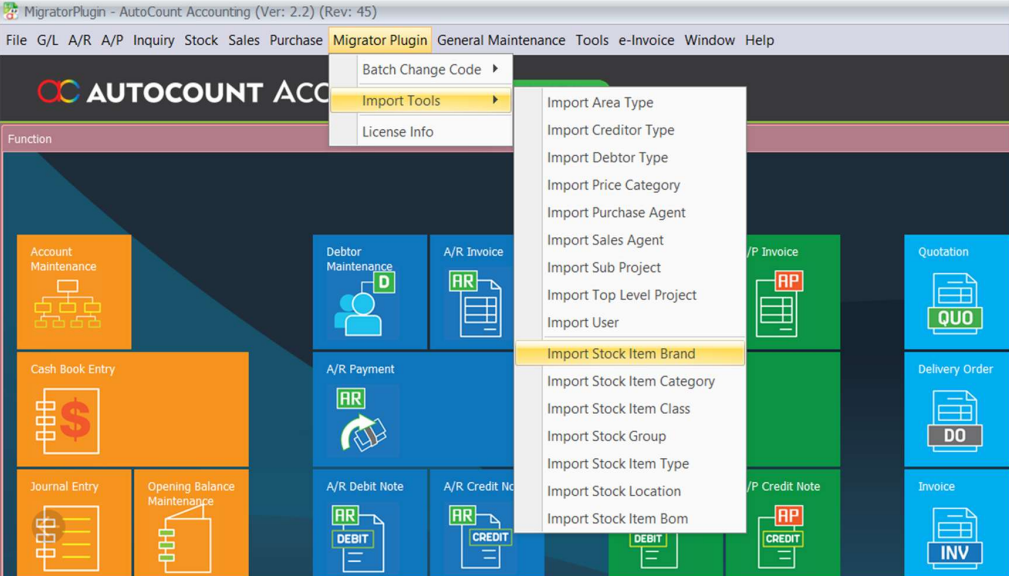
1. Open Migrator Plugin > Import Tools and select the required screen: Import Item Brand, Import
Item Category, Import Item Class, Import Item Group, Import Item Type, or Import Location.
2. Copy the prepared spreadsheet rows to the clipboard and click Paste from clipboard.
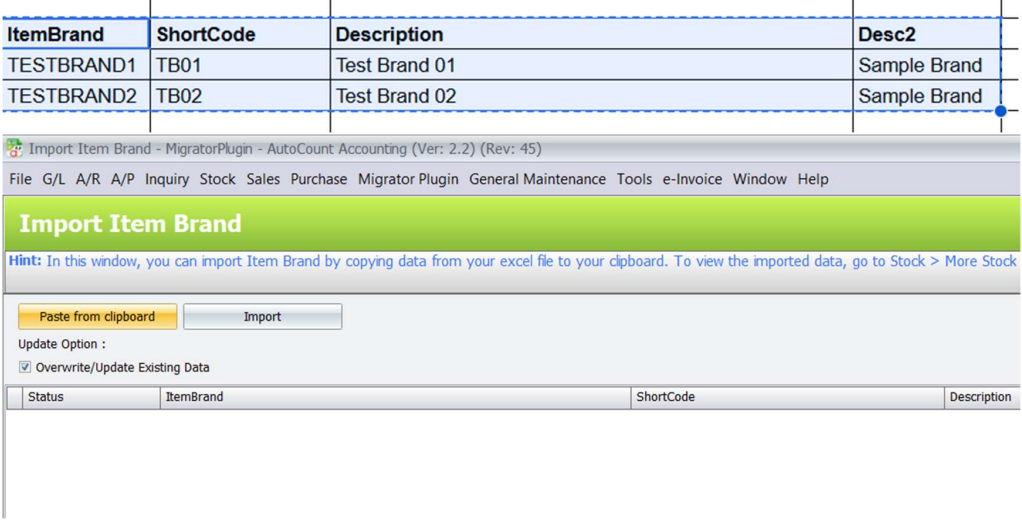
3. Review the imported rows, including the displayed Status for each row.
4. Select Overwrite/Update Existing Data only when a matching existing record should be updated.
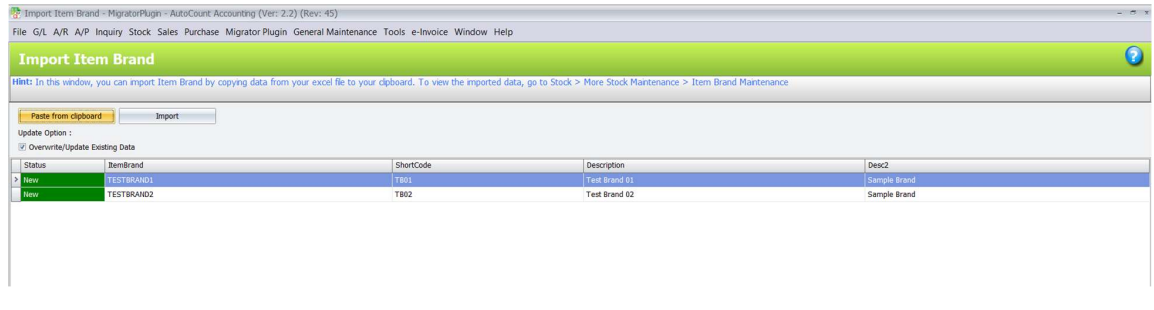
5. Click Import and confirm the resulting Successed and Status values.
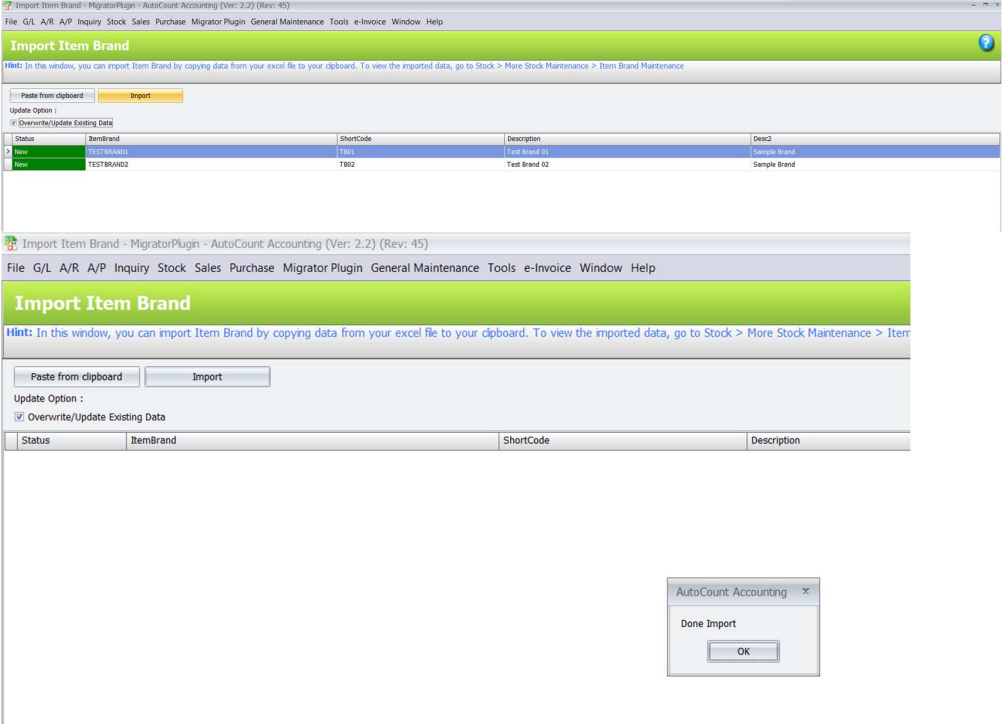
E. Import Item BOM
Import Item BOM imports item bill-of-material information from the selected source spreadsheet.
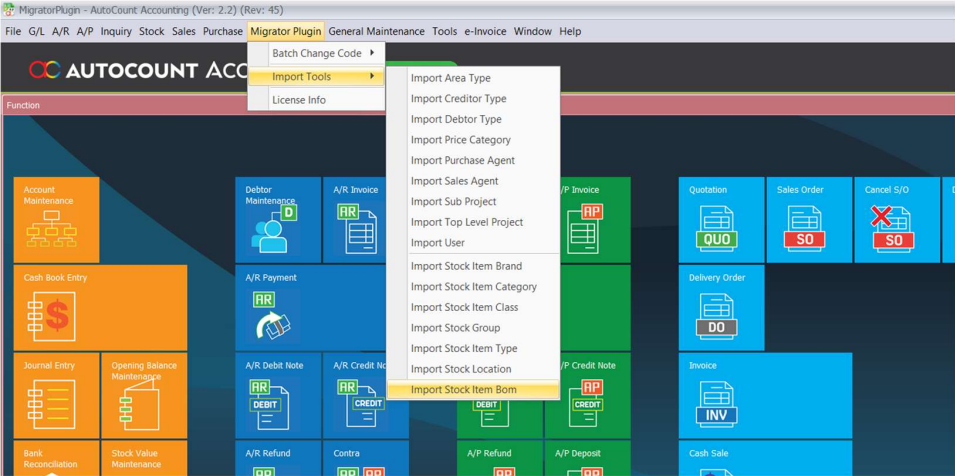
1. Open Migrator Plugin > Import Tools > Import Item BOM.
2. In the source spreadsheet, prepare the required columns and copy the column headers together
with the BOM rows.

3. Click Paste from clipboard and review the imported rows and their Status.
4. Enable Overwrite/Update Existing Data only when an existing BOM should be replaced with the
imported BOM details.
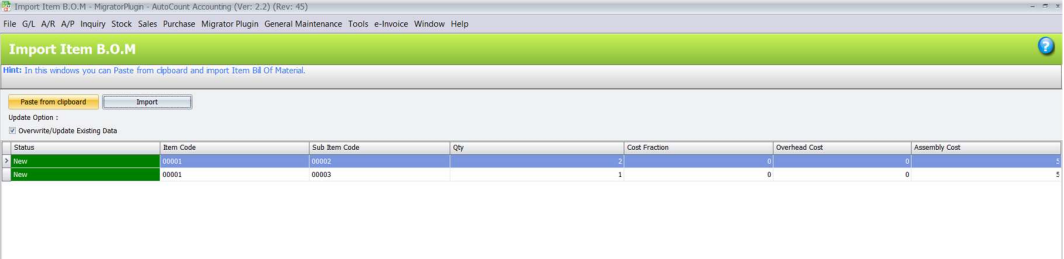
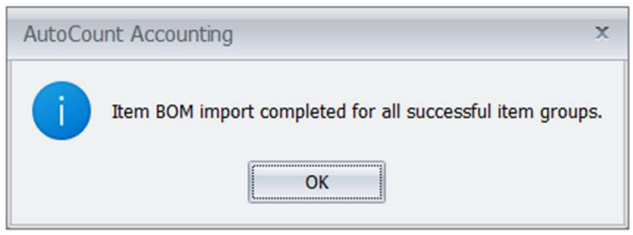
5. Click Import. Correct any rows marked Error and import again when required.
Benefits of AutoCount Migrator Plugin
Faster Data Migration
Master records that would take hours to key in can be copied from Excel and imported in a few clicks.
Consistent Codes Across Records
A code is changed once and replaced throughout the supported records, instead of being edited record by record.
Fewer Data Entry Errors
Every row shows a status before and after import, so problems are spotted and corrected before they reach your account book.
Controlled and Accountable Changes
Separate access rights for each function keep batch changes and imports in the hands of authorised users.
Conclusion
The AutoCount Migrator Plugin takes the manual work out of data migration and code restructuring. With batch code changes, clipboard imports for maintenance data and item BOM, row-by-row status checks and function-level access rights, it helps businesses set up and maintain their AutoCount data quickly and accurately.
Frequently Asked Questions
Who is the ideal user for AutoCount Migrator Plugin?
This plugin is ideal for businesses migrating to AutoCount, companies restructuring their codes, manufacturers maintaining many BOMs, and implementers or administrators who set up and maintain AutoCount account books.
Will importing overwrite my existing records?
Only if you choose to. Existing matching records are updated when Overwrite/Update Existing Data is ticked, so leave it unticked unless you want them updated.
Do I need to copy the column headers from Excel?
For Import Item BOM, yes. Copy the column headers together with the BOM rows. For other import screens, follow the column layout shown on the screen.
Why can't a user open or apply a Migrator Plugin function?
The user has not been given the right for that function. Assign the relevant Show, Open, and Apply or Import rights in General Maintenance > Access Right Maintenance.
Does AutoCount Migrator Plugin work with the latest AutoCount Accounting version?
This guide covers Migrator Plugin version 2.2.25.34 running on AutoCount Accounting 2.2. For specific version compatibility, it is recommended to consult with your AutoCount solution provider.
Interested in Getting AutoCount for your Business?
Contact our sales team today to explore pricing options and get started with the perfect solution for you.