
-
AutoCount Accounting Features
-
- Approval Workflow
- Audit Trail
- Auto Save in Draft Folder
- AutoCount Contra Account
- AutoCount License Setting Guide
- Deposit Tracking & Management
- Documents Numbering Format
- Full Transfer and Partial Transfer
- Import Data to AutoCount Accounting Using Excel
- Informative Charts and Analytical Data
- Layout Customization
- Multi Pricing
- Sales and Services Tax
- Schedule Backup
- Search Lookup Edit
- View Documents Flow
- AutoCount Feature Stock Take
- Column Chooser
- Show Remaining (3) Collapse
-
AutoCount Cloud Accounting
-
AutoCount E-Invoice
-
AutoCount HRMS User Guide
-
AutoCount Modules
-
- Activity Stream
- Advanced Financial Report
- Advanced Item
- Advanced Multi-UOM
- Advanced Quotation Module
- Basic Multi-UOM
- Budget Module
- Consignment
- Filter By Salesman
- FOC Quantity
- Formula
- Item Batch
- Item Package
- Landing Cost
- Multi-Currency
- Multi-Dimensional Analysis
- Multi-Location
- Project Account
- Recurrence
- Remote Credit Control Module
- Stock Assembly
- User Defined Fields (UDF)
- AutoCount SST Hidden Functions
- AutoCount SST Submission - Service Tax
- AutoCount Scripting Module User Guide
- AutoCount Bonus Point Module User Guide
- AutoCount Service Management Plugin User Guide
- Show Remaining (12) Collapse
-
AutoCount Plugins
-
- Fixed Assets Management
- Goldsmith
- TD Ordering Mobile Apps
- TD Stock Mobile Apps
- Universal Import Plugin
- DMS Import Plugin
- AutoCount Pick List Plugin User Guide
- AutoCount Credit Memo Plugin User Guide
- AutoCount Lock Price Plugin
- AutoCount Progressive Billing
- AutoCount Easy Recurrence Plugin
- Batch Update Unit Price Plugin
- AutoCount Production order
- AutoCount Car Tint Film Plugin
-
- Event Management System
- AutoCount To-Do List Plugin
- AutoCount AutoBank Reconciliation Plugin
- Intercompany Billing Plugin User Guide
- Lead Management 2.0 Plugin
- AutoCount Service Contract Plugin User Guide
- AutoCount Optical Plugin
- AutoCount Integrator Plugin
- AutoCount Procurement Planning Plugin
- Cage Management Plugin
- AutoCount Vehicle Plugin
- AutoCount Agent Validation Plugin User Guide
- AutoCount Barcode Generator Plugin User Guide
- AutoCount Easy Batch Number Entry Plugin User Guide
- Warranty 2.0 Plugin
- AutoCount Easy Photo 2.0 User Guide
- AutoCount Recurring Invoice Plugin User Guide
- AutoCount Scale Barcode Plugin User Guide
- AutoCount Recurrence Late Interest Plugin
- AutoCount Item Visibility Control
- AutoCount Bill Remark Plugin User Guide
- AutoCount Pain Tracker User Guide
- AutoCount Easy Payment
- AutoCount Easy Deposit Plugin
- AutoCount Easy Knock Off Plugin
- AutoCount Daily Collection Summary Plugin
- Timber Log Plugins
- Batch Transfer SODO Plugin
- AutoCount Vege Basket Plugin Guide
- AutoCount Fruit Basket Plugin Guide
- Referral Management Plugin
- AutoCount Migrator Plugin
- AutoCount Email&WhatsApp Plugin
- AutoCount Multi Company Knock Off Plugin
- AutoCount Advance Aging Format Plugin
- AutoCount Payment Request Plugin
- AutoCount Vehicle Master Plugin
- AutoCount Advance Deposit Plugin
- AutoCount IC Checker Plugin
- AutoCount RMA Plugin
- AutoCount Historical Outstanding DO Listing Plugin
- AutoCount Project Department Visibility Control Plugin
- AutoCount MRP Order Plugin
- AutoCount GridToExcel Plugin
- AutoCount Stock Availability Report Plugin
- AutoCount Batch Transfer SO DO Plugin
- AutoCount Centralized Kitchen Management Plugin
- SL AutoCount API
- AutoCount InterCompany Billing Plugin
- AutoCount Sales Commission Plugin
- AutoCount Advanced Credit Term Plugin
- AutoCount Advanced Stock Assembly Plugin
- AutoCount Shipment Plugin
- AutoCount Tour Plugin
- AutoCount Smart Analysis
- AutoCount Rental Management
- Show Remaining (41) Collapse
-
-
Form Template
-
Report Template
-
- Advance Quotation
- Cash Sale
- Consignment
- Consignment Movement
- Credit Note
- Debit Note
- Delivery Order
- FOC Quantity Analysis By Document Report
- Invoice
- Item Package Sales Report
- Monthly Sales Analysis
- Outstanding Sales Order Listing
- Profit And Loss Of Documents
- Quotation
- Sales Agent Contribution Report
- Sales Order
- Top/Bottom Sales Ranking
- Show Remaining (2) Collapse
-
- Available Stock Status Report
- Expired Item Batch Listing
- Inventory Physical Worksheet
- Stock Adjustment
- Stock Aging Report
- Stock Assembly
- Stock Assembly Order
- Stock Balance By Location
- Stock Balance Report
- Stock Card Report
- Stock Disassembly
- Stock Issue
- Stock Item Profit Margin
- Stock Movement Report
- Stock Receive
- Stock Take
- Stock Transfer
- Stock Write Off
- Show Remaining (3) Collapse
-
B2B ORDERING
-
AutoCount AI Agent
AutoCount Advance Aging Format Plugin User Guide
What is AutoCount Advance Aging Format Plugin?
The AutoCount Advance Aging Format Plugin extends the Debtor Aging and Creditor Aging reports in AutoCount Accounting with a choice of aging basis, a choice of aging format, and comparison tabs. It is useful for companies that need to see aging by invoice date or due date, and in month or day ranges, without changing each debtor's or creditor's settings.
Why Use AutoCount Advance Aging Format Plugin?
Without proper planning, purchasing is driven by guesswork, which leads to shortages on some items and overstock on others. The MRP Order Plugin helps businesses:
See material shortages before they happen
Know what to buy or assemble, and how much
Create purchasing documents from the plan
Keep stock at the right level
Key Features of AutoCount MRP Order Plugin
MRP Forecast
See projected stock for each item across the selected dates, based on sales orders, purchase orders and production.
Procurement Plan
Review suggested quantities with a status summary of Backorder, Reorder, Critical and Healthy.
Document Generation
Generate Purchase Requests and batch transfer Assembly Orders from the selected plan rows.
Easy Reorder and Transfer to PO
Calculate reorder quantities inside Reorder Advice, and create Purchase Orders from a Sales Order or Quotation.
Who Should Use AutoCount Service Contract Plugin?
Manufacturing and Assembly Businesses
Helps businesses that assemble finished goods from a bill of materials see the materials and assemblies needed to meet their orders.
Trading and Distribution Businesses
Allows businesses with many stock items to reorder based on minimum, reorder and maximum levels.
Purchasing and Planning Teams
Useful for buyers who raise purchase orders against confirmed sales orders or quotations.
Businesses with Multiple Stock Locations
Helps businesses that hold stock in several locations plan and reorder by location.
How AutoCount Advance Aging Format Plugin Works
A. Access Rights
The plugin registers its access rights under the SL Plug-In group. Grant the rights required for users who
need to view the license status or open the license registration screen.
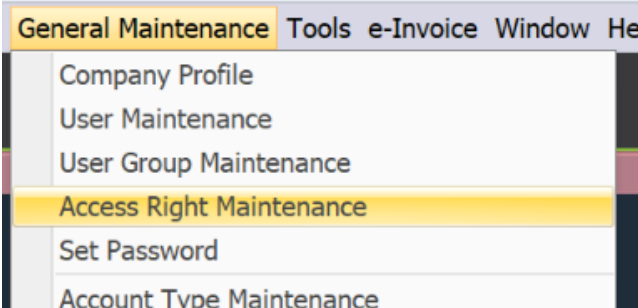
1. Go to General Maintenance > Access Rights
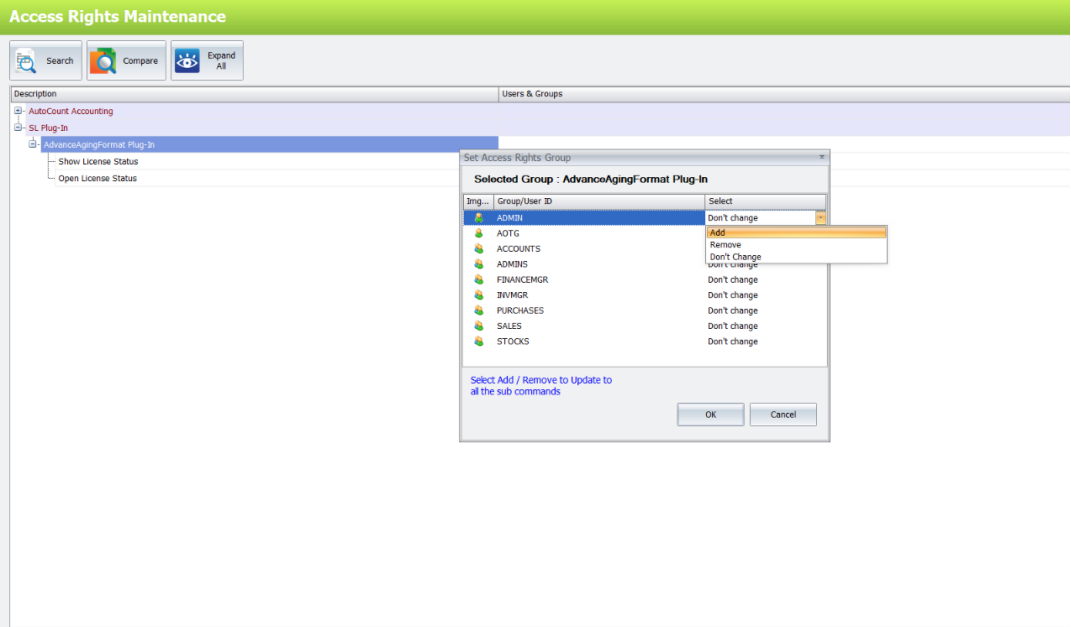
2. Expand the SL Plugins section and select AdvanceAgingFormat Plugin.
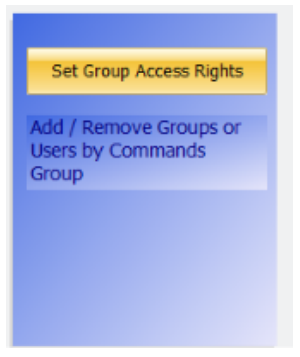
3. Click Set Group Access Rights.
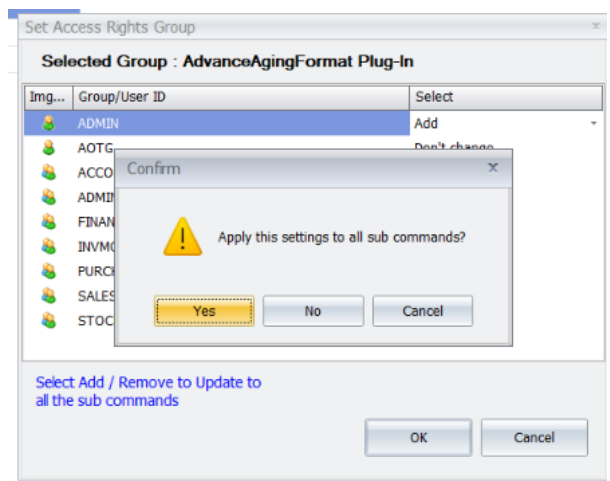
4. Select the relevant user group, example; Admin. Change the permission from Don’t Change
to Add. Click OK.
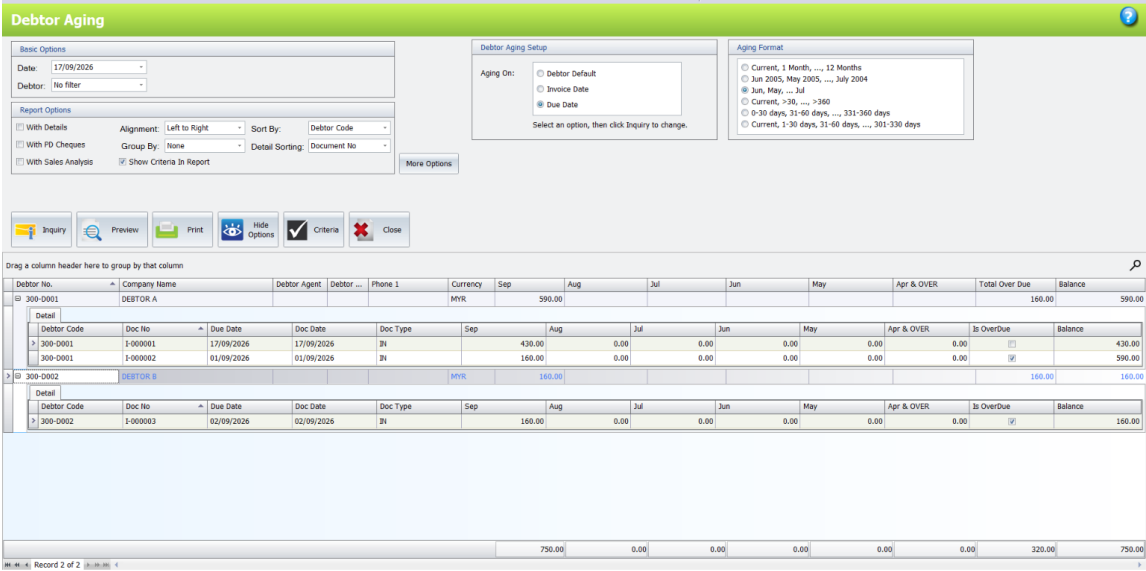
B. Debtor Aging
AdvanceAgingFormat extends the Debtor Aging inquiry with aging-basis selection, aging-format selection,
and comparison tabs. The selected choices are applied when the inquiry is refreshed.
B.1 Select the debtor aging basis
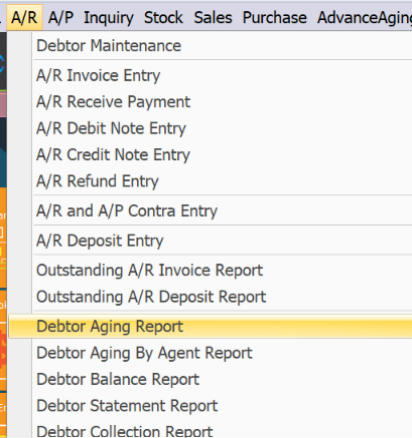
1. Open A/R > Debtor Aging Report
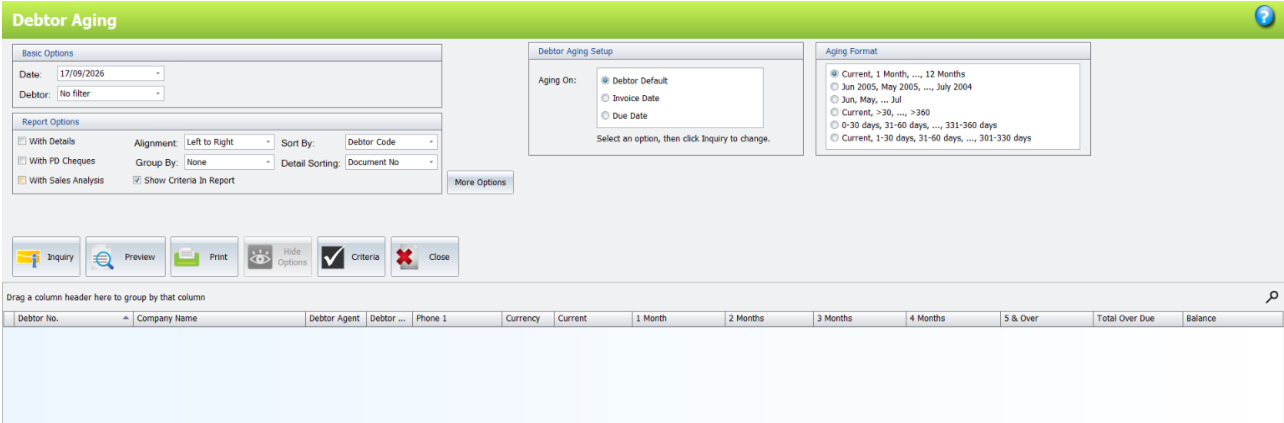
2. In Debtor Aging Setup, select Debtor Default, Invoice Date, or Due Date under Aging On.
Debtor Default: Uses the aging basis configured for each debtor in Debtor Maintenance.
Invoice Date: Calculates aging from the invoice date.
Due Date: Calculates aging from the invoice’s due date.
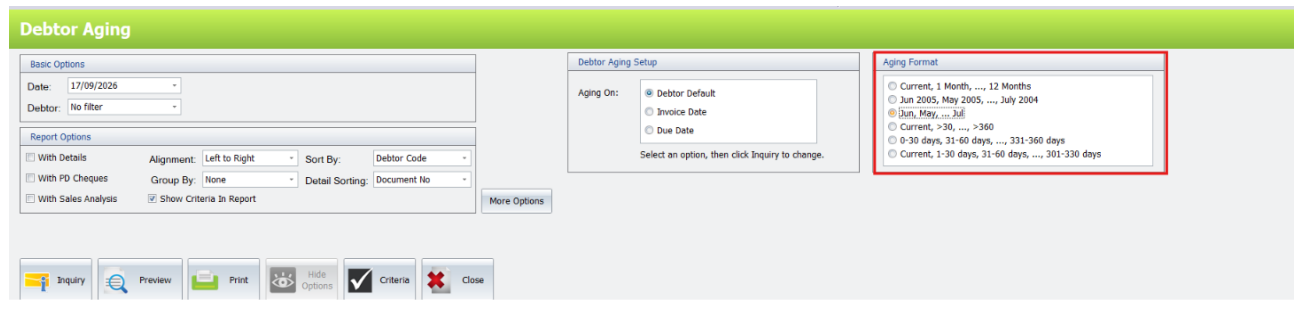
B.2 Select the debtor aging format
1. In the Aging Format group, select one of the available formats such as by month ranges or day
ranges.
2. Click Inquiry to apply the selected format to the report columns. The selected format is saved
through the AutoCount AR setting flow.
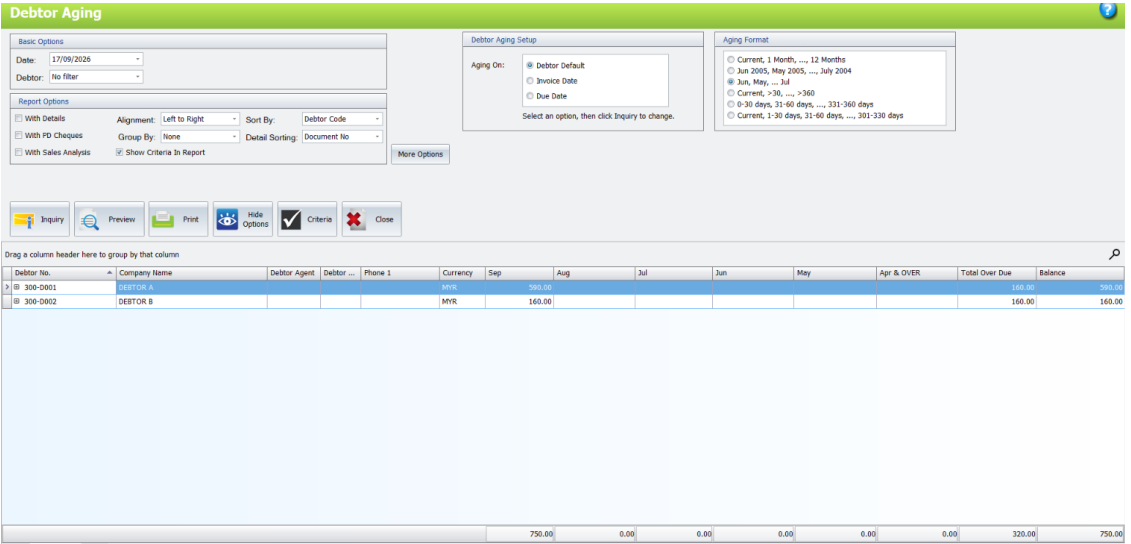
B.3 Review comparison tabs and details
1. Review the All tab for the complete result.
2. Select the Invoice Date tab or Due Date tab to review the same aging data using that basis.
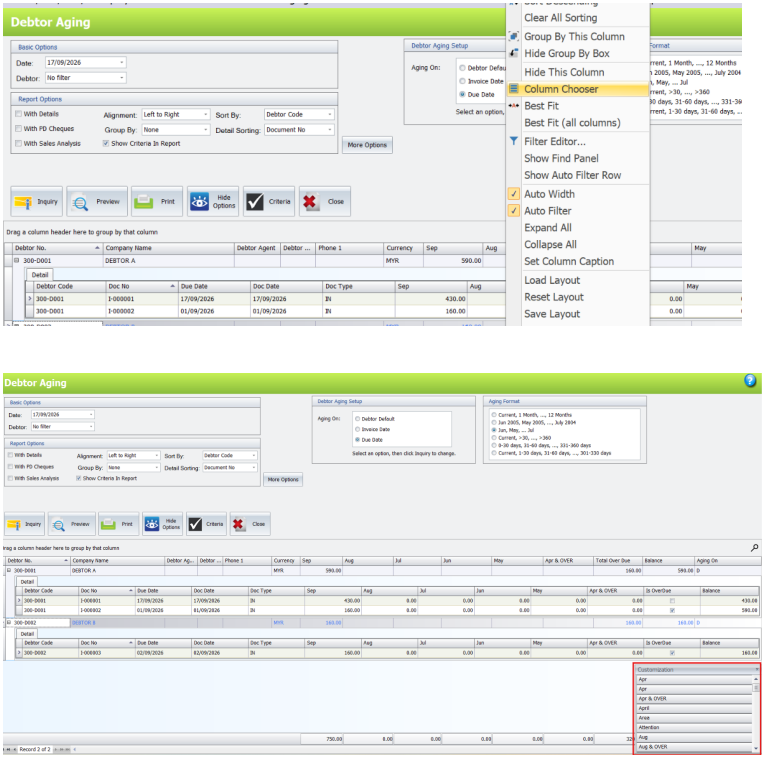
3. To change visible detail columns, right-click the detail grid header and select Column Chooser.
C. Creditor Aging
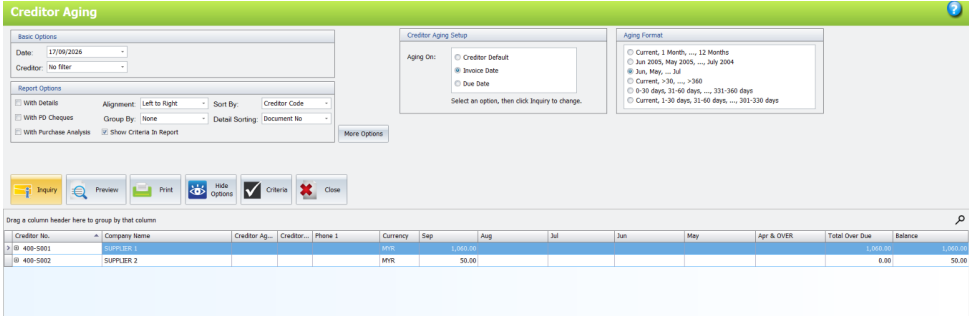
C.1 Select the creditor aging basis
1. Open A/R > Creditor Aging Report
2. In Creditor Aging Setup, select Creditor Default, Invoice Date, or Due Date under Aging On.
3. Click Inquiry. The result grid and comparison tabs refresh using the selected aging basis.
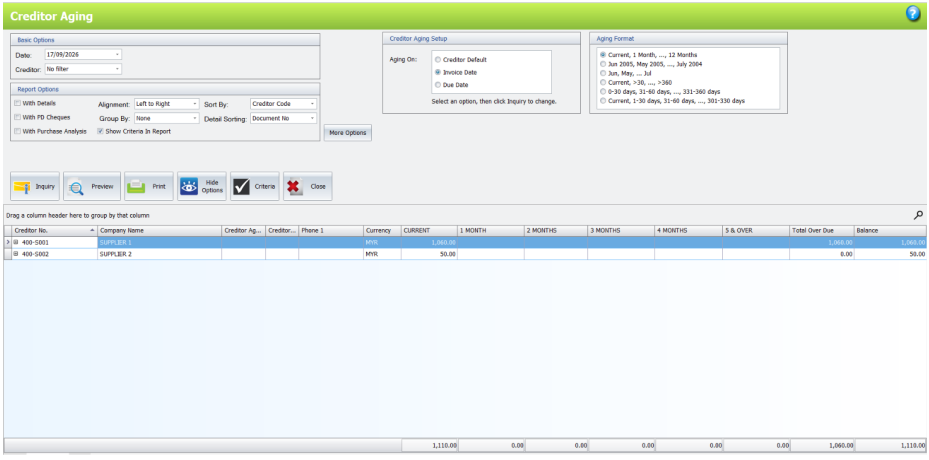
C.2 Select the creditor aging format
1. In the Aging Format group, select the required month-based or day-based format.
2. Click Inquiry to apply the selected format to the report columns.
Benefits of AutoCount MRP Order Plugin
Fewer Stock Shortages
Seeing projected stock by date helps you order before a shortage delays production or delivery.
Less Overstocking
Suggested quantities are based on actual demand and stock levels, so you buy what is needed.
Faster Purchasing
Purchase Requests, Assembly Orders and Purchase Orders are created from the plan, which removes re-keying.
Supplier Details Built In
Supplier and lead-time details are part of the plan, so each requirement is matched to its supplier before ordering.
Conclusion
The AutoCount MRP Order Plugin brings demand, stock and purchasing together in one planning screen. By showing what will run short and creating the documents to fix it, it helps businesses keep materials available without tying up cash in excess stock.
Frequently Asked Questions
What does the Advance Aging Format Plugin do?
It enhances AutoCount’s debtor and creditor aging reports with flexible aging-basis options and customizable day-based or month-based aging periods.
Why should I use the Advance Aging Format Plugin?
It allows finance teams to analyze receivables and payables from multiple perspectives—such as due date or invoice date—without relying on static aging structures.
What aging calculation bases can I choose from?
Under Aging Setup, you can calculate aging using Debtor/Creditor Default, Invoice Date, or Due Date.
Can I customize the aging period intervals?
Yes, you can choose between various month-based ranges (e.g., 1–12 Months) or custom day-based intervals (e.g., 30-day, 60-day, or 120-day buckets).
How do the comparison tabs work?
The report provides dedicated tabs such as All, Invoice Date, and Due Date, allowing you to view and compare aging calculations side by side on the same screen.
How do administrators manage access to this plugin?
Permissions can be configured under General Maintenance > Access Right Maintenance > SL Plugins > AdvanceAgingFormat Plug-In to assign license viewing and registration rights to specific user groups.
Start Improving Your Aging Analysis Today!
This plugin enables us to customize debtor and creditor aging periods, switch between invoice date and due date calculation bases, and compare aging results across dedicated inquiry tabs. We can efficiently evaluate credit terms, gain deeper visibility into overdue balances, and make informed cash-flow decisions through flexible aging reporting.