
Need Help?
-
AutoCount Accounting Features
-
- Approval Workflow
- Audit Trail
- Auto Save in Draft Folder
- AutoCount Contra Account
- AutoCount Feature Stock Take
- AutoCount License Setting Guide
- Column Chooser
- Deposit Tracking & Management
- Documents Numbering Format
- Full Transfer and Partial Transfer
- Import Data to AutoCount Accounting Using Excel
- Informative Charts and Analytical Data
- Layout Customization
- Multi Pricing
- Sales and Services Tax
- Schedule Backup
- Search Lookup Edit
- View Documents Flow
- Show Remaining (3) Collapse
-
AutoCount Cloud Accounting
-
AutoCount E-Invoice
- AutoCount E-Invoicing Tutorial
- E-Invoice Guide and Preparation for AutoCount Users
- Employee Handbook Template for E-Invoicing
- How E-Invoice Works in AutoCount Accounting?
- How to Enable and Submit SVDP e-Invoices in AutoCount 2.0
- How to Use AutoCount Accounting for LHDN e-Invoice
- What is E-Invoicing?
-
AutoCount Payroll & HRMS
-
- Coming soon
-
- Coming soon
-
AutoCount Modules
-
- Activity Stream
- Advanced Financial Report
- Advanced Item
- Advanced Multi-UOM
- Advanced Quotation Module
- AutoCount Bonus Point Module User Guide
- AutoCount Scripting Module User Guide
- AutoCount Service Management Plugin User Guide
- AutoCount SST Hidden Functions
- AutoCount SST Submission - Service Tax
- Basic Multi-UOM
- Budget Module
- Consignment
- Filter By Salesman
- FOC Quantity
- Formula
- Item Batch
- Item Package
- Landing Cost
- Multi-Currency
- Multi-Dimensional Analysis
- Multi-Location
- Project Account
- Recurrence
- Remote Credit Control Module
- Stock Assembly
- User Defined Fields (UDF)
- Show Remaining (12) Collapse
-
AutoCount Plugins
-
- AutoCount Car Tint Film Plugin
- AutoCount Credit Memo Plugin User Guide
- AutoCount Easy Recurrence Plugin
- AutoCount Lock Price Plugin
- AutoCount Pick List Plugin User Guide
- AutoCount Production order
- AutoCount Progressive Billing
- Batch Update Unit Price Plugin
- DMS Import Plugin
- Fixed Assets Management
- Goldsmith
- TD Ordering Mobile Apps
- TD Stock Mobile Apps
- Universal Import Plugin
-
- AutoCount Advance Aging Format Plugin
- AutoCount Advance Deposit Plugin
- AutoCount Advanced Credit Term Plugin User Guide
- AutoCount Advanced Stock Assembly Plugin User Guide
- AutoCount Agent Validation Plugin User Guide
- AutoCount AutoBank Reconciliation Plugin User Guide
- AutoCount Barcode Generator Plugin User Guide
- AutoCount Batch Transfer SO DO Plugin
- AutoCount Bill Remark Plugin User Guide
- AutoCount Cage Management Plugin User Guide
- AutoCount Centralized Kitchen Management Plugin
- AutoCount Daily Collection Summary Plugin User Guide
- AutoCount Easy Batch Number Entry Plugin User Guide
- AutoCount Easy Deposit Plugin User Guide
- AutoCount Easy Knock Off Plugin
- AutoCount Easy Payment Plugin User Guide
- AutoCount Easy Photo 2.0 User Guide
- AutoCount Email & WhatsApp Plugin User Guide
- AutoCount Event Management System Plugin User Guide
- AutoCount Fruit Basket Plugin Guide
- AutoCount GridToExcel Plugin
- AutoCount Historical Outstanding DO Listing Plugin
- AutoCount IC Checker Plugin
- AutoCount Integrator Plugin
- AutoCount InterCompany Billing Plugin
- AutoCount Item Visibility Control Plugin User Guide
- AutoCount Migrator Plugin
- AutoCount MRP Order Plugin
- AutoCount Multi Company Knock Off Plugin
- AutoCount Optical Plugin
- AutoCount Pain Tracker Plugin User Guide
- AutoCount Payment Request Plugin
- AutoCount Procurement Planning Plugin User Guide
- AutoCount Project Department Visibility Control Plugin
- AutoCount Recurrence Late Interest Plugin
- AutoCount Recurring Invoice Plugin User Guide
- AutoCount Referral Management Plugin User Guide
- AutoCount Rental Management
- AutoCount RMA Plugin
- AutoCount Sales Commission Plugin
- AutoCount Scale Barcode Plugin User Guide
- AutoCount Service Contract Plugin User Guide
- AutoCount Shipment Plugin User Guide
- AutoCount Smart Analysis Plugin User Guide
- AutoCount Stock Availability Report Plugin
- AutoCount Timber Log Plugin User Guide
- AutoCount To-Do List Plugin User Guide
- AutoCount Tour Plugin User Guide
- AutoCount Vege Basket Plugin User Guide
- AutoCount Vehicle Master Plugin User Guide
- AutoCount Vehicle Plugin
- AutoCount Warranty 2.0 Plugin User Guide
- Batch Transfer SODO Plugin
- Intercompany Billing Plugin User Guide
- Lead Management 2.0 Plugin
- SL AutoCount API
- Show Remaining (41) Collapse
-
-
Form Template
-
Report Template
-
- Advance Quotation
- Cash Sale
- Consignment
- Consignment Movement
- Credit Note
- Debit Note
- Delivery Order
- FOC Quantity Analysis By Document Report
- Invoice
- Item Package Sales Report
- Monthly Sales Analysis
- Outstanding Sales Order Listing
- Profit And Loss Of Documents
- Quotation
- Sales Agent Contribution Report
- Sales Order
- Top/Bottom Sales Ranking
- Show Remaining (2) Collapse
-
- Available Stock Status Report
- Expired Item Batch Listing
- Inventory Physical Worksheet
- Stock Adjustment
- Stock Aging Report
- Stock Assembly
- Stock Assembly Order
- Stock Balance By Location
- Stock Balance Report
- Stock Card Report
- Stock Disassembly
- Stock Issue
- Stock Item Profit Margin
- Stock Movement Report
- Stock Receive
- Stock Take
- Stock Transfer
- Stock Write Off
- Show Remaining (3) Collapse
-
B2B ORDERING
-
AutoCount AI Agent
-
AutoCount FAQ & Troubleshooting
-
AutoCount F&B
-
- How to Accept or Reject QR Orders in AutoCount F&B POS
- How to Connect AutoCount POS Backend to QR Ordering Using an API Key
- How to Create a Restaurant in AutoCount QR Ordering Backend
- How to Customize AutoCount QR Ordering Customer View and Operating Hours
- How to Print and Test AutoCount F&B Table QR Codes
- How to Publish Menu Items to AutoCount F&B QR Ordering
- How to Set Up AutoCount F&B QR Ordering: Complete Guide
- How to Set Up Table QR Codes in AutoCount F&B
-
-
AutoCount Unicart Integration
- How Customer, Supplier and Order Field Mapping Works
- How Does a SiteGiant iSKU Map to an AutoCount Item Code?
- How Does the System Check Duplicate iSKU Mapping?
- How Is the Stock Sync Quantity Calculated?
- How Shipping, Discounts, Vouchers and Marketplace Charges Post to AutoCount?
- How Should a New AutoCount Item and SiteGiant iSKU Be Created?
- How SiteGiant Members and Bonus Points Sync with AutoCount POS
- How SiteGiant Orders Sync to AutoCount: Manual or Automatic
- How SiteGiant Purchase Flow Posts to AutoCount GRN
- How to Auto Sync AutoCount Price & Cost to SiteGiant Inventory
- How to Choose the Stock Master in SiteGiant and AutoCount
- How to Connect SiteGiant ERP to AutoCount and Confirm the Connection
- How to Handle Cancelled, Returned or Refunded Online Orders?
- How to Handle Fulfilled by Shopee Stock in AutoCount
- How to Handle SiteGiant Bundle / KIT Items
- How to Map Different UOMs for the Same Item?
- How to Reconcile Marketplace Settlements Using Bulk Knock Off
- How to Set the Posting Rules for Each Sales Channel
- How to Sync Stock from AutoCount to SiteGiant: Manual or Automatic
- Show Remaining (4) Collapse
AUTOCOUNT ACCOUNTING · STEP-BY-STEP LAYOUT GUIDE
How to Add the Account Number Column in AutoCount
Learn how to add the Account Number column in AutoCount, position Acc. No. in the invoice item grid, and save your layout in five straightforward steps.
Quick path: Sales → Invoice → New → Column Chooser → Acc. No. → Save Layout
Step-by-Step: Add Acc. No. to Your Invoice Layout
Follow the five steps below. Each instruction includes the matching screenshot so you can identify the correct menu, field and button.
STEP 1 · Open the Invoice Document
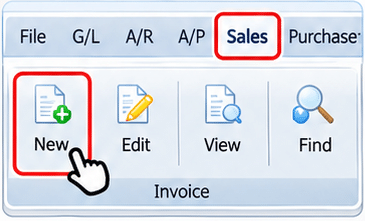
Go to Sales → Invoice, then click New to open a new invoice.
The invoice item grid is where you will add the Account Number (Acc. No.) column.
The invoice item grid is where you will add the Account Number (Acc. No.) column.
STEP 2 · Open Column Chooser
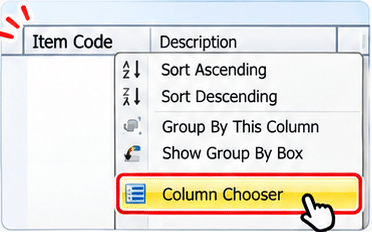
In the item grid, right-click any column header, such as Item Code. Choose Column Chooser from the menu.
Right-click the header area, rather than an empty item row.
Right-click the header area, rather than an empty item row.
STEP 3 · Select Acc. No.
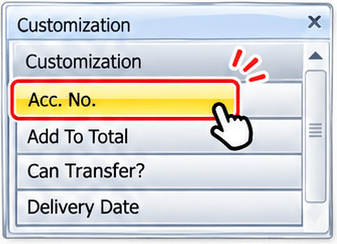
In the Column Chooser window, find Acc. No. and double-click it.
Alternatively, click and hold the field, then drag it out of the Column Chooser into the item grid.
Alternatively, click and hold the field, then drag it out of the Column Chooser into the item grid.
STEP 4 · Position the Account Number Column
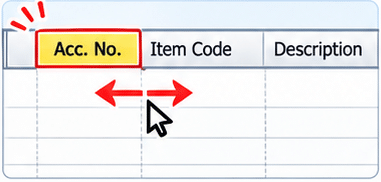
The Acc. No. column will appear in the invoice item grid. Drag its header to your preferred position.
For example, place it before Item Code so the account number is easy to locate.
For example, place it before Item Code so the account number is easy to locate.
STEP 5 · Save the Layout
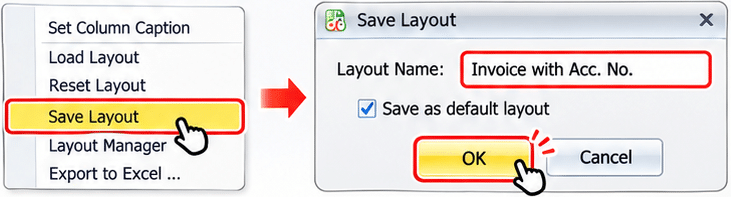
Right-click any column header again and select Save Layout. Enter a meaningful layout name, such as Invoice with Acc. No., then click OK.
Tick Save as default layout if you want this layout to be used by default.
Tick Save as default layout if you want this layout to be used by default.
Before You Finish
Use a meaningful layout name, such as Invoice with Acc. No.. Tick Save as default layout if you want this layout to be used by default. This guide changes the invoice entry-screen grid; it does not cover editing a printed invoice report template.
Frequently Asked Questions About the AutoCount Acc. No. Column
Right-click a column header in the invoice item grid, such as Item Code, then select Column Chooser.
Find Acc. No. in the Column Chooser and double-click it. You can also drag it from the chooser into the item grid.
Yes. Drag the Acc. No. header to the position you prefer after adding it to the grid.
Right-click a column header, choose Save Layout, enter a layout name and click OK. Tick Save as default layout if you want it to be used by default.
Need Assistance with Your AutoCount Layout?
Need help with AutoCount document layouts or adding columns to the item grid? Contact SL Software Solutions for assistance.