
-
AutoCount Accounting Features
-
- Approval Workflow
- Audit Trail
- Auto Save in Draft Folder
- AutoCount Contra Account
- AutoCount License Setting Guide
- Deposit Tracking & Management
- Documents Numbering Format
- Full Transfer and Partial Transfer
- Import Data to AutoCount Accounting Using Excel
- Informative Charts and Analytical Data
- Layout Customization
- Multi Pricing
- Sales and Services Tax
- Schedule Backup
- Search Lookup Edit
- View Documents Flow
- AutoCount Feature Stock Take
- Column Chooser
- Show Remaining (3) Collapse
-
AutoCount Cloud Accounting
-
AutoCount E-Invoice
-
AutoCount HRMS User Guide
-
AutoCount Modules
-
- Activity Stream
- Advanced Financial Report
- Advanced Item
- Advanced Multi-UOM
- Advanced Quotation Module
- Basic Multi-UOM
- Budget Module
- Consignment
- Filter By Salesman
- FOC Quantity
- Formula
- Item Batch
- Item Package
- Landing Cost
- Multi-Currency
- Multi-Dimensional Analysis
- Multi-Location
- Project Account
- Recurrence
- Remote Credit Control Module
- Stock Assembly
- User Defined Fields (UDF)
- AutoCount SST Hidden Functions
- AutoCount SST Submission - Service Tax
- AutoCount Scripting Module User Guide
- AutoCount Bonus Point Module User Guide
- AutoCount Service Management Plugin User Guide
- Show Remaining (12) Collapse
-
AutoCount Plugins
-
- Fixed Assets Management
- Goldsmith
- TD Ordering Mobile Apps
- TD Stock Mobile Apps
- Universal Import Plugin
- DMS Import Plugin
- AutoCount Pick List Plugin User Guide
- AutoCount Credit Memo Plugin User Guide
- AutoCount Lock Price Plugin
- AutoCount Progressive Billing
- AutoCount Easy Recurrence Plugin
- Batch Update Unit Price Plugin
- AutoCount Production order
- AutoCount Car Tint Film Plugin
-
- Event Management System
- AutoCount To-Do List Plugin
- AutoCount AutoBank Reconciliation Plugin
- Intercompany Billing Plugin User Guide
- Lead Management 2.0 Plugin
- AutoCount Service Contract Plugin User Guide
- AutoCount Optical Plugin
- AutoCount Integrator Plugin
- AutoCount Procurement Planning Plugin
- Cage Management Plugin
- AutoCount Vehicle Plugin
- AutoCount Agent Validation Plugin User Guide
- AutoCount Barcode Generator Plugin User Guide
- AutoCount Easy Batch Number Entry Plugin User Guide
- Warranty 2.0 Plugin
- AutoCount Easy Photo 2.0 User Guide
- AutoCount Recurring Invoice Plugin User Guide
- AutoCount Scale Barcode Plugin User Guide
- AutoCount Recurrence Late Interest Plugin
- AutoCount Item Visibility Control
- AutoCount Bill Remark Plugin User Guide
- AutoCount Pain Tracker User Guide
- AutoCount Easy Payment
- AutoCount Easy Deposit Plugin
- AutoCount Easy Knock Off Plugin
- AutoCount Daily Collection Summary Plugin
- Timber Log Plugins
- Batch Transfer SODO Plugin
- AutoCount Vege Basket Plugin Guide
- AutoCount Fruit Basket Plugin Guide
- Referral Management Plugin
- AutoCount Migrator Plugin
- AutoCount Email&WhatsApp Plugin
- AutoCount Multi Company Knock Off Plugin
- AutoCount Advance Aging Format Plugin
- AutoCount Payment Request Plugin
- AutoCount Vehicle Master Plugin
- AutoCount Advance Deposit Plugin
- AutoCount IC Checker Plugin
- AutoCount RMA Plugin
- AutoCount Historical Outstanding DO Listing Plugin
- AutoCount Project Department Visibility Control Plugin
- AutoCount MRP Order Plugin
- AutoCount GridToExcel Plugin
- AutoCount Stock Availability Report Plugin
- AutoCount Batch Transfer SO DO Plugin
- AutoCount Centralized Kitchen Management Plugin
- SL AutoCount API
- AutoCount InterCompany Billing Plugin
- AutoCount Sales Commission Plugin
- AutoCount Advanced Credit Term Plugin
- AutoCount Advanced Stock Assembly Plugin
- AutoCount Shipment Plugin
- AutoCount Tour Plugin
- AutoCount Smart Analysis
- AutoCount Rental Management
- Show Remaining (41) Collapse
-
-
Form Template
-
Report Template
-
- Advance Quotation
- Cash Sale
- Consignment
- Consignment Movement
- Credit Note
- Debit Note
- Delivery Order
- FOC Quantity Analysis By Document Report
- Invoice
- Item Package Sales Report
- Monthly Sales Analysis
- Outstanding Sales Order Listing
- Profit And Loss Of Documents
- Quotation
- Sales Agent Contribution Report
- Sales Order
- Top/Bottom Sales Ranking
- Show Remaining (2) Collapse
-
- Available Stock Status Report
- Expired Item Batch Listing
- Inventory Physical Worksheet
- Stock Adjustment
- Stock Aging Report
- Stock Assembly
- Stock Assembly Order
- Stock Balance By Location
- Stock Balance Report
- Stock Card Report
- Stock Disassembly
- Stock Issue
- Stock Item Profit Margin
- Stock Movement Report
- Stock Receive
- Stock Take
- Stock Transfer
- Stock Write Off
- Show Remaining (3) Collapse
-
B2B ORDERING
-
AutoCount AI Agent
AutoCount IC Checker Plugin User GuideGuide
What Is AutoCount IC Checker Plugin?
The AutoCount IC Checker Plugin helps businesses keep a list of NRIC numbers with a blacklist status and reason, and checks the NRIC entered on a transaction against that list. It is useful for companies that record a customer's IC number at the point of sale and need to stop transactions with blacklisted individuals.
Why Use AutoCount IC Checker Plugin?
Without an automatic check, staff have to remember names or look up a separate list, and blacklisted individuals can slip through. The IC Checker Plugin helps businesses:
Keep one blacklist inside AutoCount
Record the reason for every blacklist
Stop transactions with blacklisted NRIC numbers
Apply the same check for every user
This is particularly important for businesses that deal with individual customers or sellers and record their NRIC.
Key Features of AutoCount Pain Tracker Plugin
NRIC Maintenance
Store each NRIC with its name, blacklist status and blacklist reason.
Blacklist and Whitelist
Mark an NRIC as blacklisted with a required reason, or maintain it as a whitelisted record.
Import from Excel
Copy NRIC rows from an Excel worksheet and import them, with each row checked as new, update or error before saving.
Transaction Checking
Block the save of an Invoice, Cash Sale, Sales Order or Cash Purchase when its NRIC is blacklisted.
Who Should Use AutoCount Pain Tracker Plugin?
Businesses that Record Customer IC Numbers
Helps businesses that take a customer's NRIC for each sale or order turn that field into an automatic check.
Businesses with Walk-In or Individual Customers
Allows businesses to blacklist an individual once, so every user is stopped from transacting with them.
Businesses Buying from Individuals
Useful for companies that purchase from individual sellers by cash, because the same check applies to Cash Purchase documents.
Businesses with Several Counters or Branches
Helps businesses with many staff apply one blacklist consistently, without relying on each person's memory.
How AutoCount IC Checker Plugin Works
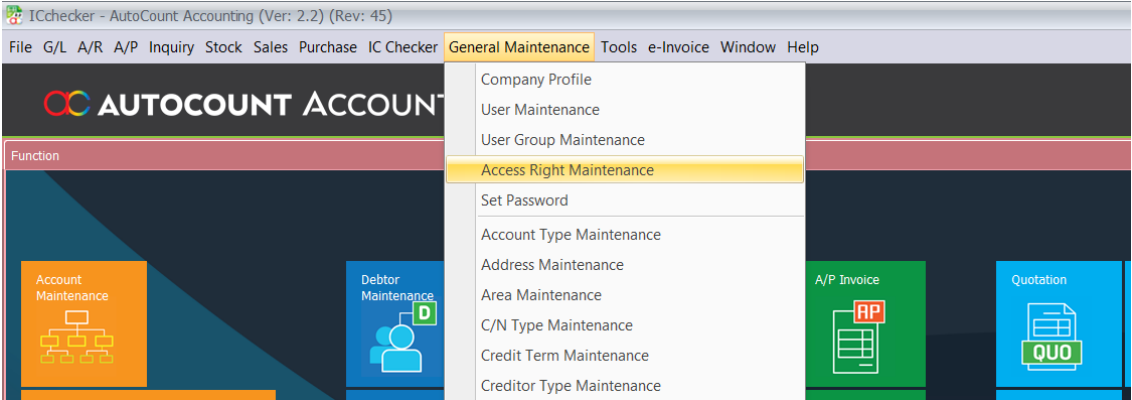
A. Access Rights
IC Checker provides separate access rights for viewing and opening NRIC Maintenance, and for creating,
editing, deleting, or importing NRIC records.
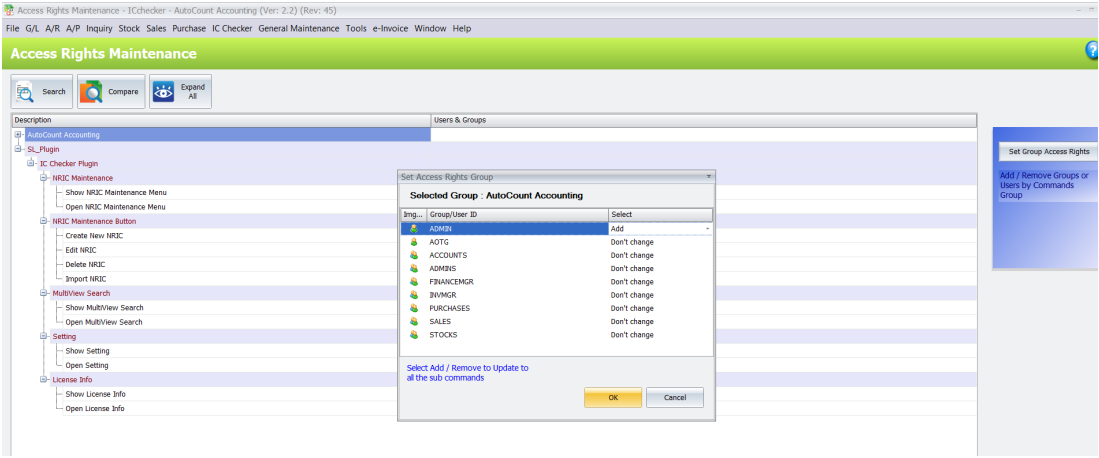
1. Open Access Rights and expand the IC Checker or SL IC Checker plug-in group.
2. Grant Show and Open NRIC Maintenance to users who need to view and open the maintenance
screen.
3. Grant New, Edit, Delete, and Import NRIC only to users who should perform those actions.
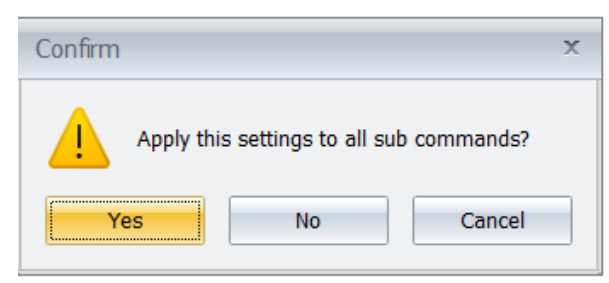
4. Save the access-right changes and ask the affected user to reopen AutoCount if the menu is not yet
visible.
B. Maintain NRIC Records
NRIC Maintenance stores the NRIC, name, blacklist status, and blacklist reason used by the transaction
checks.
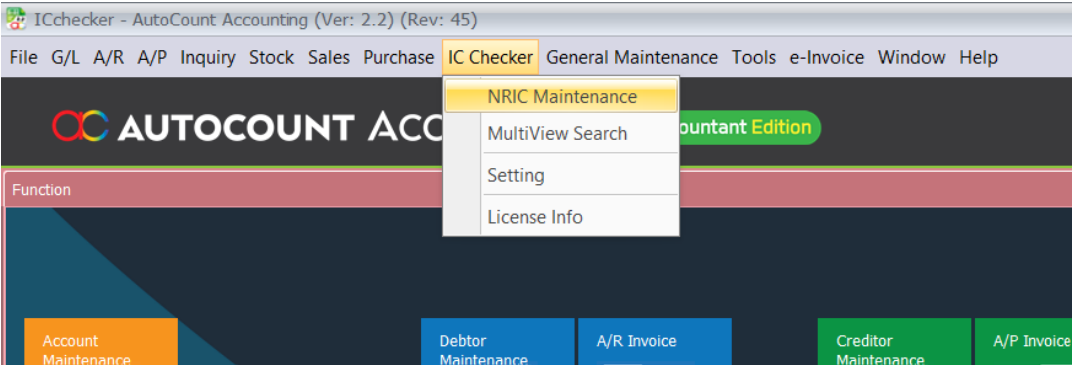
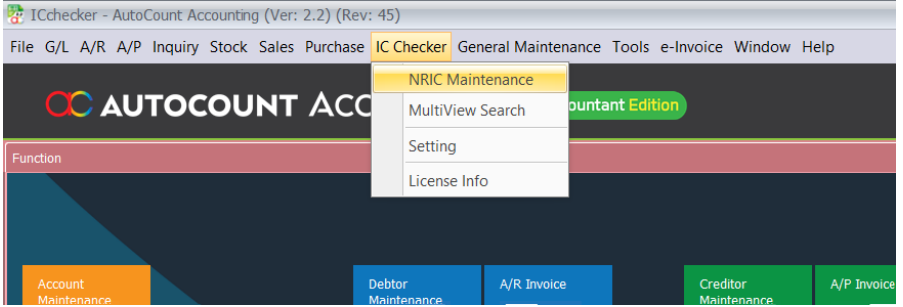
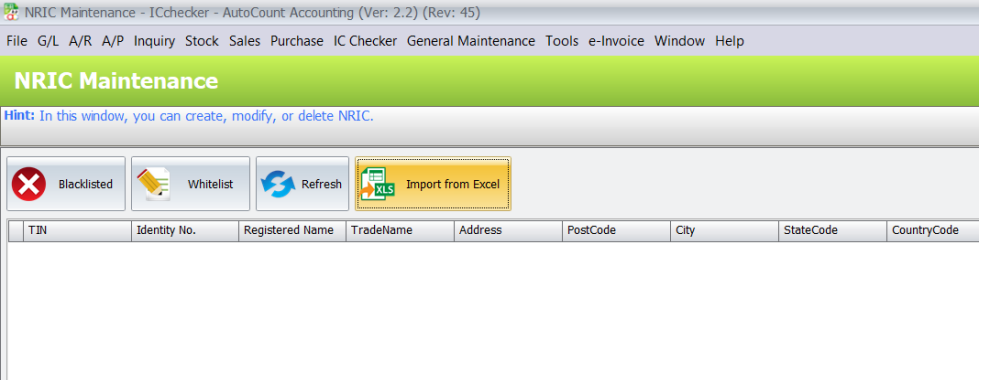
1. Open IC Checker > NRIC Maintenance.
2. Select the required NRIC record from the list.
3. Click Blacklisted to maintain the blacklist status for the selected NRIC.
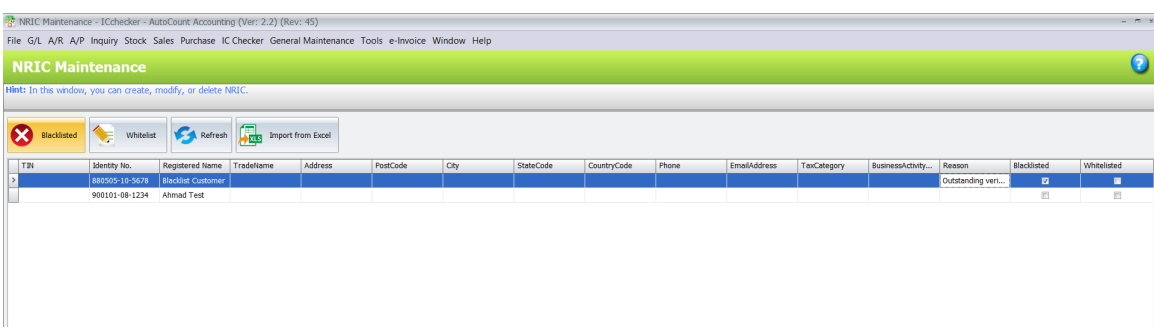
4. When setting an NRIC as blacklisted, enter a reason before saving. The plug-in requires a reason when
the blacklist option is enabled.
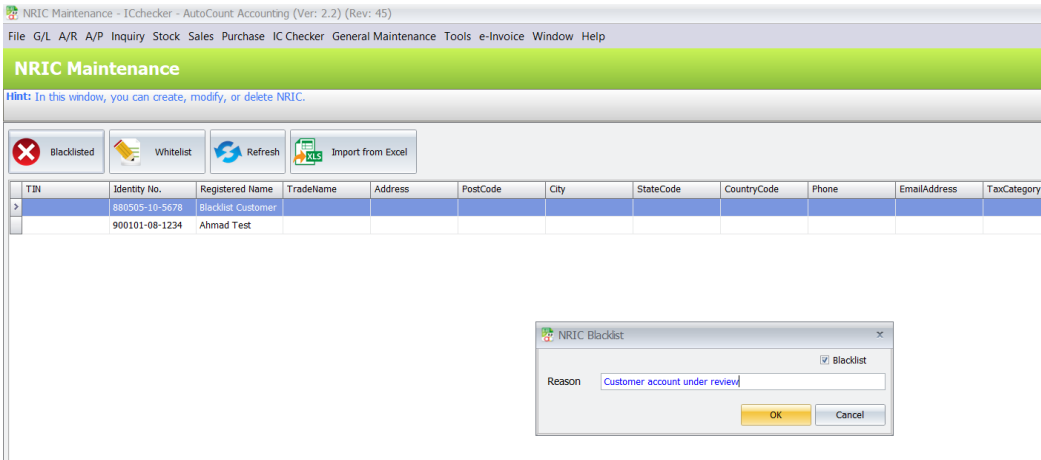
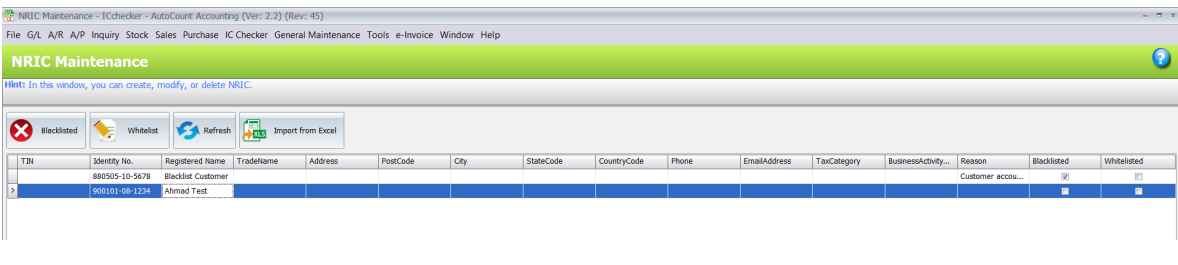
5. Click Whitelist when the selected NRIC needs to be maintained as a whitelisted record.
6. Click Refresh to reload the latest NRIC records after changes or an import.
C. Import NRIC Records from Excel
The Import NRIC screen accepts tab-delimited rows copied from an Excel worksheet and identifies rows
that are new, updates, or errors before saving.
1. Prepare an Excel worksheet with a header row containing NRIC and, where required, Name, Reason,
and Blacklist.
2. Copy the header and data rows from Excel.

3. Open NRIC Maintenance and choose Import NRIC.
4. Click Paste to load the copied rows into the preview grid.
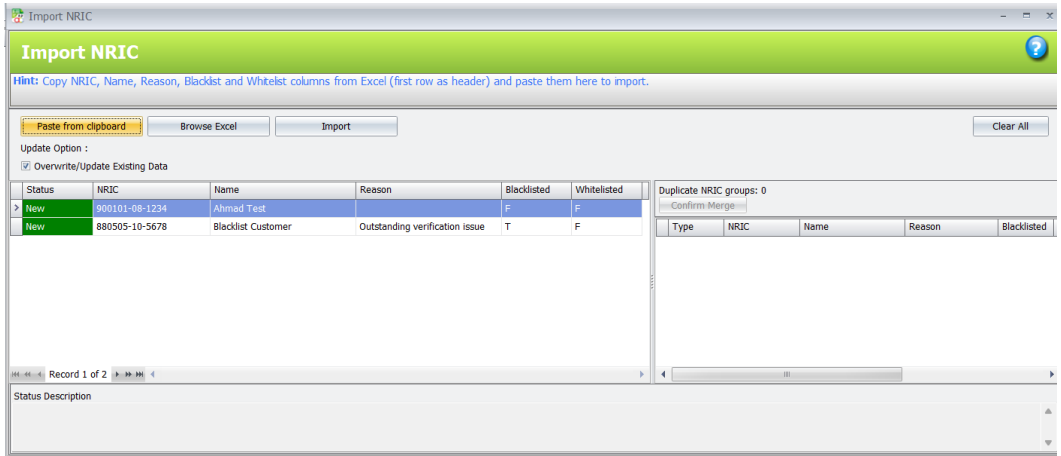
5. Review each Status and correct rows marked Error. The import checks missing or duplicate NRIC
values and field-length issues.
6. Select Overwrite existing records only when imported values should replace matching records already
in NRIC Maintenance.
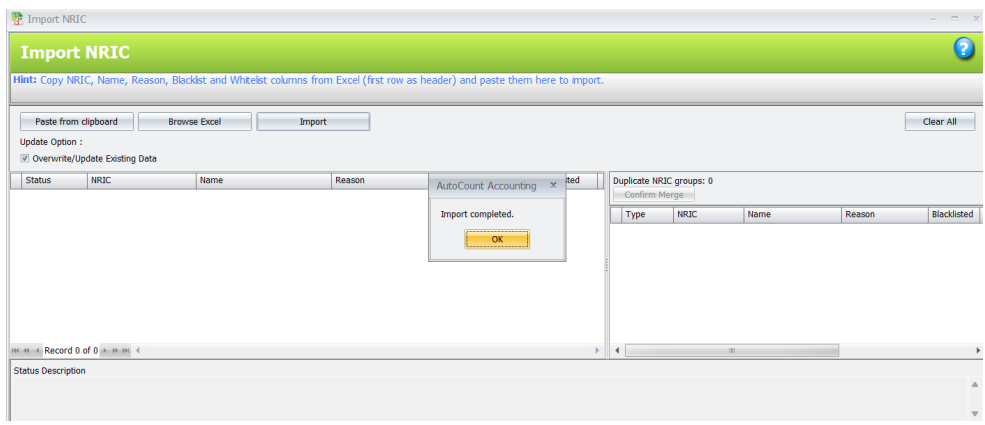
7. Click Import to save the valid rows.
D. Use NRIC Checking in Transactions
IC Checker checks the NRIC recorded on supported documents and stops a save when that NRIC is
marked as blacklisted. Supported documents are Invoice, Cash Sale, Sales Order, and Cash Purchase.
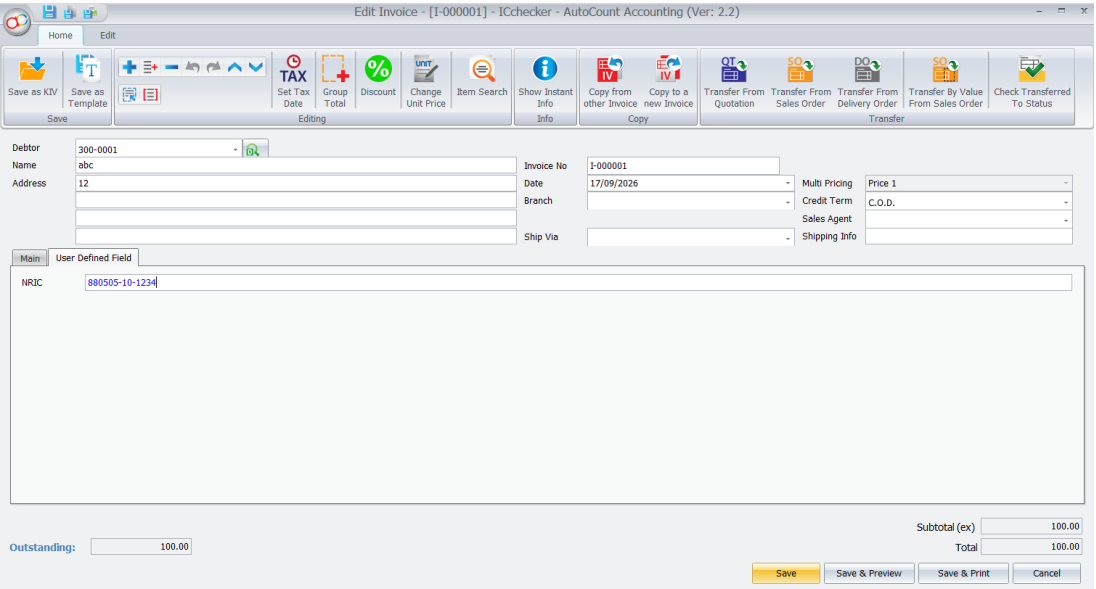
1. Open a supported transaction: Invoice, Cash Sale, Sales Order, or Cash Purchase.
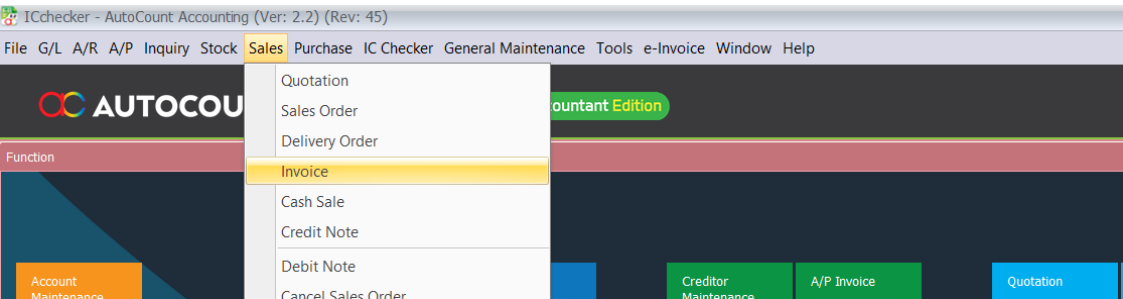
2. Enter the NRIC in the document NRIC field supplied by the plug-in.
3. Complete the transaction as usual and click Save.
4. If the NRIC is not blacklisted, the document follows the normal AutoCount save process.
Benefits of AutoCount IC Checker Plugin
Consistent Blacklist Enforcement
The check runs when the document is saved, so it does not depend on staff remembering who is blacklisted.
Reduced Risk
Stopping transactions with blacklisted individuals helps prevent repeat bad debts and disputes.
Quick Setup from Existing Lists
An existing blacklist kept in Excel can be copied and imported in one step.
Controlled Record Maintenance
Separate rights for viewing, creating, editing, deleting and importing NRIC records keep the list in trusted hands.
Conclusion
The AutoCount Pain Tracker Plugin is more than just a software add-on; it’s a strategic tool for any serious health and wellness business. It bridges the gap between administrative management and clinical care, enabling you to provide superior service based on solid health progress data. By centralizing wellness records, it not only improves daily operations but also becomes a cornerstone for business growth, client satisfaction, and professional reputation.
Frequently Asked Questions
What does the IC Checker Plugin do?
It screens and verifies identity numbers against maintained blacklist and whitelist registries during transactions to prevent unauthorized sales or purchases.
Why should I use the IC Checker Plugin?
It minimizes bad debt risk and ensures compliance by preventing transactions with blacklisted customers or suppliers across your business.
Which transaction documents support NRIC checking?
The plugin automatically validates NRIC entries on Invoices, Cash Sales, Sales Orders, and Cash Purchases prior to saving.
How do I maintain blacklist or whitelist status for an identity?
Open IC Checker > NRIC Maintenance, select the record, and click Blacklisted (a reason must be provided) or click Whitelist.
Can I import NRIC records in bulk?
Yes, open NRIC Maintenance, click Import from Excel, paste copied rows from your spreadsheet, verify status codes, and click Import.
How do administrators control user access to IC Checker?
Under General Maintenance > Access Right Maintenance, expand the IC Checker plugin group to assign viewing, creating, editing, deleting, and importing permissions.
Start Verifying Your Customer Identities Today!
This plugin enables us to validate customer and supplier identity numbers against verified registries, automate blacklist screening, and maintain compliance records with documented reasons. We can efficiently prevent unauthorized transactions, import registry datasets in bulk from Excel, and safeguard accounting workflows through strict role-based access control.