
-
AutoCount Accounting Features
-
- Approval Workflow
- Audit Trail
- Auto Save in Draft Folder
- AutoCount Contra Account
- AutoCount License Setting Guide
- Deposit Tracking & Management
- Documents Numbering Format
- Full Transfer and Partial Transfer
- Import Data to AutoCount Accounting Using Excel
- Informative Charts and Analytical Data
- Layout Customization
- Multi Pricing
- Sales and Services Tax
- Schedule Backup
- Search Lookup Edit
- View Documents Flow
- AutoCount Feature Stock Take
- Column Chooser
- Show Remaining (3) Collapse
-
AutoCount Cloud Accounting
-
AutoCount E-Invoice
-
AutoCount HRMS User Guide
-
AutoCount Modules
-
- Activity Stream
- Advanced Financial Report
- Advanced Item
- Advanced Multi-UOM
- Advanced Quotation Module
- Basic Multi-UOM
- Budget Module
- Consignment
- Filter By Salesman
- FOC Quantity
- Formula
- Item Batch
- Item Package
- Landing Cost
- Multi-Currency
- Multi-Dimensional Analysis
- Multi-Location
- Project Account
- Recurrence
- Remote Credit Control Module
- Stock Assembly
- User Defined Fields (UDF)
- AutoCount SST Hidden Functions
- AutoCount SST Submission - Service Tax
- AutoCount Scripting Module User Guide
- AutoCount Bonus Point Module User Guide
- AutoCount Service Management Plugin User Guide
- Show Remaining (12) Collapse
-
AutoCount Plugins
-
- Fixed Assets Management
- Goldsmith
- TD Ordering Mobile Apps
- TD Stock Mobile Apps
- Universal Import Plugin
- DMS Import Plugin
- AutoCount Pick List Plugin User Guide
- AutoCount Credit Memo Plugin User Guide
- AutoCount Lock Price Plugin
- AutoCount Progressive Billing
- AutoCount Easy Recurrence Plugin
- Batch Update Unit Price Plugin
- AutoCount Production order
- AutoCount Car Tint Film Plugin
-
- Event Management System
- AutoCount To-Do List Plugin
- AutoCount AutoBank Reconciliation Plugin
- Intercompany Billing Plugin User Guide
- Lead Management 2.0 Plugin
- AutoCount Service Contract Plugin User Guide
- AutoCount Optical Plugin
- AutoCount Integrator Plugin
- AutoCount Procurement Planning Plugin
- Cage Management Plugin
- AutoCount Vehicle Plugin
- AutoCount Agent Validation Plugin User Guide
- AutoCount Barcode Generator Plugin User Guide
- AutoCount Easy Batch Number Entry Plugin User Guide
- Warranty 2.0 Plugin
- AutoCount Easy Photo 2.0 User Guide
- AutoCount Recurring Invoice Plugin User Guide
- AutoCount Scale Barcode Plugin User Guide
- AutoCount Recurrence Late Interest Plugin
- AutoCount Item Visibility Control
- AutoCount Bill Remark Plugin User Guide
- AutoCount Pain Tracker User Guide
- AutoCount Easy Payment
- AutoCount Easy Deposit Plugin
- AutoCount Easy Knock Off Plugin
- AutoCount Daily Collection Summary Plugin
- Timber Log Plugins
- Batch Transfer SODO Plugin
- AutoCount Vege Basket Plugin Guide
- AutoCount Fruit Basket Plugin Guide
- Referral Management Plugin
- AutoCount Migrator Plugin
- AutoCount Email & WhatsApp Plugin
- AutoCount Multi Company Knock Off Plugin
- AutoCount Advance Aging Format Plugin
- AutoCount Payment Request Plugin
- AutoCount Vehicle Master Plugin
- AutoCount Advance Deposit Plugin
- AutoCount IC Checker Plugin
- AutoCount RMA Plugin
- AutoCount Historical Outstanding DO Listing Plugin
- AutoCount Project Department Visibility Control Plugin
- AutoCount MRP Order Plugin
- AutoCount GridToExcel Plugin
- AutoCount Stock Availability Report Plugin
- AutoCount Batch Transfer SO DO Plugin
- AutoCount Centralized Kitchen Management Plugin
- SL AutoCount API
- AutoCount InterCompany Billing Plugin
- AutoCount Sales Commission Plugin
- AutoCount Advanced Credit Term Plugin
- AutoCount Advanced Stock Assembly Plugin
- AutoCount Shipment Plugin
- AutoCount Tour Plugin
- AutoCount Smart Analysis
- AutoCount Rental Management
- Show Remaining (41) Collapse
-
-
Form Template
-
Report Template
-
- Advance Quotation
- Cash Sale
- Consignment
- Consignment Movement
- Credit Note
- Debit Note
- Delivery Order
- FOC Quantity Analysis By Document Report
- Invoice
- Item Package Sales Report
- Monthly Sales Analysis
- Outstanding Sales Order Listing
- Profit And Loss Of Documents
- Quotation
- Sales Agent Contribution Report
- Sales Order
- Top/Bottom Sales Ranking
- Show Remaining (2) Collapse
-
- Available Stock Status Report
- Expired Item Batch Listing
- Inventory Physical Worksheet
- Stock Adjustment
- Stock Aging Report
- Stock Assembly
- Stock Assembly Order
- Stock Balance By Location
- Stock Balance Report
- Stock Card Report
- Stock Disassembly
- Stock Issue
- Stock Item Profit Margin
- Stock Movement Report
- Stock Receive
- Stock Take
- Stock Transfer
- Stock Write Off
- Show Remaining (3) Collapse
-
B2B ORDERING
-
AutoCount AI Agent
AutoCount Advanced Credit Term Plugin User Guide
What is AutoCount Advanced Credit Term Plugin?
The AutoCount Advanced Credit Term Plugin is designed to help businesses manage customer credit terms, automate prompt payment discounts, and calculate late payment interest charges within AutoCount Accounting. For businesses offering credit facilities to customers, manually calculating early payment discounts and overdue interest can be time-consuming and may result in inconsistent charges or accounting errors. With features such as Prompt Payment Discounts, Late Payment Interest Calculation, Credit Term Management, Payment-Linked Calculations, and Automatic Adjustment Document Generation, the AutoCount Advanced Credit Term Plugin helps businesses streamline accounts receivable operations while maintaining better control over customer payment policies. By connecting credit term conditions with customer payment transactions, businesses can reduce manual calculations, encourage timely payments, and improve receivables management efficiency.
AutoCount Advanced Credit Term Plugin Video Guide
- AutoCount Advanced Credit Term Plugin (EN)
Advanced Credit Term Plugin Setup
- AutoCount Advanced Credit Term Plugin (CN)
高级账期插件设置
Why Use AutoCount Advanced Credit Term Plugin?
Managing customer credit terms manually can become challenging when businesses need to calculate early payment incentives, charge overdue interest, and process related accounting adjustments.
The AutoCount Advanced Credit Term Plugin helps businesses overcome these challenges through more organized and consistent credit term management.
Encourage Faster Customer Payments
Offer configurable prompt payment discounts to encourage customers to settle outstanding invoices earlier.
Manage Late Payment Charges
Calculate overdue interest according to predefined credit term rules to support more consistent late payment handling.
Reduce Manual Calculations
Minimize repetitive calculations by linking applicable discounts and interest charges to customer payment transactions.
Maintain Consistent Credit Policies
Apply standardized discount and interest rules across customer transactions according to configured credit terms.
Key Features of AutoCount Advanced Credit Term Plugin
Prompt Payment Discounts
Configure multiple discount tiers based on payment timing to reward customers who settle invoices within the specified period.
Late Payment Interest Calculation
Calculate overdue interest charges according to configurable late payment day thresholds and interest rates.
Adjustment Document Generation
Generate relevant A/R Debit Notes, Sales Invoices, or Credit Notes for applicable interest charges and payment discounts.
Payment-Linked Credit Term Processing
Evaluate credit term rules during A/R Payment processing and maintain references to related accounting adjustment documents.
Who Should Use AutoCount Advanced Credit Term Plugin?
Businesses Offering Credit Terms
Ideal for companies allowing customers to purchase goods or services on credit and requiring consistent payment policies.
Accounts Receivable Teams
Helps accounting personnel manage prompt payment discounts, overdue interest charges, and related payment adjustments more efficiently.
Credit Control & Finance Teams
Suitable for teams responsible for monitoring customer payment behaviour and maintaining company credit policies.
High-Volume B2B Businesses
Useful for businesses managing numerous credit customers and requiring more efficient discount and interest calculations.
How AutoCount Advanced Credit Term Plugin Works
A. Access Rights
Advanced Credit Term uses credit-term maintenance access together with plug-in rights for settings, the repair option, and license information.
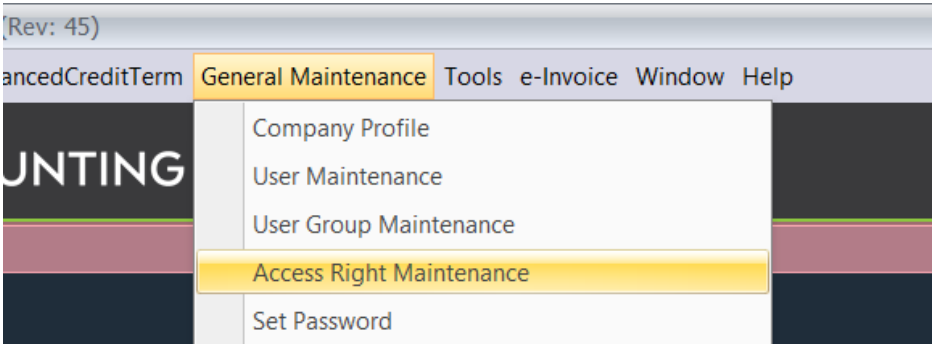
1. Open Access Rights and assign Credit Term Show and Credit Term Open to users who maintain credit-term rules.
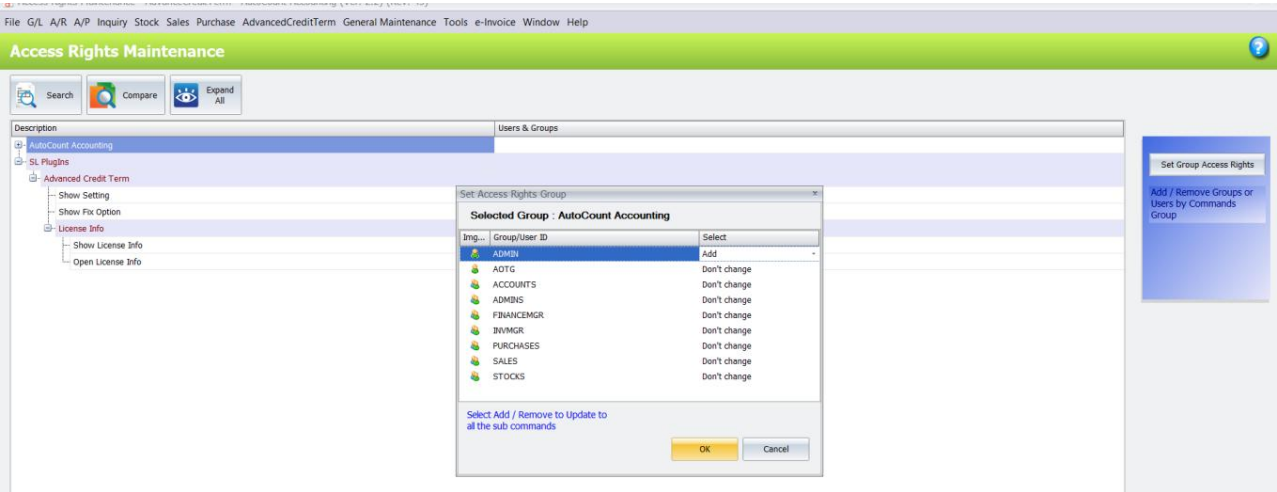
2. Expand SL PlugIns > Advanced Credit Term.
3. Assign Show Setting only to users authorised to change interest and discount document posting settings.
4. Assign Show Fix Option only to technical users who understand the repair action and have confirmed a database backup.
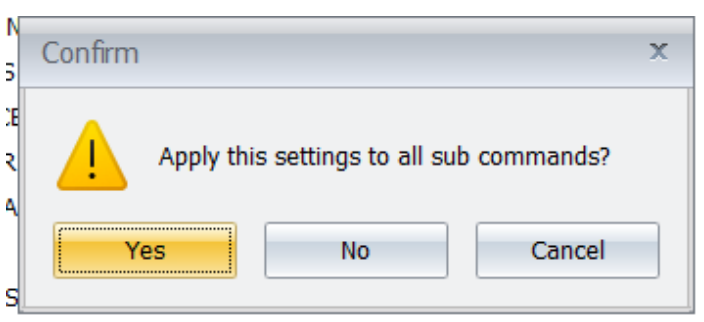
5. Assign Show License Info and Open License Info only as required, then save the access-right changes.
B. Open a Credit Term
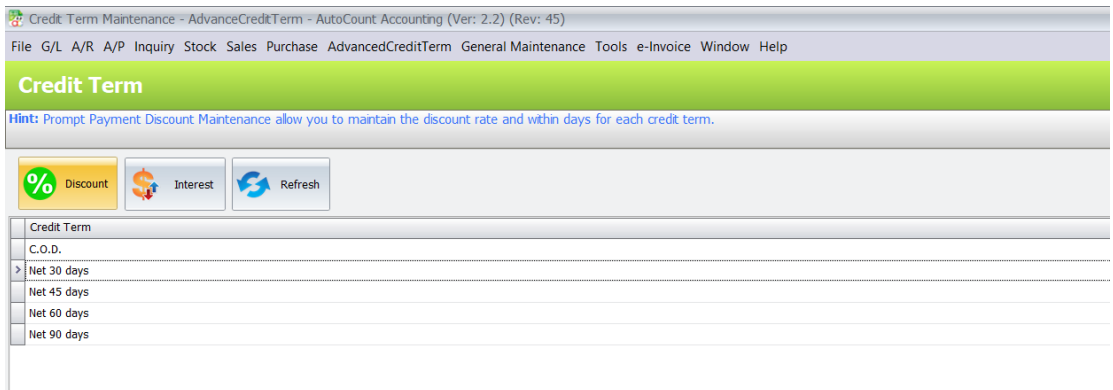
The Credit Term screen lists existing AutoCount credit terms and is the starting point for maintaining early-payment discount and late-interest tiers.
1. Open Advanced Credit Term > Credit Term.
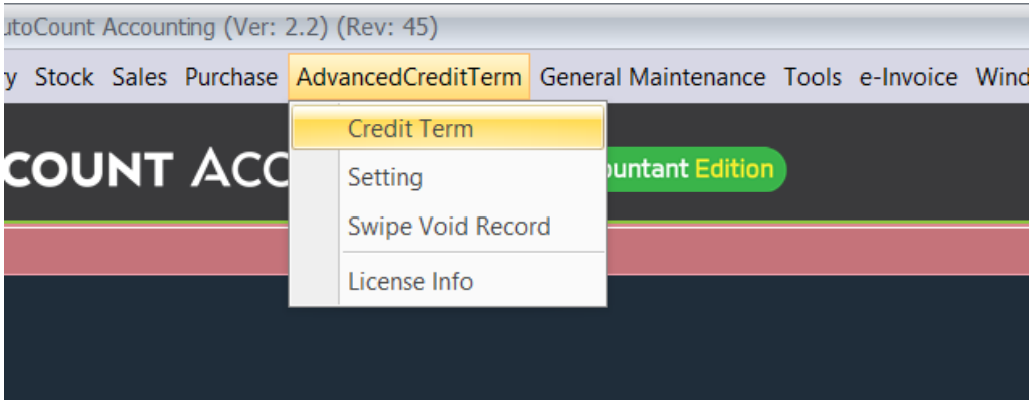
2. Select the required Credit Term row.
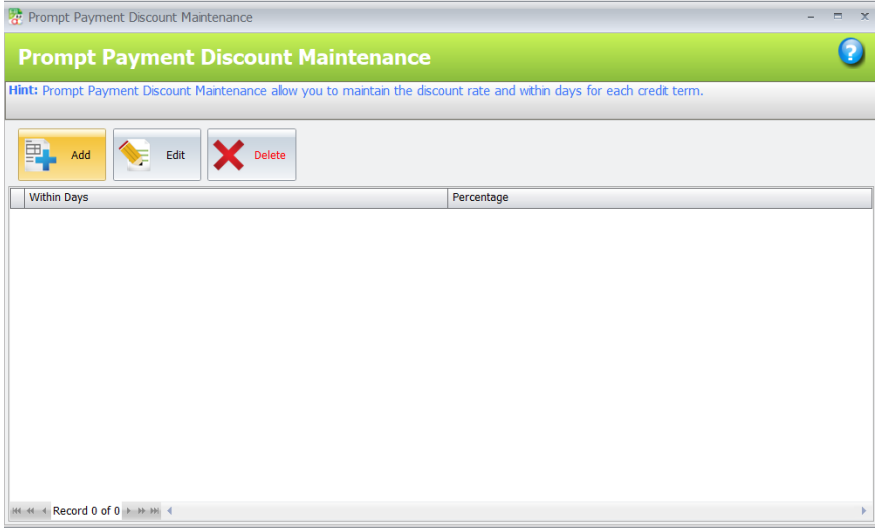
3. Click Discount to maintain prompt-payment discount rules for the selected term.
4. Click Interest to maintain late-interest charge rules for the selected term.
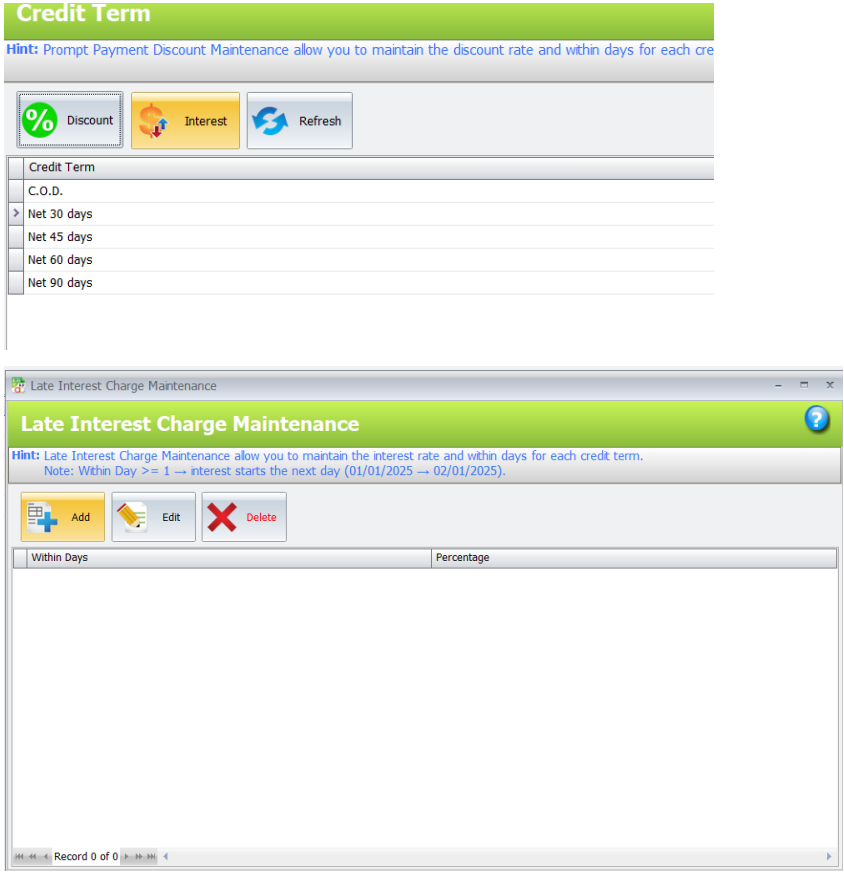
5. Click Refresh after changes to reload the credit-term list.
D. Maintain Late Interest Charge Tiers
Late Interest Charge rules define the interest percentage that applies once the payment reaches the stated late-payment day threshold for the selected credit term.
1. Select the credit term in Credit Term Maintenance and click Interest.
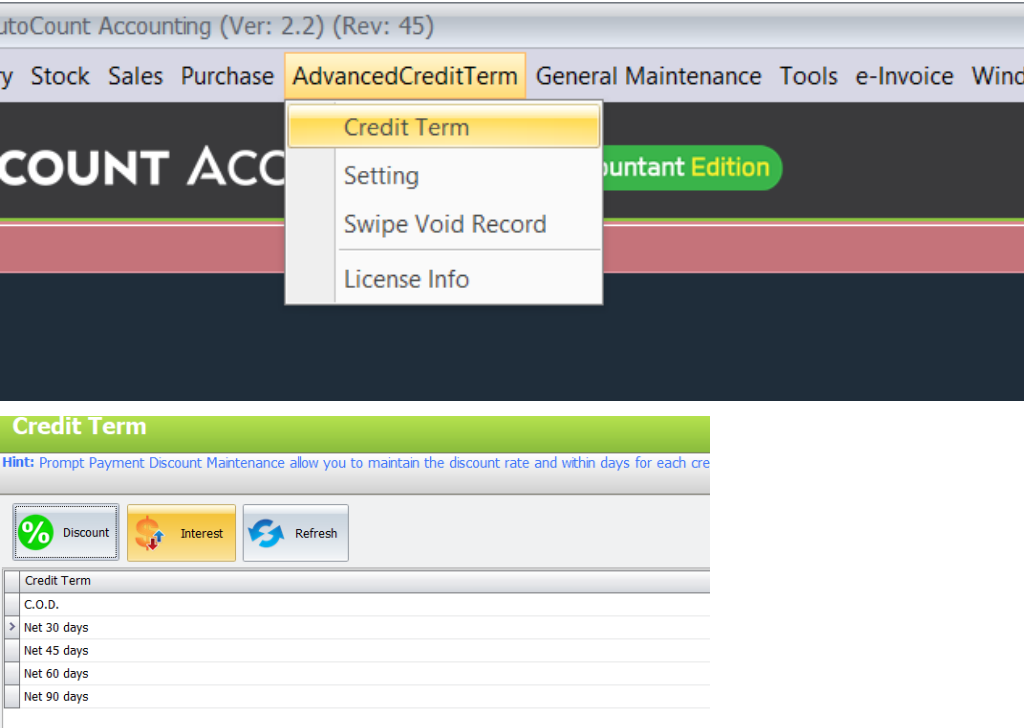
2. Click Add to create a new interest tier, or select a tier and click Edit.
3. Enter No of Days greater than or equal to the late-payment threshold and the Interest Rate.
4. Click OK to save the tier. Repeat for additional late-payment thresholds where needed.
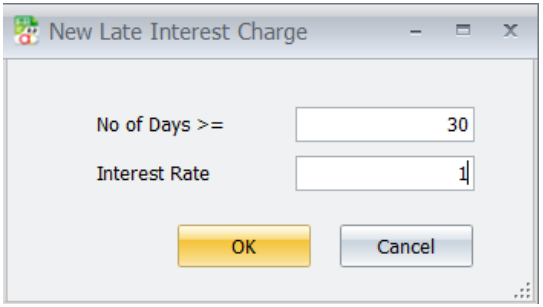
5. Use Delete only after confirming that the tier should no longer apply.
E. Configure Interest and Discount Posting
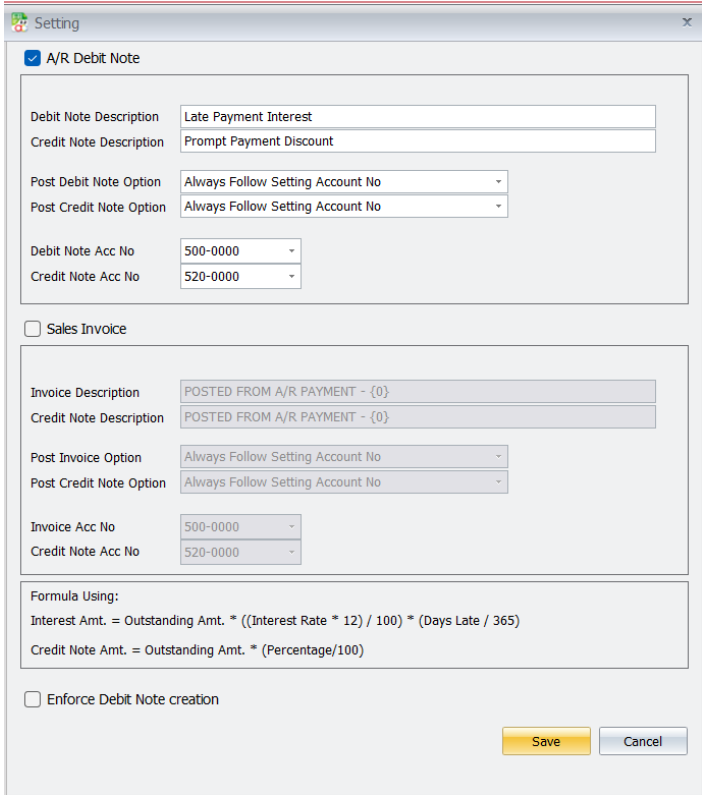
Settings determines whether interest is generated through an A/R Debit Note or Sales Invoice, and which descriptions, accounts, and posting options are used for the linked documents.
1. Open Advanced Credit Term > Setting.
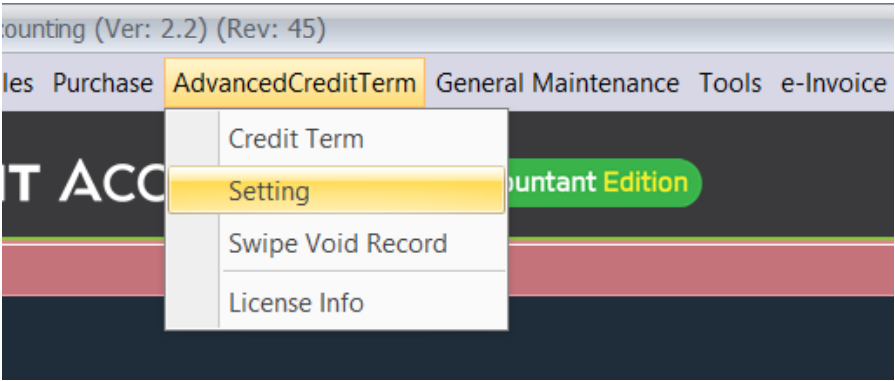
2. Select either A/R Debit Note or Sales Invoice as the interest-document method. Only one method can be selected at a time.
3. For the selected method, enter the interest document description and account number, then choose the Post Debit Note or Post Invoice Option.
4. Enter the Credit Note Description and Credit Note Account No used for prompt-payment discount credit notes, then choose the Post Credit Note Option.
5. Review the displayed interest and credit-note formulas. The interest formula changes according to the selected posting option.
6. Select Enforce Debit Note creation only if the company policy requires it. Click Save.
F. Save an A R Payment and Review Linked Documents
When an A/R Payment is saved, the plug-in evaluates the applicable credit term rules. It can create or update linked interest and discount documents and stores their reference details on the A/R Payment.
- Create or edit the A/R Payment using the normal AutoCount A/R workflow.
- Apply the payment to the relevant outstanding documents and confirm the payment date.
- Save the A/R Payment. If a document is required, complete the displayed Invoice for Interest, Debit Note for Interest, or Credit Note for Interest dialog with the document number, date, and reason.
- Review the generated linked document before finalising it. The default reason is Terms when no other reason has been entered.
- Reopen the A/R Payment and review the linked document number, date, and reason stored in its userdefined fields.
G. Correct Exceptional Records
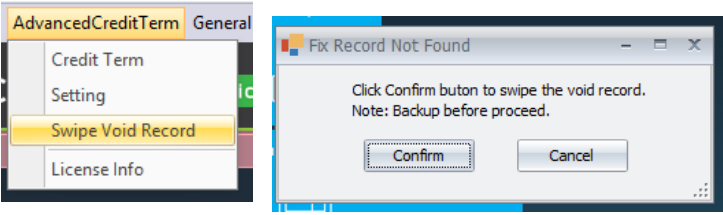
Swipe Void Record is a technical repair option intended only for exceptional record-not-found cases. It is not part of ordinary credit-term processing.
- Confirm that the issue requires the repair option and take a database backup before continuing.
- Open Advanced Credit Term > Swipe Void Record.
- Review the warning and click Confirm only after verifying the intended correction.
- Click Cancel to leave the record unchanged when there is any doubt.
- Reopen the affected A/R Payment and linked document to confirm the result.
Benefits of AutoCount Advanced Credit Term Plugin
Encourage Earlier Customer Settlements
Offer prompt payment discounts that encourage customers to settle outstanding invoices within the preferred payment period.
More Consistent Overdue Charges
Apply configured late interest rules more consistently when processing qualifying overdue customer payments.
Reduced Administrative Work
Reduce repetitive discount and interest calculations through payment-linked processing and related adjustment document generation.
Better Receivables Management
Maintain clearer credit term policies, payment adjustments, and linked document information to support accounts receivable control.
Conclusion
The AutoCount Advanced Credit Term Plugin provides businesses with a practical solution for managing customer payment conditions, prompt payment discounts, and late payment interest charges within AutoCount Accounting.
By combining flexible credit term rules, tiered discount and interest calculations, payment-linked processing, and adjustment document generation, businesses can reduce manual work and improve consistency in accounts receivable operations.
For businesses offering credit facilities to customers, the AutoCount Advanced Credit Term Plugin helps establish a more organized and efficient approach to customer credit management.
Frequently Asked Questions
What is the AutoCount Advanced Credit Term Plugin?
The AutoCount Advanced Credit Term Plugin is an add-on for AutoCount Accounting that helps businesses manage prompt payment discounts, calculate late payment interest, and generate related adjustment documents according to configured credit term rules.
How does the AutoCount Advanced Credit Term Plugin benefit businesses?
The plugin helps reduce manual discount and interest calculations, encourages timely customer payments, and supports more consistent credit term management.
Does the plugin support prompt payment discounts?
Yes. Businesses can configure prompt payment discount tiers according to payment-day thresholds and discount percentages.
Can businesses configure different late payment interest rates?
Yes. The plugin supports different overdue day thresholds and applicable interest rates for the selected credit terms.
Can the plugin generate Credit Notes for early payment discounts?
Yes. The plugin supports generating related Credit Notes for qualifying prompt payment discounts according to the configured rules.
Are credit term calculations linked to A/R Payments?
Yes. The plugin evaluates applicable discount and interest conditions when processing A/R Payments and can initiate relevant adjustment document creation.
Simplify Your Customer Credit Term Management Today!
Managing payment discounts, overdue interest charges, and customer credit policies should not require unnecessary manual calculations.
With the AutoCount Advanced Credit Term Plugin, your business can streamline discount calculations, manage overdue interest charges, and maintain more consistent accounting adjustments.
Looking for a more efficient way to manage customer credit terms?
Contact SL Software Solutions Sdn. Bhd. to learn how the AutoCount Advanced Credit Term Plugin can support your business operations.