
-
AutoCount Accounting Features
-
- Approval Workflow
- Audit Trail
- Auto Save in Draft Folder
- AutoCount Contra Account
- AutoCount License Setting Guide
- Deposit Tracking & Management
- Documents Numbering Format
- Full Transfer and Partial Transfer
- Import Data to AutoCount Accounting Using Excel
- Informative Charts and Analytical Data
- Layout Customization
- Multi Pricing
- Sales and Services Tax
- Schedule Backup
- Search Lookup Edit
- View Documents Flow
- AutoCount Feature Stock Take
- Column Chooser
- Show Remaining (3) Collapse
-
AutoCount Cloud Accounting
-
AutoCount E-Invoice
-
AutoCount HRMS User Guide
-
AutoCount Modules
-
- Activity Stream
- Advanced Financial Report
- Advanced Item
- Advanced Multi-UOM
- Advanced Quotation Module
- Basic Multi-UOM
- Budget Module
- Consignment
- Filter By Salesman
- FOC Quantity
- Formula
- Item Batch
- Item Package
- Landing Cost
- Multi-Currency
- Multi-Dimensional Analysis
- Multi-Location
- Project Account
- Recurrence
- Remote Credit Control Module
- Stock Assembly
- User Defined Fields (UDF)
- AutoCount SST Hidden Functions
- AutoCount SST Submission - Service Tax
- AutoCount Scripting Module User Guide
- AutoCount Bonus Point Module User Guide
- AutoCount Service Management Plugin User Guide
- Show Remaining (12) Collapse
-
AutoCount Plugins
-
- Fixed Assets Management
- Goldsmith
- TD Ordering Mobile Apps
- TD Stock Mobile Apps
- Universal Import Plugin
- DMS Import Plugin
- AutoCount Pick List Plugin User Guide
- AutoCount Credit Memo Plugin User Guide
- AutoCount Lock Price Plugin
- AutoCount Progressive Billing
- AutoCount Easy Recurrence Plugin
- Batch Update Unit Price Plugin
- AutoCount Production order
- AutoCount Car Tint Film Plugin
-
- Event Management System
- AutoCount To-Do List Plugin
- AutoCount AutoBank Reconciliation Plugin
- Intercompany Billing Plugin User Guide
- Lead Management 2.0 Plugin
- AutoCount Service Contract Plugin User Guide
- AutoCount Optical Plugin
- AutoCount Integrator Plugin
- AutoCount Procurement Planning Plugin
- Cage Management Plugin
- AutoCount Vehicle Plugin
- AutoCount Agent Validation Plugin User Guide
- AutoCount Barcode Generator Plugin User Guide
- AutoCount Easy Batch Number Entry Plugin User Guide
- Warranty 2.0 Plugin
- AutoCount Easy Photo 2.0 User Guide
- AutoCount Recurring Invoice Plugin User Guide
- AutoCount Scale Barcode Plugin User Guide
- AutoCount Recurrence Late Interest Plugin
- AutoCount Item Visibility Control
- AutoCount Bill Remark Plugin User Guide
- AutoCount Pain Tracker User Guide
- AutoCount Easy Payment
- AutoCount Easy Deposit Plugin
- AutoCount Easy Knock Off Plugin
- AutoCount Daily Collection Summary Plugin
- Timber Log Plugins
- Batch Transfer SODO Plugin
- AutoCount Vege Basket Plugin Guide
- AutoCount Fruit Basket Plugin Guide
- Referral Management Plugin
- AutoCount Migrator Plugin
- AutoCount Email&WhatsApp Plugin
- AutoCount Multi Company Knock Off Plugin
- AutoCount Advance Aging Format Plugin
- AutoCount Payment Request Plugin
- AutoCount Vehicle Master Plugin
- AutoCount Advance Deposit Plugin
- AutoCount IC Checker Plugin
- AutoCount RMA Plugin
- AutoCount Historical Outstanding DO Listing Plugin
- AutoCount Project Department Visibility Control Plugin
- AutoCount MRP Order Plugin
- AutoCount GridToExcel Plugin
- AutoCount Stock Availability Report Plugin
- AutoCount Batch Transfer SO DO Plugin
- AutoCount Centralized Kitchen Management Plugin
- SL AutoCount API
- AutoCount InterCompany Billing Plugin
- AutoCount Sales Commission Plugin
- AutoCount Advanced Credit Term Plugin
- AutoCount Advanced Stock Assembly Plugin
- AutoCount Shipment Plugin
- AutoCount Tour Plugin
- AutoCount Smart Analysis
- AutoCount Rental Management
- Show Remaining (41) Collapse
-
-
Form Template
-
Report Template
-
- Advance Quotation
- Cash Sale
- Consignment
- Consignment Movement
- Credit Note
- Debit Note
- Delivery Order
- FOC Quantity Analysis By Document Report
- Invoice
- Item Package Sales Report
- Monthly Sales Analysis
- Outstanding Sales Order Listing
- Profit And Loss Of Documents
- Quotation
- Sales Agent Contribution Report
- Sales Order
- Top/Bottom Sales Ranking
- Show Remaining (2) Collapse
-
- Available Stock Status Report
- Expired Item Batch Listing
- Inventory Physical Worksheet
- Stock Adjustment
- Stock Aging Report
- Stock Assembly
- Stock Assembly Order
- Stock Balance By Location
- Stock Balance Report
- Stock Card Report
- Stock Disassembly
- Stock Issue
- Stock Item Profit Margin
- Stock Movement Report
- Stock Receive
- Stock Take
- Stock Transfer
- Stock Write Off
- Show Remaining (3) Collapse
-
B2B ORDERING
-
AutoCount AI Agent
Why Use AutoCount RMA Plugin?
Without a controlled process, returns are handled through emails and paper forms, so goods come back unapproved and credit notes are missed or duplicated. The RMA Plugin helps businesses:
Approve returns before goods come back
Keep stock accurate when goods are received
Issue credit notes from the received return
Track returns that are still outstanding
This is particularly important for businesses that rely on repeat treatment sessions and progress tracking.
Key Features of AutoCount RMA Plugin
RMA Request and Approval
Record a customer’s return request against invoice lines and move it through Draft, Awaiting Approval and Approved.
RMA Return and Goods Receiving
Record the delivery method, pickup or courier details and received quantities, linked to a Stock Receive document.
Credit Note Creation
Create a Sales Credit Note or A/R Credit Note from one or more received RMA documents.
Listings and Reports
Print RMA requests and listings, and track outstanding return quantities.
Who Should Use AutoCount RMA Plugin?
Trading and Distribution Businesses
Helps businesses with regular customer returns give sales, warehouse and accounts teams one record to work from.
Electronics, Hardware and Spare Parts Suppliers
Allows suppliers handling faulty or wrong items to record the reason, the goods received and the credit given for each return.
Businesses that Need Return Approval
Helps massage centres record customer pain areas and previous session remarks for better follow-up service.
Warehouse and Accounts Teams
Helps the teams that receive returned goods and issue credit notes see which returns are waiting at each stage.
How AutoCount RMA Plugin Works
A. Access Rights
Administrators control which RMA functions each user or user group can use.
1.Open General Maintenance > Access Right Maintenance.
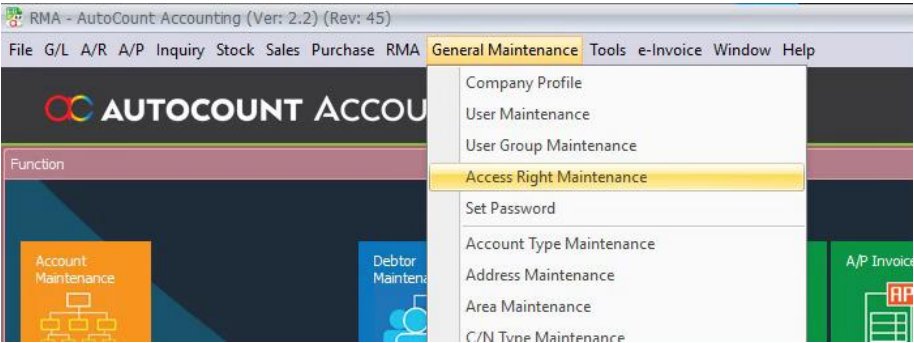
2.Select the user or user group, then expand SL Plug-In > RMA Plug-In.
3. Assign the required rights for RMA Request, RMA Request Listing, RMA Return and Delivery MethodMaintenance. Other available controls include Edit Qty/Price/Tax and Show License Status.
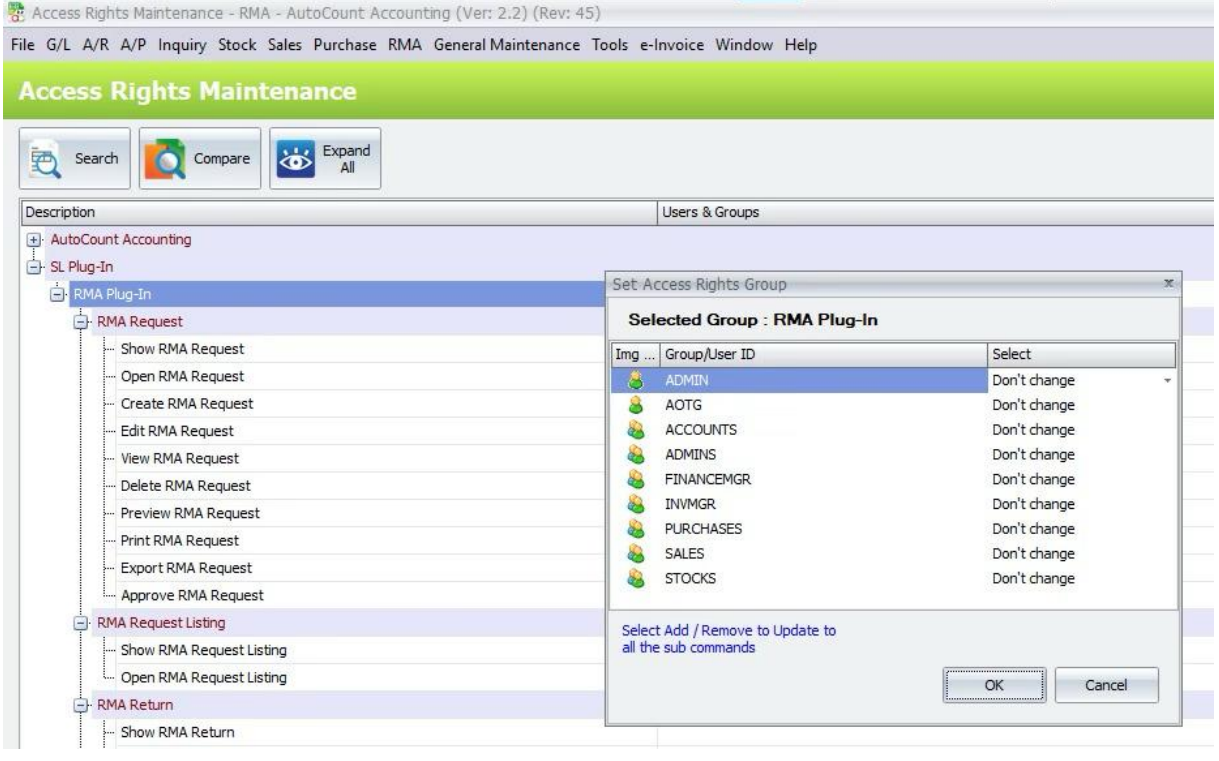
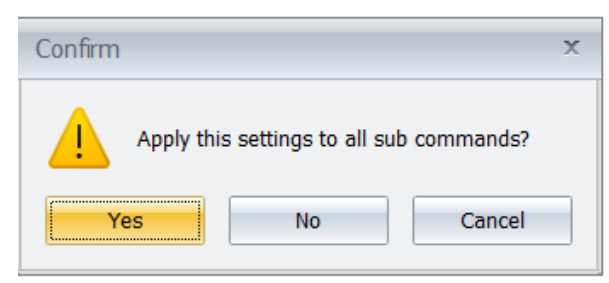
4. Save the access-right changes.
B. Delivery Method Maintenance
Delivery Method Maintenance keeps the delivery choices used during RMA return processing.
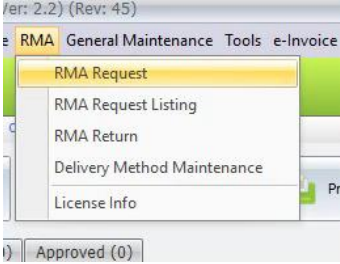
1. Open RMA > Delivery Method Maintenance.
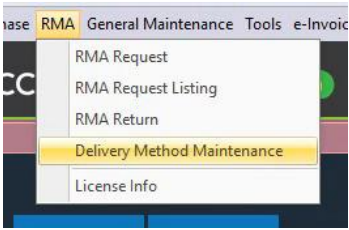
2. Click New.
3. Enter Method, Description and Description 2. Tick Is Active when the method can be used.
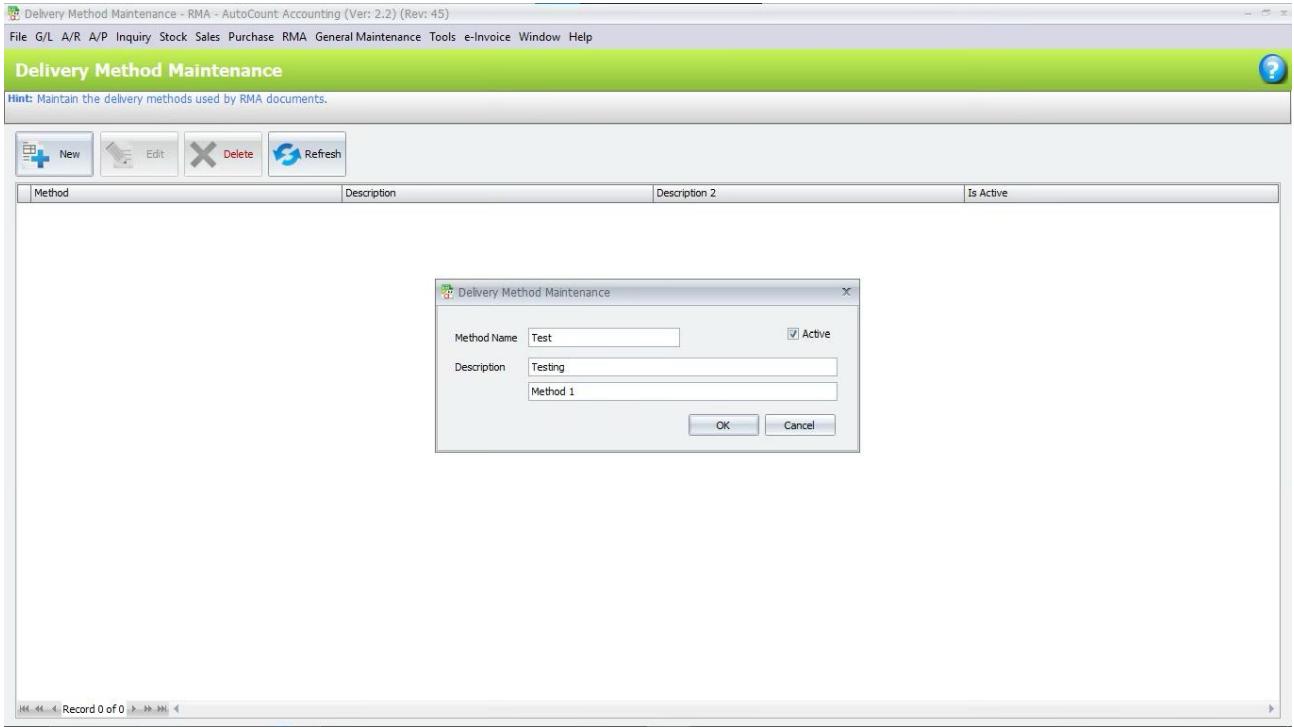
4. Click OK to save the delivery method.
5. Use Edit, Delete or Refresh when required.
C. RMA Request
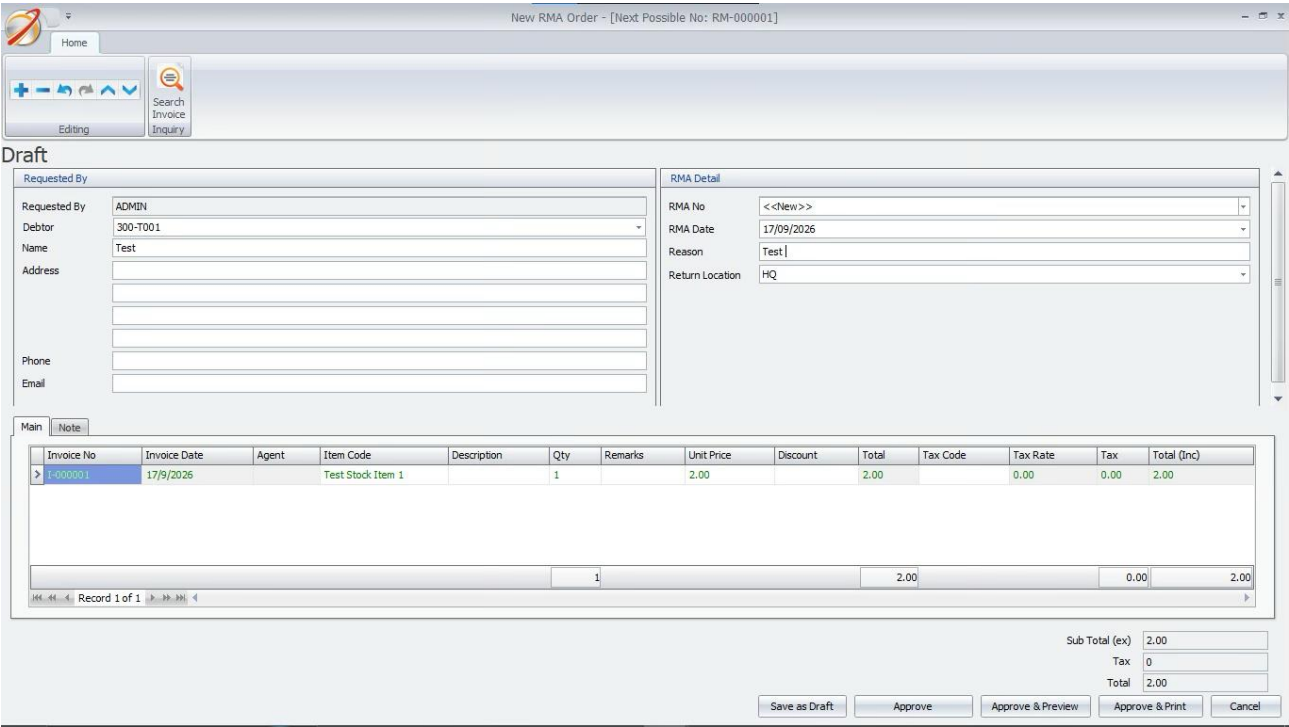
RMA Request records a customer return request before the returned goods are received. 1. Open RMA > RMA Request and click New.
2. Select the Debtor Code. Use Inquiry to select related invoice lines when required.
3. Set the Return Location, Reason and Note.
4. Review the item lines and enter the Return Qty. Qty, price and tax editing follows the user accessright.
5. Click Save Draft. The request appears under Draft / Rejected.
D. RMA Request Approval
RMA Request uses Draft / Rejected, Awaiting Approval and Approved stages to control the approval flow.
1.Open RMA > RMA Request and select the Draft / Rejected tab.
2.Tick the required request. A user without Approve RMA Request access clicks Submit for Approval. Therequest moves to Awaiting Approval.
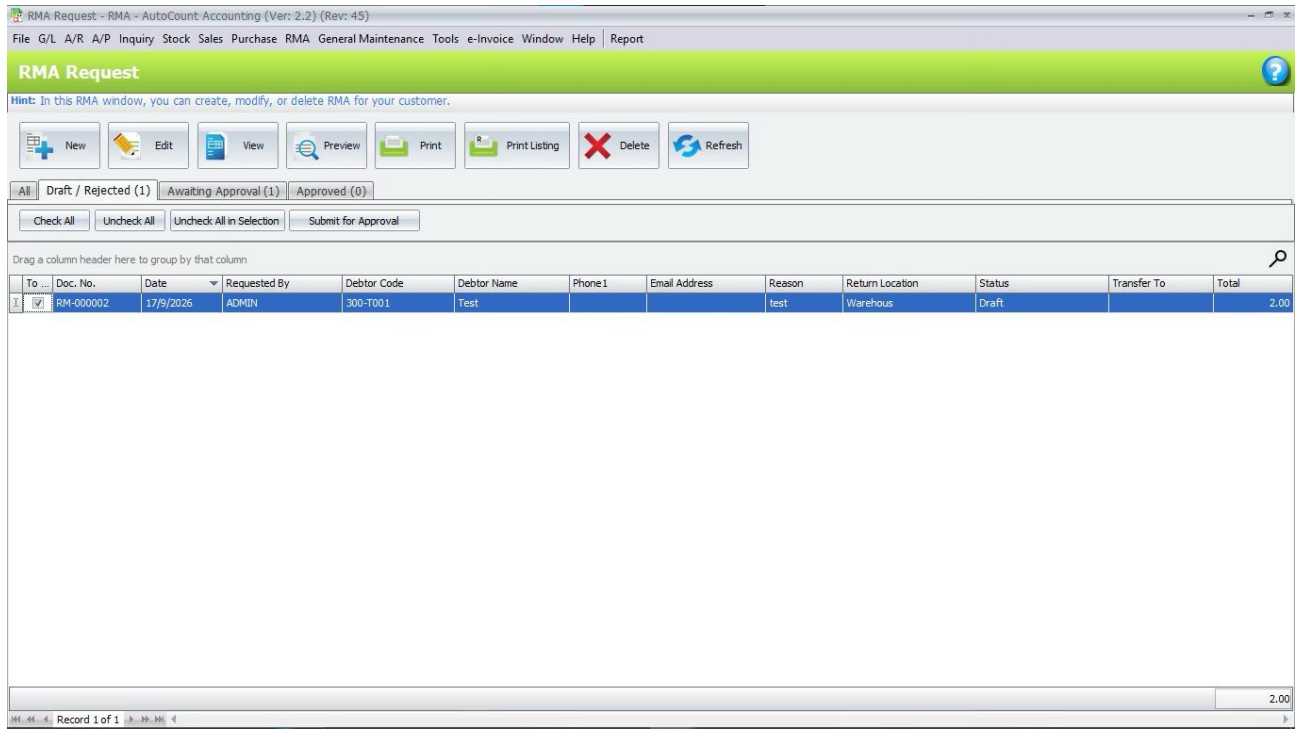
3.An approver opens the Awaiting Approval tab, ticks the required request and clicks Approve.
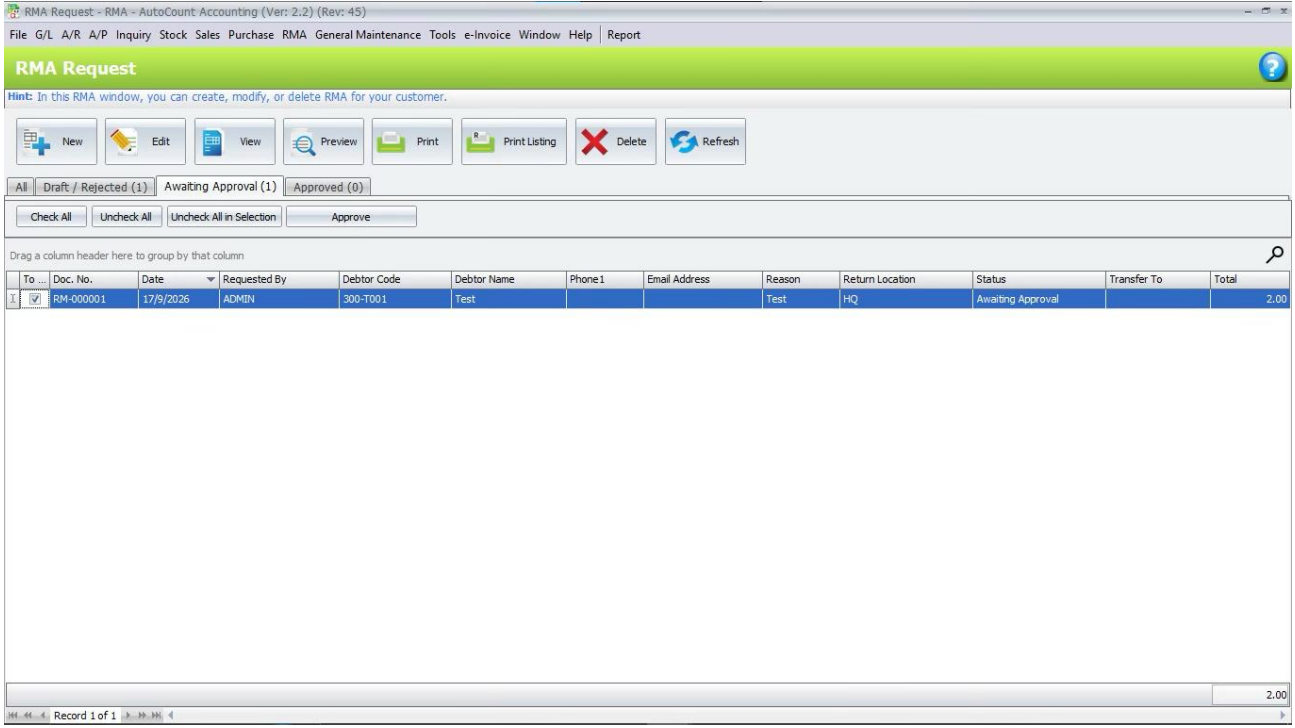
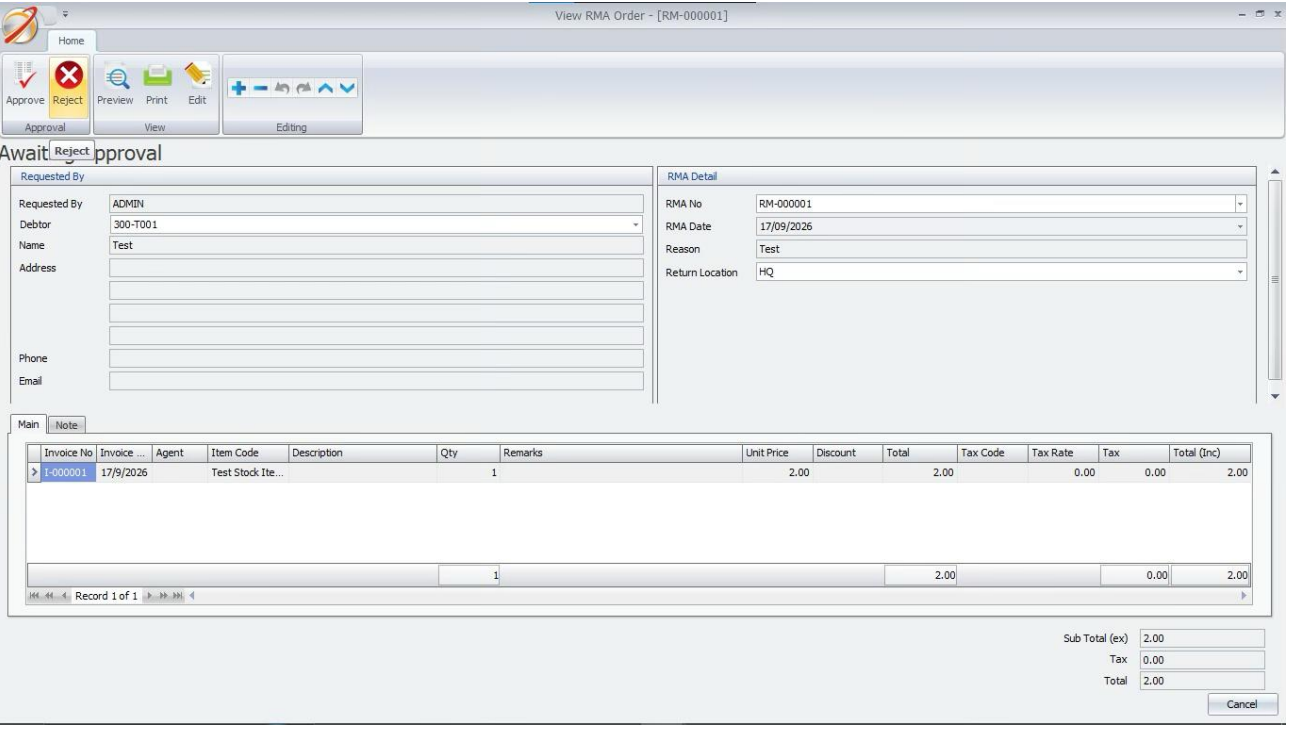
4.To reject a request, open the request and click Reject.
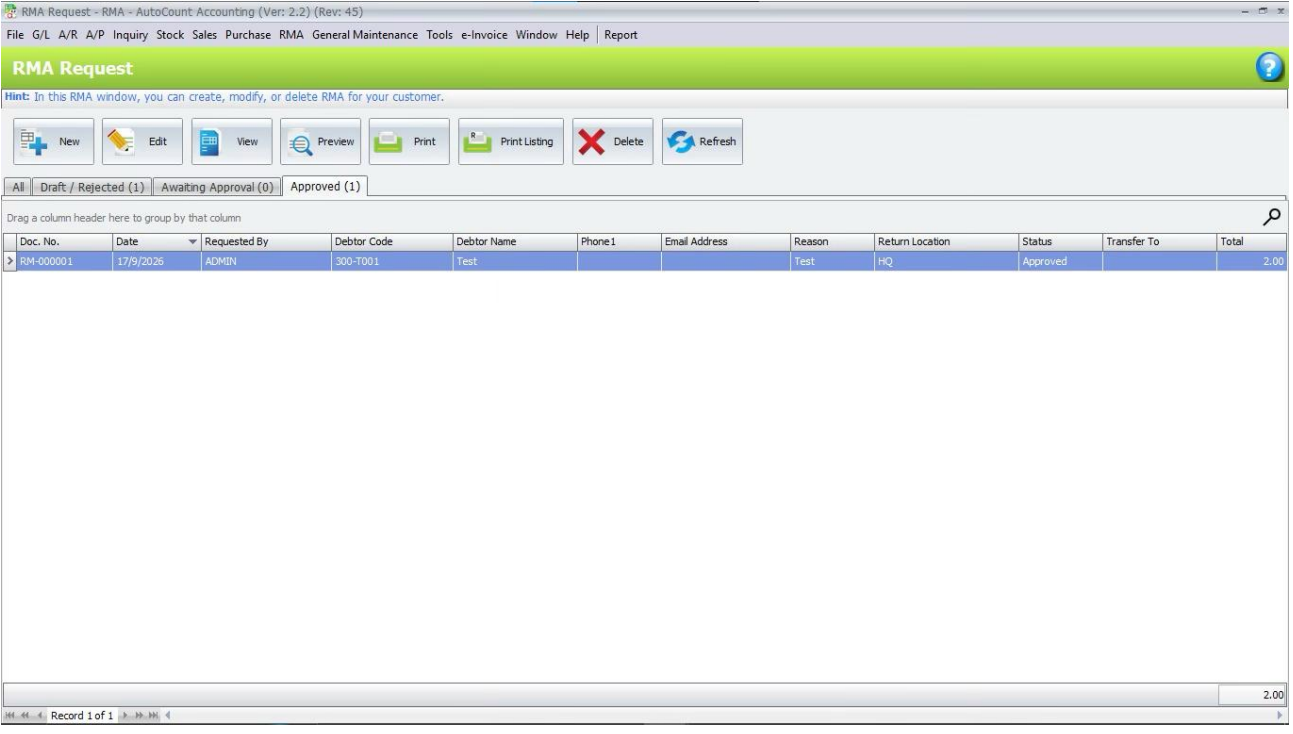
5.An approved request is ready for processing in RMA
Return.
E. RMA Request Listing
RMA Request Listing searches, previews and prints RMA request documents and listings.
1. Open RMA > RMA Request Listing.
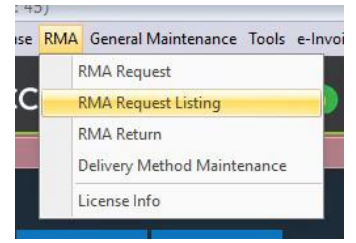
2. Set Document Date, Debtor, RMA Request, Request Status, Group By, Sort By and Report Typeasrequired.
3. Click Inquiry to load the results.
4. Tick the records to include.
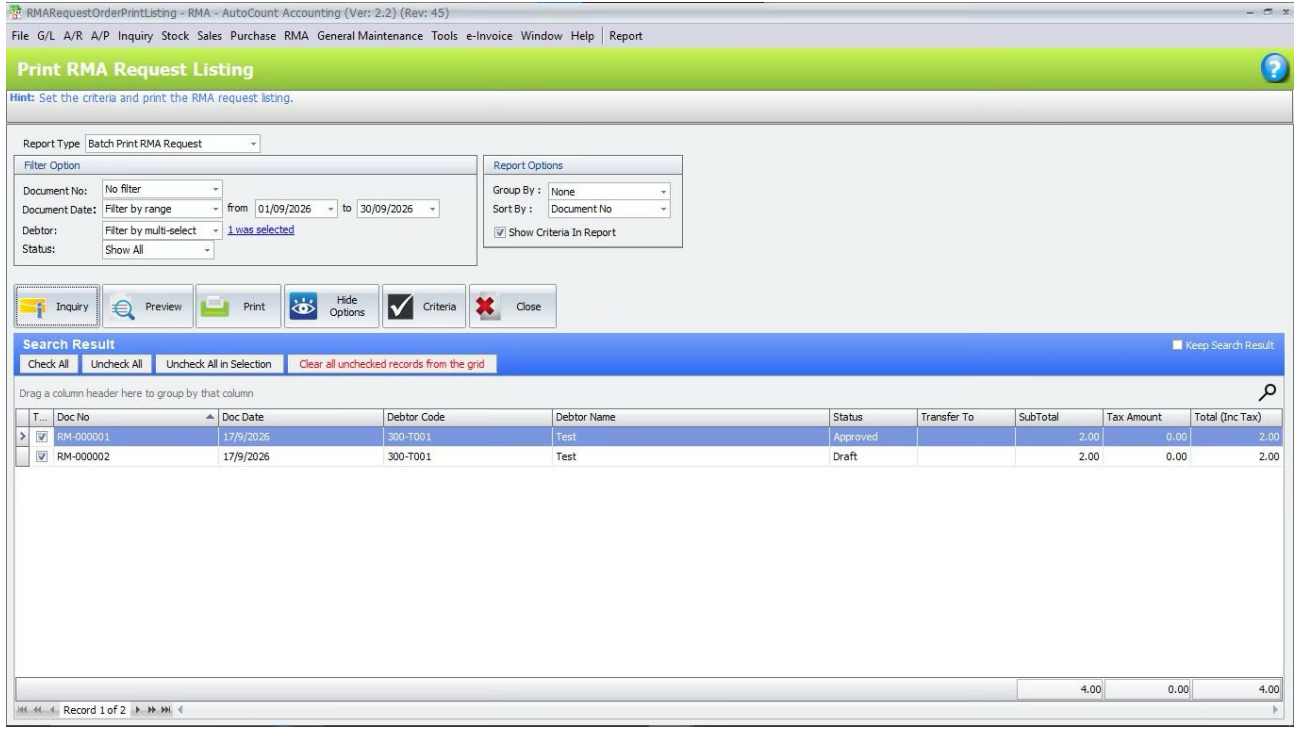
5. Choose Batch Print RMA Request or Print RMA Request Listing, then click Preview or
Print.
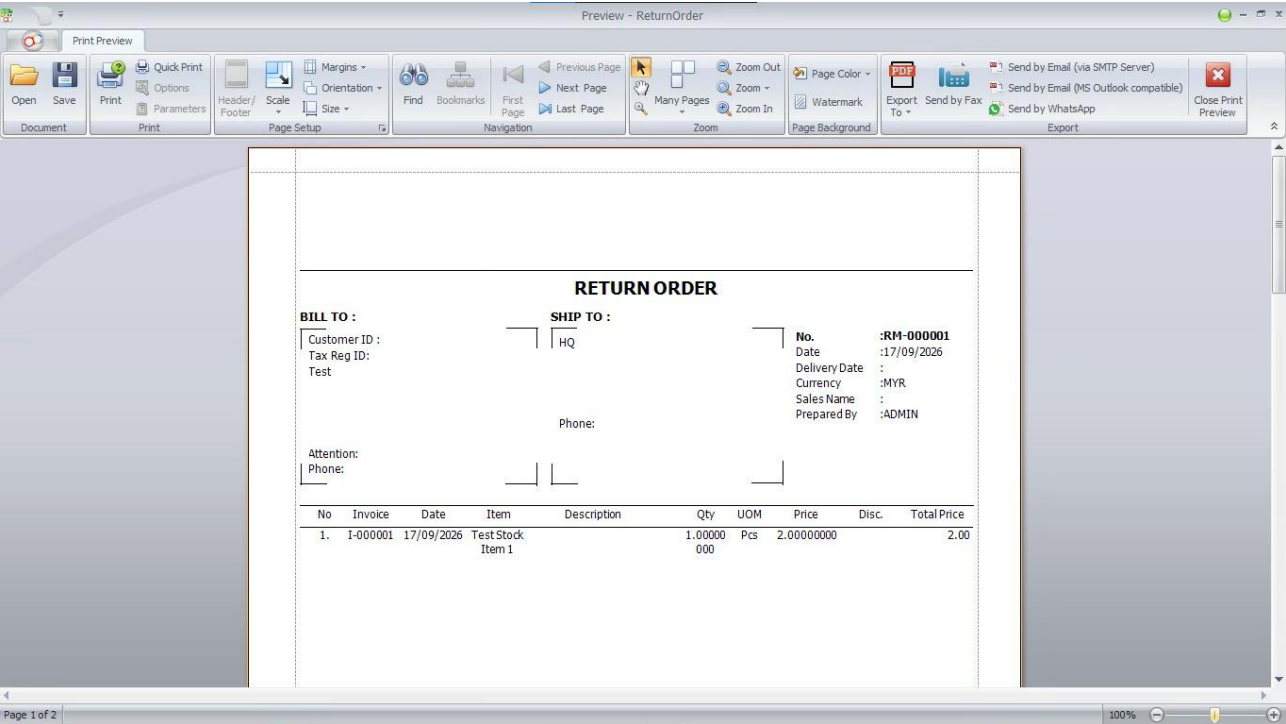
6. From the RMA Request screen, Print Listing also provides the RMA Request Detail Listing.
F. RMA Return
RMA Return handles the operational return process after a request is approved.
1. Open RMA > RMA Return.
2. Open the required Approved RMA request.
3. Select the Delivery Method and enter the pickup, courier or received details required for the return.
4. Review the Return Qty and Return Location before saving.
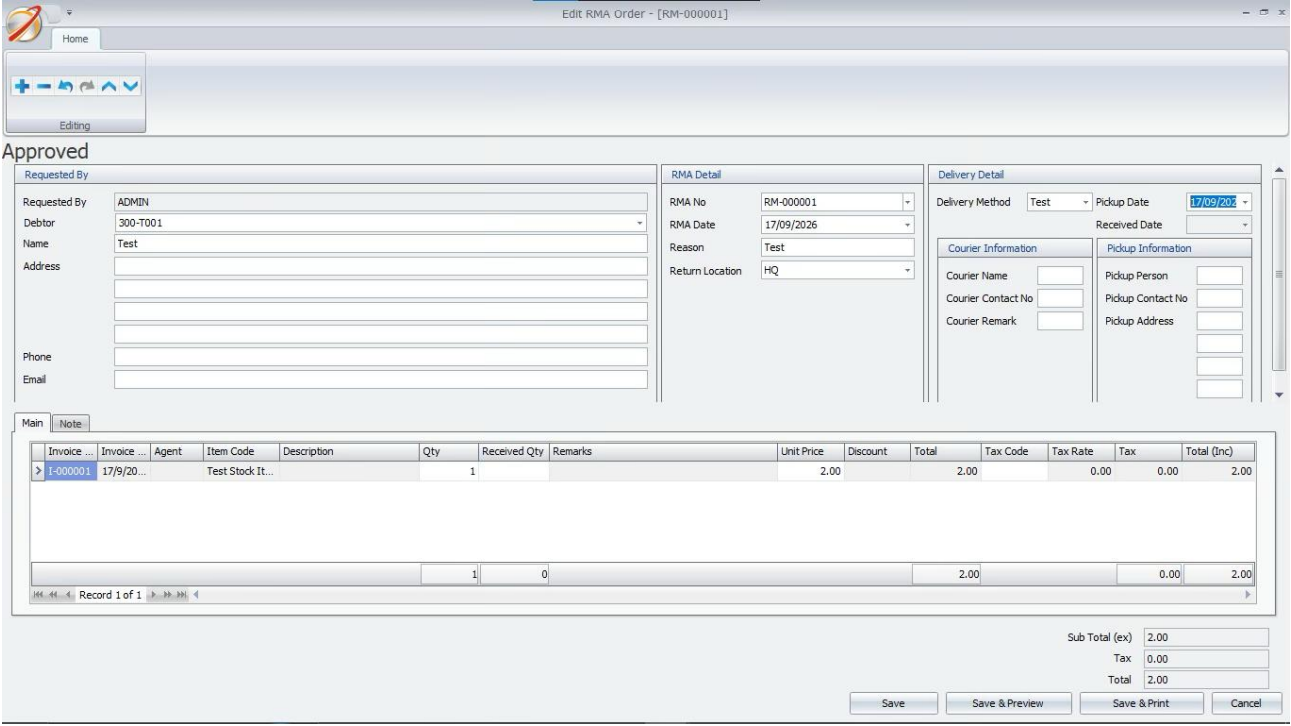
5. The return moves through Awaiting Received, Partially Received and Received as goods arereceived.
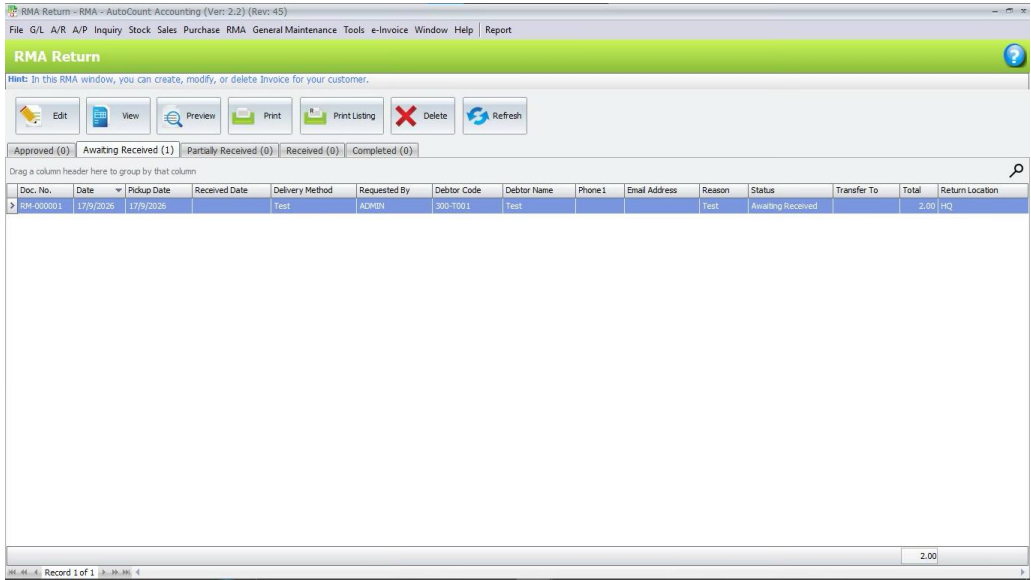
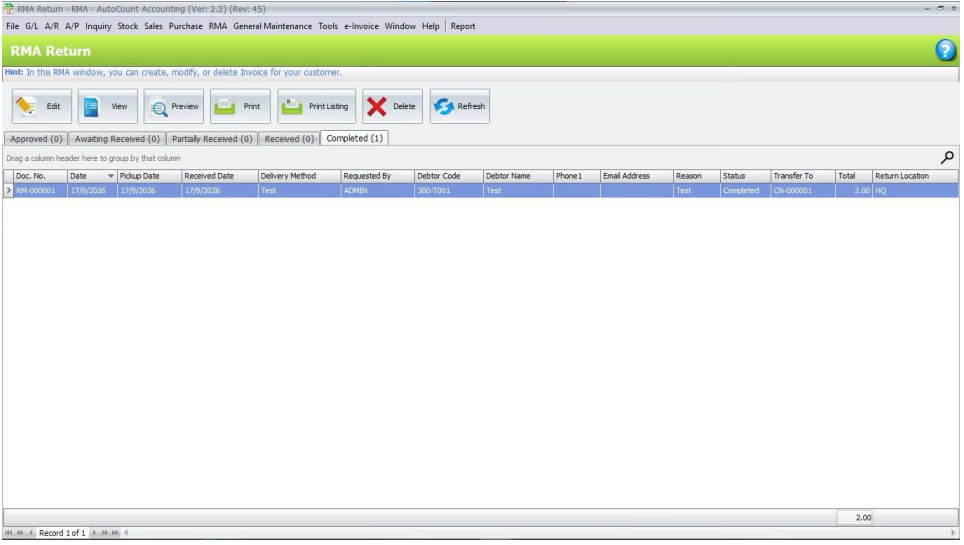
6. Completed contains RMA returns that have been transferred to credit note document(s).
G. Receive Returned Goods
Received Qty in RMA Return is synchronized with the linked Stock Receive document.
1. Open RMA > RMA Return and select an Awaiting Received or Partially Received RMA.
2. Click Edit and enter the Received Qty for each returned item. Record Condition or Remark whenthefields are available.
3. Click Save and confirm the message to create or update the linked Stock Receive.
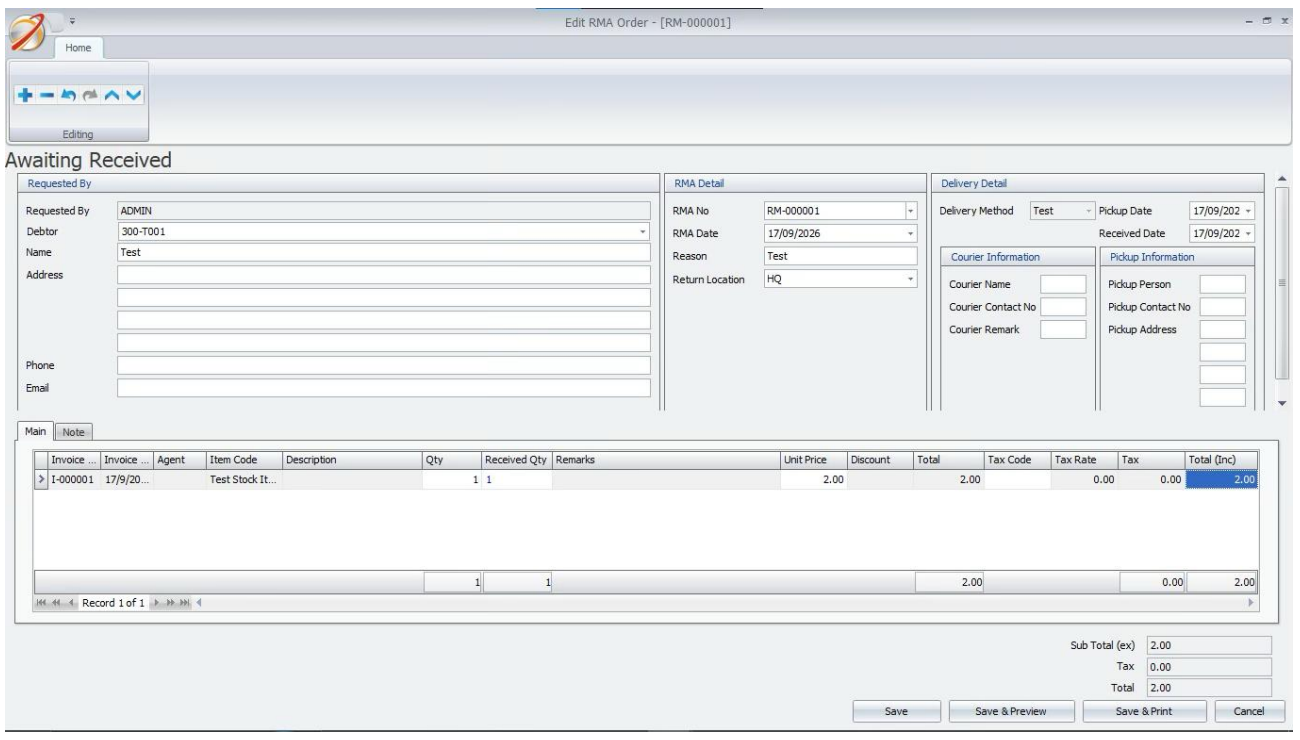
4. A partial receipt changes the status to Partially Received. When all Return Qty is received, thestatuschanges to Received.
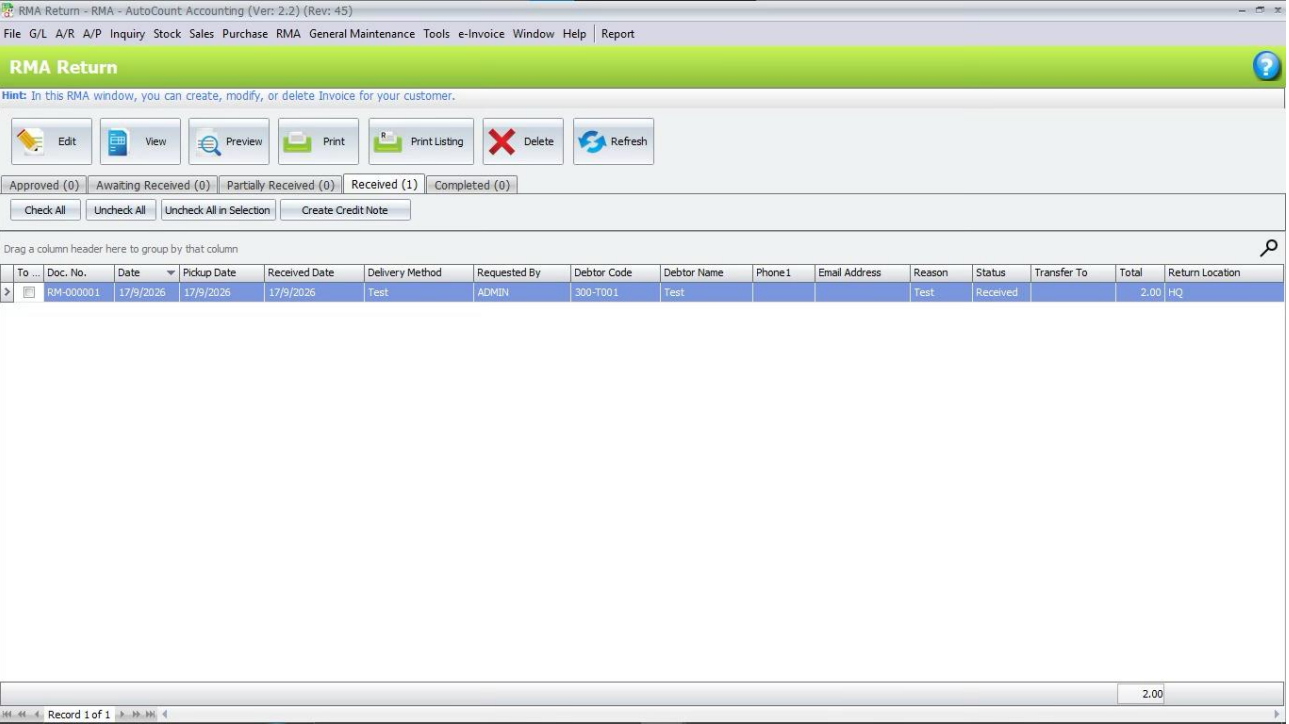
5. If a linked Stock Receive is later changed, deleted or cancelled, the RMA received quantities andstatusare recalculated.
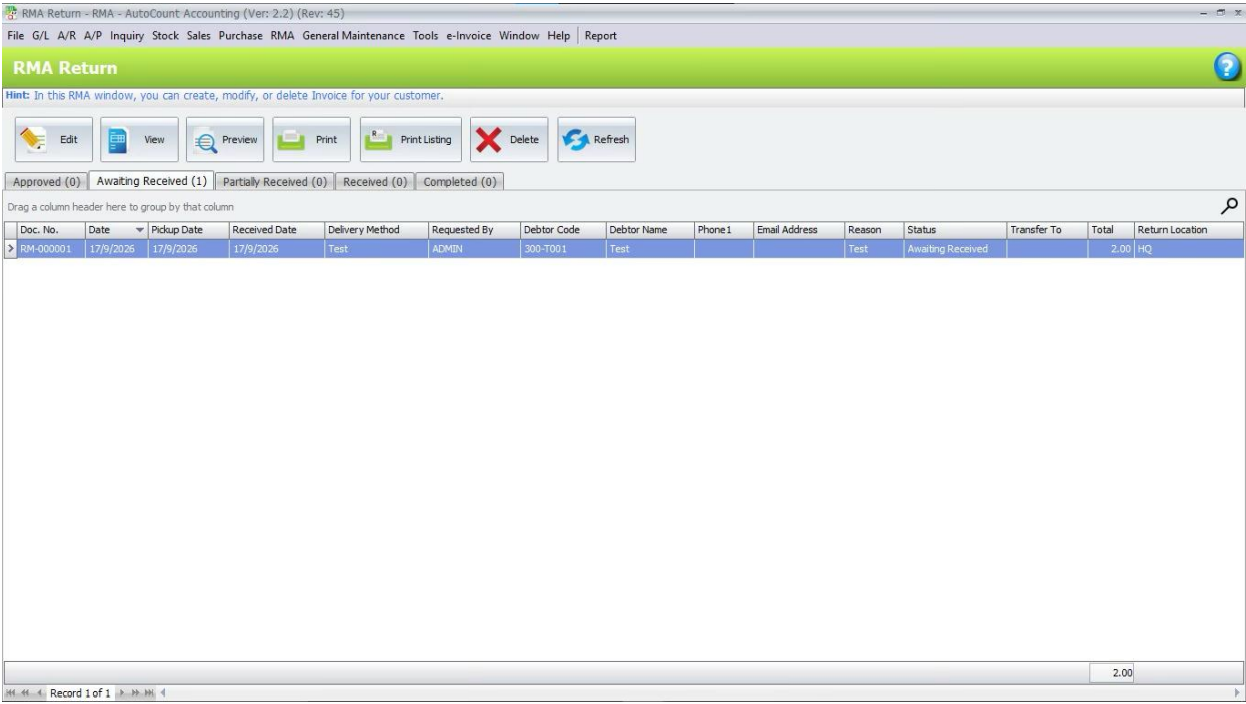
H. Create Credit Note
After an RMA reaches Received status, an authorized user can create the related credit note document.
1. Open RMA > RMA Return and select the Received tab.
2. Tick one or more received RMA documents, or open one received RMA.
3. Click Create Credit Note and confirm the action.
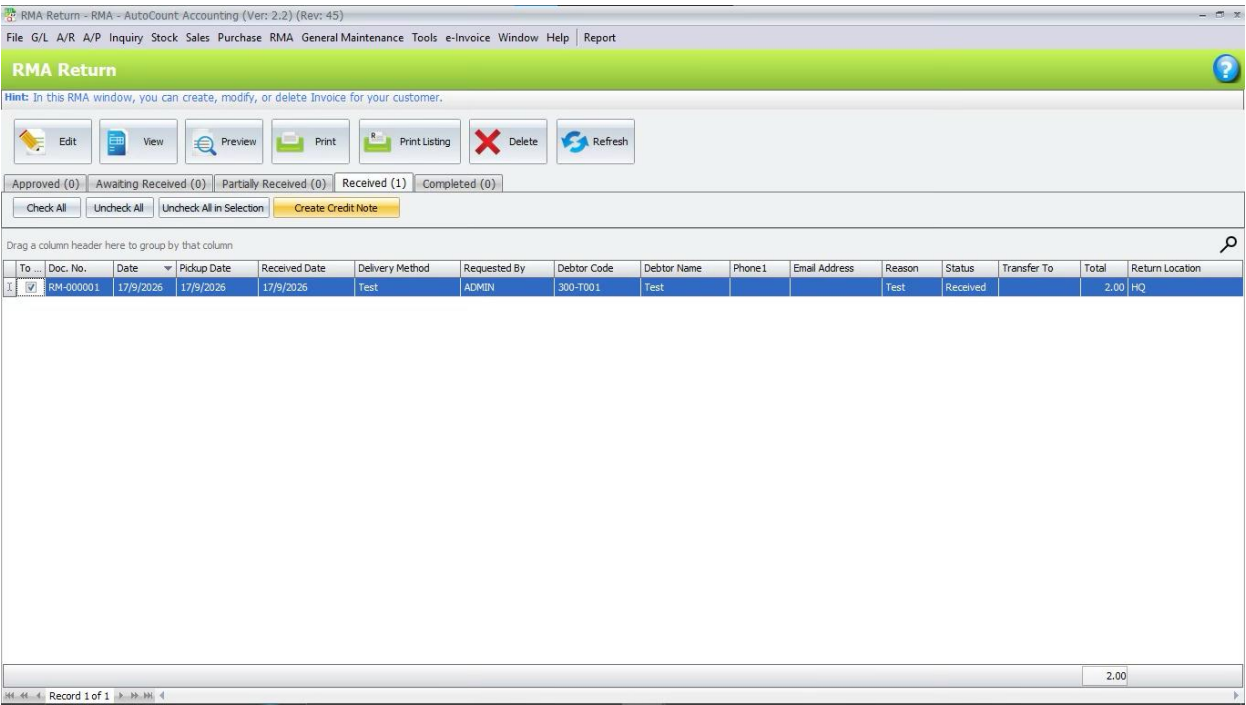
4. Invoice or item lines create a Sales Credit Note. Manual or account lines create an A/RCredit Note. Amixed RMA can create both documents.
5. After the credit note is created, the RMA changes to Completed and the created credit note document
number is shown.
H. Create Credit Note
Outstanding RMA Return Listing shows return quantities, received quantities and the remaining
outstanding quantities.
1. Open RMA > RMA Return and click Print Listing.
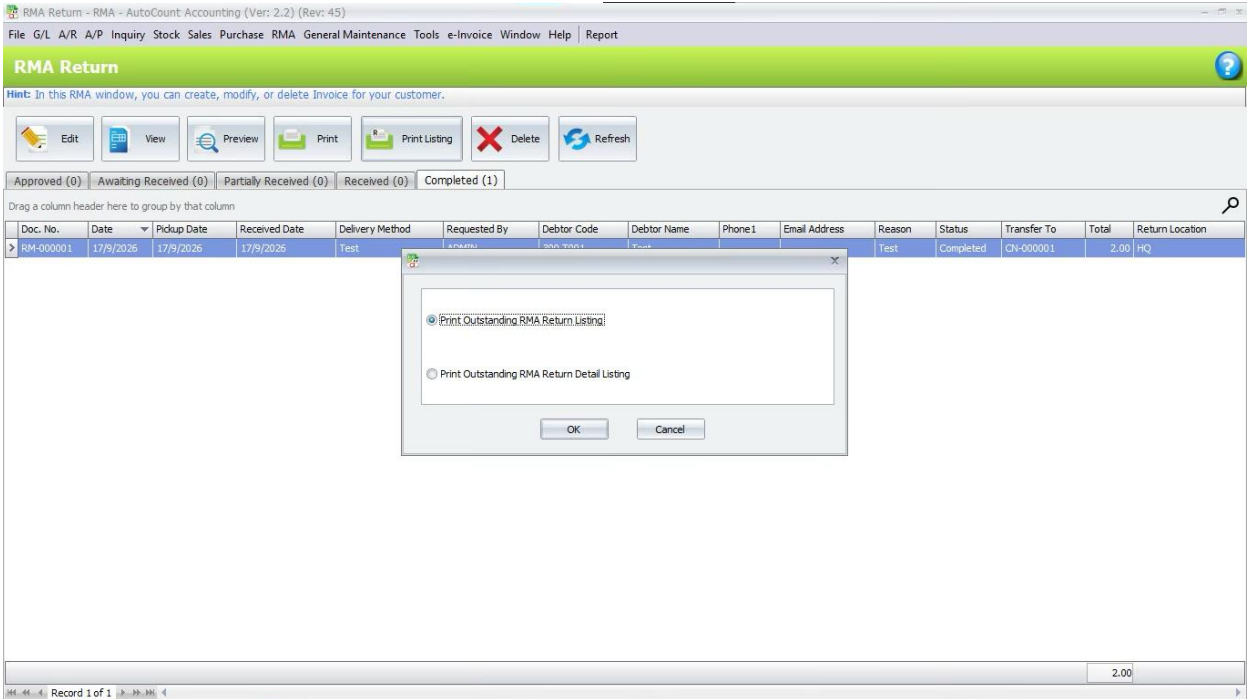
2. Choose Print Outstanding RMA Return Listing or Print Outstanding RMA Return Detail Listing.
3. Set Document Date, Debtor, RMA Request and Status. Select the required outstanding report option.
4. Click Inquiry.
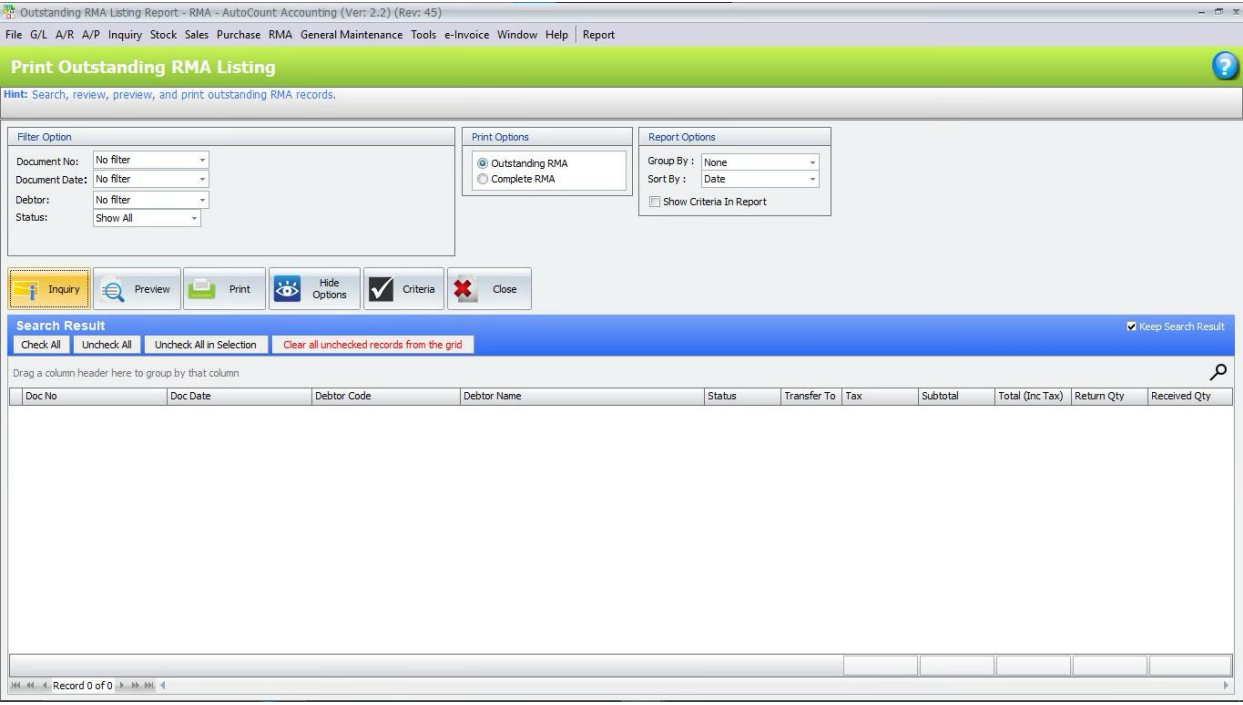
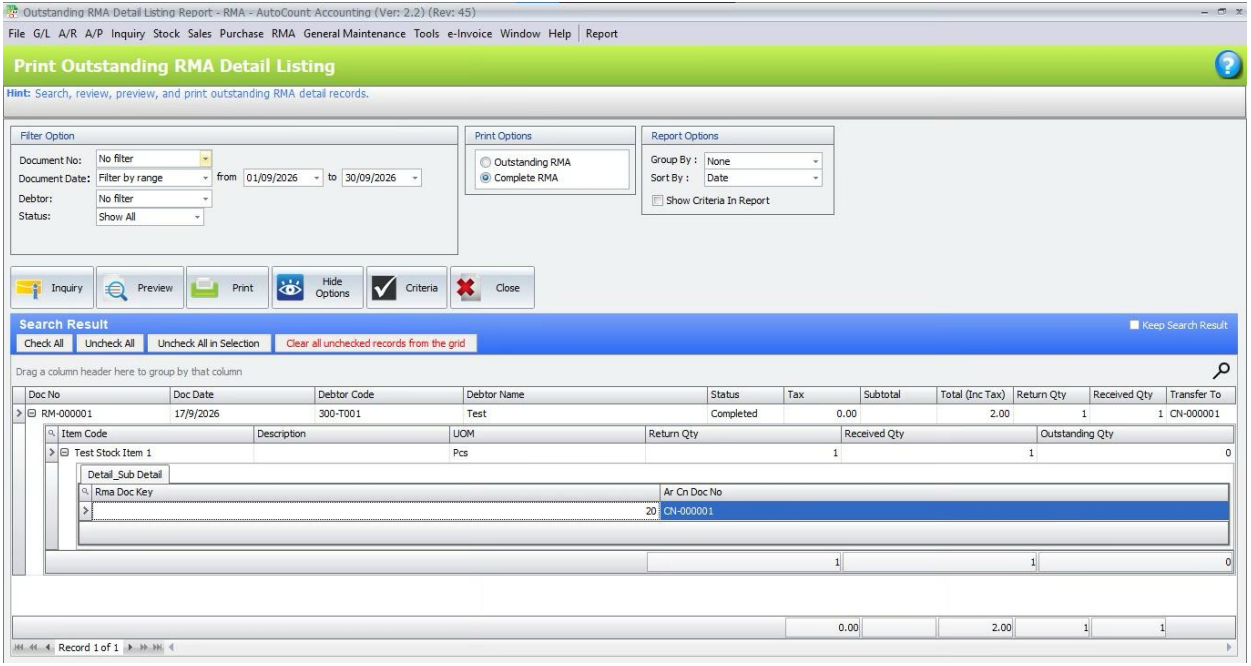
5. Expand a result to review Return Qty, Received Qty and Outstanding Qty.
6. Click Preview or Print to produce the selected report.
Benefits of AutoCount RMA Plugin
Controlled Returns
Every return is requested, approved and recorded before goods are accepted back.
Accurate Stock and Credit Notes
Received quantities update stock through the linked Stock Receive, and the credit note is created from the received RMA.
Full Visibility
Tabs and listings show where each return stands and what is still outstanding.
Faster Resolution for Customers
A clear flow from request to credit note means customers get their returns settled sooner.
Conclusion
The AutoCount RMA Plugin gives businesses a complete, controlled process for customer returns. By linking the request, approval, goods receiving and credit note in one flow, it reduces mistakes, keeps stock accurate and gives customers a faster resolution.
Frequently Asked Questions
What does the RMA Plugin do?
It manages end-to-end customer return workflows, from initial return requests and approvals to receiving goods and issuing credit notes.
Why should I use the RMA Plugin?
It centralizes merchandise returns, prevents unauthorized returns via approval stages, and eliminates manual data entry by generating linked credit notes automatically.
How do I create a new RMA Request?
Go to RMA > RMA Request, click New, select the debtor code, retrieve the original invoice items using Inquiry, set the return reason and location, and save as draft.
How does the RMA approval process work?
Requests are saved under Draft / Rejected, submitted to Awaiting Approval, and once approved by authorized users, move to Approved for return processing.
How do I receive returned items and update stock?
Open the approved request under RMA > RMA Return, enter the Received Qty along with courier or pickup details, and save to synchronize with AutoCount Stock Receive records.
When and how is the credit note generated?
Open the approved request under RMA > RMA Return, enter the Received Qty along with courier or pickup details, and save to synchronize with AutoCount Stock Receive records.
Start Managing Your Return Merchandise Authorization Today!
This plugin enables us to standardize customer return requests, streamline multi-stage approvals, and record received goods synchronized directly with stock updates. We can efficiently track courier logistics, automate credit note generation, and maintain total visibility over outstanding returns through comprehensive reporting and role-based access control.