
-
AutoCount Accounting Features
-
- Approval Workflow
- Audit Trail
- Auto Save in Draft Folder
- AutoCount Contra Account
- AutoCount License Setting Guide
- Deposit Tracking & Management
- Documents Numbering Format
- Full Transfer and Partial Transfer
- Import Data to AutoCount Accounting Using Excel
- Informative Charts and Analytical Data
- Layout Customization
- Multi Pricing
- Sales and Services Tax
- Schedule Backup
- Search Lookup Edit
- View Documents Flow
- AutoCount Feature Stock Take
- Column Chooser
- Show Remaining (3) Collapse
-
AutoCount Cloud Accounting
-
AutoCount E-Invoice
-
AutoCount HRMS User Guide
-
AutoCount Modules
-
- Activity Stream
- Advanced Financial Report
- Advanced Item
- Advanced Multi-UOM
- Advanced Quotation Module
- Basic Multi-UOM
- Budget Module
- Consignment
- Filter By Salesman
- FOC Quantity
- Formula
- Item Batch
- Item Package
- Landing Cost
- Multi-Currency
- Multi-Dimensional Analysis
- Multi-Location
- Project Account
- Recurrence
- Remote Credit Control Module
- Stock Assembly
- User Defined Fields (UDF)
- AutoCount SST Hidden Functions
- AutoCount SST Submission - Service Tax
- AutoCount Scripting Module User Guide
- AutoCount Bonus Point Module User Guide
- AutoCount Service Management Plugin User Guide
- Show Remaining (12) Collapse
-
AutoCount Plugins
-
- Fixed Assets Management
- Goldsmith
- TD Ordering Mobile Apps
- TD Stock Mobile Apps
- Universal Import Plugin
- DMS Import Plugin
- AutoCount Pick List Plugin User Guide
- AutoCount Credit Memo Plugin User Guide
- AutoCount Lock Price Plugin
- AutoCount Progressive Billing
- AutoCount Easy Recurrence Plugin
- Batch Update Unit Price Plugin
- AutoCount Production order
- AutoCount Car Tint Film Plugin
-
- Event Management System
- AutoCount To-Do List Plugin
- AutoCount AutoBank Reconciliation Plugin
- Intercompany Billing Plugin User Guide
- Lead Management 2.0 Plugin
- AutoCount Service Contract Plugin User Guide
- AutoCount Optical Plugin
- AutoCount Integrator Plugin
- AutoCount Procurement Planning Plugin
- Cage Management Plugin
- AutoCount Vehicle Plugin
- AutoCount Agent Validation Plugin User Guide
- AutoCount Barcode Generator Plugin User Guide
- AutoCount Easy Batch Number Entry Plugin User Guide
- Warranty 2.0 Plugin
- AutoCount Easy Photo 2.0 User Guide
- AutoCount Recurring Invoice Plugin User Guide
- AutoCount Scale Barcode Plugin User Guide
- AutoCount Recurrence Late Interest Plugin
- AutoCount Item Visibility Control
- AutoCount Bill Remark Plugin User Guide
- AutoCount Pain Tracker User Guide
- AutoCount Easy Payment
- AutoCount Easy Deposit Plugin
- AutoCount Easy Knock Off Plugin
- AutoCount Daily Collection Summary Plugin
- Timber Log Plugins
- Batch Transfer SODO Plugin
- AutoCount Vege Basket Plugin Guide
- AutoCount Fruit Basket Plugin Guide
- Referral Management Plugin
- AutoCount Migrator Plugin
- AutoCount Email & WhatsApp Plugin
- AutoCount Multi Company Knock Off Plugin
- AutoCount Advance Aging Format Plugin
- AutoCount Payment Request Plugin
- AutoCount Vehicle Master Plugin
- AutoCount Advance Deposit Plugin
- AutoCount IC Checker Plugin
- AutoCount RMA Plugin
- AutoCount Historical Outstanding DO Listing Plugin
- AutoCount Project Department Visibility Control Plugin
- AutoCount MRP Order Plugin
- AutoCount GridToExcel Plugin
- AutoCount Stock Availability Report Plugin
- AutoCount Batch Transfer SO DO Plugin
- AutoCount Centralized Kitchen Management Plugin
- SL AutoCount API
- AutoCount InterCompany Billing Plugin
- AutoCount Sales Commission Plugin
- AutoCount Advanced Credit Term Plugin
- AutoCount Advanced Stock Assembly Plugin
- AutoCount Shipment Plugin
- AutoCount Tour Plugin
- AutoCount Smart Analysis
- AutoCount Rental Management
- Show Remaining (41) Collapse
-
-
Form Template
-
Report Template
-
- Advance Quotation
- Cash Sale
- Consignment
- Consignment Movement
- Credit Note
- Debit Note
- Delivery Order
- FOC Quantity Analysis By Document Report
- Invoice
- Item Package Sales Report
- Monthly Sales Analysis
- Outstanding Sales Order Listing
- Profit And Loss Of Documents
- Quotation
- Sales Agent Contribution Report
- Sales Order
- Top/Bottom Sales Ranking
- Show Remaining (2) Collapse
-
- Available Stock Status Report
- Expired Item Batch Listing
- Inventory Physical Worksheet
- Stock Adjustment
- Stock Aging Report
- Stock Assembly
- Stock Assembly Order
- Stock Balance By Location
- Stock Balance Report
- Stock Card Report
- Stock Disassembly
- Stock Issue
- Stock Item Profit Margin
- Stock Movement Report
- Stock Receive
- Stock Take
- Stock Transfer
- Stock Write Off
- Show Remaining (3) Collapse
-
B2B ORDERING
-
AutoCount AI Agent
AutoCount Intercompany Billing Plugin User Guide
What is AutoCount Intercompany Billing Plugin?
The AutoCount Intercompany Billing Plugin is designed to help businesses streamline intercompany transactions, reduce duplicate data entry, and manage document transfers between connected AutoCount Accounting company databases. For businesses operating multiple companies, manually recording corresponding transactions in separate account books can be time-consuming and may lead to inconsistencies. With features such as Cross-Company Document Transfer, Account Book Mapping, Field Mapping, Batch Document Posting, and Automated Transfer Options, the AutoCount Intercompany Billing Plugin helps businesses improve transaction processing efficiency and maintain more consistent financial records. By connecting related company account books through configurable document workflows, businesses can reduce repetitive administrative work and improve coordination across their financial operations.
AutoCount InterCompany Billing Video Guide
- AutoCount InterCompany Billing Plugin (EN)
Intercompany Billing Plugin Setup
- AutoCount Intercompany Billing Plugin (CN)
公司间结算插件设置
Why Use AutoCount InterCompany Billing Plugin?
Managing transactions between related companies can become challenging when finance teams need to record corresponding invoices, purchase documents, and other transactions in multiple company databases.
The AutoCount Intercompany Billing Plugin helps businesses simplify intercompany accounting through more efficient document processing.
Reduce Duplicate Data Entry
Minimize repeated transaction entry by transferring supported documents between connected company account books.
Improve Intercompany Accuracy
Reduce manual entry discrepancies through configurable document and field mappings between related companies.
Speed Up Multi-Company Processing
Process multiple intercompany transactions through batch document posting to reduce administrative workload.
Maintain Consistent Company Records
Keep corresponding transaction information more consistent across connected AutoCount company databases.
Key Features of AutoCount InterCompany Billing Plugin
Cross-Company Document Transfer
Generate corresponding transactions in connected AutoCount company databases through configured intercompany document mappings.
Account Book Mapping
Configure the relevant target company account books for intercompany document transfers.
Header & Detail Field Mapping
Map source document fields to corresponding target fields to support consistent transaction information.
Batch Document Posting
Select and transfer multiple eligible intercompany documents while reviewing their posting progress and results.
Who Should Use AutoCount InterCompany Billing Plugin?
Group Companies
Ideal for organizations managing multiple related companies that regularly conduct intercompany transactions.
Headquarters & Subsidiaries
Suitable for businesses operating headquarters and subsidiary companies that require corresponding transactions across different account books.
Shared Finance & Accounting Teams
Helps accounting teams responsible for maintaining transaction records across multiple company databases.
Businesses with Frequent Intercompany Transactions
Useful for organizations processing regular intercompany invoices, purchase documents, and other supported transactions.
How AutoCount InterCompany Billing Plugin Works
The AutoCount Intercompany Billing Plugin supports intercompany document processing by connecting related company account books through configurable mappings and document transfer functions.
The following features demonstrate how businesses can manage intercompany transactions more efficiently.
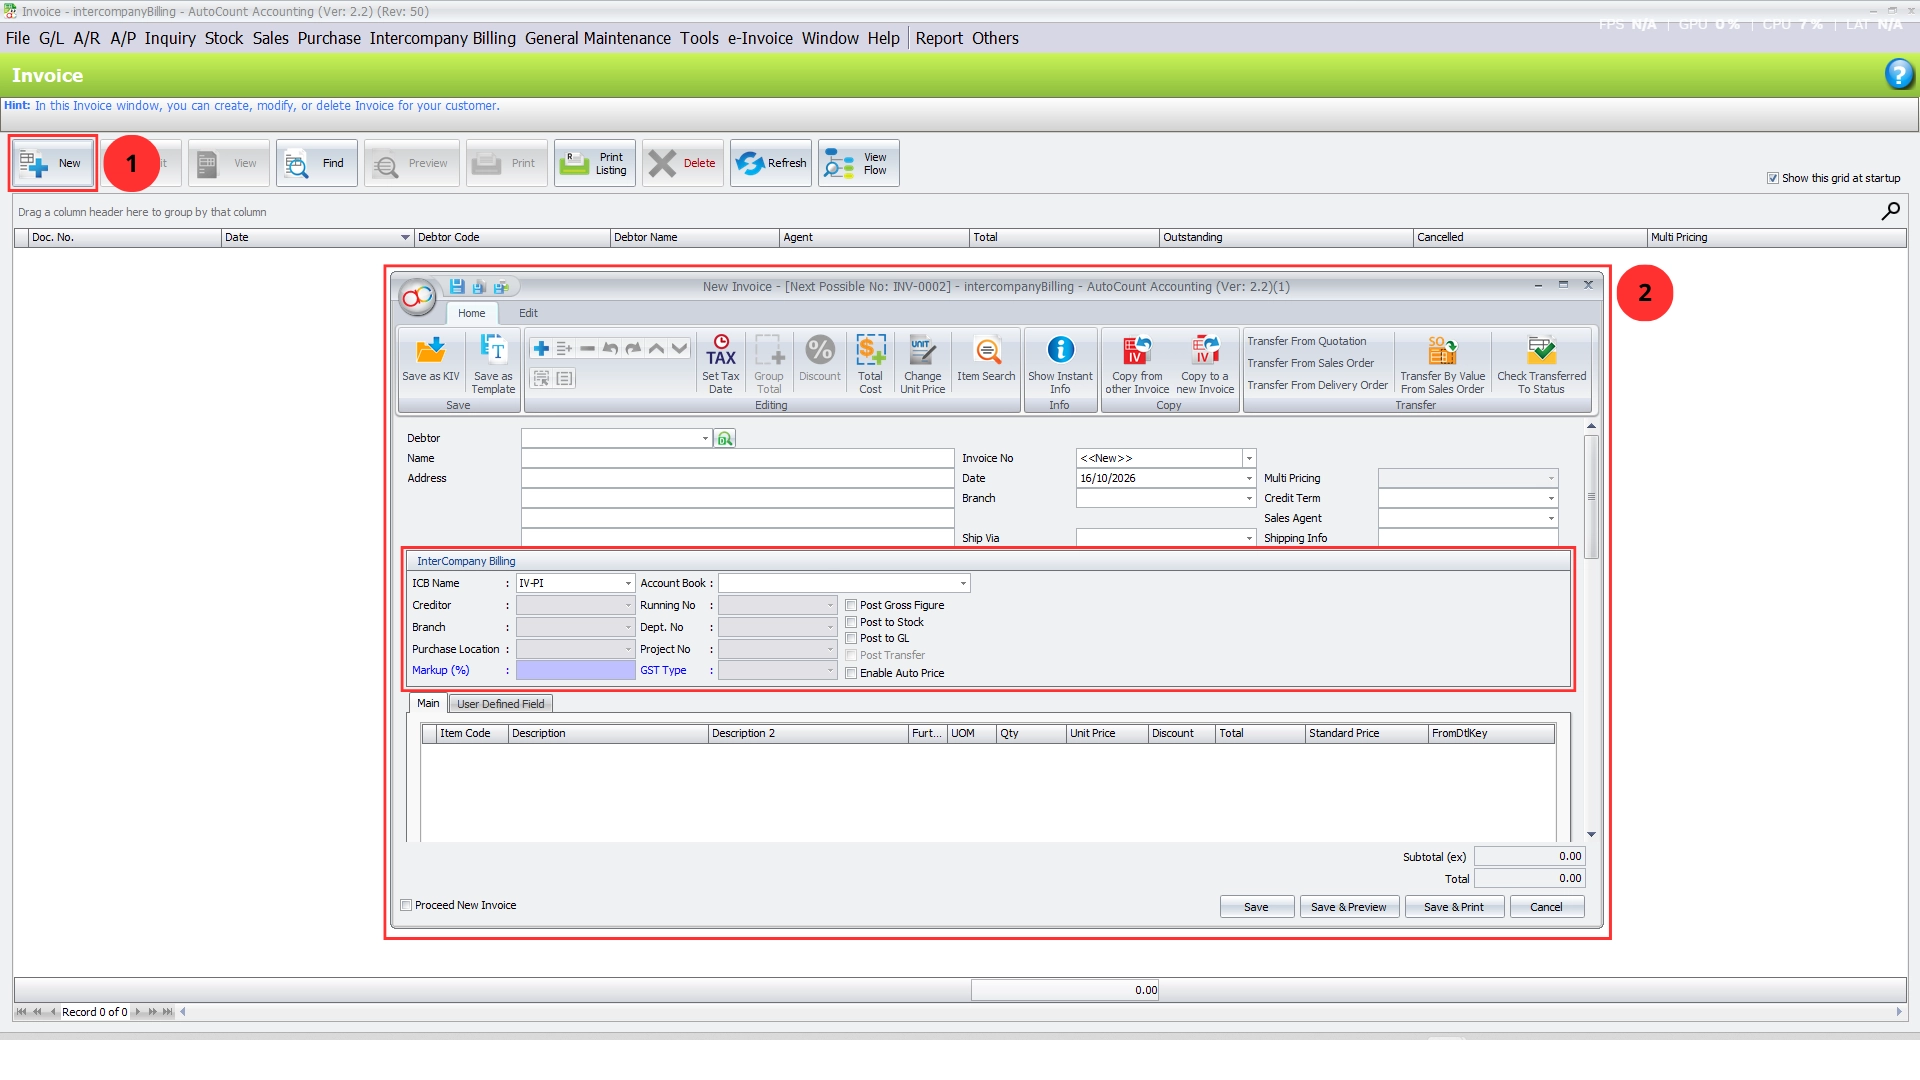
Feature 1 — Cross-Company Document Synchronization
Managing traveller details accurately is important for businesses handling tour bookings and travel arrangements.
The AutoCount Tour Plugin allows businesses to maintain traveller information directly within Sales Orders through its Customer Info function.
Users can record important details such as traveller names, passport information, remarks, and additional notes according to the relevant Sales Order items.
The system also displays the required quantity for the selected item, helping businesses organize the traveller information associated with each order.
This reduces the need to maintain separate traveller records and provides easier access to important customer travel information.
Pro Tip:
Ensure traveller information is reviewed and updated before finalizing travel arrangements to reduce documentation errors.
Feature 2 — Flexible Target Account Book Mapping
Businesses operating multiple companies need to ensure that intercompany documents are transferred to the correct company account books.
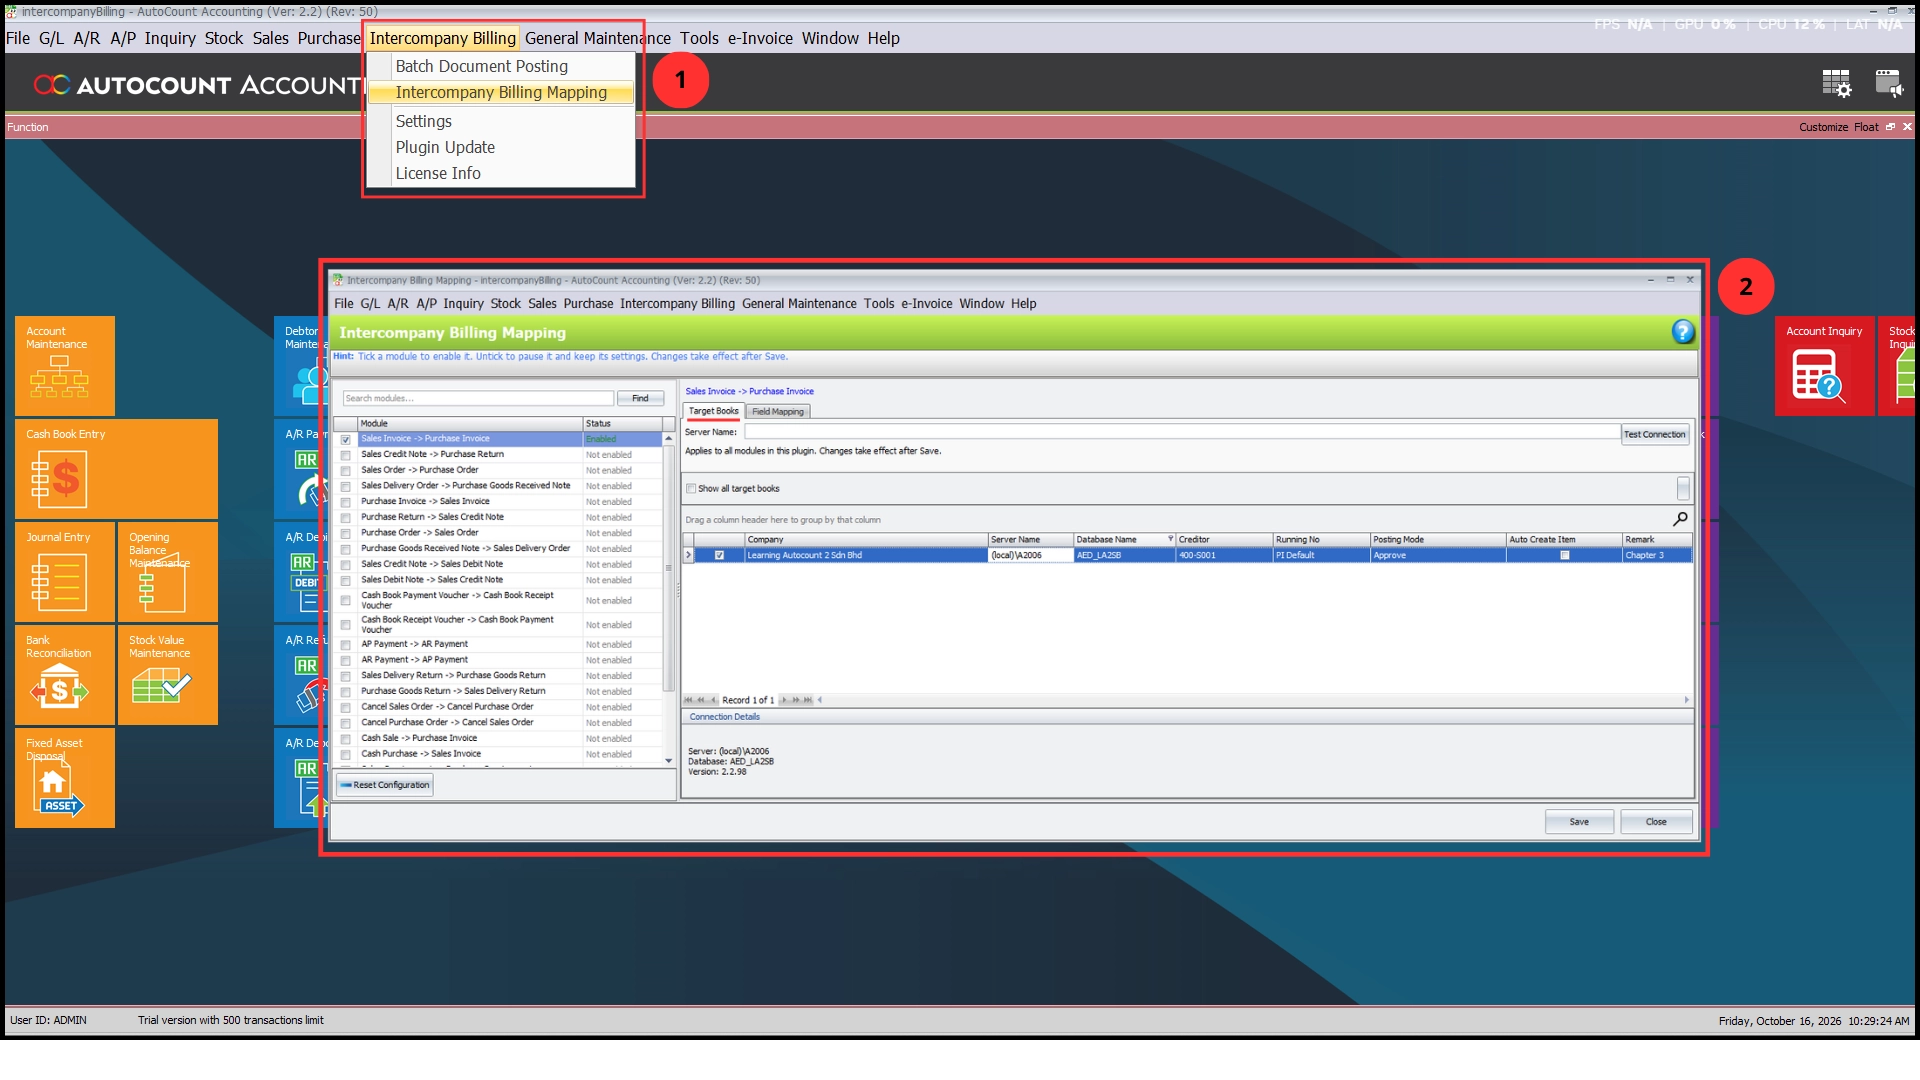
The AutoCount Intercompany Billing Plugin provides a Target Books function that allows businesses to configure the destination account books associated with supported document modules.
The system displays relevant connection information, including server names, database names, and company details.
This helps administrators identify the appropriate destination company and maintain more organized intercompany document processing.
By establishing the correct target account book mappings, businesses can reduce the risk of transferring transactions into unintended company databases.
Pro Tip:
Verify target company and database information before enabling intercompany document transfers.
Feature 3 — Customizable Header and Detail Field Mapping
Different companies may use different transaction structures or information fields within their accounting systems.
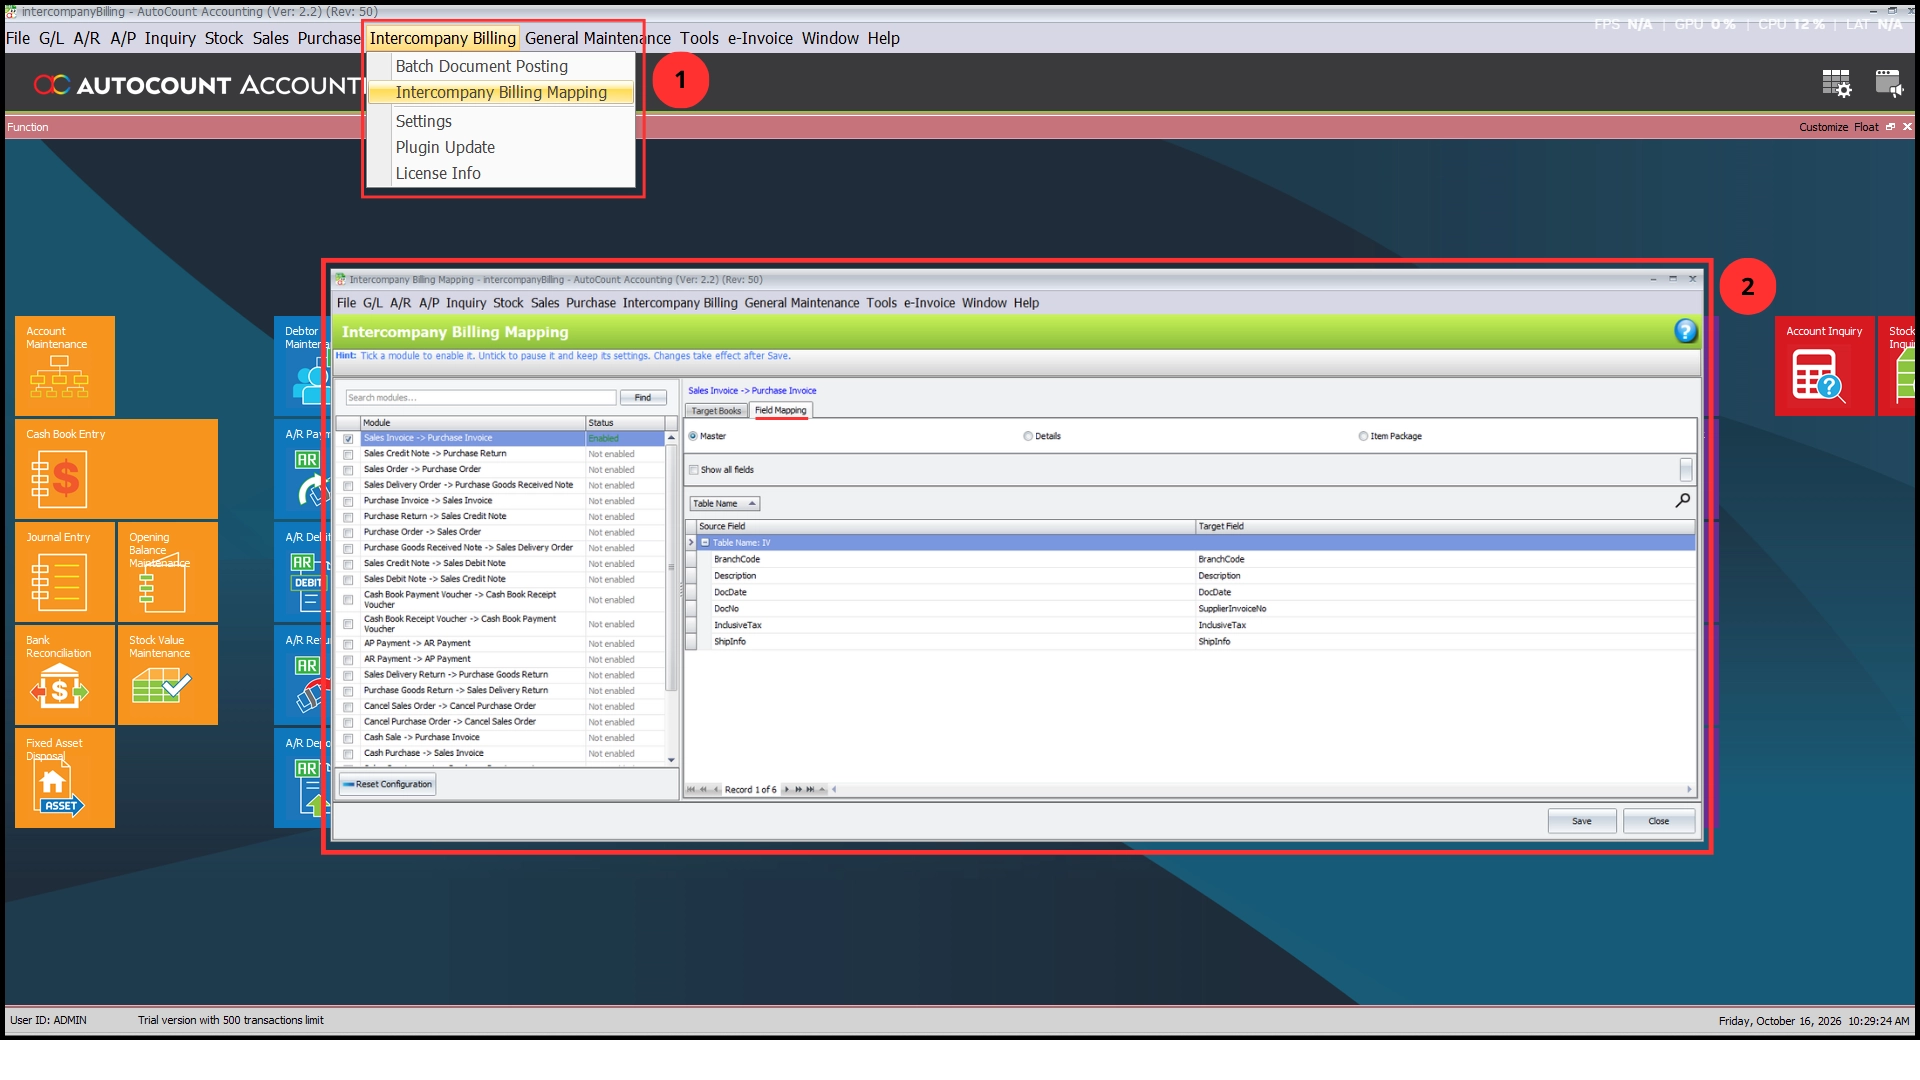
The AutoCount Intercompany Billing Plugin provides field mapping capabilities that help businesses define how information from source documents corresponds to the destination documents.
Users can maintain mappings for two main categories:
- Header Fields: Information associated with the overall transaction document.
- Detail Fields: Information associated with individual document lines.
The mapping function displays source and target fields, allowing businesses to review the relevant information used during document transfers.
This supports more consistent transaction processing and reduces the need to re-enter information manually.
Pro Tip:
Review header and detail mappings carefully whenever company document structures or business requirements change.
Feature 4 — Efficient Batch Intercompany Document Posting
Businesses managing frequent intercompany transactions may need to process large numbers of documents between related companies.
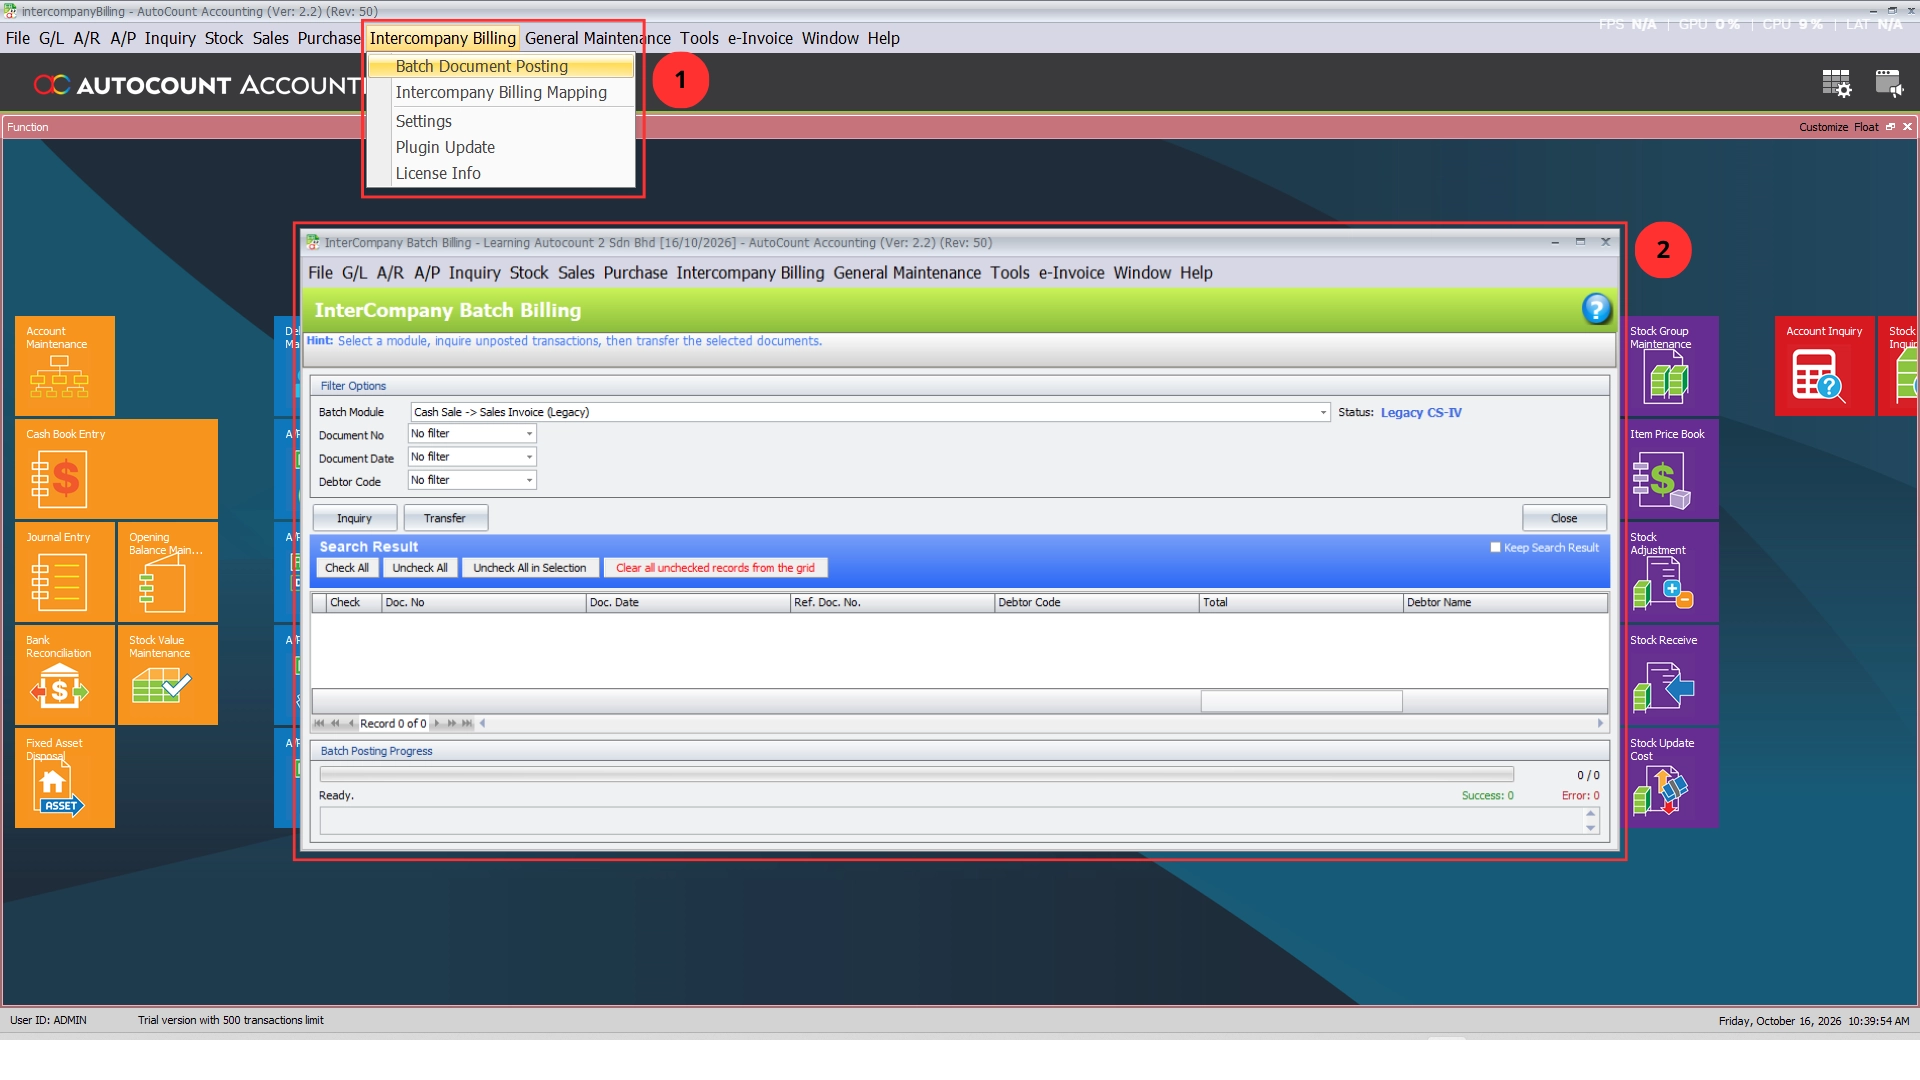
The AutoCount Intercompany Billing Plugin provides Batch Document Posting to help users identify and transfer eligible source documents more efficiently.
Users can filter available documents according to supported criteria such as document number, document date, and debtor code, depending on the selected document module.
Multiple eligible documents can then be selected for transfer into the configured target account book.
The system displays batch posting progress, posting status, and result information, helping users review the outcome of each processing activity.
This simplifies repetitive document preparation and improves efficiency when handling multiple intercompany transactions.
Pro Tip:
Review batch posting results after each transfer to identify documents that require further checking.
Feature 5 — Configurable Batch Posting and Data Handling
Intercompany transactions may require specific default information or additional controls when transferring documents between separate company databases.
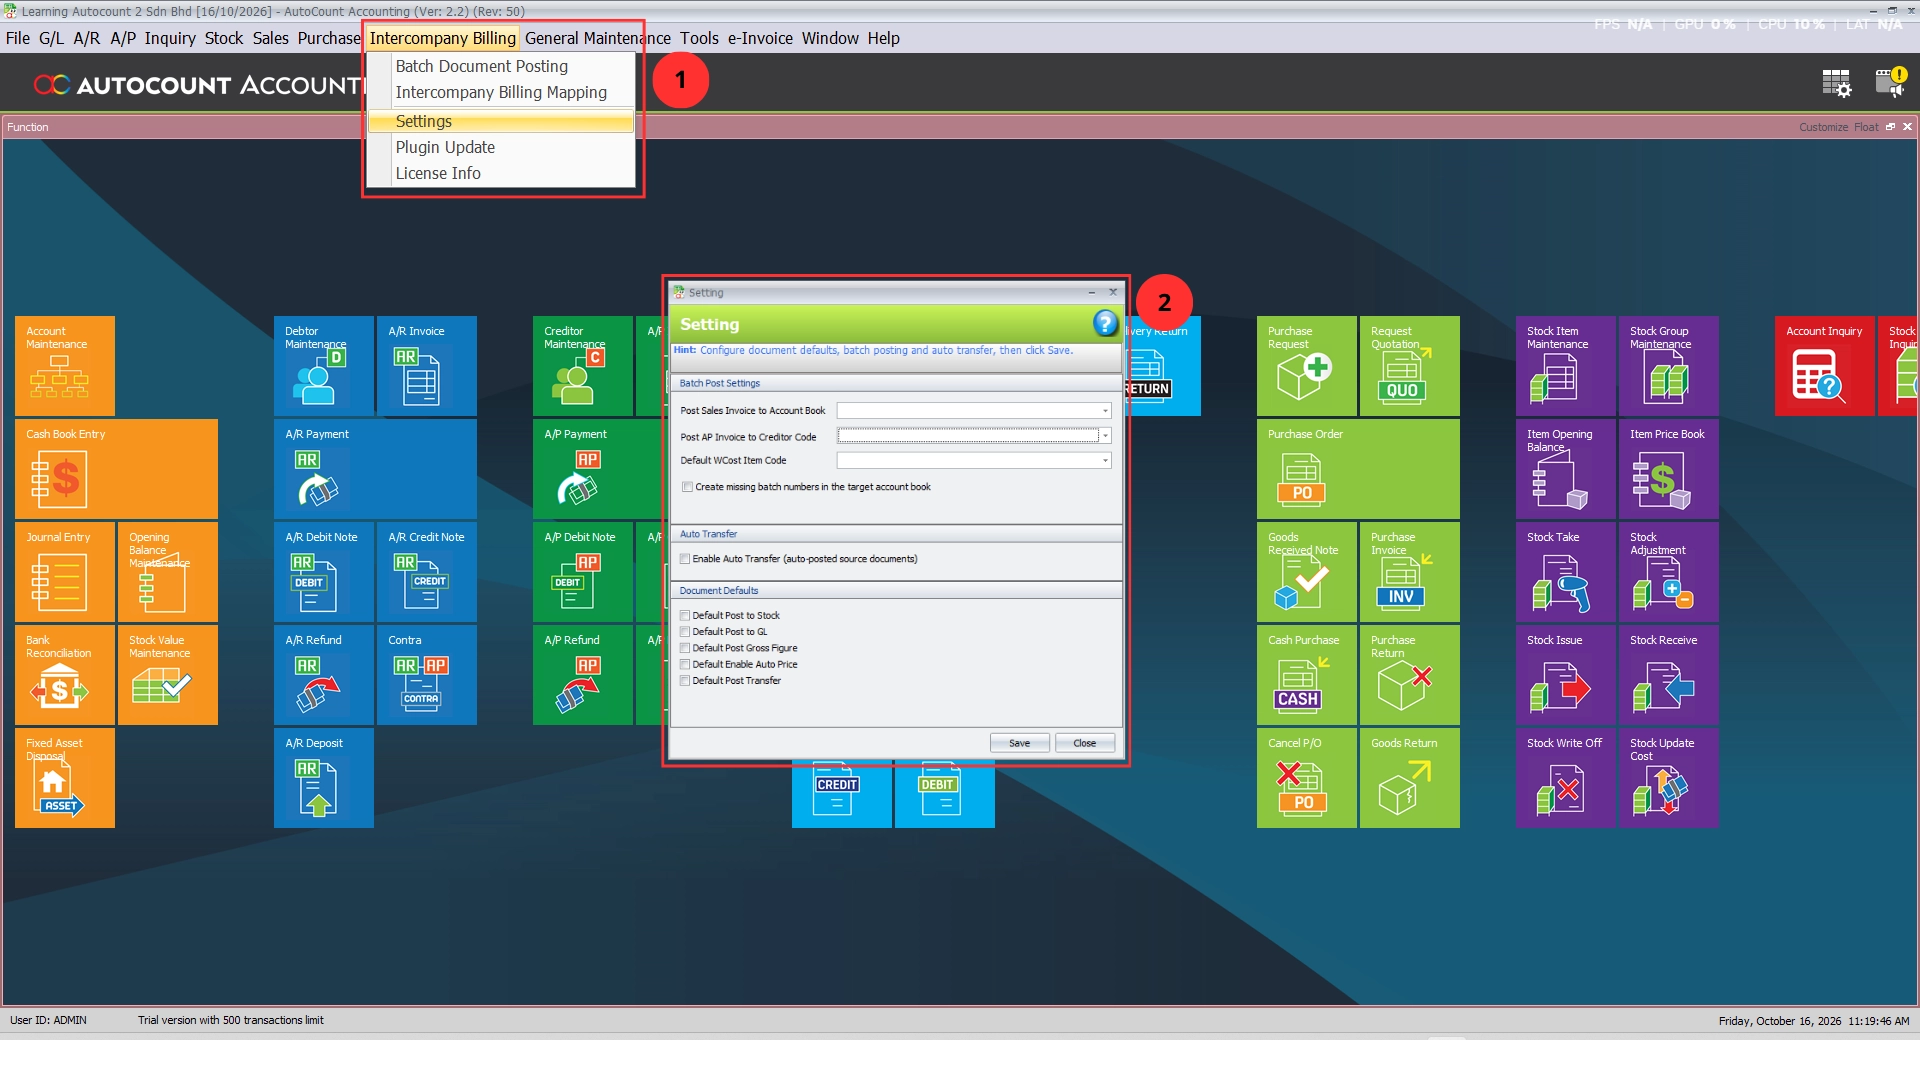
The AutoCount Intercompany Billing Plugin provides configurable posting settings that help businesses define how supported transactions should be processed.
Available options include selecting the target account book, specifying the relevant creditor code, and maintaining a default WCost Item Code where required.
The plugin also provides an option to create missing batch numbers in the target account book during applicable posting workflows.
These settings help businesses handle certain differences between source and target company data more systematically.
Pro Tip:
Review target company data requirements before enabling posting options to reduce avoidable transfer errors.
Feature 6 — Optional Automated Intercompany Transfer
For businesses processing frequent intercompany transactions, repeated manual document transfers can increase administrative workload.
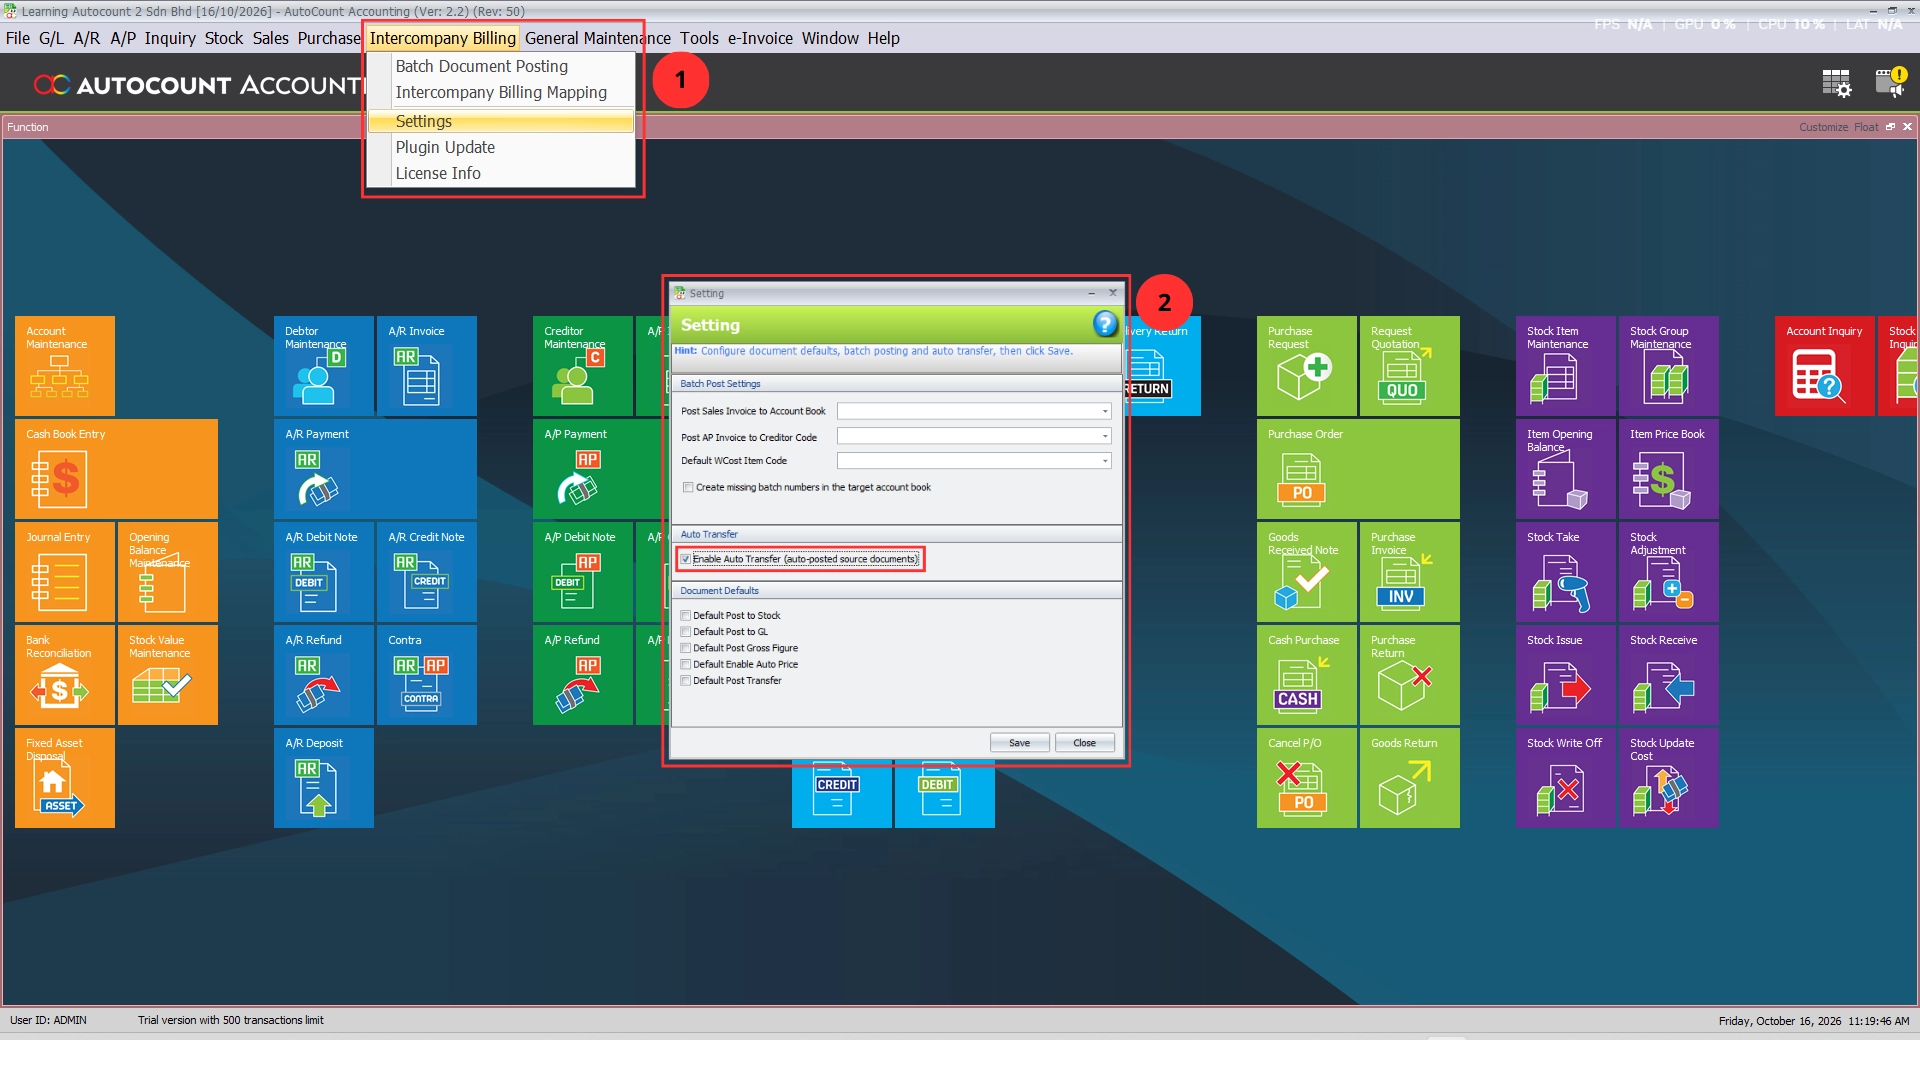
The AutoCount Intercompany Billing Plugin includes an Auto Transfer option for supported auto-posted source documents.
When the applicable function is enabled and correctly configured, eligible source documents can be processed through the automated intercompany transfer workflow.
This helps businesses reduce the need for repeated manual transfer operations and maintain a more efficient document processing routine.
The available automation behavior depends on the configured module, source document status, and applicable posting settings.
Pro Tip:
Test automated transfer settings with sample transactions before implementing them in daily operations.
Feature 7 — Controlled Intercompany Access and Permissions
Businesses managing multiple company account books need appropriate controls over who can configure mappings and process intercompany transactions.
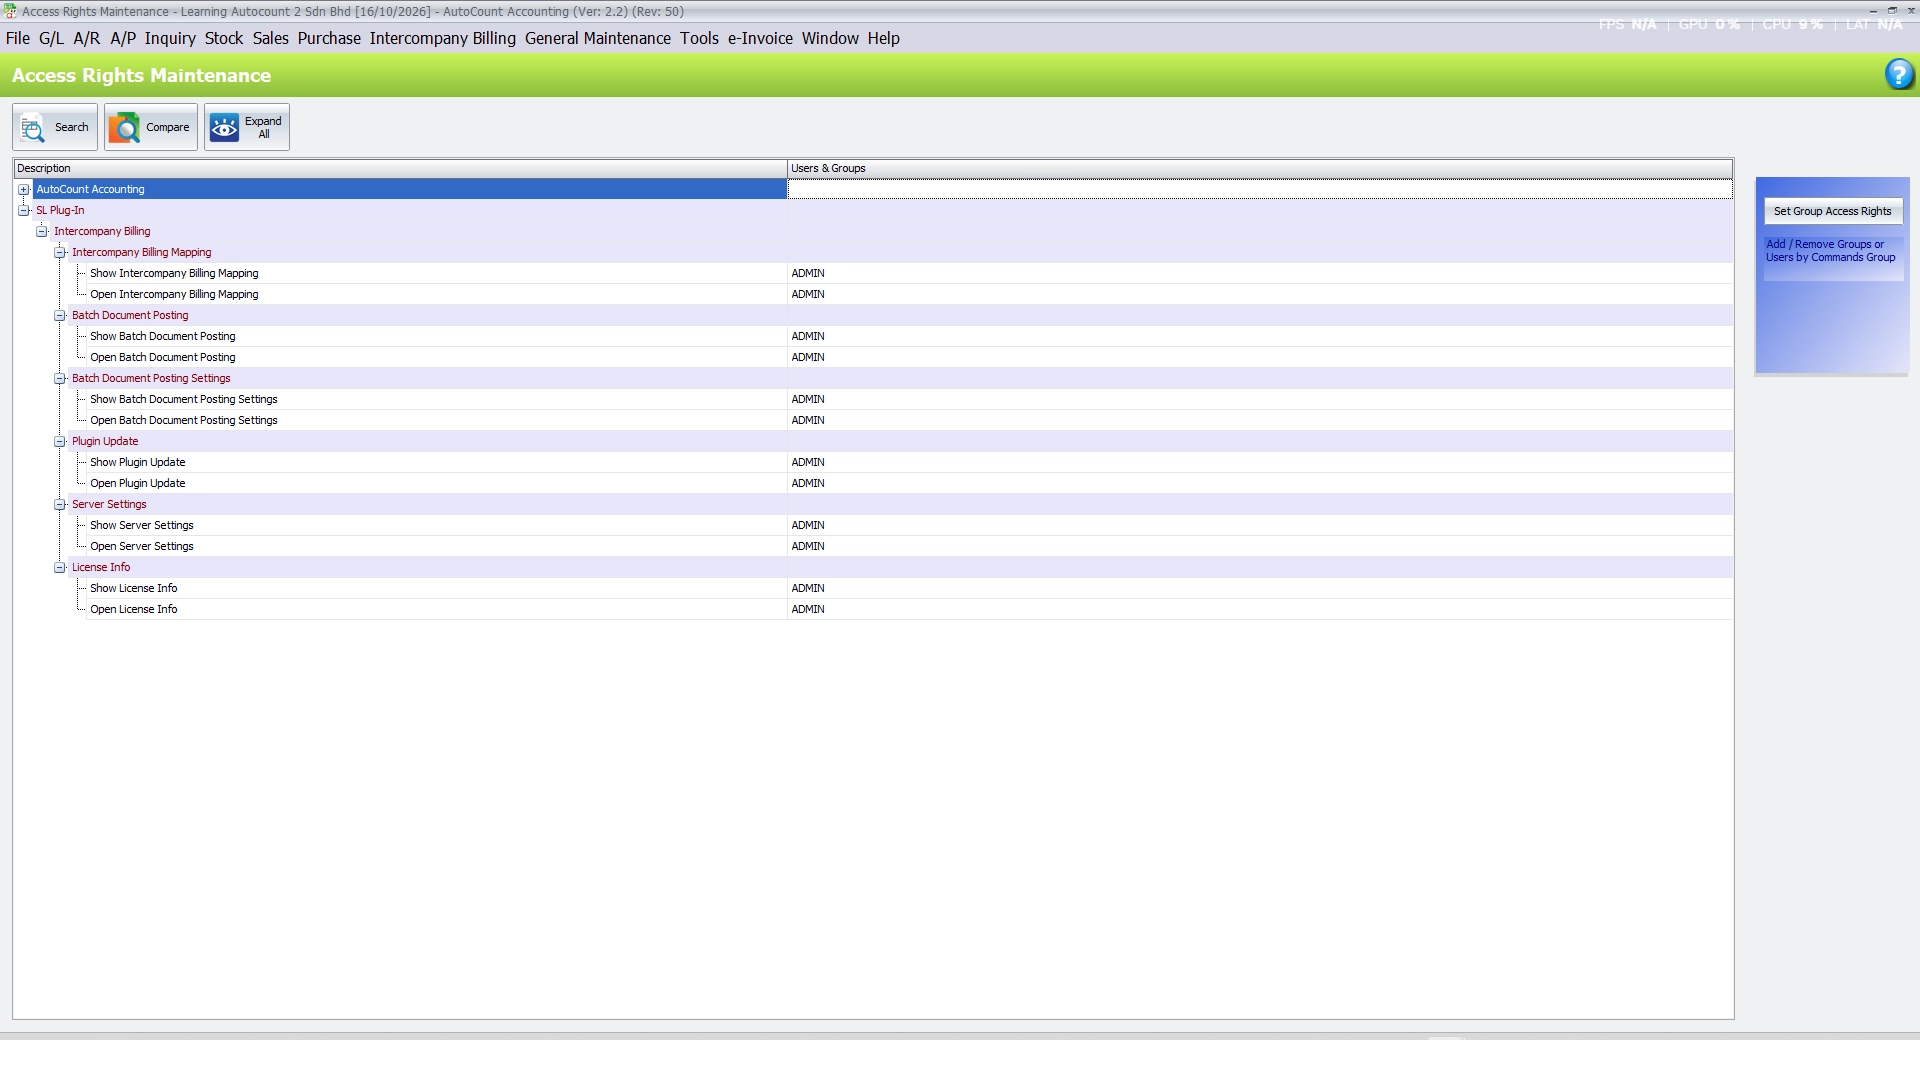
The AutoCount Intercompany Billing Plugin supports access-right management for its main functions.
Administrators can control access to Intercompany Billing Mapping, Batch Document Posting, Batch Document Posting Settings, and other protected functions.
This helps businesses assign responsibilities according to employee roles and restrict access to sensitive configuration and posting activities.
With appropriate permissions, finance teams can maintain more controlled intercompany workflows.
Pro Tip:
Limit mapping and posting configuration access to authorized employees to reduce unintended changes.
Benefits of AutoCount InterCompany Billing Plugin
Reduced Duplicate Data Entry
Minimize repeated document entry between related company account books through configurable intercompany transfers.
Improved Transaction Consistency
Reduce manual entry discrepancies by using document and field mappings across connected company databases.
Faster Multi-Company Processing
Improve accounting efficiency by processing multiple eligible intercompany transactions through batch posting and supported automated transfers.
Better Intercompany Control
Maintain clearer transaction processing controls through posting settings, result visibility, and assigned user access permissions.
Conclusion
The AutoCount Intercompany Billing Plugin provides businesses with a practical solution for managing transactions between related companies within AutoCount Accounting.
By combining cross-company document transfers, account book mapping, configurable field mapping, batch document posting, and automated transfer options, businesses can reduce repeated data entry and improve transaction consistency.
For group companies, headquarters, subsidiaries, and shared finance teams, the AutoCount Intercompany Billing Plugin helps create a more organized and efficient multi-company accounting workflow.
Frequently Asked Questions
What is the AutoCount Intercompany Billing Plugin?
The AutoCount Intercompany Billing Plugin is an add-on for AutoCount Accounting that helps businesses transfer supported transactions between connected company databases using configurable document mappings and posting functions.
How does the AutoCount Intercompany Billing Plugin benefit businesses?
The plugin helps reduce duplicate data entry, improve transaction consistency, and simplify the processing of corresponding documents between related companies.
Can the plugin transfer transactions between different company account books?
Yes. The plugin supports transferring eligible source documents into configured target company account books through the relevant document mapping functions.
Does the plugin support different documet types?
Yes. The plugin supports configured source-to-target document relationships, including examples such as Sales Invoice to Purchase Invoice and Purchase Order to Sales Order. Available workflows depend on the enabled document modules.
Can businesses customize field mappings between company databases?
Yes. The plugin provides Header and Detail Field Mapping functions that allow businesses to define corresponding source and target document fields.
Does the plugin support batch document posting?
Yes. Businesses can select multiple eligible documents for batch transfer and review their processing status and results.
Simplify Your Intercompany Billing Today!
With the AutoCount Intercompany Billing Plugin, your business can streamline cross-company document processing, maintain more consistent financial records, and improve multi-company accounting efficiency.
Looking for a more efficient way to manage intercompany transactions?
Contact SL Software Solutions Sdn. Bhd. to learn how the AutoCount Intercompany Billing Plugin can support your business operations.