
-
AutoCount Accounting Features
-
- Approval Workflow
- Audit Trail
- Auto Save in Draft Folder
- AutoCount Contra Account
- AutoCount License Setting Guide
- Deposit Tracking & Management
- Documents Numbering Format
- Full Transfer and Partial Transfer
- Import Data to AutoCount Accounting Using Excel
- Informative Charts and Analytical Data
- Layout Customization
- Multi Pricing
- Sales and Services Tax
- Schedule Backup
- Search Lookup Edit
- View Documents Flow
- AutoCount Feature Stock Take
- Column Chooser
- Show Remaining (3) Collapse
-
AutoCount Cloud Accounting
-
AutoCount E-Invoice
-
AutoCount HRMS User Guide
-
AutoCount Modules
-
- Activity Stream
- Advanced Financial Report
- Advanced Item
- Advanced Multi-UOM
- Advanced Quotation Module
- Basic Multi-UOM
- Budget Module
- Consignment
- Filter By Salesman
- FOC Quantity
- Formula
- Item Batch
- Item Package
- Landing Cost
- Multi-Currency
- Multi-Dimensional Analysis
- Multi-Location
- Project Account
- Recurrence
- Remote Credit Control Module
- Stock Assembly
- User Defined Fields (UDF)
- AutoCount SST Hidden Functions
- AutoCount SST Submission - Service Tax
- AutoCount Scripting Module User Guide
- AutoCount Bonus Point Module User Guide
- AutoCount Service Management Plugin User Guide
- Show Remaining (12) Collapse
-
AutoCount Plugins
-
- Fixed Assets Management
- Goldsmith
- TD Ordering Mobile Apps
- TD Stock Mobile Apps
- Universal Import Plugin
- DMS Import Plugin
- AutoCount Pick List Plugin User Guide
- AutoCount Credit Memo Plugin User Guide
- AutoCount Lock Price Plugin
- AutoCount Progressive Billing
- AutoCount Easy Recurrence Plugin
- Batch Update Unit Price Plugin
- AutoCount Production order
- AutoCount Car Tint Film Plugin
-
- Event Management System
- AutoCount To-Do List Plugin
- AutoCount AutoBank Reconciliation Plugin
- Intercompany Billing Plugin User Guide
- Lead Management 2.0 Plugin
- AutoCount Service Contract Plugin User Guide
- AutoCount Optical Plugin
- AutoCount Integrator Plugin
- AutoCount Procurement Planning Plugin
- Cage Management Plugin
- AutoCount Vehicle Plugin
- AutoCount Agent Validation Plugin User Guide
- AutoCount Barcode Generator Plugin User Guide
- AutoCount Easy Batch Number Entry Plugin User Guide
- Warranty 2.0 Plugin
- AutoCount Easy Photo 2.0 User Guide
- AutoCount Recurring Invoice Plugin User Guide
- AutoCount Scale Barcode Plugin User Guide
- AutoCount Recurrence Late Interest Plugin
- AutoCount Item Visibility Control
- AutoCount Bill Remark Plugin User Guide
- AutoCount Pain Tracker User Guide
- AutoCount Easy Payment
- AutoCount Easy Deposit Plugin
- AutoCount Easy Knock Off Plugin
- AutoCount Daily Collection Summary Plugin
- Timber Log Plugins
- Batch Transfer SODO Plugin
- AutoCount Vege Basket Plugin Guide
- AutoCount Fruit Basket Plugin Guide
- Referral Management Plugin
- AutoCount Migrator Plugin
- AutoCount Email & WhatsApp Plugin
- AutoCount Multi Company Knock Off Plugin
- AutoCount Advance Aging Format Plugin
- AutoCount Payment Request Plugin
- AutoCount Vehicle Master Plugin
- AutoCount Advance Deposit Plugin
- AutoCount IC Checker Plugin
- AutoCount RMA Plugin
- AutoCount Historical Outstanding DO Listing Plugin
- AutoCount Project Department Visibility Control Plugin
- AutoCount MRP Order Plugin
- AutoCount GridToExcel Plugin
- AutoCount Stock Availability Report Plugin
- AutoCount Batch Transfer SO DO Plugin
- AutoCount Centralized Kitchen Management Plugin
- SL AutoCount API
- AutoCount InterCompany Billing Plugin
- AutoCount Sales Commission Plugin
- AutoCount Advanced Credit Term Plugin
- AutoCount Advanced Stock Assembly Plugin
- AutoCount Shipment Plugin
- AutoCount Tour Plugin
- AutoCount Smart Analysis
- AutoCount Rental Management
- Show Remaining (41) Collapse
-
-
Form Template
-
Report Template
-
- Advance Quotation
- Cash Sale
- Consignment
- Consignment Movement
- Credit Note
- Debit Note
- Delivery Order
- FOC Quantity Analysis By Document Report
- Invoice
- Item Package Sales Report
- Monthly Sales Analysis
- Outstanding Sales Order Listing
- Profit And Loss Of Documents
- Quotation
- Sales Agent Contribution Report
- Sales Order
- Top/Bottom Sales Ranking
- Show Remaining (2) Collapse
-
- Available Stock Status Report
- Expired Item Batch Listing
- Inventory Physical Worksheet
- Stock Adjustment
- Stock Aging Report
- Stock Assembly
- Stock Assembly Order
- Stock Balance By Location
- Stock Balance Report
- Stock Card Report
- Stock Disassembly
- Stock Issue
- Stock Item Profit Margin
- Stock Movement Report
- Stock Receive
- Stock Take
- Stock Transfer
- Stock Write Off
- Show Remaining (3) Collapse
-
B2B ORDERING
-
AutoCount AI Agent
AutoCount Sales Commission Plugin User Guide
What is AutoCount Sales Commission Plugin?
The AutoCount Sales Commission Plugin is designed to help businesses automate sales commission calculations, manage commission plans, track sales targets, and monitor sales agent earnings within AutoCount Accounting. For businesses managing multiple sales agents or commission-based incentives, calculating commissions manually can be time-consuming and prone to errors, especially when different employees follow different commission rates, targets, and payment conditions. With features such as Flexible Commission Plans, Payment-Based Commission Calculation, Sales Target Management, Commission Team Management, and Commission Reporting, the AutoCount Sales Commission Plugin helps businesses simplify commission processing while maintaining better control over sales incentives. By connecting commission calculations with existing sales and customer payment records, businesses can reduce administrative work, improve calculation consistency, and provide greater transparency to sales teams.
Why Use AutoCount Sales Commission Plugin?
Managing sales commissions through spreadsheets can become complicated when businesses need to calculate different commission rates, monitor customer collections, and track individual sales performance.
The AutoCount Sales Commission Plugin helps businesses overcome these challenges through more organized and consistent commission management.
Apply Commission Rules Consistently
Calculate sales commissions based on defined commission plans, rates, targets, and payment conditions to reduce manual calculation errors.
Link Commission to Customer Payments
Determine when commissions are earned or released based on sales transactions, partial collections, or full customer payments.
Track Sales Targets and Bonuses
Monitor sales achievements, commission entitlements, and additional incentive bonuses to support performance-based rewards.
Improve Commission Transparency
Provide sales agents with clearer visibility into their earned, pending, and potential commissions through dedicated commission reports.
Key Features of the AutoCount Sales Commission Plugin
Flexible Commission Plans
Create customized commission plans based on individual items, sales document values, commission rates, and payment conditions.
Sales Targets & Incentive Management
Manage sales targets, commission thresholds, entitlement rates, and additional bonuses based on defined performance criteria.
Commission Team Management
Organize sales agents into commission teams and assign commission plans according to individual or team performance.
Commission Reports & Simulator
Review commission earnings, analyze sales performance, and simulate commission calculations to understand how results are determined.
Who Should Use the Sales Commission Plugin
Commission-Based Sales Businesses
Ideal for businesses that reward sales agents based on sales performance, product sales, or transaction values.
Businesses with Collection-Based Commissions
Suitable for businesses that calculate commission entitlement according to partial payments, full payments, or customer collection timing.
Sales Teams with Performance Targets
Useful for organizations managing individual or team sales targets, performance incentives, and additional commission bonuses.
Sales Managers & Finance Teams
Helps managers and accounting personnel review commission calculations, monitor sales achievements, and prepare commission reports more efficiently.
How AutoCount Sales Commission Plugin Works
The AutoCount Sales Commission Plugin connects sales transactions, commission plans, customer payments, and sales performance into a structured commission management process.
The following features demonstrate how businesses can calculate, monitor, and manage sales commissions more efficiently.
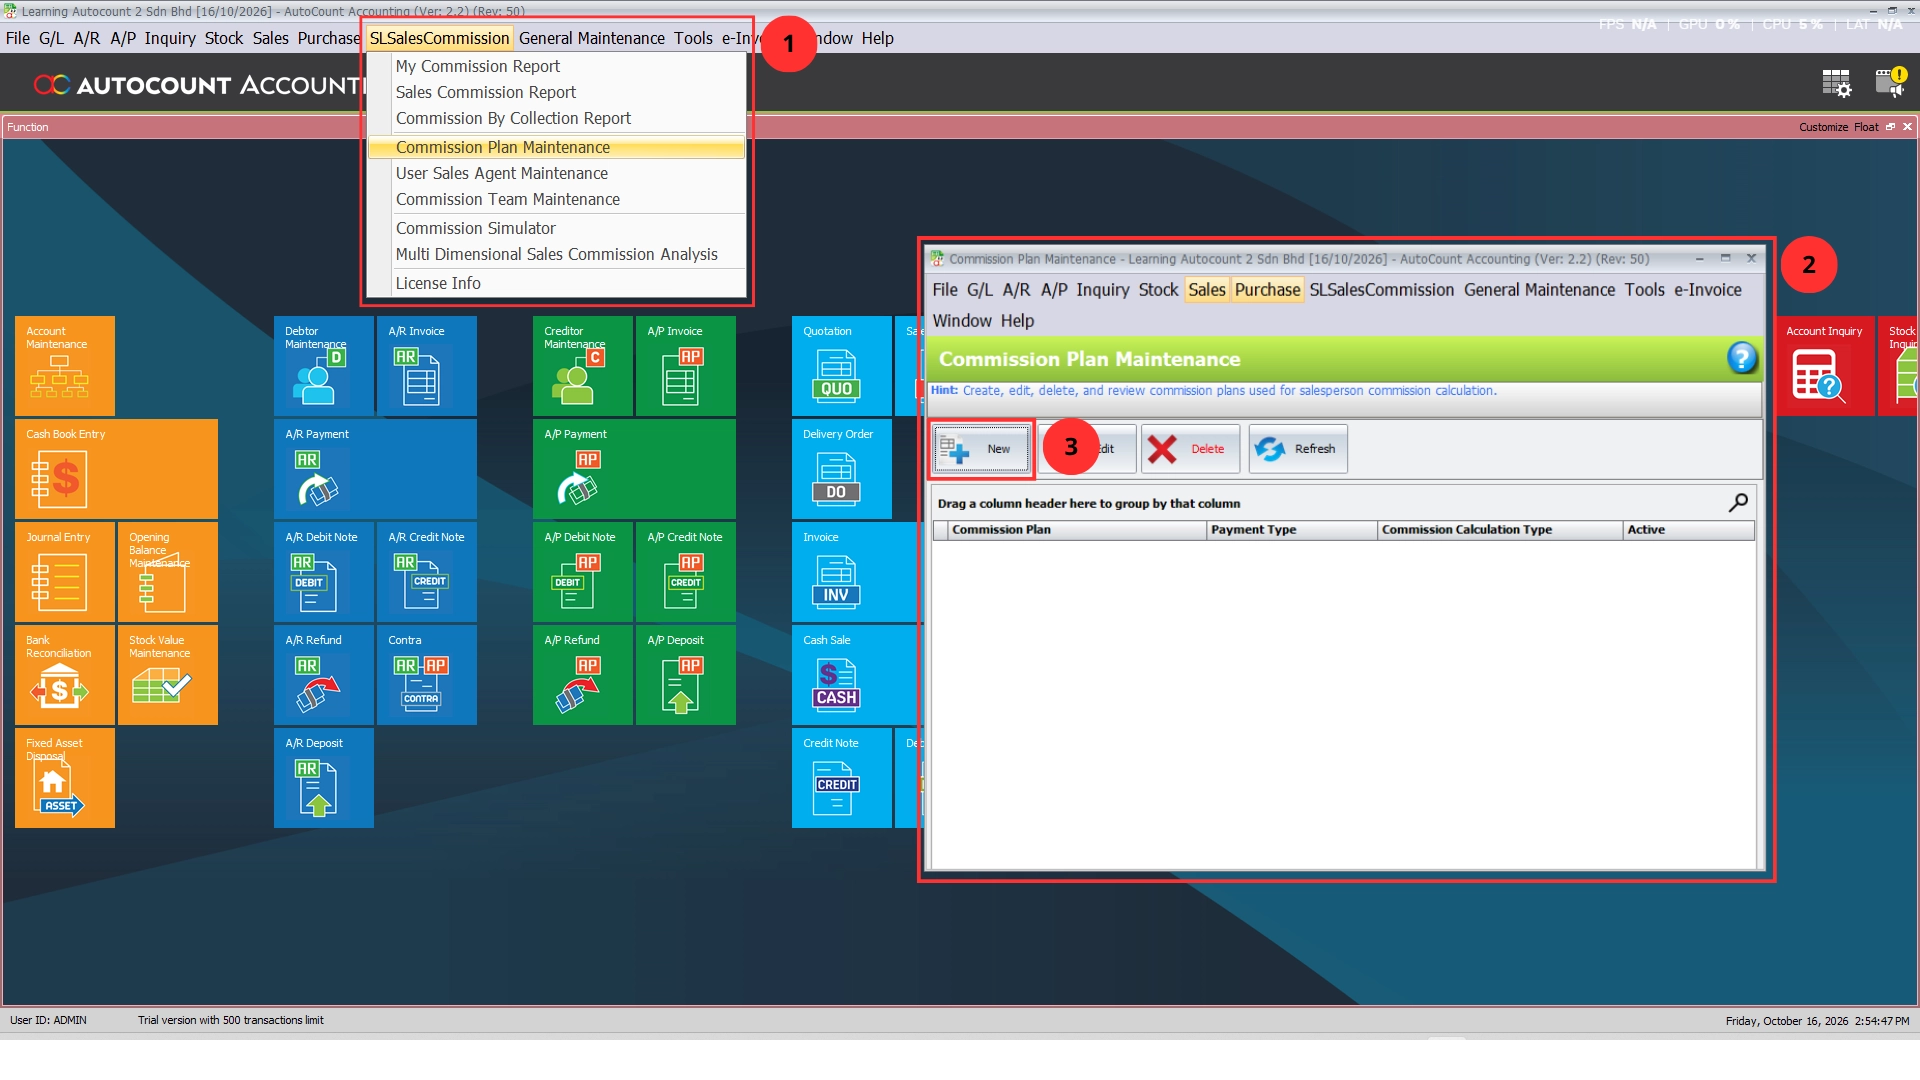
Feature 1 — Flexible Commission Calculation by Item or Sales Document
Different businesses may use different commission structures depending on the products they sell or the sales performance they want to reward.
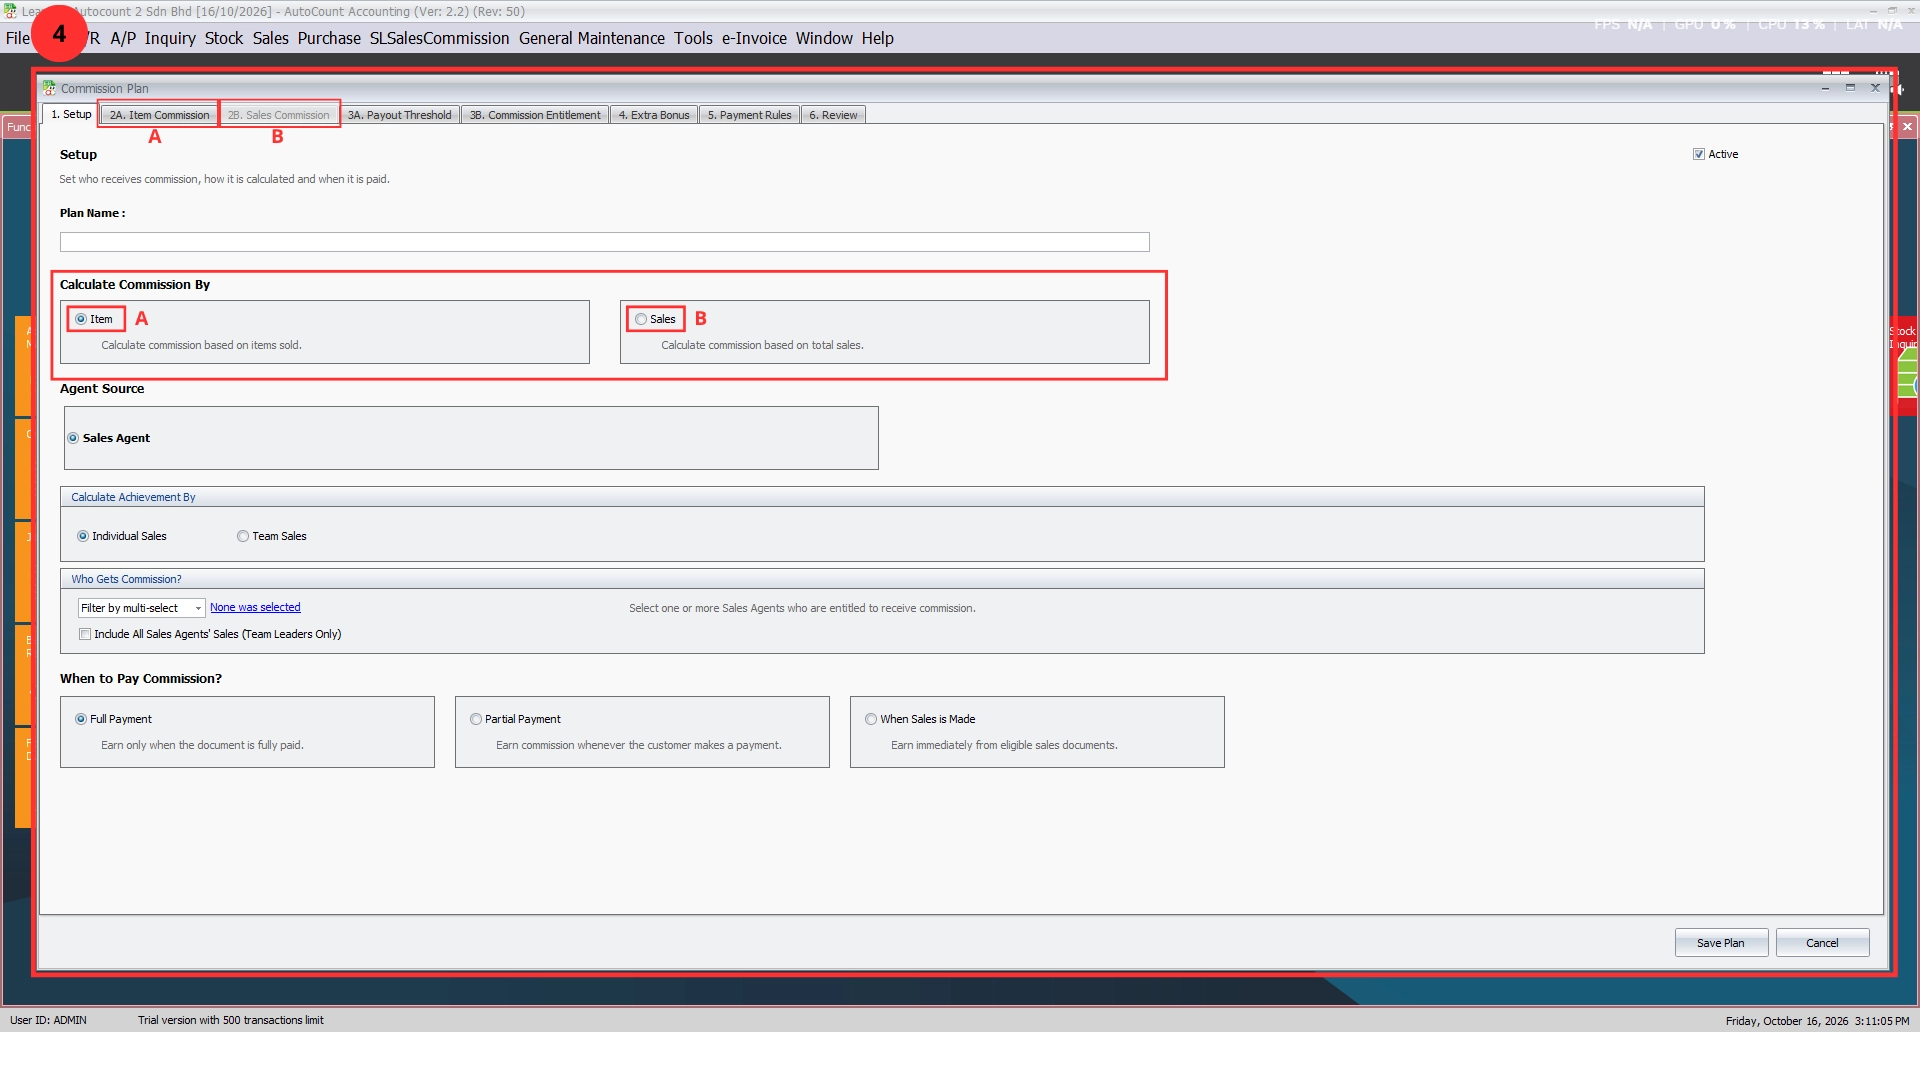
The AutoCount Sales Commission Plugin allows businesses to create customized Commission Plans that determine how commissions are calculated.
Commission calculations can be based on two main methods:
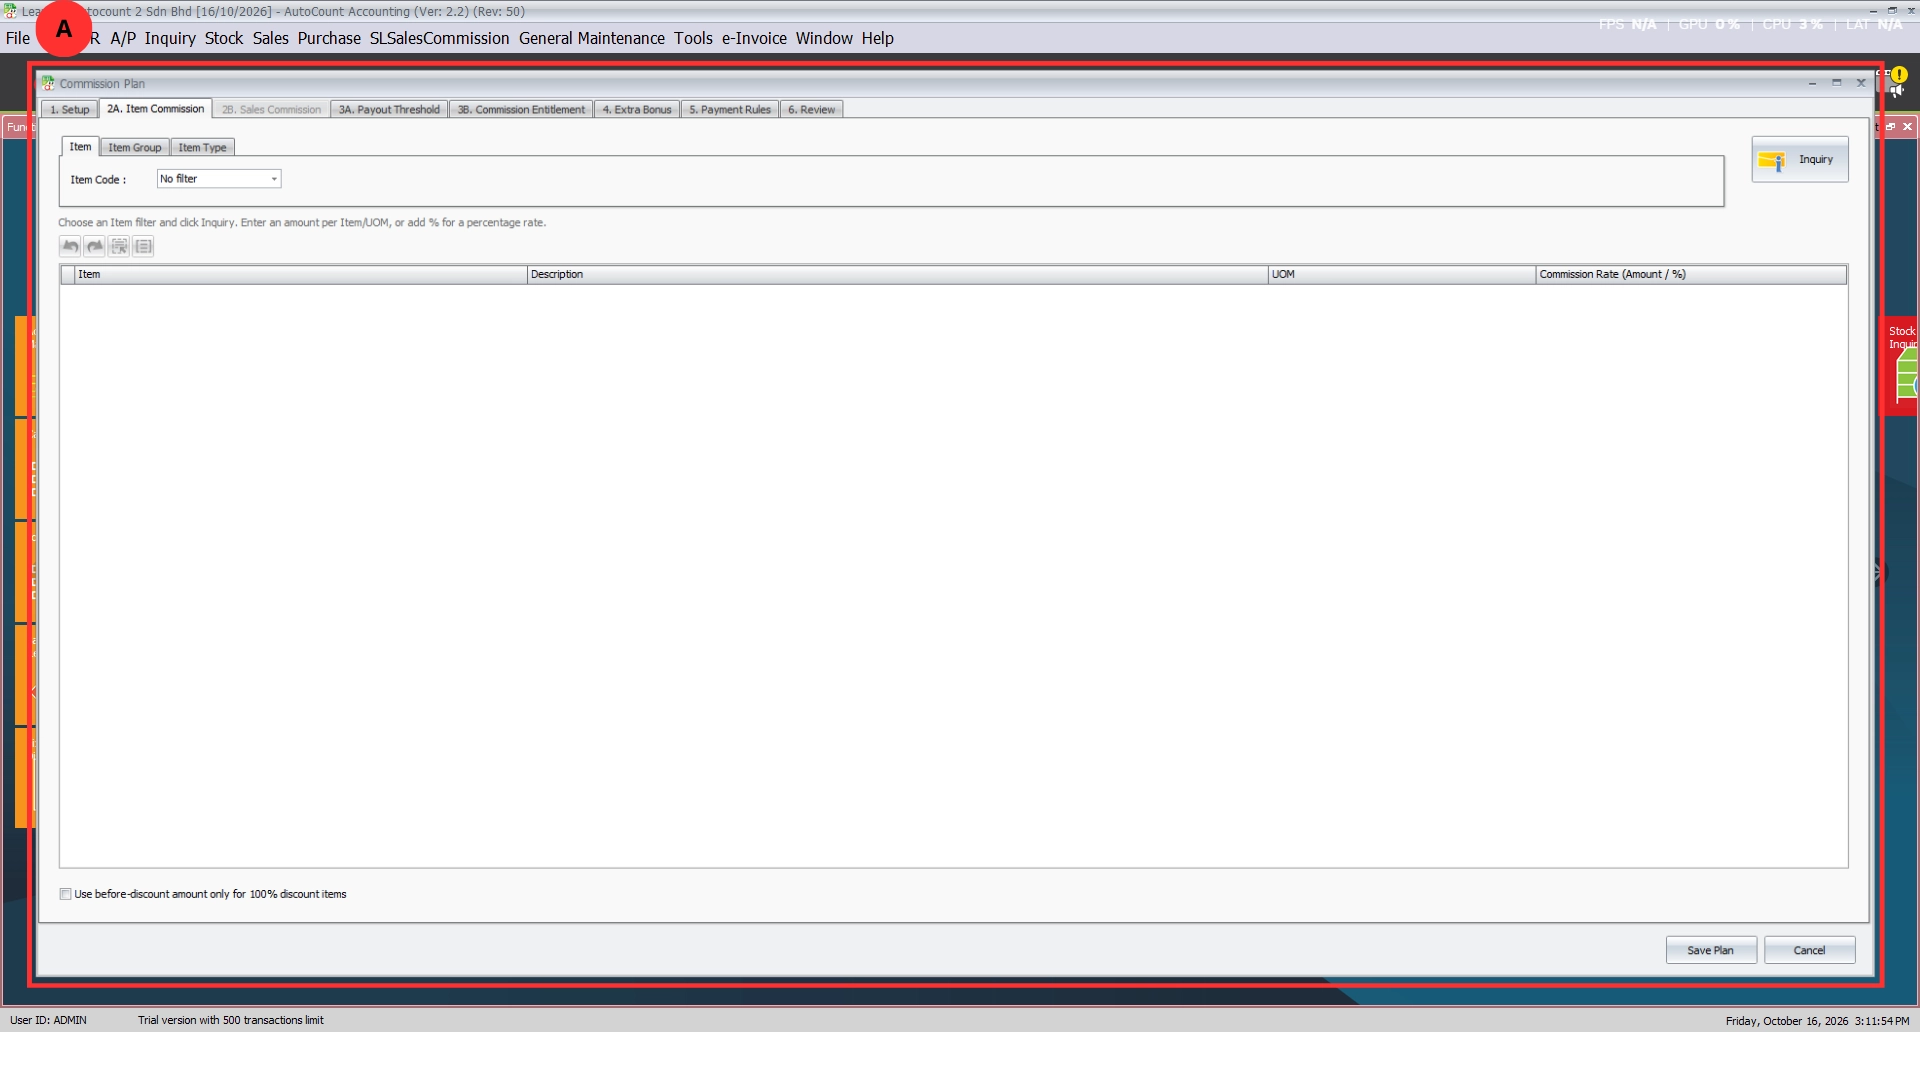
- By Item: Calculate commissions according to item-specific rates, including supported item classifications and units of measurement.
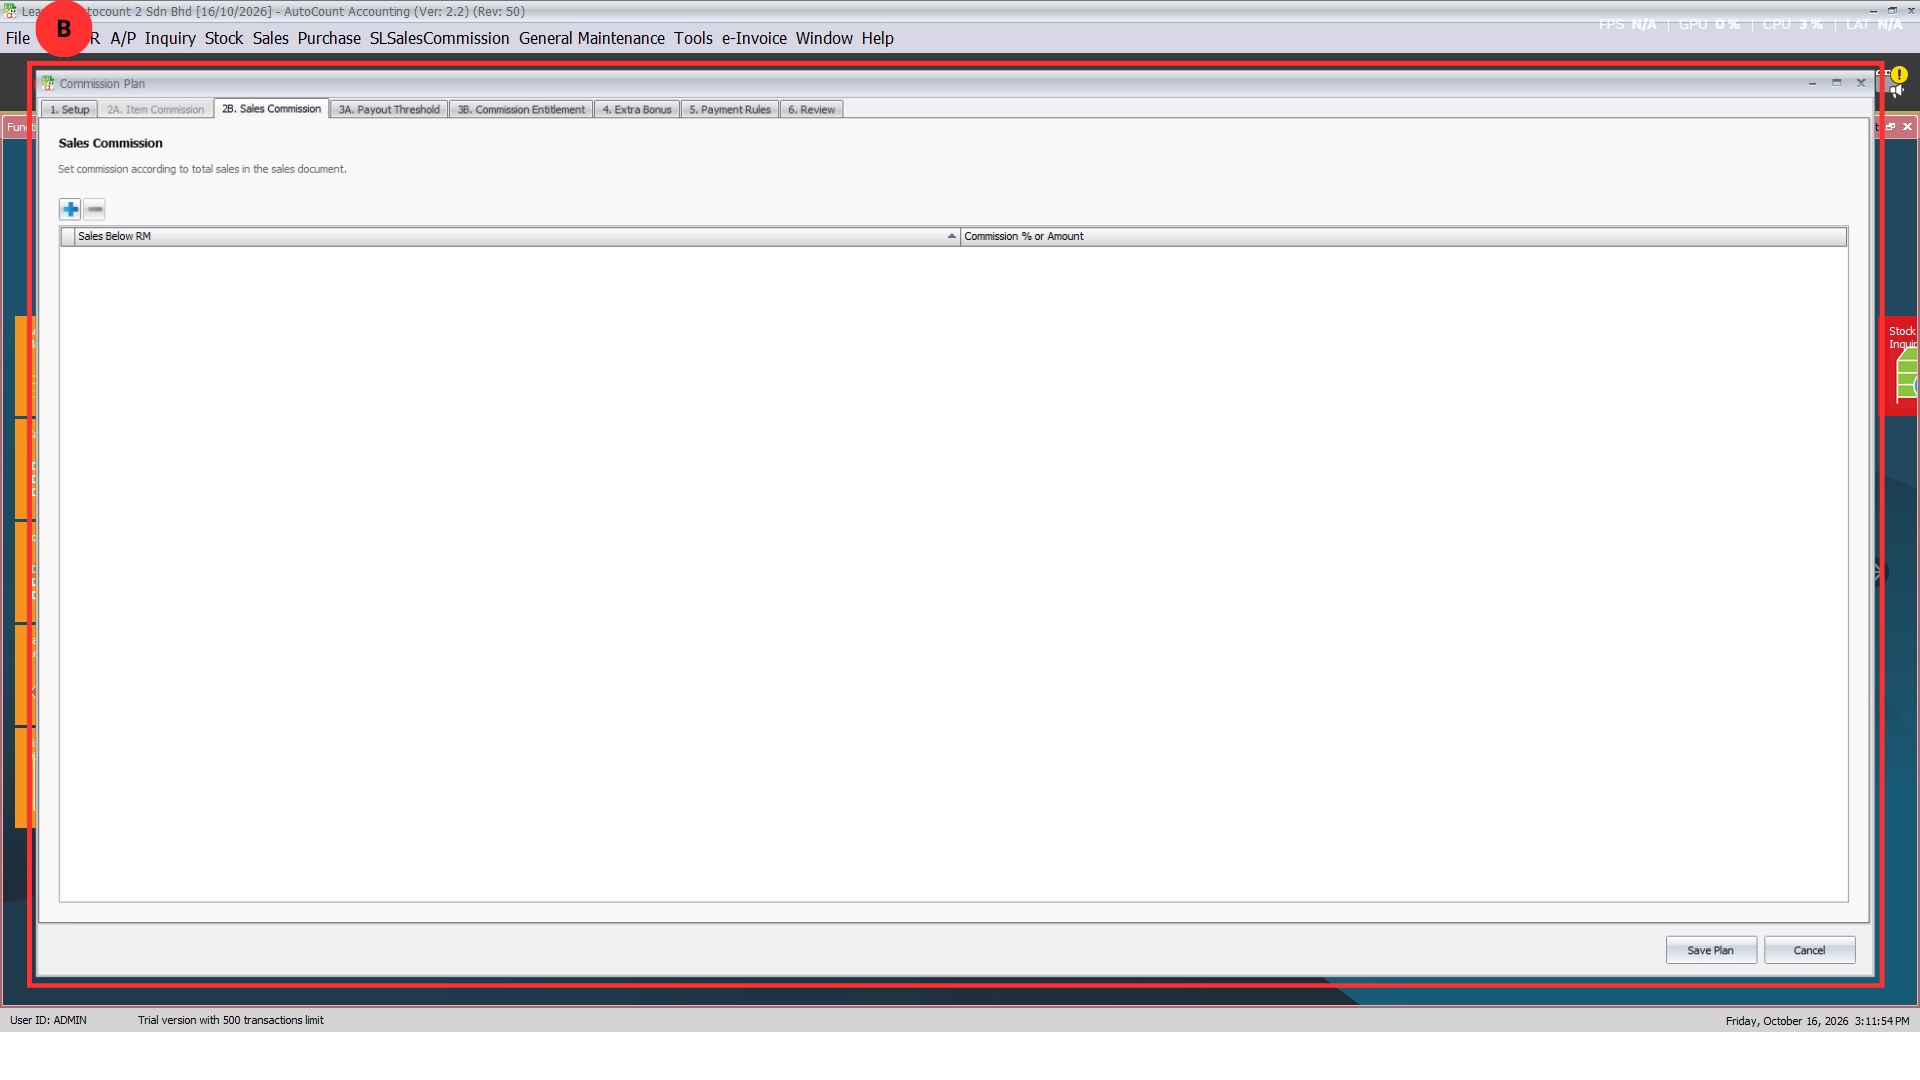
- By Sales Document: Calculate commissions according to the overall sales document value using defined commission amounts or percentage bands.
Businesses can maintain commission rates that reflect their sales policies and apply the relevant plan to eligible sales agents.
This helps eliminate inconsistent manual calculations and supports more flexible commission structures across different products and sales transactions.
Pro Tip:
Select a commission calculation method that matches your business’s sales incentive policy to maintain consistent commission results.
Feature 2 — Payment-Based Commission Release and Collection Incentives
Some businesses prefer to recognize sales commissions only after customers have made payments, rather than immediately when sales documents are issued.
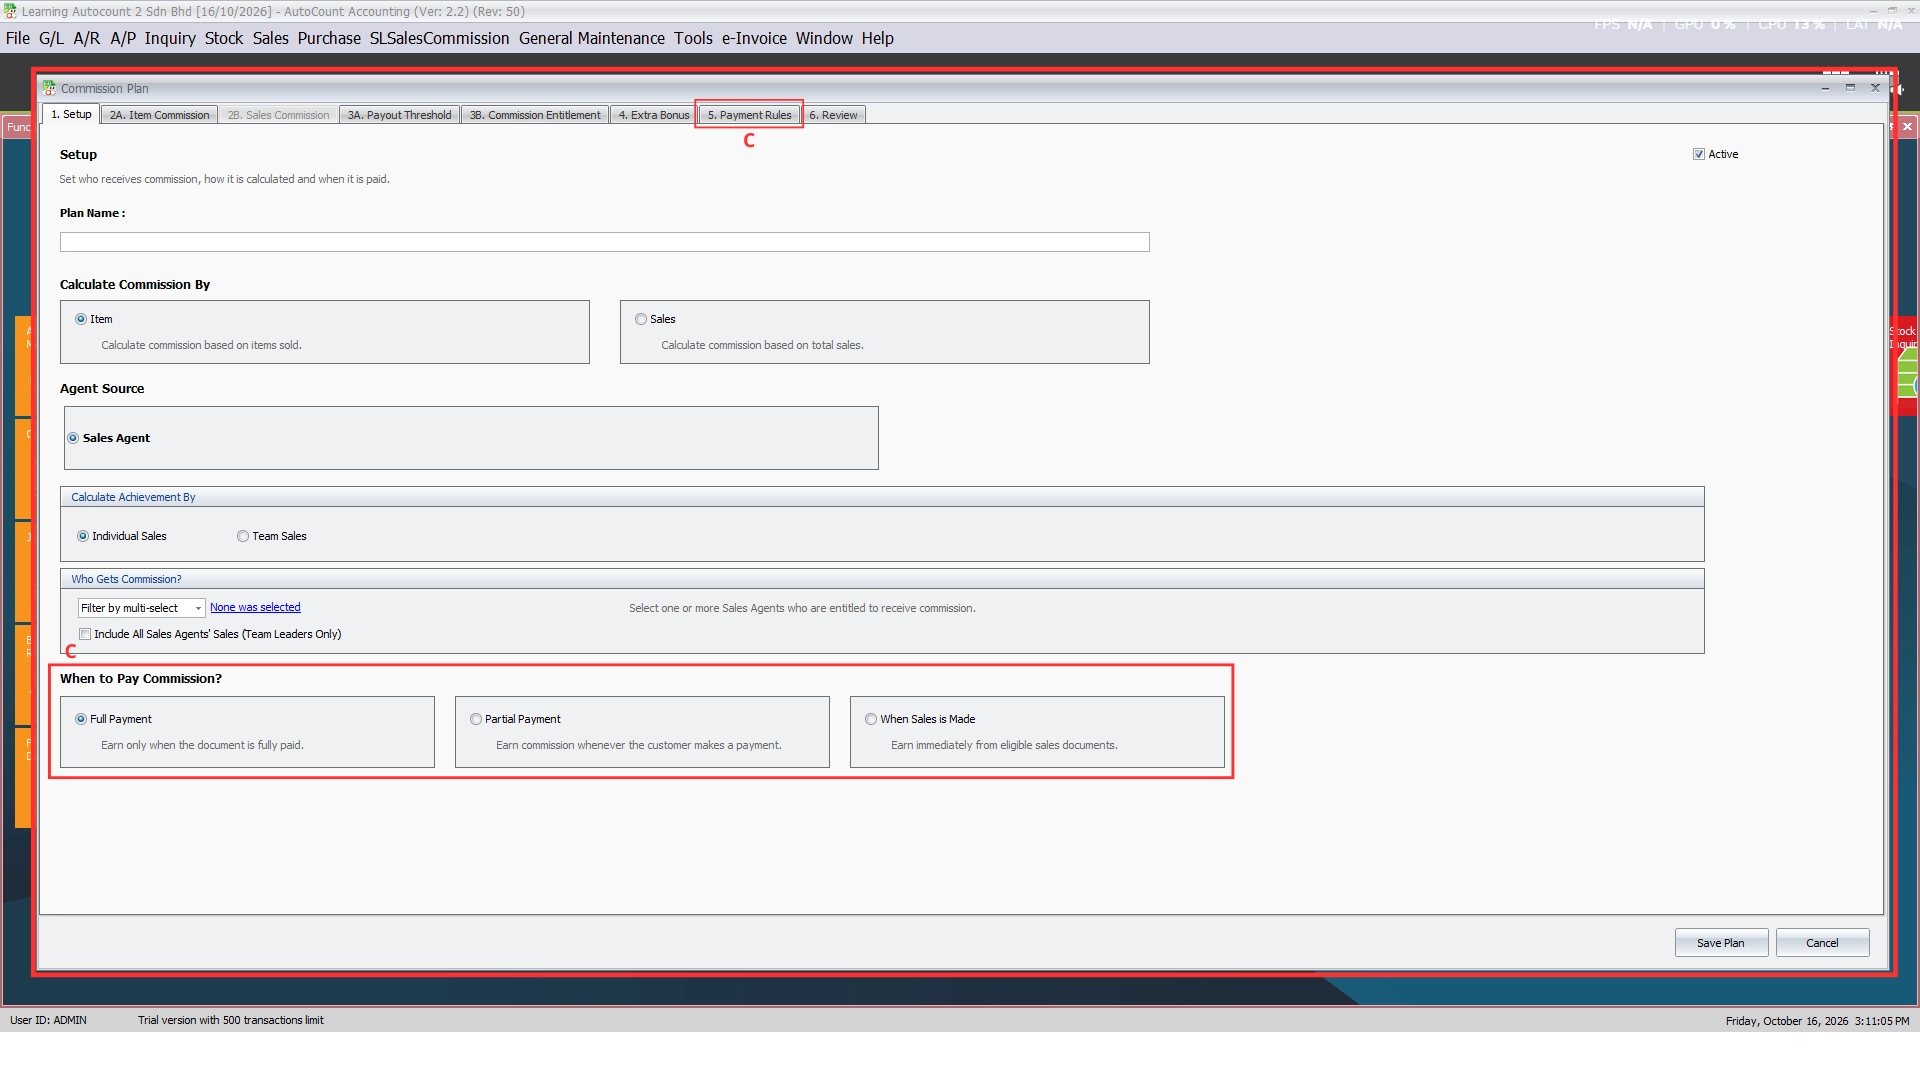
The AutoCount Sales Commission Plugin supports different commission release methods according to the configured Commission Plan.
Available payment conditions include:
- By Sales: Commission is calculated according to the sales document without waiting for customer payment.
- Partial Payment: Commission can be released progressively as eligible customer payments are received.
- Full Payment: Commission is released after the relevant invoice has been fully settled.
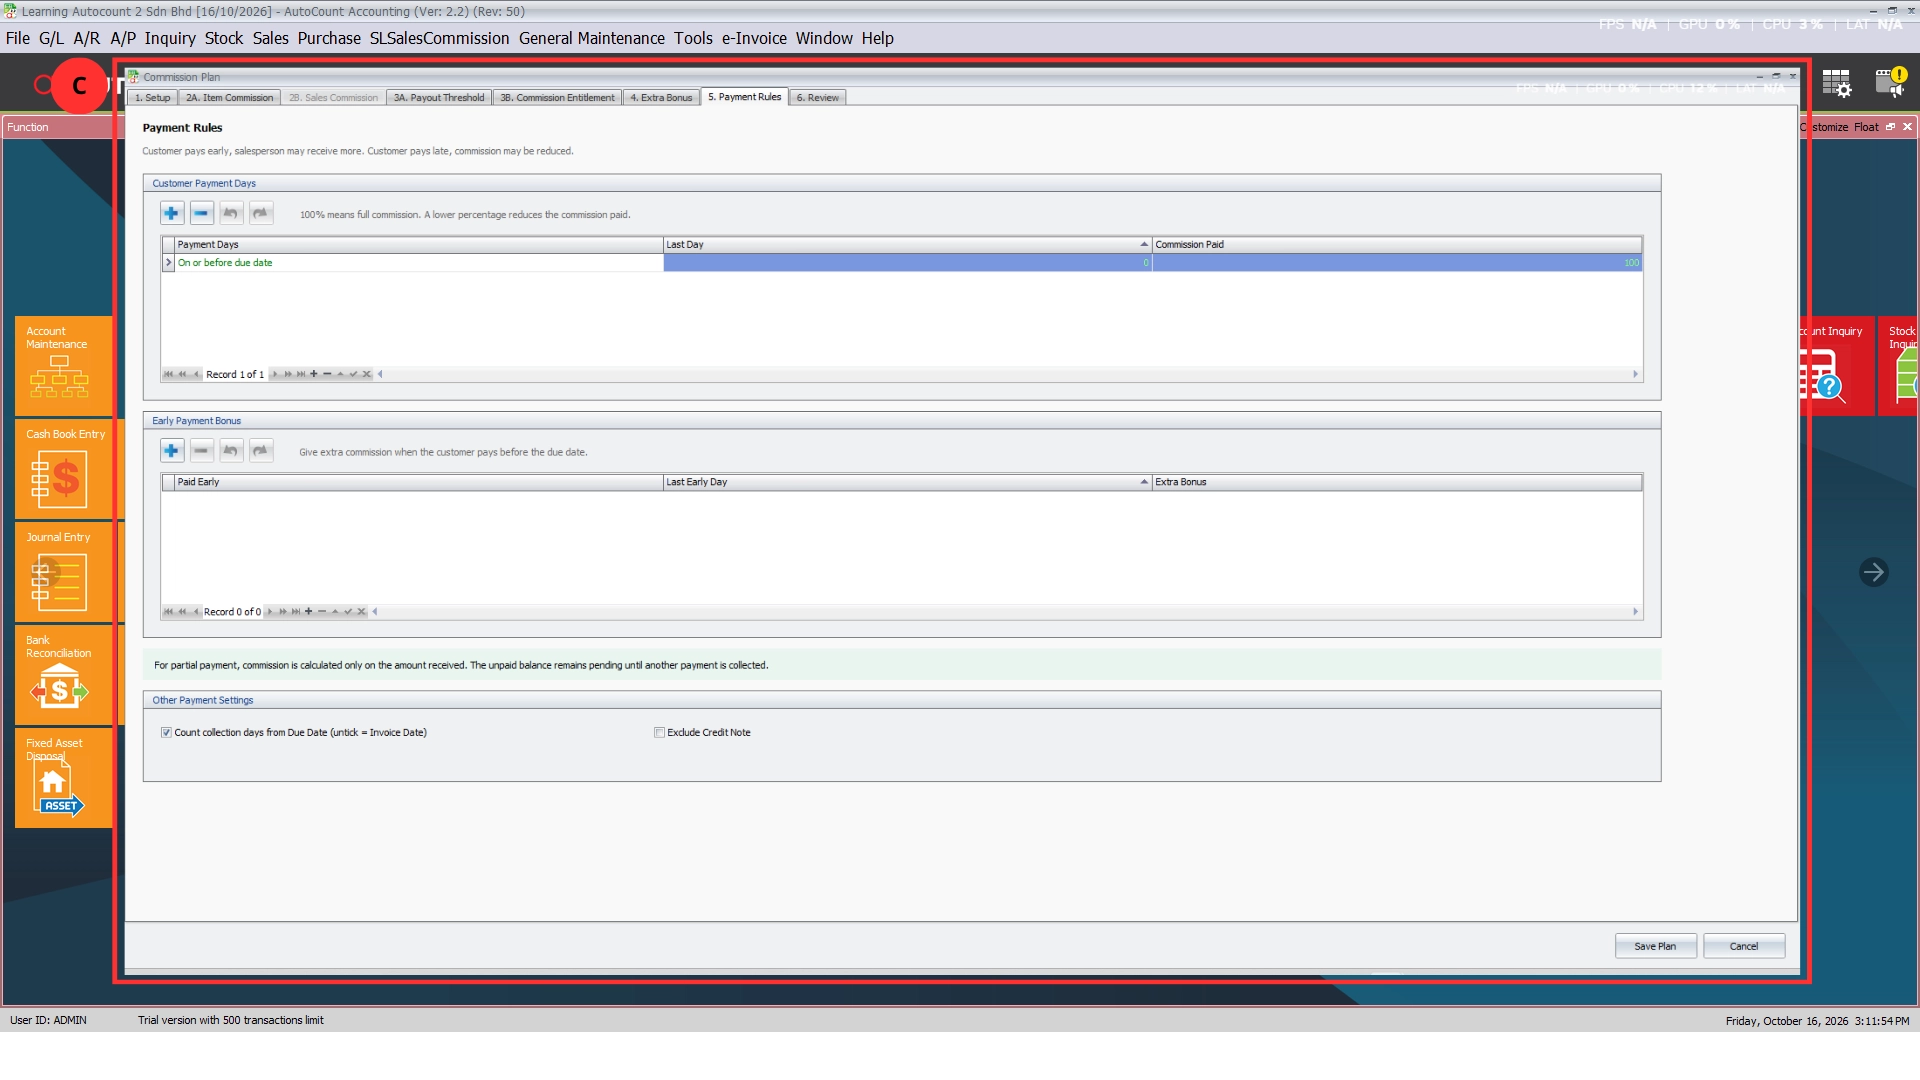
The plugin also supports payment timing rules that can adjust commission amounts according to customer collection days.
Businesses can define commission adjustments for late payments and additional incentives for early customer payments.
This helps companies align commission entitlement with their collection policies and encourages better attention to customer payment performance.
Pro Tip:
Consider linking commission release to customer payments when collection performance is an important part of your sales incentive policy.
Feature 3 — Sales Target, Commission Entitlement & Bonus Management
Businesses often want to reward sales agents not only for completing transactions but also for achieving specific sales targets.
The AutoCount Sales Commission Plugin provides commission target and incentive management features to support performance-based commission structures.
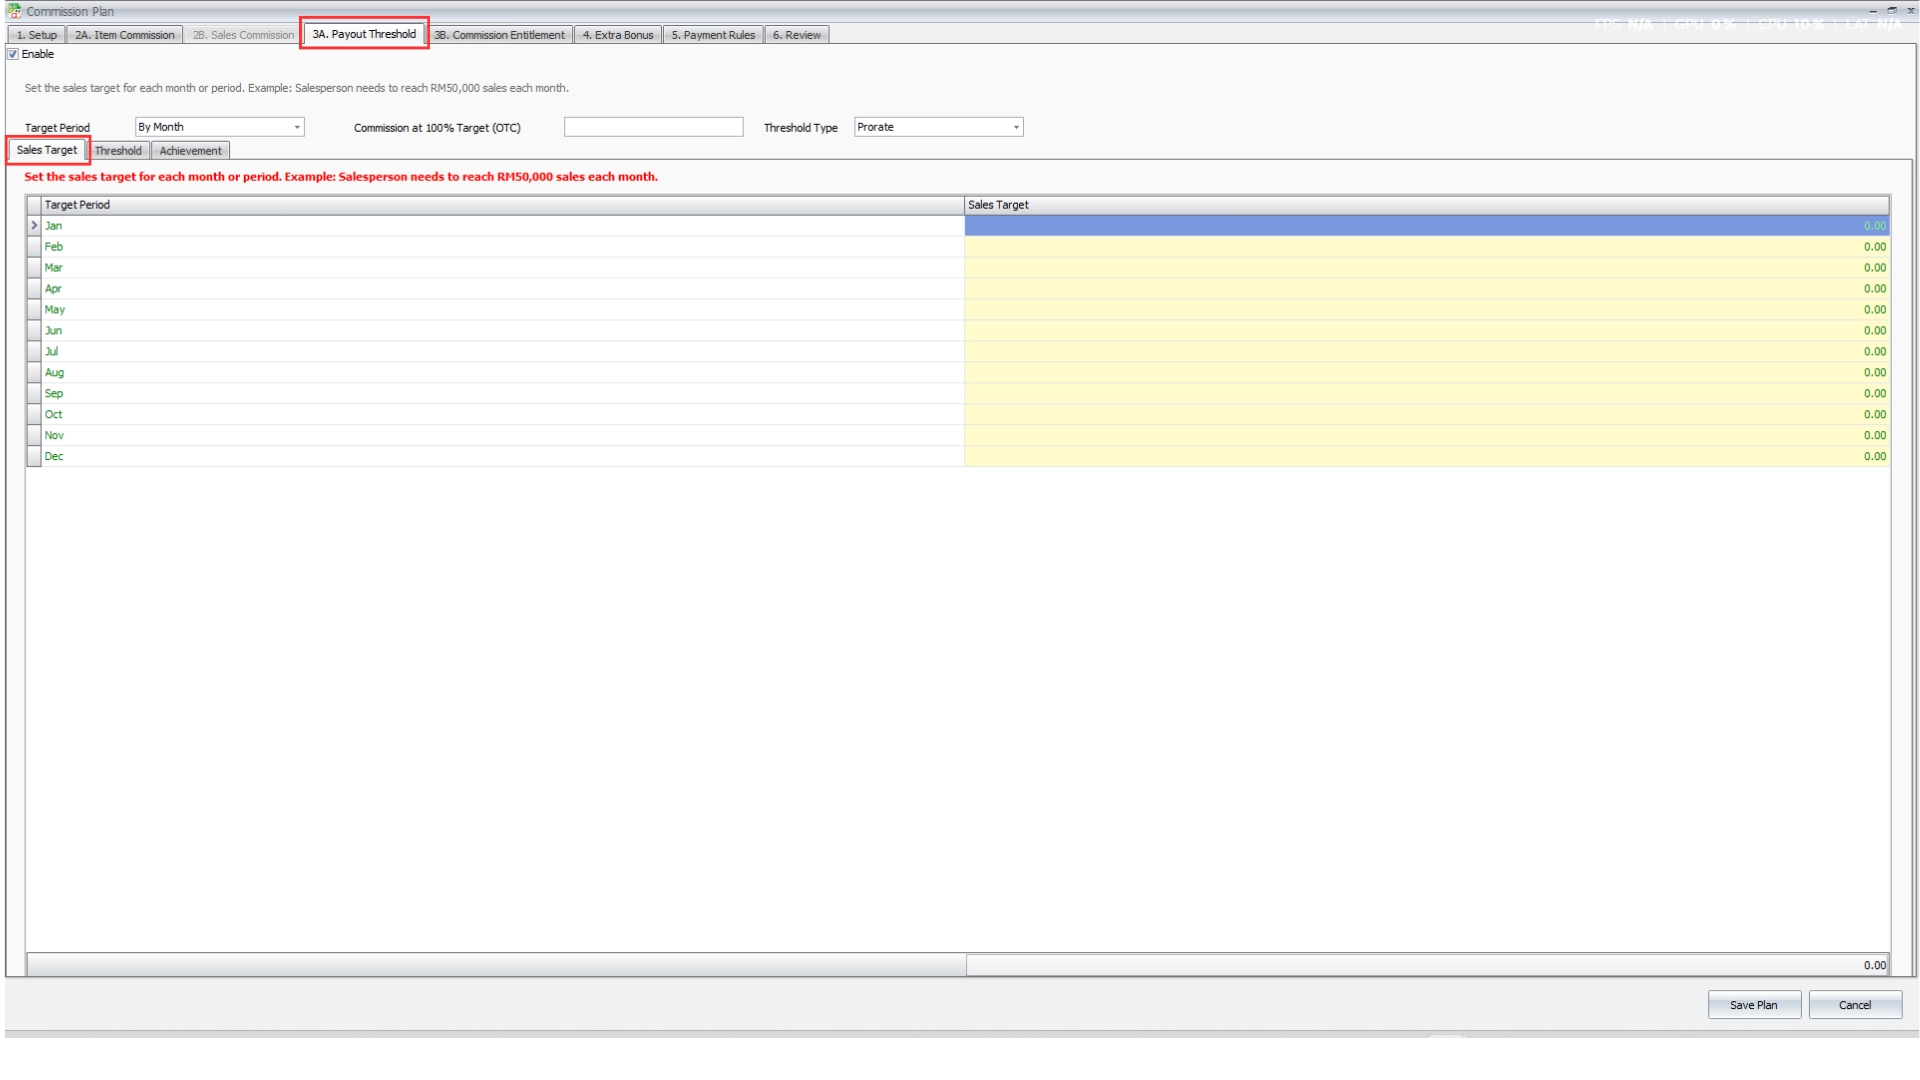
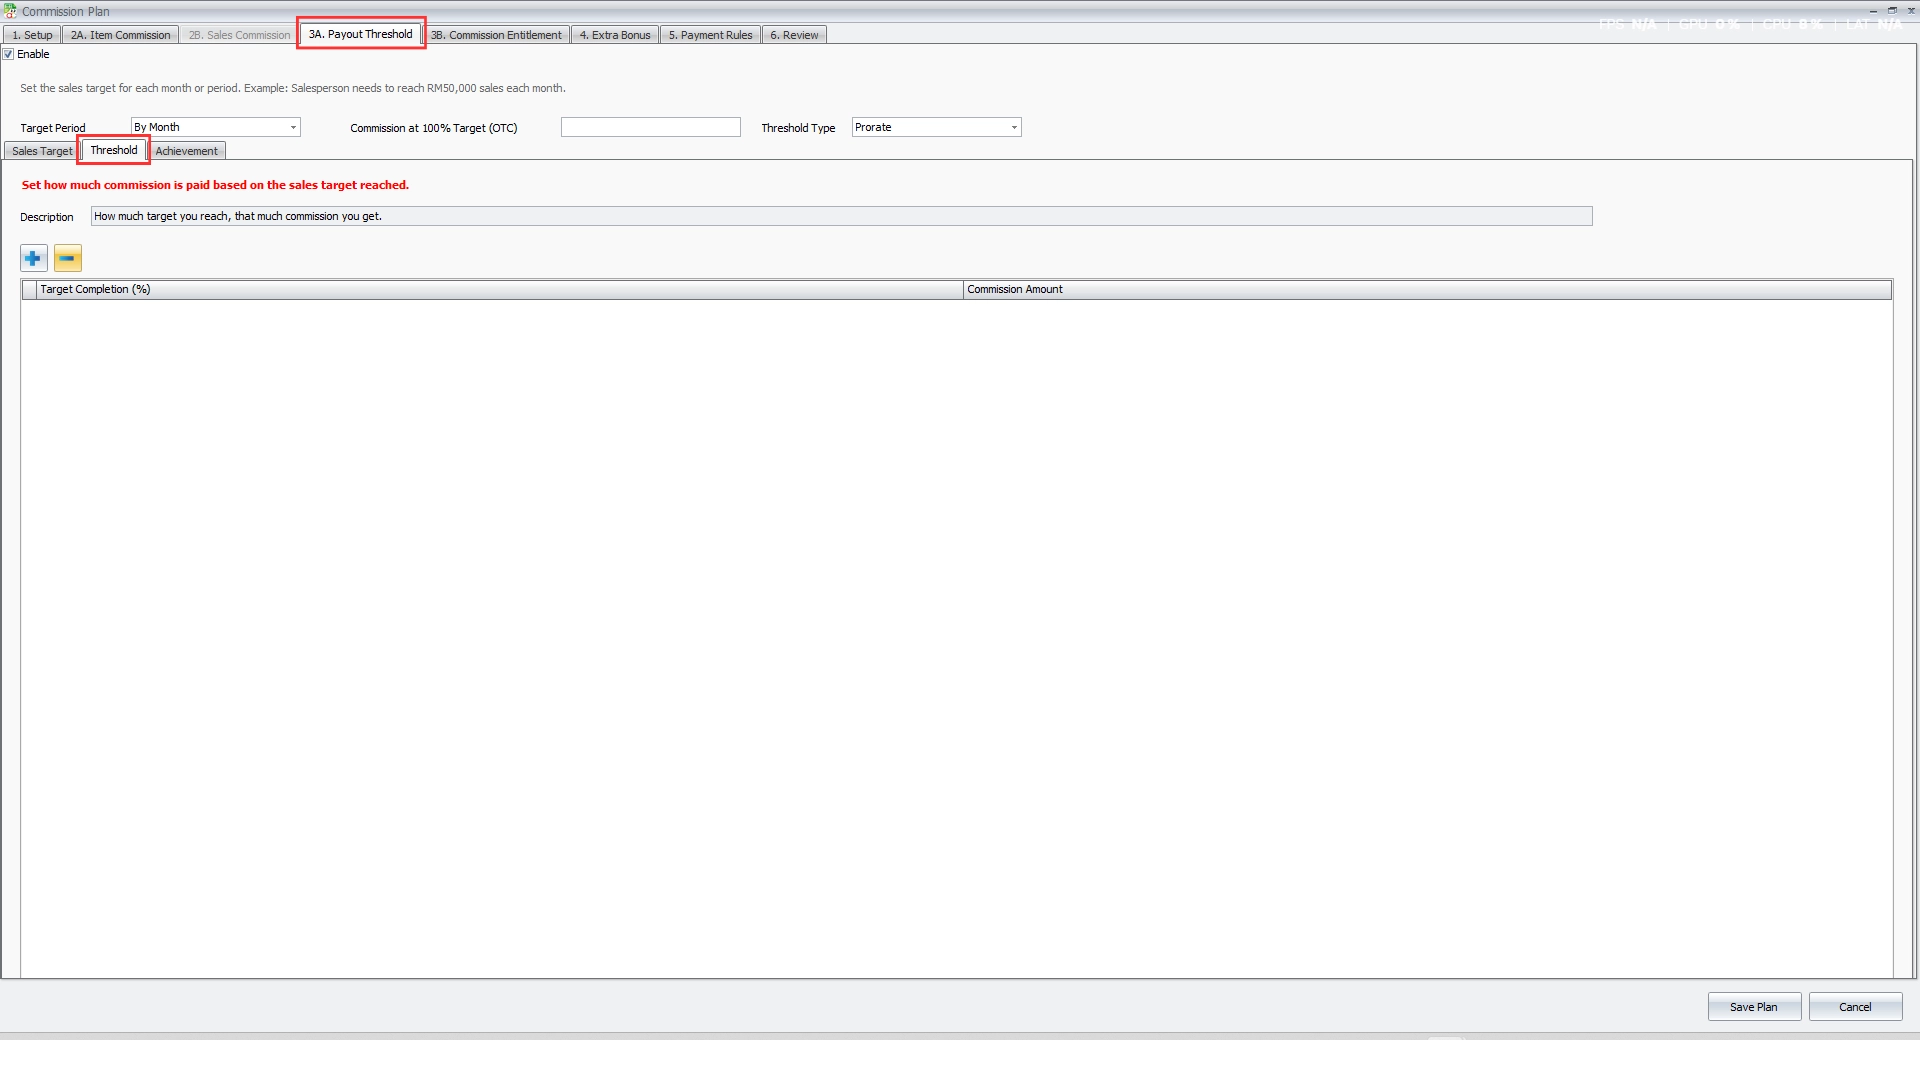
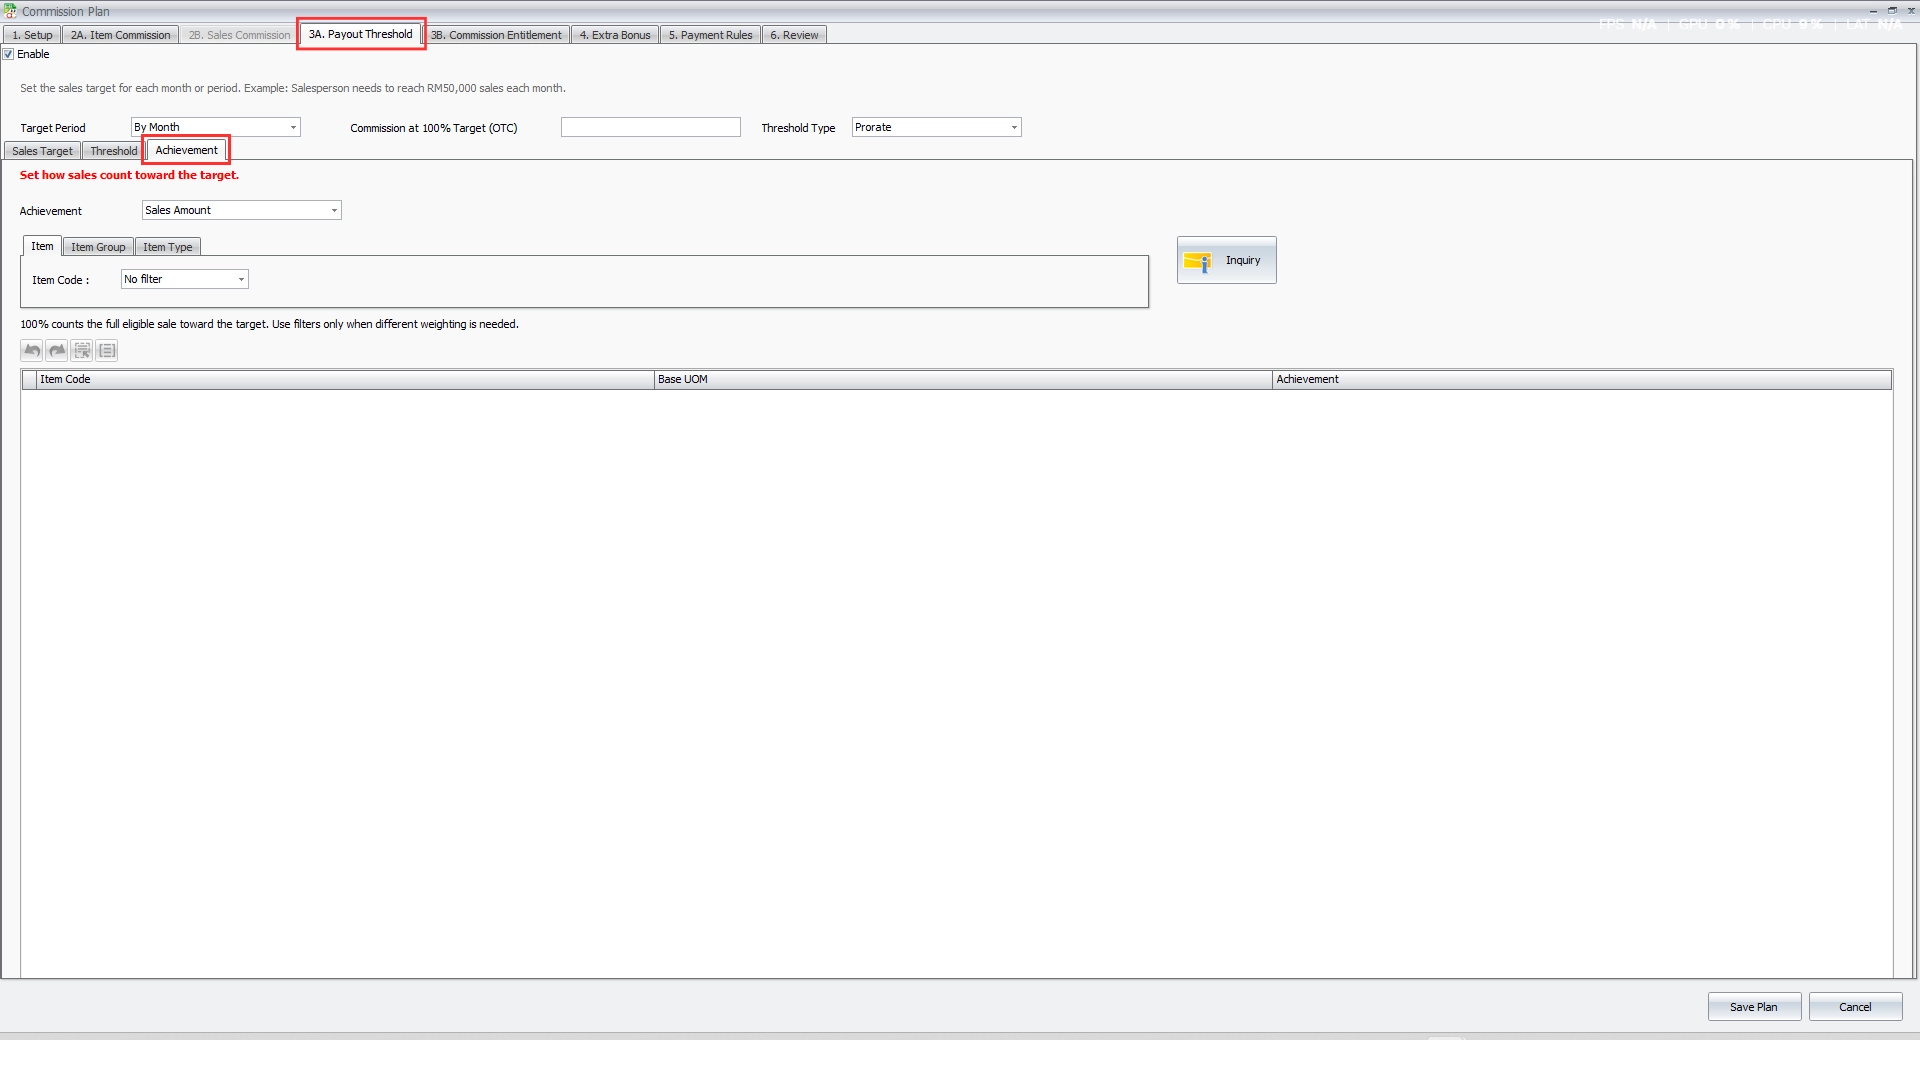
Businesses can define sales targets for different periods and apply commission thresholds according to target achievement.
The plugin supports target-based commission methods, including fixed achievement levels and prorated commission calculations.
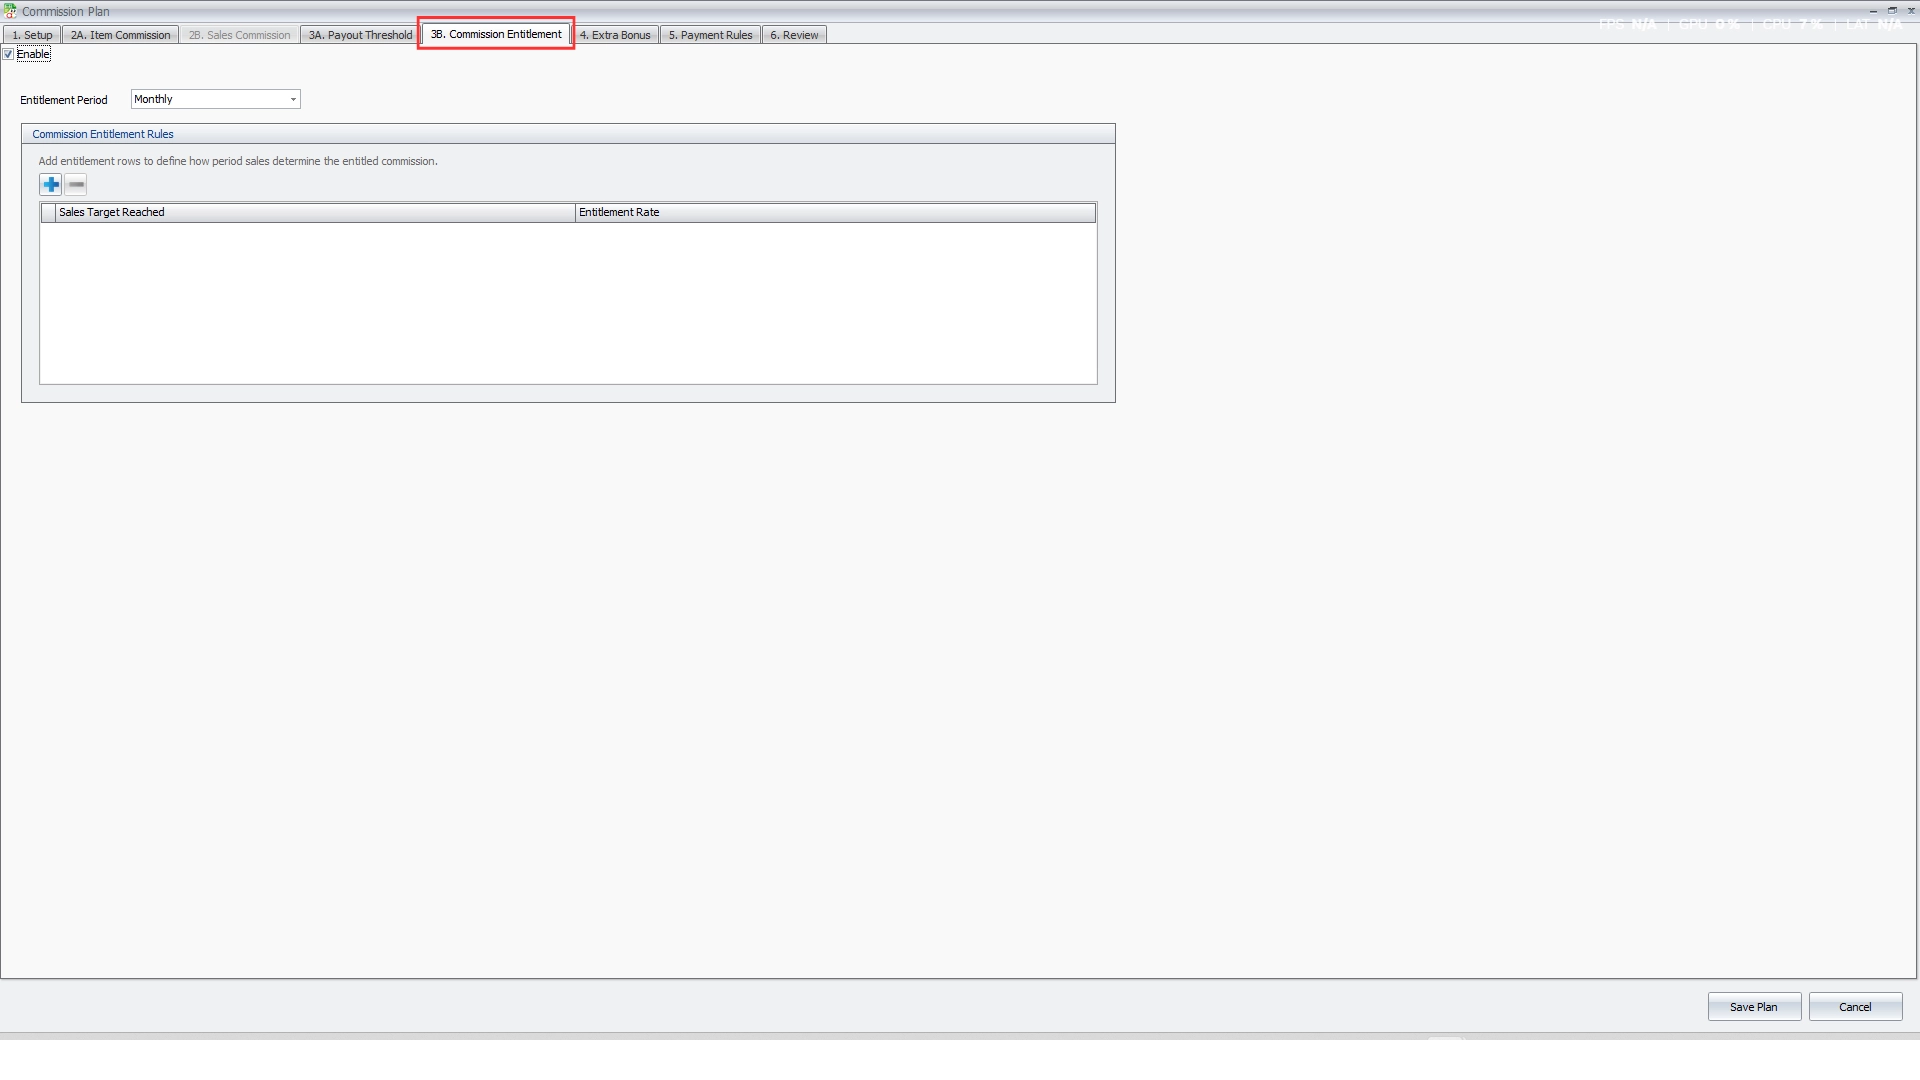
Commission Entitlement rules can also adjust the commission amount according to eligible sales within the defined entitlement period.
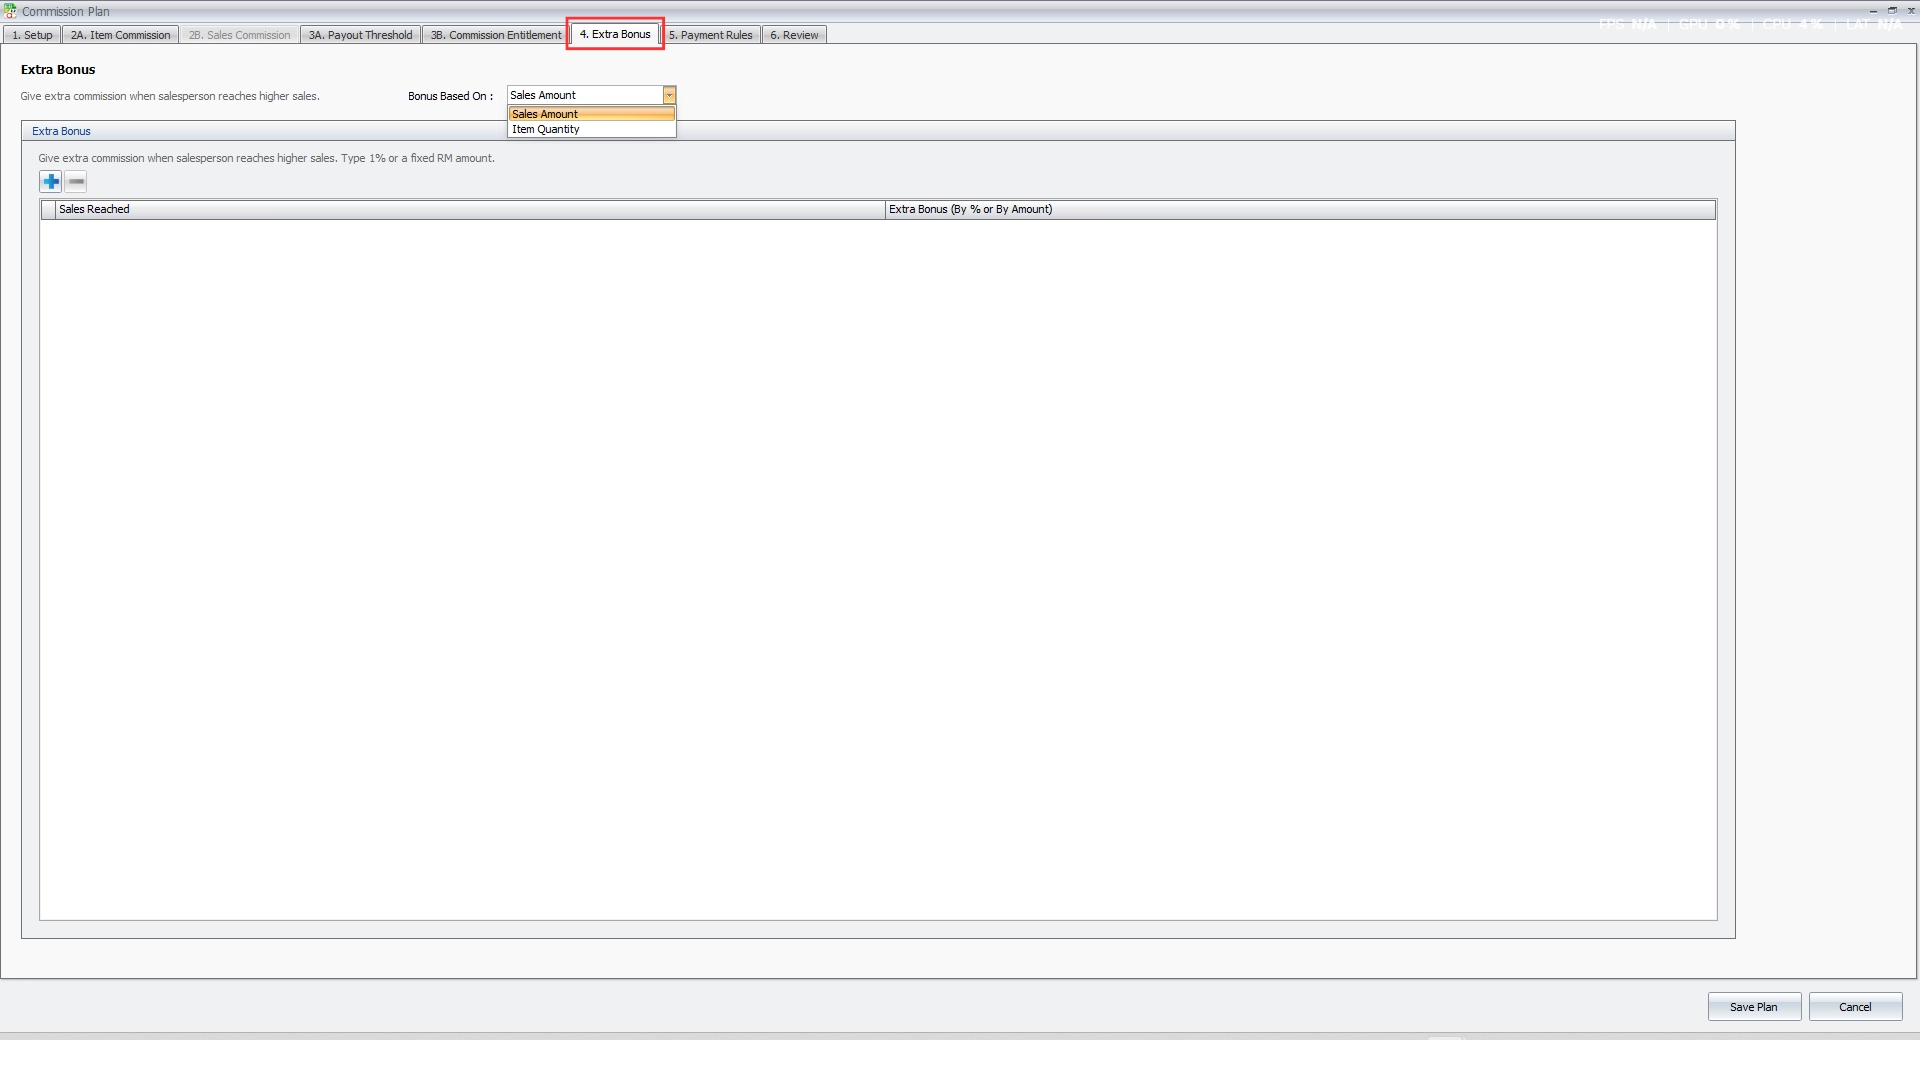
For additional incentives, businesses can configure extra bonuses based on sales achievements or item quantities.
This provides greater flexibility for rewarding sales performance while maintaining standardized calculation rules.
Pro Tip:
Establish achievable sales targets and clearly defined incentive tiers so sales agents understand how their performance affects commission entitlement.
Feature 4 — Individual and Team-Based Commission Management
Companies with multiple sales agents may need different commission arrangements for individual employees and sales teams.
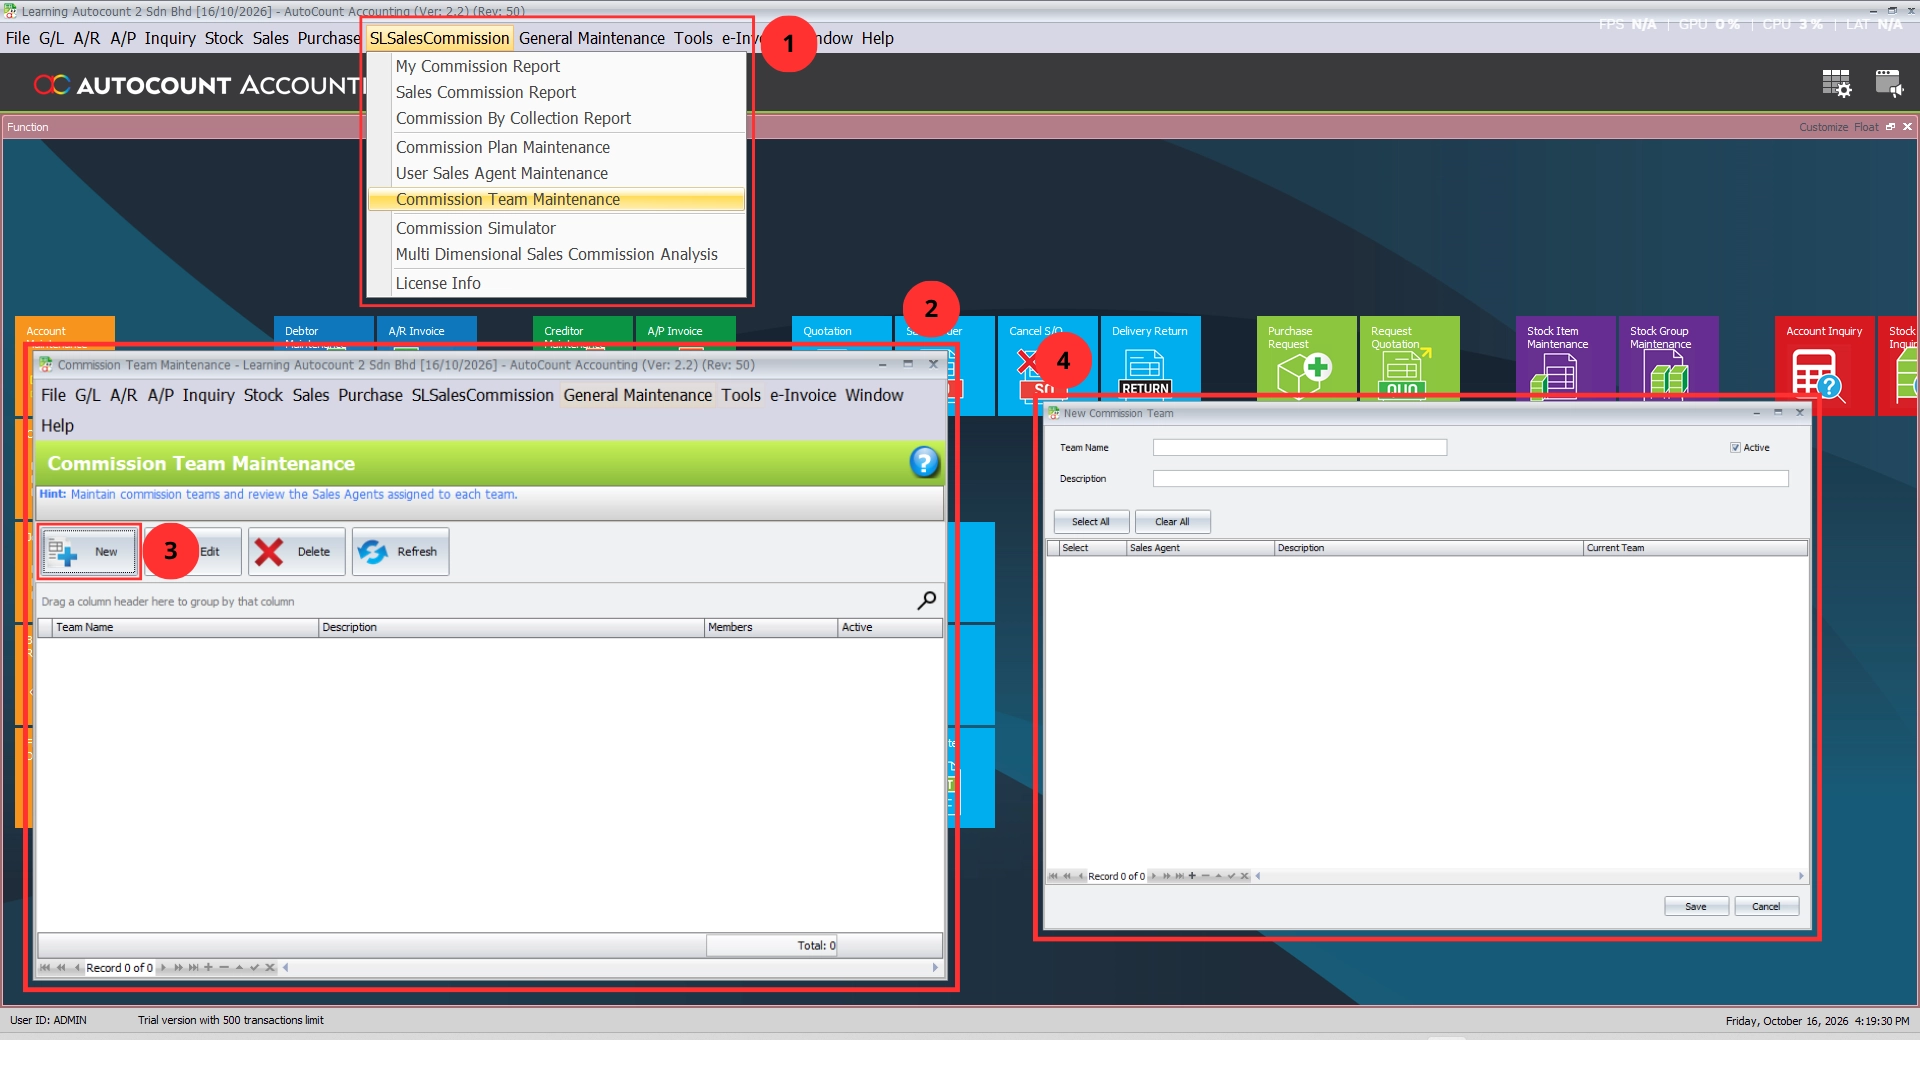
The AutoCount Sales Commission Plugin allows businesses to organize sales agents into Commission Teams with assigned team leaders and members.
Commission Plans can be associated with individual agents or configured to consider team sales performance.
This helps businesses support different incentive structures without maintaining separate manual spreadsheets for each employee.
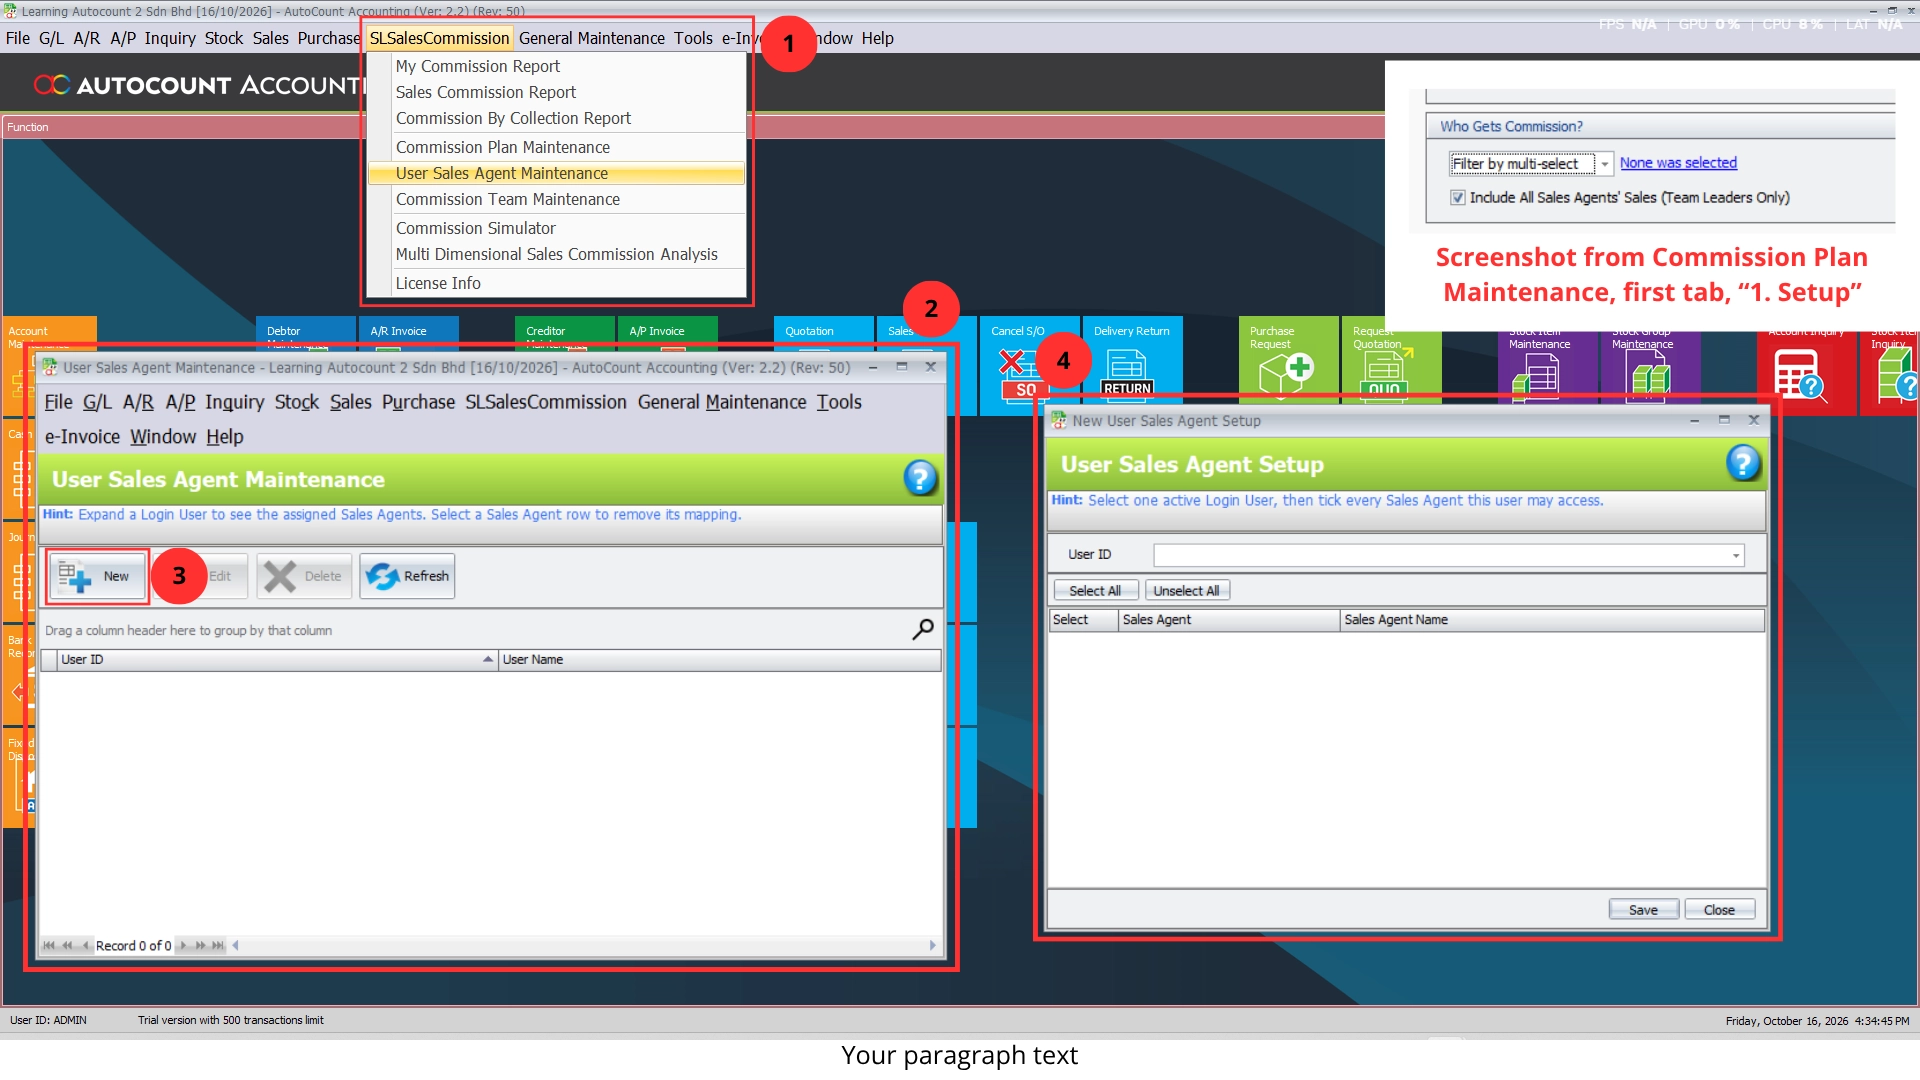
The plugin also provides User Sales Agent Setup to associate AutoCount login users with their relevant Sales Agent records.
This supports individual commission visibility and helps keep commission information organized according to employee responsibilities.
Pro Tip:
Maintain accurate sales agent and commission team records to ensure commission calculations and personal reports reflect the correct employees.
Feature 5 — Detailed Sales Commission Calculation and Reporting
Preparing commission reports manually can become challenging when businesses need to review multiple sales agents, customer transactions, and payment records.
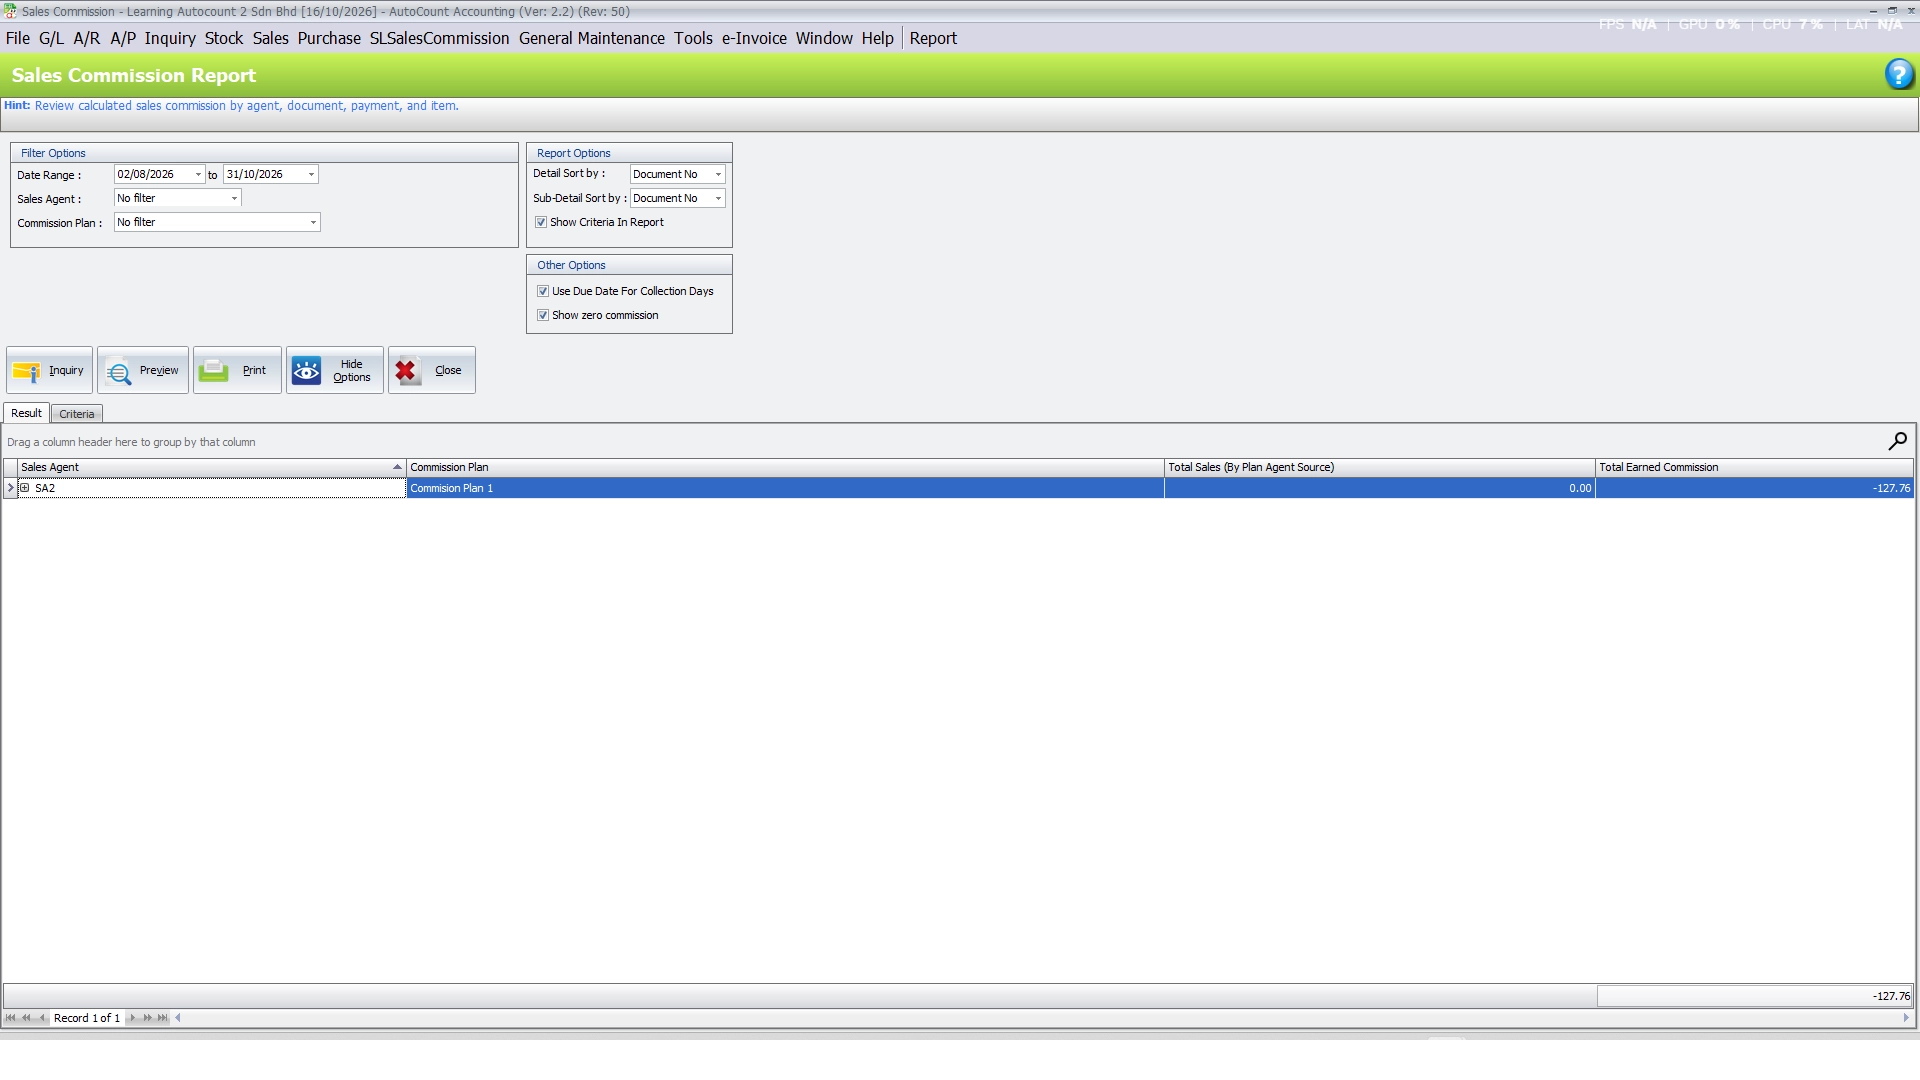
The AutoCount Sales Commission Plugin provides a Sales Commission Report that calculates commission information from the relevant sales and payment records.
Businesses can filter commission information according to selected date ranges, sales agents, and commission plans.
The report provides visibility into important information such as:
- Total sales
- Customer collections
- Earned commissions
- Related sales documents
- Payment and credit note details
- Item-level commission information
Reports can be reviewed, previewed, printed, or exported according to available functions and user permissions.
This allows sales managers and finance teams to monitor commission results more efficiently and review the transactions behind the calculated amounts.
Pro Tip:
Review commission reports regularly and investigate unusual amounts before finalizing the company’s commission payment process.
Feature 6 — Personal Commission Tracking for Sales Agents
Sales agents often want to know how much commission they have earned and which transactions contribute to their total commission.
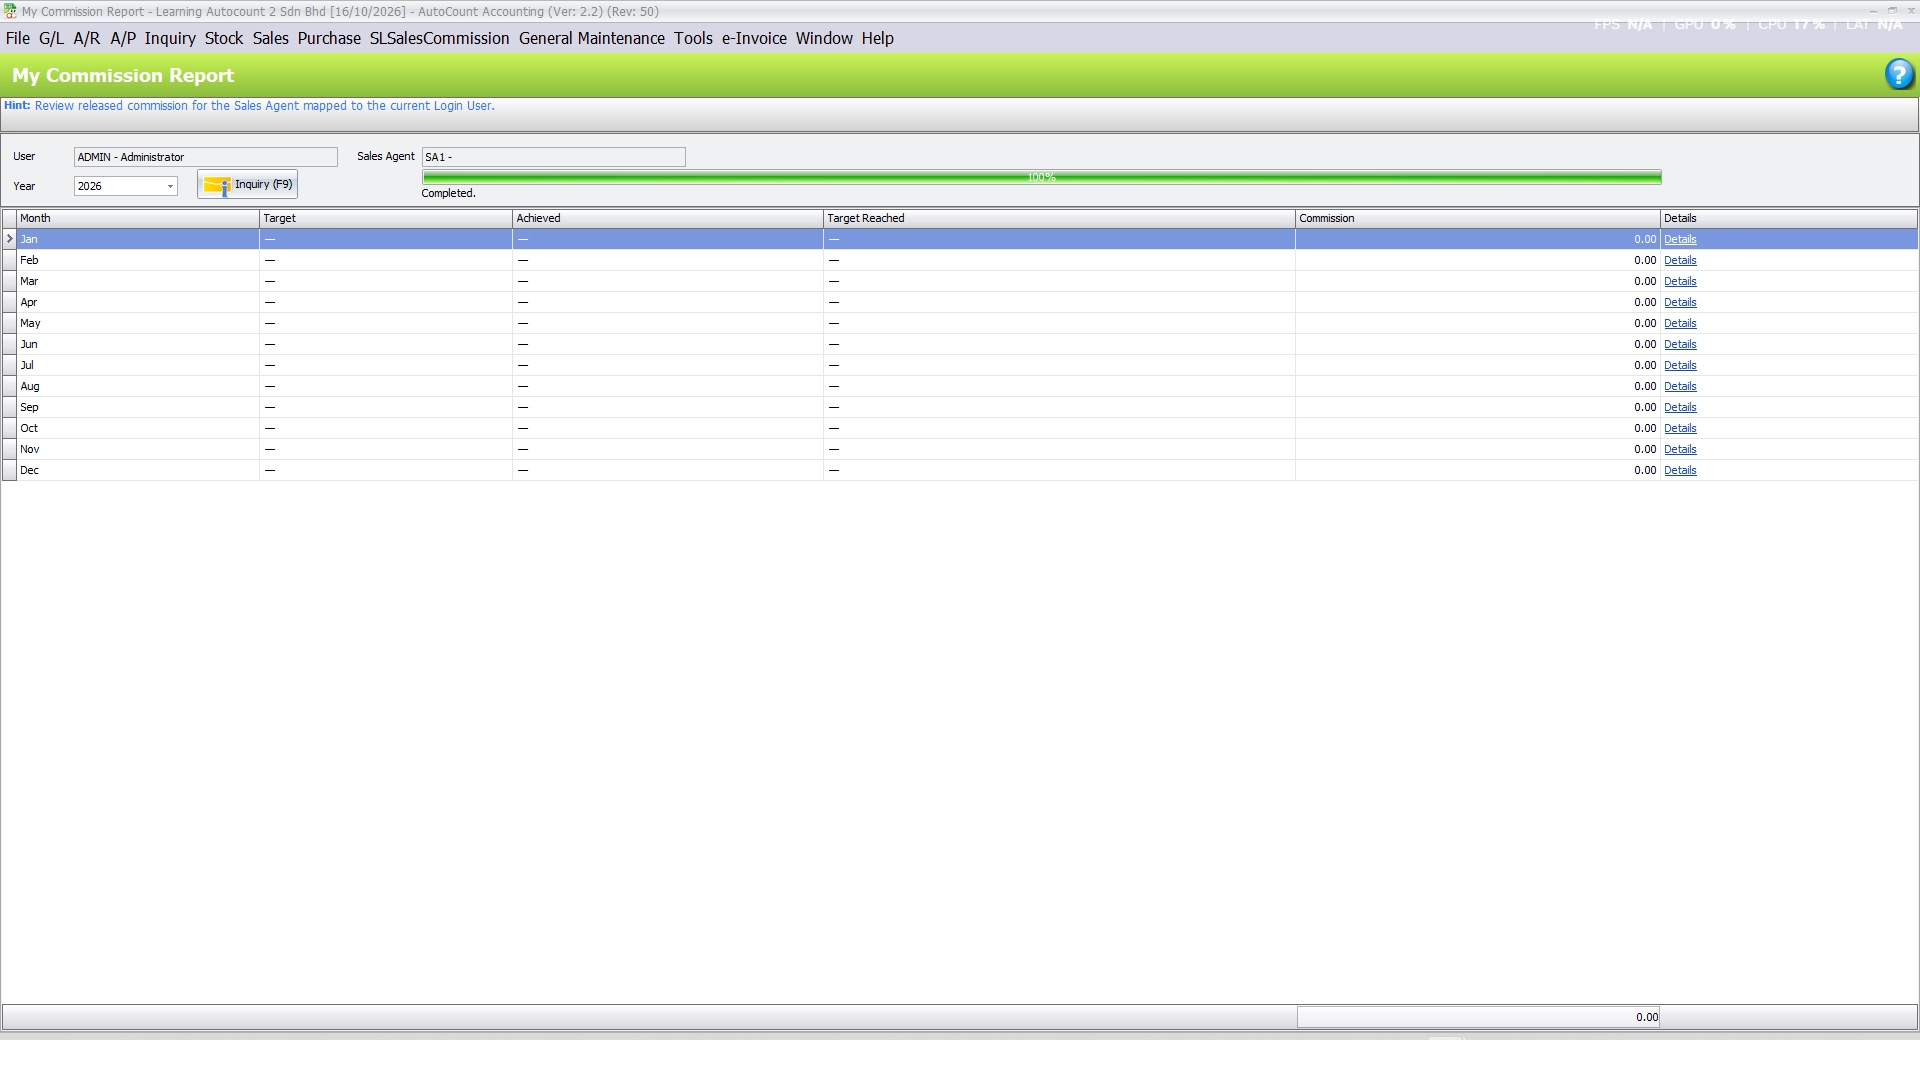
The AutoCount Sales Commission Plugin provides a My Commission Report that allows employees to review their commission information through their assigned sales agent records.
The report displays monthly commission information together with relevant sales targets and achievement results.
Sales agents can also review detailed transaction records, including earned, pending, and potential commission information where applicable.
The report includes explanations that help users understand how the relevant commission amounts were determined.
Access is linked to the sales agents mapped to the logged-in AutoCount user, helping prevent employees from viewing unrelated sales agents’ commission information.
This provides greater transparency and reduces repeated commission enquiries between sales teams and accounting departments.
Pro Tip:
Encourage sales agents to review their commission reports regularly so that discrepancies can be identified early.
Feature 7 — Multi-Dimensional Sales Commission Analysis
Businesses managing multiple sales agents, customers, products, and commission plans may require more detailed commission analysis.
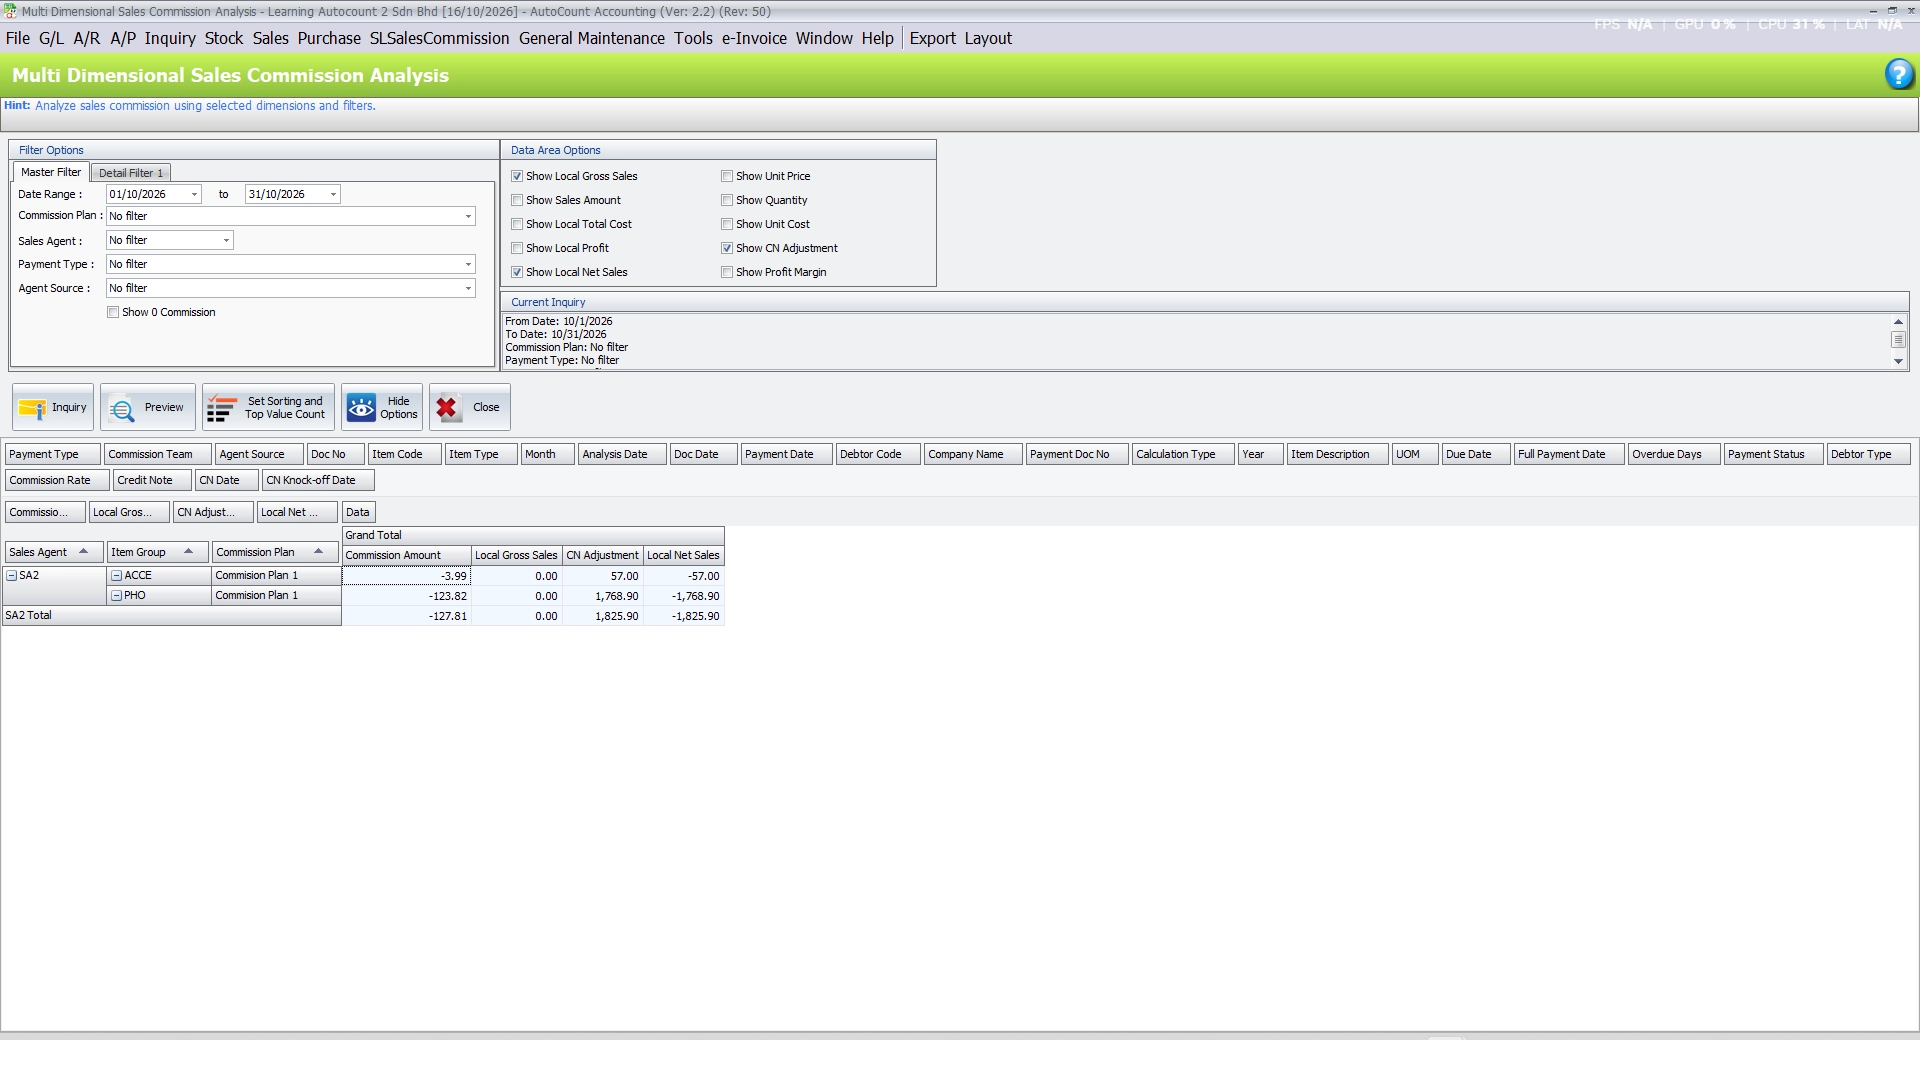
The AutoCount Sales Commission Plugin provides Multi Dimensional Sales Commission reporting to help management review commission performance from different perspectives.
The reporting function supports pivot-style analysis using dimensions such as:
- Sales agents and commission teams
- Commission plans
- Customers and sales documents
- Items and product classifications
- Sales periods
- Payment and commission status
Users can organize reporting fields and review relevant sales, payment, cost, profit, and commission information according to the available report options.
This allows management to compare commission performance, identify sales patterns, and make more informed decisions about incentive structures.
Pro Tip:
Compare commission expenses with sales and profitability information to evaluate whether incentive plans remain suitable for the business.
Feature 8 — Commission Simulation and Calculation Transparency
Complex commission plans may involve different rates, targets, entitlement conditions, bonuses, and customer payment rules.
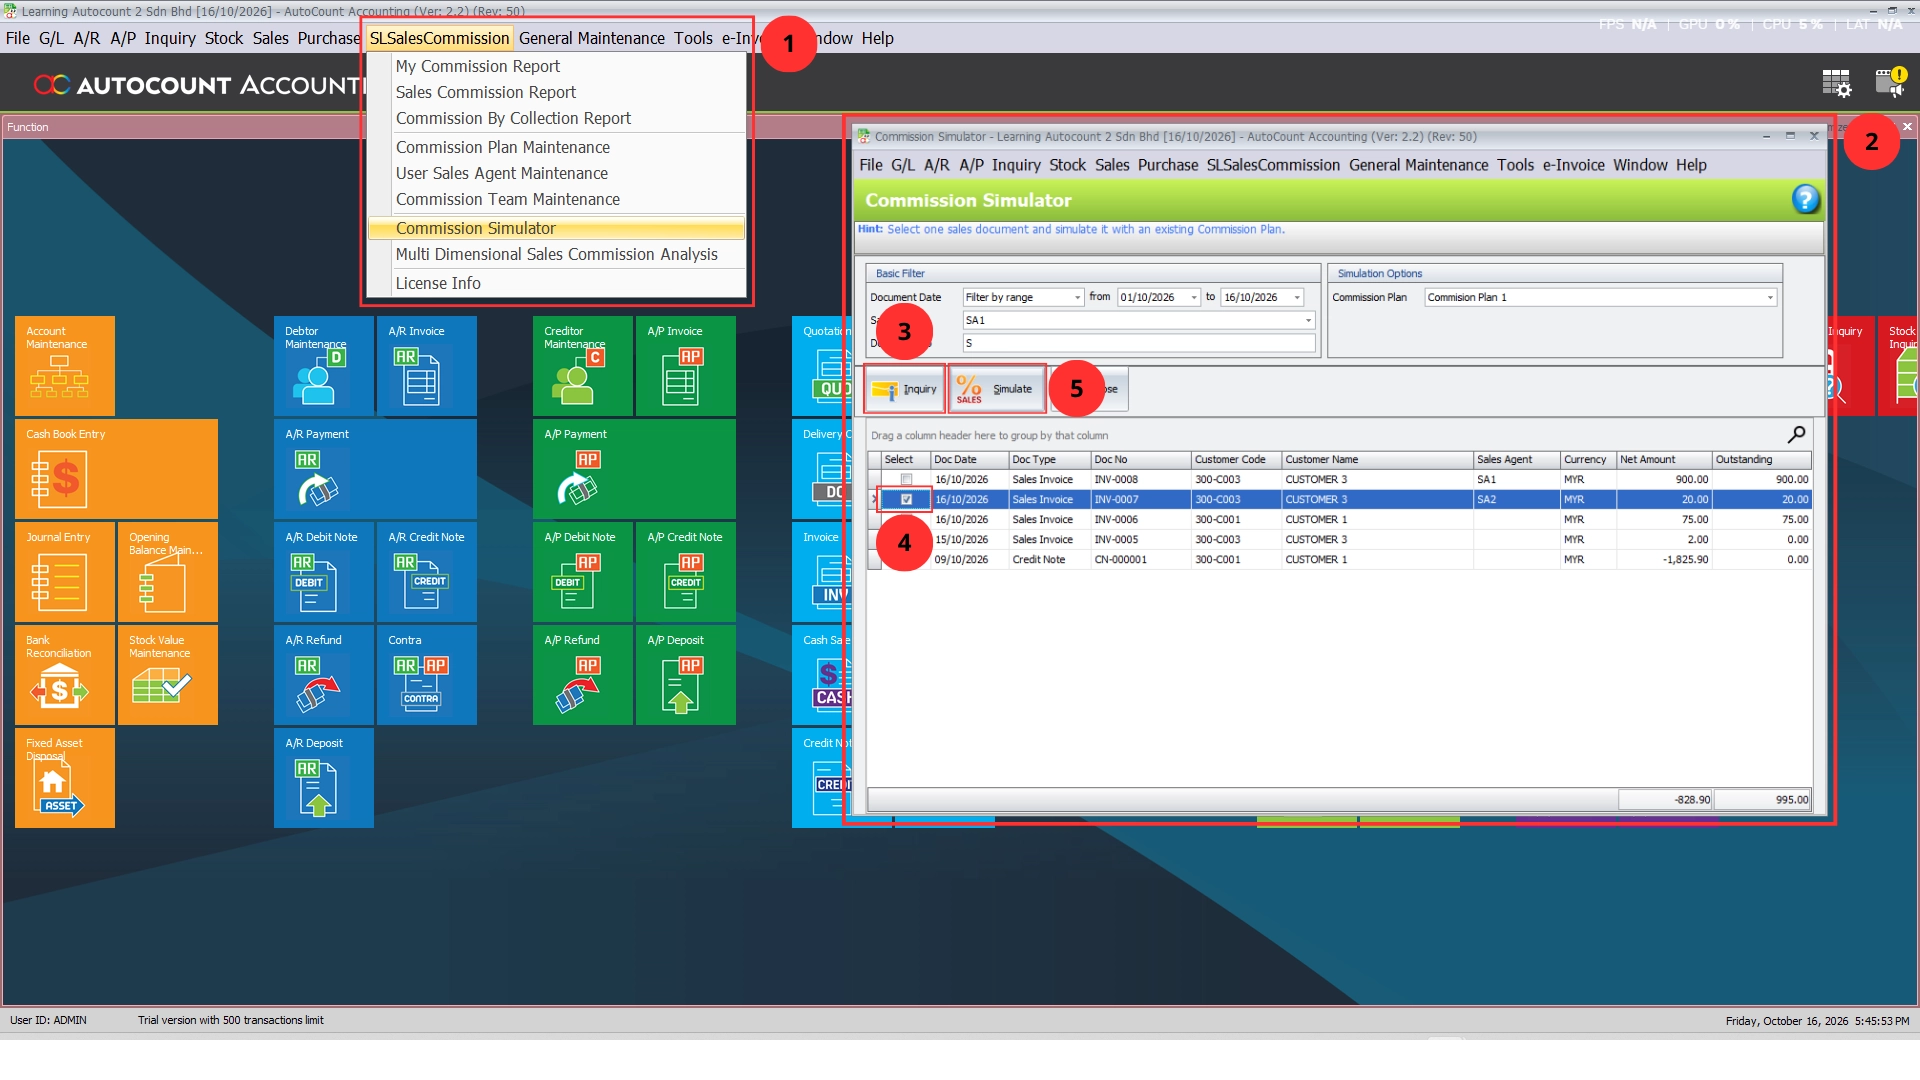
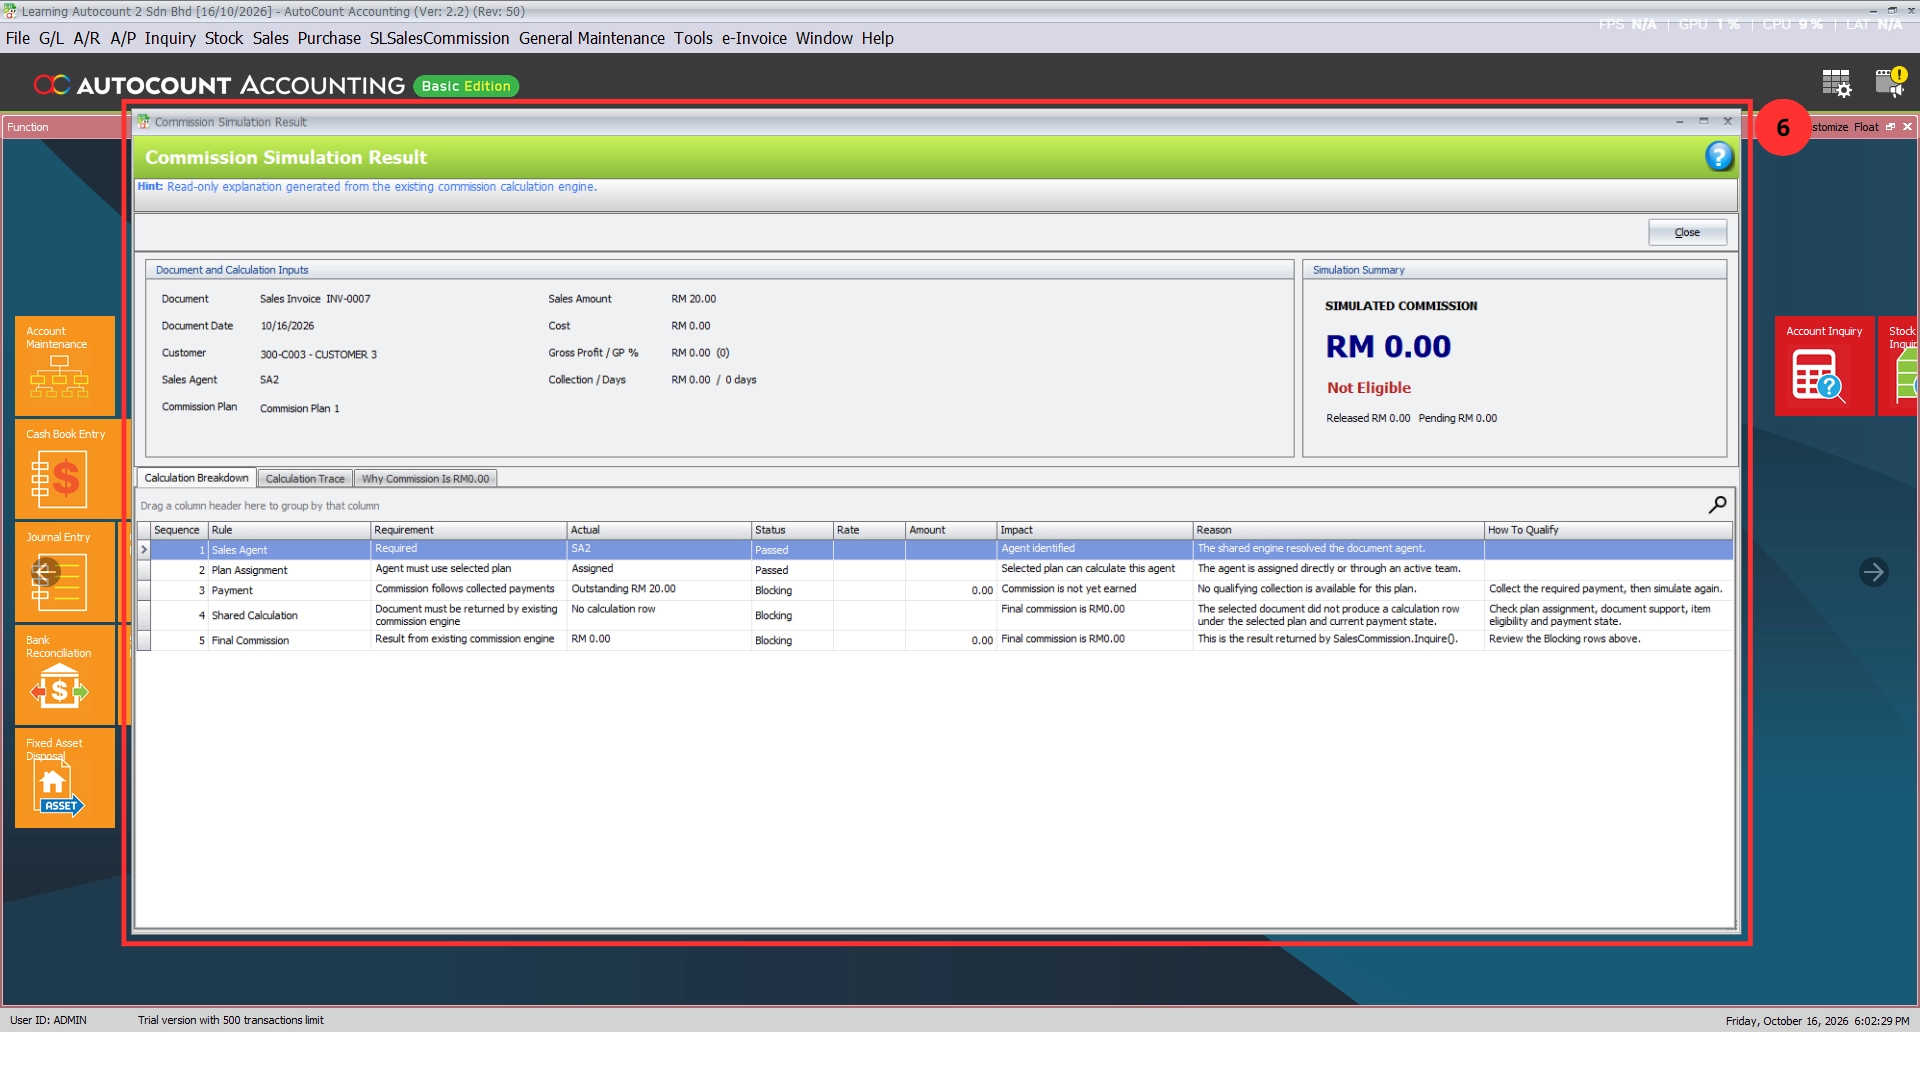
The AutoCount Sales Commission Plugin includes a Commission Simulator that helps businesses understand how a selected sales document is evaluated against a Commission Plan.
The simulator displays the resulting commission amount together with the relevant calculation information.
It provides visibility into:
- Sales document details
- Commission Plan selection
- Sales amount and cost information
- Commission calculation rules
- Released and pending commission amounts
- Calculation explanations and qualification conditions
Businesses can use this function to review commission rules and investigate why a transaction generates a particular commission amount.
The simulator also provides explanations when a transaction does not qualify for commission.
This helps reduce uncertainty and supports clearer communication between sales managers, finance teams, and sales agents.
Pro Tip:
Use the Commission Simulator to review proposed commission plans and investigate unusual commission calculations before applying policy changes.
Feature 9 — Commission Eligibility and Access Control
Not every product or sales transaction should necessarily contribute to a company’s commission calculations.
The AutoCount Sales Commission Plugin supports commission inclusion controls through the Show In Comm. Report field.
Businesses can manage whether relevant items, item groups, or supported sales document detail lines should be included in commission reporting.
This gives businesses greater flexibility when handling products or transactions that are excluded from commission policies.
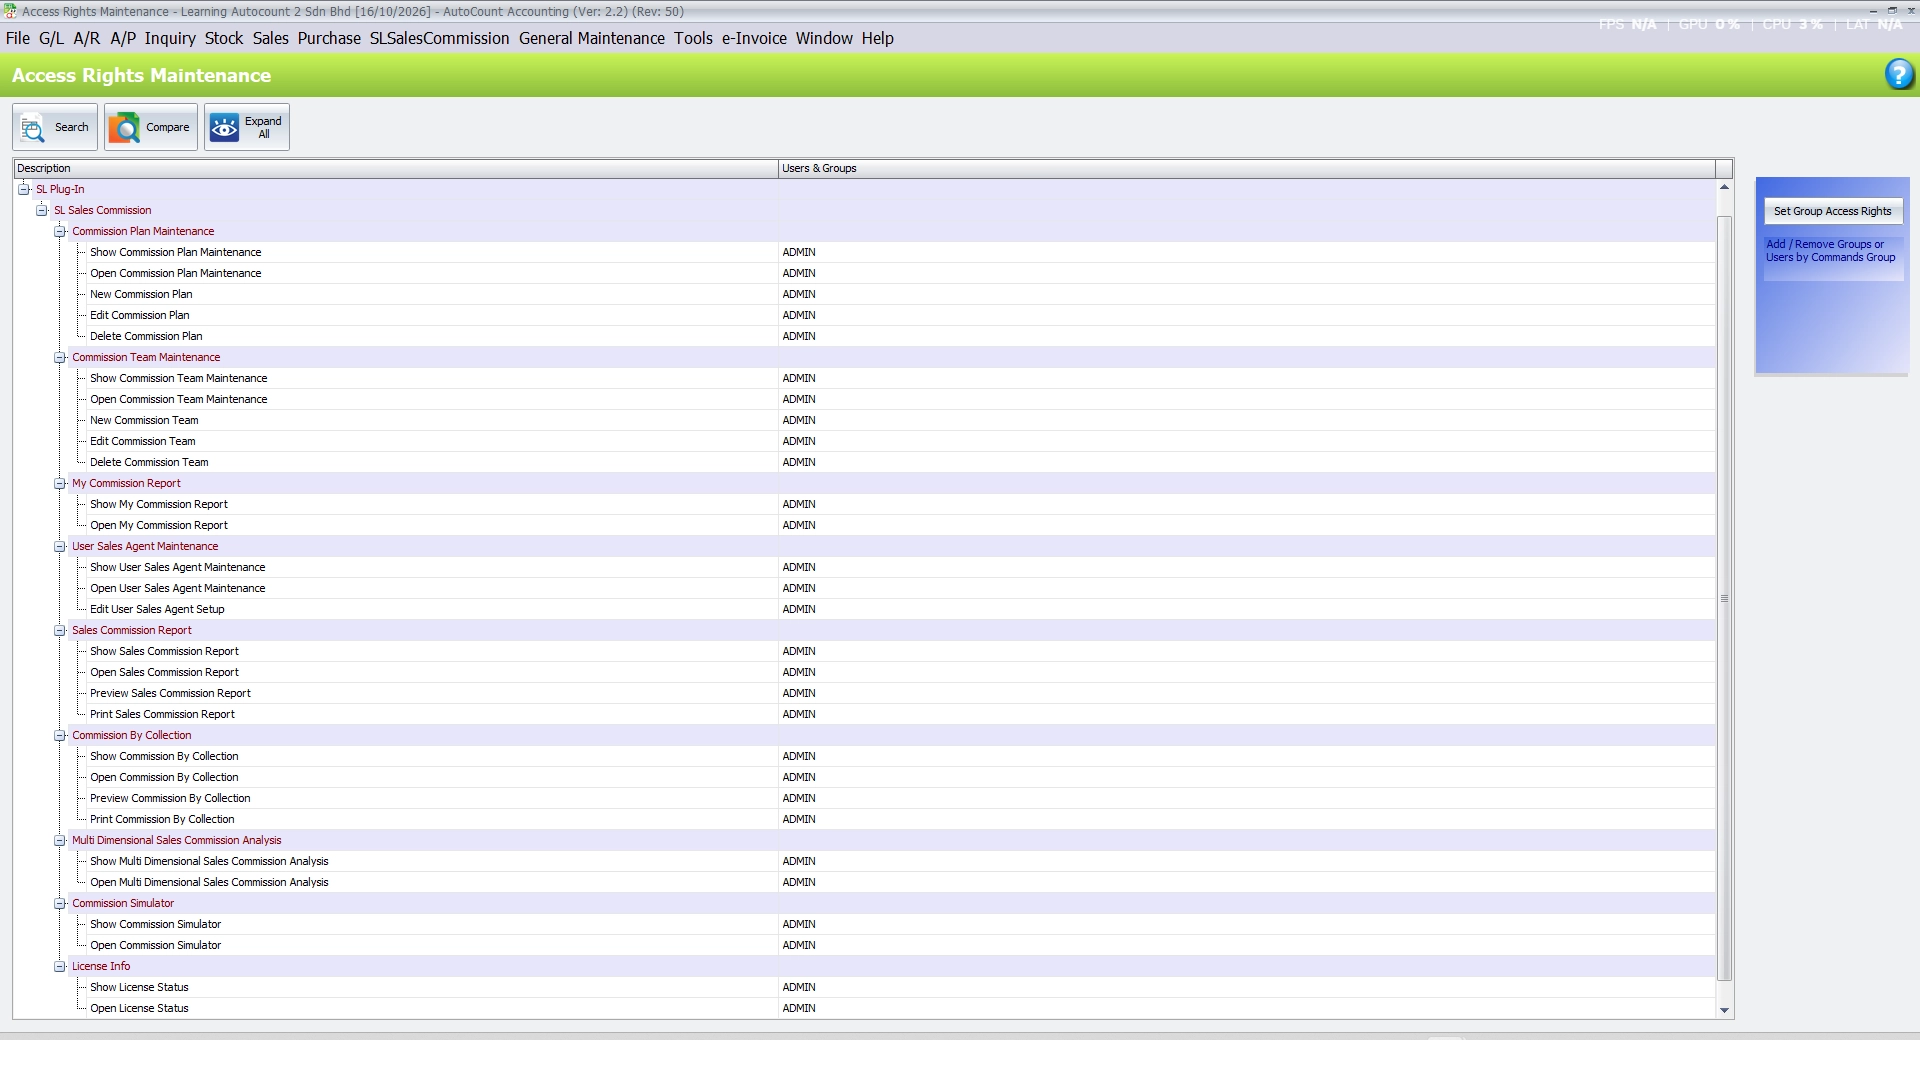
The plugin also supports access rights for functions such as Commission Plans, Commission Teams, Commission Reports, and Commission Simulation.
Businesses can assign appropriate permissions to employees based on their responsibilities.
This helps maintain better control over commission-related information and reduces unauthorized changes to important commission settings.
Pro Tip:
Review commission eligibility rules and employee permissions whenever sales policies or staff responsibilities change.
Benefits of AutoCount Sales Commission Plugin
More Accurate Commission Calculations
Reduce manual calculation errors by applying consistent commission rates, sales targets, and payment rules.
Better Commission and Collection Control
Align commission entitlement with sales performance and customer collections according to business payment policies.
Greater Sales Team Transparency
Provide clearer visibility into earned and pending commissions through personal reports and detailed calculation explanations.
Faster Commission Processing
Reduce repetitive spreadsheet work by calculating and reviewing commissions using existing AutoCount sales and payment records.
Conclusion
The AutoCount Sales Commission Plugin provides businesses with a practical solution for managing commission calculations, sales targets, team incentives, and commission reporting within AutoCount Accounting.
By combining flexible Commission Plans, payment-based commission release, performance targets, team management, detailed reporting, and commission simulation, businesses can reduce manual work and maintain better control over sales incentives.
For companies managing individual sales agents or commission-based sales teams, the AutoCount Sales Commission Plugin helps establish a more consistent, transparent, and efficient commission management process.
Frequently Asked Questions
What is the AutoCount Sales Commission Plugin?
The AutoCount Sales Commission Plugin is an add-on for AutoCount Accounting that helps businesses calculate and manage sales commissions based on configurable rates, sales documents, customer payments, targets, and incentive rules.
How does the AutoCount Sales Commision Plugin calculate commisions?
The plugin supports commission calculations based on individual items or overall sales document values. Businesses can configure the relevant commission rates and calculation conditions through Commission Plans.
Can commissions be linked to customer paymens?
Yes. Businesses can configure commissions to be released according to sales transactions, partial customer payments, or full payment settlement, depending on the selected Commission Plan.
Does the plugin support sales targets and bonuses?
Yes. The plugin supports sales targets, payout thresholds, commission entitlement rules, and additional incentive bonuses based on applicable sales or item quantity conditions.
Can the plugin manage commission teams?
Yes. Businesses can organize sales agents into Commission Teams and configure commission plans that consider individual or team sales performance.
Can sales agents view their own commissions?
Yes. The My Commission Report allows sales agents to review commission information associated with their mapped AutoCount user accounts, including relevant sales targets, achievements, and commission details.
Simplify Your Sales Commission Management Today!
Managing sales commissions, targets, bonuses, and employee incentives should not require complicated manual calculations.
With the AutoCount Sales Commission Plugin, your business can automate commission calculations, track sales performance, manage payment-based commission rules, and provide better visibility into commission earnings.
Looking for a more efficient way to manage your sales commissions?
Contact SL Software Solutions Sdn. Bhd. to discover how the AutoCount Sales Commission Plugin can support your business operations.