
-
AutoCount Accounting Features
-
- Approval Workflow
- Audit Trail
- Auto Save in Draft Folder
- AutoCount Contra Account
- AutoCount Feature Stock Take
- AutoCount License Setting Guide
- Column Chooser
- Deposit Tracking & Management
- Documents Numbering Format
- Full Transfer and Partial Transfer
- Import Data to AutoCount Accounting Using Excel
- Informative Charts and Analytical Data
- Layout Customization
- Multi Pricing
- Sales and Services Tax
- Schedule Backup
- Search Lookup Edit
- View Documents Flow
- Show Remaining (3) Collapse
-
AutoCount Cloud Accounting
-
AutoCount E-Invoice
- AutoCount E-Invoicing Tutorial
- E-Invoice Guide and Preparation for AutoCount Users
- Employee Handbook Template for E-Invoicing
- How E-Invoice Works in AutoCount Accounting?
- How to Use AutoCount Accounting for LHDN e-Invoice
- What is E-Invoicing?
- How to Enable and Submit SVDP e-Invoices in AutoCount 2.0
-
AutoCount HRMS User Guide
-
AutoCount Modules
-
- Activity Stream
- Advanced Financial Report
- Advanced Item
- Advanced Multi-UOM
- Advanced Quotation Module
- AutoCount Bonus Point Module User Guide
- AutoCount Scripting Module User Guide
- AutoCount Service Management Plugin User Guide
- AutoCount SST Hidden Functions
- AutoCount SST Submission - Service Tax
- Basic Multi-UOM
- Budget Module
- Consignment
- Filter By Salesman
- FOC Quantity
- Formula
- Item Batch
- Item Package
- Landing Cost
- Multi-Currency
- Multi-Dimensional Analysis
- Multi-Location
- Project Account
- Recurrence
- Remote Credit Control Module
- Stock Assembly
- User Defined Fields (UDF)
- Show Remaining (12) Collapse
-
AutoCount Plugins
-
- AutoCount Car Tint Film Plugin
- AutoCount Credit Memo Plugin User Guide
- AutoCount Easy Recurrence Plugin
- AutoCount Lock Price Plugin User Guide
- AutoCount Pick List Plugin User Guide
- AutoCount Production order
- AutoCount Progressive Billing
- Batch Update Unit Price Plugin
- DMS Import Plugin
- Fixed Assets Management
- Goldsmith
- TD Ordering Mobile Apps
- TD Stock Mobile Apps
- Universal Import Plugin
-
- Advanced Credit Term Management Software for AutoCount
- AutoCount Advance Aging Format Plugin
- AutoCount Advance Deposit Plugin
- AutoCount Advanced Stock Assembly Plugin User Guide
- AutoCount Agent Validation Plugin User Guide
- AutoCount AutoBank Reconciliation Plugin User Guide
- AutoCount Barcode Generator Plugin User Guide
- AutoCount Batch Transfer SO DO Plugin
- AutoCount Bill Remark Plugin User Guide
- AutoCount Centralized Kitchen Management Plugin
- AutoCount Daily Collection Summary Plugin
- AutoCount Easy Batch Number Entry Plugin User Guide
- AutoCount Easy Deposit Plugin
- AutoCount Easy Knock Off Plugin
- AutoCount Easy Payment
- AutoCount Easy Photo 2.0 User Guide
- AutoCount Email & WhatsApp Plugin
- AutoCount Fruit Basket Plugin Guide
- AutoCount GridToExcel Plugin
- AutoCount Historical Outstanding DO Listing Plugin
- AutoCount IC Checker Plugin
- AutoCount Integrator Plugin
- AutoCount InterCompany Billing Plugin
- AutoCount Item Visibility Control
- AutoCount Migrator Plugin
- AutoCount MRP Order Plugin
- AutoCount Multi Company Knock Off Plugin
- AutoCount Optical Plugin
- AutoCount Pain Tracker User Guide
- AutoCount Payment Request Plugin
- AutoCount Procurement Planning Plugin
- AutoCount Project Department Visibility Control Plugin
- AutoCount Recurrence Late Interest Plugin
- AutoCount Recurring Invoice Plugin User Guide
- AutoCount Rental Management
- AutoCount RMA Plugin
- AutoCount Sales Commission Plugin
- AutoCount Scale Barcode Plugin User Guide
- AutoCount Service Contract Plugin User Guide
- AutoCount Shipment Plugin User Guide
- AutoCount Smart Analysis Plugin User Guide
- AutoCount Stock Availability Report Plugin
- AutoCount To-Do List Plugin
- AutoCount Tour Plugin User Guide
- AutoCount Vege Basket Plugin Guide
- AutoCount Vehicle Master Plugin
- AutoCount Vehicle Plugin
- Batch Transfer SODO Plugin
- Cage Management Plugin
- Event Management System
- Intercompany Billing Plugin User Guide
- Lead Management 2.0 Plugin
- AutoCount Referral Management Plugin User Guide
- SL AutoCount API
- Timber Log Plugins
- Warranty 2.0 Plugin
- Show Remaining (41) Collapse
-
-
Form Template
-
Report Template
-
- Advance Quotation
- Cash Sale
- Consignment
- Consignment Movement
- Credit Note
- Debit Note
- Delivery Order
- FOC Quantity Analysis By Document Report
- Invoice
- Item Package Sales Report
- Monthly Sales Analysis
- Outstanding Sales Order Listing
- Profit And Loss Of Documents
- Quotation
- Sales Agent Contribution Report
- Sales Order
- Top/Bottom Sales Ranking
- Show Remaining (2) Collapse
-
- Available Stock Status Report
- Expired Item Batch Listing
- Inventory Physical Worksheet
- Stock Adjustment
- Stock Aging Report
- Stock Assembly
- Stock Assembly Order
- Stock Balance By Location
- Stock Balance Report
- Stock Card Report
- Stock Disassembly
- Stock Issue
- Stock Item Profit Margin
- Stock Movement Report
- Stock Receive
- Stock Take
- Stock Transfer
- Stock Write Off
- Show Remaining (3) Collapse
-
B2B ORDERING
-
AutoCount AI Agent
AutoCount Accounting 2.0 • e-Invoice User Guide
How to Enable and Submit SVDP e-Invoices in AutoCount 2.0
Practical step-by-step instructions for Malaysia’s e-Invoice Special Voluntary Disclosure Programme (SVDP), based on AutoCount Accounting Version 2.2.32.45 (Rev 45).
Release: 2.2.32.45 • Database upgrade: 2.2.97 • Programme ends: 31 December 2027
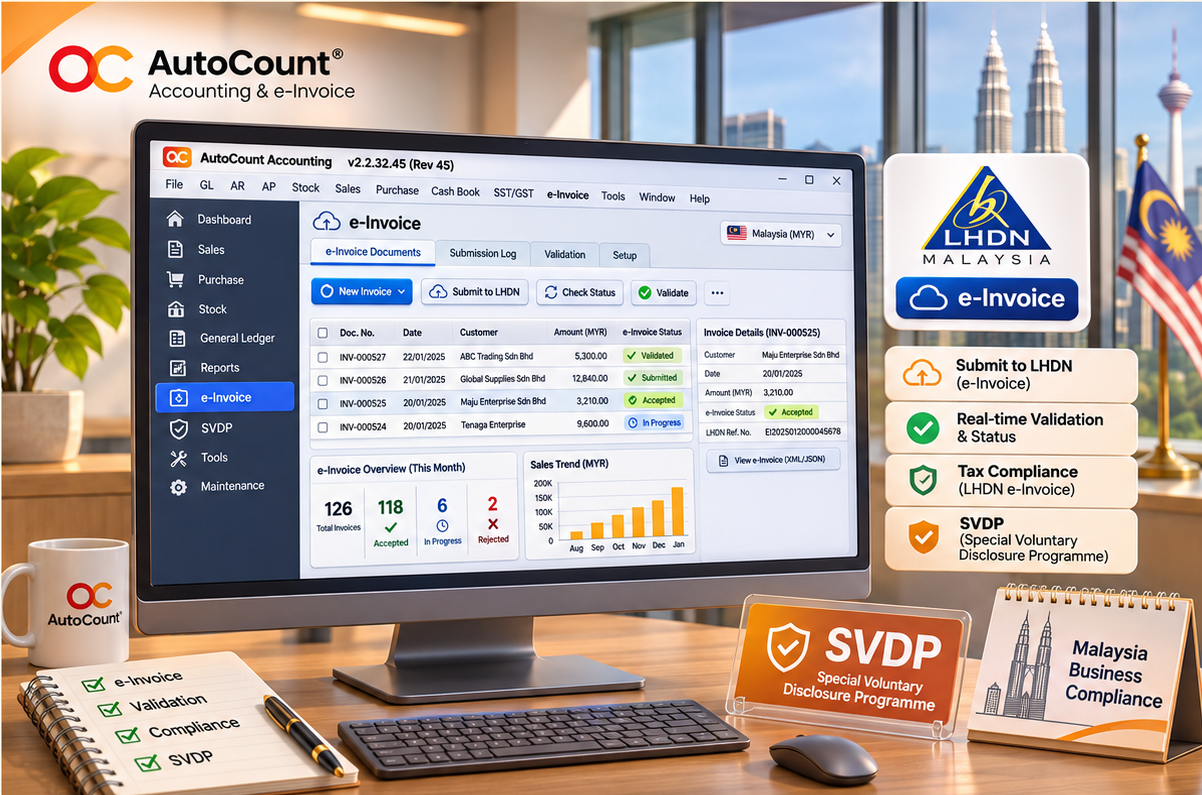
Quick guide: follow the SVDP workflow
01 Enable SVDP
02 Select your document
03 Review warnings
04 Verify in MyInvois
Before you begin
Confirm that your installation supports SVDP. Verify whether each disclosure is eligible under the latest LHDN rules. Choosing SVDP in AutoCount does not itself guarantee compliance or penalty relief.
1. Enable e-Invoice SVDP in AutoCount
- Open e-Invoice → e-Invoice Setting.
- Click Setting.
- Tick Enable e-Invoice Special Voluntary Disclosure Programme (SVDP).
- Click OK to save.
Expected result: The SVDP checkbox becomes available in supported transaction forms.
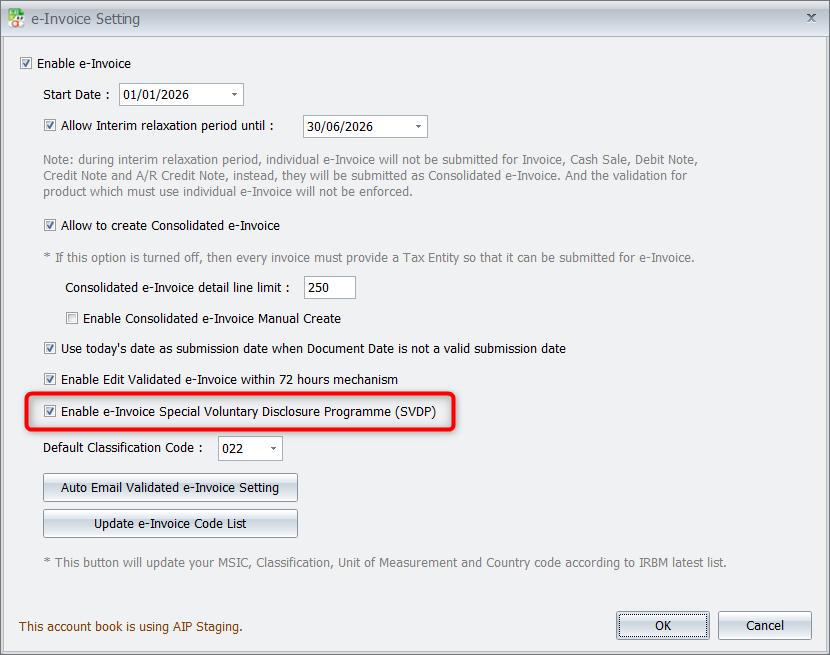
Note: The release notes state this option will be hidden after 31 December 2027.
2. Submit a transaction using SVDP
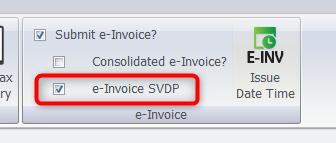
- Create or open an eligible transaction.
- Select the Edit tab.
- Under Submit e-Invoice, tick e-Invoice SVDP.
- Review the document and follow the normal submission workflow.
- Confirm its validated status in MyInvois Portal.
Supported document types
Invoice • Cash Sale • Debit Note • Credit Note • AR Credit Note • Self-Billed.
The release notes show a validated SVDP document as Invoice 1.3 in MyInvois. Always verify the appropriate document version for your case.
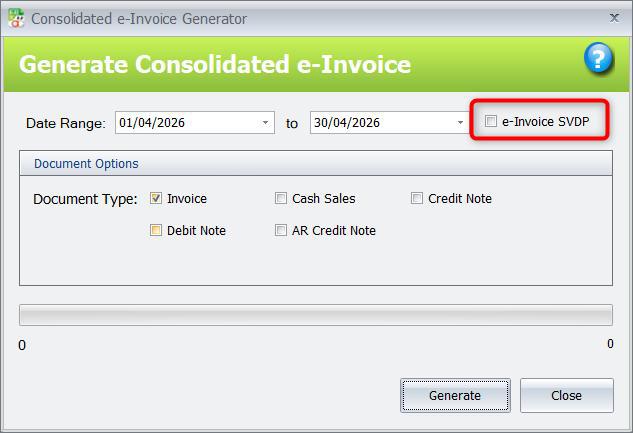
3. Generate a consolidated SVDP e-Invoice
- Navigate to e-Invoice → Consolidated e-Invoice.
- Click New.
- Select the relevant transaction month and document types.
- Tick e-Invoice SVDP.
- Click Generate and proceed with the normal submission process.
- Check the validated document in MyInvois.
4. Understand late-submission detection
Rev 45 detects potentially late consolidated submissions. When generated on or before the 7th, submissions covering two months earlier or older are flagged. When generated after the 7th, submissions for the previous month or older are flagged.
| Generate date | Transaction month | Late? |
|---|---|---|
| 7 Jul 2026 | June 2026 | No |
| 7 Jul 2026 | March 2026 | Yes |
| 20 Jul 2026 | June 2026 | Yes |
| 20 Jul 2026 | March 2026 | Yes |
Examples from AutoCount release notes, page 5.
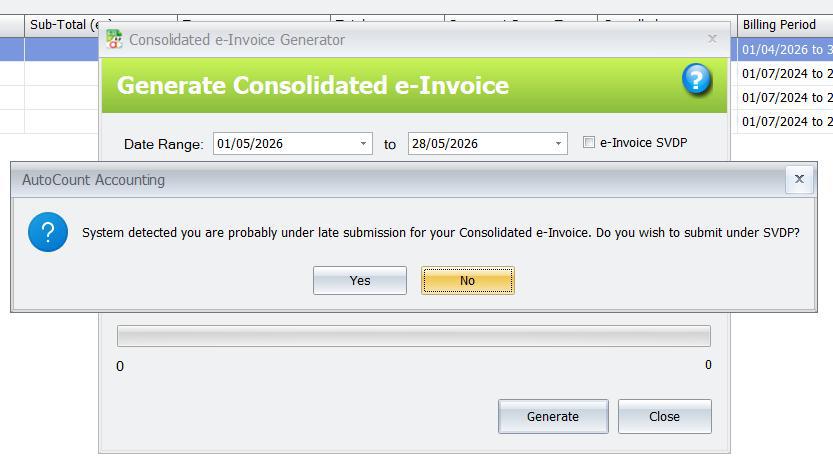
When the SVDP prompt appears, Yes continues using SVDP and No continues without SVDP.
If SVDP is disabled in settings, AutoCount prompts you to enable it.
5. Handle the multiple-month warning
AutoCount warns when a consolidated date range spans more than one transaction month. Choosing Yes still generates the document; choosing No aborts it so you can revise the period.
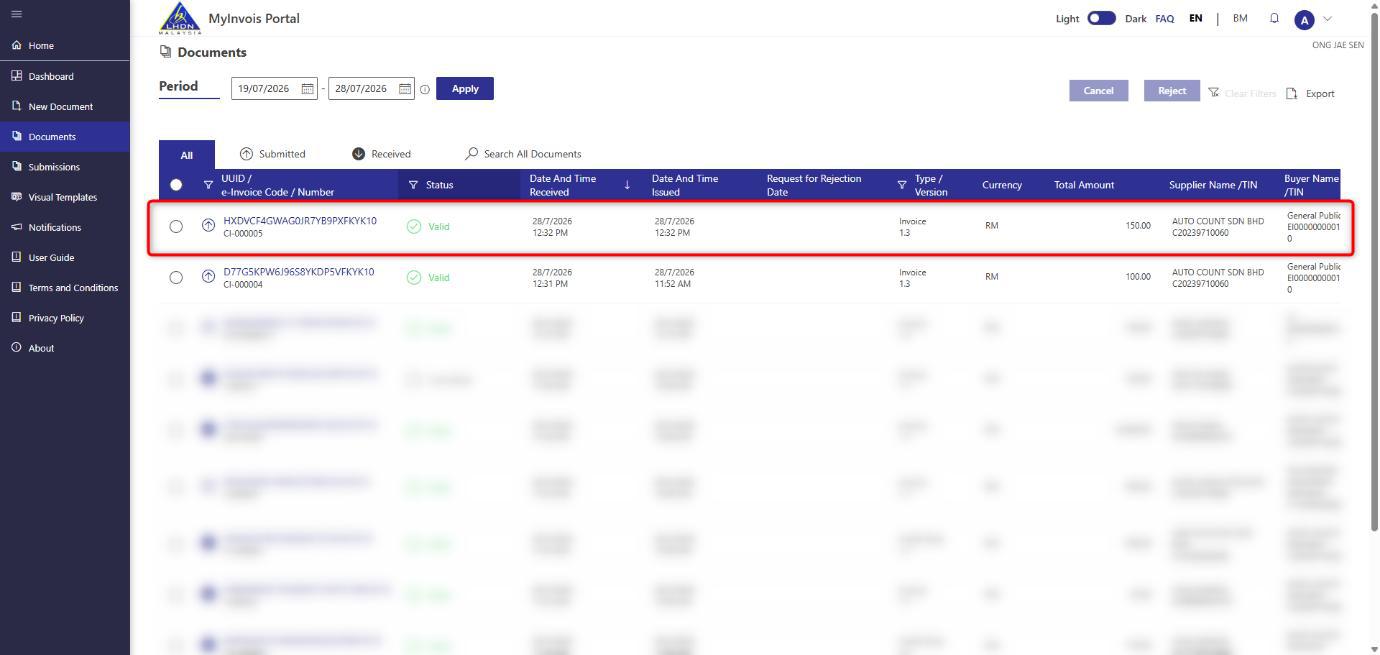
6. Verify and track SVDP submissions
- Open the relevant Invoice or Consolidated e-Invoice listing.
- Show the e-Invoice SVDP column using Column Chooser.
- Review the SVDP indicator.
- Check the validated document details in MyInvois Portal.
7. Self-Billed reporting improvements
New filtering columns in Rev 45
AutoCount Accounting 2.2.32.45 adds two helpful columns to the Self-Billed Command Form and Self-Billed Print Listing. Open Column Chooser to display them.
Year
Year.Month
Troubleshooting and FAQs
Find quick answers to common questions about SVDP settings, consolidated submissions and verification. Select a question to see the recommended check.
The SVDP checkbox is missing. What should I check?
AutoCount says SVDP is not enabled.
Why does AutoCount warn about a late consolidated submission?
Can I consolidate several transaction months together?
How can I confirm my submission used SVDP?
Does SVDP guarantee penalty relief?
Related guides and support
Malaysia e-Invoice SVDP rules and eligibility · AutoCount Download Centre · AutoCount Rev 45 overview
Reference: AutoCount “What’s New in Version 2.2.32.45” (30 July 2026). This is a software user guide, not tax advice.