
Need Help?
-
AutoCount Accounting Features
-
- Approval Workflow
- Audit Trail
- Auto Save in Draft Folder
- AutoCount Contra Account
- AutoCount License Setting Guide
- Deposit Tracking & Management
- Documents Numbering Format
- Full Transfer and Partial Transfer
- Import Data to AutoCount Accounting Using Excel
- Informative Charts and Analytical Data
- Layout Customization
- Multi Pricing
- Sales and Services Tax
- Schedule Backup
- Search Lookup Edit
- View Documents Flow
- AutoCount Feature Stock Take
- Column Chooser
- Show Remaining (3) Collapse
-
AutoCount Cloud Accounting
-
AutoCount E-Invoice
-
AutoCount HRMS User Guide
-
AutoCount Modules
-
- Activity Stream
- Advanced Financial Report
- Advanced Item
- Advanced Multi-UOM
- Advanced Quotation Module
- Basic Multi-UOM
- Budget Module
- Consignment
- Filter By Salesman
- FOC Quantity
- Formula
- Item Batch
- Item Package
- Landing Cost
- Multi-Currency
- Multi-Dimensional Analysis
- Multi-Location
- Project Account
- Recurrence
- Remote Credit Control Module
- Stock Assembly
- User Defined Fields (UDF)
- AutoCount SST Hidden Functions
- AutoCount SST Submission - Service Tax
- AutoCount Scripting Module User Guide
- AutoCount Bonus Point Module User Guide
- AutoCount Service Management Plugin User Guide
- Show Remaining (12) Collapse
-
AutoCount Plugins
-
- Fixed Assets Management
- Goldsmith
- TD Ordering Mobile Apps
- TD Stock Mobile Apps
- Universal Import Plugin
- DMS Import Plugin
- AutoCount Pick List Plugin User Guide
- AutoCount Credit Memo Plugin User Guide
- AutoCount Lock Price Plugin
- AutoCount Progressive Billing
- AutoCount Easy Recurrence Plugin
- Batch Update Unit Price Plugin
- AutoCount Production order
- AutoCount Car Tint Film Plugin
-
- Event Management System
- AutoCount To-Do List Plugin
- AutoCount AutoBank Reconciliation Plugin
- Intercompany Billing Plugin User Guide
- Lead Management 2.0 Plugin
- AutoCount Service Contract Plugin User Guide
- AutoCount Optical Plugin
- AutoCount Integrator Plugin
- AutoCount Procurement Planning Plugin
- Cage Management Plugin
- AutoCount Vehicle Plugin
- AutoCount Agent Validation Plugin User Guide
- AutoCount Barcode Generator Plugin User Guide
- AutoCount Easy Batch Number Entry Plugin User Guide
- Warranty 2.0 Plugin
- AutoCount Easy Photo 2.0 User Guide
- AutoCount Recurring Invoice Plugin User Guide
- AutoCount Scale Barcode Plugin User Guide
- AutoCount Recurrence Late Interest Plugin
- AutoCount Item Visibility Control
- AutoCount Bill Remark Plugin User Guide
- AutoCount Pain Tracker User Guide
- AutoCount Easy Payment
- AutoCount Easy Deposit Plugin
- AutoCount Easy Knock Off Plugin
- AutoCount Daily Collection Summary Plugin
- Timber Log Plugins
- Batch Transfer SODO Plugin
- AutoCount Vege Basket Plugin Guide
- AutoCount Fruit Basket Plugin Guide
- Referral Management Plugin
- AutoCount Migrator Plugin
- AutoCount Email & WhatsApp Plugin
- AutoCount Multi Company Knock Off Plugin
- AutoCount Advance Aging Format Plugin
- AutoCount Payment Request Plugin
- AutoCount Vehicle Master Plugin
- AutoCount Advance Deposit Plugin
- AutoCount IC Checker Plugin
- AutoCount RMA Plugin
- AutoCount Historical Outstanding DO Listing Plugin
- AutoCount Project Department Visibility Control Plugin
- AutoCount MRP Order Plugin
- AutoCount GridToExcel Plugin
- AutoCount Stock Availability Report Plugin
- AutoCount Batch Transfer SO DO Plugin
- AutoCount Centralized Kitchen Management Plugin
- SL AutoCount API
- AutoCount InterCompany Billing Plugin
- AutoCount Sales Commission Plugin
- AutoCount Advanced Credit Term Plugin
- AutoCount Advanced Stock Assembly Plugin
- AutoCount Shipment Plugin
- AutoCount Tour Plugin
- AutoCount Smart Analysis
- AutoCount Rental Management
- Show Remaining (41) Collapse
-
-
Form Template
-
Report Template
-
- Advance Quotation
- Cash Sale
- Consignment
- Consignment Movement
- Credit Note
- Debit Note
- Delivery Order
- FOC Quantity Analysis By Document Report
- Invoice
- Item Package Sales Report
- Monthly Sales Analysis
- Outstanding Sales Order Listing
- Profit And Loss Of Documents
- Quotation
- Sales Agent Contribution Report
- Sales Order
- Top/Bottom Sales Ranking
- Show Remaining (2) Collapse
-
- Available Stock Status Report
- Expired Item Batch Listing
- Inventory Physical Worksheet
- Stock Adjustment
- Stock Aging Report
- Stock Assembly
- Stock Assembly Order
- Stock Balance By Location
- Stock Balance Report
- Stock Card Report
- Stock Disassembly
- Stock Issue
- Stock Item Profit Margin
- Stock Movement Report
- Stock Receive
- Stock Take
- Stock Transfer
- Stock Write Off
- Show Remaining (3) Collapse
-
B2B ORDERING
-
AutoCount AI Agent
AutoCount B2B Portal Settings and Customization Guide
Introduction to Portal & Dashboard Customization
The B2B Ordering Portal allows authorised users to manage how the dashboard, customer portal, login page and WhatsApp ordering channel appear and behave. This guide explains how to review dashboard information, configure product display settings, update company branding, manage portal addresses and customise WhatsApp messages.
Configure General Portal Settings
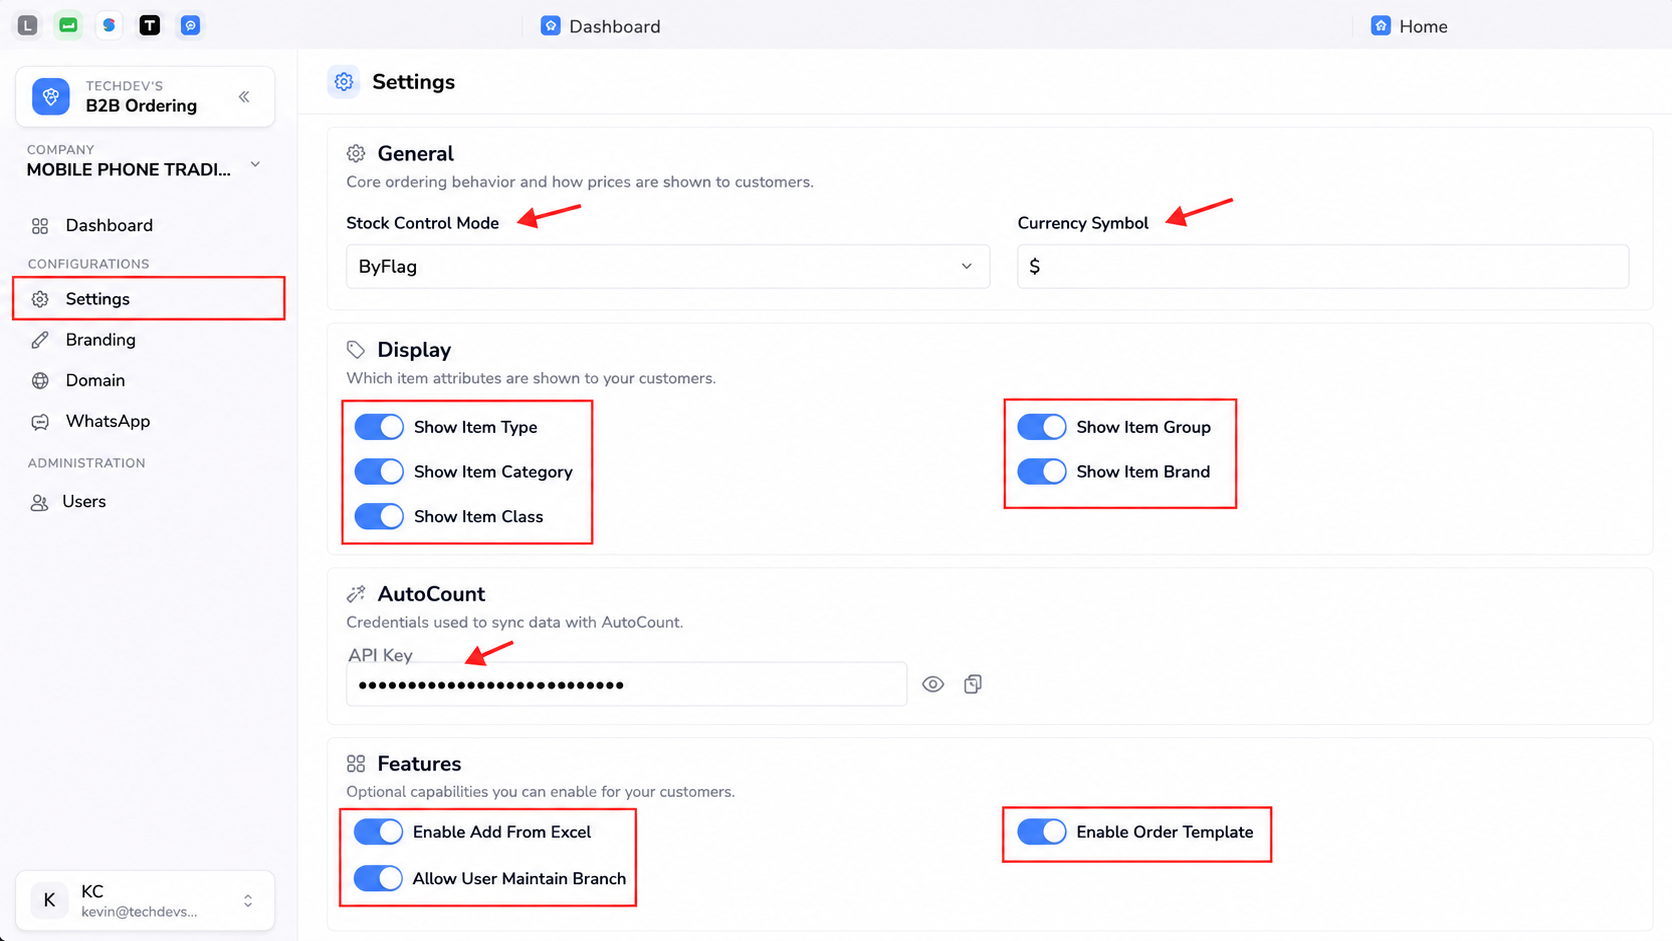
Open Settings from the administration portal to manage product display, currency, AutoCount connectivity and optional portal functions.
1. Set the Stock Control Method
Under General, review the Stock Control Mode setting. The selected method determines how product availability is controlled in the customer portal. Use the stock control method configured for the company’s ordering process. Avoid changing this setting without confirming how current product availability is maintained.
2. Set the Currency Symbol
Enter the currency symbol that should appear beside prices and order values. For Malaysian companies, this would normally be configured as:
- RM, or
- Another symbol required by the company’s pricing format
Check the customer portal after saving to confirm that product prices and order totals use the correct symbol.
3. Choose Which Item Information Customers Can See
The Display section controls which AutoCount item classifications appear in the customer portal. Available options shown in the settings include:
- Show Item Type
- Show Item Group
- Show Item Category
- Show Item Brand
- Show Item Class
Enable only the information that helps customers search for or identify products. For example:
- Enable Item Brand when customers commonly order by brand.
- Enable Item Group or Item Category when the catalogue contains many products.
- Disable classifications that are used internally and are not meaningful to customers.
4. Review the AutoCount Connection
The AutoCount section contains the API key used to connect the B2B Ordering portal with AutoCount. The API key should normally remain hidden. Only authorised administrators or implementation personnel should view, copy or replace it.
Important:
Do not share the API key through public messages, screenshots or documents. Changing an active API key may interrupt data synchronisation.
5. Enable the Required Portal Functions
The Features section contains optional customer portal capabilities. Available options shown include:
- Enable Add From Excel: Allows supported users to add order information using an Excel-based process.
- Enable Order Template: Allows customers to prepare or reuse an order template for frequently ordered items.
- Allow User Maintain Branch: Allows authorised users to maintain branch-related information from the portal.
Enable each option according to the company’s ordering process.
Customise the Portal Branding
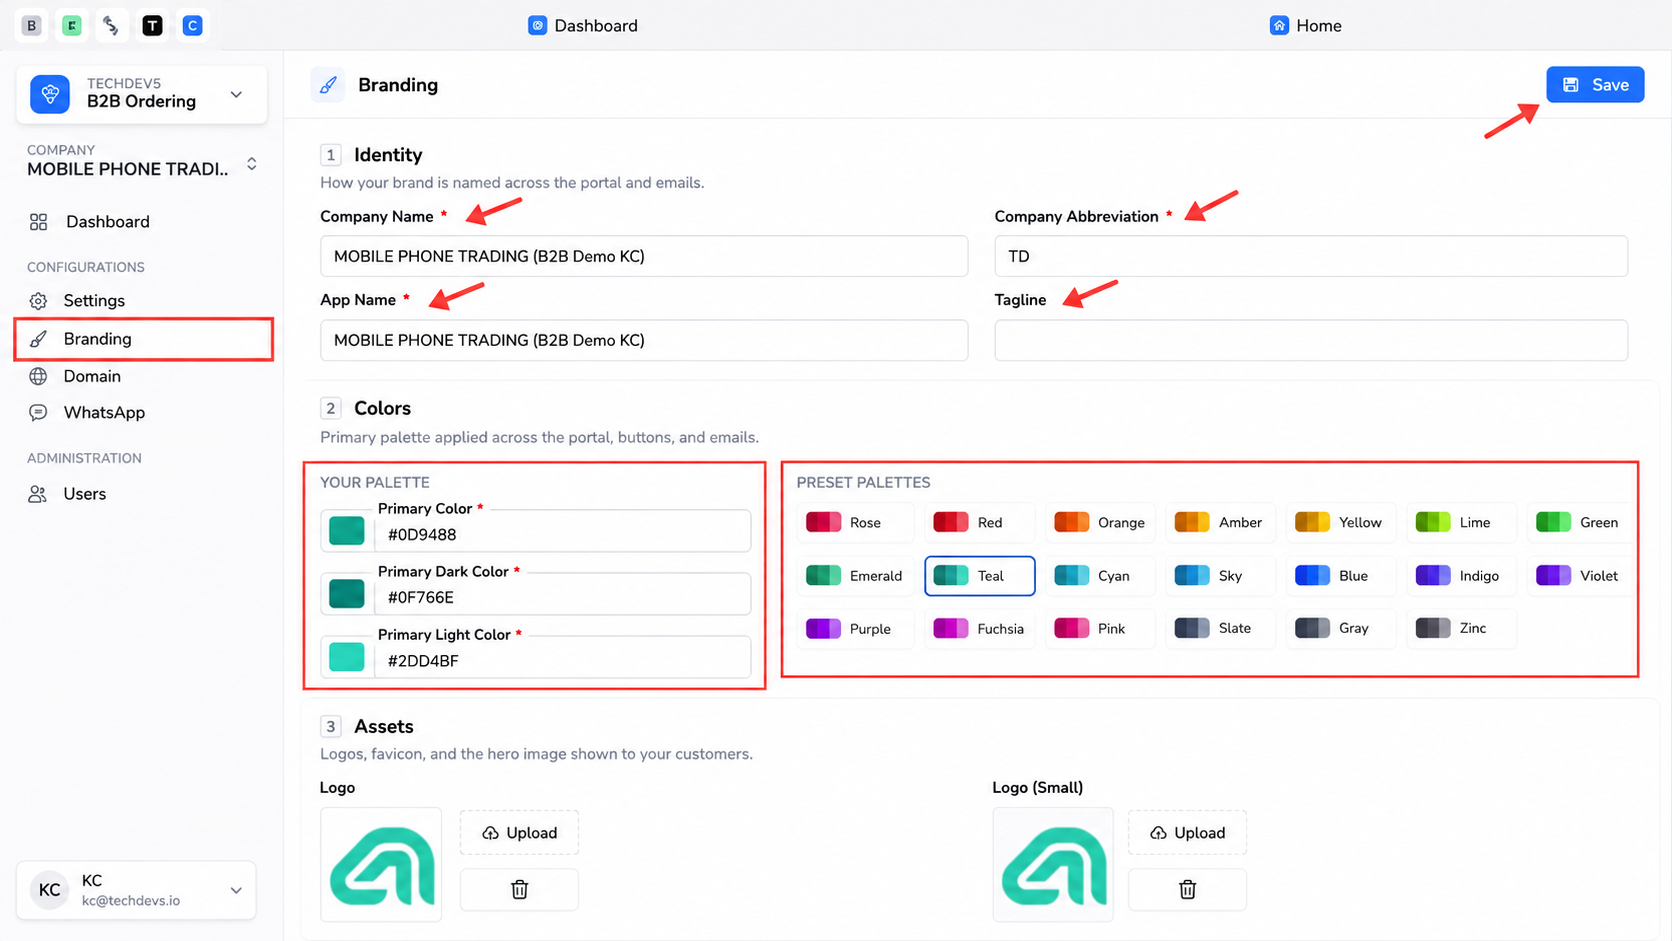
Open Branding to change the company identity, portal colours, logos and login-page presentation.
1. Enter the Company Identity
Under Identity, complete the available company information. The fields include:
- Company Name: Enter the full company name that should be displayed to users.
- Company Abbreviation: Enter a shortened name or initials for areas where the full company name may not fit.
- App Name: Enter the name that customers should see for the ordering portal.
- Tagline: Enter a short supporting phrase when the company wants a tagline displayed as part of its portal identity.
Use consistent naming across the portal. Review spelling and capitalisation before saving because these details may appear across the portal and login screen.
2. Select the Portal Colour Theme
Under Colors, configure the primary colour palette used across portal elements such as buttons, highlights and interface accents. The available colour fields include:
- Primary Color
- Primary Dark Color
- Primary Light Color
Colours can be entered using supported colour codes. Preset palettes are also available for common themes such as: Teal, Blue, Green, Orange, Red, Purple, and Gray. Select colours that provide sufficient contrast between text, buttons and backgrounds.
Pro Tips:
Use the company’s official brand colour as the primary colour. Choose darker and lighter variations of the same colour for a more consistent interface.
3. Upload the Portal Images
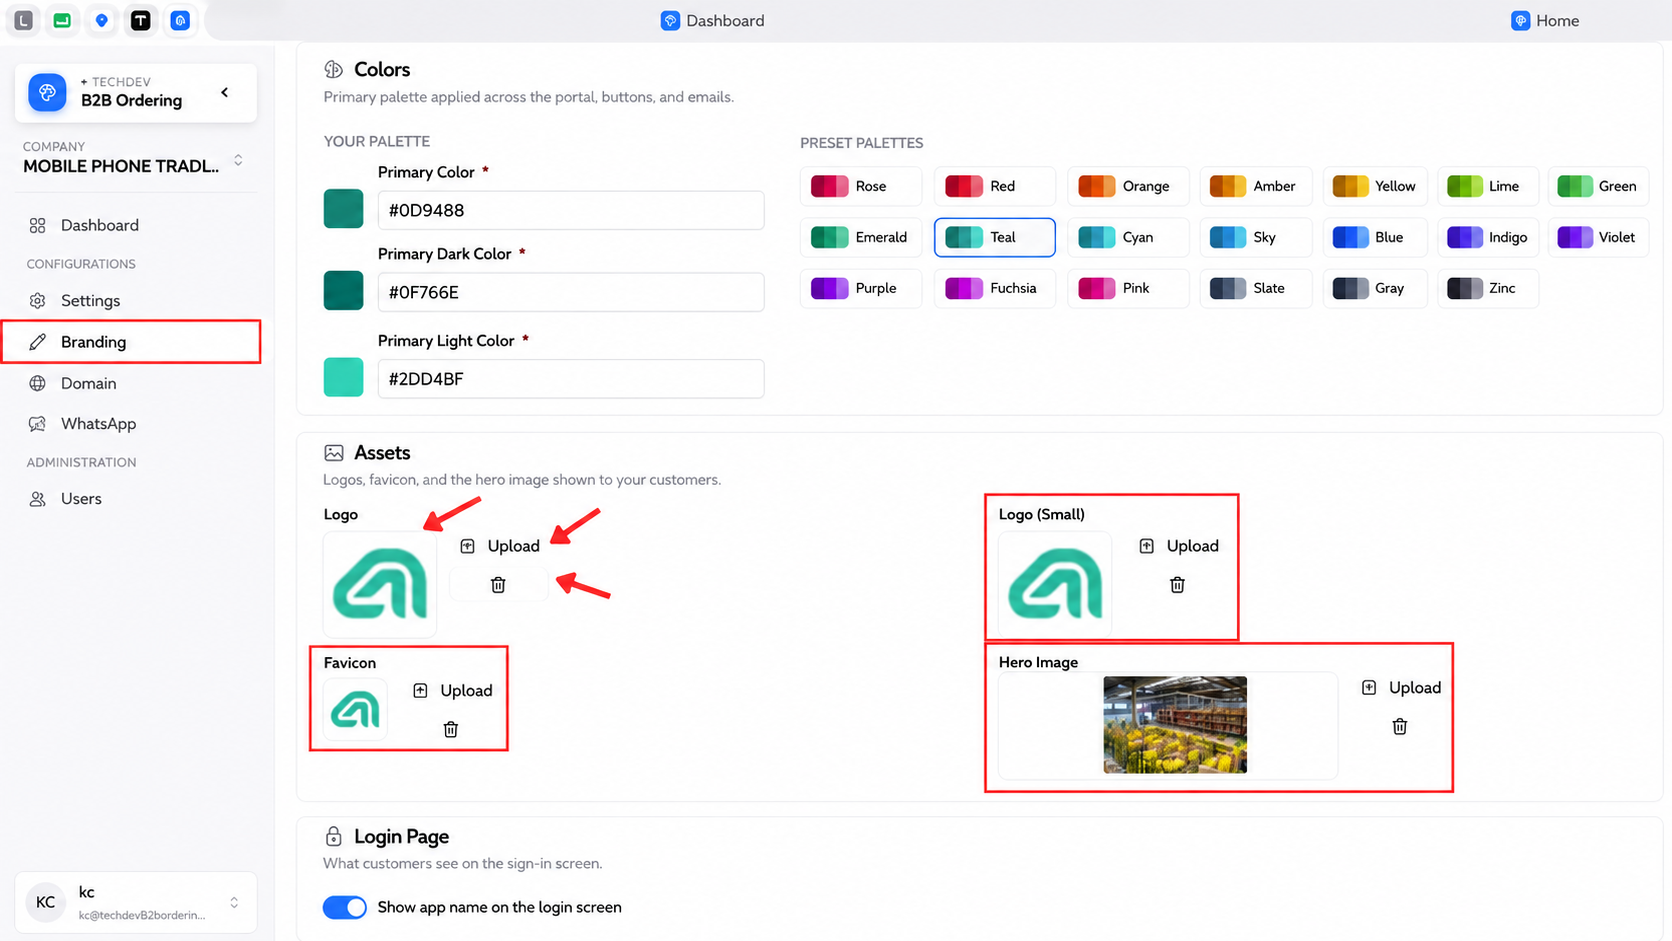
The Assets section allows the administrator to upload the images used throughout the customer portal. Available assets include:
- Logo: Used in the main portal branding area.
- Logo (Small): Used where the full-size logo is not suitable, such as compact navigation areas.
- Favicon: The small icon displayed on the browser tab.
- Hero Image: The main visual displayed on the customer-facing portal or login experience, depending on the portal design.
Use clear image files with suitable dimensions. Avoid uploading images containing excessive text or important content close to the edges.
After uploading an asset:
- Confirm that the preview displays correctly.
- Save the branding changes.
- Refresh the customer portal.
- Check the image on both desktop and mobile screen sizes.
4. Configure the Login Page
Under Login Page, enable or disable Show app name on the login screen. Enable this option when customers should see the configured app name during sign-in. Disable it when the company prefers a simpler login page using only its logo or other branding assets.
Configure the Portal Domain
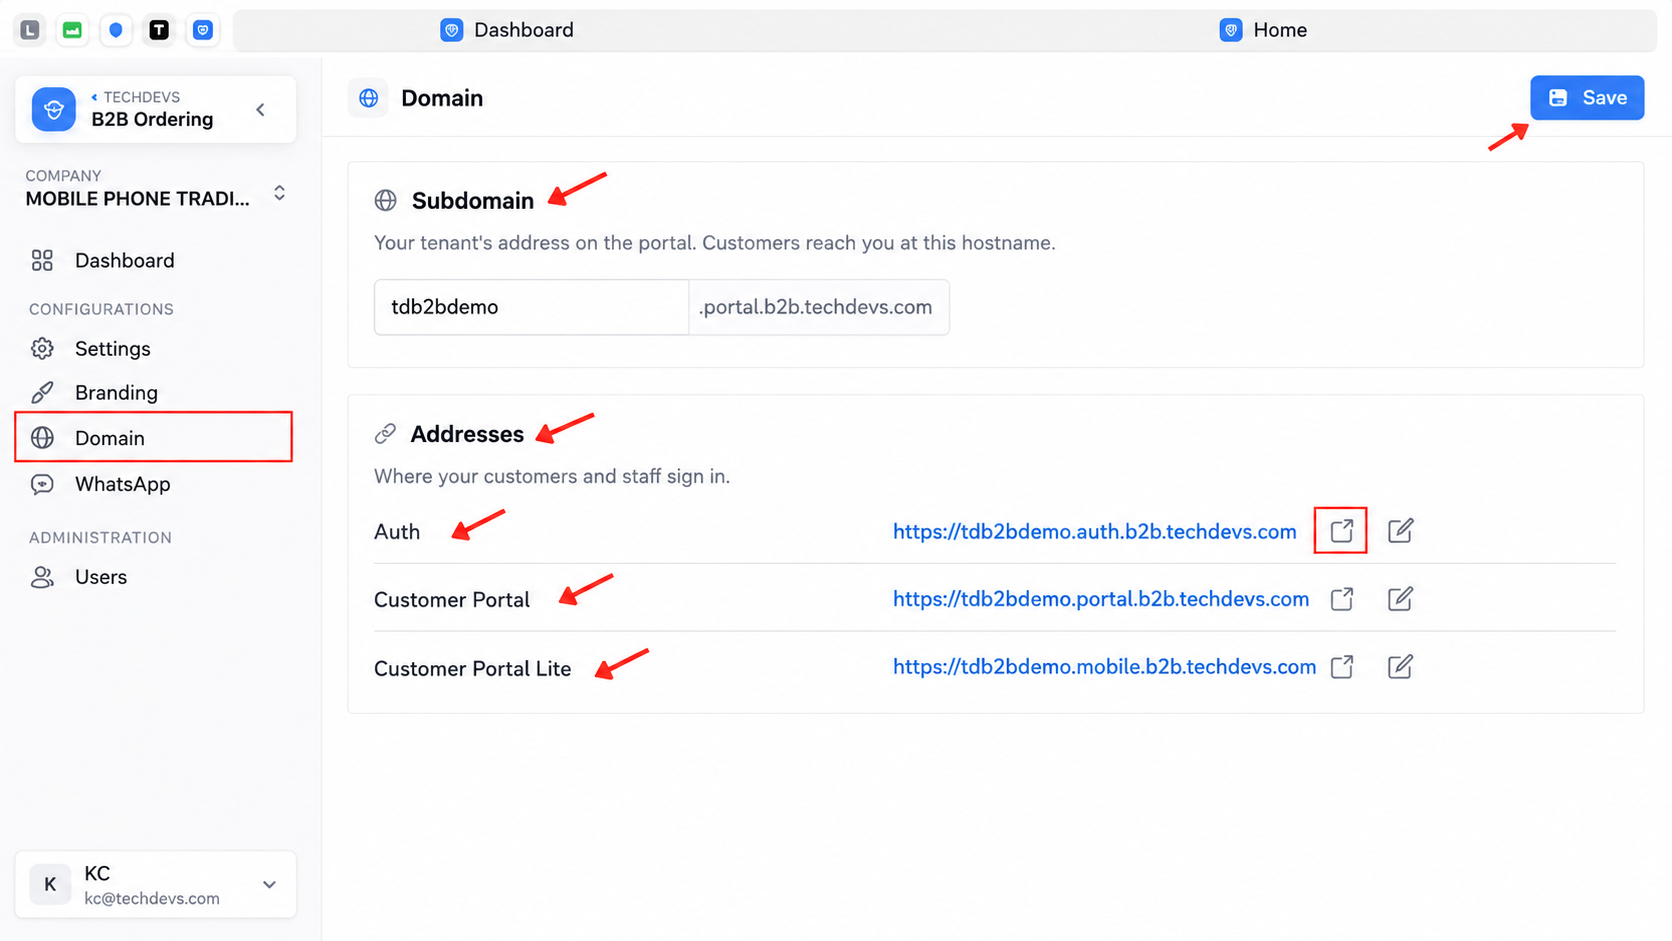
Open Domain to manage the address customers and staff use to access the B2B Ordering services.
1. Set the Portal Subdomain
Under Subdomain, enter the preferred name for the company’s portal address. A subdomain allows the portal address to include the customer’s company or brand name. This creates an address that is easier for users to recognise.
Use a short and clear subdomain that:
- Represents the company or portal name
- Is easy for customers to type
- Does not contain unnecessary symbols
- Can be used consistently in customer communications
Save the change after confirming the required subdomain is available.
2. Review the Generated Addresses
The Addresses section displays the URLs generated for the configured tenant. These may include:
- Auth — The authentication or sign-in service
- Customer Portal — The main customer ordering portal
- Customer Portal Lite — The simplified or mobile-focused portal
Use the available copy or open icons to verify each address. Before distributing a URL to customers
- Open the address in a browser.
- Confirm that the correct company branding appears.
- Test the login page.
- Confirm that the portal opens without an address or certificate warning.
- Check the portal on a mobile device.
3. Use a Custom Domain When Required
Companies with their own domain may configure a custom domain for the portal when this option is included in their implementation. Companies without a custom domain can continue using the provided subdomain and choose a suitable subdomain name.
Custom-domain configuration may require additional domain or DNS settings. These should be completed by the system administrator or implementation provider.
Configure WhatsApp Ordering Preferences
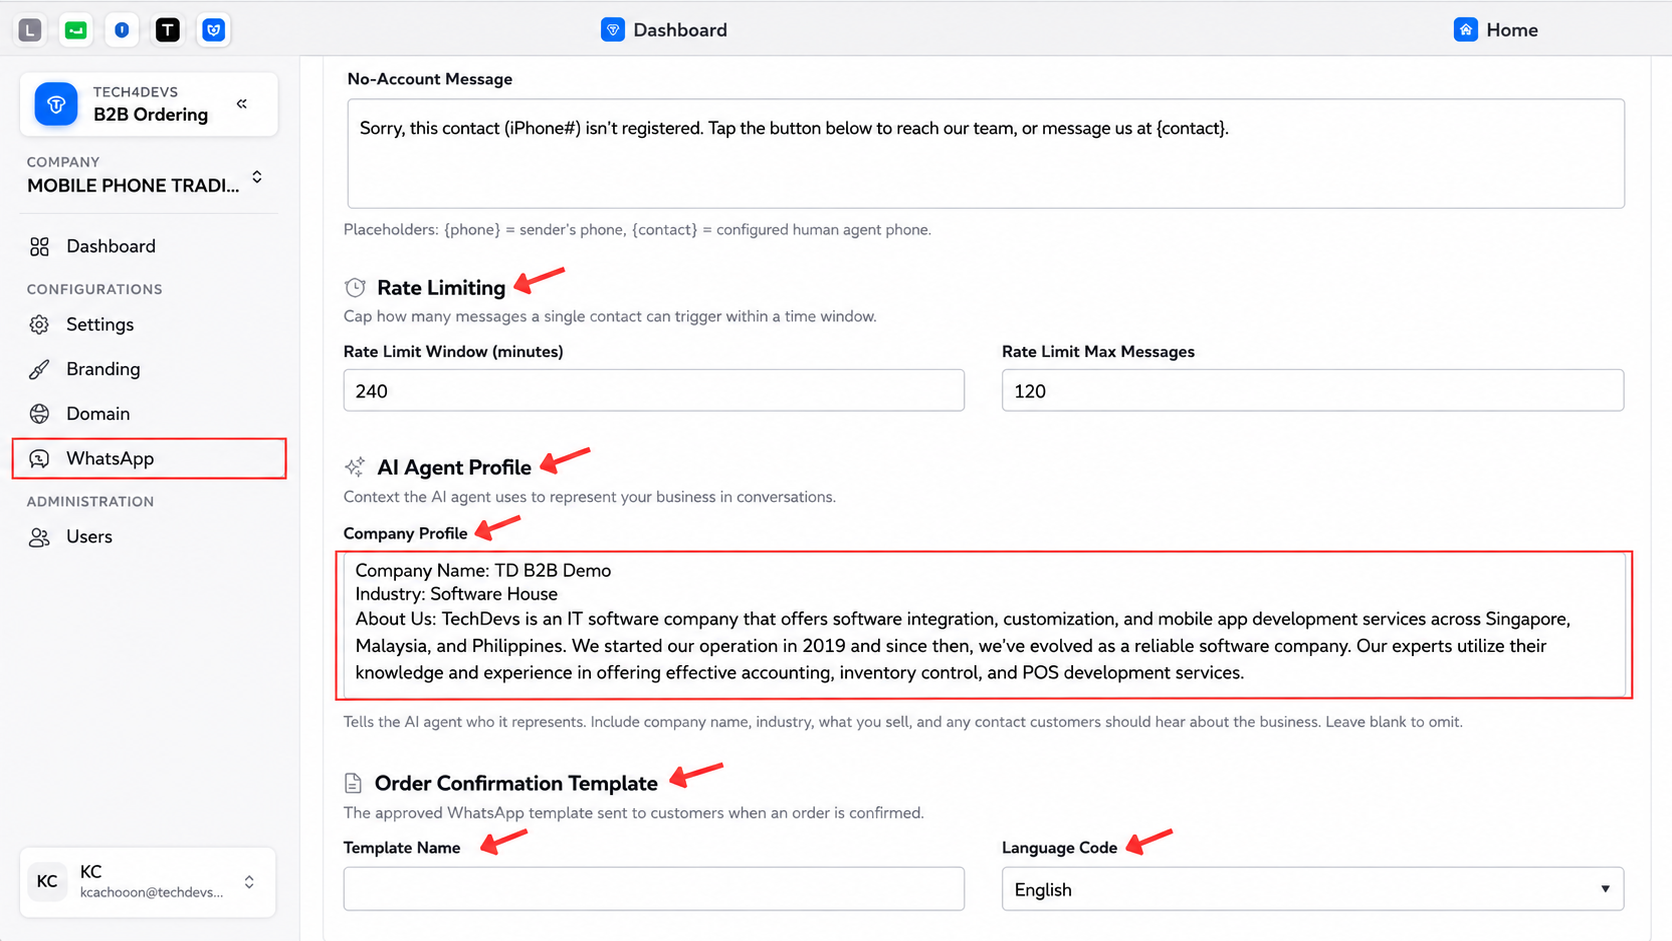
Open WhatsApp to manage the connection, fallback contact, message limits, AI company profile and order confirmation template.
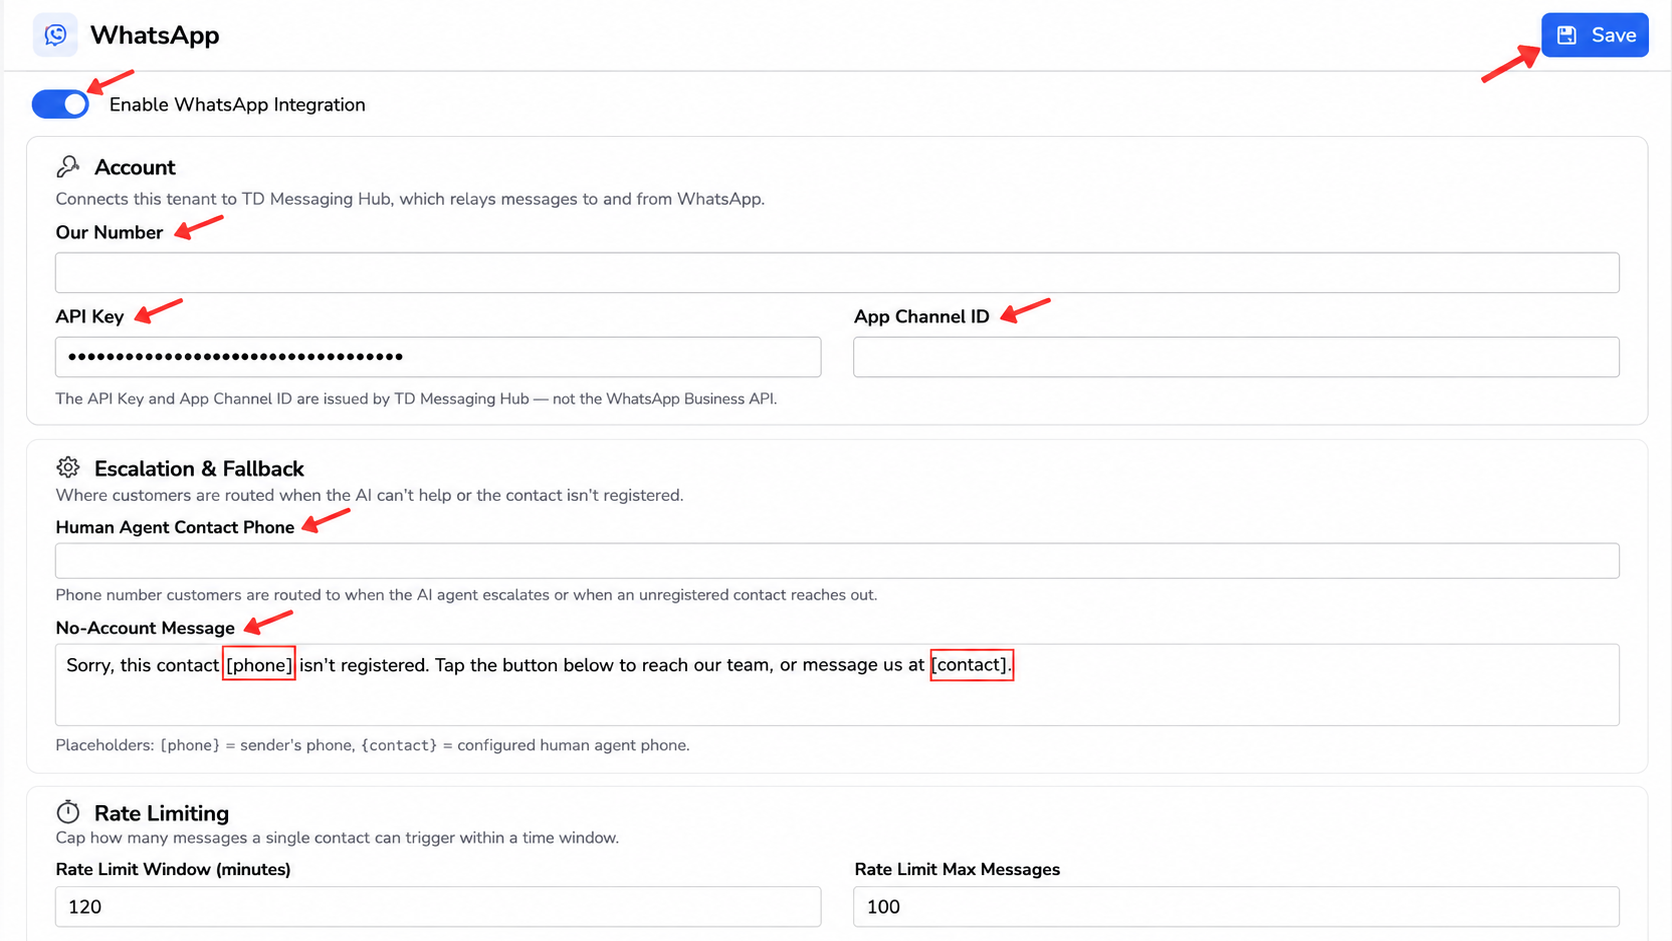
1. Enable WhatsApp Integration
Turn on Enable WhatsApp Integration when the company is ready to accept supported WhatsApp ordering conversations. The WhatsApp account may need to be enrolled and connected to the relevant WhatsApp Business or Facebook account before messages can be processed.
Do not enable the integration until the required account and messaging credentials have been prepared.
2. Enter the Messaging Account Details
Under Account, review or enter:
- Our Number
- API Key
- App Channel ID
These credentials connect the portal to the configured messaging service. The API key and App Channel ID are sensitive technical details. They should be maintained only by authorised personnel.
Important:
The credentials shown in this section may be issued by the configured messaging hub rather than entered directly from the standard WhatsApp Business interface.
3. Configure Escalation and Fallback
The Escalation & Fallback section determines where customers are directed when the AI agent cannot continue the conversation or when the sender is not registered. Enter the Human Agent Contact Phone that customers should contact for assistance. Use a monitored company number belonging to the relevant sales, customer service or back-office team.
4. Customise the Unregistered-Customer Message
Use No-Account Message to define the response sent when a WhatsApp contact is not linked to a registered customer account. The message can explain that:
- The number is not registered.
- The customer needs to contact the company.
- A human agent is available for assistance.
- Registration may be required before ordering.
Supported placeholders shown in the settings include:
- {phone} — The sender’s phone number
- {contact} — The configured human-agent contact number
Example:
“Sorry, this contact ({phone}) is not registered. Please contact our team at {contact} for assistance.”
Keep the message brief and make the next action clear.
5. Set the Message Rate Limit
Under Rate Limiting, configure:
- Rate Limit Window (minutes)
- Rate Limit Max Messages
These settings limit the number of messages a single contact can trigger within the selected time period. Rate limiting helps prevent excessive or repeated automated requests. Set the limits according to the expected number of messages in a normal ordering conversation. Avoid setting the maximum too low, as customers may need several messages to submit product details and confirm an order.
6. Complete the AI Agent Profile
The AI Agent Profile provides the business context used by the AI agent during customer conversations. The company profile may include:
- Company name
- Industry
- Products or services offered
- Customer ordering process
- Relevant company background
- Information customers should know before placing an order
Keep the information factual and directly related to customer enquiries.
Example structure
- Company Name: [Company name]
- Industry: [Industry]
- About Us: [Short company description]
- Products: [Main products or product categories]
- Ordering Information: [Any important ordering conditions]
Do not include confidential internal information, passwords, private staff details or unsupported claims.
7. Configure the Order Confirmation Template
Under Order Confirmation Template, enter or select the approved WhatsApp template used when an order is confirmed. The available fields include:
- Template Name
- Language Code
The template name should match the approved template configured for the connected messaging account. Select the language that corresponds to the approved message content.
Conclusion
After completing these settings, the B2B portal should display the correct company identity, product information, domain and customer-facing WhatsApp messages. Test the portal on desktop and mobile, verify registered and unregistered WhatsApp scenarios, and confirm that AutoCount synchronisation remains active before releasing the portal to customers.
Frequently Asked Questions
Can each company use its own logo and colour theme?
Yes. The Branding section allows the company name, app name, colours, logo, small logo, favicon and hero image to be customised.
Can the portal use the customer’s own domain?
A custom domain can be used when it is included and configured for the implementation. Otherwise, the company can use the provided portal subdomain.
Can salespersons see only their own customers?
Where agent-based filtering and access controls are configured, a salesperson can be limited to customers assigned to that agent.
Can the message for an unregistered WhatsApp customer be changed?
Yes. Edit the No-Account Message under WhatsApp > Escalation & Fallback. The message can include the supported {phone} and {contact} placeholders.
What should be included in the AI Agent Profile?
Include a clear company name, industry, business description, products or services and any relevant ordering information. Do not include passwords, API credentials or confidential internal details.
Need Help Configuring Your B2B Ordering Portal?
Need assistance changing your portal logo, colour theme, domain or WhatsApp settings? Contact our support team for help reviewing and configuring your B2B Ordering portal.
Table Of Content